Observability: Based on Prometheus & Grafana modern observability stack, providing stunning monitoring best practices. Modular design, can be used independently: Gallery & Demo.
Availability: Deliver stable, reliable, auto-routed, transaction-pooled, read-write separated high-performance database services, with flexible access modes via HAProxy, Pgbouncer, and VIP.
Flexible Modular Architecture: Flexible composition, free extension: Redis/Etcd/MinIO/Mongo; can be used independently to monitor existing RDS/hosts/databases.
Stunning Observability: Based on modern observability stack Prometheus/Grafana, providing stunning, unparalleled database observability capabilities.
Battle-Tested Reliability: Self-healing high-availability architecture: automatic failover on hardware failure, seamless traffic switching. With auto-configured PITR as safety net for accidental data deletion!
Easy to Use and Maintain: Declarative API, GitOps ready, foolproof operation, Database/Infra-as-Code and management SOPs encapsulating management complexity!
Solid Security Practices: Encryption and backup all included, with built-in basic ACL best practices. As long as hardware and keys are secure, you don’t need to worry about database security!
Broad Application Scenarios: Low-code data application development, or use preset Docker Compose templates to spin up massive software using PostgreSQL with one click!
Open-Source Free Software: Own better database services at less than 1/10 the cost of cloud databases! Truly “own” your data and achieve autonomy!
PostgreSQL integrates ecosystem tools and best practices:
Out-of-the-box PostgreSQL distribution, deeply integrating 440+ extension plugins for geospatial, time-series, distributed, graph, vector, search, and AI!
Runs on bare operating systems without container support, supporting mainstream operating systems: EL 8/9/10, Ubuntu 22.04/24.04, and Debian 12/13.
Based on patroni, haproxy, and etcd, creating a self-healing high-availability architecture: automatic failover on hardware failure, seamless traffic switching.
Based on pgBackRest and optional MinIO clusters providing out-of-the-box PITR point-in-time recovery, serving as a safety net for software defects and accidental data deletion.
Based on Ansible providing declarative APIs to abstract complexity, greatly simplifying daily operations management in a Database-as-Code manner.
Pigsty has broad applications, can be used as complete application runtime, develop demo data/visualization applications, and massive software using PG can be spun up with Docker templates.
Provides Vagrant-based local development and testing sandbox environment, and Terraform-based cloud auto-deployment solutions, keeping development, testing, and production environments consistent.
Get production-grade PostgreSQL database services locally immediately!
PostgreSQL is a near-perfect database kernel, but it needs more tools and systems to become a good enough database service (RDS). Pigsty helps PostgreSQL make this leap.
Pigsty solves various challenges you’ll encounter when using PostgreSQL: kernel extension installation, connection pooling, load balancing, service access, high availability / automatic failover, log collection, metrics monitoring, alerting, backup recovery, PITR, access control, parameter tuning, security encryption, certificate issuance, NTP, DNS, parameter tuning, configuration management, CMDB, management playbooks… You no longer need to worry about these details!
Pigsty supports PostgreSQL 13 ~ 18 mainline kernels and other compatible forks, running on EL / Debian / Ubuntu and compatible OS distributions, available on x86_64 and ARM64 chip architectures, without container support required.
Besides database kernels and many out-of-the-box extension plugins, Pigsty also provides complete infrastructure and runtime required for database services, as well as local sandbox / production environment / cloud IaaS auto-deployment solutions.
Pigsty can bootstrap an entire environment from bare metal with one click, reaching the last mile of software delivery. Ordinary developers and operations engineers can quickly get started and manage databases part-time, building enterprise-grade RDS services without database experts!
Rich Extensions
Hyper-converged multi-modal, use PostgreSQL for everything, one PG to replace all databases!
PostgreSQL’s soul lies in its rich extension ecosystem, and Pigsty uniquely deeply integrates 440+ extensions from the PostgreSQL ecosystem, providing you with an out-of-the-box hyper-converged multi-modal database!
Extensions can create synergistic effects, producing 1+1 far greater than 2 results.
You can use PostGIS for geospatial data, TimescaleDB for time-series/event stream data analysis, and Citus to upgrade it in-place to a distributed geospatial-temporal database;
You can use PGVector to store and search AI embeddings, ParadeDB for ElasticSearch-level full-text search, and simultaneously use precise SQL, full-text search, and fuzzy vector for hybrid search.
You can also achieve dedicated OLAP database/data lakehouse analytical performance through Hydra, duckdb_fdw, pg_analytics, pg_duckdb and other analytical extensions.
Using PostgreSQL as a single component to replace MySQL, Kafka, ElasticSearch, MongoDB, and big data analytics stacks has become a best practice — a single database choice can significantly reduce system complexity, greatly improve development efficiency and agility, achieving remarkable software/hardware and development/operations cost reduction and efficiency improvement.
Components in Pigsty are abstracted as independently deployable modules, which can be freely combined to address varying requirements. The INFRA module comes with a complete modern monitoring stack, while the NODE module tunes nodes to desired state and brings them under management.
Installing the PGSQL module on multiple nodes automatically forms a high-availability database cluster based on primary-replica replication, while the ETCD module provides consensus and metadata storage for database high availability.
Beyond these four core modules, Pigsty also provides a series of optional feature modules: The MINIO module can provide local object storage capability and serve as a centralized database backup repository.
The REDIS module can provide auxiliary services for databases in standalone primary-replica, sentinel, or native cluster modes. The DOCKER module can be used to spin up stateless application software.
Additionally, Pigsty provides PG-compatible / derivative kernel support. You can use Babelfish for MS SQL Server compatibility, IvorySQL for Oracle compatibility,
OpenHaloDB for MySQL compatibility, and OrioleDB for ultimate OLTP performance.
Using modern open-source observability stack, providing unparalleled monitoring best practices!
Pigsty provides best practices for monitoring based on the open-source Grafana / Prometheus modern observability stack: Grafana for visualization, VictoriaMetrics for metrics collection, VictoriaLogs for log collection and querying, Alertmanager for alert notifications. Blackbox Exporter for checking service availability. The entire system is also designed for one-click deployment as the out-of-the-box INFRA module.
Any component managed by Pigsty is automatically brought under monitoring, including host nodes, load balancer HAProxy, database Postgres, connection pool Pgbouncer, metadata store ETCD, KV cache Redis, object storage MinIO, …, and the entire monitoring infrastructure itself. Numerous Grafana monitoring dashboards and preset alert rules will qualitatively improve your system observability capabilities. Of course, this system can also be reused for your application monitoring infrastructure, or for monitoring existing database instances or RDS.
Whether for failure analysis or slow query optimization, capacity assessment or resource planning, Pigsty provides comprehensive data support, truly achieving data-driven operations. In Pigsty, over three thousand types of monitoring metrics are used to describe all aspects of the entire system, and are further processed, aggregated, analyzed, refined, and presented in intuitive visualization modes. From global overview dashboards to CRUD details of individual objects (tables, indexes, functions) in a database instance, everything is visible at a glance. You can drill down, roll up, or jump horizontally freely, browsing current system status and historical trends, and predicting future evolution.
Additionally, Pigsty’s monitoring system module can be used independently — to monitor existing host nodes and database instances, or cloud RDS services. With just one connection string and one command, you can get the ultimate PostgreSQL observability experience.
Out-of-the-box high availability and point-in-time recovery capabilities ensure your database is rock-solid!
For table/database drops caused by software defects or human error, Pigsty provides out-of-the-box PITR point-in-time recovery capability, enabled by default without additional configuration. As long as storage space allows, base backups and WAL archiving based on pgBackRest give you the ability to quickly return to any point in the past. You can use local directories/disks, or dedicated MinIO clusters or S3 object storage services to retain longer recovery windows, according to your budget.
More importantly, Pigsty makes high availability and self-healing the standard for PostgreSQL clusters. The high-availability self-healing architecture based on patroni, etcd, and haproxy lets you handle hardware failures with ease: RTO < 30s for primary failure automatic failover (configurable), with zero data loss RPO = 0 in consistency-first mode. As long as any instance in the cluster survives, the cluster can provide complete service, and clients only need to connect to any node in the cluster to get full service.
Pigsty includes built-in HAProxy load balancers for automatic traffic switching, providing DNS/VIP/LVS and other access methods for clients. Failover and active switchover are almost imperceptible to the business side except for brief interruptions, and applications don’t need to modify connection strings or restart. The minimal maintenance window requirements bring great flexibility and convenience: you can perform rolling maintenance and upgrades on the entire cluster without application coordination. The feature that hardware failures can wait until the next day to handle lets developers, operations, and DBAs sleep well.
Many large organizations and core institutions have been using Pigsty in production for extended periods. The largest deployment has 25K CPU cores and 200+ PostgreSQL ultra-large instances; in this deployment case, dozens of hardware failures and various incidents occurred over six to seven years, DBAs changed several times, but still maintained availability higher than 99.999%.
Easy to Use and Maintain
Infra as Code, Database as Code, declarative APIs encapsulate database management complexity.
Pigsty provides services through declarative interfaces, elevating system controllability to a new level: users tell Pigsty “what kind of database cluster I want” through configuration inventories, without worrying about how to do it. In effect, this is similar to CRDs and Operators in K8S, but Pigsty can be used for databases and infrastructure on any node: whether containers, virtual machines, or physical machines.
Whether creating/destroying clusters, adding/removing replicas, or creating new databases/users/services/extensions/whitelist rules, you only need to modify the configuration inventory and run the idempotent playbooks provided by Pigsty, and Pigsty adjusts the system to your desired state.
Users don’t need to worry about configuration details — Pigsty automatically tunes based on machine hardware configuration. You only need to care about basics like cluster name, how many instances on which machines, what configuration template to use: transaction/analytics/critical/tiny — developers can also self-serve. But if you’re willing to dive into the rabbit hole, Pigsty also provides rich and fine-grained control parameters to meet the demanding customization needs of the most meticulous DBAs.
Beyond that, Pigsty’s own installation and deployment is also one-click foolproof, with all dependencies pre-packaged, requiring no internet access during installation. The machine resources needed for installation can also be automatically obtained through Vagrant or Terraform templates, allowing you to spin up a complete Pigsty deployment from scratch on a local laptop or cloud VM in about ten minutes. The local sandbox environment can run on a 1-core 2GB micro VM, providing the same functional simulation as production environments, usable for development, testing, demos, and learning.
Solid Security Practices
Encryption and backup all included. As long as hardware and keys are secure, you don’t need to worry about database security.
Pigsty is designed for high-standard, demanding enterprise scenarios, adopting industry-leading security best practices to protect your data security (confidentiality/integrity/availability). The default configuration’s security is sufficient to meet compliance requirements for most scenarios.
Pigsty creates self-signed CAs (or uses your provided CA) to issue certificates and encrypt network communication. Sensitive management pages and API endpoints that need protection are password-protected.
Database backups use AES encryption, database passwords use scram-sha-256 encryption, and plugins are provided to enforce password strength policies.
Pigsty provides an out-of-the-box, easy-to-use, easily extensible ACL model, providing read/write/admin/ETL permission distinctions, with HBA rule sets following the principle of least privilege, ensuring system confidentiality through multiple layers of protection.
Pigsty enables database checksums by default to avoid silent data corruption, with replicas providing bad block fallback. Provides CRIT zero-data-loss configuration templates, using watchdog to ensure HA fencing as a fallback.
You can audit database operations through the audit plugin, with all system and database logs collected for reference to meet compliance requirements.
Pigsty correctly configures SELinux and firewall settings, and follows the principle of least privilege in designing OS user groups and file permissions, ensuring system security baselines meet compliance requirements.
Security is also uncompromised for auxiliary optional components like Etcd and MinIO — both use RBAC models and TLS encrypted communication, ensuring overall system security.
A properly configured system easily passes Level 3 security certification. As long as you follow security best practices, deploy on internal networks with properly configured security groups and firewalls, database security will no longer be your pain point.
Broad Application Scenarios
Use preset Docker templates to spin up massive software using PostgreSQL with one click!
In various data-intensive applications, the database is often the trickiest part. For example, the core difference between GitLab Enterprise and Community Edition is the underlying PostgreSQL database monitoring and high availability. If you already have a good enough local PG RDS, you can refuse to pay for software’s homemade database components.
Pigsty provides the Docker module and many out-of-the-box Compose templates. You can use Pigsty-managed high-availability PostgreSQL (as well as Redis and MinIO) as backend storage, spinning up these software in stateless mode with one click:
GitLab, Gitea, Wiki.js, NocoDB, Odoo, Jira, Confluence, Harbor, Mastodon, Discourse, KeyCloak, etc. If your application needs a reliable PostgreSQL database, Pigsty is perhaps the simplest way to get one.
Pigsty also provides application development toolsets closely related to PostgreSQL: PGAdmin4, PGWeb, ByteBase, PostgREST, Kong, as well as EdgeDB, FerretDB, Supabase — these “upper-layer databases” using PostgreSQL as storage.
More wonderfully, you can build interactive data applications quickly in a low-code manner based on the Grafana and Postgres built into Pigsty, and even use Pigsty’s built-in ECharts panels to create more expressive interactive visualization works.
Pigsty provides a powerful runtime for your AI applications. Your agents can leverage PostgreSQL and the powerful capabilities of the observability world in this environment to quickly build data-driven intelligent agents.
Open-Source Free Software
Pigsty is free software open-sourced under AGPLv3, watered by the passion of PostgreSQL-loving community members
Pigsty is completely open-source and free software, allowing you to run enterprise-grade PostgreSQL database services at nearly pure hardware cost without database experts.
For comparison, database vendors’ “enterprise database services” and public cloud vendors’ RDS charge premiums several to over ten times the underlying hardware resources as “service fees.”
Many users choose the cloud precisely because they can’t handle databases themselves; many users use RDS because there’s no other choice.
We will break cloud vendors’ monopoly, providing users with a cloud-neutral, better open-source RDS alternative:
Pigsty follows PostgreSQL upstream closely, with no vendor lock-in, no annoying “licensing fees,” no node count limits, and no data collection. All your core assets — data — can be “autonomously controlled,” in your own hands.
Pigsty itself aims to replace tedious manual database operations with database autopilot software, but even the best software can’t solve all problems.
There will always be some rare, low-frequency edge cases requiring expert intervention. This is why we also provide professional subscription services to provide safety nets for enterprise users who need them.
Subscription consulting fees of tens of thousands are less than one-thirtieth of a top DBA’s annual salary, completely eliminating your concerns and putting costs where they really matter. For community users, we also contribute with love, providing free support and daily Q&A.
2.2 - Roadmap
Future feature planning, new feature release schedule, and todo list.
Release Strategy
Pigsty uses semantic versioning: <major>.<minor>.<patch>. Alpha/Beta/RC versions will have suffixes like -a1, -b1, -c1 appended to the version number.
Major version updates signify incompatible foundational changes and major new features; minor version updates typically indicate regular feature updates and small API changes; patch version updates mean bug fixes and package version updates.
Pigsty plans to release one major version update per year. Minor version updates usually follow PostgreSQL’s minor version update rhythm, catching up within a month at the latest after a new PostgreSQL version is released.
Pigsty typically plans 4-6 minor versions per year. For complete release history, please refer to Release Notes.
Deploy with Specific Version Numbers
Pigsty develops using the main trunk branch. Please always use Releases with version numbers.
Unless you know what you’re doing, do not use GitHub’s main branch. Always check out and use a specific version.
Features Under Consideration
A sufficiently good command-line management tool
ARM architecture support for infrastructure components
Add more extensions for PostgreSQL
More preset scenario-based configuration templates
Fully migrate software repository and installation download sources to Cloudflare
Deploy and monitor highly available Kubernetes clusters using SealOS!
Use VictoriaMetrics to replace Prometheus for time-series data storage
The origin and motivation of the Pigsty project, its development history, and future goals and vision.
Historical Origins
The Pigsty project began in 2018-2019, originating from Tantan.
Tantan is an internet dating app — China’s Tinder, now acquired by Momo.
Tantan was a Nordic-style startup with a Swedish engineering founding team.
Tantan had excellent technical taste, using PostgreSQL and Go as its core technology stack.
The entire Tantan system architecture was modeled after Instagram, designed entirely around the PostgreSQL database.
Up to several million daily active users, millions of TPS, and hundreds of TB of data, the data component used only PostgreSQL.
Almost all business logic was implemented using PG stored procedures — even including 100ms recommendation algorithms!
This atypical development model of deeply using PostgreSQL features placed extremely high demands on the capabilities of engineers and DBAs.
And Pigsty is the open-source project we forged in this real-world large-scale, high-standard database cluster scenario —
embodying our experience and best practices as top PostgreSQL experts.
Development Process
In the beginning, Pigsty did not have the vision, goals, and scope it has today. It aimed to provide a PostgreSQL monitoring system for our own use.
We surveyed all available solutions — open-source, commercial, cloud-based, datadog, pgwatch, etc. — and none could meet our observability needs.
So we decided to build one ourselves based on Grafana and Prometheus. This became Pigsty’s predecessor and prototype.
Pigsty as a monitoring system was quite impressive, helping us solve countless management problems.
Subsequently, developers wanted such a monitoring system on their local development machines, so we used Ansible to write provisioning playbooks, transforming this system from a one-time construction task into reusable, replicable software.
The new functionality allowed users to use Vagrant and Terraform, using Infrastructure as Code to quickly spin up local DevBox development machines or production environment servers, automatically completing PostgreSQL and monitoring system deployment.
Next, we redesigned the production environment PostgreSQL architecture, introducing Patroni and pgBackRest to solve database high availability and point-in-time recovery issues.
We developed a zero-downtime migration solution based on logical replication, rolling upgrading two hundred production database clusters to the latest major version through blue-green deployment. And we incorporated these capabilities into Pigsty.
Pigsty is software we made for ourselves. As client users ourselves, we know exactly what we need and won’t slack on our own requirements.
The greatest benefit of “eating dog food” is that we are both developers and users — therefore we know exactly what we need and won’t slack on our own requirements.
We solved problem after problem, depositing the solutions into Pigsty. Pigsty’s positioning also gradually evolved from a monitoring system into an out-of-the-box PostgreSQL database distribution.
Therefore, at this stage, we decided to open-source Pigsty and began a series of technical sharing and publicity, and external users from various industries began using Pigsty and providing feedback.
Full-Time Entrepreneurship
In 2022, the Pigsty project received seed funding from Miracle Plus, initiated by Dr. Qi Lu, allowing me to work on this full-time.
As an open-source project, Pigsty has developed quite well. In these two years of full-time entrepreneurship, Pigsty’s GitHub stars have multiplied from a few hundred to 3,700; it made the HN front page, and growth began snowballing;
In the OSSRank open-source rankings, Pigsty ranks 22nd among PostgreSQL ecosystem projects, the highest among Chinese-led projects.
Previously, Pigsty could only run on CentOS 7, but now it basically covers all mainstream Linux distributions (EL, Debian, Ubuntu). Supported PG major versions cover 13-18, maintaining, collecting, and integrating 440 extension plugins in the PG ecosystem.
Among these, I personally maintain over half of the extension plugins, providing out-of-the-box RPM/DEB packages. Including Pigsty itself, “based on open source, giving back to open source,” this is making some contribution to the PG ecosystem.
Pigsty’s positioning has also continuously evolved from a PostgreSQL database distribution to an open-source cloud database alternative. It truly benchmarks against cloud vendors’ entire cloud database brands.
Rebel Against Public Clouds
Public cloud vendors like AWS, Azure, GCP, and Aliyun have provided many conveniences for startups, but they are closed-source and force users to rent infrastructure at exorbitant fees.
We believe that excellent database services, like excellent database kernels, should be accessible to every user, rather than requiring expensive rental from cyber lords.
Cloud computing’s agility and elasticity are great, but it should be free, open-source, inclusive, and local-first —
We believe the cloud computing universe needs a solution representing open-source values that returns infrastructure control to users without sacrificing the benefits of the cloud.
I hope that in the future world, everyone will have the de facto right to freely use excellent services, rather than being confined to a few cyber lord public cloud giants’ territories as cyber tenants or even cyber serfs.
This is exactly what Pigsty aims to do — a better, free and open-source RDS alternative. Allowing users to spin up database services better than cloud RDS anywhere (including cloud servers) with one click.
Pigsty is a complete complement to PostgreSQL, and a spicy mockery of cloud databases. Its original meaning is “pigsty,” but it’s also an acronym for Postgres In Great STYle, meaning “PostgreSQL in its full glory.”
Pigsty itself is completely free and open-source software. We purely rely on providing consulting and services to sustain operations.
A well-built system may run for years without encountering problems needing a “safety net,” but database problems, once they occur, are never small issues.
Often, expert experience can turn decay into magic with a word, and we provide such services to clients in need — we believe this is a more just, reasonable, and sustainable model.
About the Team
I am Feng Ruohang, the author of Pigsty. The vast majority of Pigsty’s code was developed by me alone, with individual features contributed by the community.
Individual heroism still exists in the software field. Only unique individuals can create unique works — I hope Pigsty can become such a work.
If you’re interested in me, here’s my personal homepage: https://vonng.com/
The name of this project always makes me grin: PIGSTY is actually an acronym, standing for Postgres In Great STYle! It’s a Postgres distribution that includes lots of components and tools out of the box in areas like availability, deployment, and observability. The latest release pushes everything up to Postgres 16.2 standards and introduces new ParadeDB and DuckDB FDW extensions.
Conferences & Talks
Date
Type
Event
Topic
2025-11-29
Award&Talk
The 8th Conf of PG Ecosystem (Hangzhou)
PostgreSQL Magneto Award, A World-Grade Postgres Meta Distribution
2025-05-16
Lightning
PGConf.Dev 2025, Montreal
Extension Delivery: Make your PGEXT accessible to users
2025-05-12
Keynote
PGEXT.DAY, PGCon.Dev 2025
The Missing Package Manager and Extension Repo for PostgreSQL Ecosystem
2025-04-19
Workshop
PostgreSQL Database Technology Summit
Using Pigsty to Deploy PG Ecosystem Partners: Dify, Odoo, Supabase
Chinese users are mainly active in WeChat groups. Currently, there are seven active groups. Groups 1-4 are full; for other groups, you need to add the assistant’s WeChat to be invited.
To join the WeChat community, search for “Pigsty小助手” (WeChat ID: pigsty-cc), note or send “加群” (join group), and the assistant will invite you to the group.
When you encounter problems using Pigsty, you can seek help from the community. The more information you provide, the more likely you are to get help from the community.
Please refer to the Community Help Guide and provide as much information as possible so that community members can help you solve the problem. Here is a reference template for asking for help:
What happened? (Required)
Pigsty version and OS version (Required)
$ grep version pigsty.yml
$ cat /etc/os-release
$ uname -a
Some cloud providers have customized standard OS distributions. You can tell us which cloud provider’s OS image you are using.
If you have customized and modified the environment after installing the OS, or if there are specific security rules and firewall configurations in your LAN, please also inform us when asking questions.
Pigsty configuration file
Please don’t forget to redact any sensitive information: passwords, internal keys, sensitive configurations, etc.
cat ~/pigsty/pigsty.yml
What did you expect to happen?
Please describe what should happen under normal circumstances, and how the actual situation differs from expectations.
How to reproduce this issue?
Please tell us in as much detail as possible how to reproduce this issue.
Monitoring screenshots
If you are using the monitoring system provided by Pigsty, you can provide relevant screenshots.
Error logs
Please provide logs related to the error as much as possible. Please do not paste content like “Failed to start xxx service” that has no informational value.
You can query logs from Grafana / Loki, or get logs from the following locations:
Syslog: /var/log/messages (rhel) or /var/log/syslog (debian)
The more information and context you provide, the more likely we can help you solve the problem.
2.6 - Privacy Policy
What user data does Pigsty software and website collect, and how will we process your data and protect your privacy?
Pigsty Software
When you install Pigsty software, if you use offline package installation in a network-isolated environment, we will not receive any data about you.
If you choose online installation, when downloading related packages, our servers or cloud provider servers will automatically log the visiting machine’s IP address and/or hostname in the logs, along with the package names you downloaded.
We will not share this information with other organizations unless required by law. (Honestly, we’d have to be really bored to look at this stuff.)
Pigsty’s primary domain is: pigsty.io. For mainland China, please use the registered mirror site pigsty.cc.
Pigsty Website
When you visit our website, our servers will automatically log your IP address and/or hostname in Nginx logs.
We will only store information such as your email address, name, and location when you decide to send us such information by completing a survey or registering as a user on one of our websites.
We collect this information to help us improve website content, customize web page layouts, and contact people for technical and support purposes. We will not share your email address with other organizations unless required by law.
This website uses Google Analytics, a web analytics service provided by Google, Inc. (“Google”). Google Analytics uses “cookies,” which are text files placed on your computer to help the website analyze how users use the site.
The information generated by the cookie about your use of the website (including your IP address) will be transmitted to and stored by Google on servers in the United States. Google will use this information to evaluate your use of the website, compile reports on website activity for website operators, and provide other services related to website activity and internet usage.
Google may also transfer this information to third parties if required by law or where such third parties process the information on Google’s behalf. Google will not associate your IP address with any other data held by Google.
You may refuse the use of cookies by selecting the appropriate settings on your browser, however, please note that if you do this, you may not be able to use the full functionality of this website. By using this website, you consent to the processing of data about you by Google in the manner and for the purposes set out above.
If you have any questions or comments about this policy, or request deletion of personal data, you can contact us by sending an email to [email protected]
2.7 - License
Pigsty’s open-source licenses — Apache-2.0, AGPLv3, and CC BY 4.0
Apache-2.0 is a permissive open-source license. You may freely use, modify, and distribute the software for commercial purposes without opening your own source code or adopting the same license.
AGPLv3 does not affect regular users: using the software is not “distribution,” so your business code using Pigsty need not be open-sourced.
AGPLv3 obligations apply only when you “distribute” these modules or modifications as part or all of a software/service offering.
What This License Grants
What This License Does NOT Grant
License Conditions
Commercial use
Trademark use
Include license and prominent notice
Modification
Liability & warranty
Maintain open-source status
Distribution
Disclose source code
Patent grant
Network use is distribution
Private use
Use same license
These modules are optional — avoid them completely to evade AGPLv3 requirements. If used, AGPLv3 compliance is straightforward since Grafana and MinIO already use AGPLv3.
Required: Essential core capabilities, no option to disable
Recommended: Enabled by default, can be disabled via configuration
Optional: Not enabled by default, can be enabled via configuration
Apache-2.0 License Text
Apache License
Version 2.0, January 2004
http://www.apache.org/licenses/
TERMS AND CONDITIONS FOR USE, REPRODUCTION, AND DISTRIBUTION
1. Definitions.
"License" shall mean the terms and conditions for use, reproduction,
and distribution as defined by Sections 1 through 9 of this document.
"Licensor" shall mean the copyright owner or entity authorized by
the copyright owner that is granting the License.
"Legal Entity" shall mean the union of the acting entity and all
other entities that control, are controlled by, or are under common
control with that entity. For the purposes of this definition,
"control" means (i) the power, direct or indirect, to cause the
direction or management of such entity, whether by contract or
otherwise, or (ii) ownership of fifty percent (50%) or more of the
outstanding shares, or (iii) beneficial ownership of such entity.
"You" (or "Your") shall mean an individual or Legal Entity
exercising permissions granted by this License.
"Source" form shall mean the preferred form for making modifications,
including but not limited to software source code, documentation
source, and configuration files.
"Object" form shall mean any form resulting from mechanical
transformation or translation of a Source form, including but
not limited to compiled object code, generated documentation,
and conversions to other media types.
"Work" shall mean the work of authorship, whether in Source or
Object form, made available under the License, as indicated by a
copyright notice that is included in or attached to the work
(an example is provided in the Appendix below).
"Derivative Works" shall mean any work, whether in Source or Object
form, that is based on (or derived from) the Work and for which the
editorial revisions, annotations, elaborations, or other modifications
represent, as a whole, an original work of authorship. For the purposes
of this License, Derivative Works shall not include works that remain
separable from, or merely link (or bind by name) to the interfaces of,
the Work and Derivative Works thereof.
"Contribution" shall mean any work of authorship, including
the original version of the Work and any modifications or additions
to that Work or Derivative Works thereof, that is intentionally
submitted to Licensor for inclusion in the Work by the copyright owner
or by an individual or Legal Entity authorized to submit on behalf of
the copyright owner. For the purposes of this definition, "submitted"
means any form of electronic, verbal, or written communication sent
to the Licensor or its representatives, including but not limited to
communication on electronic mailing lists, source code control systems,
and issue tracking systems that are managed by, or on behalf of, the
Licensor for the purpose of discussing and improving the Work, but
excluding communication that is conspicuously marked or otherwise
designated in writing by the copyright owner as "Not a Contribution."
"Contributor" shall mean Licensor and any individual or Legal Entity
on behalf of whom a Contribution has been received by Licensor and
subsequently incorporated within the Work.
2. Grant of Copyright License. Subject to the terms and conditions of
this License, each Contributor hereby grants to You a perpetual,
worldwide, non-exclusive, no-charge, royalty-free, irrevocable
copyright license to reproduce, prepare Derivative Works of,
publicly display, publicly perform, sublicense, and distribute the
Work and such Derivative Works in Source or Object form.
3. Grant of Patent License. Subject to the terms and conditions of
this License, each Contributor hereby grants to You a perpetual,
worldwide, non-exclusive, no-charge, royalty-free, irrevocable
(except as stated in this section) patent license to make, have made,
use, offer to sell, sell, import, and otherwise transfer the Work,
where such license applies only to those patent claims licensable
by such Contributor that are necessarily infringed by their
Contribution(s) alone or by combination of their Contribution(s)
with the Work to which such Contribution(s) was submitted. If You
institute patent litigation against any entity (including a
cross-claim or counterclaim in a lawsuit) alleging that the Work
or a Contribution incorporated within the Work constitutes direct
or contributory patent infringement, then any patent licenses
granted to You under this License for that Work shall terminate
as of the date such litigation is filed.
4. Redistribution. You may reproduce and distribute copies of the
Work or Derivative Works thereof in any medium, with or without
modifications, and in Source or Object form, provided that You
meet the following conditions:
(a) You must give any other recipients of the Work or
Derivative Works a copy of this License; and
(b) You must cause any modified files to carry prominent notices
stating that You changed the files; and
(c) You must retain, in the Source form of any Derivative Works
that You distribute, all copyright, patent, trademark, and
attribution notices from the Source form of the Work,
excluding those notices that do not pertain to any part of
the Derivative Works; and
(d) If the Work includes a "NOTICE" text file as part of its
distribution, then any Derivative Works that You distribute must
include a readable copy of the attribution notices contained
within such NOTICE file, excluding those notices that do not
pertain to any part of the Derivative Works, in at least one
of the following places: within a NOTICE text file distributed
as part of the Derivative Works; within the Source form or
documentation, if provided along with the Derivative Works; or,
within a display generated by the Derivative Works, if and
wherever such third-party notices normally appear. The contents
of the NOTICE file are for informational purposes only and
do not modify the License. You may add Your own attribution
notices within Derivative Works that You distribute, alongside
or as an addendum to the NOTICE text from the Work, provided
that such additional attribution notices cannot be construed
as modifying the License.
You may add Your own copyright statement to Your modifications and
may provide additional or different license terms and conditions
for use, reproduction, or distribution of Your modifications, or
for any such Derivative Works as a whole, provided Your use,
reproduction, and distribution of the Work otherwise complies with
the conditions stated in this License.
5. Submission of Contributions. Unless You explicitly state otherwise,
any Contribution intentionally submitted for inclusion in the Work
by You to the Licensor shall be under the terms and conditions of
this License, without any additional terms or conditions.
Notwithstanding the above, nothing herein shall supersede or modify
the terms of any separate license agreement you may have executed
with Licensor regarding such Contributions.
6. Trademarks. This License does not grant permission to use the trade
names, trademarks, service marks, or product names of the Licensor,
except as required for reasonable and customary use in describing the
origin of the Work and reproducing the content of the NOTICE file.
7. Disclaimer of Warranty. Unless required by applicable law or
agreed to in writing, Licensor provides the Work (and each
Contributor provides its Contributions) on an "AS IS" BASIS,
WITHOUT WARRANTIES OR CONDITIONS OF ANY KIND, either express or
implied, including, without limitation, any warranties or conditions
of TITLE, NON-INFRINGEMENT, MERCHANTABILITY, or FITNESS FOR A
PARTICULAR PURPOSE. You are solely responsible for determining the
appropriateness of using or redistributing the Work and assume any
risks associated with Your exercise of permissions under this License.
8. Limitation of Liability. In no event and under no legal theory,
whether in tort (including negligence), contract, or otherwise,
unless required by applicable law (such as deliberate and grossly
negligent acts) or agreed to in writing, shall any Contributor be
liable to You for damages, including any direct, indirect, special,
incidental, or consequential damages of any character arising as a
result of this License or out of the use or inability to use the
Work (including but not limited to damages for loss of goodwill,
work stoppage, computer failure or malfunction, or any and all
other commercial damages or losses), even if such Contributor
has been advised of the possibility of such damages.
9. Accepting Warranty or Additional Liability. While redistributing
the Work or Derivative Works thereof, You may choose to offer,
and charge a fee for, acceptance of support, warranty, indemnity,
or other liability obligations and/or rights consistent with this
License. However, in accepting such obligations, You may act only
on Your own behalf and on Your sole responsibility, not on behalf
of any other Contributor, and only if You agree to indemnify,
defend, and hold each Contributor harmless for any liability
incurred by, or claims asserted against, such Contributor by reason
of your accepting any such warranty or additional liability.
END OF TERMS AND CONDITIONS
APPENDIX: How to apply the Apache License to your work.
To apply the Apache License to your work, attach the following
boilerplate notice, with the fields enclosed by brackets "[]"
replaced with your own identifying information. (Don't include
the brackets!) The text should be enclosed in the appropriate
comment syntax for the file format. We also recommend that a
file or class name and description of purpose be included on the
same "printed page" as the copyright notice for easier
identification within third-party archives.
Copyright (C) 2018-2026 Ruohang Feng, @Vonng ([email protected])
Licensed under the Apache License, Version 2.0 (the "License");
you may not use this file except in compliance with the License.
You may obtain a copy of the License at
http://www.apache.org/licenses/LICENSE-2.0
Unless required by applicable law or agreed to in writing, software
distributed under the License is distributed on an "AS IS" BASIS,
WITHOUT WARRANTIES OR CONDITIONS OF ANY KIND, either express or implied.
See the License for the specific language governing permissions and
limitations under the License.
AGPLv3 License Text
GNU AFFERO GENERAL PUBLIC LICENSE
Version 3, 19 November 2007
Copyright (C) 2007 Free Software Foundation, Inc. <https://fsf.org/>
Everyone is permitted to copy and distribute verbatim copies
of this license document, but changing it is not allowed.
Preamble
The GNU Affero General Public License is a free, copyleft license for
software and other kinds of works, specifically designed to ensure
cooperation with the community in the case of network server software.
The licenses for most software and other practical works are designed
to take away your freedom to share and change the works. By contrast,
our General Public Licenses are intended to guarantee your freedom to
share and change all versions of a program--to make sure it remains free
software for all its users.
When we speak of free software, we are referring to freedom, not
price. Our General Public Licenses are designed to make sure that you
have the freedom to distribute copies of free software (and charge for
them if you wish), that you receive source code or can get it if you
want it, that you can change the software or use pieces of it in new
free programs, and that you know you can do these things.
Developers that use our General Public Licenses protect your rights
with two steps: (1) assert copyright on the software, and (2) offer
you this License which gives you legal permission to copy, distribute
and/or modify the software.
A secondary benefit of defending all users' freedom is that
improvements made in alternate versions of the program, if they
receive widespread use, become available for other developers to
incorporate. Many developers of free software are heartened and
encouraged by the resulting cooperation. However, in the case of
software used on network servers, this result may fail to come about.
The GNU General Public License permits making a modified version and
letting the public access it on a server without ever releasing its
source code to the public.
The GNU Affero General Public License is designed specifically to
ensure that, in such cases, the modified source code becomes available
to the community. It requires the operator of a network server to
provide the source code of the modified version running there to the
users of that server. Therefore, public use of a modified version, on
a publicly accessible server, gives the public access to the source
code of the modified version.
An older license, called the Affero General Public License and
published by Affero, was designed to accomplish similar goals. This is
a different license, not a version of the Affero GPL, but Affero has
released a new version of the Affero GPL which permits relicensing under
this license.
The precise terms and conditions for copying, distribution and
modification follow.
TERMS AND CONDITIONS
0. Definitions.
"This License" refers to version 3 of the GNU Affero General Public License.
"Copyright" also means copyright-like laws that apply to other kinds of
works, such as semiconductor masks.
"The Program" refers to any copyrightable work licensed under this
License. Each licensee is addressed as "you". "Licensees" and
"recipients" may be individuals or organizations.
To "modify" a work means to copy from or adapt all or part of the work
in a fashion requiring copyright permission, other than the making of an
exact copy. The resulting work is called a "modified version" of the
earlier work or a work "based on" the earlier work.
A "covered work" means either the unmodified Program or a work based
on the Program.
To "propagate" a work means to do anything with it that, without
permission, would make you directly or secondarily liable for
infringement under applicable copyright law, except executing it on a
computer or modifying a private copy. Propagation includes copying,
distribution (with or without modification), making available to the
public, and in some countries other activities as well.
To "convey" a work means any kind of propagation that enables other
parties to make or receive copies. Mere interaction with a user through
a computer network, with no transfer of a copy, is not conveying.
An interactive user interface displays "Appropriate Legal Notices"
to the extent that it includes a convenient and prominently visible
feature that (1) displays an appropriate copyright notice, and (2)
tells the user that there is no warranty for the work (except to the
extent that warranties are provided), that licensees may convey the
work under this License, and how to view a copy of this License. If
the interface presents a list of user commands or options, such as a
menu, a prominent item in the list meets this criterion.
1. Source Code.
The "source code" for a work means the preferred form of the work
for making modifications to it. "Object code" means any non-source
form of a work.
A "Standard Interface" means an interface that either is an official
standard defined by a recognized standards body, or, in the case of
interfaces specified for a particular programming language, one that
is widely used among developers working in that language.
The "System Libraries" of an executable work include anything, other
than the work as a whole, that (a) is included in the normal form of
packaging a Major Component, but which is not part of that Major
Component, and (b) serves only to enable use of the work with that
Major Component, or to implement a Standard Interface for which an
implementation is available to the public in source code form. A
"Major Component", in this context, means a major essential component
(kernel, window system, and so on) of the specific operating system
(if any) on which the executable work runs, or a compiler used to
produce the work, or an object code interpreter used to run it.
The "Corresponding Source" for a work in object code form means all
the source code needed to generate, install, and (for an executable
work) run the object code and to modify the work, including scripts to
control those activities. However, it does not include the work's
System Libraries, or general-purpose tools or generally available free
programs which are used unmodified in performing those activities but
which are not part of the work. For example, Corresponding Source
includes interface definition files associated with source files for
the work, and the source code for shared libraries and dynamically
linked subprograms that the work is specifically designed to require,
such as by intimate data communication or control flow between those
subprograms and other parts of the work.
The Corresponding Source need not include anything that users
can regenerate automatically from other parts of the Corresponding
Source.
The Corresponding Source for a work in source code form is that
same work.
2. Basic Permissions.
All rights granted under this License are granted for the term of
copyright on the Program, and are irrevocable provided the stated
conditions are met. This License explicitly affirms your unlimited
permission to run the unmodified Program. The output from running a
covered work is covered by this License only if the output, given its
content, constitutes a covered work. This License acknowledges your
rights of fair use or other equivalent, as provided by copyright law.
You may make, run and propagate covered works that you do not
convey, without conditions so long as your license otherwise remains
in force. You may convey covered works to others for the sole purpose
of having them make modifications exclusively for you, or provide you
with facilities for running those works, provided that you comply with
the terms of this License in conveying all material for which you do
not control copyright. Those thus making or running the covered works
for you must do so exclusively on your behalf, under your direction
and control, on terms that prohibit them from making any copies of
your copyrighted material outside their relationship with you.
Conveying under any other circumstances is permitted solely under
the conditions stated below. Sublicensing is not allowed; section 10
makes it unnecessary.
3. Protecting Users' Legal Rights From Anti-Circumvention Law.
No covered work shall be deemed part of an effective technological
measure under any applicable law fulfilling obligations under article
11 of the WIPO copyright treaty adopted on 20 December 1996, or
similar laws prohibiting or restricting circumvention of such
measures.
When you convey a covered work, you waive any legal power to forbid
circumvention of technological measures to the extent such circumvention
is effected by exercising rights under this License with respect to
the covered work, and you disclaim any intention to limit operation or
modification of the work as a means of enforcing, against the work's
users, your or third parties' legal rights to forbid circumvention of
technological measures.
4. Conveying Verbatim Copies.
You may convey verbatim copies of the Program's source code as you
receive it, in any medium, provided that you conspicuously and
appropriately publish on each copy an appropriate copyright notice;
keep intact all notices stating that this License and any
non-permissive terms added in accord with section 7 apply to the code;
keep intact all notices of the absence of any warranty; and give all
recipients a copy of this License along with the Program.
You may charge any price or no price for each copy that you convey,
and you may offer support or warranty protection for a fee.
5. Conveying Modified Source Versions.
You may convey a work based on the Program, or the modifications to
produce it from the Program, in the form of source code under the
terms of section 4, provided that you also meet all of these conditions:
a) The work must carry prominent notices stating that you modified
it, and giving a relevant date.
b) The work must carry prominent notices stating that it is
released under this License and any conditions added under section
7. This requirement modifies the requirement in section 4 to
"keep intact all notices".
c) You must license the entire work, as a whole, under this
License to anyone who comes into possession of a copy. This
License will therefore apply, along with any applicable section 7
additional terms, to the whole of the work, and all its parts,
regardless of how they are packaged. This License gives no
permission to license the work in any other way, but it does not
invalidate such permission if you have separately received it.
d) If the work has interactive user interfaces, each must display
Appropriate Legal Notices; however, if the Program has interactive
interfaces that do not display Appropriate Legal Notices, your
work need not make them do so.
A compilation of a covered work with other separate and independent
works, which are not by their nature extensions of the covered work,
and which are not combined with it such as to form a larger program,
in or on a volume of a storage or distribution medium, is called an
"aggregate" if the compilation and its resulting copyright are not
used to limit the access or legal rights of the compilation's users
beyond what the individual works permit. Inclusion of a covered work
in an aggregate does not cause this License to apply to the other
parts of the aggregate.
6. Conveying Non-Source Forms.
You may convey a covered work in object code form under the terms
of sections 4 and 5, provided that you also convey the
machine-readable Corresponding Source under the terms of this License,
in one of these ways:
a) Convey the object code in, or embodied in, a physical product
(including a physical distribution medium), accompanied by the
Corresponding Source fixed on a durable physical medium
customarily used for software interchange.
b) Convey the object code in, or embodied in, a physical product
(including a physical distribution medium), accompanied by a
written offer, valid for at least three years and valid for as
long as you offer spare parts or customer support for that product
model, to give anyone who possesses the object code either (1) a
copy of the Corresponding Source for all the software in the
product that is covered by this License, on a durable physical
medium customarily used for software interchange, for a price no
more than your reasonable cost of physically performing this
conveying of source, or (2) access to copy the
Corresponding Source from a network server at no charge.
c) Convey individual copies of the object code with a copy of the
written offer to provide the Corresponding Source. This
alternative is allowed only occasionally and noncommercially, and
only if you received the object code with such an offer, in accord
with subsection 6b.
d) Convey the object code by offering access from a designated
place (gratis or for a charge), and offer equivalent access to the
Corresponding Source in the same way through the same place at no
further charge. You need not require recipients to copy the
Corresponding Source along with the object code. If the place to
copy the object code is a network server, the Corresponding Source
may be on a different server (operated by you or a third party)
that supports equivalent copying facilities, provided you maintain
clear directions next to the object code saying where to find the
Corresponding Source. Regardless of what server hosts the
Corresponding Source, you remain obligated to ensure that it is
available for as long as needed to satisfy these requirements.
e) Convey the object code using peer-to-peer transmission, provided
you inform other peers where the object code and Corresponding
Source of the work are being offered to the general public at no
charge under subsection 6d.
A separable portion of the object code, whose source code is excluded
from the Corresponding Source as a System Library, need not be
included in conveying the object code work.
A "User Product" is either (1) a "consumer product", which means any
tangible personal property which is normally used for personal, family,
or household purposes, or (2) anything designed or sold for incorporation
into a dwelling. In determining whether a product is a consumer product,
doubtful cases shall be resolved in favor of coverage. For a particular
product received by a particular user, "normally used" refers to a
typical or common use of that class of product, regardless of the status
of the particular user or of the way in which the particular user
actually uses, or expects or is expected to use, the product. A product
is a consumer product regardless of whether the product has substantial
commercial, industrial or non-consumer uses, unless such uses represent
the only significant mode of use of the product.
"Installation Information" for a User Product means any methods,
procedures, authorization keys, or other information required to install
and execute modified versions of a covered work in that User Product from
a modified version of its Corresponding Source. The information must
suffice to ensure that the continued functioning of the modified object
code is in no case prevented or interfered with solely because
modification has been made.
If you convey an object code work under this section in, or with, or
specifically for use in, a User Product, and the conveying occurs as
part of a transaction in which the right of possession and use of
User Product is transferred to the recipient in perpetuity or for a
fixed term (regardless of how the transaction is characterized), the
Corresponding Source conveyed under this section must be accompanied
by the Installation Information. But this requirement does not apply
if neither you nor any third party retains the ability to install
modified object code on the User Product (for example, the work has
been installed in ROM).
The requirement to provide Installation Information does not include a
requirement to continue to provide support service, warranty, or updates
for a work that has been modified or installed by the recipient, or for
the User Product in which it has been modified or installed. Access to a
network may be denied when the modification itself materially and
adversely affects the operation of the network or violates the rules and
protocols for communication across the network.
Corresponding Source conveyed, and Installation Information provided,
in accord with this section must be in a format that is publicly
documented (and with an implementation available to the public in
source code form), and must require no special password or key for
unpacking, reading or copying.
7. Additional Terms.
"Additional permissions" are terms that supplement the terms of this
License by making exceptions from one or more of its conditions.
Additional permissions that are applicable to the entire Program shall
be treated as though they were included in this License, to the extent
that they are valid under applicable law. If additional permissions
apply only to part of the Program, that part may be used separately
under those permissions, but the entire Program remains governed by
this License without regard to the additional permissions.
When you convey a copy of a covered work, you may at your option
remove any additional permissions from that copy, or from any part of
it. (Additional permissions may be written to require their own
removal in certain cases when you modify the work.) You may place
additional permissions on material, added by you to a covered work,
for which you have or can give appropriate copyright permission.
Notwithstanding any other provision of this License, for material you
add to a covered work, you may (if authorized by the copyright holders of
that material) supplement the terms of this License with terms:
a) Disclaiming warranty or limiting liability differently from the
terms of sections 15 and 16 of this License; or
b) Requiring preservation of specified reasonable legal notices or
author attributions in that material or in the Appropriate Legal
Notices displayed by works containing it; or
c) Prohibiting misrepresentation of the origin of that material, or
requiring that modified versions of such material be marked in
reasonable ways as different from the original version; or
d) Limiting the use for publicity purposes of names of licensors or
authors of that material; or
e) Declining to grant rights under trademark law for use of some
trade names, trademarks, or service marks; or
f) Requiring indemnification of licensors and authors of that
material by anyone who conveys the material (or modified versions of
it) with contractual assumptions of liability to the recipient, for
any liability that these contractual assumptions directly impose on
those licensors and authors.
All other non-permissive additional terms are considered "further
restrictions" within the meaning of section 10. If the Program as you
received it, or any part of it, contains a notice stating that it is
governed by this License along with a term that is a further
restriction, you may remove that term. If a license document contains
a further restriction but permits relicensing or conveying under this
License, you may add to a covered work material governed by the terms
of that license document, provided that the further restriction does
not survive such relicensing or conveying.
If you add terms to a covered work in accord with this section, you
must place, in the relevant source files, a statement of the
additional terms that apply to those files, or a notice indicating
where to find the applicable terms.
Additional terms, permissive or non-permissive, may be stated in the
form of a separately written license, or stated as exceptions;
the above requirements apply either way.
8. Termination.
You may not propagate or modify a covered work except as expressly
provided under this License. Any attempt otherwise to propagate or
modify it is void, and will automatically terminate your rights under
this License (including any patent licenses granted under the third
paragraph of section 11).
However, if you cease all violation of this License, then your
license from a particular copyright holder is reinstated (a)
provisionally, unless and until the copyright holder explicitly and
finally terminates your license, and (b) permanently, if the copyright
holder fails to notify you of the violation by some reasonable means
prior to 60 days after the cessation.
Moreover, your license from a particular copyright holder is
reinstated permanently if the copyright holder notifies you of the
violation by some reasonable means, this is the first time you have
received notice of violation of this License (for any work) from that
copyright holder, and you cure the violation prior to 30 days after
your receipt of the notice.
Termination of your rights under this section does not terminate the
licenses of parties who have received copies or rights from you under
this License. If your rights have been terminated and not permanently
reinstated, you do not qualify to receive new licenses for the same
material under section 10.
9. Acceptance Not Required for Having Copies.
You are not required to accept this License in order to receive or
run a copy of the Program. Ancillary propagation of a covered work
occurring solely as a consequence of using peer-to-peer transmission
to receive a copy likewise does not require acceptance. However,
nothing other than this License grants you permission to propagate or
modify any covered work. These actions infringe copyright if you do
not accept this License. Therefore, by modifying or propagating a
covered work, you indicate your acceptance of this License to do so.
10. Automatic Licensing of Downstream Recipients.
Each time you convey a covered work, the recipient automatically
receives a license from the original licensors, to run, modify and
propagate that work, subject to this License. You are not responsible
for enforcing compliance by third parties with this License.
An "entity transaction" is a transaction transferring control of an
organization, or substantially all assets of one, or subdividing an
organization, or merging organizations. If propagation of a covered
work results from an entity transaction, each party to that
transaction who receives a copy of the work also receives whatever
licenses to the work the party's predecessor in interest had or could
give under the previous paragraph, plus a right to possession of the
Corresponding Source of the work from the predecessor in interest, if
the predecessor has it or can get it with reasonable efforts.
You may not impose any further restrictions on the exercise of the
rights granted or affirmed under this License. For example, you may
not impose a license fee, royalty, or other charge for exercise of
rights granted under this License, and you may not initiate litigation
(including a cross-claim or counterclaim in a lawsuit) alleging that
any patent claim is infringed by making, using, selling, offering for
sale, or importing the Program or any portion of it.
11. Patents.
A "contributor" is a copyright holder who authorizes use under this
License of the Program or a work on which the Program is based. The
work thus licensed is called the contributor's "contributor version".
A contributor's "essential patent claims" are all patent claims
owned or controlled by the contributor, whether already acquired or
hereafter acquired, that would be infringed by some manner, permitted
by this License, of making, using, or selling its contributor version,
but do not include claims that would be infringed only as a
consequence of further modification of the contributor version. For
purposes of this definition, "control" includes the right to grant
patent sublicenses in a manner consistent with the requirements of
this License.
Each contributor grants you a non-exclusive, worldwide, royalty-free
patent license under the contributor's essential patent claims, to
make, use, sell, offer for sale, import and otherwise run, modify and
propagate the contents of its contributor version.
In the following three paragraphs, a "patent license" is any express
agreement or commitment, however denominated, not to enforce a patent
(such as an express permission to practice a patent or covenant not to
sue for patent infringement). To "grant" such a patent license to a
party means to make such an agreement or commitment not to enforce a
patent against the party.
If you convey a covered work, knowingly relying on a patent license,
and the Corresponding Source of the work is not available for anyone
to copy, free of charge and under the terms of this License, through a
publicly available network server or other readily accessible means,
then you must either (1) cause the Corresponding Source to be so
available, or (2) arrange to deprive yourself of the benefit of the
patent license for this particular work, or (3) arrange, in a manner
consistent with the requirements of this License, to extend the patent
license to downstream recipients. "Knowingly relying" means you have
actual knowledge that, but for the patent license, your conveying the
covered work in a country, or your recipient's use of the covered work
in a country, would infringe one or more identifiable patents in that
country that you have reason to believe are valid.
If, pursuant to or in connection with a single transaction or
arrangement, you convey, or propagate by procuring conveyance of, a
covered work, and grant a patent license to some of the parties
receiving the covered work authorizing them to use, propagate, modify
or convey a specific copy of the covered work, then the patent license
you grant is automatically extended to all recipients of the covered
work and works based on it.
A patent license is "discriminatory" if it does not include within
the scope of its coverage, prohibits the exercise of, or is
conditioned on the non-exercise of one or more of the rights that are
specifically granted under this License. You may not convey a covered
work if you are a party to an arrangement with a third party that is
in the business of distributing software, under which you make payment
to the third party based on the extent of your activity of conveying
the work, and under which the third party grants, to any of the
parties who would receive the covered work from you, a discriminatory
patent license (a) in connection with copies of the covered work
conveyed by you (or copies made from those copies), or (b) primarily
for and in connection with specific products or compilations that
contain the covered work, unless you entered into that arrangement,
or that patent license was granted, prior to 28 March 2007.
Nothing in this License shall be construed as excluding or limiting
any implied license or other defenses to infringement that may
otherwise be available to you under applicable patent law.
12. No Surrender of Others' Freedom.
If conditions are imposed on you (whether by court order, agreement or
otherwise) that contradict the conditions of this License, they do not
excuse you from the conditions of this License. If you cannot convey a
covered work so as to satisfy simultaneously your obligations under this
License and any other pertinent obligations, then as a consequence you may
not convey it at all. For example, if you agree to terms that obligate you
to collect a royalty for further conveying from those to whom you convey
the Program, the only way you could satisfy both those terms and this
License would be to refrain entirely from conveying the Program.
13. Remote Network Interaction; Use with the GNU General Public License.
Notwithstanding any other provision of this License, if you modify the
Program, your modified version must prominently offer all users
interacting with it remotely through a computer network (if your version
supports such interaction) an opportunity to receive the Corresponding
Source of your version by providing access to the Corresponding Source
from a network server at no charge, through some standard or customary
means of facilitating copying of software. This Corresponding Source
shall include the Corresponding Source for any work covered by version 3
of the GNU General Public License that is incorporated pursuant to the
following paragraph.
Notwithstanding any other provision of this License, you have
permission to link or combine any covered work with a work licensed
under version 3 of the GNU General Public License into a single
combined work, and to convey the resulting work. The terms of this
License will continue to apply to the part which is the covered work,
but the work with which it is combined will remain governed by version
3 of the GNU General Public License.
14. Revised Versions of this License.
The Free Software Foundation may publish revised and/or new versions of
the GNU Affero General Public License from time to time. Such new versions
will be similar in spirit to the present version, but may differ in detail to
address new problems or concerns.
Each version is given a distinguishing version number. If the
Program specifies that a certain numbered version of the GNU Affero General
Public License "or any later version" applies to it, you have the
option of following the terms and conditions either of that numbered
version or of any later version published by the Free Software
Foundation. If the Program does not specify a version number of the
GNU Affero General Public License, you may choose any version ever published
by the Free Software Foundation.
If the Program specifies that a proxy can decide which future
versions of the GNU Affero General Public License can be used, that proxy's
public statement of acceptance of a version permanently authorizes you
to choose that version for the Program.
Later license versions may give you additional or different
permissions. However, no additional obligations are imposed on any
author or copyright holder as a result of your choosing to follow a
later version.
15. Disclaimer of Warranty.
THERE IS NO WARRANTY FOR THE PROGRAM, TO THE EXTENT PERMITTED BY
APPLICABLE LAW. EXCEPT WHEN OTHERWISE STATED IN WRITING THE COPYRIGHT
HOLDERS AND/OR OTHER PARTIES PROVIDE THE PROGRAM "AS IS" WITHOUT WARRANTY
OF ANY KIND, EITHER EXPRESSED OR IMPLIED, INCLUDING, BUT NOT LIMITED TO,
THE IMPLIED WARRANTIES OF MERCHANTABILITY AND FITNESS FOR A PARTICULAR
PURPOSE. THE ENTIRE RISK AS TO THE QUALITY AND PERFORMANCE OF THE PROGRAM
IS WITH YOU. SHOULD THE PROGRAM PROVE DEFECTIVE, YOU ASSUME THE COST OF
ALL NECESSARY SERVICING, REPAIR OR CORRECTION.
16. Limitation of Liability.
IN NO EVENT UNLESS REQUIRED BY APPLICABLE LAW OR AGREED TO IN WRITING
WILL ANY COPYRIGHT HOLDER, OR ANY OTHER PARTY WHO MODIFIES AND/OR CONVEYS
THE PROGRAM AS PERMITTED ABOVE, BE LIABLE TO YOU FOR DAMAGES, INCLUDING ANY
GENERAL, SPECIAL, INCIDENTAL OR CONSEQUENTIAL DAMAGES ARISING OUT OF THE
USE OR INABILITY TO USE THE PROGRAM (INCLUDING BUT NOT LIMITED TO LOSS OF
DATA OR DATA BEING RENDERED INACCURATE OR LOSSES SUSTAINED BY YOU OR THIRD
PARTIES OR A FAILURE OF THE PROGRAM TO OPERATE WITH ANY OTHER PROGRAMS),
EVEN IF SUCH HOLDER OR OTHER PARTY HAS BEEN ADVISED OF THE POSSIBILITY OF
SUCH DAMAGES.
17. Interpretation of Sections 15 and 16.
If the disclaimer of warranty and limitation of liability provided
above cannot be given local legal effect according to their terms,
reviewing courts shall apply local law that most closely approximates
an absolute waiver of all civil liability in connection with the
Program, unless a warranty or assumption of liability accompanies a
copy of the Program in return for a fee.
END OF TERMS AND CONDITIONS
How to Apply These Terms to Your New Programs
If you develop a new program, and you want it to be of the greatest
possible use to the public, the best way to achieve this is to make it
free software which everyone can redistribute and change under these terms.
To do so, attach the following notices to the program. It is safest
to attach them to the start of each source file to most effectively
state the exclusion of warranty; and each file should have at least
the "copyright" line and a pointer to where the full notice is found.
Copyright (C) 2018-2026 Ruohang Feng, Author of Pigsty
This program is free software: you can redistribute it and/or modify
it under the terms of the GNU Affero General Public License as published by
the Free Software Foundation, either version 3 of the License, or
(at your option) any later version.
This program is distributed in the hope that it will be useful,
but WITHOUT ANY WARRANTY; without even the implied warranty of
MERCHANTABILITY or FITNESS FOR A PARTICULAR PURPOSE. See the
GNU Affero General Public License for more details.
You should have received a copy of the GNU Affero General Public License
along with this program. If not, see <https://www.gnu.org/licenses/>.
Also add information on how to contact you by electronic and paper mail.
If your software can interact with users remotely through a computer
network, you should also make sure that it provides a way for users to
get its source. For example, if your program is a web application, its
interface could display a "Source" link that leads users to an archive
of the code. There are many ways you could offer source, and different
solutions will be better for different programs; see section 13 for the
specific requirements.
You should also get your employer (if you work as a programmer) or school,
if any, to sign a "copyright disclaimer" for the program, if necessary.
For more information on this, and how to apply and follow the GNU AGPL, see
<https://www.gnu.org/licenses/>.
2.8 - Sponsor Us
Pigsty sponsors and investors list - thank you for your support of this project!
Sponsor Us
Pigsty is a free and open-source software, passionately developed by PostgreSQL community members, aiming to integrate the power of the PostgreSQL ecosystem and promote the widespread adoption of PostgreSQL.
If our work has helped you, please consider sponsoring or supporting our project:
Sponsor us directly with financial support - express your sincere support in the most direct and powerful way!
Consider purchasing our Technical Support Services. We can provide professional PostgreSQL high-availability cluster deployment and maintenance services, making your budget worthwhile!
Share your Pigsty use cases and experiences through articles, talks, and videos.
Allow us to mention your organization in “Users of Pigsty.”
Recommend/refer our project and services to friends, colleagues, and clients in need.
Follow our WeChat Official Account and share relevant technical articles to groups and your social media.
Angel Investors
Pigsty is a project invested by Miracle Plus (formerly YC China) S22. We thank Miracle Plus and Dr. Qi Lu for their support of this project!
Sponsors
Special thanks to Vercel for sponsoring pigsty and hosting the Pigsty website.
2.9 - User Cases
Pigsty customer and application cases across various domains and industries
According to Google Analytics PV and download statistics, Pigsty currently has approximately 100,000 users, with half from mainland China and half from other regions globally.
They span across multiple industries including internet, cloud computing, finance, autonomous driving, manufacturing, tech innovation, ISV, and defense.
If you are using Pigsty and are willing to share your case and Logo with us, please contact us - we offer one free consultation session as a token of appreciation.
Internet
Tantan: 200+ physical machines for PostgreSQL and Redis services
Bilibili: Supporting PostgreSQL innovative business
Cloud Vendors
Bitdeer: Providing PG DBaaS
Oracle OCI: Using Pigsty to deliver PostgreSQL clusters
Pigsty Professional/Enterprise subscription service - When you encounter difficulties related to PostgreSQL and Pigsty, our subscription service provides you with comprehensive support.
Pigsty aims to unite the power of the PostgreSQL ecosystem and help users make the most of the world’s most popular database, PostgreSQL, with self-driving database management software.
While Pigsty itself has already resolved many issues in PostgreSQL usage, achieving truly enterprise-grade service quality requires expert support and comprehensive coverage from the original provider.
We deeply understand the importance of professional commercial support for enterprise customers. Therefore, Pigsty Enterprise Edition provides a series of value-added services on top of the open-source version, helping users better utilize PostgreSQL and Pigsty for customers to choose according to their needs.
If you have any of the following needs, please consider Pigsty subscription service:
Running databases in critical scenarios requiring strict SLA guarantees and comprehensive coverage.
Need comprehensive support for complex issues related to Pigsty and PostgreSQL.
Seeking guidance on PostgreSQL/Pigsty production environment best practices.
Want experts to help interpret monitoring dashboards, analyze and identify performance bottlenecks and fault root causes, and provide recommendations.
Need to plan database architectures that meet security/disaster recovery/compliance requirements based on existing resources and business needs.
Need to migrate from other databases to PostgreSQL, or migrate and transform legacy instances.
Building an observability system, data dashboards, and visualization applications based on the Prometheus/Grafana technology stack.
Migrating off cloud and seeking open-source alternatives to RDS for PostgreSQL - cloud-neutral, vendor lock-in-free solutions.
Want professional support for Redis/ETCD/MinIO, as well as extensions like TimescaleDB/Citus.
Want to avoid AGPL v3 license restrictions that mandate derivative works to use the same open-source license, for secondary development and OEM branding.
Want to sell Pigsty as SaaS/PaaS/DBaaS, or provide technical services/consulting/cloud services based on this distribution.
Pigsty Open Source Edition uses the AGPLv3 license, provides complete core functionality, requires no fees, but does not guarantee any warranty service. If you find defects in Pigsty, we welcome you to submit an Issue on Github.
If you are a regular end user (i.e., users other than public cloud providers and database vendors), we actually enforce the more permissive Apache 2.0 license - even if you perform secondary development on Pigsty, we will not pursue this.
For the open source version, we provide pre-built standard offline software packages for PostgreSQL 18 on the latest minor versions of three specific operating system distributions: EL 9.4, Debian 12.7, Ubuntu 22.04.5 (as support for open source, we also provide Debian 12 Arm64 offline software packages).
Using the Pigsty open source version allows junior development/operations engineers to have 70%+ of the capabilities of professional DBAs. Even without database experts, they can easily set up a highly available, high-performance, easy-to-maintain, secure and reliable PostgreSQL database cluster.
Code
OS Distribution Version
x86_64
Arm64
PG17
PG16
PG15
PG14
PG13
EL9
RHEL 9 / Rocky9 / Alma9
el9.x86_64
U22
Ubuntu 22.04 (jammy)
u22.x86_64
D12
Debian 12 (bookworm)
d12.x86_64
d12.aarch64
= Primary support, = Optional support
Pigsty Professional Edition (PRO)
Professional Edition Subscription: Starting Price ¥150,000 / year
Pigsty Professional Edition subscription provides complete functional modules and warranty for Pigsty itself. For defects in PostgreSQL itself and extension plugins, we will make our best efforts to provide feedback and fixes through the PostgreSQL global developer community.
Pigsty Professional Edition is built on the open source version, fully compatible with all features of the open source version, and provides additional functional modules and broader database/operating system version compatibility options: we will provide build options for all minor versions of five mainstream operating system distributions.
Pigsty Professional Edition includes support for the latest two PostgreSQL major versions (18, 17), providing all available extension plugins in both major versions, ensuring you can smoothly migrate to the latest PostgreSQL major version through rolling upgrades.
Pigsty Professional Edition subscription allows you to use China mainland mirror site software repositories, accessible without VPN/proxy; we will also customize offline software installation packages for your exact operating system major/minor version, ensuring normal installation and delivery in air-gapped environments, achieving autonomous and controllable deployment.
Pigsty Professional Edition subscription provides standard expert consulting services, including complex issue analysis, DBA Q&A support, backup compliance advice, etc. We commit to responding to your issues within business hours (5x8), and provide 1 person-day support per year, with optional person-day add-on options.
Pigsty Professional Edition uses a commercial license and provides written contractual exemption from AGPLv3 open source obligations. Even if you perform secondary development on Pigsty and violate the AGPLv3 license by not open-sourcing, we will not pursue this.
Pigsty Professional Edition starting price is ¥150,000 / year, equivalent to the annual fee for 9 vCPU AWS high-availability RDS PostgreSQL, or a junior operations engineer with a monthly salary of 10,000 yuan.
Code
OS Distribution Version
x86_64
Arm64
PG17
PG16
PG15
PG14
PG13
EL9
RHEL 9 / Rocky9 / Alma9
el9.x86_64
el9.aarch64
EL8
RHEL 8 / Rocky8 / Alma8 / Anolis8
el8.x86_64
el8.aarch64
U24
Ubuntu 24.04 (noble)
u24.x86_64
u24.aarch64
U22
Ubuntu 22.04 (jammy)
u22.x86_64
u22.aarch64
D12
Debian 12 (bookworm)
d12.x86_64
d12.aarch64
Pigsty Enterprise Edition
Enterprise Edition Subscription: Starting Price ¥400,000 / year
Pigsty Enterprise Edition subscription includes all service content provided by the Pigsty Professional Edition subscription, plus the following value-added service items:
Pigsty Enterprise Edition subscription provides the broadest range of database/operating system version support, including extended support for EOL operating systems (EL7, U20, D11), domestic operating systems, cloud vendor operating systems, and EOL database major versions (from PG 13 onwards), as well as full support for Arm64 architecture chips.
Pigsty Enterprise Edition subscription provides 信创 (domestic innovation) and localization solutions, allowing you to use PolarDB v2.0 (this kernel license needs to be purchased separately) kernel to replace the native PostgreSQL kernel to meet domestic compliance requirements.
Pigsty Enterprise Edition subscription provides higher-standard enterprise-level consulting services, committing to 7x24 with (< 1h) response time SLA, and can provide more types of consulting support: version upgrades, performance bottleneck identification, annual architecture review, extension plugin integration, etc.
Pigsty Enterprise Edition subscription includes 2 person-days of support per year, with optional person-day add-on options, for resolving more complex and time-consuming issues.
Pigsty Enterprise Edition allows you to use Pigsty for DBaaS purposes, building cloud database services for external sales.
Pigsty Enterprise Edition starting price is ¥400,000 / year, equivalent to the annual fee for 24 vCPU AWS high-availability RDS, or an operations expert with a monthly salary of 30,000 yuan.
Code
OS Distribution Version
x86_64
PG17
PG16
PG15
PG14
PG13
PG12
Arm64
PG17
PG16
PG15
PG14
PG13
PG12
EL9
RHEL 9 / Rocky9 / Alma9
el9.x86_64
el9.arm64
EL8
RHEL 8 / Rocky8 / Alma8 / Anolis8
el8.x86_64
el8.arm64
U24
Ubuntu 24.04 (noble)
u24.x86_64
u24.arm64
U22
Ubuntu 22.04 (jammy)
u22.x86_64
u22.arm64
D12
Debian 12 (bookworm)
d12.x86_64
d12.arm64
D11
Debian 11 (bullseye)
d12.x86_64
d11.arm64
U20
Ubuntu 20.04 (focal)
d12.x86_64
u20.arm64
EL7
RHEL7 / CentOS7 / UOS …
d12.x86_64
el7.arm64
Pigsty Subscription Notes
Feature Differences
Pigsty Professional/Enterprise Edition includes the following additional features compared to the open source version:
Command Line Management Tool: Unlock the full functionality of the Pigsty command line tool (pig)
System Customization Capability: Provide pre-built offline installation packages for exact mainstream Linux operating system distribution major/minor versions
Offline Installation Capability: Complete Pigsty installation in environments without Internet access (air-gapped environments)
Multi-version PG Kernel: Allow users to freely specify and install PostgreSQL major versions within the lifecycle (13 - 17)
Kernel Replacement Capability: Allow users to use other PostgreSQL-compatible kernels to replace the native PG kernel, and the ability to install these kernels offline
Babelfish: Provides Microsoft SQL Server wire protocol-level compatibility
IvorySQL: Based on PG, provides Oracle syntax/type/stored procedure compatibility
PolarDB PG: Provides support for open-source PolarDB for PostgreSQL kernel
MinIO: Enterprise PB-level object storage planning and self-hosting
DuckDB: Provides comprehensive DuckDB support, and PostgreSQL + DuckDB OLAP extension plugin support
Kafka: Provides high-availability Kafka cluster deployment and monitoring
Kubernetes, VictoriaMetrics & VictoriaLogs
Domestic Operating System Support: Provides domestic 信创 operating system support options (Enterprise Edition subscription only)
Domestic ARM Architecture Support: Provides domestic ARM64 architecture support options (Enterprise Edition subscription only)
China Mainland Mirror Repository: Smooth installation without VPN, providing domestic YUM/APT repository mirrors and DockerHub access proxy.
Chinese Interface Support: Monitoring system Chinese interface support (Beta)
Payment Model
Pigsty subscription uses an annual payment model. After signing the contract, the one-year validity period is calculated from the contract date. If payment is made before the subscription contract expires, it is considered automatic renewal.
Consecutive subscriptions have discounts. The first renewal (second year) enjoys a 95% discount, the second and subsequent renewals enjoy a 90% discount on subscription fees, and one-time subscriptions for three years or more enjoy an overall 85% discount.
After the annual subscription contract terminates, you can choose not to renew the subscription service. Pigsty will no longer provide software updates, technical support, and consulting services, but you can continue to use the already installed version of Pigsty Professional Edition software.
If you subscribed to Pigsty professional services and choose not to renew, when re-subscribing you do not need to make up for the subscription fees during the interruption period, but all discounts and benefits will be reset.
Pigsty’s pricing strategy ensures value for money - you can immediately get top DBA’s database architecture construction solutions and management best practices, with their consulting support and comprehensive coverage;
while the cost is highly competitive compared to hiring database experts full-time or using cloud databases. Here are market references for enterprise-level database professional service pricing:
Oracle Annual Service Fee: (Enterprise $47,500 + Rac $23,000) * 22% per year, equivalent to 28K/year (per vCPU)
The fair price for decent database professional services is 10,000 ~ 20,000 yuan / year, with the billing unit being vCPU, i.e., one CPU thread (1 Intel core = 2 vCPU threads).
Pigsty provides top-tier PostgreSQL expert services in China and adopts a per-node billing model. On commonly seen high-core-count server nodes, it brings users an unparalleled cost reduction and efficiency improvement experience.
Pigsty Expert Services
In addition to Pigsty subscription, Pigsty also provides on-demand Pigsty x PostgreSQL expert services - industry-leading database experts available for consultation.
Expert Advisor: ¥300,000 / three years
Within three years, provides 10 complex case handling sessions related to PostgreSQL and Pigsty, and unlimited Q&A.
Expert Support: ¥30,000 / person·day
Industry-leading expert on-site support, available for architecture consultation, fault analysis, problem troubleshooting, database health checks, monitoring interpretation, migration assessment, teaching and training, cloud migration/de-cloud consultation, and other continuous time-consuming scenarios.
Expert Consultation: ¥3,000 / case
Consult on any questions you want to know about Pigsty, PostgreSQL, databases, cloud computing, AI...
Database veterans, cloud computing maverick sharing industry-leading insights, cognition, and judgment.
Quick Consultation: ¥300 / question
Get a quick diagnostic opinion and response to questions related to PostgreSQL / Pigsty / databases, not exceeding 5 minutes.
Contact Information
Please send an email to [email protected]. Users in mainland China are welcome to add WeChat ID RuohangFeng.
2.11 - FAQ
Answers to frequently asked questions about the Pigsty project itself.
What is Pigsty, and what is it not?
Pigsty is a PostgreSQL database distribution, a local-first open-source RDS cloud database solution.
Pigsty is not a Database Management System (DBMS), but rather a tool, distribution, solution, and best practice for managing DBMS.
Analogy: The database is the car, then the DBA is the driver, RDS is the taxi service, and Pigsty is the autonomous driving software.
What problem does Pigsty solve?
The ability to use databases well is extremely scarce: either hire database experts at high cost to self-build (hire drivers), or rent RDS from cloud vendors at sky-high prices (hail a taxi), but now you have a new option: Pigsty (autonomous driving).
Pigsty helps users use databases well: allowing users to self-build higher-quality and more efficient local cloud database services at less than 1/10 the cost of RDS, without a DBA!
Who are Pigsty’s target users?
Pigsty has two typical target user groups. The foundation is medium to large companies building ultra-large-scale enterprise/production-grade PostgreSQL RDS / DBaaS services.
Through extreme customizability, Pigsty can meet the most demanding database management needs and provide enterprise-level support and service guarantees.
At the same time, Pigsty also provides “out-of-the-box” PG RDS self-building solutions for individual developers, small and medium enterprises lacking DBA capabilities, and the open-source community.
Why can Pigsty help you use databases well?
Pigsty embodies the experience and best practices of top experts refined in the most complex and largest-scale client PostgreSQL scenarios, productized into replicable software:
Solving extension installation, high availability, connection pooling, monitoring, backup and recovery, parameter optimization, IaC batch management, one-click installation, automated operations, and many other issues at once. Avoiding many pitfalls in advance and preventing repeated mistakes.
Why is Pigsty better than RDS?
Pigsty provides a feature set and infrastructure support far beyond RDS, including 440 extension plugins and 8+ kernel support.
Pigsty provides a unique professional-grade monitoring system in the PG ecosystem, along with architectural best practices battle-tested in complex scenarios, simple and easy to use.
Moreover, forged in top-tier client scenarios like Tantan, Apple, and Alibaba, continuously nurtured with passion and love, its depth and maturity are incomparable to RDS’s one-size-fits-all approach.
Why is Pigsty cheaper than RDS?
Pigsty allows you to use 10 ¥/core·month pure hardware resources to run 400¥-1400¥/core·month RDS cloud databases, and save the DBA’s salary. Typically, the total cost of ownership (TCO) of a large-scale Pigsty deployment can be over 90% lower than RDS.
Pigsty can simultaneously reduce software licensing/services/labor costs. Self-building requires no additional staff, allowing you to spend costs where it matters most.
How does Pigsty help developers?
Pigsty integrates the most comprehensive extensions in the PG ecosystem (440), providing an All-in-PG solution: a single component replacing specialized components like Redis, Kafka, MySQL, ES, vector databases, OLAP / big data analytics.
Greatly improving R&D efficiency and agility while reducing complexity costs, and developers can achieve self-service management and autonomous DevOps with Pigsty’s support, without needing a DBA.
How does Pigsty help operations?
Pigsty’s self-healing high-availability architecture ensures hardware failures don’t need immediate handling, letting ops and DBAs sleep well; monitoring aids problem analysis and performance optimization; IaC enables automated management of ultra-large-scale clusters.
Operations can moonlight as DBAs with Pigsty’s support, while DBAs can skip the system building phase, saving significant work hours and focusing on high-value work, or relaxing, learning PG.
Who is the author of Pigsty?
Pigsty is primarily developed by Feng Ruohang alone, an open-source contributor, database expert, and evangelist who has focused on PostgreSQL for 10 years,
formerly at Alibaba, Tantan, and Apple, a full-stack expert. Now the founder of a one-person company, providing professional consulting services.
He is also a tech KOL, the founder of the top WeChat database personal account “非法加冯” (Illegally Add Feng), with 60,000+ followers across all platforms.
What is Pigsty’s ecosystem position and influence?
Pigsty is the most influential Chinese open-source project in the global PostgreSQL ecosystem, with about 100,000 users, half from overseas.
Pigsty is also one of the most active open-source projects in the PostgreSQL ecosystem, currently dominating in extension distribution and monitoring systems.
PGEXT.Cloud is a PostgreSQL extension repository maintained by Pigsty, with the world’s largest PostgreSQL extension distribution volume.
It has become an upstream software supply chain for multiple international PostgreSQL vendors.
Pigsty is currently one of the major distributions in the PostgreSQL ecosystem and a challenger to cloud vendor RDS, now widely used in defense, government, healthcare, internet, finance, manufacturing, and other industries.
What scale of customers is Pigsty suitable for?
Pigsty originated from the need for ultra-large-scale PostgreSQL automated management but has been deeply optimized for ease of use. Individual developers and small-medium enterprises lacking professional DBA capabilities can also easily get started.
The largest deployment is 25K vCPU, 4.5 million QPS, 6+ years; the smallest deployment can run completely on a 1c1g VM for Demo / Devbox use.
What capabilities does Pigsty provide?
Pigsty focuses on integrating the PostgreSQL ecosystem and providing PostgreSQL best practices, but also supports a series of open-source software that works well with PostgreSQL. For example:
Etcd, Redis, MinIO, DuckDB, Prometheus
FerretDB, Babelfish, IvorySQL, PolarDB, OrioleDB
OpenHalo, Supabase, Greenplum, Dify, Odoo, …
What scenarios is Pigsty suitable for?
Running large-scale PostgreSQL clusters for business
Self-building RDS, object storage, cache, data warehouse, Supabase, …
Self-building enterprise applications like Odoo, Dify, Wiki, GitLab
Running monitoring infrastructure, monitoring existing databases and hosts
Using multiple PG extensions in combination
Dashboard development and interactive data application demos, data visualization, web building
Is Pigsty open source and free?
Pigsty is 100% open-source software + free software. Under the premise of complying with the open-source license, you can use it freely and for various commercial purposes.
We value software freedom. For non-DBaaS / OEM use cases, we enforce a more relaxed equivalent Apache 2.0 license. Please see the license for more details.
Does Pigsty provide commercial support?
Pigsty software itself is open-source and free, and provides commercial subscriptions for all budgets, providing quality assurance for Pigsty & PostgreSQL.
Subscriptions provide broader OS/PG/chip architecture support ranges, as well as expert consulting and support.
Pigsty commercial subscriptions deliver industry-leading management/technical experience/solutions,
helping you save valuable time, shouldering risks for you, and providing a safety net for difficult problems.
Does Pigsty support domestic innovation (信创)?
Pigsty software itself is not a database and is not subject to domestic innovation catalog restrictions, and already has multiple military use cases. However, the Pigsty open-source edition does not provide any form of domestic innovation support.
Commercial subscription provides domestic innovation solutions in cooperation with Alibaba Cloud, supporting the use of PolarDB-O with domestic innovation qualifications (requires separate purchase) as the RDS kernel, capable of running on domestic innovation OS/chip environments.
Can Pigsty run as a multi-tenant DBaaS?
If you use the Pigsty Infra module and distribute or operate it as part of a public cloud database service (DBaaS),
you may use it for this purpose under the premise of complying with the AGPLv3 license — open-sourcing derivative works under the same license.
We reserve the right to hold public cloud/database vendors accountable for violating the AGPLv3 license.
If you do not wish to open-source derivative works, we recommend purchasing the Pigsty Enterprise Edition subscription plan, which provides clear authorization for this use case and exemption from Pigsty’s AGPLv3 open-source obligations.
Can Pigsty’s Logo be rebranded as your own product?
When redistributing Pigsty, you must retain copyright notices, patent notices, trademark notices, and attribution notices from the original work,
and attach prominent change descriptions in modified files while preserving the content of the LICENSE file.
Under these premises, you can replace PIGSTY’s Logo and trademark, but you must not promote it as “your own original work.”
We provide commercial licensing support for OEM and rebranding in the enterprise edition.
Pigsty’s Business Entity
Pigsty is a project invested by Miracle Plus S22. The original entity Panji Cloud Data (Beijing) Technology Co., Ltd. has been liquidated and divested of the Pigsty business.
Pigsty is currently independently operated and maintained by author Feng Ruohang. The business entities are:
Hainan Zhuxia Cloud Data Co., Ltd. / 91460000MAE6L87B94
Haikou Longhua Piji Data Center / 92460000MAG0XJ569B
Haikou Longhua Yuehang Technology Center / 92460000MACCYGBQ1N
PIGSTY® and PGSTY® are registered trademarks of Haikou Longhua Yuehang Technology Center.
2.12 - Release Note
Pigsty historical version release notes
The current stable version is v3.7.0, and the latest beta is v4.0.0-b3.
Added new pgBackRest backup monitoring metrics and dashboards
Enhanced Nginx server configuration options, with support for automated Certbot issuance
Now prioritizing PostgreSQL’s built-in C/C.UTF-8 locale settings
IvorySQL 4.4 is now fully supported across all platforms (RPM/DEB on x86/ARM)
Added new software packages: Juicefs, Restic, TimescaleDB EventStreamer
The Apache AGE graph database extension now fully supports PostgreSQL 13–17 on EL
Improved the app.yml playbook: launch standard Docker app without extra config
Bump Supabase, Dify, and Odoo app templates, bump to their latest versions
Add electric app template, local-first PostgreSQL Sync Engine
Infra Packages
+restic 0.17.3
+juicefs 1.2.3
+timescaledb-event-streamer 0.12.0
Prometheus 3.2.1
AlertManager 0.28.1
blackbox_exporter 0.26.0
node_exporter 1.9.0
mysqld_exporter 0.17.2
kafka_exporter 1.9.0
redis_exporter 1.69.0
pgbackrest_exporter 0.19.0-2
DuckDB 1.2.1
etcd 3.5.20
FerretDB 2.0.0
tigerbeetle 0.16.31
vector 0.45.0
VictoriaMetrics 1.113.0
VictoriaLogs 1.17.0
rclone 1.69.1
pev2 1.14.0
grafana-victorialogs-ds 0.16.0
grafana-victoriametrics-ds 0.14.0
grafana-infinity-ds 3.0.0
PostgreSQL Related
Patroni 4.0.5
PolarDB 15.12.3.0-e1e6d85b
IvorySQL 4.4
pgbackrest 2.54.2
pev2 1.14
WiltonDB 13.17
PostgreSQL Extensions
pgspider_ext 1.3.0 (new extension)
apache age 13–17 el rpm (1.5.0)
timescaledb 2.18.2 → 2.19.0
citus 13.0.1 → 13.0.2
documentdb 1.101-0 → 1.102-0
pg_analytics 0.3.4 → 0.3.7
pg_search 0.15.2 → 0.15.8
pg_ivm 1.9 → 1.10
emaj 4.4.0 → 4.6.0
pgsql_tweaks 0.10.0 → 0.11.0
pgvectorscale 0.4.0 → 0.6.0 (pgrx 0.12.5)
pg_session_jwt 0.1.2 → 0.2.0 (pgrx 0.12.6)
wrappers 0.4.4 → 0.4.5 (pgrx 0.12.9)
pg_parquet 0.2.0 → 0.3.1 (pgrx 0.13.1)
vchord 0.2.1 → 0.2.2 (pgrx 0.13.1)
pg_tle 1.2.0 → 1.5.0
supautils 2.5.0 → 2.6.0
sslutils 1.3 → 1.4
pg_profile 4.7 → 4.8
pg_snakeoil 1.3 → 1.4
pg_jsonschema 0.3.2 → 0.3.3
pg_incremental 1.1.1 → 1.2.0
pg_stat_monitor 2.1.0 → 2.1.1
ddl_historization 0.7 → 0.0.7 (bug fix)
pg_sqlog 3.1.7 → 1.6 (bug fix)
pg_random removed development suffix (bug fix)
asn1oid 1.5 → 1.6
table_log 0.6.1 → 0.6.4
Interface Changes
Added new Docker parameters: docker_data and docker_storage_driver (#521 by @waitingsong)
Added new Infra parameter: alertmanager_port, which lets you specify the AlertManager port
Added new Infra parameter: certbot_sign, apply for cert during nginx init? (false by default)
Added new Infra parameter: certbot_email, specifying the email used when requesting certificates via Certbot
Added new Infra parameter: certbot_options, specifying additional parameters for Certbot
Updated IvorySQL to place its default binary under /usr/ivory-4 starting in IvorySQL 4.4
Changed the default for pg_lc_ctype and other locale-related parameters from en_US.UTF-8 to C
For PostgreSQL 17, if using UTF8 encoding with C or C.UTF-8 locales, PostgreSQL’s built-in localization rules now take priority
configure automatically detects whether C.utf8 is supported by both the PG version and the environment, and adjusts locale-related options accordingly
Set the default IvorySQL binary path to /usr/ivory-4
Updated the default value of pg_packages to pgsql-main patroni pgbouncer pgbackrest pg_exporter pgbadger vip-manager
Updated the default value of repo_packages to [node-bootstrap, infra-package, infra-addons, node-package1, node-package2, pgsql-utility, extra-modules]
Removed LANG and LC_ALL environment variable settings from /etc/profile.d/node.sh
Now using bento/rockylinux-8 and bento/rockylinux-9 as the Vagrant box images for EL
Added a new alias, extra_modules, which includes additional optional modules
This article compares Pigsty with similar products and projects, highlighting feature differences.
Comparison with RDS
Pigsty is a local-first RDS alternative released under AGPLv3, deployable on your own physical/virtual machines or cloud servers.
We’ve chosen Amazon AWS RDS for PostgreSQL (the global market leader) and Alibaba Cloud RDS for PostgreSQL (China’s market leader) as benchmarks for comparison.
Both Aliyun RDS and AWS RDS are closed-source cloud database services, available only through rental models on public clouds. The following comparison is based on the latest PostgreSQL 16 as of February 2024.
Feature Comparison
Feature
Pigsty
Aliyun RDS
AWS RDS
Major Version Support
13 - 18
13 - 18
13 - 18
Read Replicas
Supports unlimited read replicas
Standby instances not exposed to users
Standby instances not exposed to users
Read/Write Splitting
Port-based traffic separation
Separate paid component
Separate paid component
Fast/Slow Separation
Supports offline ETL instances
Not available
Not available
Cross-Region DR
Supports standby clusters
Multi-AZ deployment supported
Multi-AZ deployment supported
Delayed Replicas
Supports delayed instances
Not available
Not available
Load Balancing
HAProxy / LVS
Separate paid component
Separate paid component
Connection Pool
Pgbouncer
Separate paid component: RDS
Separate paid component: RDS Proxy
High Availability
Patroni / etcd
Requires HA edition
Requires HA edition
Point-in-Time Recovery
pgBackRest / MinIO
Backup supported
Backup supported
Metrics Monitoring
Prometheus / Exporter
Free basic / Paid advanced
Free basic / Paid advanced
Log Collection
Loki / Promtail
Basic support
Basic support
Visualization
Grafana / Echarts
Basic monitoring
Basic monitoring
Alert Aggregation
AlertManager
Basic support
Basic support
Key Extensions
Here are some important extensions compared based on PostgreSQL 16, as of 2024-02-28
Based on experience, RDS unit cost is 5-15 times that of self-hosted for software and hardware resources, with a rent-to-own ratio typically around one month. For details, see Cost Analysis.
Factor
Metric
Pigsty
Aliyun RDS
AWS RDS
Cost
Software License/Service Fee
Free, hardware ~¥20-40/core·month
¥200-400/core·month
¥400-1300/core·month
Support Service Fee
Service ~¥100/core·month
Included in RDS cost
Other On-Premises Database Management Software
Some software and vendors providing PostgreSQL management capabilities:
There was a time when “moving to the cloud” was almost politically correct in tech circles, and an entire generation of app developers had their vision obscured by the cloud. Let’s use real data analysis and firsthand experience to explain the value and pitfalls of the public cloud rental model — for your reference in this era of cost reduction and efficiency improvement — please see “Cloud Computing Mudslide: Collection”
Understand Pigsty’s core concepts, architecture design, and principles. Master high availability, backup recovery, security compliance, and other key capabilities.
Pigsty is a portable, extensible open-source PostgreSQL distribution for building production-grade database services in local environments with declarative configuration and automation. It has a vast ecosystem providing a complete set of tools, scripts, and best practices to bring PostgreSQL to enterprise-grade RDS service levels.
Pigsty’s name comes from PostgreSQL In Great STYle, also understood as Postgres, Infras, Graphics, Service, Toolbox, it’s all Yours—a self-hosted PostgreSQL solution with graphical monitoring that’s all yours. You can find the source code on GitHub, visit the official documentation for more information, or experience the Web UI in the online demo.
Why Pigsty? What Can It Do?
PostgreSQL is a sufficiently perfect database kernel, but it needs more tools and systems to become a truly excellent database service. In production environments, you need to manage every aspect of your database: high availability, backup recovery, monitoring alerts, access control, parameter tuning, extension installation, connection pooling, load balancing…
Wouldn’t it be easier if all this complex operational work could be automated? This is precisely why Pigsty was created.
Pigsty provides:
Out-of-the-Box PostgreSQL Distribution
Pigsty deeply integrates 440+ extensions from the PostgreSQL ecosystem, providing out-of-the-box distributed, time-series, geographic, spatial, graph, vector, search, and other multi-modal database capabilities. From kernel to RDS distribution, providing production-grade database services for versions 13-18 on EL/Debian/Ubuntu.
Self-Healing High Availability Architecture
A high availability architecture built on Patroni, Etcd, and HAProxy enables automatic failover for hardware failures with seamless traffic handoff. Primary failure recovery time RTO < 30s, data recovery point RPO ≈ 0. You can perform rolling maintenance and upgrades on the entire cluster without application coordination.
Complete Point-in-Time Recovery Capability
Based on pgBackRest and optional MinIO cluster, providing out-of-the-box PITR point-in-time recovery capability. Giving you the ability to quickly return to any point in time, protecting against software defects and accidental data deletion.
Flexible Service Access and Traffic Management
Through HAProxy, Pgbouncer, and VIP, providing flexible service access patterns for read-write separation, connection pooling, and automatic routing. Delivering stable, reliable, auto-routing, transaction-pooled high-performance database services.
Stunning Observability
A modern observability stack based on Prometheus and Grafana provides unparalleled monitoring best practices. Over three thousand types of monitoring metrics describe every aspect of the system, from global dashboards to CRUD operations on individual objects.
Declarative Configuration Management
Following the Infrastructure as Code philosophy, using declarative configuration to describe the entire environment. You just tell Pigsty “what kind of database cluster you want” without worrying about how to implement it—the system automatically adjusts to the desired state.
Modular Architecture Design
A modular architecture design that can be freely combined to suit different scenarios. Beyond the core PostgreSQL module, it also provides optional modules for Redis, MinIO, Etcd, FerretDB, and support for various PG-compatible kernels.
Solid Security Best Practices
Industry-leading security best practices: self-signed CA certificate encryption, AES encrypted backups, scram-sha-256 encrypted passwords, out-of-the-box ACL model, HBA rule sets following the principle of least privilege, ensuring data security.
Simple and Easy Deployment
All dependencies are pre-packaged for one-click installation in environments without internet access. Local sandbox environments can run on micro VMs with 1 core and 2GB RAM, providing functionality identical to production environments. Provides Vagrant-based local sandboxes and Terraform-based cloud deployments.
What Pigsty Is Not
Pigsty is not a traditional, all-encompassing PaaS (Platform as a Service) system.
Pigsty doesn’t provide basic hardware resources. It runs on nodes you provide, whether bare metal, VMs, or cloud instances, but it doesn’t create or manage these resources itself (though it provides Terraform templates to simplify cloud resource preparation).
Pigsty is not a container orchestration system. It runs directly on the operating system, not requiring Kubernetes or Docker as infrastructure. Of course, it can coexist with these systems and provides a Docker module for running stateless applications.
Pigsty is not a general database management tool. It focuses on PostgreSQL and its ecosystem. While it also supports peripheral components like Redis, Etcd, and MinIO, the core is always built around PostgreSQL.
Pigsty won’t lock you in. It’s built on open-source components, doesn’t modify the PostgreSQL kernel, and introduces no proprietary protocols. You can continue using your well-managed PostgreSQL clusters anytime without Pigsty.
Pigsty doesn’t restrict how you should or shouldn’t build your database services. For example:
Pigsty provides good parameter defaults and configuration templates, but you can override any parameter.
Pigsty provides a declarative API, but you can still use underlying tools (Ansible, Patroni, pgBackRest, etc.) for manual management.
Pigsty can manage the complete lifecycle, or you can use only its monitoring system to observe existing database instances or RDS.
Pigsty provides a different level of abstraction than the hardware layer—it works at the database service layer, focusing on how to deliver PostgreSQL at its best, rather than reinventing the wheel.
Evolution of PostgreSQL Deployment
To understand Pigsty’s value, let’s review the evolution of PostgreSQL deployment approaches.
Manual Deployment Era
In traditional deployment, DBAs needed to manually install and configure PostgreSQL, manually set up replication, manually configure monitoring, and manually handle failures. The problems with this approach are obvious:
Low efficiency: Each instance requires repeating many manual operations, prone to errors.
Lack of standardization: Databases configured by different DBAs can vary greatly, making maintenance difficult.
Poor reliability: Failure handling depends on manual intervention, with long recovery times and susceptibility to human error.
Weak observability: Lack of unified monitoring, making problem discovery and diagnosis difficult.
Managed Database Era
To solve these problems, cloud providers offer managed database services (RDS). Cloud RDS does solve some operational issues, but also brings new challenges:
High cost: Managed services typically charge multiples to dozens of times hardware cost as “service fees.”
Vendor lock-in: Migration is difficult, tied to specific cloud platforms.
Limited functionality: Cannot use certain advanced features, extensions are restricted, parameter tuning is limited.
Data sovereignty: Data stored in the cloud, reducing autonomy and control.
Local RDS Era
Pigsty represents a third approach: building database services in local environments that match or exceed cloud RDS.
Pigsty combines the advantages of both approaches:
High automation: One-click deployment, automatic configuration, self-healing failures—as convenient as cloud RDS.
Complete autonomy: Runs on your own infrastructure, data completely in your own hands.
Extremely low cost: Run enterprise-grade database services at near-pure-hardware costs.
Complete functionality: Unlimited use of PostgreSQL’s full capabilities and ecosystem extensions.
Open architecture: Based on open-source components, no vendor lock-in, free to migrate anytime.
This approach is particularly suitable for:
Private and hybrid clouds: Enterprises needing to run databases in local environments.
Cost-sensitive users: Organizations looking to reduce database TCO.
High-security scenarios: Critical data requiring complete autonomy and control.
PostgreSQL power users: Scenarios requiring advanced features and rich extensions.
Development and testing: Quickly setting up databases locally that match production environments.
What’s Next
Now that you understand Pigsty’s basic concepts, you can:
ETCD: Distributed key-value store as DCS for HA Postgres clusters: consensus leader election/config management/service discovery.
REDIS: Redis servers supporting standalone primary-replica, sentinel, and cluster modes with full monitoring.
MINIO: S3-compatible simple object storage that can serve as an optional backup destination for PG databases.
You can declaratively compose them freely. If you only want host monitoring, installing the INFRA module on infrastructure nodes and the NODE module on managed nodes is sufficient.
The ETCD and PGSQL modules are used to build HA PG clusters—installing these modules on multiple nodes automatically forms a high-availability database cluster.
You can reuse Pigsty infrastructure and develop your own modules; REDIS and MINIO can serve as examples. More modules will be added—preliminary support for Mongo and MySQL is already on the roadmap.
Note that all modules depend strongly on the NODE module: in Pigsty, nodes must first have the NODE module installed to be managed before deploying other modules.
When nodes (by default) use the local software repo for installation, the NODE module has a weak dependency on the INFRA module. Therefore, the admin/infrastructure nodes with the INFRA module complete the bootstrap process in the deploy.yml playbook, resolving the circular dependency.
Standalone Installation
By default, Pigsty installs on a single node (physical/virtual machine). The deploy.yml playbook installs INFRA, ETCD, PGSQL, and optionally MINIO modules on the current node,
giving you a fully-featured observability stack (Prometheus, Grafana, Loki, AlertManager, PushGateway, BlackboxExporter, etc.), plus a built-in PostgreSQL standalone instance as a CMDB, ready to use out of the box (cluster name pg-meta, database name meta).
This node now has a complete self-monitoring system, visualization tools, and a Postgres database with PITR auto-configured (HA unavailable since you only have one node). You can use this node as a devbox, for testing, running demos, and data visualization/analysis. Or, use this node as an admin node to deploy and manage more nodes!
Monitoring
The installed standalone meta node can serve as an admin node and monitoring center to bring more nodes and database servers under its supervision and control.
Pigsty’s monitoring system can be used independently. If you want to install the Prometheus/Grafana observability stack, Pigsty provides best practices!
It offers rich dashboards for host nodes and PostgreSQL databases.
Whether or not these nodes or PostgreSQL servers are managed by Pigsty, with simple configuration, you immediately have a production-grade monitoring and alerting system, bringing existing hosts and PostgreSQL under management.
HA PostgreSQL Clusters
Pigsty helps you own your own production-grade HA PostgreSQL RDS service anywhere.
To create such an HA PostgreSQL cluster/RDS service, you simply describe it with a short config and run the playbook to create it:
In less than 10 minutes, you’ll have a PostgreSQL database cluster with service access, monitoring, backup PITR, and HA fully configured.
Hardware failures are covered by the self-healing HA architecture provided by patroni, etcd, and haproxy—in case of primary failure, automatic failover executes within 30 seconds by default.
Clients don’t need to modify config or restart applications: Haproxy uses patroni health checks for traffic distribution, and read-write requests are automatically routed to the new cluster primary, avoiding split-brain issues.
This process is seamless—for example, in case of replica failure or planned switchover, clients experience only a momentary flash of the current query.
Software failures, human errors, and datacenter-level disasters are covered by pgbackrest and the optional MinIO cluster. This provides local/cloud PITR capabilities and, in case of datacenter failure, offers cross-region replication and disaster recovery.
3.1.1 - Nodes
A node is an abstraction of hardware/OS resources—physical machines, bare metal, VMs, or containers/pods.
A node is an abstraction of hardware resources and operating systems. It can be a physical machine, bare metal, virtual machine, or container/pod.
Any machine running a Linux OS (with systemd daemon) and standard CPU/memory/disk/network resources can be treated as a node.
Nodes can have modules installed. Pigsty has several node types, distinguished by which modules are deployed:
In a singleton Pigsty deployment, multiple roles converge on one node: it serves as the regular node, admin node, infra node, ETCD node, and database node simultaneously.
Regular Node
Nodes managed by Pigsty can have modules installed. The node.yml playbook configures nodes to the desired state.
A regular node may run the following services:
Component
Port
Description
Status
node_exporter
9100
Host metrics exporter
Enabled
haproxy
9101
HAProxy load balancer (admin port)
Enabled
vector
9598
Log collection agent
Enabled
docker
9323
Container runtime support
Optional
keepalived
n/a
L2 VIP for node cluster
Optional
keepalived_exporter
9650
Keepalived status monitor
Optional
Here, node_exporter exposes host metrics, vector sends logs to the collection system, and haproxy provides load balancing. These three are enabled by default.
Docker, keepalived, and keepalived_exporter are optional and can be enabled as needed.
ADMIN Node
A Pigsty deployment has exactly one admin node—the node that runs Ansible playbooks and issues control/deployment commands.
This node has ssh/sudo access to all other nodes. Admin node security is critical; ensure access is strictly controlled.
During single-node installation and configuration, the current node becomes the admin node.
However, alternatives exist. For example, if your laptop can SSH to all managed nodes and has Ansible installed, it can serve as the admin node—though this isn’t recommended for production.
For instance, you might use your laptop to manage a Pigsty VM in the cloud. In this case, your laptop is the admin node.
In serious production environments, the admin node is typically 1-2 dedicated DBA machines. In resource-constrained setups, INFRA nodes often double as admin nodes since all INFRA nodes have Ansible installed by default.
INFRA Node
A Pigsty deployment may have 1 or more INFRA nodes; large production environments typically have 2-3.
The infra group in the inventory defines which nodes are INFRA nodes. These nodes run the INFRA module with these components:
Component
Port
Description
nginx
80/443
Web UI, local software repository
grafana
3000
Visualization platform
victoriaMetrics
8428
Time-series database (metrics)
victoriaLogs
9428
Log collection server
victoriaTraces
10428
Trace collection server
vmalert
8880
Alerting and derived metrics
alertmanager
9093
Alert aggregation and routing
blackbox_exporter
9115
Blackbox probing (ping nodes/VIPs)
dnsmasq
53
Internal DNS resolution
chronyd
123
NTP time server
ansible
-
Playbook execution
Nginx serves as the module’s entry point, providing the web UI and local software repository.
With multiple INFRA nodes, services on each are independent, but you can access all monitoring data sources from any INFRA node’s Grafana.
Note: The INFRA module is licensed under AGPLv3 due to Grafana.
As an exception, if you only use Nginx/Victoria components without Grafana, you’re effectively under Apache-2.0.
ETCD Node
The ETCD module provides Distributed Consensus Service (DCS) for PostgreSQL high availability.
The etcd group in the inventory defines ETCD nodes. These nodes run etcd servers on two ports:
The minio group in the inventory defines MinIO nodes. These nodes run MinIO servers on:
Component
Port
Description
minio
9000
MinIO S3 API endpoint
minio
9001
MinIO admin console
PGSQL Node
Nodes with the PGSQL module are called PGSQL nodes. Node and PostgreSQL instance have a 1:1 deployment—one PG instance per node.
PGSQL nodes can borrow identity from their PostgreSQL instance—controlled by node_id_from_pg, defaulting to true, meaning the node name is set to the PG instance name.
PGSQL nodes run these additional components beyond regular node services:
Component
Port
Description
Status
postgres
5432
PostgreSQL database server
Enabled
pgbouncer
6432
PgBouncer connection pool
Enabled
patroni
8008
Patroni HA management
Enabled
pg_exporter
9630
PostgreSQL metrics exporter
Enabled
pgbouncer_exporter
9631
PgBouncer metrics exporter
Enabled
pgbackrest_exporter
9854
pgBackRest metrics exporter
Enabled
vip-manager
n/a
Binds L2 VIP to cluster primary
Optional
{{ pg_cluster }}-primary
5433
HAProxy service: pooled read/write
Enabled
{{ pg_cluster }}-replica
5434
HAProxy service: pooled read-only
Enabled
{{ pg_cluster }}-default
5436
HAProxy service: primary direct connection
Enabled
{{ pg_cluster }}-offline
5438
HAProxy service: offline read
Enabled
{{ pg_cluster }}-<service>
543x
HAProxy service: custom PostgreSQL services
Custom
The vip-manager is only enabled when users configure a PG VIP.
Additional custom services can be defined in pg_services, exposed via haproxy using additional service ports.
Node Relationships
Regular nodes typically reference an INFRA node via the admin_ip parameter as their infrastructure provider.
For example, with global admin_ip = 10.10.10.10, all nodes use infrastructure services at this IP.
Typically the admin node and INFRA node coincide. With multiple INFRA nodes, the admin node is usually the first one; others serve as backups.
In large-scale production deployments, you might separate the Ansible admin node from INFRA module nodes.
For example, use 1-2 small dedicated hosts under the DBA team as the control hub (ADMIN nodes), and 2-3 high-spec physical machines as monitoring infrastructure (INFRA nodes).
Typical node counts by deployment scale:
Scale
ADMIN
INFRA
ETCD
MINIO
PGSQL
Single-node
1
1
1
0
1
3-node
1
3
3
0
3
Small prod
1
2
3
0
N
Large prod
2
3
5
4+
N
3.1.2 - Infrastructure
Infrastructure module architecture, components, and functionality in Pigsty.
Running production-grade, highly available PostgreSQL clusters typically requires a comprehensive set of infrastructure services (foundation) for support, such as monitoring and alerting, log collection, time synchronization, DNS resolution, and local software repositories.
Pigsty provides the INFRA module to address this—it’s an optional module, but we strongly recommend enabling it.
Overview
The diagram below shows the architecture of a single-node deployment. The right half represents the components included in the INFRA module:
Infrastructure components with WebUIs can be exposed uniformly through Nginx, such as Grafana, VictoriaMetrics (VMUI), AlertManager,
and HAProxy console. Additionally, the local software repository and other static resources are served via Nginx.
Nginx configures local web servers or reverse proxy servers based on definitions in infra_portal.
infra_portal:home :{domain:i.pigsty }
By default, it exposes Pigsty’s admin homepage: i.pigsty. Different endpoints on this page proxy different components:
Pigsty supports offline installation, which essentially pre-copies a prepared local software repository to the target environment.
When Pigsty performs production deployment and needs to create a local software repository, if it finds the /www/pigsty/repo_complete marker file already exists locally, it skips downloading packages from upstream and uses existing packages directly, avoiding internet downloads.
Pigsty provides pre-built dashboards based on VictoriaMetrics / Logs / Traces, with one-click drill-down and roll-up via URL jumps for rapid troubleshooting.
Grafana can also serve as a low-code visualization platform, so ECharts, victoriametrics-datasource, victorialogs-datasource plugins are installed by default,
with Vector / Victoria datasources registered uniformly as vmetrics-*, vlogs-*, vtraces-* for easy custom dashboard extension.
VictoriaMetrics is fully compatible with the Prometheus API, supporting PromQL queries, remote read/write protocols, and the Alertmanager API.
The built-in VMUI provides an ad-hoc query interface for exploring metrics data directly, and also serves as a Grafana datasource.
All managed nodes run Vector Agent by default, collecting system logs, PostgreSQL logs, Patroni logs, Pgbouncer logs, etc., processing them into structured format and pushing to VictoriaLogs.
The built-in Web UI supports log search and filtering, and can be integrated with Grafana’s victorialogs-datasource plugin for visual analysis.
VictoriaTraces provides a Jaeger-compatible interface for analyzing service call chains and database slow queries.
Combined with Grafana dashboards, it enables rapid identification of performance bottlenecks and root cause tracing.
VMAlert reads metrics data from VictoriaMetrics and periodically evaluates alerting rules.
Pigsty provides pre-built alerting rules for PGSQL, NODE, REDIS, and other modules, covering common failure scenarios out of the box.
AlertManager supports multiple notification channels: email, Webhook, Slack, PagerDuty, WeChat Work, etc.
Through alert routing rules, differentiated dispatch based on severity level and module type is possible, with support for silencing, inhibition, and other advanced features.
It supports multiple probe methods including ICMP Ping, TCP ports, and HTTP/HTTPS endpoints.
Useful for monitoring VIP reachability, service port availability, external dependency health, etc.—an important tool for assessing failure impact scope.
Ansible is Pigsty’s core orchestration tool; all deployment, configuration, and management operations are performed through Ansible Playbooks.
Pigsty automatically installs Ansible on the admin node (Infra node) during installation.
It adopts a declarative configuration style and idempotent playbook design: the same playbook can be run repeatedly, and the system automatically converges to the desired state without side effects.
Ansible’s core advantages:
Agentless: Executes remotely via SSH, no additional software needed on target nodes.
Declarative: Describes the desired state rather than execution steps; configuration is documentation.
Idempotent: Multiple executions produce consistent results; supports retry after partial failures.
Chronyd provides NTP time synchronization service, ensuring consistent clocks across all nodes in the environment.
It listens on port 123 (UDP) by default, serving as the time source within the environment:
Protocol
Port
Description
UDP
123
NTP time sync service
Time synchronization is critical for distributed systems: log analysis requires aligned timestamps, certificate validation depends on accurate clocks, and PostgreSQL streaming replication is sensitive to clock drift.
In isolated network environments, the INFRA node can serve as an internal NTP server with other nodes synchronizing to it.
Typically the admin node and INFRA node coincide. With multiple INFRA nodes, the admin node is usually the first one; others serve as backups.
In large-scale production deployments, you might separate the Ansible admin node from nodes running the INFRA module for various reasons.
For example, use 1-2 small dedicated hosts belonging to the DBA team as the control hub (ADMIN nodes),
and 2-3 high-spec physical machines as monitoring infrastructure (INFRA nodes).
The table below shows typical node counts for different deployment scales:
Deployment Scale
ADMIN
INFRA
ETCD
MINIO
PGSQL
Single-node dev
1
1
1
0
1
Three-node
1
3
3
0
3
Small production
1
2
3
0
N
Large production
2
3
5
4+
N
3.1.3 - PostgreSQL
PostgreSQL module component interactions and data flow.
The PGSQL module organizes PostgreSQL in production as clusters—logical entities composed of a group of database instances associated by primary-replica relationships.
Each cluster is an autonomous business unit consisting of at least one primary instance, exposing capabilities through services.
There are four core entities in Pigsty’s PGSQL module:
Cluster: An autonomous PostgreSQL business unit serving as the top-level namespace for other entities.
Service: A named abstraction that exposes capabilities, routes traffic, and exposes services using node ports.
Instance: A single PostgreSQL server consisting of running processes and database files on a single node.
Node: A hardware resource abstraction running Linux + Systemd environment—can be bare metal, VM, container, or Pod.
Along with two business entities—“Database” and “Role”—these form the complete logical view as shown below:
Naming Conventions
Cluster names should be valid DNS domain names without any dots, regex: [a-zA-Z0-9-]+
Service names should be prefixed with the cluster name and suffixed with specific words: primary, replica, offline, delayed, connected by -.
Instance names are prefixed with the cluster name and suffixed with a positive integer instance number, connected by -, e.g., ${cluster}-${seq}.
Nodes are identified by their primary internal IP address; since databases and hosts are deployed 1:1 in the PGSQL module, hostnames typically match instance names.
Overview
The diagram below illustrates the PGSQL module architecture, showing interactions between components:
Collects PostgreSQL, Patroni, Pgbouncer logs and ships to central store
PostgreSQL
PostgreSQL is the core of the PGSQL module, listening on port 5432 by default for relational database services.
Protocol
Port
Description
TCP
5432
PostgreSQL database service
Installing the PGSQL module on multiple nodes with the same pg_cluster automatically forms a high-availability cluster based on streaming replication.
Instance roles are defined by pg_role: primary, replica, or offline.
PostgreSQL processes are managed by Patroni by default. Configuration templates can be switched via pg_conf for OLTP/OLAP/CRIT/TINY workloads,
and any parameter can be overridden through pg_parameters.
Patroni is the PostgreSQL high-availability controller, listening on port 8008 by default for its REST API.
Protocol
Port
Description
TCP
8008
Patroni REST API / Health Check
Patroni takes over PostgreSQL startup, shutdown, configuration, and health status, writing leader and member information to etcd.
It handles automatic failover, maintains replication factor, coordinates parameter changes, and provides a REST API for HAProxy, monitoring, and administrators.
HAProxy uses Patroni health check endpoints to determine instance roles and route traffic to the correct primary or replica.
vip-manager monitors the leader key in etcd and automatically migrates the VIP when the primary changes.
Pgbouncer is a lightweight connection pooling middleware, listening on port 6432 by default.
Protocol
Port
Description
TCP
6432
Pgbouncer connection pool
Pgbouncer runs statelessly on each instance, connecting to PostgreSQL via local Unix socket,
absorbing burst connections, stabilizing sessions, and providing additional metrics.
By default, Pigsty routes production traffic (read-write service 5433 / read-only service 5434) through Pgbouncer,
while only the default service (5436) and offline service (5438) bypass the connection pool for direct PostgreSQL connections.
Pool mode is controlled by pgbouncer_poolmode, defaulting to transaction (transaction-level pooling).
Connection pooling can be disabled via pgbouncer_enabled.
HAProxy serves as the service entry point and load balancer, exposing multiple database service ports.
Port
Service
Target
Description
9101
Admin
-
HAProxy statistics and admin page
5433
primary
Primary Pgbouncer
Read-write service, routes to primary pool
5434
replica
Replica Pgbouncer
Read-only service, routes to replica pool
5436
default
Primary Postgres
Default service, direct to primary (bypasses pool)
5438
offline
Offline Postgres
Offline service, direct to offline replica (ETL/analytics)
HAProxy uses Patroni REST API health checks to determine instance roles and route traffic to the appropriate primary or replica.
Service definitions are composed from pg_default_services and pg_services.
A dedicated HAProxy node group can be specified via pg_service_provider to handle higher traffic;
by default, HAProxy on local nodes publishes services.
vip-manager binds an L2 VIP to the current primary node for transparent failover.
Protocol
Description
L2
Virtual IP bound to primary node NIC
vip-manager runs on each PG node, monitoring the leader key written by Patroni in etcd,
and binds pg_vip_address to the current primary node’s network interface.
During failover, vip-manager immediately releases the VIP from the old primary and rebinds it on the new primary,
ensuring the old primary stops responding to requests and preventing split-brain.
This component is optional, enabled via pg_vip_enabled.
When enabled, ensure all nodes are in the same VLAN; otherwise, VIP migration will fail.
pgBackRest is a professional PostgreSQL backup and recovery tool supporting full/incremental/differential backups and WAL archiving.
Feature
Description
Full Backup
Complete database backup
Incremental
Backs up only changed data blocks
WAL Archiving
Continuous WAL archiving, enables PITR
Repository
Local disk (default) or object storage like MinIO
pgBackRest works with PostgreSQL to create backup repositories on the primary, executing backup and archiving tasks.
By default, it uses a local backup repository (pgbackrest_method = local),
but can be configured for MinIO or other object storage for centralized backup management.
After initialization, pgbackrest_init_backup can automatically trigger the first full backup.
Recovery integrates with Patroni, supporting bootstrapping replicas as new primaries or standbys.
pg_exporter exports PostgreSQL monitoring metrics, listening on port 9630 by default.
Protocol
Port
Description
TCP
9630
pg_exporter metrics port
pg_exporter runs on each PG node, connecting to PostgreSQL via local Unix socket,
exporting rich metrics covering sessions, buffer hits, replication lag, transaction rates, etc., scraped by VictoriaMetrics on INFRA nodes.
pgbouncer_exporter exports Pgbouncer connection pool metrics, listening on port 9631 by default.
Protocol
Port
Description
TCP
9631
pgbouncer_exporter metrics port
pgbouncer_exporter reads Pgbouncer statistics views, providing metrics on pool utilization, wait queues, and hit rates.
If Pgbouncer is disabled, this component should also be disabled.
pgbackrest_exporter exports backup status metrics, listening on port 9854 by default.
Protocol
Port
Description
TCP
9854
pgbackrest_exporter metrics port
pgbackrest_exporter parses pgBackRest status, generating metrics for most recent backup time, size, type, etc.
Combined with alerting policies, it quickly detects expired or failed backups, ensuring data safety.
Patroni and etcd work together for automatic failover, pgBackRest ensures data recoverability,
and the three Exporters combined with VictoriaMetrics provide complete observability.
How Pigsty abstracts different functionalities into modules, and the logical model of these modules.
In Pigsty, functional modules are organized as “clusters”. Each cluster is an Ansible group containing several node resources with defined instances.
PGSQL Module Overview: Key Concepts and Architecture Details
The PGSQL module is organized as clusters in production environments, which are logical entities composed of a set of database instances associated by primary-replica relationships.
Each database cluster is an autonomous business service unit consisting of at least one database (primary) instance.
Entity Relationship
Let’s start with the ER diagram. In Pigsty’s PGSQL module, there are four core entities:
Cluster: An autonomous PostgreSQL business unit, serving as the top-level namespace for other entities.
Service: A named abstraction of cluster capability that routes traffic and exposes PostgreSQL services using node ports.
Instance: A single PostgreSQL server consisting of a running process and database files on a single node.
Node: An abstraction of hardware resources, which can be bare metal, virtual machines, or even Kubernetes pods.
Naming Conventions
Cluster names should be valid DNS domain names without dots, matching the regex: [a-zA-Z0-9-]+
Service names should be prefixed with the cluster name and suffixed with specific words: primary, replica, offline, delayed, connected by -.
Instance names are prefixed with the cluster name and suffixed with a positive integer instance number, connected by -, e.g., ${cluster}-${seq}.
Nodes are identified by their primary internal IP address. Since databases and hosts are deployed 1:1 in the PGSQL module, the hostname is usually the same as the instance name.
Identity Parameters
Pigsty uses identity parameters to identify entities: PG_ID.
Besides the node IP address, pg_cluster, pg_role, and pg_seq are the minimum required parameters for defining a PostgreSQL cluster.
Using the sandbox environment test cluster pg-test as an example:
Pigsty uses Infrastructure as Code (IaC) philosophy to manage all components, providing declarative management for large-scale clusters.
Pigsty follows the IaC and GitOPS philosophy: use a declarative config inventory to describe the entire environment, and materialize it through idempotent playbooks.
Users describe their desired state declaratively through parameters, and playbooks idempotently adjust target nodes to reach that state.
This is similar to Kubernetes CRDs & Operators, but Pigsty implements this functionality on bare metal and virtual machines through Ansible.
Pigsty was born to solve the operational management problem of ultra-large-scale PostgreSQL clusters. The idea behind it is simple — we need the ability to replicate the entire infrastructure (100+ database clusters + PG/Redis + observability) on ready servers within ten minutes.
No GUI + ClickOps can complete such a complex task in such a short time, making CLI + IaC the only choice — it provides precise, efficient control.
The config inventory pigsty.yml file describes the state of the entire deployment. Whether it’s production (prod), staging, test, or development (devbox) environments,
the difference between infrastructures lies only in the config inventory, while the deployment delivery logic is exactly the same.
You can use git for version control and auditing of this deployment “seed/gene”, and Pigsty even supports storing the config inventory as database tables in PostgreSQL CMDB, further achieving Infra as Data capability.
Seamlessly integrate with your existing workflows.
IaC is designed for professional users and enterprise scenarios but is also deeply optimized for individual developers and SMBs.
Even if you’re not a professional DBA, you don’t need to understand these hundreds of adjustment knobs and switches. All parameters come with well-performing default values.
You can get an out-of-the-box single-node database with zero configuration;
Simply add two more IP addresses to get an enterprise-grade high-availability PostgreSQL cluster.
Declare Modules
Take the following default config snippet as an example. This config describes a node 10.10.10.10 with INFRA, NODE, ETCD, and PGSQL modules installed.
# monitoring, alerting, DNS, NTP and other infrastructure cluster...infra:{hosts:{10.10.10.10:{infra_seq:1}}}# minio cluster, s3 compatible object storageminio:{hosts:{10.10.10.10:{minio_seq: 1 } }, vars:{minio_cluster:minio } }# etcd cluster, used as DCS for PostgreSQL high availabilityetcd:{hosts:{10.10.10.10:{etcd_seq: 1 } }, vars:{etcd_cluster:etcd } }# PGSQL example cluster: pg-metapg-meta:{hosts:{10.10.10.10:{pg_seq: 1, pg_role: primary }, vars:{pg_cluster:pg-meta } }
To actually install these modules, execute the following playbooks:
./infra.yml -l 10.10.10.10 # Initialize infra module on node 10.10.10.10./etcd.yml -l 10.10.10.10 # Initialize etcd module on node 10.10.10.10./minio.yml -l 10.10.10.10 # Initialize minio module on node 10.10.10.10./pgsql.yml -l 10.10.10.10 # Initialize pgsql module on node 10.10.10.10
Declare Clusters
You can declare PostgreSQL database clusters by installing the PGSQL module on multiple nodes, making them a service unit:
For example, to deploy a three-node high-availability PostgreSQL cluster using streaming replication on the following three Pigsty-managed nodes,
you can add the following definition to the all.children section of the config file pigsty.yml:
Not only can you define clusters declaratively, but you can also define databases, users, services, and HBA rules within the cluster. For example, the following config file deeply customizes the content of the default pg-meta single-node database cluster:
Including: declaring six business databases and seven business users, adding an extra standby service (synchronous standby, providing read capability with no replication delay), defining some additional pg_hba rules, an L2 VIP address pointing to the cluster primary, and a customized backup strategy.
pg-meta:hosts:{10.10.10.10:{pg_seq: 1, pg_role: primary , pg_offline_query:true}}vars:pg_cluster:pg-metapg_databases:# define business databases on this cluster, array of database definition- name:meta # REQUIRED, `name` is the only mandatory field of a database definitionbaseline:cmdb.sql # optional, database sql baseline path, (relative path among ansible search path, e.g files/)pgbouncer:true# optional, add this database to pgbouncer database list? true by defaultschemas:[pigsty] # optional, additional schemas to be created, array of schema namesextensions: # optional, additional extensions to be installed:array of `{name[,schema]}`- {name: postgis , schema:public }- {name:timescaledb }comment:pigsty meta database # optional, comment string for this databaseowner:postgres # optional, database owner, postgres by defaulttemplate:template1 # optional, which template to use, template1 by defaultencoding:UTF8 # optional, database encoding, UTF8 by default. (MUST same as template database)locale:C # optional, database locale, C by default. (MUST same as template database)lc_collate:C # optional, database collate, C by default. (MUST same as template database)lc_ctype:C # optional, database ctype, C by default. (MUST same as template database)tablespace:pg_default # optional, default tablespace, 'pg_default' by default.allowconn:true# optional, allow connection, true by default. false will disable connect at allrevokeconn:false# optional, revoke public connection privilege. false by default. (leave connect with grant option to owner)register_datasource:true# optional, register this database to grafana datasources? true by defaultconnlimit:-1# optional, database connection limit, default -1 disable limitpool_auth_user:dbuser_meta # optional, all connection to this pgbouncer database will be authenticated by this userpool_mode:transaction # optional, pgbouncer pool mode at database level, default transactionpool_size:64# optional, pgbouncer pool size at database level, default 64pool_size_reserve:32# optional, pgbouncer pool size reserve at database level, default 32pool_size_min:0# optional, pgbouncer pool size min at database level, default 0pool_max_db_conn:100# optional, max database connections at database level, default 100- {name: grafana ,owner: dbuser_grafana ,revokeconn: true ,comment:grafana primary database }- {name: bytebase ,owner: dbuser_bytebase ,revokeconn: true ,comment:bytebase primary database }- {name: kong ,owner: dbuser_kong ,revokeconn: true ,comment:kong the api gateway database }- {name: gitea ,owner: dbuser_gitea ,revokeconn: true ,comment:gitea meta database }- {name: wiki ,owner: dbuser_wiki ,revokeconn: true ,comment:wiki meta database }pg_users:# define business users/roles on this cluster, array of user definition- name:dbuser_meta # REQUIRED, `name` is the only mandatory field of a user definitionpassword:DBUser.Meta # optional, password, can be a scram-sha-256 hash string or plain textlogin:true# optional, can log in, true by default (new biz ROLE should be false)superuser:false# optional, is superuser? false by defaultcreatedb:false# optional, can create database? false by defaultcreaterole:false# optional, can create role? false by defaultinherit:true# optional, can this role use inherited privileges? true by defaultreplication:false# optional, can this role do replication? false by defaultbypassrls:false# optional, can this role bypass row level security? false by defaultpgbouncer:true# optional, add this user to pgbouncer user-list? false by default (production user should be true explicitly)connlimit:-1# optional, user connection limit, default -1 disable limitexpire_in:3650# optional, now + n days when this role is expired (OVERWRITE expire_at)expire_at:'2030-12-31'# optional, YYYY-MM-DD 'timestamp' when this role is expired (OVERWRITTEN by expire_in)comment:pigsty admin user # optional, comment string for this user/roleroles: [dbrole_admin] # optional, belonged roles. default roles are:dbrole_{admin,readonly,readwrite,offline}parameters:{}# optional, role level parameters with `ALTER ROLE SET`pool_mode:transaction # optional, pgbouncer pool mode at user level, transaction by defaultpool_connlimit:-1# optional, max database connections at user level, default -1 disable limit- {name: dbuser_view ,password: DBUser.Viewer ,pgbouncer: true ,roles: [dbrole_readonly], comment:read-only viewer for meta database}- {name: dbuser_grafana ,password: DBUser.Grafana ,pgbouncer: true ,roles: [dbrole_admin] ,comment:admin user for grafana database }- {name: dbuser_bytebase ,password: DBUser.Bytebase ,pgbouncer: true ,roles: [dbrole_admin] ,comment:admin user for bytebase database }- {name: dbuser_kong ,password: DBUser.Kong ,pgbouncer: true ,roles: [dbrole_admin] ,comment:admin user for kong api gateway }- {name: dbuser_gitea ,password: DBUser.Gitea ,pgbouncer: true ,roles: [dbrole_admin] ,comment:admin user for gitea service }- {name: dbuser_wiki ,password: DBUser.Wiki ,pgbouncer: true ,roles: [dbrole_admin] ,comment:admin user for wiki.js service }pg_services:# extra services in addition to pg_default_services, array of service definition# standby service will route {ip|name}:5435 to sync replica's pgbouncer (5435->6432 standby)- name: standby # required, service name, the actual svc name will be prefixed with `pg_cluster`, e.g:pg-meta-standbyport:5435# required, service exposed port (work as kubernetes service node port mode)ip:"*"# optional, service bind ip address, `*` for all ip by defaultselector:"[]"# required, service member selector, use JMESPath to filter inventorydest:default # optional, destination port, default|postgres|pgbouncer|<port_number>, 'default' by defaultcheck:/sync # optional, health check url path, / by defaultbackup:"[? pg_role == `primary`]"# backup server selectormaxconn:3000# optional, max allowed front-end connectionbalance: roundrobin # optional, haproxy load balance algorithm (roundrobin by default, other:leastconn)options:'inter 3s fastinter 1s downinter 5s rise 3 fall 3 on-marked-down shutdown-sessions slowstart 30s maxconn 3000 maxqueue 128 weight 100'pg_hba_rules:- {user: dbuser_view , db: all ,addr: infra ,auth: pwd ,title:'allow grafana dashboard access cmdb from infra nodes'}pg_vip_enabled:truepg_vip_address:10.10.10.2/24pg_vip_interface:eth1node_crontab:# make a full backup 1 am everyday- '00 01 * * * postgres /pg/bin/pg-backup full'
Declare Access Control
You can also deeply customize Pigsty’s access control capabilities through declarative configuration. For example, the following config file provides deep security customization for the pg-meta cluster:
Uses the three-node core cluster template: crit.yml, to ensure data consistency is prioritized with zero data loss during failover.
Enables L2 VIP and restricts database and connection pool listening addresses to local loopback IP + internal network IP + VIP three specific addresses.
The template enforces Patroni’s SSL API and Pgbouncer’s SSL, and in HBA rules, enforces SSL usage for accessing the database cluster.
Also enables the $libdir/passwordcheck extension in pg_libs to enforce password strength security policy.
Finally, a separate pg-meta-delay cluster is declared as pg-meta’s delayed replica from one hour ago, for emergency data deletion recovery.
pg-meta:# 3 instance postgres cluster `pg-meta`hosts:10.10.10.10:{pg_seq: 1, pg_role:primary }10.10.10.11:{pg_seq: 2, pg_role:replica }10.10.10.12:{pg_seq: 3, pg_role: replica , pg_offline_query:true}vars:pg_cluster:pg-metapg_conf:crit.ymlpg_users:- {name: dbuser_meta , password: DBUser.Meta , pgbouncer: true , roles: [ dbrole_admin ] , comment:pigsty admin user }- {name: dbuser_view , password: DBUser.Viewer , pgbouncer: true , roles: [ dbrole_readonly ] , comment:read-only viewer for meta database }pg_databases:- {name: meta ,baseline: cmdb.sql ,comment: pigsty meta database ,schemas: [pigsty] ,extensions:[{name: postgis, schema:public}, {name: timescaledb}]}pg_default_service_dest:postgrespg_services:- {name: standby ,src_ip:"*",port: 5435 , dest: default ,selector:"[]", backup:"[? pg_role == `primary`]"}pg_vip_enabled:truepg_vip_address:10.10.10.2/24pg_vip_interface:eth1pg_listen:'${ip},${vip},${lo}'patroni_ssl_enabled:truepgbouncer_sslmode:requirepgbackrest_method:miniopg_libs:'timescaledb, $libdir/passwordcheck, pg_stat_statements, auto_explain'# add passwordcheck extension to enforce strong passwordpg_default_roles:# default roles and users in postgres cluster- {name: dbrole_readonly ,login: false ,comment:role for global read-only access }- {name: dbrole_offline ,login: false ,comment:role for restricted read-only access }- {name: dbrole_readwrite ,login: false ,roles: [dbrole_readonly] ,comment:role for global read-write access }- {name: dbrole_admin ,login: false ,roles: [pg_monitor, dbrole_readwrite] ,comment:role for object creation }- {name: postgres ,superuser: true ,expire_in: 7300 ,comment:system superuser }- {name: replicator ,replication: true ,expire_in: 7300 ,roles: [pg_monitor, dbrole_readonly] ,comment:system replicator }- {name: dbuser_dba ,superuser: true ,expire_in: 7300 ,roles: [dbrole_admin] ,pgbouncer: true ,pool_mode: session, pool_connlimit: 16 , comment:pgsql admin user }- {name: dbuser_monitor ,roles: [pg_monitor] ,expire_in: 7300 ,pgbouncer: true ,parameters:{log_min_duration_statement: 1000 } ,pool_mode: session ,pool_connlimit: 8 ,comment:pgsql monitor user }pg_default_hba_rules:# postgres host-based auth rules by default- {user:'${dbsu}',db: all ,addr: local ,auth: ident ,title:'dbsu access via local os user ident'}- {user:'${dbsu}',db: replication ,addr: local ,auth: ident ,title:'dbsu replication from local os ident'}- {user:'${repl}',db: replication ,addr: localhost ,auth: ssl ,title:'replicator replication from localhost'}- {user:'${repl}',db: replication ,addr: intra ,auth: ssl ,title:'replicator replication from intranet'}- {user:'${repl}',db: postgres ,addr: intra ,auth: ssl ,title:'replicator postgres db from intranet'}- {user:'${monitor}',db: all ,addr: localhost ,auth: pwd ,title:'monitor from localhost with password'}- {user:'${monitor}',db: all ,addr: infra ,auth: ssl ,title:'monitor from infra host with password'}- {user:'${admin}',db: all ,addr: infra ,auth: ssl ,title:'admin @ infra nodes with pwd & ssl'}- {user:'${admin}',db: all ,addr: world ,auth: cert ,title:'admin @ everywhere with ssl & cert'}- {user: '+dbrole_readonly',db: all ,addr: localhost ,auth: ssl ,title:'pgbouncer read/write via local socket'}- {user: '+dbrole_readonly',db: all ,addr: intra ,auth: ssl ,title:'read/write biz user via password'}- {user: '+dbrole_offline' ,db: all ,addr: intra ,auth: ssl ,title:'allow etl offline tasks from intranet'}pgb_default_hba_rules:# pgbouncer host-based authentication rules- {user:'${dbsu}',db: pgbouncer ,addr: local ,auth: peer ,title:'dbsu local admin access with os ident'}- {user: 'all' ,db: all ,addr: localhost ,auth: pwd ,title:'allow all user local access with pwd'}- {user:'${monitor}',db: pgbouncer ,addr: intra ,auth: ssl ,title:'monitor access via intranet with pwd'}- {user:'${monitor}',db: all ,addr: world ,auth: deny ,title:'reject all other monitor access addr'}- {user:'${admin}',db: all ,addr: intra ,auth: ssl ,title:'admin access via intranet with pwd'}- {user:'${admin}',db: all ,addr: world ,auth: deny ,title:'reject all other admin access addr'}- {user: 'all' ,db: all ,addr: intra ,auth: ssl ,title:'allow all user intra access with pwd'}# OPTIONAL delayed cluster for pg-metapg-meta-delay:# delayed instance for pg-meta (1 hour ago)hosts:{10.10.10.13:{pg_seq: 1, pg_role: primary, pg_upstream: 10.10.10.10, pg_delay:1h } }vars:{pg_cluster:pg-meta-delay }
Citus Distributed Cluster
Below is a declarative configuration for a four-node Citus distributed cluster:
all:children:pg-citus0:# citus coordinator, pg_group = 0hosts:{10.10.10.10:{pg_seq: 1, pg_role:primary } }vars:{pg_cluster: pg-citus0 , pg_group:0}pg-citus1:# citus data node 1hosts:{10.10.10.11:{pg_seq: 1, pg_role:primary } }vars:{pg_cluster: pg-citus1 , pg_group:1}pg-citus2:# citus data node 2hosts:{10.10.10.12:{pg_seq: 1, pg_role:primary } }vars:{pg_cluster: pg-citus2 , pg_group:2}pg-citus3:# citus data node 3, with an extra replicahosts:10.10.10.13:{pg_seq: 1, pg_role:primary }10.10.10.14:{pg_seq: 2, pg_role:replica }vars:{pg_cluster: pg-citus3 , pg_group:3}vars:# global parameters for all citus clusterspg_mode: citus # pgsql cluster mode:cituspg_shard: pg-citus # citus shard name:pg-cituspatroni_citus_db:meta # citus distributed database namepg_dbsu_password:DBUser.Postgres# all dbsu password access for citus clusterpg_users:[{name: dbuser_meta ,password: DBUser.Meta ,pgbouncer: true ,roles:[dbrole_admin ] } ]pg_databases:[{name: meta ,extensions:[{name:citus }, { name: postgis }, { name: timescaledb } ] } ]pg_hba_rules:- {user: 'all' ,db: all ,addr: 127.0.0.1/32 ,auth: ssl ,title:'all user ssl access from localhost'}- {user: 'all' ,db: all ,addr: intra ,auth: ssl ,title:'all user ssl access from intranet'}
Redis Clusters
Below are declarative configuration examples for Redis primary-replica cluster, sentinel cluster, and Redis Cluster:
Below is a declarative configuration example for a three-node Etcd cluster:
etcd:# dcs service for postgres/patroni ha consensushosts:# 1 node for testing, 3 or 5 for production10.10.10.10:{etcd_seq:1}# etcd_seq required10.10.10.11:{etcd_seq:2}# assign from 1 ~ n10.10.10.12:{etcd_seq:3}# odd number pleasevars:# cluster level parameter override roles/etcdetcd_cluster:etcd # mark etcd cluster name etcdetcd_safeguard:false# safeguard against purgingetcd_clean:true# purge etcd during init process
MinIO Cluster
Below is a declarative configuration example for a three-node MinIO cluster:
minio:hosts:10.10.10.10:{minio_seq:1}10.10.10.11:{minio_seq:2}10.10.10.12:{minio_seq:3}vars:minio_cluster:miniominio_data:'/data{1...2}'# use two disks per nodeminio_node:'${minio_cluster}-${minio_seq}.pigsty'# node name patternhaproxy_services:- name:minio # [required] service name, must be uniqueport:9002# [required] service port, must be uniqueoptions:- option httpchk- option http-keep-alive- http-check send meth OPTIONS uri /minio/health/live- http-check expect status 200servers:- {name: minio-1 ,ip: 10.10.10.10 , port: 9000 , options:'check-ssl ca-file /etc/pki/ca.crt check port 9000'}- {name: minio-2 ,ip: 10.10.10.11 , port: 9000 , options:'check-ssl ca-file /etc/pki/ca.crt check port 9000'}- {name: minio-3 ,ip: 10.10.10.12 , port: 9000 , options:'check-ssl ca-file /etc/pki/ca.crt check port 9000'}
3.3.1 - Inventory
Describe your infrastructure and clusters using declarative configuration files
Every Pigsty deployment corresponds to an Inventory that describes key properties of the infrastructure and database clusters.
You can directly edit this configuration file to customize your deployment, or use the configure wizard script provided by Pigsty to automatically generate an appropriate configuration file.
Configuration Structure
The inventory uses standard Ansible YAML configuration format, consisting of two parts: global parameters (all.vars) and multiple groups (all.children).
You can define new clusters in all.children and describe the infrastructure using global variables: all.vars, which looks like this:
all: # Top-level object:allvars:{...} # Global parameterschildren:# Group definitionsinfra: # Group definition:'infra'hosts:{...} # Group members:'infra'vars:{...} # Group parameters:'infra'etcd:{...} # Group definition:'etcd'pg-meta:{...} # Group definition:'pg-meta'pg-test:{...} # Group definition:'pg-test'redis-test:{...} # Group definition:'redis-test'# ...
Cluster Definition
Each Ansible group may represent a cluster, which can be a node cluster, PostgreSQL cluster, Redis cluster, Etcd cluster, MinIO cluster, etc.
A cluster definition consists of two parts: cluster members (hosts) and cluster parameters (vars).
You can define cluster members in <cls>.hosts and describe the cluster using configuration parameters in <cls>.vars.
Here’s an example of a 3-node high-availability PostgreSQL cluster definition:
all:children:# Ansible group listpg-test:# Ansible group namehosts:# Ansible group instances (cluster members)10.10.10.11:{pg_seq: 1, pg_role:primary }# Host 110.10.10.12:{pg_seq: 2, pg_role:replica }# Host 210.10.10.13:{pg_seq: 3, pg_role:offline }# Host 3vars:# Ansible group variables (cluster parameters)pg_cluster:pg-test
Cluster-level vars (cluster parameters) override global parameters, and instance-level vars override both cluster parameters and global parameters.
Splitting Configuration
If your deployment is large or you want to better organize configuration files,
you can split the inventory into multiple files for easier management and maintenance.
inventory/├── hosts.yml # Host and cluster definitions├── group_vars/│ ├── all.yml # Global default variables (corresponds to all.vars)│ ├── infra.yml # infra group variables│ ├── etcd.yml # etcd group variables│ └── pg-meta.yml # pg-meta cluster variables└── host_vars/├── 10.10.10.10.yml # Specific host variables└── 10.10.10.11.yml
You can place cluster member definitions in the hosts.yml file and put cluster-level configuration parameters in corresponding files under the group_vars directory.
Switching Configuration
You can temporarily specify a different inventory file when running playbooks using the -i parameter.
Additionally, Ansible supports multiple configuration methods. You can use local yaml|ini configuration files, or use CMDB and any dynamic configuration scripts as configuration sources.
In Pigsty, we specify pigsty.yml in the same directory as the default inventory through ansible.cfg in the Pigsty home directory. You can modify it as needed.
[defaults]inventory=pigsty.yml
Additionally, Pigsty supports using a CMDB metabase to store the inventory, facilitating integration with existing systems.
3.3.2 - Configure
Use the configure script to automatically generate recommended configuration files based on your environment.
Pigsty provides a configure script as a configuration wizard that automatically generates an appropriate pigsty.yml configuration file based on your current environment.
This is an optional script: if you already understand how to configure Pigsty, you can directly edit the pigsty.yml configuration file and skip the wizard.
Quick Start
Enter the pigsty source home directory and run ./configure to automatically start the configuration wizard. Without any arguments, it defaults to the meta single-node configuration template:
cd ~/pigsty
./configure # Interactive configuration wizard, auto-detect environment and generate config
This command will use the selected template as a base, detect the current node’s IP address and region, and generate a pigsty.yml configuration file suitable for the current environment.
Features
The configure script performs the following adjustments based on environment and input, generating a pigsty.yml configuration file in the current directory.
Detects the current node IP address; if multiple IPs exist, prompts the user to input a primary IP address as the node’s identity
Uses the IP address to replace the placeholder 10.10.10.10 in the configuration template and sets it as the admin_ip parameter value
Detects the current region, setting region to default (global default repos) or china (using Chinese mirror repos)
For micro instances (vCPU < 4), uses the tiny parameter template for node_tune and pg_conf to optimize resource usage
If -v PG major version is specified, sets pg_version and all PG alias parameters to the corresponding major version
If -g is specified, replaces all default passwords with randomly generated strong passwords for enhanced security (strongly recommended)
When PG major version ≥ 17, prioritizes the built-in C.UTF-8 locale, or the OS-supported C.UTF-8
Checks if the core dependency ansible for deployment is available in the current environment
Also checks if the deployment target node is SSH-reachable and can execute commands with sudo (-s to skip)
Usage Examples
# Basic usage./configure # Interactive configuration wizard./configure -i 10.10.10.10 # Specify primary IP address# Specify configuration template./configure -c meta # Use default single-node template (default)./configure -c rich # Use feature-rich single-node template./configure -c slim # Use minimal template (PGSQL + ETCD only)./configure -c ha/full # Use 4-node HA sandbox template./configure -c ha/trio # Use 3-node HA template./configure -c app/supa # Use Supabase self-hosted template# Specify PostgreSQL version./configure -v 17# Use PostgreSQL 17./configure -v 16# Use PostgreSQL 16./configure -c rich -v 16# rich template + PG 16# Region and proxy./configure -r china # Use Chinese mirrors./configure -r europe # Use European mirrors./configure -x # Import current proxy environment variables# Skip and automation./configure -s # Skip IP detection, keep placeholder./configure -n -i 10.10.10.10 # Non-interactive mode with specified IP./configure -c ha/full -s # 4-node template, skip IP replacement# Security enhancement./configure -g # Generate random passwords./configure -c meta -g -i 10.10.10.10 # Complete production configuration# Specify output and SSH port./configure -o prod.yml # Output to prod.yml./configure -p 2222# Use SSH port 2222
Command Arguments
./configure
[-c|--conf <template>]# Configuration template name (meta|rich|slim|ha/full|...)[-i|--ip <ipaddr>]# Specify primary IP address[-v|--version <pgver>]# PostgreSQL major version (13|14|15|16|17|18)[-r|--region <region>]# Upstream software repo region (default|china|europe)[-o|--output <file>]# Output configuration file path (default: pigsty.yml)[-s|--skip]# Skip IP address detection and replacement[-x|--proxy]# Import proxy settings from environment variables[-n|--non-interactive]# Non-interactive mode (don't ask any questions)[-p|--port <port>]# Specify SSH port[-g|--generate]# Generate random passwords[-h|--help]# Display help information
Argument Details
Argument
Description
-c, --conf
Generate config from conf/<template>.yml, supports subdirectories like ha/full
-i, --ip
Replace placeholder 10.10.10.10 in config template with specified IP
-v, --version
Specify PostgreSQL major version (13-18), keeps template default if not specified
-r, --region
Set software repo mirror region: default, china (Chinese mirrors), europe (European)
-o, --output
Specify output file path, defaults to pigsty.yml
-s, --skip
Skip IP address detection and replacement, keep 10.10.10.10 placeholder in template
-x, --proxy
Write current environment proxy variables (HTTP_PROXY, HTTPS_PROXY, ALL_PROXY, NO_PROXY) to config
-n, --non-interactive
Non-interactive mode, don’t ask any questions (requires -i to specify IP)
-p, --port
Specify SSH port (when using non-default port 22)
-g, --generate
Generate random values for passwords in config file, improving security (strongly recommended)
Execution Flow
The configure script executes detection and configuration in the following order:
When using the -g argument, the script generates 24-character random strings for the following passwords:
Password Parameter
Description
grafana_admin_password
Grafana admin password
pg_admin_password
PostgreSQL admin password
pg_monitor_password
PostgreSQL monitor user password
pg_replication_password
PostgreSQL replication user password
patroni_password
Patroni API password
haproxy_admin_password
HAProxy admin password
minio_secret_key
MinIO Secret Key
etcd_root_password
ETCD Root password
It also replaces the following placeholder passwords:
DBUser.Meta → random password
DBUser.Viewer → random password
S3User.Backup → random password
S3User.Meta → random password
S3User.Data → random password
$ ./configure -g
[INFO] generating random passwords...
grafana_admin_password : xK9mL2nP4qR7sT1vW3yZ5bD8
pg_admin_password : aB3cD5eF7gH9iJ1kL2mN4oP6
...
[INFO] random passwords generated, check and save them
Configuration Templates
The script reads configuration templates from the conf/ directory, supporting the following templates:
Core Templates
Template
Description
meta
Default template: Single-node installation with INFRA + NODE + ETCD + PGSQL
rich
Feature-rich version: Includes almost all extensions, MinIO, local repo
slim
Minimal version: PostgreSQL + ETCD only, no monitoring infrastructure
fat
Complete version: rich base with more extensions installed
$ ./configure
configure pigsty v4.0.0 begin
[ OK ]region= china
[ OK ]kernel= Linux
[ OK ]machine= x86_64
[ OK ]package= rpm,dnf
[ OK ]vendor= rocky (Rocky Linux)[ OK ]version=9(9.5)[ OK ]sudo= vagrant ok
[ OK ]ssh=[email protected] ok
[WARN] Multiple IP address candidates found:
(1) 192.168.121.193 inet 192.168.121.193/24 brd 192.168.121.255 scope global dynamic noprefixroute eth0
(2) 10.10.10.10 inet 10.10.10.10/24 brd 10.10.10.255 scope global noprefixroute eth1
[ OK ]primary_ip= 10.10.10.10 (from demo)[ OK ]admin=[email protected] ok
[ OK ]mode= meta (el9)[ OK ]locale= C.UTF-8
[ OK ]ansible= ready
[ OK ] pigsty configured
[WARN] don't forget to check it and change passwords!
proceed with ./deploy.yml
Environment Variables
The script supports the following environment variables:
Environment Variable
Description
Default
PIGSTY_HOME
Pigsty installation directory
~/pigsty
METADB_URL
Metabase connection URL
service=meta
HTTP_PROXY
HTTP proxy
-
HTTPS_PROXY
HTTPS proxy
-
ALL_PROXY
Universal proxy
-
NO_PROXY
Proxy whitelist
Built-in default
Notes
Passwordless access: Before running configure, ensure the current user has passwordless sudo privileges and passwordless SSH to localhost. This can be automatically configured via the bootstrap script.
IP address selection: Choose an internal IP as the primary IP address, not a public IP or 127.0.0.1.
Password security: In production environments, always modify default passwords in the configuration file, or use the -g argument to generate random passwords.
Configuration review: After the script completes, it’s recommended to review the generated pigsty.yml file to confirm the configuration meets expectations.
Multiple executions: You can run configure multiple times to regenerate configuration; each run will overwrite the existing pigsty.yml.
macOS limitations: When running on macOS, the script skips some Linux-specific checks and uses placeholder IP 10.10.10.10. macOS can only serve as an admin node.
FAQ
How to use a custom configuration template?
Place your configuration file in the conf/ directory, then specify it with the -c argument:
Inventory: Understand the Ansible inventory structure
Parameters: Understand Pigsty parameter hierarchy and priority
Templates: View all available configuration templates
Installation: Understand the complete installation process
Metabase: Use PostgreSQL as a dynamic configuration source
3.3.3 - Parameters
Fine-tune Pigsty customization using configuration parameters
In the inventory, you can use various parameters to fine-tune Pigsty customization. These parameters cover everything from infrastructure settings to database configuration.
Parameter List
Pigsty provides approximately 380+ configuration parameters distributed across 8 default modules for fine-grained control of various system aspects. See Reference - Parameter List for the complete list.
Parameters are key-value pairs that describe entities. The Key is a string, and the Value can be one of five types: boolean, string, number, array, or object.
Exceptions are etcd_cluster and minio_cluster which have default values.
This assumes each deployment has only one etcd cluster for DCS and one optional MinIO cluster for centralized backup storage, so they are assigned default cluster names etcd and minio.
However, you can still deploy multiple etcd or MinIO clusters using different names.
3.3.4 - Conf Templates
Use pre-made configuration templates to quickly generate configuration files adapted to your environment
In Pigsty, deployment blueprint details are defined by the inventory, which is the pigsty.yml configuration file. You can customize it through declarative configuration.
However, writing configuration files directly can be daunting for new users. To address this, we provide some ready-to-use configuration templates covering common usage scenarios.
Each template is a predefined pigsty.yml configuration file containing reasonable defaults suitable for specific scenarios.
You can choose a template as your customization starting point, then modify it as needed to meet your specific requirements.
Using Templates
Pigsty provides the configure script as an optional configuration wizard that generates an inventory with good defaults based on your environment and input.
Use ./configure -c <conf> to specify a configuration template, where <conf> is the path relative to the conf directory (the .yml suffix can be omitted).
./configure # Default to meta.yml configuration template./configure -c meta # Explicitly specify meta.yml single-node template./configure -c rich # Use feature-rich template with all extensions and MinIO./configure -c slim # Use minimal single-node template# Use different database kernels./configure -c pgsql # Native PostgreSQL kernel, basic features (13~18)./configure -c citus # Citus distributed HA PostgreSQL (14~17)./configure -c mssql # Babelfish kernel, SQL Server protocol compatible (15)./configure -c polar # PolarDB PG kernel, Aurora/RAC style (15)./configure -c ivory # IvorySQL kernel, Oracle syntax compatible (18)./configure -c mysql # OpenHalo kernel, MySQL compatible (14)./configure -c pgtde # Percona PostgreSQL Server transparent encryption (18)./configure -c oriole # OrioleDB kernel, OLTP enhanced (17)./configure -c supabase # Supabase self-hosted configuration (15~18)# Use multi-node HA templates./configure -c ha/dual # Use 2-node HA template./configure -c ha/trio # Use 3-node HA template./configure -c ha/full # Use 4-node HA template
If no template is specified, Pigsty defaults to the meta.yml single-node configuration template.
Template List
Main Templates
The following are single-node configuration templates for installing Pigsty on a single server:
The following configuration templates are for development and testing purposes:
Template
Description
build.yml
Open source build config for EL 9/10, Debian 12/13, Ubuntu 22.04/24.04
3.3.5 - Use CMDB as Config Inventory
Use PostgreSQL as a CMDB metabase to store Ansible inventory.
Pigsty allows you to use a PostgreSQL metabase as a dynamic configuration source, replacing static YAML configuration files for more powerful configuration management capabilities.
Overview
CMDB (Configuration Management Database) is a method of storing configuration information in a database for management.
In Pigsty, the default configuration source is a static YAML file pigsty.yml,
which serves as Ansible’s inventory.
This approach is simple and direct, but when infrastructure scales and requires complex, fine-grained management and external integration, a single static file becomes insufficient.
Feature
Static YAML File
CMDB Metabase
Querying
Manual search/grep
SQL queries with any conditions, aggregation analysis
Database transactions naturally support concurrency
External Integration
Requires YAML parsing
Standard SQL interface, easy integration with any language
Scalability
Difficult to maintain when file becomes too large
Scales to physical limits
Dynamic Generation
Static file, changes require manual application
Immediate effect, real-time configuration changes
Pigsty provides the CMDB database schema in the sample database pg-meta.meta schema baseline definition.
How It Works
The core idea of CMDB is to replace the static configuration file with a dynamic script.
Ansible supports using executable scripts as inventory, as long as the script outputs inventory data in JSON format.
When you enable CMDB, Pigsty creates a dynamic inventory script named inventory.sh:
#!/bin/bash
psql ${METADB_URL} -AXtwc 'SELECT text FROM pigsty.inventory;'
This script’s function is simple: every time Ansible needs to read the inventory, it queries configuration data from the PostgreSQL database’s pigsty.inventory view and returns it in JSON format.
The overall architecture is as follows:
flowchart LR
conf["bin/inventory_conf"]
tocmdb["bin/inventory_cmdb"]
load["bin/inventory_load"]
ansible["🚀 Ansible"]
subgraph static["📄 Static Config Mode"]
yml[("pigsty.yml")]
end
subgraph dynamic["🗄️ CMDB Dynamic Mode"]
sh["inventory.sh"]
cmdb[("PostgreSQL CMDB")]
end
conf -->|"switch"| yml
yml -->|"load config"| load
load -->|"write"| cmdb
tocmdb -->|"switch"| sh
sh --> cmdb
yml --> ansible
cmdb --> ansible
Data Model
The CMDB database schema is defined in files/cmdb.sql, with all objects in the pigsty schema.
Core Tables
Table
Description
Primary Key
pigsty.group
Cluster/group definitions, corresponds to Ansible groups
cls
pigsty.host
Host definitions, belongs to a group
(cls, ip)
pigsty.global_var
Global variables, corresponds to all.vars
key
pigsty.group_var
Group variables, corresponds to all.children.<cls>.vars
CREATETABLEpigsty.group(clsTEXTPRIMARYKEY,-- Cluster name, primary key
ctimeTIMESTAMPTZDEFAULTnow(),-- Creation time
mtimeTIMESTAMPTZDEFAULTnow()-- Modification time
);
Host Table pigsty.host
CREATETABLEpigsty.host(clsTEXTNOTNULLREFERENCESpigsty.group(cls),-- Parent cluster
ipINETNOTNULL,-- Host IP address
ctimeTIMESTAMPTZDEFAULTnow(),mtimeTIMESTAMPTZDEFAULTnow(),PRIMARYKEY(cls,ip));
Global Variables Table pigsty.global_var
CREATETABLEpigsty.global_var(keyTEXTPRIMARYKEY,-- Variable name
valueJSONBNULL,-- Variable value (JSON format)
mtimeTIMESTAMPTZDEFAULTnow()-- Modification time
);
Modifies ansible.cfg to set inventory to inventory.sh
The generated inventory.sh contents:
#!/bin/bash
psql ${METADB_URL} -AXtwc 'SELECT text FROM pigsty.inventory;'
inventory_conf
Switch back to using static YAML configuration file:
bin/inventory_conf
The script modifies ansible.cfg to set inventory back to pigsty.yml.
Usage Workflow
First-time CMDB Setup
Initialize CMDB schema (usually done automatically during Pigsty installation):
psql -f ~/pigsty/files/cmdb.sql
Load configuration to database:
bin/inventory_load
Switch to CMDB mode:
bin/inventory_cmdb
Verify configuration:
ansible all --list-hosts # List all hostsansible-inventory --list # View complete inventory
Query Configuration
After enabling CMDB, you can flexibly query configuration using SQL:
-- View all clusters
SELECTclsFROMpigsty.group;-- View all hosts in a cluster
SELECTipFROMpigsty.hostWHEREcls='pg-meta';-- View global variables
SELECTkey,valueFROMpigsty.global_var;-- View cluster variables
SELECTkey,valueFROMpigsty.group_varWHEREcls='pg-meta';-- View all PostgreSQL clusters
SELECTcls,name,pg_databases,pg_usersFROMpigsty.pg_cluster;-- View all PostgreSQL instances
SELECTcls,ins,ip,seq,roleFROMpigsty.pg_instance;-- View all database definitions
SELECTcls,datname,owner,encodingFROMpigsty.pg_database;-- View all user definitions
SELECTcls,name,login,superuserFROMpigsty.pg_users;
Modify Configuration
You can modify configuration directly via SQL:
-- Add new cluster
INSERTINTOpigsty.group(cls)VALUES('pg-new');-- Add cluster variable
INSERTINTOpigsty.group_var(cls,key,value)VALUES('pg-new','pg_cluster','"pg-new"');-- Add host
INSERTINTOpigsty.host(cls,ip)VALUES('pg-new','10.10.10.20');-- Add host variables
INSERTINTOpigsty.host_var(cls,ip,key,value)VALUES('pg-new','10.10.10.20','pg_seq','1'),('pg-new','10.10.10.20','pg_role','"primary"');-- Modify global variable
UPDATEpigsty.global_varSETvalue='"new-value"'WHEREkey='some_param';-- Delete cluster (cascades to hosts and variables)
DELETEFROMpigsty.groupWHEREcls='pg-old';
Changes take effect immediately without reloading or restarting any service.
Track configuration changes using the mtime field:
-- View recently modified global variables
SELECTkey,value,mtimeFROMpigsty.global_varORDERBYmtimeDESCLIMIT10;-- View changes after a specific time
SELECT*FROMpigsty.group_varWHEREmtime>'2024-01-01'::timestamptz;
Integration with External Systems
CMDB uses standard PostgreSQL, making it easy to integrate with other systems:
Web Management Interface: Expose configuration data through REST API (e.g., PostgREST)
CI/CD Pipelines: Read/write database directly in deployment scripts
Monitoring & Alerting: Generate monitoring rules based on configuration data
ITSM Systems: Sync with enterprise CMDB systems
Considerations
Data Consistency: After modifying configuration, you need to re-run the corresponding Ansible playbooks to apply changes to the actual environment
Backup: Configuration data in CMDB is critical, ensure regular backups
Permissions: Configure appropriate database access permissions for CMDB to avoid accidental modifications
Transactions: When making batch configuration changes, perform them within a transaction for rollback on errors
Connection Pooling: The inventory.sh script creates a new connection on each execution; if Ansible runs frequently, consider using connection pooling
Summary
CMDB is Pigsty’s advanced configuration management solution, suitable for scenarios requiring large-scale cluster management, complex queries, external integration, or fine-grained access control. By storing configuration data in PostgreSQL, you can fully leverage the database’s powerful capabilities to manage infrastructure configuration.
Feature
Description
Storage
PostgreSQL pigsty schema
Dynamic Inventory
inventory.sh script
Config Load
bin/inventory_load
Switch to CMDB
bin/inventory_cmdb
Switch to YAML
bin/inventory_conf
Core View
pigsty.inventory
3.4 - High Availability
Pigsty uses Patroni to implement PostgreSQL high availability, ensuring automatic failover when the primary becomes unavailable.
Overview
Pigsty’s PostgreSQL clusters come with out-of-the-box high availability, powered by Patroni, Etcd, and HAProxy.
When your PostgreSQL cluster has two or more instances, you automatically have self-healing database high availability without any additional configuration — as long as any instance in the cluster survives, the cluster can provide complete service. Clients only need to connect to any node in the cluster to get full service without worrying about primary-replica topology changes.
With default configuration, the primary failure Recovery Time Objective (RTO) ≈ 30s, and Recovery Point Objective (RPO) < 1MB; for replica failures, RPO = 0 and RTO ≈ 0 (brief interruption). In consistency-first mode, failover can guarantee zero data loss: RPO = 0. All these metrics can be configured as needed based on your actual hardware conditions and reliability requirements.
Pigsty includes built-in HAProxy load balancers for automatic traffic switching, providing DNS/VIP/LVS and other access methods for clients. Failover and switchover are almost transparent to the business side except for brief interruptions - applications don’t need to modify connection strings or restart.
The minimal maintenance window requirements bring great flexibility and convenience: you can perform rolling maintenance and upgrades on the entire cluster without application coordination. The feature that hardware failures can wait until the next day to handle lets developers, operations, and DBAs sleep well during incidents.
Many large organizations and core institutions have been using Pigsty in production for extended periods. The largest deployment has 25K CPU cores and 220+ PostgreSQL ultra-large instances (64c / 512g / 3TB NVMe SSD). In this deployment case, dozens of hardware failures and various incidents occurred over five years, yet overall availability of over 99.999% was maintained.
What problems does High Availability solve?
Elevates data security C/IA availability to a new level: RPO ≈ 0, RTO < 30s.
Gains seamless rolling maintenance capability, minimizing maintenance window requirements and bringing great convenience.
Hardware failures can self-heal immediately without human intervention, allowing operations and DBAs to sleep well.
Replicas can handle read-only requests, offloading primary load and fully utilizing resources.
What are the costs of High Availability?
Infrastructure dependency: HA requires DCS (etcd/zk/consul) for consensus.
Higher starting threshold: A meaningful HA deployment requires at least three nodes.
Extra resource consumption: Each new replica consumes additional resources, though this is usually not a major concern.
Since replication happens in real-time, all changes are immediately applied to replicas. Therefore, streaming replication-based HA solutions cannot handle data deletion or modification caused by human errors and software defects. (e.g., DROP TABLE or DELETE data)
Such failures require using delayed clusters or performing point-in-time recovery using previous base backups and WAL archives.
Configuration Strategy
RTO
RPO
Standalone + Nothing
Data permanently lost, unrecoverable
All data lost
Standalone + Base Backup
Depends on backup size and bandwidth (hours)
Lose data since last backup (hours to days)
Standalone + Base Backup + WAL Archive
Depends on backup size and bandwidth (hours)
Lose unarchived data (tens of MB)
Primary-Replica + Manual Failover
~10 minutes
Lose data in replication lag (~100KB)
Primary-Replica + Auto Failover
Within 1 minute
Lose data in replication lag (~100KB)
Primary-Replica + Auto Failover + Sync Commit
Within 1 minute
No data loss
How It Works
In Pigsty, the high availability architecture works as follows:
PostgreSQL uses standard streaming replication to build physical replicas; replicas take over when the primary fails.
Patroni manages PostgreSQL server processes and handles high availability matters.
Etcd provides distributed configuration storage (DCS) capability and is used for leader election after failures.
Patroni relies on Etcd to reach cluster leader consensus and provides health check interfaces externally.
HAProxy exposes cluster services externally and uses Patroni health check interfaces to automatically distribute traffic to healthy nodes.
vip-manager provides an optional Layer 2 VIP, retrieves leader information from Etcd, and binds the VIP to the node where the cluster primary resides.
When the primary fails, a new round of leader election is triggered. The healthiest replica in the cluster (highest LSN position, minimum data loss) wins and is promoted to the new primary. After the winning replica is promoted, read-write traffic is immediately routed to the new primary.
The impact of primary failure is brief write service unavailability: write requests will be blocked or fail directly from primary failure until new primary promotion, with unavailability typically lasting 15 to 30 seconds, usually not exceeding 1 minute.
When a replica fails, read-only traffic is routed to other replicas. Only when all replicas fail will read-only traffic ultimately be handled by the primary.
The impact of replica failure is partial read-only query interruption: queries currently running on that replica will abort due to connection reset and be immediately taken over by other available replicas.
Failure detection is performed jointly by Patroni and Etcd. The cluster leader holds a lease; if the cluster leader fails to renew the lease in time (10s) due to failure, the lease is released, triggering a Failover and new cluster election.
Even without any failures, you can proactively change the cluster primary through Switchover.
In this case, write queries on the primary will experience a brief interruption and be immediately routed to the new primary. This operation is typically used for rolling maintenance/upgrades of database servers.
Tradeoffs
Recovery Time Objective (RTO) and Recovery Point Objective (RPO) are two parameters that require careful tradeoffs when designing high availability clusters.
The default RTO and RPO values used by Pigsty meet reliability requirements for most scenarios. You can adjust them based on your hardware level, network quality, and business requirements.
RTO and RPO are NOT always better when smaller!
Too small an RTO increases false positive rates; too small an RPO reduces the probability of successful automatic failover.
The upper limit of unavailability during failover is controlled by the pg_rto parameter. RTO defaults to 30s. Increasing it will result in longer primary failure write unavailability, while decreasing it will increase the rate of false positive failovers (e.g., repeated switching due to brief network jitter).
The upper limit of potential data loss is controlled by the pg_rpo parameter, defaulting to 1MB. Reducing this value can lower the data loss ceiling during failover but also increases the probability of refusing automatic failover when replicas are not healthy enough (lagging too far behind).
Pigsty uses availability-first mode by default, meaning it will failover as quickly as possible when the primary fails, and data not yet replicated to replicas may be lost (under typical 10GbE networks, replication lag is usually a few KB to 100KB).
If you need to ensure zero data loss during failover, you can use the crit.yml template to ensure no data loss during failover, but this sacrifices some performance as a tradeoff.
Recovery Time Objective (RTO) in seconds. This is used to calculate Patroni’s TTL value, defaulting to 30 seconds.
If the primary instance is missing for this long, a new leader election will be triggered. This value is not always better when lower; it involves tradeoffs:
Reducing this value can decrease unavailability during cluster failover (inability to write), but makes the cluster more sensitive to short-term network jitter, increasing the probability of false positive failover triggers.
You need to configure this value based on network conditions and business constraints, making a tradeoff between failure probability and failure impact.
Recovery Point Objective (RPO) in bytes, default: 1048576.
Defaults to 1MiB, meaning up to 1MiB of data loss can be tolerated during failover.
When the primary goes down and all replicas are lagging, you must make a difficult choice:
Either promote a replica to become the new primary immediately, accepting acceptable data loss (e.g., less than 1MB), and restore service as quickly as possible.
Or wait for the primary to come back online (which may never happen) to avoid any data loss, or abandon automatic failover and wait for human intervention to make the final decision.
You need to configure this value based on business preference, making a tradeoff between availability and consistency.
Additionally, you can always ensure RPO = 0 by enabling synchronous commit (e.g., using the crit.yml template), sacrificing some cluster latency/throughput performance to guarantee data consistency.
3.4.1 - Service Access
Pigsty uses HAProxy to provide service access, with optional pgBouncer for connection pooling, and optional L2 VIP and DNS access.
Split read and write operations, route traffic correctly, and deliver PostgreSQL cluster capabilities reliably.
Service is an abstraction: it represents the form in which database clusters expose their capabilities externally, encapsulating underlying cluster details.
Services are crucial for stable access in production environments, showing their value during automatic failover in high availability clusters. Personal users typically don’t need to worry about this concept.
Personal Users
The concept of “service” is for production environments. Personal users with single-node clusters can skip the complexity and directly use instance names or IP addresses to access the database.
For example, Pigsty’s default single-node pg-meta.meta database can be connected directly using three different users:
psql postgres://dbuser_dba:[email protected]/meta # Connect directly with DBA superuserpsql postgres://dbuser_meta:[email protected]/meta # Connect with default business admin userpsql postgres://dbuser_view:DBUser.View@pg-meta/meta # Connect with default read-only user via instance domain name
Service Overview
In real-world production environments, we use primary-replica database clusters based on replication. Within a cluster, one and only one instance serves as the leader (primary) that can accept writes.
Other instances (replicas) continuously fetch change logs from the cluster leader to stay synchronized. Replicas can also handle read-only requests, significantly offloading the primary in read-heavy, write-light scenarios.
Therefore, distinguishing write requests from read-only requests is a common practice.
Additionally, for production environments with high-frequency, short-lived connections, we pool requests through connection pool middleware (Pgbouncer) to reduce connection and backend process creation overhead. However, for scenarios like ETL and change execution, we need to bypass the connection pool and directly access the database.
Meanwhile, high-availability clusters may undergo failover during failures, causing cluster leadership changes. Therefore, high-availability database solutions require write traffic to automatically adapt to cluster leadership changes.
These varying access needs (read-write separation, pooled vs. direct connections, failover auto-adaptation) ultimately lead to the abstraction of the Service concept.
Typically, database clusters must provide this most basic service:
Read-write service (primary): Can read from and write to the database
For production database clusters, at least these two services should be provided:
Read-write service (primary): Write data: Can only be served by the primary.
Read-only service (replica): Read data: Can be served by replicas; falls back to primary when no replicas are available
Additionally, depending on specific business scenarios, there may be other services, such as:
Default direct service (default): Allows (admin) users to bypass the connection pool and directly access the database
Offline replica service (offline): Dedicated replica not serving online read traffic, used for ETL and analytical queries
Sync replica service (standby): Read-only service with no replication delay, handled by synchronous standby/primary for read queries
Delayed replica service (delayed): Access data from the same cluster as it was some time ago, handled by delayed replicas
Access Services
Pigsty’s service delivery boundary stops at the cluster’s HAProxy. Users can access these load balancers through various means.
The typical approach is to use DNS or VIP access, binding them to all or any number of load balancers in the cluster.
You can use different host & port combinations, which provide PostgreSQL service in different ways.
Host
Type
Sample
Description
Cluster Domain Name
pg-test
Access via cluster domain name (resolved by dnsmasq @ infra nodes)
Cluster VIP Address
10.10.10.3
Access via L2 VIP address managed by vip-manager, bound to primary node
Instance Hostname
pg-test-1
Access via any instance hostname (resolved by dnsmasq @ infra nodes)
Instance IP Address
10.10.10.11
Access any instance’s IP address
Port
Pigsty uses different ports to distinguish pg services
Port
Service
Type
Description
5432
postgres
Database
Direct access to postgres server
6432
pgbouncer
Middleware
Access postgres through connection pool middleware
5433
primary
Service
Access primary pgbouncer (or postgres)
5434
replica
Service
Access replica pgbouncer (or postgres)
5436
default
Service
Access primary postgres
5438
offline
Service
Access offline postgres
Combinations
# Access via cluster domainpostgres://test@pg-test:5432/test # DNS -> L2 VIP -> primary direct connectionpostgres://test@pg-test:6432/test # DNS -> L2 VIP -> primary connection pool -> primarypostgres://test@pg-test:5433/test # DNS -> L2 VIP -> HAProxy -> primary connection pool -> primarypostgres://test@pg-test:5434/test # DNS -> L2 VIP -> HAProxy -> replica connection pool -> replicapostgres://dbuser_dba@pg-test:5436/test # DNS -> L2 VIP -> HAProxy -> primary direct connection (for admin)postgres://dbuser_stats@pg-test:5438/test # DNS -> L2 VIP -> HAProxy -> offline direct connection (for ETL/personal queries)# Access via cluster VIP directlypostgres://[email protected]:5432/test # L2 VIP -> primary direct accesspostgres://[email protected]:6432/test # L2 VIP -> primary connection pool -> primarypostgres://[email protected]:5433/test # L2 VIP -> HAProxy -> primary connection pool -> primarypostgres://[email protected]:5434/test # L2 VIP -> HAProxy -> replica connection pool -> replicapostgres://[email protected]:5436/test # L2 VIP -> HAProxy -> primary direct connection (for admin)postgres://[email protected]::5438/test # L2 VIP -> HAProxy -> offline direct connection (for ETL/personal queries)# Directly specify any cluster instance namepostgres://test@pg-test-1:5432/test # DNS -> database instance direct connection (singleton access)postgres://test@pg-test-1:6432/test # DNS -> connection pool -> databasepostgres://test@pg-test-1:5433/test # DNS -> HAProxy -> connection pool -> database read/writepostgres://test@pg-test-1:5434/test # DNS -> HAProxy -> connection pool -> database read-onlypostgres://dbuser_dba@pg-test-1:5436/test # DNS -> HAProxy -> database direct connectionpostgres://dbuser_stats@pg-test-1:5438/test # DNS -> HAProxy -> database offline read/write# Directly specify any cluster instance IP accesspostgres://[email protected]:5432/test # Database instance direct connection (directly specify instance, no automatic traffic distribution)postgres://[email protected]:6432/test # Connection pool -> databasepostgres://[email protected]:5433/test # HAProxy -> connection pool -> database read/writepostgres://[email protected]:5434/test # HAProxy -> connection pool -> database read-onlypostgres://[email protected]:5436/test # HAProxy -> database direct connectionpostgres://[email protected]:5438/test # HAProxy -> database offline read-write# Smart client: read/write separation via URLpostgres://[email protected]:6432,10.10.10.12:6432,10.10.10.13:6432/test?target_session_attrs=primary
postgres://[email protected]:6432,10.10.10.12:6432,10.10.10.13:6432/test?target_session_attrs=prefer-standby
3.5 - Point-in-Time Recovery
Pigsty uses pgBackRest to implement PostgreSQL point-in-time recovery, allowing users to roll back to any point in time within the backup policy window.
Overview
You can restore and roll back your cluster to any point in the past, avoiding data loss caused by software defects and human errors.
Pigsty’s PostgreSQL clusters come with auto-configured Point-in-Time Recovery (PITR) capability, powered by the backup component pgBackRest and optional object storage repository MinIO.
High availability solutions can address hardware failures but are powerless against data deletion/overwriting/database drops caused by software defects and human errors.
For such situations, Pigsty provides out-of-the-box Point-in-Time Recovery (PITR) capability, enabled by default without additional configuration.
Pigsty provides default configurations for base backups and WAL archiving. You can use local directories and disks, or dedicated MinIO clusters or S3 object storage services to store backups and achieve geo-redundant disaster recovery.
When using local disks, the default capability to recover to any point within the past day is retained. When using MinIO or S3, the default capability to recover to any point within the past week is retained.
As long as storage space permits, you can retain any arbitrarily long recoverable time window, as your budget allows.
What problems does PITR solve?
Enhanced disaster recovery: RPO drops from ∞ to tens of MB, RTO drops from ∞ to hours/minutes.
Ensures data security: Data integrity in C/I/A: avoids data consistency issues caused by accidental deletion.
Ensures data security: Data availability in C/I/A: provides fallback for “permanently unavailable” disaster scenarios
Standalone Configuration Strategy
Event
RTO
RPO
Nothing
Crash
Permanently lost
All lost
Base Backup
Crash
Depends on backup size and bandwidth (hours)
Lose data since last backup (hours to days)
Base Backup + WAL Archive
Crash
Depends on backup size and bandwidth (hours)
Lose unarchived data (tens of MB)
What are the costs of PITR?
Reduces C in data security: Confidentiality, creates additional leak points, requires additional backup protection.
Extra resource consumption: Local storage or network traffic/bandwidth overhead, usually not a concern.
Increased complexity: Users need to pay backup management costs.
Limitations of PITR
If only PITR is used for failure recovery, RTO and RPO metrics are inferior compared to high availability solutions, and typically both should be used together.
RTO: With only standalone + PITR, recovery time depends on backup size and network/disk bandwidth, ranging from tens of minutes to hours or days.
RPO: With only standalone + PITR, some data may be lost during crashes - one or several WAL segment files may not yet be archived, losing 16 MB to tens of MB of data.
Besides PITR, you can also use delayed clusters in Pigsty to address data deletion/modification caused by human errors or software defects.
How It Works
Point-in-time recovery allows you to restore and roll back your cluster to “any point” in the past, avoiding data loss caused by software defects and human errors. To achieve this, two preparations are needed: Base Backup and WAL Archiving.
Having a base backup allows users to restore the database to its state at backup time, while having WAL archives starting from a base backup allows users to restore the database to any point after the base backup time.
Pigsty uses pgBackRest to manage PostgreSQL backups. pgBackRest initializes empty repositories on all cluster instances but only actually uses the repository on the cluster primary.
pgBackRest supports three backup modes: full backup, incremental backup, and differential backup, with the first two being most commonly used.
Full backup takes a complete physical snapshot of the database cluster at the current moment; incremental backup records the differences between the current database cluster and the previous full backup.
Pigsty provides a wrapper command for backups: /pg/bin/pg-backup [full|incr]. You can schedule regular base backups as needed through Crontab or any other task scheduling system.
WAL Archiving
Pigsty enables WAL archiving on the cluster primary by default and uses the pgbackrest command-line tool to continuously push WAL segment files to the backup repository.
pgBackRest automatically manages required WAL files and timely cleans up expired backups and their corresponding WAL archive files based on the backup retention policy.
If you don’t need PITR functionality, you can disable WAL archiving by configuring the cluster: archive_mode: off and remove node_crontab to stop scheduled backup tasks.
Implementation
By default, Pigsty provides two preset backup strategies: The default uses local filesystem backup repository, performing one full backup daily to ensure users can roll back to any point within the past day. The alternative strategy uses dedicated MinIO clusters or S3 storage for backups, with weekly full backups, daily incremental backups, and two weeks of backup and WAL archive retention by default.
Pigsty uses pgBackRest to manage backups, receive WAL archives, and perform PITR. Backup repositories can be flexibly configured (pgbackrest_repo): defaults to primary’s local filesystem (local), but can also use other disk paths, or the included optional MinIO service (minio) and cloud S3 services.
pgbackrest_enabled:true# enable pgBackRest on pgsql host?pgbackrest_clean:true# remove pg backup data during init?pgbackrest_log_dir:/pg/log/pgbackrest# pgbackrest log dir, `/pg/log/pgbackrest` by defaultpgbackrest_method: local # pgbackrest repo method:local, minio, [user-defined...]pgbackrest_repo: # pgbackrest repo:https://pgbackrest.org/configuration.html#section-repositorylocal:# default pgbackrest repo with local posix fspath:/pg/backup # local backup directory, `/pg/backup` by defaultretention_full_type:count # retention full backup by countretention_full:2# keep at most 3 full backup, at least 2, when using local fs repominio:# optional minio repo for pgbackresttype:s3 # minio is s3-compatible, so use s3s3_endpoint:sss.pigsty # minio endpoint domain name, `sss.pigsty` by defaults3_region:us-east-1 # minio region, us-east-1 by default, not used for minios3_bucket:pgsql # minio bucket name, `pgsql` by defaults3_key:pgbackrest # minio user access key for pgbackrests3_key_secret:S3User.Backup # minio user secret key for pgbackrests3_uri_style:path # use path style uri for minio rather than host stylepath:/pgbackrest # minio backup path, `/pgbackrest` by defaultstorage_port:9000# minio port, 9000 by defaultstorage_ca_file:/etc/pki/ca.crt # minio ca file path, `/etc/pki/ca.crt` by defaultbundle:y# bundle small files into a single filecipher_type:aes-256-cbc # enable AES encryption for remote backup repocipher_pass:pgBackRest # AES encryption password, default is 'pgBackRest'retention_full_type:time # retention full backup by time on minio reporetention_full:14# keep full backup for last 14 days# You can also add other optional backup repos, such as S3, for geo-redundant disaster recovery
Pigsty parameter pgbackrest_repo target repositories are converted to repository definitions in the /etc/pgbackrest/pgbackrest.conf configuration file.
For example, if you define a US West S3 repository for storing cold backups, you can use the following reference configuration.
You can directly use the following wrapper commands for PostgreSQL database cluster point-in-time recovery.
Pigsty uses incremental differential parallel recovery by default, allowing you to recover to a specified point in time at maximum speed.
pg-pitr # Restore to the end of WAL archive stream (e.g., for entire datacenter failure)pg-pitr -i # Restore to the most recent backup completion time (rarely used)pg-pitr --time="2022-12-30 14:44:44+08"# Restore to a specified point in time (for database or table drops)pg-pitr --name="my-restore-point"# Restore to a named restore point created with pg_create_restore_pointpg-pitr --lsn="0/7C82CB8" -X # Restore to immediately before the LSNpg-pitr --xid="1234567" -X -P # Restore to immediately before the specified transaction ID, then promote cluster to primarypg-pitr --backup=latest # Restore to the latest backup setpg-pitr --backup=20221108-105325 # Restore to a specific backup set, backup sets can be listed with pgbackrest infopg-pitr # pgbackrest --stanza=pg-meta restorepg-pitr -i # pgbackrest --stanza=pg-meta --type=immediate restorepg-pitr -t "2022-12-30 14:44:44+08"# pgbackrest --stanza=pg-meta --type=time --target="2022-12-30 14:44:44+08" restorepg-pitr -n "my-restore-point"# pgbackrest --stanza=pg-meta --type=name --target=my-restore-point restorepg-pitr -b 20221108-105325F # pgbackrest --stanza=pg-meta --type=name --set=20221230-120101F restorepg-pitr -l "0/7C82CB8" -X # pgbackrest --stanza=pg-meta --type=lsn --target="0/7C82CB8" --target-exclusive restorepg-pitr -x 1234567 -X -P # pgbackrest --stanza=pg-meta --type=xid --target="0/7C82CB8" --target-exclusive --target-action=promote restore
When performing PITR, you can use Pigsty’s monitoring system to observe the cluster LSN position status and determine whether recovery to the specified point in time, transaction point, LSN position, or other point was successful.
3.6 - Monitoring System
How Pigsty’s monitoring system is architected and how monitored targets are automatically managed.
If you only have one minute, remember this diagram:
flowchart TB
subgraph L1["Layer 1: Network Security"]
L1A["Firewall + SSL/TLS Encryption + HAProxy Proxy"]
L1B["Who can connect? Is the connection encrypted?"]
end
subgraph L2["Layer 2: Authentication"]
L2A["HBA Rules + SCRAM-SHA-256 Passwords + Certificate Auth"]
L2B["Who are you? How do you prove it?"]
end
subgraph L3["Layer 3: Access Control"]
L3A["Role System + Object Permissions + Database Isolation"]
L3B["What can you do? What data can you access?"]
end
subgraph L4["Layer 4: Data Security"]
L4A["Data Checksums + Backup Encryption + Audit Logs"]
L4B["Is data intact? Are operations logged?"]
end
L1 --> L2 --> L3 --> L4
Core Value: Enterprise-grade security configuration out of the box, best practices enabled by default, additional configuration achieves SOC 2 compliance.
Important: After production deployment, immediately change these default passwords!
Role and Permission System
Pigsty provides a four-tier role system out of the box:
flowchart TB
subgraph Admin["dbrole_admin (Admin)"]
A1["Inherits dbrole_readwrite"]
A2["Can CREATE/DROP/ALTER objects (DDL)"]
A3["For: Business admins, apps needing table creation"]
end
subgraph RW["dbrole_readwrite (Read-Write)"]
RW1["Inherits dbrole_readonly"]
RW2["Can INSERT/UPDATE/DELETE"]
RW3["For: Production business accounts"]
end
subgraph RO["dbrole_readonly (Read-Only)"]
RO1["Can SELECT all tables"]
RO2["For: Reporting, data analysis"]
end
subgraph Offline["dbrole_offline (Offline)"]
OFF1["Can only access offline instances"]
OFF2["For: ETL, personal analysis, slow queries"]
end
Admin --> |inherits| RW
RW --> |inherits| RO
Creating Business Users
pg_users:# Read-only user - for reporting- name:dbuser_reportpassword:ReportUser123roles:[dbrole_readonly]pgbouncer:true# Read-write user - for production- name:dbuser_apppassword:AppUser456roles:[dbrole_readwrite]pgbouncer:true# Admin user - for DDL operations- name:dbuser_adminpassword:AdminUser789roles:[dbrole_admin]pgbouncer:true
HBA Access Control
HBA (Host-Based Authentication) controls “who can connect from where”:
flowchart LR
subgraph Sources["Connection Sources"]
S1["Local Socket"]
S2["localhost"]
S3["Intranet CIDR"]
S4["Admin Nodes"]
S5["External"]
end
subgraph Auth["Auth Methods"]
A1["ident/peer<br/>OS user mapping, most secure"]
A2["scram-sha-256<br/>Password auth"]
A3["scram-sha-256 + SSL<br/>Enforce SSL"]
end
S1 --> A1
S2 --> A2
S3 --> A2
S4 --> A3
S5 --> A3
Note["Rules matched in order<br/>First matching rule applies"]
Custom HBA Rules
pg_hba_rules:# Allow app servers from intranet- {user: dbuser_app, db: mydb, addr: '10.10.10.0/24', auth:scram-sha-256}# Force SSL for certain users- {user: admin, db: all, addr: world, auth:ssl}# Require certificate auth (highest security)- {user: secure_user, db: all, addr: world, auth:cert}
Encrypted Communication
SSL/TLS Architecture
sequenceDiagram
participant Client as Client
participant Server as PostgreSQL
Client->>Server: 1. ClientHello
Server->>Client: 2. ServerHello
Server->>Client: 3. Server Certificate
Client->>Server: 4. Client Key
Client->>Server: 5. Encrypted Channel Established
Server->>Client: 5. Encrypted Channel Established
rect rgb(200, 255, 200)
Note over Client,Server: Encrypted Data Transfer
Client->>Server: 6. Application Data (encrypted)
Server->>Client: 6. Application Data (encrypted)
end
Note over Client,Server: Prevents eavesdropping, tampering, verifies server identity
Local CA
Pigsty automatically generates a local CA and issues certificates:
/etc/pki/
├── ca.crt # CA certificate (public)
├── ca.key # CA private key (keep secret!)
└── server.crt/key # Server certificate/key
Important: Securely back up ca.key—if lost, all certificates must be reissued!
Pigsty includes a self-signed CA PKI infrastructure for issuing SSL certificates and encrypting network traffic.
Pigsty enables security best practices by default: using SSL to encrypt network traffic and HTTPS for web interfaces.
To achieve this, Pigsty includes a local self-signed CA for issuing SSL certificates and encrypting network communications.
By default, SSL and HTTPS are enabled but not enforced. For environments with higher security requirements, you can enforce SSL and HTTPS usage.
Local CA
During initialization, Pigsty generates a self-signed CA in the Pigsty source directory (~/pigsty) on the ADMIN node. This CA can be used for SSL, HTTPS, digital signatures, issuing database client certificates, and advanced security features.
Each Pigsty deployment uses a unique CA—CAs from different Pigsty deployments are not mutually trusted.
The local CA consists of two files, located in the files/pki/ca directory by default:
ca.crt: Self-signed CA root certificate, distributed to all managed nodes for certificate verification.
ca.key: CA private key for issuing certificates and verifying CA identity—keep this file secure and prevent leakage!
Protect the CA Private Key
Keep the CA private key file safe—don’t lose it or leak it. We recommend encrypting and backing up this file after completing Pigsty installation.
Using an Existing CA
If you already have your own CA PKI infrastructure, Pigsty can be configured to use your existing CA.
Simply place your CA public key and private key files in the files/pki/ca directory:
files/pki/ca/ca.key # Core CA private key file, must exist; if missing, a new one is randomly generatedfiles/pki/ca/ca.crt # If certificate file is missing, Pigsty auto-generates a new root certificate from the CA private key
When Pigsty executes the install.yml or infra.yml playbooks, if a ca.key private key file exists in files/pki/ca, the existing CA will be used. Since ca.crt can be generated from the ca.key private key, Pigsty will automatically regenerate the root certificate file if it’s missing.
Note When Using Existing CA
You can set the ca_method parameter to copy to ensure Pigsty errors out and stops if it can’t find a local CA, rather than auto-generating a new self-signed CA.
Trusting the CA
During Pigsty installation, ca.crt is distributed to all nodes at /etc/pki/ca.crt during the node_ca task in the node.yml playbook.
EL-family and Debian-family operating systems have different default trusted CA certificate paths, so the distribution path and update methods differ:
Pigsty issues HTTPS certificates for domain names used by web systems on infrastructure nodes by default, allowing HTTPS access to Pigsty’s web interfaces.
If you want to avoid “untrusted CA certificate” warnings in client browsers, distribute ca.crt to the trusted certificate directory on client machines.
You can double-click the ca.crt file to add it to your system keychain. For example, on MacOS, open “Keychain Access,” search for pigsty-ca, and set it to “trust” this root certificate.
Viewing Certificate Contents
Use the following command to view the Pigsty CA certificate contents:
openssl x509 -text -in /etc/pki/ca.crt
Local CA Root Certificate Content Example
Certificate:
Data:
Version: 3 (0x2)
Serial Number:
50:29:e3:60:96:93:f4:85:14:fe:44:81:73:b5:e1:09:2a:a8:5c:0a
Signature Algorithm: sha256WithRSAEncryption
Issuer: O=pigsty, OU=ca, CN=pigsty-ca
Validity
Not Before: Feb 7 00:56:27 2023 GMT
Not After : Jan 14 00:56:27 2123 GMT
Subject: O=pigsty, OU=ca, CN=pigsty-ca
Subject Public Key Info:
Public Key Algorithm: rsaEncryption
Public-Key: (4096 bit)
Modulus:
00:c1:41:74:4f:28:c3:3c:2b:13:a2:37:05:87:31:
....
e6:bd:69:a5:5b:e3:b4:c0:65:09:6e:84:14:e9:eb:
90:f7:61
Exponent: 65537 (0x10001)
X509v3 extensions:
X509v3 Subject Alternative Name:
DNS:pigsty-ca
X509v3 Key Usage:
Digital Signature, Certificate Sign, CRL Sign
X509v3 Basic Constraints: critical
CA:TRUE, pathlen:1
X509v3 Subject Key Identifier:
C5:F6:23:CE:BA:F3:96:F6:4B:48:A5:B1:CD:D4:FA:2B:BD:6F:A6:9C
Signature Algorithm: sha256WithRSAEncryption
Signature Value:
89:9d:21:35:59:6b:2c:9b:c7:6d:26:5b:a9:49:80:93:81:18:
....
9e:dd:87:88:0d:c4:29:9e
-----BEGIN CERTIFICATE-----
...
cXyWAYcvfPae3YeIDcQpng==
-----END CERTIFICATE-----
Issuing Certificates
If you want to use client certificate authentication, you can use the local CA and the cert.yml playbook to manually issue PostgreSQL client certificates.
Set the certificate’s CN field to the database username:
Access control is important, but many users struggle to implement it properly. Pigsty provides a streamlined access control model that serves as a security baseline for your cluster.
pg_default_roles:# Global default roles and system users- {name: dbrole_readonly ,login: false ,comment:role for global read-only access }- {name: dbrole_offline ,login: false ,comment:role for restricted read-only access }- {name: dbrole_readwrite ,login: false ,roles: [dbrole_readonly] ,comment:role for global read-write access }- {name: dbrole_admin ,login: false ,roles: [pg_monitor, dbrole_readwrite] ,comment:role for object creation }- {name: postgres ,superuser: true ,comment:system superuser }- {name: replicator ,replication: true ,roles: [pg_monitor, dbrole_readonly] ,comment:system replicator }- {name: dbuser_dba ,superuser: true ,roles: [dbrole_admin] ,pgbouncer: true ,pool_mode: session, pool_connlimit: 16 ,comment:pgsql admin user }- {name: dbuser_monitor ,roles: [pg_monitor] ,pgbouncer: true ,parameters:{log_min_duration_statement: 1000 } ,pool_mode: session ,pool_connlimit: 8 ,comment:pgsql monitor user }
Default Roles
Pigsty has four default roles:
Business Read-Only (dbrole_readonly): Role for global read-only access. Use this if other services need read-only access to this database.
Business Read-Write (dbrole_readwrite): Role for global read-write access. Production accounts for primary business should have database read-write permissions.
Business Admin (dbrole_admin): Role with DDL permissions. Typically used for business administrators or scenarios requiring table creation in applications.
Offline Read-Only (dbrole_offline): Restricted read-only access role (can only access offline instances). Usually for personal users or ETL tool accounts.
Default roles are defined in pg_default_roles. Unless you know what you’re doing, don’t change the default role names.
- {name: dbrole_readonly , login: false , comment:role for global read-only access }- {name: dbrole_offline , login: false , comment:role for restricted read-only access (offline instance) }- {name: dbrole_readwrite , login: false , roles: [dbrole_readonly], comment:role for global read-write access }- {name: dbrole_admin , login: false , roles: [pg_monitor, dbrole_readwrite] , comment:role for object creation }
Default Users
Pigsty also has four default users (system users):
Superuser (postgres): Cluster owner and creator, same name as OS dbsu.
Replication User (replicator): System user for primary-replica replication.
Monitor User (dbuser_monitor): User for monitoring database and connection pool metrics.
Admin User (dbuser_dba): Administrator for daily operations and database changes.
These 4 default users’ username/password are defined by 4 pairs of dedicated parameters and referenced in many places:
pg_dbsu: OS dbsu name, defaults to postgres. Best not to change it.
pg_dbsu_password: dbsu password, default empty means no password. Best not to set it.
Remember to change these passwords in production deployments—don’t use defaults!
pg_dbsu:postgres # Database superuser name, recommended not to changepg_dbsu_password:''# Database superuser password, recommended to leave empty!pg_replication_username:replicator # System replication usernamepg_replication_password:DBUser.Replicator # System replication password, must change!pg_monitor_username:dbuser_monitor # System monitor usernamepg_monitor_password:DBUser.Monitor # System monitor password, must change!pg_admin_username:dbuser_dba # System admin usernamepg_admin_password:DBUser.DBA # System admin password, must change!
Permission System
Pigsty has an out-of-the-box permission model that works with default roles.
All users can access all schemas.
Read-only users (dbrole_readonly) can read from all tables. (SELECT, EXECUTE)
Read-write users (dbrole_readwrite) can write to all tables and run DML. (INSERT, UPDATE, DELETE)
Admin users (dbrole_admin) can create objects and run DDL. (CREATE, USAGE, TRUNCATE, REFERENCES, TRIGGER)
Offline users (dbrole_offline) are similar to read-only but with restricted access—only offline instances (pg_role = 'offline' or pg_offline_query = true)
Objects created by admin users will have correct permissions.
Default privileges are configured on all databases, including template databases.
Database connection permissions are managed by database definition.
CREATE privilege on databases and public schema is revoked from PUBLIC by default.
Object Privileges
Default privileges for newly created objects are controlled by pg_default_privileges:
- GRANT USAGE ON SCHEMAS TO dbrole_readonly- GRANT SELECT ON TABLES TO dbrole_readonly- GRANT SELECT ON SEQUENCES TO dbrole_readonly- GRANT EXECUTE ON FUNCTIONS TO dbrole_readonly- GRANT USAGE ON SCHEMAS TO dbrole_offline- GRANT SELECT ON TABLES TO dbrole_offline- GRANT SELECT ON SEQUENCES TO dbrole_offline- GRANT EXECUTE ON FUNCTIONS TO dbrole_offline- GRANT INSERT ON TABLES TO dbrole_readwrite- GRANT UPDATE ON TABLES TO dbrole_readwrite- GRANT DELETE ON TABLES TO dbrole_readwrite- GRANT USAGE ON SEQUENCES TO dbrole_readwrite- GRANT UPDATE ON SEQUENCES TO dbrole_readwrite- GRANT TRUNCATE ON TABLES TO dbrole_admin- GRANT REFERENCES ON TABLES TO dbrole_admin- GRANT TRIGGER ON TABLES TO dbrole_admin- GRANT CREATE ON SCHEMAS TO dbrole_admin
Objects newly created by admins will have the above privileges by default. Use \ddp+ to view these default privileges:
Type
Access Privileges
Function
=X
dbrole_readonly=X
dbrole_offline=X
dbrole_admin=X
Schema
dbrole_readonly=U
dbrole_offline=U
dbrole_admin=UC
Sequence
dbrole_readonly=r
dbrole_offline=r
dbrole_readwrite=wU
dbrole_admin=rwU
Table
dbrole_readonly=r
dbrole_offline=r
dbrole_readwrite=awd
dbrole_admin=arwdDxt
Default Privileges
The SQL statement ALTER DEFAULT PRIVILEGES lets you set privileges for future objects. It doesn’t affect existing objects or objects created by non-admin users.
In Pigsty, default privileges are defined for three roles:
{%forprivinpg_default_privileges%}ALTERDEFAULTPRIVILEGESFORROLE{{pg_dbsu}}{{priv}};{%endfor%}{%forprivinpg_default_privileges%}ALTERDEFAULTPRIVILEGESFORROLE{{pg_admin_username}}{{priv}};{%endfor%}-- For other business admins, they should SET ROLE dbrole_admin before executing DDL
{%forprivinpg_default_privileges%}ALTERDEFAULTPRIVILEGESFORROLE"dbrole_admin"{{priv}};{%endfor%}
To maintain correct object permissions, you must execute DDL with admin users:
Business admin users granted dbrole_admin role (using SET ROLE to switch to dbrole_admin)
Using postgres as global object owner is wise. If creating objects as business admin, use SET ROLE dbrole_admin before creation to maintain correct permissions.
If you intend to learn about Pigsty, you can start with the Quick Start single-node deployment. A Linux virtual machine with 1C/2G is sufficient to run Pigsty.
You can use a Linux MiniPC, free/discounted virtual machines provided by cloud providers, Windows WSL, or create a virtual machine on your own laptop for Pigsty deployment.
Pigsty provides out-of-the-box Vagrant templates and Terraform templates to help you provision Linux VMs with one click locally or in the cloud.
The single-node version of Pigsty includes all core features: 440+PG extensions, self-contained Grafana/Victoria monitoring, IaC provisioning capabilities,
and local PITR point-in-time recovery. If you have external object storage (for PostgreSQL PITR backup), then for scenarios like demos, personal websites, and small services,
even a single-node environment can provide a certain degree of data persistence guarantee.
However, single-node cannot achieve High Availability—automatic failover requires at least 3 nodes.
If you want to install Pigsty in an environment without internet connection, please refer to the Offline Install mode.
If you only need the PostgreSQL database itself, please refer to the Slim Install mode.
If you are ready to start serious multi-node production deployment, please refer to the Deployment Guide.
This command runs the install script, downloads and extracts Pigsty source to your home directory and installs dependencies. Then complete Configure and Deploy:
cd ~/pigsty # Enter Pigsty directory./configure -g # Generate config file (optional, skip if you know how to configure)./deploy.yml # Execute deployment playbook based on generated config
After installation, access the Web UI via IP/domain + port 80/443 through Nginx,
and access the default PostgreSQL service via port 5432.
The complete process takes 3–10 minutes depending on server specs/network. Offline installation speeds this up significantly; for monitoring-free setups, use Slim Install for even faster deployment.
Video Example: Online Single-Node Installation (Debian 13, x86_64)
Prepare
Installing Pigsty involves some preparation work. Here’s a checklist.
For single-node installations, many constraints can be relaxed—typically you only need to know your IP address. If you don’t have a static IP, use 127.0.0.1.
Typically, you only need to focus on your local IP address—as an exception, for single-node deployment, use 127.0.0.1 if no static IP available.
Install
Use the following commands to auto-install Pigsty source to ~/pigsty (recommended). Deployment dependencies (Ansible) are installed automatically.
curl -fsSL https://repo.pigsty.io/get | bash # Install latest stable versioncurl -fsSL https://repo.pigsty.io/get | bash -s v4.0.0 # Install specific version
curl -fsSL https://repo.pigsty.cc/get | bash # Install latest stable versioncurl -fsSL https://repo.pigsty.cc/get | bash -s v4.0.0 # Install specific version
If you prefer not to run a remote script, you can manually download or clone the source. When using git, always checkout a specific version before use.
git clone https://github.com/pgsty/pigsty;cd pigsty;git checkout v4.0.0-b4;# Always checkout a specific version when using git
For manual download/clone installations, run the bootstrap script to install Ansible and other dependencies. You can also install them yourself.
./bootstrap # Install ansible for subsequent deployment
Configure
In Pigsty, deployment blueprints are defined by the inventory, the pigsty.yml configuration file. You can customize through declarative configuration.
Pigsty provides the configure script as an optional configuration wizard,
which generates an inventory with good defaults based on your environment and input:
./configure -g # Use config wizard to generate config with random passwords
The generated config file is at ~/pigsty/pigsty.yml by default. Review and customize as needed before installation.
Many configuration templates are available for reference. You can skip the wizard and directly edit pigsty.yml:
./configure # Default template, install PG 18 with essential extensions./configure -v 17# Use PG 17 instead of default PG 18./configure -c rich # Create local repo, download all extensions, install major ones./configure -c slim # Minimal install template, use with ./slim.yml playbook./configure -c app/supa # Use app/supa self-hosted Supabase template./configure -c ivory # Use IvorySQL kernel instead of native PG./configure -i 10.11.12.13 # Explicitly specify primary IP address./configure -r china # Use China mirrors instead of default repos./configure -c ha/full -s # Use 4-node sandbox template, skip IP replacement/detection
Example configure output
$ ./configure
configure pigsty v4.0.0 begin
[ OK ]region= default
[ OK ]kernel= Linux
[ OK ]machine= x86_64
[ OK ]package= rpm,dnf
[ OK ]vendor= rocky (Rocky Linux)[ OK ]version=9(9.6)[ OK ]sudo= vagrant ok
[ OK ]ssh=[email protected] ok
[WARN] Multiple IP address candidates found:
(1) 192.168.121.24 inet 192.168.121.24/24 brd 192.168.121.255 scope global dynamic noprefixroute eth0
(2) 10.10.10.12 inet 10.10.10.12/24 brd 10.10.10.255 scope global noprefixroute eth1
[ IN ] INPUT primary_ip address (of current meta node, e.g 10.10.10.10):
=> 10.10.10.12 # <------- INPUT YOUR PRIMARY IPV4 ADDRESS HERE![ OK ]primary_ip= 10.10.10.12 (from input)[ OK ]admin=[email protected] ok
[ OK ]mode= meta (el9)[ OK ]locale= C.UTF-8
[ OK ] configure pigsty doneproceed with ./deploy.yml
Common configure arguments:
Argument
Description
-i|--ip
Primary internal IP of current host, replaces placeholder 10.10.10.10
If your machine has multiple IPs bound, use -i|--ip <ipaddr> to explicitly specify the primary IP, or provide it in the interactive prompt.
The script replaces the placeholder 10.10.10.10 with your node’s primary IPv4 address. Choose a static IP; do not use public IPs.
Change default passwords!
We strongly recommend modifying default passwords and credentials in the config file before installation. See Security Recommendations for details.
When you see pgsql init done, PLAY RECAP and similar output at the end, installation is complete!
Upstream repo changes may cause online installation failures!
Upstream repos used by Pigsty (like Linux/PGDG repos) can sometimes enter a broken state due to improper updates, causing deployment failures (this has happened multiple times)!
You can wait for upstream fixes or use pre-made offline packages to solve this.
Avoid re-running the deployment playbook!
Warning: Running deploy.yml again on an existing deployment may restart services and overwrite configurations!
Interface
After single-node installation, you typically have four modules installed on the current node:
PGSQL, INFRA, NODE, and ETCD.
Explore Pigsty’s Web graphical management interface, Grafana dashboards, and how to access them via domain names and HTTPS.
After single-node installation, you’ll have the INFRA module installed on the current node, which includes an out-of-the-box Nginx web server.
The default server configuration provides a WebUI graphical interface for displaying monitoring dashboards and unified proxy access to other component web interfaces.
Access
You can access this graphical interface by entering the deployment node’s IP address in your browser. By default, Nginx serves on standard ports 80/443.
If your service is exposed to Internet or office network, we recommend accessing via domain names and enabling HTTPS encryption—only minimal configuration is needed.
Endpoints
By default, Nginx exposes the following endpoints via different paths on the default server at ports 80/443:
If you have your own domain name, you can point it to Pigsty server’s IP address to access various services via domain.
If you want to enable HTTPS, you should modify the home server configuration in the infra_portal parameter:
all:vars:infra_portal:home :{domain:i.pigsty }# Replace i.pigsty with your domain
all:vars:infra_portal:# domain specifies the domain name # certbot parameter specifies certificate namehome :{domain: demo.pigsty.io ,certbot:mycert }
You can run make cert command after deployment to apply for a free Let’s Encrypt certificate for the domain.
If you don’t define the certbot field, Pigsty will use the local CA to issue a self-signed HTTPS certificate by default.
In this case, you must first trust Pigsty’s self-signed CA to access normally in your browser.
You can also mount local directories and other upstream services to Nginx. For more management details, refer to INFRA Management - Nginx.
4.3 - Getting Started with PostgreSQL
Get started with PostgreSQL—connect using CLI and graphical clients
PostgreSQL (abbreviated as PG) is the world’s most advanced and popular open-source relational database. Use it to store and retrieve multi-modal data.
This guide is for developers with basic Linux CLI experience but not very familiar with PostgreSQL, helping you quickly get started with PG in Pigsty.
We assume you’re a personal user deploying in the default single-node mode. For prod multi-node HA cluster access, refer to Prod Service Access.
Basics
In the default single-node installation template, you’ll create a PostgreSQL database cluster named pg-meta on the current node, with only one primary instance.
PostgreSQL listens on port 5432, and the cluster has a preset database meta available for use.
After installation, exit the current admin user ssh session and re-login to refresh environment variables.
Then simply type p and press Enter to access the database cluster via the psql CLI tool:
vagrant@pg-meta-1:~$ p
psql (18.1 (Ubuntu 18.1-1.pgdg24.04+2))Type "help"for help.
postgres=#
You can also switch to the postgres OS user and execute psql directly to connect to the default postgres admin database.
Connecting to Database
To access a PostgreSQL database, use a CLI tool or graphical client and fill in the PostgreSQL connection string:
postgres://username:password@host:port/dbname
Some drivers and tools may require you to fill in these parameters separately. The following five are typically required:
Parameter
Description
Example Value
Notes
host
Database server address
10.10.10.10
Replace with your node IP or domain; can omit for localhost
port
Port number
5432
PG default port, can be omitted
username
Username
dbuser_dba
Pigsty default database admin
password
Password
DBUser.DBA
Pigsty default admin password (change this!)
dbname
Database name
meta
Default template database name
For personal use, you can directly use the Pigsty default database superuser dbuser_dba for connection and management. The dbuser_dba has full database privileges.
By default, if you specified the configure -g parameter when configuring Pigsty, the password will be randomly generated and saved in ~/pigsty/pigsty.yml:
cat ~/pigsty/pigsty.yml | grep pg_admin_password
Default Accounts
Pigsty’s default single-node template presets the following database users, ready to use out of the box:
Username
Password
Role
Purpose
dbuser_dba
DBUser.DBA
Superuser
Database admin (change this!)
dbuser_meta
DBUser.Meta
Business admin
App R/W (change this!)
dbuser_view
DBUser.Viewer
Read-only user
Data viewing (change this!)
For example, you can connect to the meta database in the pg-meta cluster using three different connection strings with three different users:
Note: These default passwords are automatically replaced with random strong passwords when using configure -g. Remember to replace the IP address and password with actual values.
Using CLI Tools
psql is the official PostgreSQL CLI client tool, powerful and the first choice for DBAs and developers.
On a server with Pigsty deployed, you can directly use psql to connect to the local database:
# Simplest way: use postgres system user for local connection (no password needed)sudo -u postgres psql
# Use connection string (recommended, most universal)psql 'postgres://dbuser_dba:[email protected]:5432/meta'# Use parameter formpsql -h 10.10.10.10 -p 5432 -U dbuser_dba -d meta
# Use env vars to avoid password appearing in command lineexportPGPASSWORD='DBUser.DBA'psql -h 10.10.10.10 -p 5432 -U dbuser_dba -d meta
After successful connection, you’ll see a prompt like this:
psql (18.1)Type "help"for help.
meta=#
Common psql Commands
After entering psql, you can execute SQL statements or use meta-commands starting with \:
Command
Description
Command
Description
Ctrl+C
Interrupt query
Ctrl+D
Exit psql
\?
Show all meta commands
\h
Show SQL command help
\l
List all databases
\c dbname
Switch to database
\d table
View table structure
\d+ table
View table details
\du
List all users/roles
\dx
List installed extensions
\dn
List all schemas
\dt
List all tables
Executing SQL
In psql, directly enter SQL statements ending with semicolon ;:
-- Check PostgreSQL version
SELECTversion();-- Check current time
SELECTnow();-- Create a test table
CREATETABLEtest(idSERIALPRIMARYKEY,nameTEXT,created_atTIMESTAMPTZDEFAULTnow());-- Insert data
INSERTINTOtest(name)VALUES('hello'),('world');-- Query data
SELECT*FROMtest;-- Drop test table
DROPTABLEtest;
Using Graphical Clients
If you prefer graphical interfaces, here are some popular PostgreSQL clients:
Grafana
Pigsty’s INFRA module includes Grafana with a pre-configured PostgreSQL data source (Meta).
You can directly query the database using SQL from the Grafana Explore panel through the browser graphical interface, no additional client tools needed.
Grafana’s default username is admin, and the password can be found in the grafana_admin_password field in the inventory (default pigsty).
DataGrip
DataGrip is a professional database IDE from JetBrains, with powerful features.
IntelliJ IDEA’s built-in Database Console can also connect to PostgreSQL in a similar way.
DBeaver
DBeaver is a free open-source universal database tool supporting almost all major databases. It’s a cross-platform desktop client.
pgAdmin
pgAdmin is the official PostgreSQL-specific GUI tool from PGDG, available through browser or as a desktop client.
Pigsty provides a configuration template for one-click pgAdmin service deployment using Docker in Software Template: pgAdmin.
Viewing Monitoring Dashboards
Pigsty provides many PostgreSQL monitoring dashboards, covering everything from cluster overview to single-table analysis.
We recommend starting with PGSQL Overview. Many elements in the dashboards are clickable, allowing you to drill down layer by layer to view details of each cluster, instance, database, and even internal database objects like tables, indexes, and functions.
Trying Extensions
One of PostgreSQL’s most powerful features is its extension ecosystem. Extensions can add new data types, functions, index methods, and more to the database.
Pigsty provides an unparalleled 440+ extensions in the PG ecosystem, covering 16 major categories including time-series, geographic, vector, and full-text search—install with one click.
Start with three powerful and commonly used extensions that are automatically installed in Pigsty’s default template. You can also install more extensions as needed.
postgis: Geographic information system for processing maps and location data
pgvector: Vector database supporting AI embedding vector similarity search
timescaledb: Time-series database for efficient storage and querying of time-series data
\dx-- psql meta command, list installed extensions
TABLEpg_available_extensions;-- Query installed, available extensions
CREATEEXTENSIONpostgis;-- Enable postgis extension
Next Steps
Congratulations on completing the PostgreSQL basics! Next, you can start configuring and customizing your database.
4.4 - Customize Pigsty with Configuration
Express your infra and clusters with declarative config files
Besides using the configuration wizard to auto-generate configs, you can write Pigsty config files from scratch.
This tutorial guides you through building a complex inventory step by step.
If you define everything in the inventory upfront, a single deploy.yml playbook run completes all deployment—but it hides the details.
This doc breaks down all modules and playbooks, showing how to incrementally build from a simple config to a complete deployment.
Minimal Configuration
The simplest valid config only defines the admin_ip variable—the IP address of the node where Pigsty is installed (admin node):
all:{vars:{admin_ip:10.10.10.10}}
# Set region: china to use mirrorsall:{vars:{admin_ip: 10.10.10.10, region:china } }
This config deploys nothing, but running ./deploy.yml generates a self-signed CA in files/pki/ca for issuing certificates.
For convenience, you can also set region to specify which region’s software mirrors to use (default, china, europe).
Add Nodes
Pigsty’s NODE module manages cluster nodes. Any IP address in the inventory will be managed by Pigsty with the NODE module installed.
all:# Remember to replace 10.10.10.10 with your actual IPchildren:{nodes:{hosts:{10.10.10.10:{}}}}vars:admin_ip:10.10.10.10# Current node IPregion:default # Default reposnode_repo_modules:node,pgsql,infra # Add node, pgsql, infra repos
all:# Remember to replace 10.10.10.10 with your actual IPchildren:{nodes:{hosts:{10.10.10.10:{}}}}vars:admin_ip:10.10.10.10# Current node IPregion:china # Use mirrorsnode_repo_modules:node,pgsql,infra # Add node, pgsql, infra repos
These parameters enable the node to use correct repositories and install required packages.
The NODE module offers many customization options: node names, DNS, repos, packages, NTP, kernel params, tuning templates, monitoring, log collection, etc.
Even without changes, the defaults are sufficient.
Run deploy.yml or more precisely node.yml to bring the defined node under Pigsty management.
A full-featured RDS cloud database service needs infrastructure support: monitoring (metrics/log collection, alerting, visualization), NTP, DNS, and other foundational services.
Define a special group infra to deploy the INFRA module:
all:# Simply changed group name from nodes -> infra and added infra_seqchildren:{infra:{hosts:{10.10.10.10:{infra_seq:1}}}}vars:admin_ip:10.10.10.10region:defaultnode_repo_modules:node,pgsql,infra
all:# Simply changed group name from nodes -> infra and added infra_seqchildren:{infra:{hosts:{10.10.10.10:{infra_seq:1}}}}vars:admin_ip:10.10.10.10region:chinanode_repo_modules:node,pgsql,infra
./infra.yml # Install INFRA module on infra group (includes NODE module)
NODE module is implicitly defined as long as an IP exists. NODE is idempotent—re-running has no side effects.
After completion, you’ll have complete observability infrastructure and node monitoring, but PostgreSQL database service is not yet deployed.
If your goal is just to set up this monitoring system (Grafana + Victoria), you’re done! The infra template is designed for this.
Everything in Pigsty is modular: you can deploy only monitoring infra without databases;
or vice versa—run HA PostgreSQL clusters without infra—Slim Install.
In Pigsty, you can customize PostgreSQL cluster internals like databases and users through the inventory:
all:children:# Other groups and variables hidden for brevitypg-meta:hosts:{10.10.10.10:{pg_seq: 1, pg_role:primary } }vars:pg_cluster:pg-metapg_users:# Define database users- {name: dbuser_meta ,password: DBUser.Meta ,pgbouncer: true ,roles: [dbrole_admin] ,comment:admin user }pg_databases:# Define business databases- {name: meta ,baseline: cmdb.sql ,comment: pigsty meta database ,schemas: [pigsty] ,extensions:[vector] }
pg_users: Defines a new user dbuser_meta with password DBUser.Meta
pg_databases: Defines a new database meta with Pigsty CMDB schema (optional) and vector extension
Pigsty offers rich customization parameters covering all aspects of databases and users.
If you define these parameters upfront, they’re automatically created during ./pgsql.yml execution.
For existing clusters, you can incrementally create or modify users and databases:
bin/pgsql-user pg-meta dbuser_meta # Ensure user dbuser_meta exists in pg-metabin/pgsql-db pg-meta meta # Ensure database meta exists in pg-meta
Use pre-made application templates to launch common software tools with one click, such as the GUI tool for PG management: Pgadmin:
./app.yml -l infra -e app=pgadmin
You can even self-host enterprise-gradeSupabase with Pigsty, using external HA PostgreSQL clusters as the foundation and running stateless components in containers.
4.5 - Run Playbooks with Ansible
Use Ansible playbooks to deploy and manage Pigsty clusters
Pigsty uses Ansible to manage clusters, a very popular large-scale/batch/automation ops tool in the SRE community.
Ansible can use declarative approach for server configuration management. All module deployments are implemented through a series of idempotent Ansible playbooks.
For example, in single-node deployment, you’ll use the deploy.yml playbook. Pigsty has more built-in playbooks, you can choose to use as needed.
Understanding Ansible basics helps with better use of Pigsty, but this is not required, especially for single-node deployment.
Deploy Playbook
Pigsty provides a “one-stop” deploy playbook deploy.yml, installing all modules on the current env in one go (if defined in config):
Playbook
Command
Group
infra
[nodes]
etcd
minio
[pgsql]
infra.yml
./infra.yml
-l infra
✓
✓
node.yml
./node.yml
✓
✓
✓
✓
etcd.yml
./etcd.yml
-l etcd
✓
minio.yml
./minio.yml
-l minio
✓
pgsql.yml
./pgsql.yml
✓
This is the simplest deployment method. You can also follow instructions in Customization Guide to incrementally complete deployment of all modules and nodes step by step.
Install Ansible
When using the Pigsty installation script, or the bootstrap phase of offline installation, Pigsty will automatically install ansible and its dependencies for you.
If you want to manually install Ansible, refer to the following instructions. The minimum supported Ansible version is 2.9.
sudo apt install -y ansible python3-jmespath
sudo dnf install -y ansible python-jmespath # EL 10sudo dnf install -y ansible python3.12-jmespath # EL 9/8
brew install ansible
pip3 install jmespath
Change default passwords!
Please note that EL10 EPEL repo doesn’t yet provide a complete Ansible package. Pigsty PGSQL EL10 repo supplements this.
Ansible is also available on macOS. You can use Homebrew to install Ansible on Mac,
and use it as an admin node to manage remote cloud servers. This is convenient for single-node Pigsty deployment on cloud VPS, but not recommended in prod envs.
Execute Playbook
Ansible playbooks are executable YAML files containing a series of task definitions to execute.
Running playbooks requires the ansible-playbook executable in your environment variable PATH.
Running ./node.yml playbook is essentially executing the ansible-playbook node.yml command.
You can use some parameters to fine-tune playbook execution. The following 4 parameters are essential for effective Ansible use:
./node.yml # Run node playbook on all hosts./pgsql.yml -l pg-test # Run pgsql playbook on pg-test cluster./infra.yml -t repo_build # Run infra.yml subtask repo_build./pgsql-rm.yml -e pg_rm_pkg=false# Remove pgsql, but keep packages (don't uninstall software)./infra.yml -i conf/mynginx.yml # Use another location's config file
Limit Hosts
Playbook execution targets can be limited with -l|--limit <selector>.
This is convenient when running playbooks on specific hosts/nodes or groups/clusters.
Here are some host limit examples:
./pgsql.yml # Run on all hosts (dangerous!)./pgsql.yml -l pg-test # Run on pg-test cluster./pgsql.yml -l 10.10.10.10 # Run on single host 10.10.10.10./pgsql.yml -l pg-* # Run on hosts/groups matching glob `pg-*`./pgsql.yml -l '10.10.10.11,&pg-test'# Run on 10.10.10.11 in pg-test group./pgsql-rm.yml -l 'pg-test,!10.10.10.11'# Run on pg-test, except 10.10.10.11
To run multiple tasks, specify multiple tags separated by commas -t tag1,tag2:
./node.yml -t node_repo,node_pkg # Add repos, then install packages./pgsql.yml -t pg_hba,pg_reload # Configure, then reload pg hba rules
Extra Vars
You can override config parameters at runtime using CLI arguments, which have highest priority.
Extra command-line parameters are passed via -e|--extra-vars KEY=VALUE, usable multiple times:
# Create admin using another admin user./node.yml -e ansible_user=admin -k -K -t node_admin
# Initialize a specific Redis instance: 10.10.10.11:6379./redis.yml -l 10.10.10.10 -e redis_port=6379 -t redis
# Remove PostgreSQL but keep packages and data./pgsql-rm.yml -e pg_rm_pkg=false -e pg_rm_data=false
For complex parameters, use JSON strings to pass multiple complex parameters at once:
# Add repo and install packages./node.yml -t node_install -e '{"node_repo_modules":"infra","node_packages":["duckdb"]}'
Specify Inventory
The default config file is pigsty.yml in the Pigsty home directory.
You can use -i <path> to specify a different inventory file path.
./pgsql.yml -i conf/rich.yml # Initialize single node with all extensions per rich config./pgsql.yml -i conf/ha/full.yml # Initialize 4-node cluster per full config./pgsql.yml -i conf/app/supa.yml # Initialize 1-node Supabase deployment per supa.yml
Changing the default inventory file
To permanently change the default config file, modify the inventory parameter in ansible.cfg.
Convenience Scripts
Pigsty provides a series of convenience scripts to simplify common operations. These scripts are in the bin/ directory:
These scripts are simple wrappers around Ansible playbooks, making common operations more convenient.
Playbook List
Below are the built-in playbooks in Pigsty. You can also easily add your own playbooks, or customize and modify playbook implementation logic as needed.
Install Pigsty in air-gapped env using offline packages
Pigsty installs from Internet upstream by default, but some envs are isolated from the Internet.
To address this, Pigsty supports offline installation using offline packages.
Think of them as Linux-native Docker images.
Overview
Offline packages bundle all required RPM/DEB packages and dependencies; they are snapshots of the local APT/YUM repo after a normal installation.
In serious prod deployments, we strongly recommend using offline packages.
They ensure all future nodes have consistent software versions with the existing env,
and avoid online installation failures caused by upstream changes (quite common!),
guaranteeing you can run it independently forever.
Advantages of offline packages
Easy delivery in Internet-isolated envs.
Pre-download all packages in one pass to speed up installation.
No need to worry about upstream dependency breakage causing install failures.
If you have multiple nodes, all packages only need to be downloaded once, saving bandwidth.
Use local repo to ensure all nodes have consistent software versions for unified version management.
Disadvantages of offline packages
Offline packages are made for specific OS minor versions, typically cannot be used across versions.
It’s a snapshot at the time of creation, may not include the latest updates and OS security patches.
Offline packages are typically about 1GB, while online installation downloads on-demand, saving space.
Offline Packages
We typically release offline packages for the following Linux distros, using the latest OS minor version.
If you use an OS from the list above (exact minor version match), we recommend using offline packages.
Pigsty provides ready-to-use pre-made offline packages for these systems, freely downloadable from GitHub.
Offline packages are made for specific Linux OS minor versions
When OS minor versions don’t match, it may work or may fail—we don’t recommend taking the risk.
Please note that Pigsty’s EL9/EL10 packages are built on 9.6/10.0 and currently cannot be used for 9.7/10.1 minor versions (due to OpenSSL version changes).
You need to perform an online installation on a matching OS version and create your own offline package, or contact us for custom offline packages.
Using Offline Packages
Offline installation steps:
Download Pigsty offline package, place it at /tmp/pkg.tgz
Download Pigsty source package, extract and enter directory (assume extracted to home: cd ~/pigsty)
./bootstrap, it will extract the package and configure using local repo (and install ansible from it offline)
./configure -g -c rich, you can directly use the rich template configured for offline installation, or configure yourself
Run ./deploy.yml as usual—it will install everything from the local repo
If you want to use the already extracted and configured offline package in your own config, modify and ensure these settings:
repo_enabled: Set to true, will build local software repo (explicitly disabled in most templates)
node_repo_modules: Set to local, then all nodes in the env will install from the local software repo
In most templates, this is explicitly set to: node,infra,pgsql, i.e., install directly from these upstream repos.
Setting it to local will use the local software repo to install all packages, fastest, no interference from other repos.
If you want to use both local and upstream repos, you can add other repo module names too, e.g., local,node,infra,pgsql
The first parameter, if enabled, Pigsty will create a local software repo. The second parameter, if contains local, then all nodes in the env will use this local software repo.
If it only contains local, then it becomes the sole repo for all nodes. If you still want to install other packages from other upstream repos, you can add other repo module names too, e.g., local,node,infra,pgsql.
Hybrid Installation Mode
If your env has Internet access, there’s a hybrid approach combining advantages of offline and online installation.
You can use the offline package as a base, and supplement missing packages online.
For example, if you’re using RockyLinux 9.5 but the official offline package is for RockyLinux 9.6.
You can use the el9 offline package (though made for 9.6), then execute make repo-build before formal installation to re-download missing packages for 9.5.
Pigsty will download the required increments from upstream repos.
Making Offline Packages
If your OS isn’t in the default list, you can make your own offline package with the built-in cache.yml playbook:
Find a node running the exact same OS version with Internet access
cd ~/pigsty; ./cache.yml: make and fetch the offline package to ~/pigsty/dist/${version}/
Copy the offline package to the env without Internet access (ftp, scp, usb, etc.), extract and use via bootstrap
We offer paid services providing tested, pre-made offline packages for specific Linux major.minor versions (¥200).
Bootstrap
Pigsty relies on ansible to execute playbooks; this script is responsible for ensuring ansible is correctly installed in various ways.
./bootstrap # Ensure ansible is correctly installed (if offline package exists, use offline installation and extract first)
Usually, you need to run this script in two cases:
You didn’t install Pigsty via the installation script, but by downloading or git clone of the source package, so ansible isn’t installed.
You’re preparing to install Pigsty via offline packages and need to use this script to install ansible from the offline package.
The bootstrap script will automatically detect if the offline package exists (-p to specify, default is /tmp/pkg.tgz).
If it exists, it will extract and use it, then install ansible from it.
If the offline package doesn’t exist, it will try to install ansible from the Internet. If that still fails, you’re on your own!
Where are my yum/apt repo files?
The bootloader will by default move away existing repo configurations to ensure only required repos are enabled.
You can find them in /etc/yum.repos.d/backup (EL) or /etc/apt/backup (Debian / Ubuntu).
If you want to keep existing repo configurations during bootstrap, use the -k|--keep parameter.
./bootstrap -k # or --keep
4.7 - Slim Installation
Install only HA PostgreSQL clusters with minimal dependencies
If you only want HA PostgreSQL database cluster itself without monitoring, infra, etc., consider Slim Installation.
Slim installation has no INFRA module, no monitoring, no local repo—just ETCD and PGSQL and partial NODE functionality.
Slim installation is suitable for:
Only needing PostgreSQL database itself, no observability infra required.
Extremely resource-constrained envs unwilling to bear infra overhead (~0.2 vCPU / 500MB on single node).
Already having external monitoring system, wanting to use your own unified monitoring framework.
Not wanting to introduce the AGPLv3-licensed Grafana visualization dashboard component.
Limitations of slim installation:
No INFRA module, cannot use WebUI and local software repo features.
Offline Install is limited to single-node mode; multi-node slim install can only be done online.
Overview
To use slim installation, you need to:
Use the slim.yml slim install config template (configure -c slim)
Run the slim.yml playbook instead of the default deploy.yml
Three security hardening tips for single-node quick-start deployment
For Demo/Dev single-node deployments, Pigsty’s default config is secure enough as long as you change default passwords.
If your deployment is exposed to Internet or office network, consider adding firewall rules to restrict port access and source IPs for enhanced security.
Additionally, we recommend protecting Pigsty’s critical files (config files and CA private key) from unauthorized access and backing them up regularly.
For enterprise prod envs with strict security requirements, refer to the Deployment - Security Hardening documentation for advanced configuration.
Passwords
Pigsty is an open-source project with well-known default passwords. If your deployment is exposed to Internet or office network, you must change all default passwords!
To avoid manually modifying passwords, Pigsty’s configuration wizard provides automatic random strong password generation using the -g argument with configure.
$ ./configure -g
configure pigsty v4.0.0 begin
[ OK ]region= china
[WARN]kernel= Darwin, can be used as admin node only
[ OK ]machine= arm64
[ OK ]package= brew (macOS)[WARN]primary_ip= default placeholder 10.10.10.10 (macOS)[ OK ]mode= meta (unknown distro)[ OK ]locale= C.UTF-8
[ OK ] generating random passwords...
grafana_admin_password : CdG0bDcfm3HFT9H2cvFuv9w7
pg_admin_password : 86WqSGdokjol7WAU9fUxY8IG
pg_monitor_password : 0X7PtgMmLxuCd2FveaaqBuX9
pg_replication_password : 4iAjjXgEY32hbRGVUMeFH460
patroni_password : DsD38QLTSq36xejzEbKwEqBK
haproxy_admin_password : uhdWhepXrQBrFeAhK9sCSUDo
minio_secret_key : z6zrYUN1SbdApQTmfRZlyWMT
etcd_root_password : Bmny8op1li1wKlzcaAmvPiWc
DBUser.Meta : U5v3CmeXICcMdhMNzP9JN3KY
DBUser.Viewer : 9cGQF1QMNCtV3KlDn44AEzpw
S3User.Backup : 2gjgSCFYNmDs5tOAiviCqM2X
S3User.Meta : XfqkAKY6lBtuDMJ2GZezA15T
S3User.Data : OygorcpCbV7DpDmqKe3G6UOj
[ OK ] random passwords generated, check and save them
[ OK ]ansible= ready
[ OK ] pigsty configured
[WARN] don't forget to check it and change passwords!
proceed with ./deploy.yml
Firewall
For deployments exposed to Internet or office networks, we strongly recommend configuring firewall rules to limit access IP ranges and ports.
You can use your cloud provider’s security group features, or Linux distribution firewall services (like firewalld, ufw, iptables, etc.) to implement this.
Direction
Protocol
Port
Service
Description
Inbound
TCP
22
SSH
Allow SSH login access
Inbound
TCP
80
Nginx
Allow Nginx HTTP access
Inbound
TCP
443
Nginx
Allow Nginx HTTPS access
Inbound
TCP
5432
PostgreSQL
Remote database access, enable as needed
Pigsty supports configuring firewall rules to allow 22/80/443/5432 from external networks, but this is not enabled by default.
Files
In Pigsty, you need to protect the following files:
pigsty.yml: Pigsty main config file, contains access information and passwords for all nodes
files/pki/ca/ca.key: Pigsty self-signed CA private key, used to issue all SSL certificates in the deployment (auto-generated during deployment)
We recommend strictly controlling access permissions for these two files, regularly backing them up, and storing them in a secure location.
5 - Deployment
Multi-node, high-availability Pigsty deployment for serious production environments.
This chapter helps you understand the complete deployment process and provides best practices for production environments.
Before deploying to production, we recommend testing in Pigsty’s Sandbox to fully understand the workflow.
Use Vagrant to create a local 4-node sandbox, or leverage Terraform to provision larger simulation environments in the cloud.
For production, you typically need at least three nodes for high availability. You should understand Pigsty’s core Concepts and common administration procedures,
including Configuration, Ansible Playbooks, and Security Hardening for enterprise compliance.
5.1 - Install Pigsty for Production
How to install Pigsty on Linux hosts for production?
This is the Pigsty production multi-node deployment guide. For single-node Demo/Dev setups, see Getting Started.
This runs the install script, downloading and extracting Pigsty source to your home directory with dependencies installed. Complete configuration and deployment to finish.
cd ~/pigsty # Enter Pigsty directory./configure -g # Generate config file (optional, skip if you know how to configure)./deploy.yml # Execute deployment playbook based on generated config
After installation, access the WebUI via IP/domain + ports 80/443,
and PostgreSQL service via port 5432.
Full installation takes 3-10 minutes depending on specs/network. Offline installation significantly speeds this up; slim installation further accelerates when monitoring isn’t needed.
Video Example: 20-node Production Simulation (Ubuntu 24.04 x86_64)
Prepare
Production Pigsty deployment involves preparation work. Here’s the complete checklist:
./configure -g # Use wizard to generate config with random passwords
The generated config defaults to ~/pigsty/pigsty.yml. Review and customize before installation.
Many configuration templates are available for reference. You can skip the wizard and directly edit pigsty.yml:
./configure -c ha/full -g # Use 4-node sandbox template./configure -c ha/trio -g # Use 3-node minimal HA template./configure -c ha/dual -g -v 17# Use 2-node semi-HA template with PG 17./configure -c ha/simu -s # Use 20-node production simulation, skip IP check, no random passwords
Example configure output
vagrant@meta:~/pigsty$ ./configure
configure pigsty v4.0.0 begin
[ OK ]region= china
[ OK ]kernel= Linux
[ OK ]machine= x86_64
[ OK ]package= deb,apt
[ OK ]vendor= ubuntu (Ubuntu)[ OK ]version=22(22.04)[ OK ]sudo= vagrant ok
[ OK ]ssh=[email protected] ok
[WARN] Multiple IP address candidates found:
(1) 192.168.121.38 inet 192.168.121.38/24 metric 100 brd 192.168.121.255 scope global dynamic eth0
(2) 10.10.10.10 inet 10.10.10.10/24 brd 10.10.10.255 scope global eth1
[ OK ]primary_ip= 10.10.10.10 (from demo)[ OK ]admin=[email protected] ok
[ OK ]mode= meta (ubuntu22.04)[ OK ]locale= C.UTF-8
[ OK ]ansible= ready
[ OK ] pigsty configured
[WARN] don't forget to check it and change passwords!
proceed with ./deploy.yml
The wizard only replaces the current node’s IP (use -s to skip replacement). For multi-node deployments, replace other node IPs manually.
Also customize the config as needed—modify default passwords, add nodes, etc.
Common configure parameters:
Parameter
Description
-c|--conf
Specify config template relative to conf/, without .yml suffix
-v|--version
PostgreSQL major version: 13, 14, 15, 16, 17, 18
-r|--region
Upstream repo region for faster downloads: default|china|europe
-n|--non-interactive
Use CLI params for primary IP, skip interactive wizard
-x|--proxy
Configure proxy_env from current environment variables
If your machine has multiple IPs, explicitly specify one with -i|--ip <ipaddr> or provide it interactively.
The script replaces IP placeholder 10.10.10.10 with the current node’s primary IPv4. Use a static IP; never use public IPs.
Generated config is at ~/pigsty/pigsty.yml. Review and modify before installation.
Change default passwords!
We strongly recommend modifying default passwords and credentials before installation. See Security Hardening.
When output ends with pgsql init done, PLAY RECAP, etc., installation is complete!
Upstream repo changes may cause online installation failures!
Upstream repos (Linux/PGDG) may break due to improper updates, causing deployment failures (quite common)!
For serious production deployments, we strongly recommend using verified offline packages for offline installation.
Avoid running deploy playbook repeatedly!
Warning: Running deploy.yml again on an initialized environment may restart services and overwrite configs. Be careful!
Interface
Assuming the 4-node deployment template, your Pigsty environment should have a structure like:
Production deployment preparation including hardware, nodes, disks, network, VIP, domain, software, and filesystem requirements.
Pigsty runs on nodes (physical machines or VMs). This document covers the planning and preparation required for deployment.
Node
Pigsty currently runs on Linux kernel with x86_64 / aarch64 architecture.
A “node” refers to an SSH accessible resource that provides a bare Linux OS environment.
It can be a physical machine, virtual machine, or a systemd-enabled container equipped with systemd, sudo, and sshd.
Deploying Pigsty requires at least 1 node. You can prepare more and deploy everything in one pass via playbooks, or add nodes later.
The minimum spec requirement is 1C1G, but at least 1C2G is recommended. Higher is better—no upper limit. Parameters are auto-tuned based on available resources.
The number of nodes you need depends on your requirements. See Architecture Planning for details.
Although a single-node deployment with external backup provides reasonable recovery guarantees,
we recommend multiple nodes for production. A functioning HA setup requires at least 3 nodes; 2 nodes provide Semi-HA.
Disk
Pigsty uses /data as the default data directory. If you have a dedicated data disk, mount it there.
Use /data1, /data2, /dataN for additional disk drives.
To use a different data directory, configure these parameters:
You can use any supported Linux filesystem for data disks. For production, we recommend xfs.
xfs is a Linux standard with excellent performance and CoW capabilities for instant large database cluster cloning. MinIO requires xfs.
ext4 is another viable option with a richer data recovery tool ecosystem, but lacks CoW.
zfs provides RAID and snapshot features but with significant performance overhead and requires separate installation.
Choose among these three based on your needs. Avoid NFS for database services.
Pigsty assumes /data is owned by root:root with 755 permissions.
Admins can assign ownership for first-level directories; each application runs with a dedicated user in its subdirectory.
See FHS for the directory structure reference.
Network
Pigsty defaults to online installation mode, requiring outbound Internet access.
Offline installation eliminates the Internet requirement.
Internally, Pigsty requires a static network. Assign a fixed IPv4 address to each node.
The IP address serves as the node’s unique identifier—the primary IP bound to the main network interface for internal communications.
For single-node deployment without a fixed IP, use the loopback address 127.0.0.1 as a workaround.
Never use Public IP as identifier
Using public IP addresses as node identifiers can cause security and connectivity issues. Always use internal IP addresses.
VIP
Pigsty supports optional L2 VIP for NODE clusters (keepalived) and PGSQL clusters (vip-manager).
To use L2 VIP, you must explicitly assign an L2 VIP address for each node/database cluster.
This is straightforward on your own hardware but may be challenging in public cloud environments.
L2 VIP requires L2 Networking
To use optional Node VIP and PG VIP features, ensure all nodes are on the same L2 network.
CA
Pigsty generates a self-signed CA infrastructure for each deployment, issuing all encryption certificates.
If you have an existing enterprise CA or self-signed CA, you can use it to issue the certificates Pigsty requires.
Domain
Pigsty uses a local static domain i.pigsty by default for WebUI access. This is optional—IP addresses work too.
For production, domain names are recommended to enable HTTPS and encrypted data transmission.
Domains also allow multiple services on the same port, differentiated by domain name.
For Internet-facing deployments, use public DNS providers (Cloudflare, AWS Route53, etc.) to manage resolution.
Point your domain to the Pigsty node’s public IP address.
For LAN/office network deployments, use internal DNS servers with the node’s internal IP address.
For local-only access, add the following to /etc/hosts on machines accessing the Pigsty WebUI:
10.10.10.10 i.pigsty # Replace with your domain and Pigsty node IP
Linux
Pigsty runs on Linux. It supports 14 mainstream distributions: Compatible OS List
We recommend RockyLinux 10.0, Debian 13.2, or Ubuntu 24.04.2 as default options.
On macOS and Windows, use VM software or Docker systemd images to run Pigsty.
We strongly recommend a fresh OS installation. If your server already runs Nginx, PostgreSQL, or similar services, consider deploying on new nodes.
Use the same OS version on all nodes
For multi-node deployments, ensure all nodes use the same Linux distribution, architecture, and version. Heterogeneous deployments may work but are unsupported and may cause unpredictable issues.
Locale
We recommend setting en_US as the primary OS language, or at minimum ensuring this locale is available, so PostgreSQL logs are in English.
Some distributions (e.g., Debian) may not provide the en_US locale by default. Enable it with:
For PostgreSQL, we strongly recommend using the built-in C.UTF-8 collation (PG 17+) as the default.
The configuration wizard automatically sets C.UTF-8 as the collation when PG version and OS support are detected.
Ansible
Pigsty uses Ansible to control all managed nodes from the admin node.
See Installing Ansible for details.
Pigsty installs Ansible on Infra nodes by default, making them usable as admin nodes (or backup admin nodes).
For single-node deployment, the installation node serves as both the admin node running Ansible and the INFRA node hosting infrastructure.
Pigsty
You can install the latest stable Pigsty source with:
Your architecture choice depends on reliability requirements and available resources.
Serious production deployments require at least 3 nodes for HA configuration.
With only 2 nodes, use Semi-HA configuration.
Pigsty monitoring requires at least 1 INFRA node. Production typically uses 2; large-scale deployments use 3.
PostgreSQL HA requires at least 1 ETCD node. Production typically uses 3; large-scale uses 5. Must be odd numbers.
Object storage (MinIO) requires at least 1MINIO node. Production typically uses 4+ nodes in MNMD clusters.
Production PG clusters typically use at least two-node primary-replica configuration; serious deployments use 3 nodes; high read loads can have dozens of replicas.
For PostgreSQL, you can also use advanced configurations: offline instances, sync instances, standby clusters, delayed clusters, etc.
Single-Node Setup
The simplest configuration with everything on a single node. Installs four essential modules by default. Typically used for demos, devbox, or testing.
With proper virtualization infrastructure or abundant resources, you can use more nodes for dedicated deployment of each module, achieving optimal reliability, observability, and performance.
Admin user, sudo, SSH, accessibility verification, and firewall configuration
Pigsty requires an OS admin user with passwordless SSH and Sudo privileges on all managed nodes.
This user must be able to SSH to all managed nodes and execute sudo commands on them.
User
Typically use names like dba or admin, avoiding root and postgres:
Using root for deployment is possible but not a production best practice.
Using postgres (pg_dbsu) as admin user is strictly prohibited.
Passwordless
The passwordless requirement is optional if you can accept entering a password for every ssh and sudo command.
Use -k|--ask-pass when running playbooks to prompt for SSH password,
and -K|--ask-become-pass to prompt for sudo password.
./deploy.yml -k -K
Some enterprise security policies may prohibit passwordless ssh or sudo. In such cases, use the options above,
or consider configuring a sudoers rule with a longer password cache time to reduce password prompts.
Create Admin User
Typically, your server/VM provider creates an initial admin user.
If unsatisfied with that user, Pigsty’s deployment playbook can create a new admin user for you.
Assuming you have root access or an existing admin user on the node, create an admin user with Pigsty itself:
All admin users should have sudo privileges on all managed nodes, preferably with passwordless execution.
To configure an admin user with passwordless sudo from scratch, edit/create a sudoers file (assuming username vagrant):
echo'%vagrant ALL=(ALL) NOPASSWD: ALL'| sudo tee /etc/sudoers.d/vagrant
For admin user dba, the /etc/sudoers.d/dba content should be:
%dba ALL=(ALL) NOPASSWD: ALL
If your security policy prohibits passwordless sudo, remove the NOPASSWD: part:
%dba ALL=(ALL) ALL
Ansible relies on sudo to execute commands with root privileges on managed nodes.
In environments where sudo is unavailable (e.g., inside Docker containers), install sudo first.
SSH
Your current user should have passwordless SSH access to all managed nodes as the corresponding admin user.
Your current user can be the admin user itself, but this isn’t required—as long as you can SSH as the admin user.
SSH configuration is Linux 101, but here are the basics:
Pigsty will do this for you during the bootstrap stage if you lack a key pair.
Copy SSH Key
Distribute your generated public key to remote (and local) servers, placing it in the admin user’s ~/.ssh/authorized_keys file on all nodes.
Use the ssh-copy-id utility:
When direct SSH access is unavailable (jumpserver, non-standard port, different credentials), configure SSH aliases in ~/.ssh/config:
Host meta
HostName 10.10.10.10
User dba # Different user on remote IdentityFile /etc/dba/id_rsa # Non-standard key Port 24# Non-standard port
Reference the alias in the inventory using ansible_host for the real SSH alias:
nodes:hosts:# If node `10.10.10.10` requires SSH alias `meta`10.10.10.10:{ansible_host:meta } # Access via `ssh meta`
SSH parameters work directly in Ansible. See Ansible Inventory Guide for details.
This technique enables accessing nodes in private networks via jumpservers, or using different ports and credentials,
or using your local laptop as an admin node.
Check Accessibility
You should be able to passwordlessly ssh from the admin node to all managed nodes as your current user.
The remote user (admin user) should have privileges to run passwordless sudo commands.
To verify passwordless ssh/sudo works, run this command on the admin node for all managed nodes:
ssh <ip|alias> 'sudo ls'
If there’s no password prompt or error, passwordless ssh/sudo is working as expected.
Firewall
Production deployments typically require firewall configuration to block unauthorized port access.
By default, block inbound access from office/Internet networks except:
SSH port 22 for node access
HTTP (80) / HTTPS (443) for WebUI services
PostgreSQL port 5432 for database access
If accessing PostgreSQL via other ports, allow them accordingly.
See used ports for the complete port list.
5432: PostgreSQL database
6432: Pgbouncer connection pooler
5433: PG primary service
5434: PG replica service
5436: PG default service
5438: PG offline service
5.5 - Sandbox
4-node sandbox environment for learning, testing, and demonstration
Pigsty provides a standard 4-node sandbox environment for learning, testing, and feature demonstration.
The sandbox uses fixed IP addresses and predefined identity identifiers, making it easy to reproduce various demo use cases.
Description
The default sandbox environment consists of 4 nodes, using the ha/full.yml configuration template.
ID
IP Address
Node
PostgreSQL
INFRA
ETCD
MINIO
1
10.10.10.10
meta
pg-meta-1
infra-1
etcd-1
minio-1
2
10.10.10.11
node-1
pg-test-1
3
10.10.10.12
node-2
pg-test-2
4
10.10.10.13
node-3
pg-test-3
The sandbox configuration can be summarized as the following config:
After installing VirtualBox, you need to restart your system and allow its kernel extensions in System Preferences.
On Linux, you can use VirtualBox or vagrant-libvirt as the VM provider.
Create Virtual Machines
Use the Pigsty-provided make shortcuts to create virtual machines:
cd ~/pigsty
make meta # 1 node devbox for quick start, development, and testingmake full # 4 node sandbox for HA testing and feature demonstrationmake simu # 20 node simubox for production environment simulation# Other less common specsmake dual # 2 node environmentmake trio # 3 node environmentmake deci # 10 node environment
You can use variant aliases to specify different operating system images:
make meta9 # Create single node with RockyLinux 9make full12 # Create 4-node sandbox with Debian 12make simu24 # Create 20-node simubox with Ubuntu 24.04
simu.rb provides a 20-node production environment simulation configuration:
3 x infra nodes (meta1-3): 4c16g
2 x haproxy nodes (proxy1-2): 1c2g
4 x minio nodes (minio1-4): 1c2g
5 x etcd nodes (etcd1-5): 1c2g
6 x pgsql nodes (pg-src-1-3, pg-dst-1-3): 2c4g
Config Script
Use the vagrant/config script to generate the final Vagrantfile based on spec and options:
cd ~/pigsty
vagrant/config [spec][image][scale][provider]# Examplesvagrant/config meta # Use 1-node spec with default EL9 imagevagrant/config dual el9 # Use 2-node spec with EL9 imagevagrant/config trio d12 2# Use 3-node spec with Debian 12, double resourcesvagrant/config full u22 4# Use 4-node spec with Ubuntu 22, 4x resourcesvagrant/config simu u24 1 libvirt # Use 20-node spec with Ubuntu 24, libvirt provider
Image Aliases
The config script supports various image aliases:
Distro
Alias
Vagrant Box
CentOS 7
el7, 7, centos
generic/centos7
Rocky 8
el8, 8, rocky8
bento/rockylinux-9
Rocky 9
el9, 9, rocky9, el
bento/rockylinux-9
Rocky 10
el10, rocky10
rockylinux/10
Debian 11
d11, 11, debian11
generic/debian11
Debian 12
d12, 12, debian12
generic/debian12
Debian 13
d13, 13, debian13
cloud-image/debian-13
Ubuntu 20.04
u20, 20, ubuntu20
generic/ubuntu2004
Ubuntu 22.04
u22, 22, ubuntu22, ubuntu
generic/ubuntu2204
Ubuntu 24.04
u24, 24, ubuntu24
bento/ubuntu-24.04
Resource Scaling
You can use the VM_SCALE environment variable to adjust the resource multiplier (default is 1):
VM_SCALE=2 vagrant/config meta # Double the CPU/memory resources for meta spec
For example, using VM_SCALE=4 with the meta spec will adjust the default 2c4g to 8c16g:
The simu spec doesn’t support resource scaling. The scale parameter will be automatically ignored because its resource configuration is already optimized for simulation scenarios.
VM Management
Pigsty provides a set of Makefile shortcuts for managing virtual machines:
make # Equivalent to make startmake new # Destroy existing VMs and create new onesmake ssh # Write VM SSH config to ~/.ssh/ (must run after creation)make dns # Write VM DNS records to /etc/hosts (optional)make start # Start VMs and configure SSH (up + ssh)make up # Start VMs with vagrant upmake halt # Shutdown VMs (alias: down, dw)make clean # Destroy VMs (alias: del, destroy)make status # Show VM status (alias: st)make pause # Pause VMs (alias: suspend)make resume # Resume VMsmake nuke # Destroy all VMs and volumes with virsh (libvirt only)make info # Show libvirt info (VMs, networks, storage volumes)
SSH Keys
Pigsty Vagrant templates use your ~/.ssh/id_rsa[.pub] as the SSH key for VMs by default.
Before starting, ensure you have a valid SSH key pair. If not, generate one with:
You can find more available Box images on Vagrant Cloud.
Environment Variables
You can use the following environment variables to control Vagrant behavior:
exportVM_SPEC='meta'# Spec nameexportVM_IMAGE='bento/rockylinux-9'# Image nameexportVM_SCALE='1'# Resource scaling multiplierexportVM_PROVIDER='virtualbox'# Virtualization providerexportVAGRANT_EXPERIMENTAL=disks # Enable experimental disk features
Notes
VirtualBox Network Configuration
When using older versions of VirtualBox as Vagrant provider, additional configuration is required to use 10.x.x.x CIDR as Host-Only network:
echo"* 10.0.0.0/8"| sudo tee -a /etc/vbox/networks.conf
First-time image download is slow
The first time you use Vagrant to start a specific operating system, it will download the corresponding Box image file (typically 1-2 GB). After download, the image is cached and reused for subsequent VM creation.
libvirt Provider
If you’re using libvirt as the provider, you can use make info to view VMs, networks, and storage volume information, and make nuke to forcefully destroy all related resources.
5.7 - Terraform
Create virtual machine environment on public cloud with Terraform
Terraform is a popular “Infrastructure as Code” tool that you can use to create virtual machines on public clouds with one click.
Pigsty provides Terraform templates for Alibaba Cloud, AWS, and Tencent Cloud as examples.
Quick Start
Install Terraform
On macOS, you can use Homebrew to install Terraform:
Use the ssh script to automatically configure SSH aliases and distribute keys:
./ssh # Write SSH config to ~/.ssh/pigsty_config and copy keys
This script writes the IP addresses from Terraform output to ~/.ssh/pigsty_config and automatically distributes SSH keys using the default password PigstyDemo4.
After configuration, you can login directly using hostnames:
ssh meta # Login using hostname instead of IP
Using SSH Config File
If you want to use the configuration in ~/.ssh/pigsty_config, ensure your ~/.ssh/config includes:
Include ~/.ssh/pigsty_config
Destroy Resources
After testing, you can destroy all created cloud resources with one click:
terraform destroy
Template Specs
Pigsty provides multiple predefined cloud resource templates in the terraform/spec/ directory:
When using a template, copy the template file to terraform.tf:
cd ~/pigsty/terraform
cp spec/aliyun-full.tf terraform.tf # Use Alibaba Cloud 4-node sandbox templateterraform init && terraform apply
Variable Configuration
Pigsty’s Terraform templates use variables to control architecture, OS distribution, and resource configuration:
Architecture and Distribution
variable"architecture" {
description="Architecture type (amd64 or arm64)" type=string default="amd64" # Comment this line to use arm64
#default = "arm64" # Uncomment to use arm64
}
variable"distro" {
description="Distribution code (el8,el9,el10,u22,u24,d12,d13)" type=string default="el9" # Default uses Rocky Linux 9
}
Resource Configuration
The following resource parameters can be configured in the locals block:
locals {
bandwidth=100 # Public bandwidth (Mbps)
disk_size=40 # System disk size (GB)
spot_policy="SpotWithPriceLimit" # Spot policy: NoSpot, SpotWithPriceLimit, SpotAsPriceGo
spot_price_limit=5 # Max spot price (only effective with SpotWithPriceLimit)
}
Alibaba Cloud Configuration
Credential Setup
Add your Alibaba Cloud credentials to environment variables, for example in ~/.bash_profile or ~/.zshrc:
Tencent Cloud templates are community-contributed examples and may need adjustments based on your specific requirements.
Shortcut Commands
Pigsty provides some Makefile shortcuts for Terraform operations:
cd ~/pigsty/terraform
make u # terraform apply -auto-approve + configure SSHmake d # terraform destroy -auto-approvemake apply # terraform apply (interactive confirmation)make destroy # terraform destroy (interactive confirmation)make out # terraform outputmake ssh # Run ssh script to configure SSH accessmake r # Reset terraform.tf to repository state
Notes
Cloud Resource Costs
Cloud resources created with Terraform incur costs. After testing, promptly use terraform destroy to destroy resources to avoid unnecessary expenses.
It’s recommended to use pay-as-you-go instance types for testing. Templates default to using Spot Instances to reduce costs.
Default Password
The default root password for VMs in all templates is PigstyDemo4. In production environments, be sure to change this password or use SSH key authentication.
Security Group Configuration
Terraform templates automatically create security groups and open necessary ports (all TCP ports open by default). In production environments, adjust security group rules according to actual needs, following the principle of least privilege.
SSH Access
After creation, SSH login to the admin node using:
ssh root@<public_ip>
You can also use ./ssh or make ssh to write SSH aliases to the config file, then login using ssh pg-meta.
5.8 - Security
Security considerations for production Pigsty deployment
Pigsty’s default configuration is sufficient to cover the security needs of most scenarios.
Pigsty already provides out-of-the-box authentication and access control models that are secure enough for most scenarios.
If you want to further harden system security, here are some recommendations:
Confidentiality
Important Files
Protect your pigsty.yml configuration file or CMDB
The pigsty.yml configuration file usually contains highly sensitive confidential information. You should ensure its security.
Strictly control access permissions to admin nodes, limiting access to DBAs or Infra administrators only.
Strictly control access permissions to the pigsty.yml configuration file repository (if you manage it with git)
Protect your CA private key and other certificates, these files are very important.
Related files are generated by default in the files/pki directory under the Pigsty source directory on the admin node.
You should regularly back them up to a secure location.
Passwords
You MUST change these passwords when deploying to production, don’t use defaults!
Don’t log password change statements to postgres logs or other logs
SET log_statement TO 'none';ALTER USER "{{ user.name }}" PASSWORD '{{ user.password }}';SET log_statement TO DEFAULT;
IP Addresses
Bind specified IP addresses for postgres/pgbouncer/patroni, not all addresses.
The default pg_listen address is 0.0.0.0, meaning all IPv4 addresses.
Consider using pg_listen: '${ip},${vip},${lo}' to bind to specific IP address(es) for enhanced security.
Don’t expose any ports directly to public IP, except infrastructure egress Nginx ports (default 80/443)
For convenience, components like Prometheus/Grafana listen on all IP addresses by default and can be accessed directly via public IP ports
You can modify their configurations to listen only on internal IP addresses, restricting access through the Nginx portal via domain names only. You can also use security groups or firewall rules to implement these security restrictions.
For convenience, Redis servers listen on all IP addresses by default. You can modify redis_bind_address to listen only on internal IP addresses.
Detailed reference information and lists, including supported OS distros, available modules, monitor metrics, extensions, cost comparison and analysis, glossary
6.1 - Supported Linux
Pigsty compatible Linux OS distribution major versions and CPU architectures
Pigsty runs on Linux, supporting amd64/x86_64 and arm64/aarch64 arch, plus 3 major distros: EL, Debian, Ubuntu.
Pigsty runs bare-metal without containers. Supports latest 2 major releases for each of the 3 major distros across both archs.
Overview
Recommended OS versions: RockyLinux 10.0, Ubuntu 24.04, Debian 13.1.
ETCD: Distributed key-value store serving as DCS for HA PostgreSQL clusters: consensus, config management, service discovery.
Kernel Modules
Pigsty provides four kernel modules as optional in-place replacements for the vanilla PostgreSQL kernel, offering different database flavors:
MSSQL: Microsoft SQL Server wire-protocol compatible PG kernel, powered by AWS, WiltonDB & Babelfish!
IVORY: Oracle-compatible PostgreSQL 16 kernel, from the IvorySQL open-source project by HighGo.
POLAR: “Cloud-native” PostgreSQL kernel open-sourced by Alibaba Cloud, an Aurora-style RAC PostgreSQL fork.
CITUS: Distributed PostgreSQL cluster via extension (Azure Hyperscale), with native Patroni HA support!
Chinese Domestic Kernel Support!
Pigsty Pro Edition provides Chinese domestic database kernel support: PolarDB-O v2 — an Oracle-compatible domestic database kernel based on PolarPG.
Extension Modules
Pigsty provides four extension modules that are not essential for core functionality but can enhance PostgreSQL capabilities:
MINIO: S3-compatible simple object storage server, serving as optional backup repository for PostgreSQL, with production deployment and monitoring support.
REDIS: Redis server, high-performance data structure server, supporting standalone, sentinel, and cluster deployment modes with comprehensive monitoring.
MONGO: Native FerretDB deployment support — adding MongoDB wire-protocol level API compatibility to PostgreSQL!
DOCKER: Docker daemon service, enabling one-click deployment of containerized stateless software templates to extend Pigsty’s capabilities!
Peripheral Modules
Pigsty also supports peripheral modules that are closely related to the PostgreSQL kernel (extensions, forks, derivatives, wrappers):
DUCKDB: Powerful embedded OLAP database. Pigsty provides binaries, dynamic libraries, and related PG extensions: pg_duckdb, pg_lakehouse, and duckdb_fdw.
SUPABASE: Pigsty allows running the popular Firebase open-source alternative — Supabase — on existing HA PostgreSQL clusters!
GREENPLUM: MPP data warehouse based on PostgreSQL 12 kernel, currently with monitoring and RPM installation support only. (Beta)
CLOUDBERRY: Open-source fork by original Greenplum developers after it went closed-source, based on PG 14 kernel, currently RPM installation support only. (Beta)
NEON: Serverless PostgreSQL kernel with database branching capabilities. (WIP)
Pilot Modules
Pigsty is adding support for some pilot modules related to the PostgreSQL ecosystem. These may become official Pigsty modules in the future:
KAFKA: Deploy KRaft-powered Kafka message queues with Pigsty, with out-of-the-box monitoring support. (Beta)
MYSQL: Deploy highly available MySQL 8.0 clusters with Pigsty, with out-of-the-box monitoring support (for critique/migration evaluation). (Beta)
KUBE: Production-grade Kubernetes deployment and monitoring using SealOS. (Alpha)
VICTORIA: Alternative Infra implementation based on VictoriaMetrics and VictoriaLogs, offering better performance and resource utilization. (Alpha)
JUPYTER: Out-of-the-box Jupyter Notebook environment for data analysis and machine learning scenarios. (Alpha)
Monitoring Other Databases
Pigsty’s INFRA module can be used standalone as an out-of-the-box monitoring infrastructure to monitor other nodes or existing PostgreSQL databases:
Existing PostgreSQL Services: Pigsty can monitor external PostgreSQL services not managed by Pigsty, still providing relatively complete monitoring support.
RDS PG: PostgreSQL RDS services provided by cloud vendors can be monitored as standard external Postgres instances.
PolarDB: Alibaba Cloud’s cloud-native database can be monitored as external PostgreSQL 11 / 14 instances.
KingBase: A Chinese domestic database provided by KINGBASE, monitored as external PostgreSQL 12 instances.
Greenplum / YMatrixDB monitoring: Currently monitored as horizontally sharded PostgreSQL clusters.
6.3 - Extensions
This article lists PostgreSQL extensions supported by Pigsty and their compatibility across different systems.
Pigsty has 440 extensions. See PGEXT.CLOUD for details, maintained by PIGSTY.
Category
All
PGDG
PIGSTY
CONTRIB
MISS
PG18
PG17
PG16
PG15
PG14
PG13
ALL
440
149
268
71
0
408
429
428
430
415
386
EL
434
143
268
71
6
397
421
422
424
412
382
Debian
426
105
250
71
14
394
416
414
416
404
371
6.4 - File Hierarchy
How Pigsty’s file system structure is designed and organized, and directory structures used by each module.
Pigsty FHS
Pigsty’s home directory is located at ~/pigsty by default. The file structure within this directory is as follows:
Pigsty’s self-signed CA is located in files/pki/ under the Pigsty home directory.
You must keep the CA key file secure: files/pki/ca/ca.key. This key is generated by the ca role during deploy.yml or infra.yml execution.
# pigsty/files/pki# ^-----@ca # Self-signed CA key and certificate# ^[email protected] # CRITICAL: Keep this secret# ^[email protected] # CRITICAL: Trusted everywhere# ^-----@csr # Certificate signing requests# ^-----@misc # Miscellaneous certificates, issued certs# ^-----@etcd # ETCD server certificates# ^-----@minio # MinIO server certificates# ^-----@nginx # Nginx SSL certificates# ^-----@infra # Infra client certificates# ^-----@pgsql # PostgreSQL server certificates# ^-----@mongo # MongoDB/FerretDB server certificates# ^-----@mysql # MySQL server certificates (placeholder)
Nodes managed by Pigsty will have the following certificate files installed:
/etc/pki/ca.crt # Root certificate added to all nodes
/etc/pki/ca-trust/source/anchors/ca.crt # Symlink to system trust anchors
All infra nodes will have the following certificates:
/etc/pki/infra.crt # Infra node certificate
/etc/pki/infra.key # Infra node private key
When your admin node fails, the files/pki directory and pigsty.yml file should be available on the backup admin node. You can use rsync to achieve this:
# run on meta-1, rsync to meta2cd ~/pigsty;rsync -avz ./ meta-2:~/pigsty
NODE FHS
The node data directory is specified by the node_data parameter, defaulting to /data, owned by root with permissions 0777.
Each component’s default data directory is located under this data directory:
/data
# ^-----@postgres # PostgreSQL database directory# ^-----@backups # PostgreSQL backup directory (when no dedicated backup disk)# ^-----@redis # Redis data directory (shared by multiple instances)# ^-----@minio # MinIO data directory (single-node single-disk mode)# ^-----@etcd # ETCD main data directory# ^-----@infra # Infra module data directory# ^-----@docker # Docker data directory# ^-----@... # Other component data directories
VictoriaMetrics-related scripts and rule definitions are placed in the files/victoria/ directory under the Pigsty home directory, and are copied to /etc/prometheus/ on all infrastructure nodes.
# /etc/prometheus/# ^-----prometheus.yml # Prometheus main configuration file# ^-----@bin # Utility scripts: check config, show status, reload, rebuild# ^-----@rules # Recording and alerting rule definitions# ^-----infra.yml # Infra rules and alerts# ^-----etcd.yml # ETCD rules and alerts# ^-----node.yml # Node rules and alerts# ^-----pgsql.yml # PGSQL rules and alerts# ^-----redis.yml # Redis rules and alerts# ^-----minio.yml # MinIO rules and alerts# ^-----kafka.yml # Kafka rules and alerts# ^-----mysql.yml # MySQL rules and alerts# ^-----@targets # File-based service discovery target definitions# ^-----@infra # Infra static target definitions# ^-----@node # Node static target definitions# ^-----@pgsql # PGSQL static target definitions# ^-----@pgrds # PGSQL remote RDS targets# ^-----@redis # Redis static target definitions# ^-----@minio # MinIO static target definitions# ^-----@mongo # MongoDB static target definitions# ^-----@mysql # MySQL static target definitions# ^-----@etcd # ETCD static target definitions# ^-----@ping # Ping static target definitions# ^-----@patroni # Patroni static targets (used when Patroni SSL is enabled)# ^-----@..... # Other monitoring target definitions# /etc/alertmanager.yml # Alertmanager main configuration file# /etc/blackbox.yml # Blackbox exporter main configuration file
PostgreSQL FHS
The following parameters are related to PostgreSQL database directory structure:
pg_dbsu_home: Postgres default user home directory, defaults to /var/lib/pgsql
pg_bin_dir: Postgres binary directory, defaults to /usr/pgsql/bin/
pg_data: Postgres database directory, defaults to /pg/data
pg_fs_main: Postgres main data disk mount point, defaults to /data
pg_fs_backup: Postgres backup disk mount point, defaults to /data/backups (optional, can also backup to a subdirectory on the main data disk)
# Physical directories{{ pg_fs_main }} /data # Top-level data directory, typically fast SSD mount point{{ pg_dir_main }} /data/postgres # Contains all Postgres instance data (may have multiple instances/versions){{ pg_cluster_dir }} /data/postgres/pg-test-15 # Contains `pg-test` cluster data (major version 15) /data/postgres/pg-test-15/bin # PostgreSQL utility scripts /data/postgres/pg-test-15/log # Logs: postgres/pgbouncer/patroni/pgbackrest /data/postgres/pg-test-15/tmp # Temporary files, e.g., rendered SQL files /data/postgres/pg-test-15/cert # PostgreSQL server certificates /data/postgres/pg-test-15/conf # PostgreSQL configuration file index /data/postgres/pg-test-15/data # PostgreSQL main data directory /data/postgres/pg-test-15/meta # PostgreSQL identity information /data/postgres/pg-test-15/stat # Statistics, log reports, summary digests /data/postgres/pg-test-15/change # Change records{{ pg_fs_backup }} /data/backups # Optional backup disk directory/mount point /data/backups/postgres/pg-test-15/backup # Actual storage location for cluster backups# Symlinks/pg -> /data/postgres/pg-test-15 # pg root symlink/pg/data -> /data/postgres/pg-test-15/data # pg data directory/pg/backup -> /var/backups/postgres/pg-test-15/backup # pg backup directory
Binary File Structure
On EL-compatible distributions (using yum), PostgreSQL default installation location is:
/usr/pgsql-${pg_version}/
Pigsty creates a symlink named /usr/pgsql pointing to the actual version specified by the pg_version parameter, for example:
/usr/pgsql -> /usr/pgsql-15
Therefore, the default pg_bin_dir is /usr/pgsql/bin/, and this path is added to the system PATH environment variable, defined in: /etc/profile.d/pgsql.sh.
For Ubuntu/Debian, the default systemd service directory is /lib/systemd/system/ instead of /usr/lib/systemd/system/.
6.5 - Parameters
Pigsty configuration parameter overview and navigation
Pigsty provides approximately 380+ configuration parameters distributed across 8 core modules, allowing fine-grained control over all aspects of the system.
Module Navigation
This page provides navigation and overview for all Pigsty configuration parameters. Click on a module name to jump to the detailed parameter documentation.
PG_REMOVE parameter group configures PostgreSQL instance cleanup and uninstallation behavior, including data directory, backup, and package removal control.
Safeguard to prevent accidental pgsql cleanup? default false
INFRA Parameters
META parameter group defines Pigsty meta information, including version number, admin node IP, repository region, default language, and proxy settings.
Infrastructure data directory, default /data/infra
REPO parameter group configures local software repository, including repository enable switch, directory path, upstream source definitions, and packages to download.
Log send destination endpoint, default sends to infra group
ETCD Parameters
ETCD parameter group is for etcd cluster deployment and configuration, including instance identity, cluster name, data directory, ports, and authentication password.
Uninstall etcd package when removing? default false
REDIS Parameters
REDIS parameter group is for Redis cluster deployment and configuration, including identity, instance definitions, working mode, memory configuration, persistence, and monitoring.
Master list monitored by Redis sentinel, only for sentinel cluster
MINIO Parameters
MINIO parameter group is for MinIO cluster deployment and configuration, including identity, storage paths, ports, authentication credentials, and bucket/user provisioning.
Uninstall minio package when removing? default false
FERRET Parameters
FERRET parameter group is for FerretDB deployment and configuration, including identity, underlying PostgreSQL connection, listen port, and SSL settings.
DOCKER parameter group is for Docker container engine deployment and configuration, including enable switch, data directory, storage driver, registry mirrors, and monitoring.
Docker image tarball path to import, default /tmp/docker/*.tgz
6.6 - Playbooks
Overview and navigation of Pigsty preset playbooks
Pigsty provides a series of Ansible playbooks for automated deployment and management of various modules. This page provides navigation and summary of all playbooks.
Multiple modules provide deletion protection through *_safeguard parameters:
PGSQL: pg_safeguard prevents accidental deletion of PostgreSQL clusters
ETCD: etcd_safeguard prevents accidental deletion of Etcd clusters
MINIO: minio_safeguard prevents accidental deletion of MinIO clusters
By default, these safeguard parameters are not enabled (undefined). It’s recommended to explicitly set them to true for initialized clusters in production environments.
When the protection switch is set to true, the corresponding *-rm.yml playbook will abort immediately. You can force override through command-line parameters:
When executing playbooks, it’s recommended to use the -l parameter to limit the execution scope:
./pgsql.yml -l pg-meta # Limit execution to pg-meta cluster./node.yml -l 10.10.10.10 # Limit execution to specific node./redis.yml -l redis-test # Limit execution to redis-test cluster
Idempotency
Most playbooks are idempotent and can be executed repeatedly. However, note:
infra.yml does not clear data by default and can be safely re-executed. All clean parameters (vmetrics_clean, vlogs_clean, vtraces_clean, grafana_clean, nginx_clean) default to false
To clear infrastructure data for rebuild, you need to explicitly set the corresponding clean parameter to true
Be extra careful when repeatedly executing *-rm.yml deletion playbooks
Task Tags
You can use the -t parameter to execute only specific task subsets:
./pgsql.yml -l pg-test -t pg_service # Only refresh pg-test cluster services./node.yml -t haproxy # Only set up haproxy on nodes./etcd.yml -t etcd_launch # Only restart etcd service
Software and tools that use PostgreSQL can be managed by the docker daemon
PostgreSQL is the most popular database in the world, and countless software is built on PostgreSQL, around PostgreSQL, or serves PostgreSQL itself, such as
“Application software” that uses PostgreSQL as the preferred database
“Tooling software” that serves PostgreSQL software development and management
“Database software” that derives, wraps, forks, modifies, or extends PostgreSQL
And Pigsty just have a series of Docker Compose templates for these software, application and databases:
Expose PostgreSQL & Pgbouncer Metrics for Prometheus
How to prepare Docker?
To run docker compose templates, you need to install the DOCKER module on the node,
If you don’t have the Internet access or having firewall issues, you may need to configure a DockerHub proxy, check the tutorial.
7.1 - Enterprise Self-Hosted Supabase
Self-host enterprise-grade Supabase with Pigsty, featuring monitoring, high availability, PITR, IaC, and 440+ PostgreSQL extensions.
Supabase is great, but having your own Supabase is even better.
Pigsty can help you deploy enterprise-grade Supabase on your own servers (physical, virtual, or cloud) with a single command — more extensions, better performance, deeper control, and more cost-effective.
Supabase is a BaaS (Backend as a Service), an open-source Firebase alternative, and the most popular database + backend solution in the AI Agent era.
Supabase wraps PostgreSQL and provides authentication, messaging, edge functions, object storage, and automatically generates REST and GraphQL APIs based on your database schema.
Supabase aims to provide developers with a one-stop backend solution, reducing the complexity of developing and maintaining backend infrastructure.
It allows developers to skip most backend development work — you only need to understand database design and frontend to ship quickly!
Developers can use vibe coding to create a frontend and database schema to rapidly build complete applications.
Currently, Supabase is the most popular open-source project in the PostgreSQL ecosystem, with over 90,000 GitHub stars.
Supabase also offers a “generous” free tier for small startups — free 500 MB storage, more than enough for storing user tables and analytics data.
Why Self-Host?
If Supabase cloud is so attractive, why self-host?
The most obvious reason is what we discussed in “Is Cloud Database an IQ Tax?”: when your data/compute scale exceeds the cloud computing sweet spot (Supabase: 4C/8G/500MB free storage), costs can explode.
And nowadays, reliable local enterprise NVMe SSDs have three to four orders of magnitude cost advantage over cloud storage, and self-hosting can better leverage this.
Another important reason is functionality — Supabase cloud features are limited. Many powerful PostgreSQL extensions aren’t available in cloud services due to multi-tenant security challenges and licensing.
Despite extensions being PostgreSQL’s core feature, only 64 extensions are available on Supabase cloud.
Self-hosted Supabase with Pigsty provides up to 440 ready-to-use PostgreSQL extensions.
Additionally, self-control and vendor lock-in avoidance are important reasons for self-hosting. Although Supabase aims to provide a vendor-lock-free open-source Google Firebase alternative, self-hosting enterprise-grade Supabase is not trivial.
Supabase includes a series of PostgreSQL extensions they develop and maintain, and plans to replace the native PostgreSQL kernel with OrioleDB (which they acquired). These kernels and extensions are not available in the official PGDG repository.
This is implicit vendor lock-in, preventing users from self-hosting in ways other than the supabase/postgres Docker image. Pigsty provides an open, transparent, and universal solution.
We package all 10 missing Supabase extensions into ready-to-use RPM/DEB packages, ensuring they work on all major Linux distributions:
Filter queries by execution plan cost (C), provided by PIGSTY
We also install most extensions by default in Supabase deployments. You can enable them as needed.
Pigsty also handles the underlying highly availablePostgreSQL cluster, highly available MinIO object storage cluster, and even Docker deployment, Nginx reverse proxy, domain configuration, and HTTPS certificate issuance. You can spin up any number of stateless Supabase container clusters using Docker Compose and store state in external Pigsty-managed database services.
With this self-hosted architecture, you gain the freedom to use different kernels (PG 15-18, OrioleDB), install 437 extensions, scale Supabase/Postgres/MinIO, freedom from database operations, and freedom from vendor lock-in — running locally forever. Compared to cloud service costs, you only need to prepare servers and run a few commands.
Single-Node Quick Start
Let’s start with single-node Supabase deployment. We’ll cover multi-node high availability later.
Before deploying Supabase, modify the auto-generated pigsty.yml configuration file (domain and passwords) according to your needs.
For local development/testing, you can skip this and customize later.
If configured correctly, after about ten minutes, you can access the Supabase Studio GUI at http://<your_ip_address>:8000 on your local network.
Default username and password are supabase and pigsty.
Notes:
In mainland China, Pigsty uses 1Panel and 1ms DockerHub mirrors by default, which may be slow.
You can configure your own proxy and registry mirror, then manually pull images with cd /opt/supabase; docker compose pull. We also offer expert consulting services including complete offline installation packages.
If you need object storage functionality, you must access Supabase via domain and HTTPS, otherwise errors will occur.
For serious production deployments, always change all default passwords!
Key Technical Decisions
Here are some key technical decisions for self-hosting Supabase:
Single-node deployment doesn’t provide PostgreSQL/MinIO high availability.
However, single-node deployment still has significant advantages over the official pure Docker Compose approach: out-of-the-box monitoring, freedom to install extensions, component scaling capabilities, and point-in-time recovery as a safety net.
If you only have one server or choose to self-host on cloud servers, Pigsty recommends using external S3 instead of local MinIO for object storage to hold PostgreSQL backups and Supabase Storage.
This deployment provides a minimum safety net RTO (hour-level recovery time) / RPO (MB-level data loss) disaster recovery in single-node conditions.
For serious production deployments, Pigsty recommends at least 3-4 nodes, ensuring both MinIO and PostgreSQL use enterprise-grade multi-node high availability deployments.
You’ll need more nodes and disks, adjusting cluster configuration in pigsty.yml and Supabase cluster configuration to use high availability endpoints.
Some Supabase features require sending emails, so SMTP service is needed. Unless purely for internal use, production deployments should use SMTP cloud services. Self-hosted mail servers’ emails are often marked as spam.
If your service is directly exposed to the public internet, we strongly recommend using real domain names and HTTPS certificates via Nginx Portal.
Next, we’ll discuss advanced topics for improving Supabase security, availability, and performance beyond single-node deployment.
Advanced: Security Hardening
Pigsty Components
For serious production deployments, we strongly recommend changing Pigsty component passwords. These defaults are public and well-known — going to production without changing passwords is like running naked:
After modifying Supabase credentials, restart Docker Compose to apply:
./app.yml -t app_config,app_launch # Using playbookcd /opt/supabase; make up # Manual execution
Advanced: Domain Configuration
If using Supabase locally or on LAN, you can directly connect to Kong’s HTTP port 8000 via IP:Port.
You can use an internal static-resolved domain, but for serious production deployments, we recommend using a real domain + HTTPS to access Supabase.
In this case, your server should have a public IP, you should own a domain, use cloud/DNS/CDN provider’s DNS resolution to point to the node’s public IP (optional fallback: local /etc/hosts static resolution).
The simple approach is to batch-replace the placeholder domain (supa.pigsty) with your actual domain, e.g., supa.pigsty.cc:
sed -ie 's/supa.pigsty/supa.pigsty.cc/g' ~/pigsty/pigsty.yml
If not configured beforehand, reload Nginx and Supabase configuration:
all:vars:certbot_sign:true# Use certbot to sign real certificatesinfra_portal:home:i.pigsty.cc # Replace with your domain!supa:domain:supa.pigsty.cc # Replace with your domain!endpoint:"10.10.10.10:8000"websocket:truecertbot:supa.pigsty.cc # Certificate name, usually same as domainchildren:supabase:vars:apps:supabase:# Supabase app definitionconf:# Override /opt/supabase/.envSITE_URL:https://supa.pigsty.cc # <------- Change to your external domain nameAPI_EXTERNAL_URL:https://supa.pigsty.cc # <------- Otherwise the storage API may not work!SUPABASE_PUBLIC_URL:https://supa.pigsty.cc # <------- Don't forget to set this in infra_portal!
For complete domain/HTTPS configuration, see Certificate Management. You can also use Pigsty’s built-in local static resolution and self-signed HTTPS certificates as fallback.
Advanced: External Object Storage
You can use S3 or S3-compatible services for PostgreSQL backups and Supabase object storage. Here we use Alibaba Cloud OSS as an example.
Pigsty provides a terraform/spec/aliyun-s3.tf template for provisioning a server and OSS bucket on Alibaba Cloud.
First, modify the S3 configuration in all.children.supa.vars.apps.[supabase].conf to point to Alibaba Cloud OSS:
# if using s3/minio as file storageS3_BUCKET:data # Replace with S3-compatible service infoS3_ENDPOINT:https://sss.pigsty:9000 # Replace with S3-compatible service infoS3_ACCESS_KEY:s3user_data # Replace with S3-compatible service infoS3_SECRET_KEY:S3User.Data # Replace with S3-compatible service infoS3_FORCE_PATH_STYLE:true# Replace with S3-compatible service infoS3_REGION:stub # Replace with S3-compatible service infoS3_PROTOCOL:https # Replace with S3-compatible service info
Reload Supabase configuration:
./app.yml -t app_config,app_launch
You can also use S3 as PostgreSQL backup repository. Add an aliyun backup repository definition in all.vars.pgbackrest_repo:
all:vars:pgbackrest_method: aliyun # pgbackrest backup method:local,minio,[user-defined repos...]pgbackrest_repo: # pgbackrest backup repo:https://pgbackrest.org/configuration.html#section-repositoryaliyun:# Define new backup repo 'aliyun'type:s3 # Alibaba Cloud OSS is S3-compatibles3_endpoint:oss-cn-beijing-internal.aliyuncs.coms3_region:oss-cn-beijings3_bucket:pigsty-osss3_key:xxxxxxxxxxxxxxs3_key_secret:xxxxxxxxs3_uri_style:hostpath:/pgbackrestbundle:y# bundle small files into a single filebundle_limit:20MiB # Limit for file bundles, 20MiB for object storagebundle_size:128MiB # Target size for file bundles, 128MiB for object storagecipher_type:aes-256-cbc # enable AES encryption for remote backup repocipher_pass:pgBackRest.MyPass # Set encryption password for pgBackRest backup reporetention_full_type:time # retention full backup by time on minio reporetention_full:14# keep full backup for the last 14 days
Then specify aliyun backup repository in all.vars.pgbackrest_method and reset pgBackrest:
./pgsql.yml -t pgbackrest
Pigsty will switch the backup repository to external object storage. For more backup configuration, see PostgreSQL Backup.
Advanced: Using SMTP
You can use SMTP for sending emails. Modify the supabase app configuration with SMTP information:
all:children:supabase:# supa groupvars:# supa group varsapps:# supa group app listsupabase:# the supabase appconf:# the supabase app conf entriesSMTP_HOST:smtpdm.aliyun.com:80SMTP_PORT:80SMTP_USER:[email protected]SMTP_PASS:your_email_user_passwordSMTP_SENDER_NAME:MySupabaseSMTP_ADMIN_EMAIL:[email protected]ENABLE_ANONYMOUS_USERS:false
Don’t forget to reload configuration with app.yml.
Advanced: True High Availability
After these configurations, you have enterprise-grade Supabase with public domain, HTTPS certificate, SMTP, PITR backup, monitoring, IaC, and 400+ extensions (basic single-node version).
For high availability configuration, see other Pigsty documentation. We offer expert consulting services for hands-on Supabase self-hosting — $400 USD to save you the hassle.
Single-node RTO/RPO relies on external object storage as a safety net. If your node fails, backups in external S3 storage let you redeploy Supabase on a new node and restore from backup.
This provides minimum safety net RTO (hour-level recovery) / RPO (MB-level data loss) disaster recovery.
For RTO < 30s with zero data loss on failover, use multi-node high availability deployment:
ETCD: DCS needs three or more nodes to tolerate one node failure.
PGSQL: PostgreSQL synchronous commit (no data loss) mode recommends at least three nodes.
INFRA: Monitoring infrastructure failure has less impact; production recommends dual replicas.
Supabase stateless containers can also be multi-node replicas for high availability.
In this case, you also need to modify PostgreSQL and MinIO endpoints to use DNS / L2 VIP / HAProxy high availability endpoints.
For these parts, follow the documentation for each Pigsty module.
Reference conf/ha/trio.yml and conf/ha/safe.yml for upgrading to three or more nodes.
7.2 - Odoo: Self-Hosted Open Source ERP
How to spin up an out-of-the-box enterprise application suite Odoo and use Pigsty to manage its backend PostgreSQL database.
Odoo is an open-source enterprise resource planning (ERP) software that provides a full suite of business applications, including CRM, sales, purchasing, inventory, production, accounting, and other management functions. Odoo is a typical web application that uses PostgreSQL as its underlying database.
All your business on one platform — Simple, efficient, yet affordable
Odoo listens on port 8069 by default. Access http://<ip>:8069 in your browser. The default username and password are both admin.
You can add a DNS resolution record odoo.pigsty pointing to your server in the browser host’s /etc/hosts file, allowing you to access the Odoo web interface via http://odoo.pigsty.
If you want to access Odoo via SSL/HTTPS, you need to use a real SSL certificate or trust the self-signed CA certificate automatically generated by Pigsty. (In Chrome, you can also type thisisunsafe to bypass certificate verification)
Configuration Template
conf/app/odoo.yml defines a template configuration file containing the resources required for a single Odoo instance.
all:children:# Odoo application (default username and password: admin/admin)odoo:hosts:{10.10.10.10:{}}vars:app:odoo # Specify app name to install (in apps)apps:# Define all applicationsodoo:# App name, should have corresponding ~/pigsty/app/odoo folderfile:# Optional directories to create- {path: /data/odoo ,state: directory, owner: 100, group:101}- {path: /data/odoo/webdata ,state: directory, owner: 100, group:101}- {path: /data/odoo/addons ,state: directory, owner: 100, group:101}conf:# Override /opt/<app>/.env config filePG_HOST:10.10.10.10# PostgreSQL hostPG_PORT:5432# PostgreSQL portPG_USERNAME:odoo # PostgreSQL userPG_PASSWORD:DBUser.Odoo # PostgreSQL passwordODOO_PORT:8069# Odoo app portODOO_DATA:/data/odoo/webdata # Odoo webdataODOO_ADDONS:/data/odoo/addons # Odoo pluginsODOO_DBNAME:odoo # Odoo database nameODOO_VERSION:19.0# Odoo image version# Odoo databasepg-odoo:hosts:{10.10.10.10:{pg_seq: 1, pg_role:primary } }vars:pg_cluster:pg-odoopg_users:- {name: odoo ,password: DBUser.Odoo ,pgbouncer: true ,roles: [ dbrole_admin ] ,createdb: true ,comment:admin user for odoo service }- {name: odoo_ro ,password: DBUser.Odoo ,pgbouncer: true ,roles: [ dbrole_readonly ] ,comment:read only user for odoo service }- {name: odoo_rw ,password: DBUser.Odoo ,pgbouncer: true ,roles: [ dbrole_readwrite ] ,comment:read write user for odoo service }pg_databases:- {name: odoo ,owner: odoo ,revokeconn: true ,comment:odoo main database }pg_hba_rules:- {user: all ,db: all ,addr: 172.17.0.0/16 ,auth: pwd ,title:'allow access from local docker network'}- {user: dbuser_view , db: all ,addr: infra ,auth: pwd ,title:'allow grafana dashboard access cmdb from infra nodes'}node_crontab:['00 01 * * * postgres /pg/bin/pg-backup full']# Full backup daily at 1aminfra:{hosts:{10.10.10.10:{infra_seq:1}}}etcd:{hosts:{10.10.10.10:{etcd_seq: 1 } }, vars:{etcd_cluster:etcd } }#minio: { hosts: { 10.10.10.10: { minio_seq: 1 } }, vars: { minio_cluster: minio } }vars:# Global variablesversion:v4.0.0 # Pigsty version stringadmin_ip:10.10.10.10# Admin node IP addressregion: default # Upstream mirror region:default|china|europenode_tune: oltp # Node tuning specs:oltp,olap,tiny,critpg_conf: oltp.yml # PGSQL tuning specs:{oltp,olap,tiny,crit}.ymldocker_enabled:true# Enable docker on app group#docker_registry_mirrors: ["https://docker.1panel.live","https://docker.1ms.run","https://docker.xuanyuan.me","https://registry-1.docker.io"]proxy_env:# Global proxy env for downloading packages & pulling docker imagesno_proxy:"localhost,127.0.0.1,10.0.0.0/8,192.168.0.0/16,*.pigsty,*.aliyun.com,mirrors.*,*.tsinghua.edu.cn"#http_proxy: 127.0.0.1:12345 # Add proxy env here for downloading packages or pulling images#https_proxy: 127.0.0.1:12345 # Usually format is http://user:[email protected]#all_proxy: 127.0.0.1:12345infra_portal:# Domain names and upstream servershome :{domain:i.pigsty }minio :{domain: m.pigsty ,endpoint:"${admin_ip}:9001",scheme: https ,websocket:true}odoo:# Nginx server config for odoodomain:odoo.pigsty # REPLACE WITH YOUR OWN DOMAIN!endpoint:"10.10.10.10:8069"# Odoo service endpoint: IP:PORTwebsocket:true# Add websocket supportcertbot:odoo.pigsty # Certbot cert name, apply with `make cert`repo_enabled:falsenode_repo_modules:node,infra,pgsqlpg_version:18#----------------------------------## Credentials: MUST CHANGE THESE!#----------------------------------#grafana_admin_password:pigstygrafana_view_password:DBUser.Viewerpg_admin_password:DBUser.DBApg_monitor_password:DBUser.Monitorpg_replication_password:DBUser.Replicatorpatroni_password:Patroni.APIhaproxy_admin_password:pigstyminio_secret_key:S3User.MinIOetcd_root_password:Etcd.Root
Basics
Check the configurable environment variables in the .env file:
If you want to access Odoo via SSL, you must trust files/pki/ca/ca.crt in your browser (or use the dirty hack thisisunsafe in Chrome).
7.3 - Dify: AI Workflow Platform
How to self-host the AI Workflow LLMOps platform — Dify, using external PostgreSQL, PGVector, and Redis for storage with Pigsty?
Dify is a Generative AI Application Innovation Engine and open-source LLM application development platform. It provides capabilities from Agent building to AI workflow orchestration, RAG retrieval, and model management, helping users easily build and operate generative AI native applications.
Pigsty provides support for self-hosted Dify, allowing you to deploy Dify with a single command while storing critical state in externally managed PostgreSQL. You can use pgvector as a vector database in the same PostgreSQL instance, further simplifying deployment.
Dify listens on port 5001 by default. Access http://<ip>:5001 in your browser and set up your initial user credentials to log in.
Once Dify starts, you can install various extensions, configure system models, and start using it!
Why Self-Host
There are many reasons to self-host Dify, but the primary motivation is data security. The Docker Compose template provided by Dify uses basic default database images, lacking enterprise features like high availability, disaster recovery, monitoring, IaC, and PITR capabilities.
Pigsty elegantly solves these issues for Dify, deploying all components with a single command based on configuration files and using mirrors to address China region access challenges. This makes Dify deployment and delivery very smooth. It handles PostgreSQL primary database, PGVector vector database, MinIO object storage, Redis, Prometheus monitoring, Grafana visualization, Nginx reverse proxy, and free HTTPS certificates all at once.
Pigsty ensures all Dify state is stored in externally managed services, including metadata in PostgreSQL and other data in the file system. Dify instances launched via Docker Compose become stateless applications that can be destroyed and rebuilt at any time, greatly simplifying operations.
Installation
Let’s start with single-node Dify deployment. We’ll cover production high-availability deployment methods later.
curl -fsSL https://repo.pigsty.io/get | bash;cd ~/pigsty
./bootstrap # Prepare Pigsty dependencies./configure -c app/dify # Use Dify application templatevi pigsty.yml # Edit configuration file, modify domains and passwords./deploy.yml # Install Pigsty and various databases
When you use the ./configure -c app/dify command, Pigsty automatically generates a configuration file based on the conf/app/dify.yml template and your current environment.
You should modify passwords, domains, and other relevant parameters in the generated pigsty.yml configuration file according to your needs, then run ./deploy.yml to execute the standard installation process.
Next, run docker.yml to install Docker and Docker Compose, then use app.yml to complete Dify deployment:
./docker.yml # Install Docker and Docker Compose./app.yml # Deploy Dify stateless components with Docker
You can access the Dify Web admin interface at http://<your_ip_address>:5001 on your local network.
The first login will prompt you to set up default username, email, and password.
You can also use the locally resolved placeholder domain dify.pigsty, or follow the configuration below to use a real domain with an HTTPS certificate.
Configuration
When you use the ./configure -c app/dify command for configuration, Pigsty automatically generates a configuration file based on the conf/app/dify.yml template and your current environment. Here’s a detailed explanation of the default configuration:
---#==============================================================## File : dify.yml# Desc : pigsty config for running 1-node dify app# Ctime : 2025-02-24# Mtime : 2025-12-12# Docs : https://doc.pgsty.com/app/odoo# License : Apache-2.0 @ https://pigsty.io/docs/about/license/# Copyright : 2018-2026 Ruohang Feng / Vonng ([email protected])#==============================================================## Last Verified Dify Version: v1.8.1 on 2025-0908# tutorial: https://doc.pgsty.com/app/dify# how to use this template:## curl -fsSL https://repo.pigsty.io/get | bash; cd ~/pigsty# ./bootstrap # prepare local repo & ansible# ./configure -c app/dify # use this dify config template# vi pigsty.yml # IMPORTANT: CHANGE CREDENTIALS!!# ./deploy.yml # install pigsty & pgsql & minio# ./docker.yml # install docker & docker-compose# ./app.yml # install dify with docker-compose## To replace domain name:# sed -ie 's/dify.pigsty/dify.pigsty.cc/g' pigsty.ymlall:children:# the dify applicationdify:hosts:{10.10.10.10:{}}vars:app:dify # specify app name to be installed (in the apps)apps:# define all applicationsdify:# app name, should have corresponding ~/pigsty/app/dify folderfile:# data directory to be created- {path: /data/dify ,state: directory ,mode:0755}conf:# override /opt/dify/.env config file# change domain, mirror, proxy, secret keyNGINX_SERVER_NAME:dify.pigsty# A secret key for signing and encryption, gen with `openssl rand -base64 42` (CHANGE PASSWORD!)SECRET_KEY:sk-somerandomkey# expose DIFY nginx service with port 5001 by defaultDIFY_PORT:5001# where to store dify files? the default is ./volume, we'll use another volume created aboveDIFY_DATA:/data/dify# proxy and mirror settings#PIP_MIRROR_URL: https://pypi.tuna.tsinghua.edu.cn/simple#SANDBOX_HTTP_PROXY: http://10.10.10.10:12345#SANDBOX_HTTPS_PROXY: http://10.10.10.10:12345# database credentialsDB_USERNAME:difyDB_PASSWORD:difyai123456DB_HOST:10.10.10.10DB_PORT:5432DB_DATABASE:difyVECTOR_STORE:pgvectorPGVECTOR_HOST:10.10.10.10PGVECTOR_PORT:5432PGVECTOR_USER:difyPGVECTOR_PASSWORD:difyai123456PGVECTOR_DATABASE:difyPGVECTOR_MIN_CONNECTION:2PGVECTOR_MAX_CONNECTION:10pg-meta:hosts:{10.10.10.10:{pg_seq: 1, pg_role:primary } }vars:pg_cluster:pg-metapg_users:- {name: dify ,password: difyai123456 ,pgbouncer: true ,roles: [ dbrole_admin ] ,superuser: true ,comment:dify superuser }pg_databases:- {name: dify ,owner: dify ,revokeconn: true ,comment:dify main database }- {name: dify_plugin ,owner: dify ,revokeconn: true ,comment:dify plugin_daemon database }pg_hba_rules:- {user: dify ,db: all ,addr: 172.17.0.0/16 ,auth: pwd ,title:'allow dify access from local docker network'}node_crontab:['00 01 * * * postgres /pg/bin/pg-backup full']# make a full backup every 1aminfra:{hosts:{10.10.10.10:{infra_seq:1}}}etcd:{hosts:{10.10.10.10:{etcd_seq: 1 } }, vars:{etcd_cluster:etcd } }#minio: { hosts: { 10.10.10.10: { minio_seq: 1 } }, vars: { minio_cluster: minio } }vars:# global variablesversion:v4.0.0 # pigsty version stringadmin_ip:10.10.10.10# admin node ip addressregion: default # upstream mirror region:default|china|europenode_tune: oltp # node tuning specs:oltp,olap,tiny,critpg_conf: oltp.yml # pgsql tuning specs:{oltp,olap,tiny,crit}.ymldocker_enabled:true# enable docker on app group#docker_registry_mirrors: ["https://docker.1panel.live","https://docker.1ms.run","https://docker.xuanyuan.me","https://registry-1.docker.io"]proxy_env:# global proxy env when downloading packages & pull docker imagesno_proxy:"localhost,127.0.0.1,10.0.0.0/8,192.168.0.0/16,*.pigsty,*.aliyun.com,mirrors.*,*.tsinghua.edu.cn"#http_proxy: 127.0.0.1:12345 # add your proxy env here for downloading packages or pull images#https_proxy: 127.0.0.1:12345 # usually the proxy is format as http://user:[email protected]#all_proxy: 127.0.0.1:12345infra_portal:# domain names and upstream servershome :{domain:i.pigsty }#minio : { domain: m.pigsty ,endpoint: "${admin_ip}:9001" ,scheme: https ,websocket: true }dify:# nginx server config for difydomain:dify.pigsty # REPLACE WITH YOUR OWN DOMAIN!endpoint:"10.10.10.10:5001"# dify service endpoint: IP:PORTwebsocket:true# add websocket supportcertbot:dify.pigsty # certbot cert name, apply with `make cert`repo_enabled:falsenode_repo_modules:node,infra,pgsqlpg_version:18#----------------------------------------------## PASSWORD : https://doc.pgsty.com/config/security#----------------------------------------------#grafana_admin_password:pigstygrafana_view_password:DBUser.Viewerpg_admin_password:DBUser.DBApg_monitor_password:DBUser.Monitorpg_replication_password:DBUser.Replicatorpatroni_password:Patroni.APIhaproxy_admin_password:pigstyminio_secret_key:S3User.MinIOetcd_root_password:Etcd.Root...
Checklist
Here’s a checklist of configuration items you need to pay attention to:
It’s best to specify an email address certbot_email for certificate expiration notifications
Configure Dify’s NGINX_SERVER_NAME parameter to specify your actual domain
all:children:# Cluster definitionsdify:# Dify groupvars:# Dify group variablesapps:# Application configurationdify:# Dify application definitionconf:# Dify application configurationNGINX_SERVER_NAME:dify.pigstyvars:# Global parameters#certbot_sign: true # Use Certbot for free HTTPS certificatecertbot_email:[email protected]# Email for certificate requests, for expiration notifications, optionalinfra_portal:# Configure Nginx serversdify:# Dify server definitiondomain:dify.pigsty # Replace with your own domain here!endpoint:"10.10.10.10:5001"# Specify Dify's IP and port here (auto-configured by default)websocket:true# Dify requires websocket enabledcertbot:dify.pigsty # Specify Certbot certificate name
Use the following commands to request Nginx certificates:
# Request certificate, can also manually run /etc/nginx/sign-cert scriptmake cert
# The above Makefile shortcut actually runs the following playbook task:./infra.yml -t nginx_certbot,nginx_reload -e certbot_sign=true
Run the app.yml playbook to redeploy Dify service for the NGINX_SERVER_NAME configuration to take effect:
./app.yml
File Backup
You can use restic to backup Dify’s file storage (default location /data/dify):
Another more reliable method is using JuiceFS to mount MinIO object storage to the /data/dify directory, allowing you to use MinIO/S3 for file state storage.
If you want to store all data in PostgreSQL, consider “storing file system data in PostgreSQL using JuiceFS”.
For example, you can create another dify_fs database and use it as JuiceFS metadata storage:
METAURL=postgres://dify:difyai123456@:5432/dify_fs
OPTIONS=( --storage postgres
--bucket :5432/dify_fs
--access-key dify
--secret-key difyai123456
${METAURL} jfs
)juicefs format "${OPTIONS[@]}"# Create PG file systemjuicefs mount ${METAURL} /data/dify -d # Mount to /data/dify directory in backgroundjuicefs bench /data/dify # Test performancejuicefs umount /data/dify # Unmount
Use NocoDB to transform PostgreSQL databases into smart spreadsheets, a no-code database application platform.
NocoDB is an open-source Airtable alternative that turns any database into a smart spreadsheet.
It provides a rich user interface that allows you to create powerful database applications without writing code. NocoDB supports PostgreSQL, MySQL, SQL Server, and more, making it ideal for building internal tools and data management systems.
Quick Start
Pigsty provides a Docker Compose configuration file for NocoDB in the software template directory:
cd ~/pigsty/app/nocodb
Review and modify the .env configuration file (adjust database connections as needed).
First-time access requires creating an administrator account
Management Commands
Pigsty provides convenient Makefile commands to manage NocoDB:
make up # Start NocoDB servicemake run # Start with Docker (connect to external PostgreSQL)make view # Display NocoDB access URLmake log # View container logsmake info # View service detailsmake stop # Stop the servicemake clean # Stop and remove containersmake pull # Pull the latest imagemake rmi # Remove NocoDB imagemake save # Save image to /tmp/nocodb.tgzmake load # Load image from /tmp/nocodb.tgz
Connect to PostgreSQL
NocoDB can connect to PostgreSQL databases managed by Pigsty.
When adding a new project in the NocoDB interface, select “External Database” and enter the PostgreSQL connection information:
Build AI-powered no-code database applications with Teable to boost team productivity.
Teable is an AI-powered no-code database platform designed for team collaboration and automation.
Teable perfectly combines the power of databases with the ease of spreadsheets, integrating AI capabilities to help teams efficiently generate, automate, and collaborate on data.
Quick Start
Teable requires a complete Pigsty environment (including PostgreSQL, Redis, MinIO).
Prepare Environment
cd ~/pigsty
./bootstrap # Prepare local repo and Ansible./configure -c app/teable # Important: modify default credentials!./deploy.yml # Install Pigsty, PostgreSQL, MinIO./redis.yml # Install Redis instance./docker.yml # Install Docker and Docker Compose./app.yml # Install Teable with Docker Compose
First-time access requires registering an administrator account
Management Commands
Manage Teable in the Pigsty software template directory:
cd ~/pigsty/app/teable
make up # Start Teable servicemake down # Stop Teable servicemake log # View container logsmake clean # Clean up containers and data
Architecture
Teable depends on the following components:
PostgreSQL: Stores application data and metadata
Redis: Caching and session management
MinIO: Object storage (files, images, etc.)
Docker: Container runtime environment
Ensure these services are properly installed before deploying Teable.
Features
AI Integration: Built-in AI assistant for auto-generating data, formulas, and workflows
Smart Tables: Powerful table functionality with multiple field types
Automated Workflows: No-code automation to boost team efficiency
Multiple Views: Grid, form, kanban, calendar, and more
Team Collaboration: Real-time collaboration, permission management, comments
API and Integrations: Auto-generated API with Webhook support
Template Library: Rich application templates for quick project starts
Configuration
Teable configuration is managed through environment variables in docker-compose.yml:
make up # pull up gitea with docker-compose in minimal modemake run # launch gitea with docker , local data dir and external PostgreSQLmake view # print gitea access pointmake log # tail -f gitea logsmake info # introspect gitea with jqmake stop # stop gitea containermake clean # remove gitea containermake pull # pull latest gitea imagemake rmi # remove gitea imagemake save # save gitea image to /tmp/gitea.tgzmake load # load gitea image from /tmp
PostgreSQL Preparation
Gitea use built-in SQLite as default metadata storage, you can let Gitea use external PostgreSQL by setting connection string environment variable
# add to nginx_upstream- {name: wiki , domain: wiki.pigsty.cc , endpoint:"127.0.0.1:9002"}
./infra.yml -t nginx_config
ansible all -b -a 'nginx -s reload'
7.9 - Mattermost: Open-Source IM
Build a private team collaboration platform with Mattermost, the open-source Slack alternative.
Mattermost is an open-source team collaboration and messaging platform.
Mattermost provides instant messaging, file sharing, audio/video calls, and more. It’s an open-source alternative to Slack and Microsoft Teams, particularly suitable for enterprises requiring self-hosted deployment.
Quick Start
cd ~/pigsty/app/mattermost
make up # Start Mattermost with Docker Compose
Manage personal finances with Maybe, the open-source Mint/Personal Capital alternative.
Maybe is an open-source personal finance management application.
Maybe provides financial tracking, budget management, investment analysis, and more. It’s an open-source alternative to Mint and Personal Capital, giving you complete control over your financial data.
Quick Start
cd ~/pigsty/app/maybe
cp .env.example .env
vim .env # Must modify SECRET_KEY_BASEmake up # Start Maybe service
Use Metabase for rapid business intelligence analysis with a user-friendly interface for team self-service data exploration.
Metabase is a fast, easy-to-use open-source business intelligence tool that lets your team explore and visualize data without SQL knowledge.
Metabase provides a friendly user interface with rich chart types and supports connecting to various databases, making it an ideal choice for enterprise data analysis.
Quick Start
Pigsty provides a Docker Compose configuration file for Metabase in the software template directory:
cd ~/pigsty/app/metabase
Review and modify the .env configuration file:
vim .env # Check configuration, recommend changing default credentials
Pigsty provides convenient Makefile commands to manage Metabase:
make up # Start Metabase servicemake run # Start with Docker (connect to external PostgreSQL)make view # Display Metabase access URLmake log # View container logsmake info # View service detailsmake stop # Stop the servicemake clean # Stop and remove containersmake pull # Pull the latest imagemake rmi # Remove Metabase imagemake save # Save image to filemake load # Load image from file
Connect to PostgreSQL
Metabase can connect to PostgreSQL databases managed by Pigsty.
During Metabase initialization or when adding a database, select “PostgreSQL” and enter the connection information:
Recommended: Use a dedicated PostgreSQL database for storing Metabase metadata.
Data Persistence
Metabase metadata (users, questions, dashboards, etc.) is stored in the configured database.
If using H2 database (default), data is saved in the /data/metabase directory. Using PostgreSQL as the metadata database is strongly recommended for production environments.
Performance Optimization
Use PostgreSQL: Replace the default H2 database
Increase Memory: Add JVM memory with JAVA_OPTS=-Xmx4g
Database Indexes: Create indexes for frequently queried fields
Result Caching: Enable Metabase query result caching
Scheduled Updates: Set reasonable dashboard auto-refresh frequency
Security Recommendations
Change Default Credentials: Modify metadata database username and password
Enable HTTPS: Configure SSL certificates for production
Configure Authentication: Enable SSO or LDAP authentication
Restrict Access: Limit access through firewall
Regular Backups: Back up the Metabase metadata database
Learn how to deploy Kong, the API gateway, with Docker Compose and use external PostgreSQL as the backend database
TL;DR
cd app/kong ; docker-compose up -d
make up # pull up kong with docker-composemake ui # run swagger ui containermake log # tail -f kong logsmake info # introspect kong with jqmake stop # stop kong containermake clean # remove kong containermake rmui # remove swagger ui containermake pull # pull latest kong imagemake rmi # remove kong imagemake save # save kong image to /tmp/kong.tgzmake load # load kong image from /tmp
Then visit http://10.10.10.10:8887/ or http://ddl.pigsty to access bytebase console. You have to “Create Project”, “Env”, “Instance”, “Database” to perform schema migration.
make up # pull up bytebase with docker-compose in minimal modemake run # launch bytebase with docker , local data dir and external PostgreSQLmake view # print bytebase access pointmake log # tail -f bytebase logsmake info # introspect bytebase with jqmake stop # stop bytebase containermake clean # remove bytebase containermake pull # pull latest bytebase imagemake rmi # remove bytebase imagemake save # save bytebase image to /tmp/bytebase.tgzmake load # load bytebase image from /tmp
PostgreSQL Preparation
Bytebase use its internal PostgreSQL database by default, You can use external PostgreSQL for higher durability.
If you wish to perform CRUD operations and design more fine-grained permission control, please refer
to Tutorial 1 - The Golden Key to generate a signed JWT.
This is an example of creating pigsty cmdb API with PostgREST
cd ~/pigsty/app/postgrest ; docker-compose up -d
http://10.10.10.10:8884 is the default endpoint for PostgREST
http://10.10.10.10:8883 is the default api docs for PostgREST
make up # pull up postgrest with docker-composemake run # launch postgrest with dockermake ui # run swagger ui containermake view # print postgrest access pointmake log # tail -f postgrest logsmake info # introspect postgrest with jqmake stop # stop postgrest containermake clean # remove postgrest containermake rmui # remove swagger ui containermake pull # pull latest postgrest imagemake rmi # remove postgrest imagemake save # save postgrest image to /tmp/postgrest.tgzmake load # load postgrest image from /tmp
Swagger UI
Launch a swagger OpenAPI UI and visualize PostgREST API on 8883 with:
Use Electric to solve PostgreSQL data synchronization challenges with partial replication and real-time data transfer.
Electric is a PostgreSQL sync engine that solves complex data synchronization problems.
Electric supports partial replication, fan-out delivery, and efficient data transfer, making it ideal for building real-time and offline-first applications.
Quick Start
cd ~/pigsty/app/electric
make up # Start Electric service
importpsycopg2conn=psycopg2.connect('postgres://dbuser_dba:[email protected]:5432/meta')cursor=conn.cursor()cursor.execute('SELECT * FROM pg_stat_activity')foriincursor.fetchall():print(i)
Alias
make up # pull up jupyter with docker composemake dir # create required /data/jupyter and set ownermake run # launch jupyter with dockermake view # print jupyter access pointmake log # tail -f jupyter logsmake info # introspect jupyter with jqmake stop # stop jupyter containermake clean # remove jupyter containermake pull # pull latest jupyter imagemake rmi # remove jupyter imagemake save # save jupyter image to /tmp/docker/jupyter.tgzmake load # load jupyter image from /tmp/docker/jupyter.tgz
7.21 - Data Applications
PostgreSQL-based data visualization applications
7.22 - PGLOG: PostgreSQL Log Analysis Application
A sample Applet included with Pigsty for analyzing PostgreSQL CSV log samples
PGLOG is a sample application included with Pigsty that uses the pglog.sample table in MetaDB as its data source. You simply need to load logs into this table, then access the related dashboard.
Pigsty provides convenient commands for pulling CSV logs and loading them into the sample table. On the meta node, the following shortcut commands are available by default:
catlog [node=localhost][date=today]# Print CSV log to stdoutpglog # Load CSVLOG from stdinpglog12 # Load PG12 format CSVLOGpglog13 # Load PG13 format CSVLOGpglog14 # Load PG14 format CSVLOG (=pglog)catlog | pglog # Analyze current node's log for todaycatlog node-1 '2021-07-15'| pglog # Analyze node-1's csvlog for 2021-07-15
Next, you can access the following links to view the sample log analysis interface.
PGLOG Overview: Present the entire CSV log sample details, aggregated by multiple dimensions.
PGLOG Session: Present detailed information about a specific connection in the log sample.
The catlog command pulls CSV database logs from a specific node for a specific date and writes to stdout
By default, catlog pulls logs from the current node for today. You can specify the node and date through parameters.
Using pglog and catlog together, you can quickly pull database CSV logs for analysis.
catlog | pglog # Analyze current node's log for todaycatlog node-1 '2021-07-15'| pglog # Analyze node-1's csvlog for 2021-07-15
7.23 - NOAA ISD Global Weather Station Historical Data Query
Demonstrate how to import data into a database using the ISD dataset as an example
If you have a database and don’t know what to do with it, why not try this open-source project: Vonng/isd
You can directly reuse the monitoring system Grafana to interactively browse sub-hourly meteorological data from nearly 30,000 surface weather stations over the past 120 years.
This is a fully functional data application that can query meteorological observation records from 30,000 global surface weather stations since 1901.
The PostgreSQL instance should have the PostGIS extension enabled. Use the PGURL environment variable to pass database connection information:
# Pigsty uses dbuser_dba as the default admin account with password DBUser.DBAexportPGURL=postgres://dbuser_dba:[email protected]:5432/meta?sslmode=disable
psql "${PGURL}" -c 'SELECT 1'# Check if connection is available
Fetch and import ISD weather station metadata
This is a daily-updated weather station metadata file containing station longitude/latitude, elevation, name, country, province, and other information. Use the following command to download and import:
make reload-station # Equivalent to downloading the latest station data then loading: get-station + load-station
Fetch and import the latest isd.daily data
isd.daily is a daily-updated dataset containing daily observation data summaries from global weather stations. Use the following command to download and import.
Note that raw data downloaded directly from the NOAA website needs to be parsed before it can be loaded into the database, so you need to download or build an ISD data parser.
make get-parser # Download the parser binary from Github, or you can build directly with go using make buildmake reload-daily # Download and import the latest isd.daily data for this year into the database
Load pre-parsed CSV dataset
The ISD Daily dataset has some dirty data and duplicate data. If you don’t want to manually parse and clean it, a stable pre-parsed CSV dataset is also provided here.
This dataset contains isd.daily data up to 2023-06-24. You can download and import it directly into PostgreSQL without needing a parser.
make get-stable # Get the stable isd.daily historical dataset from Githubmake load-stable # Load the downloaded stable historical dataset into the PostgreSQL database
More Data
Two parts of the ISD dataset are updated daily: weather station metadata and the latest year’s isd.daily (e.g., the 2023 tarball).
You can use the following command to download and refresh these two parts. If the dataset hasn’t been updated, these commands won’t re-download the same data package:
make reload # Actually: reload-station + reload-daily
You can also use the following commands to download and load isd.daily data for a specific year:
bin/get-daily 2022# Get daily weather observation summary for 2022 (1900-2023)bin/load-daily "${PGURL}"2022# Load daily weather observation summary for 2022 (1900-2023)
In addition to the daily summary isd.daily, ISD also provides more detailed sub-hourly raw observation records isd.hourly. The download and load methods are similar:
bin/get-hourly 2022# Download hourly observation records for a specific year (e.g., 2022, options 1900-2023)bin/load-hourly "${PGURL}"2022# Load hourly observation records for a specific year
Data
Dataset Overview
ISD provides four datasets: sub-hourly raw observation data, daily statistical summary data, monthly statistical summary, and yearly statistical summary
Dataset
Notes
ISD Hourly
Sub-hourly observation records
ISD Daily
Daily statistical summary
ISD Monthly
Not used, can be calculated from isd.daily
ISD Yearly
Not used, can be calculated from isd.daily
Daily Summary Dataset
Compressed package size 2.8GB (as of 2023-06-24)
Table size 24GB, index size 6GB, total size approximately 30GB in PostgreSQL
If timescaledb compression is enabled, total size can be compressed to 4.5 GB
Sub-hourly Observation Data
Total compressed package size 117GB
After loading into database: table size 1TB+, index size 600GB+, total size 1.6TB
CREATETABLEIFNOTEXISTSisd.daily(stationVARCHAR(12)NOTNULL,-- station number 6USAF+5WBAN
tsDATENOTNULL,-- observation date
-- Temperature & Dew Point
temp_meanNUMERIC(3,1),-- mean temperature ℃
temp_minNUMERIC(3,1),-- min temperature ℃
temp_maxNUMERIC(3,1),-- max temperature ℃
dewp_meanNUMERIC(3,1),-- mean dew point ℃
-- Air Pressure
slp_meanNUMERIC(5,1),-- sea level pressure (hPa)
stp_meanNUMERIC(5,1),-- station pressure (hPa)
-- Visibility
vis_meanNUMERIC(6),-- visible distance (m)
-- Wind Speed
wdsp_meanNUMERIC(4,1),-- average wind speed (m/s)
wdsp_maxNUMERIC(4,1),-- max wind speed (m/s)
gustNUMERIC(4,1),-- max wind gust (m/s)
-- Precipitation / Snow Depth
prcp_meanNUMERIC(5,1),-- precipitation (mm)
prcpNUMERIC(5,1),-- rectified precipitation (mm)
sndpNuMERIC(5,1),-- snow depth (mm)
-- FRSHTT (Fog/Rain/Snow/Hail/Thunder/Tornado)
is_foggyBOOLEAN,-- (F)og
is_rainyBOOLEAN,-- (R)ain or Drizzle
is_snowyBOOLEAN,-- (S)now or pellets
is_hailBOOLEAN,-- (H)ail
is_thunderBOOLEAN,-- (T)hunder
is_tornadoBOOLEAN,-- (T)ornado or Funnel Cloud
-- Record counts used for statistical aggregation
temp_countSMALLINT,-- record count for temp
dewp_countSMALLINT,-- record count for dew point
slp_countSMALLINT,-- record count for sea level pressure
stp_countSMALLINT,-- record count for station pressure
wdsp_countSMALLINT,-- record count for wind speed
visib_countSMALLINT,-- record count for visible distance
-- Temperature flags
temp_min_fBOOLEAN,-- aggregate min temperature
temp_max_fBOOLEAN,-- aggregate max temperature
prcp_flagCHAR,-- precipitation flag: ABCDEFGHI
PRIMARYKEY(station,ts));-- PARTITION BY RANGE (ts);
Sub-hourly Raw Observation Data Table
ISD Hourly
CREATETABLEIFNOTEXISTSisd.hourly(stationVARCHAR(12)NOTNULL,-- station id
tsTIMESTAMPNOTNULL,-- timestamp
-- air
tempNUMERIC(3,1),-- [-93.2,+61.8]
dewpNUMERIC(3,1),-- [-98.2,+36.8]
slpNUMERIC(5,1),-- [8600,10900]
stpNUMERIC(5,1),-- [4500,10900]
visNUMERIC(6),-- [0,160000]
-- wind
wd_angleNUMERIC(3),-- [1,360]
wd_speedNUMERIC(4,1),-- [0,90]
wd_gustNUMERIC(4,1),-- [0,110]
wd_codeVARCHAR(1),-- code that denotes the character of the WIND-OBSERVATION.
-- cloud
cld_heightNUMERIC(5),-- [0,22000]
cld_codeVARCHAR(2),-- cloud code
-- water
sndpNUMERIC(5,1),-- mm snow
prcpNUMERIC(5,1),-- mm precipitation
prcp_hourNUMERIC(2),-- precipitation duration in hour
prcp_codeVARCHAR(1),-- precipitation type code
-- sky
mw_codeVARCHAR(2),-- manual weather observation code
aw_codeVARCHAR(2),-- auto weather observation code
pw_codeVARCHAR(1),-- weather code of past period of time
pw_hourNUMERIC(2),-- duration of pw_code period
-- misc
-- remark TEXT,
-- eqd TEXT,
dataJSONB-- extra data
)PARTITIONBYRANGE(ts);
Parser
The raw data provided by NOAA ISD is in a highly compressed proprietary format that needs to be processed through a parser before it can be converted into database table format.
For the Daily and Hourly datasets, two parsers are provided here: isdd and isdh.
Both parsers take annual data compressed packages as input, produce CSV results as output, and work in pipeline mode as shown below:
NAME
isd -- Intergrated Surface Dataset Parser
SYNOPSIS
isd daily [-i <input|stdin>][-o <output|stout>][-v] isd hourly [-i <input|stdin>][-o <output|stout>][-v][-d raw|ts-first|hour-first]DESCRIPTION
The isd program takes noaa isd daily/hourly raw tarball data as input.
and generate parsed data in csv format as output. Works in pipe mode
cat data/daily/2023.tar.gz | bin/isd daily -v | psql ${PGURL} -AXtwqc "COPY isd.daily FROM STDIN CSV;" isd daily -v -i data/daily/2023.tar.gz | psql ${PGURL} -AXtwqc "COPY isd.daily FROM STDIN CSV;" isd hourly -v -i data/hourly/2023.tar.gz | psql ${PGURL} -AXtwqc "COPY isd.hourly FROM STDIN CSV;"OPTIONS
-i <input> input file, stdin by default
-o <output> output file, stdout by default
-p <profpath> pprof file path, enableif specified
-d de-duplicate rows for hourly dataset (raw, ts-first, hour-first) -v verbose mode
-h print help
User Interface
Several dashboards made with Grafana are provided here for exploring the ISD dataset and querying weather stations and historical meteorological data.
ISD Overview
Global overview with overall metrics and weather station navigation.
ISD Country
Display all weather stations within a single country/region.
ISD Station
Display detailed information for a single weather station, including metadata and daily/monthly/yearly summary metrics.
ISD Station Dashboard
ISD Detail
Display raw sub-hourly observation metric data for a weather station, requires the isd.hourly dataset.
ISD Station Dashboard
7.24 - WHO COVID-19 Pandemic Dashboard
A sample Applet included with Pigsty for visualizing World Health Organization official pandemic data
Covid is a sample Applet included with Pigsty for visualizing the World Health Organization’s official pandemic data dashboard.
You can browse COVID-19 infection and death cases for each country and region, as well as global pandemic trends.
Enter the application directory on the admin node and execute make to complete the installation.
make # Complete all configuration
Other sub-tasks:
make reload # download latest data and pour it againmake ui # install grafana dashboardsmake sql # install database schemasmake download # download latest datamake load # load downloaded data into databasemake reload # download latest data and pour it into database
7.25 - StackOverflow Global Developer Survey
Analyze database-related data from StackOverflow’s global developer survey over the past seven years
Default single-node installation template with extensive configuration parameter descriptions
The meta configuration template is Pigsty’s default template, designed to fulfill Pigsty’s core functionality—deploying PostgreSQL—on a single node.
To maximize compatibility, meta installs only the minimum required software set to ensure it runs across all operating system distributions and architectures.
Overview
Config Name: meta
Node Count: Single node
Description: Default single-node installation template with extensive configuration parameter descriptions and minimum required feature set.
---#==============================================================## File : meta.yml# Desc : Pigsty default 1-node online install config# Ctime : 2020-05-22# Mtime : 2025-12-28# Docs : https://doc.pgsty.com/config# License : Apache-2.0 @ https://pigsty.io/docs/about/license/# Copyright : 2018-2026 Ruohang Feng / Vonng ([email protected])#==============================================================## This is the default 1-node configuration template, with:# INFRA, NODE, PGSQL, ETCD, MINIO, DOCKER, APP (pgadmin)# with basic pg extensions: postgis, pgvector## Work with PostgreSQL 14-18 on all supported platform# Usage:# curl https://repo.pigsty.io/get | bash# ./configure# ./deploy.ymlall:#==============================================================## Clusters, Nodes, and Modules#==============================================================#children:#----------------------------------------------## PGSQL : https://doc.pgsty.com/pgsql#----------------------------------------------## this is an example single-node postgres cluster with pgvector installed, with one biz database & two biz userspg-meta:hosts:10.10.10.10:{pg_seq: 1, pg_role:primary }# <---- primary instance with read-write capability#x.xx.xx.xx: { pg_seq: 2, pg_role: replica } # <---- read only replica for read-only online traffic#x.xx.xx.xy: { pg_seq: 3, pg_role: offline } # <---- offline instance of ETL & interactive queriesvars:pg_cluster:pg-meta# install, load, create pg extensions: https://doc.pgsty.com/pgsql/extensionpg_extensions:[postgis, pgvector ]# define business users/roles : https://doc.pgsty.com/pgsql/userpg_users:- {name: dbuser_meta ,password: DBUser.Meta ,pgbouncer: true ,roles: [dbrole_admin ] ,comment:pigsty admin user }- {name: dbuser_view ,password: DBUser.Viewer ,pgbouncer: true ,roles: [dbrole_readonly] ,comment:read-only viewer }# define business databases : https://doc.pgsty.com/pgsql/dbpg_databases:- name:metabaseline:cmdb.sqlcomment:"pigsty meta database"schemas:[pigsty]# define extensions in database : https://doc.pgsty.com/pgsql/extension/createextensions:[postgis, vector ]# define HBA rules : https://doc.pgsty.com/pgsql/hbapg_hba_rules:- {user: dbuser_view , db: all ,addr: infra ,auth: pwd ,title:'allow grafana dashboard access cmdb from infra nodes'}# define backup policies: https://doc.pgsty.com/pgsql/backupnode_crontab:['00 01 * * * postgres /pg/bin/pg-backup full']# make a full backup every day 1am# define (OPTIONAL) L2 VIP that bind to primary#pg_vip_enabled: true#pg_vip_address: 10.10.10.2/24#pg_vip_interface: eth1#----------------------------------------------## INFRA : https://doc.pgsty.com/infra#----------------------------------------------#infra:hosts:10.10.10.10:{infra_seq:1}vars:repo_enabled: false # disable in 1-node mode :https://doc.pgsty.com/admin/repo#repo_extra_packages: [ pg18-main ,pg18-time ,pg18-gis ,pg18-rag ,pg18-fts ,pg18-olap ,pg18-feat ,pg18-lang ,pg18-type ,pg18-util ,pg18-func ,pg18-admin ,pg18-stat ,pg18-sec ,pg18-fdw ,pg18-sim ,pg18-etl]#----------------------------------------------## ETCD : https://doc.pgsty.com/etcd#----------------------------------------------#etcd:hosts:10.10.10.10:{etcd_seq:1}vars:etcd_cluster:etcdetcd_safeguard:false# prevent purging running etcd instance?#----------------------------------------------## MINIO : https://doc.pgsty.com/minio#----------------------------------------------##minio:# hosts:# 10.10.10.10: { minio_seq: 1 }# vars:# minio_cluster: minio# minio_users: # list of minio user to be created# - { access_key: pgbackrest ,secret_key: S3User.Backup ,policy: pgsql }# - { access_key: s3user_meta ,secret_key: S3User.Meta ,policy: meta }# - { access_key: s3user_data ,secret_key: S3User.Data ,policy: data }#----------------------------------------------## DOCKER : https://doc.pgsty.com/docker# APP : https://doc.pgsty.com/app#----------------------------------------------## launch example pgadmin app with: ./app.yml (http://10.10.10.10:8885 [email protected] / pigsty)app:hosts:{10.10.10.10:{}}vars:docker_enabled:true# enabled docker with ./docker.yml#docker_registry_mirrors: ["https://docker.1panel.live","https://docker.1ms.run","https://docker.xuanyuan.me","https://registry-1.docker.io"]app:pgadmin # specify the default app name to be installed (in the apps)apps: # define all applications, appname:definitionpgadmin:# pgadmin app definition (app/pgadmin -> /opt/pgadmin)conf:# override /opt/pgadmin/.envPGADMIN_DEFAULT_EMAIL:[email protected]PGADMIN_DEFAULT_PASSWORD:pigsty#==============================================================## Global Parameters#==============================================================#vars:#----------------------------------------------## INFRA : https://doc.pgsty.com/infra#----------------------------------------------#version:v4.0.0 # pigsty version stringadmin_ip:10.10.10.10# admin node ip addressregion: china # upstream mirror region:default|china|europeproxy_env:# global proxy env when downloading packagesno_proxy:"localhost,127.0.0.1,10.0.0.0/8,192.168.0.0/16,*.pigsty,*.aliyun.com,mirrors.*,*.myqcloud.com,*.tsinghua.edu.cn"# http_proxy: # set your proxy here: e.g http://user:[email protected]# https_proxy: # set your proxy here: e.g http://user:[email protected]# all_proxy: # set your proxy here: e.g http://user:[email protected]infra_portal:# infra services exposed via portalhome :{domain:i.pigsty } # default domain namepgadmin :{domain: adm.pigsty ,endpoint:"${admin_ip}:8885"}#minio : { domain: m.pigsty ,endpoint: "${admin_ip}:9001" ,scheme: https ,websocket: true }#----------------------------------------------## NODE : https://doc.pgsty.com/node/param#----------------------------------------------#nodename_overwrite:false# do not overwrite node hostname on single node modenode_tune: oltp # node tuning specs:oltp,olap,tiny,critnode_etc_hosts:['${admin_ip} i.pigsty sss.pigsty']node_repo_modules:'node,infra,pgsql'# add these repos directly to the singleton node#node_repo_modules: local # use this if you want to build & user local reponode_repo_remove:true# remove existing node repo for node managed by pigsty#node_packages: [openssh-server] # packages to be installed current nodes with the latest version#----------------------------------------------## PGSQL : https://doc.pgsty.com/pgsql/param#----------------------------------------------#pg_version:18# default postgres versionpg_conf: oltp.yml # pgsql tuning specs:{oltp,olap,tiny,crit}.ymlpg_safeguard:false# prevent purging running postgres instance?pg_packages:[pgsql-main, pgsql-common ] # pg kernel and common utils#pg_extensions: [ pg18-time ,pg18-gis ,pg18-rag ,pg18-fts ,pg18-olap ,pg18-feat ,pg18-lang ,pg18-type ,pg18-util ,pg18-func ,pg18-admin ,pg18-stat ,pg18-sec ,pg18-fdw ,pg18-sim ,pg18-etl]#----------------------------------------------## BACKUP : https://doc.pgsty.com/pgsql/backup#----------------------------------------------## if you want to use minio as backup repo instead of 'local' fs, uncomment this, and configure `pgbackrest_repo`# you can also use external object storage as backup repo#pgbackrest_method: minio # if you want to use minio as backup repo instead of 'local' fs, uncomment this#pgbackrest_repo: # pgbackrest repo: https://pgbackrest.org/configuration.html#section-repository# local: # default pgbackrest repo with local posix fs# path: /pg/backup # local backup directory, `/pg/backup` by default# retention_full_type: count # retention full backups by count# retention_full: 2 # keep 2, at most 3 full backup when using local fs repo# minio: # optional minio repo for pgbackrest# type: s3 # minio is s3-compatible, so s3 is used# s3_endpoint: sss.pigsty # minio endpoint domain name, `sss.pigsty` by default# s3_region: us-east-1 # minio region, us-east-1 by default, useless for minio# s3_bucket: pgsql # minio bucket name, `pgsql` by default# s3_key: pgbackrest # minio user access key for pgbackrest# s3_key_secret: S3User.Backup # minio user secret key for pgbackrest# s3_uri_style: path # use path style uri for minio rather than host style# path: /pgbackrest # minio backup path, default is `/pgbackrest`# storage_port: 9000 # minio port, 9000 by default# storage_ca_file: /etc/pki/ca.crt # minio ca file path, `/etc/pki/ca.crt` by default# block: y # Enable block incremental backup# bundle: y # bundle small files into a single file# bundle_limit: 20MiB # Limit for file bundles, 20MiB for object storage# bundle_size: 128MiB # Target size for file bundles, 128MiB for object storage# cipher_type: aes-256-cbc # enable AES encryption for remote backup repo# cipher_pass: pgBackRest # AES encryption password, default is 'pgBackRest'# retention_full_type: time # retention full backup by time on minio repo# retention_full: 14 # keep full backup for last 14 days# s3: # aliyun oss (s3 compatible) object storage service# type: s3 # oss is s3-compatible# s3_endpoint: oss-cn-beijing-internal.aliyuncs.com# s3_region: oss-cn-beijing# s3_bucket: <your_bucket_name># s3_key: <your_access_key># s3_key_secret: <your_secret_key># s3_uri_style: host# path: /pgbackrest# bundle: y # bundle small files into a single file# bundle_limit: 20MiB # Limit for file bundles, 20MiB for object storage# bundle_size: 128MiB # Target size for file bundles, 128MiB for object storage# cipher_type: aes-256-cbc # enable AES encryption for remote backup repo# cipher_pass: pgBackRest # AES encryption password, default is 'pgBackRest'# retention_full_type: time # retention full backup by time on minio repo# retention_full: 14 # keep full backup for last 14 days#----------------------------------------------## PASSWORD : https://doc.pgsty.com/config/security#----------------------------------------------#grafana_admin_password:pigstygrafana_view_password:DBUser.Viewerpg_admin_password:DBUser.DBApg_monitor_password:DBUser.Monitorpg_replication_password:DBUser.Replicatorpatroni_password:Patroni.APIhaproxy_admin_password:pigstyminio_secret_key:S3User.MinIOetcd_root_password:Etcd.Root...
Explanation
The meta template is Pigsty’s default getting-started configuration, designed for quick onboarding.
Use Cases:
First-time Pigsty users
Quick deployment in development and testing environments
Small production environments running on a single machine
As a base template for more complex deployments
Key Features:
Online installation mode without building local software repository (repo_enabled: false)
Default installs PostgreSQL 18 with postgis and pgvector extensions
Includes complete monitoring infrastructure (Grafana, Prometheus, Loki, etc.)
Preconfigured Docker and pgAdmin application examples
MinIO backup storage disabled by default, can be enabled as needed
Notes:
Default passwords are sample passwords; must be changed for production environments
Single-node etcd has no high availability guarantee, suitable for development and testing
If you need to build a local software repository, use the rich template
8.3 - rich
Feature-rich single-node configuration with local software repository, all extensions, MinIO backup, and complete examples
The rich configuration template is an enhanced version of meta, designed for users who need to experience complete functionality.
If you want to build a local software repository, use MinIO for backup storage, run Docker applications, or need preconfigured business databases, use this template.
Overview
Config Name: rich
Node Count: Single node
Description: Feature-rich single-node configuration, adding local software repository, MinIO backup, complete extensions, Docker application examples on top of meta
---#==============================================================## File : rich.yml# Desc : Pigsty feature-rich 1-node online install config# Ctime : 2020-05-22# Mtime : 2025-12-12# Docs : https://doc.pgsty.com/config# License : Apache-2.0 @ https://pigsty.io/docs/about/license/# Copyright : 2018-2026 Ruohang Feng / Vonng ([email protected])#==============================================================## This is the enhanced version of default meta.yml, which has:# - almost all available postgres extensions# - build local software repo for entire env# - 1 node minio used as central backup repo# - cluster stub for 3-node pg-test / ferret / redis# - stub for nginx, certs, and website self-hosting config# - detailed comments for database / user / service## Usage:# curl https://repo.pigsty.io/get | bash# ./configure -c rich# ./deploy.ymlall:#==============================================================## Clusters, Nodes, and Modules#==============================================================#children:#----------------------------------------------## PGSQL : https://doc.pgsty.com/pgsql#----------------------------------------------## this is an example single-node postgres cluster with pgvector installed, with one biz database & two biz userspg-meta:hosts:10.10.10.10:{pg_seq: 1, pg_role:primary }# <---- primary instance with read-write capability#x.xx.xx.xx: { pg_seq: 2, pg_role: replica } # <---- read only replica for read-only online traffic#x.xx.xx.xy: { pg_seq: 3, pg_role: offline } # <---- offline instance of ETL & interactive queriesvars:pg_cluster:pg-meta# install, load, create pg extensions: https://doc.pgsty.com/pgsql/extensionpg_extensions:[postgis, timescaledb, pgvector, pg_wait_sampling ]pg_libs:'timescaledb, pg_stat_statements, auto_explain, pg_wait_sampling'# define business users/roles : https://doc.pgsty.com/pgsql/userpg_users:- name:dbuser_meta # REQUIRED, `name` is the only mandatory field of a user definitionpassword:DBUser.Meta # optional, the password. can be a scram-sha-256 hash string or plain text#state: create # optional, create|absent, 'create' by default, use 'absent' to drop user#login: true # optional, can log in, true by default (new biz ROLE should be false)#superuser: false # optional, is superuser? false by default#createdb: false # optional, can create databases? false by default#createrole: false # optional, can create role? false by default#inherit: true # optional, can this role use inherited privileges? true by default#replication: false # optional, can this role do replication? false by default#bypassrls: false # optional, can this role bypass row level security? false by default#pgbouncer: true # optional, add this user to the pgbouncer user-list? false by default (production user should be true explicitly)#connlimit: -1 # optional, user connection limit, default -1 disable limit#expire_in: 3650 # optional, now + n days when this role is expired (OVERWRITE expire_at)#expire_at: '2030-12-31' # optional, YYYY-MM-DD 'timestamp' when this role is expired (OVERWRITTEN by expire_in)#comment: pigsty admin user # optional, comment string for this user/role#roles: [dbrole_admin] # optional, belonged roles. default roles are: dbrole_{admin|readonly|readwrite|offline}#parameters: {} # optional, role level parameters with `ALTER ROLE SET`#pool_mode: transaction # optional, pgbouncer pool mode at user level, transaction by default#pool_connlimit: -1 # optional, max database connections at user level, default -1 disable limit# Enhanced roles syntax (PG16+): roles can be string or object with options:# - dbrole_readwrite # simple string: GRANT role# - { name: role, admin: true } # GRANT WITH ADMIN OPTION# - { name: role, set: false } # PG16: REVOKE SET OPTION# - { name: role, inherit: false } # PG16: REVOKE INHERIT OPTION# - { name: role, state: absent } # REVOKE membership- {name: dbuser_view ,password: DBUser.Viewer ,pgbouncer: true ,roles: [dbrole_readonly], comment:read-only viewer for meta database }#- {name: dbuser_bytebase ,password: DBUser.Bytebase ,pgbouncer: true ,roles: [dbrole_admin] ,comment: admin user for bytebase database }#- {name: dbuser_remove ,state: absent } # use state: absent to remove a user# define business databases : https://doc.pgsty.com/pgsql/dbpg_databases:# define business databases on this cluster, array of database definition- name:meta # REQUIRED, `name` is the only mandatory field of a database definition#state: create # optional, create|absent|recreate, create by defaultbaseline: cmdb.sql # optional, database sql baseline path, (relative path among the ansible search path, e.g.:files/)schemas:[pigsty ] # optional, additional schemas to be created, array of schema namesextensions: # optional, additional extensions to be installed:array of `{name[,schema]}`- vector # install pgvector for vector similarity search- postgis # install postgis for geospatial type & index- timescaledb # install timescaledb for time-series data- {name: pg_wait_sampling, schema:monitor }# install pg_wait_sampling on monitor schemacomment:pigsty meta database # optional, comment string for this database#pgbouncer: true # optional, add this database to the pgbouncer database list? true by default#owner: postgres # optional, database owner, current user if not specified#template: template1 # optional, which template to use, template1 by default#strategy: FILE_COPY # optional, clone strategy: FILE_COPY or WAL_LOG (PG15+), default to PG's default#encoding: UTF8 # optional, inherited from template / cluster if not defined (UTF8)#locale: C # optional, inherited from template / cluster if not defined (C)#lc_collate: C # optional, inherited from template / cluster if not defined (C)#lc_ctype: C # optional, inherited from template / cluster if not defined (C)#locale_provider: libc # optional, locale provider: libc, icu, builtin (PG15+)#icu_locale: en-US # optional, icu locale for icu locale provider (PG15+)#icu_rules: '' # optional, icu rules for icu locale provider (PG16+)#builtin_locale: C.UTF-8 # optional, builtin locale for builtin locale provider (PG17+)#tablespace: pg_default # optional, default tablespace, pg_default by default#is_template: false # optional, mark database as template, allowing clone by any user with CREATEDB privilege#allowconn: true # optional, allow connection, true by default. false will disable connect at all#revokeconn: false # optional, revoke public connection privilege. false by default. (leave connect with grant option to owner)#register_datasource: true # optional, register this database to grafana datasources? true by default#connlimit: -1 # optional, database connection limit, default -1 disable limit#pool_auth_user: dbuser_meta # optional, all connection to this pgbouncer database will be authenticated by this user#pool_mode: transaction # optional, pgbouncer pool mode at database level, default transaction#pool_size: 64 # optional, pgbouncer pool size at database level, default 64#pool_size_reserve: 32 # optional, pgbouncer pool size reserve at database level, default 32#pool_size_min: 0 # optional, pgbouncer pool size min at database level, default 0#pool_max_db_conn: 100 # optional, max database connections at database level, default 100#- {name: bytebase ,owner: dbuser_bytebase ,revokeconn: true ,comment: bytebase primary database }# define HBA rules : https://doc.pgsty.com/pgsql/hbapg_hba_rules:- {user: dbuser_view , db: all ,addr: infra ,auth: pwd ,title:'allow grafana dashboard access cmdb from infra nodes'}# define backup policies: https://doc.pgsty.com/pgsql/backupnode_crontab:['00 01 * * * postgres /pg/bin/pg-backup full']# make a full backup every day 1am# define (OPTIONAL) L2 VIP that bind to primary#pg_vip_enabled: true#pg_vip_address: 10.10.10.2/24#pg_vip_interface: eth1#----------------------------------------------## PGSQL HA Cluster Example: 3-node pg-test#----------------------------------------------##pg-test:# hosts:# 10.10.10.11: { pg_seq: 1, pg_role: primary } # primary instance, leader of cluster# 10.10.10.12: { pg_seq: 2, pg_role: replica } # replica instance, follower of leader# 10.10.10.13: { pg_seq: 3, pg_role: replica, pg_offline_query: true } # replica with offline access# vars:# pg_cluster: pg-test # define pgsql cluster name# pg_users: [{ name: test , password: test , pgbouncer: true , roles: [ dbrole_admin ] }]# pg_databases: [{ name: test }]# # define business service here: https://doc.pgsty.com/pgsql/service# pg_services: # extra services in addition to pg_default_services, array of service definition# # standby service will route {ip|name}:5435 to sync replica's pgbouncer (5435->6432 standby)# - name: standby # required, service name, the actual svc name will be prefixed with `pg_cluster`, e.g: pg-meta-standby# port: 5435 # required, service exposed port (work as kubernetes service node port mode)# ip: "*" # optional, service bind ip address, `*` for all ip by default# selector: "[]" # required, service member selector, use JMESPath to filter inventory# dest: default # optional, destination port, default|postgres|pgbouncer|<port_number>, 'default' by default# check: /sync # optional, health check url path, / by default# backup: "[? pg_role == `primary`]" # backup server selector# maxconn: 3000 # optional, max allowed front-end connection# balance: roundrobin # optional, haproxy load balance algorithm (roundrobin by default, other: leastconn)# options: 'inter 3s fastinter 1s downinter 5s rise 3 fall 3 on-marked-down shutdown-sessions slowstart 30s maxconn 3000 maxqueue 128 weight 100'# pg_vip_enabled: true# pg_vip_address: 10.10.10.3/24# pg_vip_interface: eth1# node_crontab: # make a full backup on monday 1am, and an incremental backup during weekdays# - '00 01 * * 1 postgres /pg/bin/pg-backup full'# - '00 01 * * 2,3,4,5,6,7 postgres /pg/bin/pg-backup'#----------------------------------------------## INFRA : https://doc.pgsty.com/infra#----------------------------------------------#infra:hosts:10.10.10.10:{infra_seq:1}vars:repo_enabled: true # build local repo, and install everything from it:https://doc.pgsty.com/admin/repo# and download all extensions into local reporepo_extra_packages:[pg18-main ,pg18-time ,pg18-gis ,pg18-rag ,pg18-fts ,pg18-olap ,pg18-feat ,pg18-lang ,pg18-type ,pg18-util ,pg18-func ,pg18-admin ,pg18-stat ,pg18-sec ,pg18-fdw ,pg18-sim ,pg18-etl]#----------------------------------------------## ETCD : https://doc.pgsty.com/etcd#----------------------------------------------#etcd:hosts:10.10.10.10:{etcd_seq:1}vars:etcd_cluster:etcdetcd_safeguard:false# prevent purging running etcd instance?#----------------------------------------------## MINIO : https://doc.pgsty.com/minio#----------------------------------------------#minio:hosts:10.10.10.10:{minio_seq:1}vars:minio_cluster:miniominio_users:# list of minio user to be created- {access_key: pgbackrest ,secret_key: S3User.Backup ,policy:pgsql }- {access_key: s3user_meta ,secret_key: S3User.Meta ,policy:meta }- {access_key: s3user_data ,secret_key: S3User.Data ,policy:data }#----------------------------------------------## DOCKER : https://doc.pgsty.com/docker# APP : https://doc.pgsty.com/app#----------------------------------------------## OPTIONAL, launch example pgadmin app with: ./app.yml & ./app.yml -e app=bytebaseapp:hosts:{10.10.10.10:{}}vars:docker_enabled:true# enabled docker with ./docker.yml#docker_registry_mirrors: ["https://docker.1panel.live","https://docker.1ms.run","https://docker.xuanyuan.me","https://registry-1.docker.io"]app:pgadmin # specify the default app name to be installed (in the apps)apps: # define all applications, appname:definition# Admin GUI for PostgreSQL, launch with: ./app.ymlpgadmin:# pgadmin app definition (app/pgadmin -> /opt/pgadmin)conf:# override /opt/pgadmin/.envPGADMIN_DEFAULT_EMAIL:[email protected]# default user namePGADMIN_DEFAULT_PASSWORD:pigsty # default password# Schema Migration GUI for PostgreSQL, launch with: ./app.yml -e app=bytebasebytebase:conf:BB_DOMAIN:http://ddl.pigsty # replace it with your public domain name and postgres database urlBB_PGURL:"postgresql://dbuser_bytebase:[email protected]:5432/bytebase?sslmode=prefer"#----------------------------------------------## REDIS : https://doc.pgsty.com/redis#----------------------------------------------## OPTIONAL, launch redis clusters with: ./redis.ymlredis-ms:hosts:{10.10.10.10:{redis_node: 1 , redis_instances:{6379:{}, 6380:{replica_of:'10.10.10.10 6379'}}}}vars:{redis_cluster: redis-ms ,redis_password: 'redis.ms' ,redis_max_memory:64MB }#==============================================================## Global Parameters#==============================================================#vars:#----------------------------------------------## INFRA : https://doc.pgsty.com/infra#----------------------------------------------#version:v4.0.0 # pigsty version stringadmin_ip:10.10.10.10# admin node ip addressregion: default # upstream mirror region:default|china|europeproxy_env:# global proxy env when downloading packagesno_proxy:"localhost,127.0.0.1,10.0.0.0/8,192.168.0.0/16,*.pigsty,*.aliyun.com,mirrors.*,*.myqcloud.com,*.tsinghua.edu.cn"# http_proxy: # set your proxy here: e.g http://user:[email protected]# https_proxy: # set your proxy here: e.g http://user:[email protected]# all_proxy: # set your proxy here: e.g http://user:[email protected]certbot_sign:false# enable certbot to sign https certificate for infra portalcertbot_email:[email protected]# replace your email address to receive expiration noticeinfra_portal:# infra services exposed via portalhome :{domain:i.pigsty } # default domain namepgadmin :{domain: adm.pigsty ,endpoint:"${admin_ip}:8885"}bytebase :{domain: ddl.pigsty ,endpoint:"${admin_ip}:8887"}minio :{domain: m.pigsty ,endpoint:"${admin_ip}:9001",scheme: https ,websocket:true}#website: # static local website example stub# domain: repo.pigsty # external domain name for static site# certbot: repo.pigsty # use certbot to sign https certificate for this static site# path: /www/pigsty # path to the static site directory#supabase: # dynamic upstream service example stub# domain: supa.pigsty # external domain name for upstream service# certbot: supa.pigsty # use certbot to sign https certificate for this upstream server# endpoint: "10.10.10.10:8000" # path to the static site directory# websocket: true # add websocket support# certbot: supa.pigsty # certbot cert name, apply with `make cert`#----------------------------------------------## PASSWORD : https://doc.pgsty.com/config/security#----------------------------------------------#grafana_admin_password:pigstygrafana_view_password:DBUser.Viewerpg_admin_password:DBUser.DBApg_monitor_password:DBUser.Monitorpg_replication_password:DBUser.Replicatorpatroni_password:Patroni.APIhaproxy_admin_password:pigstyminio_secret_key:S3User.MinIOetcd_root_password:Etcd.Root#----------------------------------------------## NODE : https://doc.pgsty.com/node/param#----------------------------------------------#nodename_overwrite:false# do not overwrite node hostname on single node modenode_tune: oltp # node tuning specs:oltp,olap,tiny,critnode_etc_hosts:# add static domains to all nodes /etc/hosts- '${admin_ip} i.pigsty sss.pigsty'- '${admin_ip} adm.pigsty ddl.pigsty repo.pigsty supa.pigsty'node_repo_modules:local # use pre-made local repo rather than install from upstreamnode_repo_remove:true# remove existing node repo for node managed by pigsty#node_packages: [openssh-server] # packages to be installed current nodes with latest version#node_timezone: Asia/Hong_Kong # overwrite node timezone#----------------------------------------------## PGSQL : https://doc.pgsty.com/pgsql/param#----------------------------------------------#pg_version:18# default postgres versionpg_conf: oltp.yml # pgsql tuning specs:{oltp,olap,tiny,crit}.ymlpg_safeguard:false# prevent purging running postgres instance?pg_packages:[pgsql-main, pgsql-common ] # pg kernel and common utils#pg_extensions: [ pg18-time ,pg18-gis ,pg18-rag ,pg18-fts ,pg18-olap ,pg18-feat ,pg18-lang ,pg18-type ,pg18-util ,pg18-func ,pg18-admin ,pg18-stat ,pg18-sec ,pg18-fdw ,pg18-sim ,pg18-etl]#----------------------------------------------## BACKUP : https://doc.pgsty.com/pgsql/backup#----------------------------------------------## if you want to use minio as backup repo instead of 'local' fs, uncomment this, and configure `pgbackrest_repo`# you can also use external object storage as backup repopgbackrest_method:minio # if you want to use minio as backup repo instead of 'local' fs, uncomment thispgbackrest_repo: # pgbackrest repo:https://pgbackrest.org/configuration.html#section-repositorylocal:# default pgbackrest repo with local posix fspath:/pg/backup # local backup directory, `/pg/backup` by defaultretention_full_type:count # retention full backups by countretention_full:2# keep 2, at most 3 full backups when using local fs repominio:# optional minio repo for pgbackresttype:s3 # minio is s3-compatible, so s3 is useds3_endpoint:sss.pigsty # minio endpoint domain name, `sss.pigsty` by defaults3_region:us-east-1 # minio region, us-east-1 by default, useless for minios3_bucket:pgsql # minio bucket name, `pgsql` by defaults3_key:pgbackrest # minio user access key for pgbackrest [CHANGE ACCORDING to minio_users.pgbackrest]s3_key_secret:S3User.Backup # minio user secret key for pgbackrest [CHANGE ACCORDING to minio_users.pgbackrest]s3_uri_style:path # use path style uri for minio rather than host stylepath:/pgbackrest # minio backup path, default is `/pgbackrest`storage_port:9000# minio port, 9000 by defaultstorage_ca_file:/etc/pki/ca.crt # minio ca file path, `/etc/pki/ca.crt` by defaultblock:y# Enable block incremental backupbundle:y# bundle small files into a single filebundle_limit:20MiB # Limit for file bundles, 20MiB for object storagebundle_size:128MiB # Target size for file bundles, 128MiB for object storagecipher_type:aes-256-cbc # enable AES encryption for remote backup repocipher_pass:pgBackRest # AES encryption password, default is 'pgBackRest'retention_full_type:time # retention full backup by time on minio reporetention_full:14# keep full backup for the last 14 dayss3:# you can use cloud object storage as backup repotype:s3 # Add your object storage credentials here!s3_endpoint:oss-cn-beijing-internal.aliyuncs.coms3_region:oss-cn-beijings3_bucket:<your_bucket_name>s3_key:<your_access_key>s3_key_secret:<your_secret_key>s3_uri_style:hostpath:/pgbackrestbundle:y# bundle small files into a single filebundle_limit:20MiB # Limit for file bundles, 20MiB for object storagebundle_size:128MiB # Target size for file bundles, 128MiB for object storagecipher_type:aes-256-cbc # enable AES encryption for remote backup repocipher_pass:pgBackRest # AES encryption password, default is 'pgBackRest'retention_full_type:time # retention full backup by time on minio reporetention_full:14# keep full backup for the last 14 days...
Explanation
The rich template is Pigsty’s complete functionality showcase configuration, suitable for users who want to deeply experience all features.
Use Cases:
Offline environments requiring local software repository
Environments needing MinIO as PostgreSQL backup storage
Pre-planning multiple business databases and users
Preinstalls TimescaleDB, pg_wait_sampling and other additional extensions
Includes detailed parameter comments for understanding configuration meanings
Preconfigures HA cluster stub configuration (pg-test)
Notes:
Some extensions unavailable on ARM64 architecture, adjust as needed
Building local software repository requires longer time and larger disk space
Default passwords are sample passwords, must be changed for production
8.4 - slim
Minimal installation template without monitoring infrastructure, installs PostgreSQL directly from internet
The slim configuration template provides minimal installation capability, installing a PostgreSQL high-availability cluster directly from the internet without deploying Infra monitoring infrastructure.
When you only need an available database instance without the monitoring system, consider using the Slim Installation mode.
Overview
Config Name: slim
Node Count: Single node
Description: Minimal installation template without monitoring infrastructure, installs PostgreSQL directly
---#==============================================================## File : slim.yml# Desc : Pigsty slim installation config template# Ctime : 2020-05-22# Mtime : 2025-12-28# Docs : https://doc.pgsty.com/config# License : Apache-2.0 @ https://pigsty.io/docs/about/license/# Copyright : 2018-2026 Ruohang Feng / Vonng ([email protected])#==============================================================## This is the config template for slim / minimal installation# No monitoring & infra will be installed, just raw postgresql## Usage:# curl https://repo.pigsty.io/get | bash# ./configure -c slim# ./slim.ymlall:children:etcd:# dcs service for postgres/patroni ha consensushosts:# 1 node for testing, 3 or 5 for production10.10.10.10:{etcd_seq:1}# etcd_seq required#10.10.10.11: { etcd_seq: 2 } # assign from 1 ~ n#10.10.10.12: { etcd_seq: 3 } # odd number pleasevars:# cluster level parameter override roles/etcdetcd_cluster:etcd # mark etcd cluster name etcd#----------------------------------------------## PostgreSQL Cluster#----------------------------------------------#pg-meta:hosts:10.10.10.10:{pg_seq: 1, pg_role:primary }#10.10.10.11: { pg_seq: 2, pg_role: replica } # you can add more!#10.10.10.12: { pg_seq: 3, pg_role: replica, pg_offline_query: true }vars:pg_cluster:pg-metapg_users:- {name: dbuser_meta ,password: DBUser.Meta ,pgbouncer: true ,roles: [dbrole_admin ] ,comment:pigsty admin user }- {name: dbuser_view ,password: DBUser.Viewer ,pgbouncer: true ,roles: [dbrole_readonly] ,comment:read-only viewer }pg_databases:- {name: meta, baseline: cmdb.sql ,comment: pigsty meta database ,schemas: [pigsty] ,extensions:[vector ]}node_crontab:['00 01 * * * postgres /pg/bin/pg-backup full']# make a full backup every 1amvars:version:v4.0.0 # pigsty version stringadmin_ip:10.10.10.10# admin node ip addressregion: default # upstream mirror region:default,china,europenodename_overwrite:false# do not overwrite node hostname on single node modenode_repo_modules:node,infra,pgsql# add these repos directly to the singleton nodenode_tune: oltp # node tuning specs:oltp,olap,tiny,critpg_conf: oltp.yml # pgsql tuning specs:{oltp,olap,tiny,crit}.ymlpg_version:18# Default PostgreSQL Major Version is 18pg_packages:[pgsql-main, pgsql-common ] # pg kernel and common utils#pg_extensions: [ pg18-time ,pg18-gis ,pg18-rag ,pg18-fts ,pg18-olap ,pg18-feat ,pg18-lang ,pg18-type ,pg18-util ,pg18-func ,pg18-admin ,pg18-stat ,pg18-sec ,pg18-fdw ,pg18-sim ,pg18-etl]#----------------------------------------------## PASSWORD : https://doc.pgsty.com/config/security#----------------------------------------------#grafana_admin_password:pigstygrafana_view_password:DBUser.Viewerpg_admin_password:DBUser.DBApg_monitor_password:DBUser.Monitorpg_replication_password:DBUser.Replicatorpatroni_password:Patroni.APIhaproxy_admin_password:pigstyminio_secret_key:S3User.MinIOetcd_root_password:Etcd.Root...
Explanation
The slim template is Pigsty’s minimal installation configuration, designed for quick deployment of bare PostgreSQL clusters.
Use Cases:
Only need PostgreSQL database, no monitoring system required
Resource-limited small servers or edge devices
Quick deployment of temporary test databases
Already have monitoring system, only need PostgreSQL HA cluster
Key Features:
Uses slim.yml playbook instead of deploy.yml for installation
Installs software directly from internet, no local software repository
Retains core PostgreSQL HA capability (Patroni + etcd + HAProxy)
Minimized package downloads, faster installation
Default uses PostgreSQL 18
Differences from meta:
slim uses dedicated slim.yml playbook, skips Infra module installation
Faster installation, less resource usage
Suitable for “just need a database” scenarios
Notes:
After slim installation, cannot view database status through Grafana
If monitoring is needed, use meta or rich template
Can add replicas as needed for high availability
8.5 - fat
Feature-All-Test template, single-node installation of all extensions, builds local repo with PG 13-18 all versions
The fat configuration template is Pigsty’s Feature-All-Test template, installing all extension plugins on a single node and building a local software repository containing all extensions for PostgreSQL 13-18 (six major versions).
This is a full-featured configuration for testing and development, suitable for scenarios requiring complete software package cache or testing all extensions.
Overview
Config Name: fat
Node Count: Single node
Description: Feature-All-Test template, installs all extensions, builds local repo with PG 13-18 all versions
---#==============================================================## File : fat.yml# Desc : Pigsty Feature-All-Test config template# Ctime : 2020-05-22# Mtime : 2025-12-28# Docs : https://doc.pgsty.com/config# License : Apache-2.0 @ https://pigsty.io/docs/about/license/# Copyright : 2018-2026 Ruohang Feng / Vonng ([email protected])#==============================================================## This is the 4-node sandbox for pigsty## Usage:# curl https://repo.pigsty.io/get | bash# ./configure -c fat [-v 18|17|16|15]# ./deploy.ymlall:#==============================================================## Clusters, Nodes, and Modules#==============================================================#children:#----------------------------------------------## PGSQL : https://doc.pgsty.com/pgsql#----------------------------------------------## this is an example single-node postgres cluster with pgvector installed, with one biz database & two biz userspg-meta:hosts:10.10.10.10:{pg_seq: 1, pg_role:primary }# <---- primary instance with read-write capability#x.xx.xx.xx: { pg_seq: 2, pg_role: replica } # <---- read only replica for read-only online traffic#x.xx.xx.xy: { pg_seq: 3, pg_role: offline } # <---- offline instance of ETL & interactive queriesvars:pg_cluster:pg-meta# install, load, create pg extensions: https://doc.pgsty.com/pgsql/extensionpg_extensions:[pg18-main ,pg18-time ,pg18-gis ,pg18-rag ,pg18-fts ,pg18-olap ,pg18-feat ,pg18-lang ,pg18-type ,pg18-util ,pg18-func ,pg18-admin ,pg18-stat ,pg18-sec ,pg18-fdw ,pg18-sim ,pg18-etl]pg_libs:'timescaledb, pg_stat_statements, auto_explain, pg_wait_sampling'# define business users/roles : https://doc.pgsty.com/pgsql/userpg_users:- name:dbuser_meta # REQUIRED, `name` is the only mandatory field of a user definitionpassword:DBUser.Meta # optional, the password. can be a scram-sha-256 hash string or plain text#state: create # optional, create|absent, 'create' by default, use 'absent' to drop user#login: true # optional, can log in, true by default (new biz ROLE should be false)#superuser: false # optional, is superuser? false by default#createdb: false # optional, can create databases? false by default#createrole: false # optional, can create role? false by default#inherit: true # optional, can this role use inherited privileges? true by default#replication: false # optional, can this role do replication? false by default#bypassrls: false # optional, can this role bypass row level security? false by default#pgbouncer: true # optional, add this user to the pgbouncer user-list? false by default (production user should be true explicitly)#connlimit: -1 # optional, user connection limit, default -1 disable limit#expire_in: 3650 # optional, now + n days when this role is expired (OVERWRITE expire_at)#expire_at: '2030-12-31' # optional, YYYY-MM-DD 'timestamp' when this role is expired (OVERWRITTEN by expire_in)#comment: pigsty admin user # optional, comment string for this user/role#roles: [dbrole_admin] # optional, belonged roles. default roles are: dbrole_{admin|readonly|readwrite|offline}#parameters: {} # optional, role level parameters with `ALTER ROLE SET`#pool_mode: transaction # optional, pgbouncer pool mode at user level, transaction by default#pool_connlimit: -1 # optional, max database connections at user level, default -1 disable limit# Enhanced roles syntax (PG16+): roles can be string or object with options:# - dbrole_readwrite # simple string: GRANT role# - { name: role, admin: true } # GRANT WITH ADMIN OPTION# - { name: role, set: false } # PG16: REVOKE SET OPTION# - { name: role, inherit: false } # PG16: REVOKE INHERIT OPTION# - { name: role, state: absent } # REVOKE membership- {name: dbuser_view ,password: DBUser.Viewer ,pgbouncer: true ,roles: [dbrole_readonly], comment:read-only viewer for meta database }#- {name: dbuser_bytebase ,password: DBUser.Bytebase ,pgbouncer: true ,roles: [dbrole_admin] ,comment: admin user for bytebase database }#- {name: dbuser_remove ,state: absent } # use state: absent to remove a user# define business databases : https://doc.pgsty.com/pgsql/dbpg_databases:# define business databases on this cluster, array of database definition- name:meta # REQUIRED, `name` is the only mandatory field of a database definition#state: create # optional, create|absent|recreate, create by defaultbaseline: cmdb.sql # optional, database sql baseline path, (relative path among the ansible search path, e.g.:files/)schemas:[pigsty ] # optional, additional schemas to be created, array of schema namesextensions: # optional, additional extensions to be installed:array of `{name[,schema]}`- vector # install pgvector for vector similarity search- postgis # install postgis for geospatial type & index- timescaledb # install timescaledb for time-series data- {name: pg_wait_sampling, schema:monitor }# install pg_wait_sampling on monitor schemacomment:pigsty meta database # optional, comment string for this database#pgbouncer: true # optional, add this database to the pgbouncer database list? true by default#owner: postgres # optional, database owner, current user if not specified#template: template1 # optional, which template to use, template1 by default#strategy: FILE_COPY # optional, clone strategy: FILE_COPY or WAL_LOG (PG15+), default to PG's default#encoding: UTF8 # optional, inherited from template / cluster if not defined (UTF8)#locale: C # optional, inherited from template / cluster if not defined (C)#lc_collate: C # optional, inherited from template / cluster if not defined (C)#lc_ctype: C # optional, inherited from template / cluster if not defined (C)#locale_provider: libc # optional, locale provider: libc, icu, builtin (PG15+)#icu_locale: en-US # optional, icu locale for icu locale provider (PG15+)#icu_rules: '' # optional, icu rules for icu locale provider (PG16+)#builtin_locale: C.UTF-8 # optional, builtin locale for builtin locale provider (PG17+)#tablespace: pg_default # optional, default tablespace, pg_default by default#is_template: false # optional, mark database as template, allowing clone by any user with CREATEDB privilege#allowconn: true # optional, allow connection, true by default. false will disable connect at all#revokeconn: false # optional, revoke public connection privilege. false by default. (leave connect with grant option to owner)#register_datasource: true # optional, register this database to grafana datasources? true by default#connlimit: -1 # optional, database connection limit, default -1 disable limit#pool_auth_user: dbuser_meta # optional, all connection to this pgbouncer database will be authenticated by this user#pool_mode: transaction # optional, pgbouncer pool mode at database level, default transaction#pool_size: 64 # optional, pgbouncer pool size at database level, default 64#pool_size_reserve: 32 # optional, pgbouncer pool size reserve at database level, default 32#pool_size_min: 0 # optional, pgbouncer pool size min at database level, default 0#pool_max_db_conn: 100 # optional, max database connections at database level, default 100#- {name: bytebase ,owner: dbuser_bytebase ,revokeconn: true ,comment: bytebase primary database }# define HBA rules : https://doc.pgsty.com/pgsql/hbapg_hba_rules:- {user: dbuser_view , db: all ,addr: infra ,auth: pwd ,title:'allow grafana dashboard access cmdb from infra nodes'}# define backup policies: https://doc.pgsty.com/pgsql/backupnode_crontab:['00 01 * * * postgres /pg/bin/pg-backup full']# make a full backup every day 1am# define (OPTIONAL) L2 VIP that bind to primarypg_vip_enabled:truepg_vip_address:10.10.10.2/24pg_vip_interface:eth1#----------------------------------------------## INFRA : https://doc.pgsty.com/infra#----------------------------------------------#infra:hosts:10.10.10.10:{infra_seq:1}vars:repo_enabled: true # build local repo:https://doc.pgsty.com/admin/repo#repo_extra_packages: [ pg18-main ,pg18-time ,pg18-gis ,pg18-rag ,pg18-fts ,pg18-olap ,pg18-feat ,pg18-lang,pg18-type ,pg18-util ,pg18-func ,pg18-admin ,pg18-stat ,pg18-sec ,pg18-fdw ,pg18-sim ,pg18-etl]repo_packages:[node-bootstrap, infra-package, infra-addons, node-package1, node-package2, pgsql-utility, extra-modules,pg18-full,pg18-time,pg18-gis,pg18-rag,pg18-fts,pg18-olap,pg18-feat,pg18-lang,pg18-type,pg18-util,pg18-func,pg18-admin,pg18-stat,pg18-sec,pg18-fdw,pg18-sim,pg18-etl,pg17-full,pg17-time,pg17-gis,pg17-rag,pg17-fts,pg17-olap,pg17-feat,pg17-lang,pg17-type,pg17-util,pg17-func,pg17-admin,pg17-stat,pg17-sec,pg17-fdw,pg17-sim,pg17-etl,pg16-full,pg16-time,pg16-gis,pg16-rag,pg16-fts,pg16-olap,pg16-feat,pg16-lang,pg16-type,pg16-util,pg16-func,pg16-admin,pg16-stat,pg16-sec,pg16-fdw,pg16-sim,pg16-etl,pg15-full,pg15-time,pg15-gis,pg15-rag,pg15-fts,pg15-olap,pg15-feat,pg15-lang,pg15-type,pg15-util,pg15-func,pg15-admin,pg15-stat,pg15-sec,pg15-fdw,pg15-sim,pg15-etl,pg14-full,pg14-time,pg14-gis,pg14-rag,pg14-fts,pg14-olap,pg14-feat,pg14-lang,pg14-type,pg14-util,pg14-func,pg14-admin,pg14-stat,pg14-sec,pg14-fdw,pg14-sim,pg14-etl,pg13-full,pg13-time,pg13-gis,pg13-rag,pg13-fts,pg13-olap,pg13-feat,pg13-lang,pg13-type,pg13-util,pg13-func,pg13-admin,pg13-stat,pg13-sec,pg13-fdw,pg13-sim,pg13-etl,infra-extra, kafka, java-runtime, sealos, tigerbeetle, polardb, ivorysql]#----------------------------------------------## ETCD : https://doc.pgsty.com/etcd#----------------------------------------------#etcd:hosts:10.10.10.10:{etcd_seq:1}vars:etcd_cluster:etcdetcd_safeguard:false# prevent purging running etcd instance?#----------------------------------------------## MINIO : https://doc.pgsty.com/minio#----------------------------------------------#minio:hosts:10.10.10.10:{minio_seq:1}vars:minio_cluster:miniominio_users:# list of minio user to be created- {access_key: pgbackrest ,secret_key: S3User.Backup ,policy:pgsql }- {access_key: s3user_meta ,secret_key: S3User.Meta ,policy:meta }- {access_key: s3user_data ,secret_key: S3User.Data ,policy:data }#----------------------------------------------## DOCKER : https://doc.pgsty.com/docker# APP : https://doc.pgsty.com/app#----------------------------------------------## OPTIONAL, launch example pgadmin app with: ./app.yml & ./app.yml -e app=bytebaseapp:hosts:{10.10.10.10:{}}vars:docker_enabled:true# enabled docker with ./docker.yml#docker_registry_mirrors: ["https://docker.1panel.live","https://docker.1ms.run","https://docker.xuanyuan.me","https://registry-1.docker.io"]app:pgadmin # specify the default app name to be installed (in the apps)apps: # define all applications, appname:definition# Admin GUI for PostgreSQL, launch with: ./app.ymlpgadmin:# pgadmin app definition (app/pgadmin -> /opt/pgadmin)conf:# override /opt/pgadmin/.envPGADMIN_DEFAULT_EMAIL:[email protected]# default user namePGADMIN_DEFAULT_PASSWORD:pigsty # default password# Schema Migration GUI for PostgreSQL, launch with: ./app.yml -e app=bytebasebytebase:conf:BB_DOMAIN:http://ddl.pigsty # replace it with your public domain name and postgres database urlBB_PGURL:"postgresql://dbuser_bytebase:[email protected]:5432/bytebase?sslmode=prefer"#==============================================================## Global Parameters#==============================================================#vars:#----------------------------------------------## INFRA : https://doc.pgsty.com/infra#----------------------------------------------#version:v4.0.0 # pigsty version stringadmin_ip:10.10.10.10# admin node ip addressregion: default # upstream mirror region:default|china|europeproxy_env:# global proxy env when downloading packagesno_proxy:"localhost,127.0.0.1,10.0.0.0/8,192.168.0.0/16,*.pigsty,*.aliyun.com,mirrors.*,*.myqcloud.com,*.tsinghua.edu.cn"# http_proxy: # set your proxy here: e.g http://user:[email protected]# https_proxy: # set your proxy here: e.g http://user:[email protected]# all_proxy: # set your proxy here: e.g http://user:[email protected]certbot_sign:false# enable certbot to sign https certificate for infra portalcertbot_email:[email protected]# replace your email address to receive expiration noticeinfra_portal:# domain names and upstream servershome :{domain:i.pigsty }pgadmin :{domain: adm.pigsty ,endpoint:"${admin_ip}:8885"}bytebase :{domain: ddl.pigsty ,endpoint:"${admin_ip}:8887",websocket:true}minio :{domain: m.pigsty ,endpoint:"${admin_ip}:9001",scheme: https ,websocket:true}#website: # static local website example stub# domain: repo.pigsty # external domain name for static site# certbot: repo.pigsty # use certbot to sign https certificate for this static site# path: /www/pigsty # path to the static site directory#supabase: # dynamic upstream service example stub# domain: supa.pigsty # external domain name for upstream service# certbot: supa.pigsty # use certbot to sign https certificate for this upstream server# endpoint: "10.10.10.10:8000" # path to the static site directory# websocket: true # add websocket support# certbot: supa.pigsty # certbot cert name, apply with `make cert`#----------------------------------------------## NODE : https://doc.pgsty.com/node/param#----------------------------------------------#nodename_overwrite:true# overwrite node hostname on multi-node templatenode_tune: oltp # node tuning specs:oltp,olap,tiny,critnode_etc_hosts:# add static domains to all nodes /etc/hosts- 10.10.10.10i.pigsty sss.pigsty- 10.10.10.10adm.pigsty ddl.pigsty repo.pigsty supa.pigstynode_repo_modules:local,node,infra,pgsql# use pre-made local repo rather than install from upstreamnode_repo_remove:true# remove existing node repo for node managed by pigsty#node_packages: [openssh-server] # packages to be installed current nodes with latest version#node_timezone: Asia/Hong_Kong # overwrite node timezone#----------------------------------------------## PGSQL : https://doc.pgsty.com/pgsql/param#----------------------------------------------#pg_version:18# default postgres versionpg_conf: oltp.yml # pgsql tuning specs:{oltp,olap,tiny,crit}.ymlpg_safeguard:false# prevent purging running postgres instance?pg_packages:[pgsql-main, pgsql-common ]# pg kernel and common utils#pg_extensions: [ pg18-time ,pg18-gis ,pg18-rag ,pg18-fts ,pg18-olap ,pg18-feat ,pg18-lang ,pg18-type ,pg18-util ,pg18-func ,pg18-admin ,pg18-stat ,pg18-sec ,pg18-fdw ,pg18-sim ,pg18-etl]#----------------------------------------------## BACKUP : https://doc.pgsty.com/pgsql/backup#----------------------------------------------## if you want to use minio as backup repo instead of 'local' fs, uncomment this, and configure `pgbackrest_repo`# you can also use external object storage as backup repopgbackrest_method:minio # if you want to use minio as backup repo instead of 'local' fs, uncomment thispgbackrest_repo: # pgbackrest repo:https://pgbackrest.org/configuration.html#section-repositorylocal:# default pgbackrest repo with local posix fspath:/pg/backup # local backup directory, `/pg/backup` by defaultretention_full_type:count # retention full backups by countretention_full:2# keep 2, at most 3 full backups when using local fs repominio:# optional minio repo for pgbackresttype:s3 # minio is s3-compatible, so s3 is useds3_endpoint:sss.pigsty # minio endpoint domain name, `sss.pigsty` by defaults3_region:us-east-1 # minio region, us-east-1 by default, useless for minios3_bucket:pgsql # minio bucket name, `pgsql` by defaults3_key:pgbackrest # minio user access key for pgbackrest [CHANGE ACCORDING to minio_users.pgbackrest]s3_key_secret:S3User.Backup # minio user secret key for pgbackrest [CHANGE ACCORDING to minio_users.pgbackrest]s3_uri_style:path # use path style uri for minio rather than host stylepath:/pgbackrest # minio backup path, default is `/pgbackrest`storage_port:9000# minio port, 9000 by defaultstorage_ca_file:/etc/pki/ca.crt # minio ca file path, `/etc/pki/ca.crt` by defaultblock:y# Enable block incremental backupbundle:y# bundle small files into a single filebundle_limit:20MiB # Limit for file bundles, 20MiB for object storagebundle_size:128MiB # Target size for file bundles, 128MiB for object storagecipher_type:aes-256-cbc # enable AES encryption for remote backup repocipher_pass:pgBackRest # AES encryption password, default is 'pgBackRest'retention_full_type:time # retention full backup by time on minio reporetention_full:14# keep full backup for the last 14 dayss3:# you can use cloud object storage as backup repotype:s3 # Add your object storage credentials here!s3_endpoint:oss-cn-beijing-internal.aliyuncs.coms3_region:oss-cn-beijings3_bucket:<your_bucket_name>s3_key:<your_access_key>s3_key_secret:<your_secret_key>s3_uri_style:hostpath:/pgbackrestbundle:y# bundle small files into a single filebundle_limit:20MiB # Limit for file bundles, 20MiB for object storagebundle_size:128MiB # Target size for file bundles, 128MiB for object storagecipher_type:aes-256-cbc # enable AES encryption for remote backup repocipher_pass:pgBackRest # AES encryption password, default is 'pgBackRest'retention_full_type:time # retention full backup by time on minio reporetention_full:14# keep full backup for the last 14 days#----------------------------------------------## PASSWORD : https://doc.pgsty.com/config/security#----------------------------------------------#grafana_admin_password:pigstygrafana_view_password:DBUser.Viewerpg_admin_password:DBUser.DBApg_monitor_password:DBUser.Monitorpg_replication_password:DBUser.Replicatorpatroni_password:Patroni.APIhaproxy_admin_password:pigstyminio_secret_key:S3User.MinIOetcd_root_password:Etcd.Root...
Explanation
The fat template is Pigsty’s full-featured test configuration, designed for completeness testing and offline package building.
Key Features:
All Extensions: Installs all categorized extension packages for PostgreSQL 18
Multi-version Repository: Local repo contains all six major versions of PostgreSQL 13-18
Complete Component Stack: Includes MinIO backup, Docker applications, VIP, etc.
Enterprise Components: Includes Kafka, PolarDB, IvorySQL, TigerBeetle, etc.
fat requires larger disk space and longer build time
Use Cases:
Pigsty development testing and feature validation
Building complete multi-version offline software packages
Testing all extension compatibility scenarios
Enterprise environments pre-caching all software packages
Notes:
Requires large disk space (100GB+ recommended) for storing all packages
Building local software repository requires longer time
Some extensions unavailable on ARM64 architecture
Default passwords are sample passwords, must be changed for production
8.6 - infra
Only installs observability infrastructure, dedicated template without PostgreSQL and etcd
The infra configuration template only deploys Pigsty’s observability infrastructure components (VictoriaMetrics/Grafana/Loki/Nginx, etc.), without PostgreSQL and etcd.
Suitable for scenarios requiring a standalone monitoring stack, such as monitoring external PostgreSQL/RDS instances or other data sources.
Overview
Config Name: infra
Node Count: Single or multiple nodes
Description: Only installs observability infrastructure, without PostgreSQL and etcd
Can add multiple infra nodes for high availability as needed
8.7 - Kernel Templates
8.8 - pgsql
Native PostgreSQL kernel, supports deployment of PostgreSQL versions 13 to 18
The pgsql configuration template uses the native PostgreSQL kernel, which is Pigsty’s default database kernel, supporting PostgreSQL versions 13 to 18.
---#==============================================================## File : pgsql.yml# Desc : 1-node PostgreSQL Config template# Ctime : 2025-02-23# Mtime : 2025-12-28# Docs : https://doc.pgsty.com/config# License : Apache-2.0 @ https://pigsty.io/docs/about/license/# Copyright : 2018-2026 Ruohang Feng / Vonng ([email protected])#==============================================================## This is the config template for basical PostgreSQL Kernel.# Nothing special, just a basic setup with one node.# tutorial: https://doc.pgsty.com/pgsql/kernel/postgres## Usage:# curl https://repo.pigsty.io/get | bash# ./configure -c pgsql# ./deploy.ymlall:children:infra:{hosts:{10.10.10.10:{infra_seq: 1 }} ,vars:{repo_enabled:false}}etcd:{hosts:{10.10.10.10:{etcd_seq: 1 }} ,vars:{etcd_cluster:etcd }}#minio: { hosts: { 10.10.10.10: { minio_seq: 1 }} ,vars: { minio_cluster: minio }}#----------------------------------------------## PostgreSQL Cluster#----------------------------------------------#pg-meta:hosts:10.10.10.10:{pg_seq: 1, pg_role:primary }vars:pg_cluster:pg-metapg_users:- {name: dbuser_meta ,password: DBUser.Meta ,pgbouncer: true ,roles: [dbrole_admin ] ,comment:pigsty admin user }- {name: dbuser_view ,password: DBUser.Viewer ,pgbouncer: true ,roles: [dbrole_readonly] ,comment:read-only viewer }pg_databases:- {name: meta, baseline: cmdb.sql ,comment: pigsty meta database ,schemas: [pigsty] ,extensions:[postgis, timescaledb, vector ]}pg_extensions:[postgis, timescaledb, pgvector, pg_wait_sampling ]pg_libs:'timescaledb, pg_stat_statements, auto_explain, pg_wait_sampling'pg_hba_rules:- {user: dbuser_view , db: all ,addr: infra ,auth: pwd ,title:'allow grafana dashboard access cmdb from infra nodes'}node_crontab:['00 01 * * * postgres /pg/bin/pg-backup full']# make a full backup every 1amvars:#----------------------------------------------## INFRA : https://doc.pgsty.com/infra/param#----------------------------------------------#version:v4.0.0 # pigsty version stringadmin_ip:10.10.10.10# admin node ip addressregion: default # upstream mirror region:default,china,europeinfra_portal:# infra services exposed via portalhome :{domain:i.pigsty } # default domain name#----------------------------------------------## NODE : https://doc.pgsty.com/node/param#----------------------------------------------#nodename_overwrite:false# do not overwrite node hostname on single node modenode_repo_modules:node,infra,pgsql# add these repos directly to the singleton nodenode_tune: oltp # node tuning specs:oltp,olap,tiny,crit#----------------------------------------------## PGSQL : https://doc.pgsty.com/pgsql/param#----------------------------------------------#pg_version:18# Default PostgreSQL Major Version is 18pg_conf: oltp.yml # pgsql tuning specs:{oltp,olap,tiny,crit}.ymlpg_packages:[pgsql-main, pgsql-common ] # pg kernel and common utils#pg_extensions: [ pg18-time ,pg18-gis ,pg18-rag ,pg18-fts ,pg18-olap ,pg18-feat ,pg18-lang ,pg18-type ,pg18-util ,pg18-func ,pg18-admin ,pg18-stat ,pg18-sec ,pg18-fdw ,pg18-sim ,pg18-etl]#----------------------------------------------## PASSWORD : https://doc.pgsty.com/config/security#----------------------------------------------#grafana_admin_password:pigstygrafana_view_password:DBUser.Viewerpg_admin_password:DBUser.DBApg_monitor_password:DBUser.Monitorpg_replication_password:DBUser.Replicatorpatroni_password:Patroni.APIhaproxy_admin_password:pigstyminio_secret_key:S3User.MinIOetcd_root_password:Etcd.Root...
Explanation
The pgsql template is Pigsty’s standard kernel configuration, using community-native PostgreSQL.
Version Support:
PostgreSQL 18 (default)
PostgreSQL 17, 16, 15, 14, 13
Use Cases:
Need to use the latest PostgreSQL features
Need the widest extension support
Standard production environment deployment
Same functionality as meta template, explicitly declaring native kernel usage
Differences from meta:
pgsql template explicitly declares using native PostgreSQL kernel
Suitable for scenarios needing clear distinction between different kernel types
8.9 - citus
Citus distributed PostgreSQL cluster, provides horizontal scaling and sharding capabilities
The citus configuration template deploys a distributed PostgreSQL cluster using the Citus extension, providing transparent horizontal scaling and data sharding capabilities.
Overview
Config Name: citus
Node Count: Five nodes (1 coordinator + 4 data nodes)
---#==============================================================## File : citus.yml# Desc : 1-node Citus (Distributive) Config Template# Ctime : 2020-05-22# Mtime : 2025-12-28# Docs : https://doc.pgsty.com/config# License : Apache-2.0 @ https://pigsty.io/docs/about/license/# Copyright : 2018-2026 Ruohang Feng / Vonng ([email protected])#==============================================================## This is the config template for Citus Distributive Cluster# tutorial: https://doc.pgsty.com/pgsql/kernel/citus## Usage:# curl https://repo.pigsty.io/get | bash# ./configure -c citus# ./deploy.ymlall:children:infra:{hosts:{10.10.10.10:{infra_seq: 1 }} ,vars:{repo_enabled:false}}etcd:{hosts:{10.10.10.10:{etcd_seq: 1 }} ,vars:{etcd_cluster:etcd }}#minio: { hosts: { 10.10.10.10: { minio_seq: 1 }} ,vars: { minio_cluster: minio }}#----------------------------------------------## pg-citus: 10 node citus cluster#----------------------------------------------#pg-citus:# the citus group contains 5 clustershosts:10.10.10.10:{pg_group: 0, pg_cluster: pg-citus0 ,pg_vip_address: 10.10.10.60/24 ,pg_seq: 0, pg_role:primary }#10.10.10.11: { pg_group: 0, pg_cluster: pg-citus0 ,pg_vip_address: 10.10.10.60/24 ,pg_seq: 1, pg_role: replica }#10.10.10.12: { pg_group: 1, pg_cluster: pg-citus1 ,pg_vip_address: 10.10.10.61/24 ,pg_seq: 0, pg_role: primary }#10.10.10.13: { pg_group: 1, pg_cluster: pg-citus1 ,pg_vip_address: 10.10.10.61/24 ,pg_seq: 1, pg_role: replica }#10.10.10.14: { pg_group: 2, pg_cluster: pg-citus2 ,pg_vip_address: 10.10.10.62/24 ,pg_seq: 0, pg_role: primary }#10.10.10.15: { pg_group: 2, pg_cluster: pg-citus2 ,pg_vip_address: 10.10.10.62/24 ,pg_seq: 1, pg_role: replica }#10.10.10.16: { pg_group: 3, pg_cluster: pg-citus3 ,pg_vip_address: 10.10.10.63/24 ,pg_seq: 0, pg_role: primary }#10.10.10.17: { pg_group: 3, pg_cluster: pg-citus3 ,pg_vip_address: 10.10.10.63/24 ,pg_seq: 1, pg_role: replica }#10.10.10.18: { pg_group: 4, pg_cluster: pg-citus4 ,pg_vip_address: 10.10.10.64/24 ,pg_seq: 0, pg_role: primary }#10.10.10.19: { pg_group: 4, pg_cluster: pg-citus4 ,pg_vip_address: 10.10.10.64/24 ,pg_seq: 1, pg_role: replica }vars:pg_mode: citus # pgsql cluster mode:cituspg_shard: pg-citus # citus shard name:pg-cituspg_primary_db:citus # primary database used by cituspg_dbsu_password:DBUser.Postgres # enable dbsu password access for cituspg_extensions:[citus, postgis, pgvector, topn, pg_cron, hll ] # install these extensionspg_libs:'citus, pg_cron, pg_stat_statements'# citus will be added by patroni automaticallypg_users:[{name: dbuser_citus ,password: DBUser.Citus ,pgbouncer: true ,roles:[dbrole_admin ] }]pg_databases:[{name: citus ,owner: dbuser_citus ,extensions:[citus, vector, topn, pg_cron, hll ] }]pg_parameters:cron.database_name:cituscitus.node_conninfo:'sslrootcert=/pg/cert/ca.crt sslmode=verify-full'pg_hba_rules:- {user: 'all' ,db: all ,addr: 127.0.0.1/32 ,auth: ssl ,title:'all user ssl access from localhost'}- {user: 'all' ,db: all ,addr: intra ,auth: ssl ,title:'all user ssl access from intranet'}pg_vip_enabled:true# enable vip for citus clusterpg_vip_interface:eth1 # vip interface for all members (you can override this in each host)vars:# global variables#----------------------------------------------## INFRA : https://doc.pgsty.com/infra/param#----------------------------------------------#version:v4.0.0 # pigsty version stringadmin_ip:10.10.10.10# admin node ip addressregion: default # upstream mirror region:default,china,europeinfra_portal:# infra services exposed via portalhome :{domain:i.pigsty } # default domain name#----------------------------------------------## NODE : https://doc.pgsty.com/node/param#----------------------------------------------#nodename_overwrite:true# overwrite hostname since this is a multi-node tempaltenode_repo_modules:node,infra,pgsql# add these repos directly to the singleton nodenode_tune: oltp # node tuning specs:oltp,olap,tiny,crit#----------------------------------------------## PGSQL : https://doc.pgsty.com/pgsql/param#----------------------------------------------#pg_version:17# Default PostgreSQL Major Version is 17pg_conf: oltp.yml # pgsql tuning specs:{oltp,olap,tiny,crit}.ymlpg_packages:[pgsql-main, pgsql-common ] # pg kernel and common utils#pg_extensions: [ pg17-time ,pg17-gis ,pg17-rag ,pg17-fts ,pg17-olap ,pg17-feat ,pg17-lang ,pg17-type ,pg17-util ,pg17-func ,pg17-admin ,pg17-stat ,pg17-sec ,pg17-fdw ,pg17-sim ,pg17-etl]#repo_extra_packages: [ pgsql-main, citus, postgis, pgvector, pg_cron, hll, topn ]#----------------------------------------------## PASSWORD : https://doc.pgsty.com/config/security#----------------------------------------------#grafana_admin_password:pigstygrafana_view_password:DBUser.Viewerpg_admin_password:DBUser.DBApg_monitor_password:DBUser.Monitorpg_replication_password:DBUser.Replicatorpatroni_password:Patroni.APIhaproxy_admin_password:pigstyminio_secret_key:S3User.MinIOetcd_root_password:Etcd.Root...
Explanation
The citus template deploys a Citus distributed PostgreSQL cluster, suitable for large-scale data scenarios requiring horizontal scaling.
Key Features:
Transparent data sharding, automatically distributes data to multiple nodes
Parallel query execution, aggregates results from multiple nodes
Supports distributed transactions (2PC)
Maintains PostgreSQL SQL compatibility
Architecture:
Coordinator Node (pg-citus0): Receives queries, routes to data nodes
Data Nodes (pg-citus1~3): Stores sharded data
Use Cases:
Single table data volume exceeds single-node capacity
Need horizontal scaling for write and query performance
Multi-tenant SaaS applications
Real-time analytical workloads
Notes:
Citus supports PostgreSQL 14~17
Distributed tables require specifying a distribution column
Some PostgreSQL features may be limited (e.g., cross-shard foreign keys)
ARM64 architecture not supported
8.10 - mssql
WiltonDB / Babelfish kernel, provides Microsoft SQL Server protocol and syntax compatibility
The mssql configuration template uses WiltonDB / Babelfish database kernel instead of native PostgreSQL, providing Microsoft SQL Server wire protocol (TDS) and T-SQL syntax compatibility.
Compatible with Oracle data types (NUMBER, VARCHAR2, etc.)
Supports Oracle-style packages
Retains all standard PostgreSQL functionality
Use Cases:
Migrating from Oracle to PostgreSQL
Applications needing both Oracle and PostgreSQL syntax support
Leveraging PostgreSQL ecosystem while maintaining PL/SQL compatibility
Test environments for evaluating IvorySQL features
Notes:
IvorySQL 4 is based on PostgreSQL 18
Using liboracle_parser requires loading into shared_preload_libraries
pgbackrest may have checksum issues in Oracle-compatible mode, PITR capability is limited
Only supports EL8/EL9 systems, Debian/Ubuntu not supported
8.13 - mysql
OpenHalo kernel, provides MySQL protocol and syntax compatibility
The mysql configuration template uses OpenHalo database kernel instead of native PostgreSQL, providing MySQL wire protocol and SQL syntax compatibility.
---#==============================================================## File : mysql.yml# Desc : 1-node OpenHaloDB (MySQL Compatible) template# Ctime : 2025-04-03# Mtime : 2025-12-28# Docs : https://doc.pgsty.com/config# License : Apache-2.0 @ https://pigsty.io/docs/about/license/# Copyright : 2018-2026 Ruohang Feng / Vonng ([email protected])#==============================================================## This is the config template for OpenHalo PG Kernel,# Which is a PostgreSQL 14 fork with MySQL Wire Compatibility# tutorial: https://doc.pgsty.com/pgsql/kernel/openhalo## Usage:# curl https://repo.pigsty.io/get | bash# ./configure -c mysql# ./deploy.ymlall:children:infra:{hosts:{10.10.10.10:{infra_seq: 1 }} ,vars:{repo_enabled:false}}etcd:{hosts:{10.10.10.10:{etcd_seq: 1 }} ,vars:{etcd_cluster:etcd }}#minio: { hosts: { 10.10.10.10: { minio_seq: 1 }} ,vars: { minio_cluster: minio }}#----------------------------------------------## OpenHalo Database Cluster#----------------------------------------------## connect with mysql client: mysql -h 10.10.10.10 -u dbuser_meta -D mysql (the actual database is 'postgres', and 'mysql' is a schema)pg-meta:hosts:10.10.10.10:{pg_seq: 1, pg_role:primary }vars:pg_cluster:pg-metapg_users:- {name: dbuser_meta ,password: DBUser.Meta ,pgbouncer: true ,roles: [dbrole_admin] ,comment:pigsty admin user }- {name: dbuser_view ,password: DBUser.Viewer ,pgbouncer: true ,roles: [dbrole_readonly] ,comment:read-only viewer for meta database }pg_databases:- {name: postgres, extensions:[aux_mysql]}# the mysql compatible database- {name: meta ,baseline: cmdb.sql ,comment: pigsty meta database ,schemas:[pigsty]}pg_hba_rules:- {user: dbuser_view , db: all ,addr: infra ,auth: pwd ,title:'allow grafana dashboard access cmdb from infra nodes'}node_crontab:['00 01 * * * postgres /pg/bin/pg-backup full']# make a full backup every 1am# OpenHalo Ad Hoc Settingpg_mode:mysql # MySQL Compatible Mode by HaloDBpg_version:14# The current HaloDB is compatible with PG Major Version 14pg_packages:[openhalodb, pgsql-common ] # install openhalodb instead of postgresql kernelvars:#----------------------------------------------## INFRA : https://doc.pgsty.com/infra/param#----------------------------------------------#version:v4.0.0 # pigsty version stringadmin_ip:10.10.10.10# admin node ip addressregion: default # upstream mirror region:default,china,europeinfra_portal:# infra services exposed via portalhome :{domain:i.pigsty } # default domain name#----------------------------------------------## NODE : https://doc.pgsty.com/node/param#----------------------------------------------#nodename_overwrite:false# do not overwrite node hostname on single node modenode_repo_modules:node,infra,pgsql# add these repos directly to the singleton nodenode_tune: oltp # node tuning specs:oltp,olap,tiny,crit#----------------------------------------------## PGSQL : https://doc.pgsty.com/pgsql/param#----------------------------------------------#pg_version:14# OpenHalo is compatible with PG 14pg_conf: oltp.yml # pgsql tuning specs:{oltp,olap,tiny,crit}.yml#----------------------------------------------## PASSWORD : https://doc.pgsty.com/config/security#----------------------------------------------#grafana_admin_password:pigstygrafana_view_password:DBUser.Viewerpg_admin_password:DBUser.DBApg_monitor_password:DBUser.Monitorpg_replication_password:DBUser.Replicatorpatroni_password:Patroni.APIhaproxy_admin_password:pigstyminio_secret_key:S3User.MinIOetcd_root_password:Etcd.Root...
Explanation
The mysql template uses the OpenHalo kernel, allowing you to connect to PostgreSQL using MySQL client tools.
Key Features:
Uses MySQL protocol (port 3306), compatible with MySQL clients
Supports a subset of MySQL SQL syntax
Retains PostgreSQL’s ACID properties and storage engine
Supports both PostgreSQL and MySQL protocol connections simultaneously
Connection Methods:
# Using MySQL clientmysql -h 10.10.10.10 -P 3306 -u dbuser_meta -pDBUser.Meta
# Also retains PostgreSQL connection capabilitypsql postgres://dbuser_meta:[email protected]:5432/meta
Use Cases:
Migrating from MySQL to PostgreSQL
Applications needing to support both MySQL and PostgreSQL clients
Leveraging PostgreSQL ecosystem while maintaining MySQL compatibility
Notes:
OpenHalo is based on PostgreSQL 14, does not support higher version features
Some MySQL syntax may have compatibility differences
Only supports EL8/EL9 systems
ARM64 architecture not supported
8.14 - pgtde
Percona PostgreSQL kernel, provides Transparent Data Encryption (pg_tde) capability
The pgtde configuration template uses Percona PostgreSQL database kernel, providing Transparent Data Encryption (TDE) capability.
Overview
Config Name: pgtde
Node Count: Single node
Description: Percona PostgreSQL transparent data encryption configuration
Bloat-free Design: Uses UNDO logs instead of Multi-Version Concurrency Control (MVCC)
No VACUUM Required: Eliminates performance jitter from autovacuum
Row-level WAL: More efficient logging and replication
Compressed Storage: Built-in data compression, reduces storage space
Use Cases:
High-frequency update OLTP workloads
Applications sensitive to write latency
Need for stable response times (eliminates VACUUM impact)
Large tables with frequent updates causing bloat
Usage:
-- Create table using OrioleDB storage
CREATETABLEorders(idSERIALPRIMARYKEY,customer_idINT,amountDECIMAL(10,2))USINGorioledb;-- Existing tables cannot be directly converted, need to be rebuilt
Notes:
OrioleDB is based on PostgreSQL 17
Need to add orioledb to shared_preload_libraries
Some PostgreSQL features may not be fully supported
ARM64 architecture not supported
8.16 - supabase
Self-host Supabase using Pigsty-managed PostgreSQL, an open-source Firebase alternative
The supabase configuration template provides a reference configuration for self-hosting Supabase, using Pigsty-managed PostgreSQL as the underlying storage.
---#==============================================================## File : supabase.yml# Desc : Pigsty configuration for self-hosting supabase# Ctime : 2023-09-19# Mtime : 2025-12-28# Docs : https://doc.pgsty.com/config# License : Apache-2.0 @ https://pigsty.io/docs/about/license/# Copyright : 2018-2026 Ruohang Feng / Vonng ([email protected])#==============================================================## supabase is available on el8/el9/u22/u24/d12 with pg15,16,17,18# tutorial: https://doc.pgsty.com/app/supabase# Usage:# curl https://repo.pigsty.io/get | bash # install pigsty# ./configure -c supabase # use this supabase conf template# ./deploy.yml # install pigsty & pgsql & minio# ./docker.yml # install docker & docker compose# ./app.yml # launch supabase with docker composeall:children:#----------------------------------------------## INFRA : https://doc.pgsty.com/infra#----------------------------------------------#infra:hosts:10.10.10.10:{infra_seq:1}vars:repo_enabled:false# disable local repo#----------------------------------------------## ETCD : https://doc.pgsty.com/etcd#----------------------------------------------#etcd:hosts:10.10.10.10:{etcd_seq:1}vars:etcd_cluster:etcdetcd_safeguard:false# enable to prevent purging running etcd instance#----------------------------------------------## MINIO : https://doc.pgsty.com/minio#----------------------------------------------#minio:hosts:10.10.10.10:{minio_seq:1}vars:minio_cluster:miniominio_users:# list of minio user to be created- {access_key: pgbackrest ,secret_key: S3User.Backup ,policy:pgsql }- {access_key: s3user_meta ,secret_key: S3User.Meta ,policy:meta }- {access_key: s3user_data ,secret_key: S3User.Data ,policy:data }#----------------------------------------------## PostgreSQL cluster for Supabase self-hosting#----------------------------------------------#pg-meta:hosts:10.10.10.10:{pg_seq: 1, pg_role:primary }vars:pg_cluster:pg-metapg_users:# supabase roles: anon, authenticated, dashboard_user- {name: anon ,login:false}- {name: authenticated ,login:false}- {name: dashboard_user ,login: false ,replication: true ,createdb: true ,createrole:true}- {name: service_role ,login: false ,bypassrls:true}# supabase users: please use the same password- {name: supabase_admin ,password: 'DBUser.Supa' ,pgbouncer: true ,inherit: true ,roles: [ dbrole_admin ] ,superuser: true ,replication: true ,createdb: true ,createrole: true ,bypassrls:true}- {name: authenticator ,password: 'DBUser.Supa' ,pgbouncer: true ,inherit: false ,roles:[dbrole_admin, authenticated ,anon ,service_role ] }- {name: supabase_auth_admin ,password: 'DBUser.Supa' ,pgbouncer: true ,inherit: false ,roles: [ dbrole_admin ] ,createrole:true}- {name: supabase_storage_admin ,password: 'DBUser.Supa' ,pgbouncer: true ,inherit: false ,roles: [ dbrole_admin, authenticated ,anon ,service_role ] ,createrole:true}- {name: supabase_functions_admin ,password: 'DBUser.Supa' ,pgbouncer: true ,inherit: false ,roles: [ dbrole_admin ] ,createrole:true}- {name: supabase_replication_admin ,password: 'DBUser.Supa' ,replication: true ,roles:[dbrole_admin ]}- {name: supabase_etl_admin ,password: 'DBUser.Supa' ,replication: true ,roles:[pg_read_all_data ]}- {name: supabase_read_only_user ,password: 'DBUser.Supa' ,bypassrls: true ,roles:[pg_read_all_data, dbrole_readonly ]}pg_databases:- name:postgresbaseline:supabase.sqlowner:supabase_admincomment:supabase postgres databaseschemas:[extensions ,auth ,realtime ,storage ,graphql_public ,supabase_functions ,_analytics ,_realtime ]extensions:- {name: pgcrypto ,schema:extensions }# cryptographic functions- {name: pg_net ,schema:extensions }# async HTTP- {name: pgjwt ,schema:extensions }# json web token API for postgres- {name: uuid-ossp ,schema:extensions }# generate universally unique identifiers (UUIDs)- {name: pgsodium ,schema:extensions }# pgsodium is a modern cryptography library for Postgres.- {name: supabase_vault ,schema:extensions }# Supabase Vault Extension- {name: pg_graphql ,schema: extensions } # pg_graphql:GraphQL support- {name: pg_jsonschema ,schema: extensions } # pg_jsonschema:Validate json schema- {name: wrappers ,schema: extensions } # wrappers:FDW collections- {name: http ,schema: extensions } # http:allows web page retrieval inside the database.- {name: pg_cron ,schema: extensions } # pg_cron:Job scheduler for PostgreSQL- {name: timescaledb ,schema: extensions } # timescaledb:Enables scalable inserts and complex queries for time-series data- {name: pg_tle ,schema: extensions } # pg_tle:Trusted Language Extensions for PostgreSQL- {name: vector ,schema: extensions } # pgvector:the vector similarity search- {name: pgmq ,schema: extensions } # pgmq:A lightweight message queue like AWS SQS and RSMQ- {name: supabase ,owner: supabase_admin ,comment: supabase analytics database ,schemas:[extensions, _analytics ] }# supabase required extensionspg_libs:'timescaledb, pgsodium, plpgsql, plpgsql_check, pg_cron, pg_net, pg_stat_statements, auto_explain, pg_wait_sampling, pg_tle, plan_filter'pg_extensions:[pg18-main ,pg18-time ,pg18-gis ,pg18-rag ,pg18-fts ,pg18-olap ,pg18-feat ,pg18-lang ,pg18-type ,pg18-util ,pg18-func ,pg18-admin ,pg18-stat ,pg18-sec ,pg18-fdw ,pg18-sim ,pg18-etl]pg_parameters:{cron.database_name:postgres }pg_hba_rules:# supabase hba rules, require access from docker network- {user: all ,db: postgres ,addr: intra ,auth: pwd ,title:'allow supabase access from intranet'}- {user: all ,db: postgres ,addr: 172.17.0.0/16 ,auth: pwd ,title:'allow access from local docker network'}node_crontab:- '00 01 * * * postgres /pg/bin/pg-backup full'# make a full backup every 1am- '* * * * * postgres /pg/bin/supa-kick' # kick supabase _analytics lag per minute:https://github.com/pgsty/pigsty/issues/581#----------------------------------------------## Supabase#----------------------------------------------## ./docker.yml# ./app.yml# the supabase stateless containers (default username & password: supabase/pigsty)supabase:hosts:10.10.10.10:{}vars:docker_enabled:true# enable docker on this group#docker_registry_mirrors: ["https://docker.1panel.live","https://docker.1ms.run","https://docker.xuanyuan.me","https://registry-1.docker.io"]app:supabase # specify app name (supa) to be installed (in the apps)apps:# define all applicationssupabase:# the definition of supabase appconf:# override /opt/supabase/.env# IMPORTANT: CHANGE JWT_SECRET AND REGENERATE CREDENTIAL ACCORDING!!!!!!!!!!!# https://supabase.com/docs/guides/self-hosting/docker#securing-your-servicesJWT_SECRET:your-super-secret-jwt-token-with-at-least-32-characters-longANON_KEY:eyJhbGciOiJIUzI1NiIsInR5cCI6IkpXVCJ9.eyAgCiAgICAicm9sZSI6ICJhbm9uIiwKICAgICJpc3MiOiAic3VwYWJhc2UtZGVtbyIsCiAgICAiaWF0IjogMTY0MTc2OTIwMCwKICAgICJleHAiOiAxNzk5NTM1NjAwCn0.dc_X5iR_VP_qT0zsiyj_I_OZ2T9FtRU2BBNWN8Bu4GESERVICE_ROLE_KEY:eyJhbGciOiJIUzI1NiIsInR5cCI6IkpXVCJ9.eyAgCiAgICAicm9sZSI6ICJzZXJ2aWNlX3JvbGUiLAogICAgImlzcyI6ICJzdXBhYmFzZS1kZW1vIiwKICAgICJpYXQiOiAxNjQxNzY5MjAwLAogICAgImV4cCI6IDE3OTk1MzU2MDAKfQ.DaYlNEoUrrEn2Ig7tqibS-PHK5vgusbcbo7X36XVt4QPG_META_CRYPTO_KEY:your-encryption-key-32-chars-minDASHBOARD_USERNAME:supabaseDASHBOARD_PASSWORD:pigsty# 32~64 random characters string for logflareLOGFLARE_PUBLIC_ACCESS_TOKEN:1234567890abcdef1234567890abcdefLOGFLARE_PRIVATE_ACCESS_TOKEN:fedcba0987654321fedcba0987654321# postgres connection string (use the correct ip and port)POSTGRES_HOST:10.10.10.10# point to the local postgres nodePOSTGRES_PORT:5436# access via the 'default' service, which always route to the primary postgresPOSTGRES_DB:postgres # the supabase underlying databasePOSTGRES_PASSWORD:DBUser.Supa # password for supabase_admin and multiple supabase users# expose supabase via domain nameSITE_URL:https://supa.pigsty # <------- Change This to your external domain nameAPI_EXTERNAL_URL:https://supa.pigsty # <------- Otherwise the storage api may not work!SUPABASE_PUBLIC_URL:https://supa.pigsty # <------- DO NOT FORGET TO PUT IT IN infra_portal!# if using s3/minio as file storageS3_BUCKET:dataS3_ENDPOINT:https://sss.pigsty:9000S3_ACCESS_KEY:s3user_dataS3_SECRET_KEY:S3User.DataS3_FORCE_PATH_STYLE:trueS3_PROTOCOL:httpsS3_REGION:stubMINIO_DOMAIN_IP:10.10.10.10# sss.pigsty domain name will resolve to this ip statically# if using SMTP (optional)#SMTP_ADMIN_EMAIL: [email protected]#SMTP_HOST: supabase-mail#SMTP_PORT: 2500#SMTP_USER: fake_mail_user#SMTP_PASS: fake_mail_password#SMTP_SENDER_NAME: fake_sender#ENABLE_ANONYMOUS_USERS: false#==============================================================## Global Parameters#==============================================================#vars:#----------------------------------------------## INFRA : https://doc.pgsty.com/infra#----------------------------------------------#version:v4.0.0 # pigsty version stringadmin_ip:10.10.10.10# admin node ip addressregion: default # upstream mirror region:default|china|europeproxy_env:# global proxy env when downloading packagesno_proxy:"localhost,127.0.0.1,10.0.0.0/8,192.168.0.0/16,*.pigsty,*.aliyun.com,mirrors.*,*.myqcloud.com,*.tsinghua.edu.cn"# http_proxy: # set your proxy here: e.g http://user:[email protected]# https_proxy: # set your proxy here: e.g http://user:[email protected]# all_proxy: # set your proxy here: e.g http://user:[email protected]certbot_sign:false# enable certbot to sign https certificate for infra portalcertbot_email:[email protected]# replace your email address to receive expiration noticeinfra_portal:# infra services exposed via portalhome :{domain:i.pigsty } # default domain namepgadmin :{domain: adm.pigsty ,endpoint:"${admin_ip}:8885"}bytebase :{domain: ddl.pigsty ,endpoint:"${admin_ip}:8887"}#minio : { domain: m.pigsty ,endpoint: "${admin_ip}:9001" ,scheme: https ,websocket: true }# Nginx / Domain / HTTPS : https://doc.pgsty.com/admin/portalsupa :# nginx server config for supabasedomain:supa.pigsty # REPLACE IT WITH YOUR OWN DOMAIN!endpoint:"10.10.10.10:8000"# supabase service endpoint: IP:PORTwebsocket:true# add websocket supportcertbot:supa.pigsty # certbot cert name, apply with `make cert`#----------------------------------------------## NODE : https://doc.pgsty.com/node/param#----------------------------------------------#nodename_overwrite:false# do not overwrite node hostname on single node modenode_tune: oltp # node tuning specs:oltp,olap,tiny,critnode_etc_hosts:# add static domains to all nodes /etc/hosts- 10.10.10.10i.pigsty sss.pigsty supa.pigstynode_repo_modules:node,pgsql,infra # use pre-made local repo rather than install from upstreamnode_repo_remove:true# remove existing node repo for node managed by pigsty#node_packages: [openssh-server] # packages to be installed current nodes with latest version#node_timezone: Asia/Hong_Kong # overwrite node timezone#----------------------------------------------## PGSQL : https://doc.pgsty.com/pgsql/param#----------------------------------------------#pg_version:18# default postgres versionpg_conf: oltp.yml # pgsql tuning specs:{oltp,olap,tiny,crit}.ymlpg_safeguard:false# prevent purging running postgres instance?pg_default_schemas: [ monitor, extensions ] # add new schema:exxtensionspg_default_extensions:# default extensions to be created- {name: pg_stat_statements ,schema:monitor }- {name: pgstattuple ,schema:monitor }- {name: pg_buffercache ,schema:monitor }- {name: pageinspect ,schema:monitor }- {name: pg_prewarm ,schema:monitor }- {name: pg_visibility ,schema:monitor }- {name: pg_freespacemap ,schema:monitor }- {name: pg_wait_sampling ,schema:monitor }# move default extensions to `extensions` schema for supabase- {name: postgres_fdw ,schema:extensions }- {name: file_fdw ,schema:extensions }- {name: btree_gist ,schema:extensions }- {name: btree_gin ,schema:extensions }- {name: pg_trgm ,schema:extensions }- {name: intagg ,schema:extensions }- {name: intarray ,schema:extensions }- {name: pg_repack ,schema:extensions }#----------------------------------------------## BACKUP : https://doc.pgsty.com/pgsql/backup#----------------------------------------------#minio_endpoint:https://sss.pigsty:9000# explicit overwrite minio endpoint with haproxy portpgbackrest_method: minio # pgbackrest repo method:local,minio,[user-defined...]pgbackrest_repo: # pgbackrest repo:https://pgbackrest.org/configuration.html#section-repositorylocal:# default pgbackrest repo with local posix fspath:/pg/backup # local backup directory, `/pg/backup` by defaultretention_full_type:count # retention full backups by countretention_full:2# keep 2, at most 3 full backups when using local fs repominio:# optional minio repo for pgbackresttype:s3 # minio is s3-compatible, so s3 is useds3_endpoint:sss.pigsty # minio endpoint domain name, `sss.pigsty` by defaults3_region:us-east-1 # minio region, us-east-1 by default, useless for minios3_bucket:pgsql # minio bucket name, `pgsql` by defaults3_key:pgbackrest # minio user access key for pgbackrests3_key_secret:S3User.Backup # minio user secret key for pgbackrest <------------------ HEY, DID YOU CHANGE THIS?s3_uri_style:path # use path style uri for minio rather than host stylepath:/pgbackrest # minio backup path, default is `/pgbackrest`storage_port:9000# minio port, 9000 by defaultstorage_ca_file:/etc/pki/ca.crt # minio ca file path, `/etc/pki/ca.crt` by defaultblock:y# Enable block incremental backupbundle:y# bundle small files into a single filebundle_limit:20MiB # Limit for file bundles, 20MiB for object storagebundle_size:128MiB # Target size for file bundles, 128MiB for object storagecipher_type:aes-256-cbc # enable AES encryption for remote backup repocipher_pass:pgBackRest # AES encryption password, default is 'pgBackRest' <----- HEY, DID YOU CHANGE THIS?retention_full_type:time # retention full backup by time on minio reporetention_full:14# keep full backup for the last 14 dayss3:# you can use cloud object storage as backup repotype:s3 # Add your object storage credentials here!s3_endpoint:oss-cn-beijing-internal.aliyuncs.coms3_region:oss-cn-beijings3_bucket:<your_bucket_name>s3_key:<your_access_key>s3_key_secret:<your_secret_key>s3_uri_style:hostpath:/pgbackrestbundle:y# bundle small files into a single filebundle_limit:20MiB # Limit for file bundles, 20MiB for object storagebundle_size:128MiB # Target size for file bundles, 128MiB for object storagecipher_type:aes-256-cbc # enable AES encryption for remote backup repocipher_pass:pgBackRest # AES encryption password, default is 'pgBackRest'retention_full_type:time # retention full backup by time on minio reporetention_full:14# keep full backup for the last 14 days#----------------------------------------------## PASSWORD : https://doc.pgsty.com/config/security#----------------------------------------------#grafana_admin_password:pigstygrafana_view_password:DBUser.Viewerpg_admin_password:DBUser.DBApg_monitor_password:DBUser.Monitorpg_replication_password:DBUser.Replicatorpatroni_password:Patroni.APIhaproxy_admin_password:pigstyminio_secret_key:S3User.MinIOetcd_root_password:Etcd.Root...
Installation Demo
Explanation
The supabase template provides a complete self-hosted Supabase solution, allowing you to run this open-source Firebase alternative on your own infrastructure.
Architecture:
PostgreSQL: Production-grade Pigsty-managed PostgreSQL (with HA support)
Four-node complete feature demonstration environment with two PostgreSQL clusters, MinIO, Redis, etc.
The ha/full configuration template is Pigsty’s recommended sandbox demonstration environment, deploying two PostgreSQL clusters across four nodes for testing and demonstrating various Pigsty capabilities.
Most Pigsty tutorials and examples are based on this template’s sandbox environment.
Overview
Config Name: ha/full
Node Count: Four nodes
Description: Four-node complete feature demonstration environment with two PostgreSQL clusters, MinIO, Redis, etc.
---#==============================================================## File : full.yml# Desc : Pigsty Local Sandbox 4-node Demo Config# Ctime : 2020-05-22# Mtime : 2025-12-12# Docs : https://doc.pgsty.com/config# License : Apache-2.0 @ https://pigsty.io/docs/about/license/# Copyright : 2018-2026 Ruohang Feng / Vonng ([email protected])#==============================================================#all:#==============================================================## Clusters, Nodes, and Modules#==============================================================#children:# infra: monitor, alert, repo, etc..infra:hosts:10.10.10.10:{infra_seq:1}vars:docker_enabled:true# enabled docker with ./docker.yml#docker_registry_mirrors: ["https://docker.1panel.live","https://docker.1ms.run","https://docker.xuanyuan.me","https://registry-1.docker.io"]# etcd cluster for HA postgres DCSetcd:hosts:10.10.10.10:{etcd_seq:1}vars:etcd_cluster:etcd# minio (single node, used as backup repo)minio:hosts:10.10.10.10:{minio_seq:1}vars:minio_cluster:miniominio_users:# list of minio user to be created- {access_key: pgbackrest ,secret_key: S3User.Backup ,policy:pgsql }- {access_key: s3user_meta ,secret_key: S3User.Meta ,policy:meta }- {access_key: s3user_data ,secret_key: S3User.Data ,policy:data }# postgres cluster: pg-metapg-meta:hosts:10.10.10.10:{pg_seq: 1, pg_role:primary }vars:pg_cluster:pg-metapg_users:- {name: dbuser_meta ,password: DBUser.Meta ,pgbouncer: true ,roles: [ dbrole_admin ] ,comment:pigsty admin user }- {name: dbuser_view ,password: DBUser.Viewer ,pgbouncer: true ,roles: [ dbrole_readonly ] ,comment:read-only viewer for meta database }pg_databases:- {name: meta ,baseline: cmdb.sql ,comment: pigsty meta database ,schemas:[pigsty ] }pg_hba_rules:- {user: dbuser_view , db: all ,addr: infra ,auth: pwd ,title:'allow grafana dashboard access cmdb from infra nodes'}pg_vip_enabled:truepg_vip_address:10.10.10.2/24pg_vip_interface:eth1node_crontab:# make a full backup 1 am everyday- '00 01 * * * postgres /pg/bin/pg-backup full'# pgsql 3 node ha cluster: pg-testpg-test:hosts:10.10.10.11:{pg_seq: 1, pg_role:primary } # primary instance, leader of cluster10.10.10.12:{pg_seq: 2, pg_role:replica } # replica instance, follower of leader10.10.10.13:{pg_seq: 3, pg_role: replica, pg_offline_query:true}# replica with offline accessvars:pg_cluster:pg-test # define pgsql cluster namepg_users:[{name: test , password: test , pgbouncer: true , roles:[dbrole_admin ] }]pg_databases:[{name:test }]pg_vip_enabled:truepg_vip_address:10.10.10.3/24pg_vip_interface:eth1node_crontab:# make a full backup on monday 1am, and an incremental backup during weekdays- '00 01 * * 1 postgres /pg/bin/pg-backup full'- '00 01 * * 2,3,4,5,6,7 postgres /pg/bin/pg-backup'#----------------------------------## redis ms, sentinel, native cluster#----------------------------------#redis-ms:# redis classic primary & replicahosts:{10.10.10.10:{redis_node: 1 , redis_instances:{6379:{}, 6380:{replica_of:'10.10.10.10 6379'}}}}vars:{redis_cluster: redis-ms ,redis_password: 'redis.ms' ,redis_max_memory:64MB }redis-meta:# redis sentinel x 3hosts:{10.10.10.11:{redis_node: 1 , redis_instances:{26379:{} ,26380:{} ,26381:{}}}}vars:redis_cluster:redis-metaredis_password:'redis.meta'redis_mode:sentinelredis_max_memory:16MBredis_sentinel_monitor:# primary list for redis sentinel, use cls as name, primary ip:port- {name: redis-ms, host: 10.10.10.10, port: 6379 ,password: redis.ms, quorum:2}redis-test: # redis native cluster:3m x 3shosts:10.10.10.12:{redis_node: 1 ,redis_instances:{6379:{} ,6380:{} ,6381:{}}}10.10.10.13:{redis_node: 2 ,redis_instances:{6379:{} ,6380:{} ,6381:{}}}vars:{redis_cluster: redis-test ,redis_password: 'redis.test' ,redis_mode: cluster, redis_max_memory:32MB }#==============================================================## Global Parameters#==============================================================#vars:version:v4.0.0 # pigsty version stringadmin_ip:10.10.10.10# admin node ip addressregion: default # upstream mirror region:default|china|europenode_tune: oltp # node tuning specs:oltp,olap,tiny,critpg_conf: oltp.yml # pgsql tuning specs:{oltp,olap,tiny,crit}.ymlproxy_env:# global proxy env when downloading packagesno_proxy:"localhost,127.0.0.1,10.0.0.0/8,192.168.0.0/16,*.pigsty,*.aliyun.com,mirrors.*,*.myqcloud.com,*.tsinghua.edu.cn"# http_proxy: # set your proxy here: e.g http://user:[email protected]# https_proxy: # set your proxy here: e.g http://user:[email protected]# all_proxy: # set your proxy here: e.g http://user:[email protected]infra_portal:# infra services exposed via portalhome :{domain:i.pigsty } # default domain name#minio : { domain: m.pigsty ,endpoint: "${admin_ip}:9001" ,scheme: https ,websocket: true }#----------------------------------## MinIO Related Options#----------------------------------#node_etc_hosts:['${admin_ip} i.pigsty sss.pigsty']pgbackrest_method:minio # if you want to use minio as backup repo instead of 'local' fs, uncomment thispgbackrest_repo: # pgbackrest repo:https://pgbackrest.org/configuration.html#section-repositorylocal:# default pgbackrest repo with local posix fspath:/pg/backup # local backup directory, `/pg/backup` by defaultretention_full_type:count # retention full backups by countretention_full:2# keep 2, at most 3 full backup when using local fs repominio:# optional minio repo for pgbackresttype:s3 # minio is s3-compatible, so s3 is useds3_endpoint:sss.pigsty # minio endpoint domain name, `sss.pigsty` by defaults3_region:us-east-1 # minio region, us-east-1 by default, useless for minios3_bucket:pgsql # minio bucket name, `pgsql` by defaults3_key:pgbackrest # minio user access key for pgbackrests3_key_secret:S3User.Backup # minio user secret key for pgbackrests3_uri_style:path # use path style uri for minio rather than host stylepath:/pgbackrest # minio backup path, default is `/pgbackrest`storage_port:9000# minio port, 9000 by defaultstorage_ca_file:/etc/pki/ca.crt # minio ca file path, `/etc/pki/ca.crt` by defaultblock:y# Enable block incremental backupbundle:y# bundle small files into a single filebundle_limit:20MiB # Limit for file bundles, 20MiB for object storagebundle_size:128MiB # Target size for file bundles, 128MiB for object storagecipher_type:aes-256-cbc # enable AES encryption for remote backup repocipher_pass:pgBackRest # AES encryption password, default is 'pgBackRest'retention_full_type:time # retention full backup by time on minio reporetention_full:14# keep full backup for last 14 days#----------------------------------## Repo, Node, Packages#----------------------------------#repo_remove:true# remove existing repo on admin node during repo bootstrapnode_repo_remove:true# remove existing node repo for node managed by pigstyrepo_extra_packages:[pg18-main ]#,pg18-core ,pg18-time ,pg18-gis ,pg18-rag ,pg18-fts ,pg18-olap ,pg18-feat ,pg18-lang ,pg18-type ,pg18-util ,pg18-func ,pg18-admin ,pg18-stat ,pg18-sec ,pg18-fdw ,pg18-sim ,pg18-etl]pg_version:18# default postgres version#pg_extensions: [pg18-time ,pg18-gis ,pg18-rag ,pg18-fts ,pg18-feat ,pg18-lang ,pg18-type ,pg18-util ,pg18-func ,pg18-admin ,pg18-stat ,pg18-sec ,pg18-fdw ,pg18-sim ,pg18-etl ,pg18-olap]#----------------------------------------------## PASSWORD : https://doc.pgsty.com/config/security#----------------------------------------------#grafana_admin_password:pigstygrafana_view_password:DBUser.Viewerpg_admin_password:DBUser.DBApg_monitor_password:DBUser.Monitorpg_replication_password:DBUser.Replicatorpatroni_password:Patroni.APIhaproxy_admin_password:pigstyminio_secret_key:S3User.MinIOetcd_root_password:Etcd.Root...
Explanation
The ha/full template is Pigsty’s complete feature demonstration configuration, showcasing the collaboration of various components.
Components Overview:
Component
Node Distribution
Description
INFRA
Node 1
Monitoring/Alerting/Nginx/DNS
ETCD
Node 1
DCS Service
MinIO
Node 1
S3-compatible Storage
pg-meta
Node 1
Single-node PostgreSQL
pg-test
Nodes 2-4
Three-node HA PostgreSQL
redis-ms
Node 1
Redis Primary-Replica Mode
redis-meta
Node 2
Redis Sentinel Mode
redis-test
Nodes 3-4
Redis Native Cluster Mode
Use Cases:
Pigsty feature demonstration and learning
Development testing environments
Evaluating HA architecture
Comparing different Redis modes
Differences from ha/trio:
Added second PostgreSQL cluster (pg-test)
Added three Redis cluster mode examples
Infrastructure uses single node (instead of three nodes)
Notes:
This template is mainly for demonstration and testing; for production, refer to ha/trio or ha/safe
MinIO backup enabled by default; comment out related config if not needed
8.20 - ha/safe
Security-hardened HA configuration template with high-standard security best practices
The ha/safe configuration template is based on the ha/trio template, providing a security-hardened configuration with high-standard security best practices.
Overview
Config Name: ha/safe
Node Count: Three nodes (optional delayed replica)
Description: Security-hardened HA configuration with high-standard security best practices
OS Distro: el8, el9, el10, d12, d13, u22, u24
OS Arch: x86_64 (some security extensions unavailable on ARM64)
Critical business with extremely high data security demands
Notes:
Some security extensions unavailable on ARM64 architecture, enable appropriately
All default passwords must be changed to strong passwords
Recommend using with regular security audits
8.21 - ha/trio
Three-node standard HA configuration, tolerates any single server failure
Three nodes is the minimum scale for achieving true high availability. The ha/trio template uses a three-node standard HA architecture, with INFRA, ETCD, and PGSQL all deployed across three nodes, tolerating any single server failure.
Overview
Config Name: ha/trio
Node Count: Three nodes
Description: Three-node standard HA architecture, tolerates any single server failure
Production environments should enable pgbackrest_method: minio for remote backup
8.22 - ha/dual
Two-node configuration, limited HA deployment tolerating specific server failure
The ha/dual template uses two-node deployment, implementing a “semi-HA” architecture with one primary and one standby. If you only have two servers, this is a pragmatic choice.
Overview
Config Name: ha/dual
Node Count: Two nodes
Description: Two-node limited HA deployment, tolerates specific server failure
---#==============================================================## File : dual.yml# Desc : Pigsty deployment example for two nodes# Ctime : 2020-05-22# Mtime : 2025-12-12# Docs : https://doc.pgsty.com/config# License : Apache-2.0 @ https://pigsty.io/docs/about/license/# Copyright : 2018-2026 Ruohang Feng / Vonng ([email protected])#==============================================================## It is recommended to use at least three nodes in production deployment.# But sometimes, there are only two nodes available, that's dual.yml for## In this setup, we have two nodes, .10 (admin_node) and .11 (pgsql_priamry):## If .11 is down, .10 will take over since the dcs:etcd is still alive# If .10 is down, .11 (pgsql primary) will still be functioning as a primary if:# - Only dcs:etcd is down# - Only pgsql is down# if both etcd & pgsql are down (e.g. node down), the primary will still demote itself.all:children:# infra cluster for proxy, monitor, alert, etc..infra:{hosts:{10.10.10.10:{infra_seq:1}}}# etcd cluster for ha postgresetcd:{hosts:{10.10.10.10:{etcd_seq: 1 } }, vars:{etcd_cluster:etcd } }# minio cluster, optional backup repo for pgbackrest#minio: { hosts: { 10.10.10.10: { minio_seq: 1 } }, vars: { minio_cluster: minio } }# postgres cluster 'pg-meta' with single primary instancepg-meta:hosts:10.10.10.10:{pg_seq: 1, pg_role:replica }10.10.10.11:{pg_seq: 2, pg_role:primary } # <----- use this as primary by defaultvars:pg_cluster:pg-metapg_databases:[{name: meta ,baseline: cmdb.sql ,comment: pigsty meta database ,schemas: [ pigsty ] ,extensions:[{name:vector }] } ]pg_users:- {name: dbuser_meta ,password: DBUser.Meta ,pgbouncer: true ,roles: [ dbrole_admin ] ,comment:pigsty admin user }- {name: dbuser_view ,password: DBUser.Viewer ,pgbouncer: true ,roles: [ dbrole_readonly ] ,comment:read-only viewer for meta database }node_crontab:['00 01 * * * postgres /pg/bin/pg-backup full']# make a full backup every 1ampg_vip_enabled:truepg_vip_address:10.10.10.2/24pg_vip_interface:eth1vars:# global parametersversion:v4.0.0 # pigsty version stringadmin_ip:10.10.10.10# admin node ip addressregion: default # upstream mirror region:default,china,europenode_tune: oltp # node tuning specs:oltp,olap,tiny,critpg_conf: oltp.yml # pgsql tuning specs:{oltp,olap,tiny,crit}.yml#docker_registry_mirrors: ["https://docker.1panel.live","https://docker.1ms.run","https://docker.xuanyuan.me","https://registry-1.docker.io"]infra_portal:# domain names and upstream servershome :{domain:i.pigsty }#minio : { domain: m.pigsty ,endpoint: "${admin_ip}:9001" ,scheme: https ,websocket: true }#----------------------------------## Repo, Node, Packages#----------------------------------#repo_remove:true# remove existing repo on admin node during repo bootstrapnode_repo_remove:true# remove existing node repo for node managed by pigstyrepo_extra_packages:[pg18-main ]#,pg18-core ,pg18-time ,pg18-gis ,pg18-rag ,pg18-fts ,pg18-olap ,pg18-feat ,pg18-lang ,pg18-type ,pg18-util ,pg18-func ,pg18-admin ,pg18-stat ,pg18-sec ,pg18-fdw ,pg18-sim ,pg18-etl]pg_version:18# default postgres version#pg_extensions: [ pg18-time ,pg18-gis ,pg18-rag ,pg18-fts ,pg18-olap ,pg18-feat ,pg18-lang ,pg18-type ,pg18-util ,pg18-func ,pg18-admin ,pg18-stat ,pg18-sec ,pg18-fdw ,pg18-sim ,pg18-etl]#----------------------------------------------## PASSWORD : https://doc.pgsty.com/config/security#----------------------------------------------#grafana_admin_password:pigstygrafana_view_password:DBUser.Viewerpg_admin_password:DBUser.DBApg_monitor_password:DBUser.Monitorpg_replication_password:DBUser.Replicatorpatroni_password:Patroni.APIhaproxy_admin_password:pigstyminio_secret_key:S3User.MinIOetcd_root_password:Etcd.Root...
Explanation
The ha/dual template is Pigsty’s two-node limited HA configuration, designed for scenarios with only two servers.
Architecture:
Node A (10.10.10.10): Admin node, runs Infra + etcd + PostgreSQL replica
Node B (10.10.10.11): Data node, runs PostgreSQL primary only
Failure Scenario Analysis:
Failed Node
Impact
Auto Recovery
Node B down
Primary switches to Node A
Auto
Node A etcd down
Primary continues running (no DCS)
Manual
Node A pgsql down
Primary continues running
Manual
Node A complete failure
Primary degrades to standalone
Manual
Use Cases:
Budget-limited environments with only two servers
Acceptable that some failure scenarios need manual intervention
Transitional solution before upgrading to three-node HA
Notes:
True HA requires at least three nodes (DCS needs majority)
Recommend upgrading to three-node architecture as soon as possible
L2 VIP requires network environment support (same broadcast domain)
8.23 - App Templates
8.24 - app/odoo
Deploy Odoo open-source ERP system using Pigsty-managed PostgreSQL
The app/odoo configuration template provides a reference configuration for self-hosting Odoo open-source ERP system, using Pigsty-managed PostgreSQL as the database.
# Odoo Web interfacehttp://odoo.pigsty:8069
# Default admin accountUsername: admin
Password: admin (set on first login)
Use Cases:
SMB ERP systems
Alternative to SAP, Oracle ERP and other commercial solutions
Enterprise applications requiring customized business processes
Notes:
Odoo container runs as uid=100, gid=101, data directory needs correct permissions
First access requires creating database and setting admin password
Production environments should enable HTTPS
Custom modules can be installed via /data/odoo/addons
8.25 - app/dify
Deploy Dify AI application development platform using Pigsty-managed PostgreSQL
The app/dify configuration template provides a reference configuration for self-hosting Dify AI application development platform, using Pigsty-managed PostgreSQL and pgvector as vector storage.
---#==============================================================## File : dify.yml# Desc : pigsty config for running 1-node dify app# Ctime : 2025-02-24# Mtime : 2025-12-12# Docs : https://doc.pgsty.com/app/odoo# License : Apache-2.0 @ https://pigsty.io/docs/about/license/# Copyright : 2018-2026 Ruohang Feng / Vonng ([email protected])#==============================================================## Last Verified Dify Version: v1.8.1 on 2025-0908# tutorial: https://doc.pgsty.com/app/dify# how to use this template:## curl -fsSL https://repo.pigsty.io/get | bash; cd ~/pigsty# ./bootstrap # prepare local repo & ansible# ./configure -c app/dify # use this dify config template# vi pigsty.yml # IMPORTANT: CHANGE CREDENTIALS!!# ./deploy.yml # install pigsty & pgsql & minio# ./docker.yml # install docker & docker-compose# ./app.yml # install dify with docker-compose## To replace domain name:# sed -ie 's/dify.pigsty/dify.pigsty.cc/g' pigsty.ymlall:children:# the dify applicationdify:hosts:{10.10.10.10:{}}vars:app:dify # specify app name to be installed (in the apps)apps:# define all applicationsdify:# app name, should have corresponding ~/pigsty/app/dify folderfile:# data directory to be created- {path: /data/dify ,state: directory ,mode:0755}conf:# override /opt/dify/.env config file# change domain, mirror, proxy, secret keyNGINX_SERVER_NAME:dify.pigsty# A secret key for signing and encryption, gen with `openssl rand -base64 42` (CHANGE PASSWORD!)SECRET_KEY:sk-somerandomkey# expose DIFY nginx service with port 5001 by defaultDIFY_PORT:5001# where to store dify files? the default is ./volume, we'll use another volume created aboveDIFY_DATA:/data/dify# proxy and mirror settings#PIP_MIRROR_URL: https://pypi.tuna.tsinghua.edu.cn/simple#SANDBOX_HTTP_PROXY: http://10.10.10.10:12345#SANDBOX_HTTPS_PROXY: http://10.10.10.10:12345# database credentialsDB_USERNAME:difyDB_PASSWORD:difyai123456DB_HOST:10.10.10.10DB_PORT:5432DB_DATABASE:difyVECTOR_STORE:pgvectorPGVECTOR_HOST:10.10.10.10PGVECTOR_PORT:5432PGVECTOR_USER:difyPGVECTOR_PASSWORD:difyai123456PGVECTOR_DATABASE:difyPGVECTOR_MIN_CONNECTION:2PGVECTOR_MAX_CONNECTION:10pg-meta:hosts:{10.10.10.10:{pg_seq: 1, pg_role:primary } }vars:pg_cluster:pg-metapg_users:- {name: dify ,password: difyai123456 ,pgbouncer: true ,roles: [ dbrole_admin ] ,superuser: true ,comment:dify superuser }pg_databases:- {name: dify ,owner: dify ,revokeconn: true ,comment:dify main database }- {name: dify_plugin ,owner: dify ,revokeconn: true ,comment:dify plugin_daemon database }pg_hba_rules:- {user: dify ,db: all ,addr: 172.17.0.0/16 ,auth: pwd ,title:'allow dify access from local docker network'}node_crontab:['00 01 * * * postgres /pg/bin/pg-backup full']# make a full backup every 1aminfra:{hosts:{10.10.10.10:{infra_seq:1}}}etcd:{hosts:{10.10.10.10:{etcd_seq: 1 } }, vars:{etcd_cluster:etcd } }#minio: { hosts: { 10.10.10.10: { minio_seq: 1 } }, vars: { minio_cluster: minio } }vars:# global variablesversion:v4.0.0 # pigsty version stringadmin_ip:10.10.10.10# admin node ip addressregion: default # upstream mirror region:default|china|europenode_tune: oltp # node tuning specs:oltp,olap,tiny,critpg_conf: oltp.yml # pgsql tuning specs:{oltp,olap,tiny,crit}.ymldocker_enabled:true# enable docker on app group#docker_registry_mirrors: ["https://docker.1panel.live","https://docker.1ms.run","https://docker.xuanyuan.me","https://registry-1.docker.io"]proxy_env:# global proxy env when downloading packages & pull docker imagesno_proxy:"localhost,127.0.0.1,10.0.0.0/8,192.168.0.0/16,*.pigsty,*.aliyun.com,mirrors.*,*.tsinghua.edu.cn"#http_proxy: 127.0.0.1:12345 # add your proxy env here for downloading packages or pull images#https_proxy: 127.0.0.1:12345 # usually the proxy is format as http://user:[email protected]#all_proxy: 127.0.0.1:12345infra_portal:# domain names and upstream servershome :{domain:i.pigsty }#minio : { domain: m.pigsty ,endpoint: "${admin_ip}:9001" ,scheme: https ,websocket: true }dify:# nginx server config for difydomain:dify.pigsty # REPLACE WITH YOUR OWN DOMAIN!endpoint:"10.10.10.10:5001"# dify service endpoint: IP:PORTwebsocket:true# add websocket supportcertbot:dify.pigsty # certbot cert name, apply with `make cert`repo_enabled:falsenode_repo_modules:node,infra,pgsqlpg_version:18#----------------------------------------------## PASSWORD : https://doc.pgsty.com/config/security#----------------------------------------------#grafana_admin_password:pigstygrafana_view_password:DBUser.Viewerpg_admin_password:DBUser.DBApg_monitor_password:DBUser.Monitorpg_replication_password:DBUser.Replicatorpatroni_password:Patroni.APIhaproxy_admin_password:pigstyminio_secret_key:S3User.MinIOetcd_root_password:Etcd.Root...
Explanation
The app/dify template provides a one-click deployment solution for Dify AI application development platform.
What is Dify:
Open-source LLM application development platform
Supports RAG, Agent, Workflow and other AI application modes
Provides visual Prompt orchestration and application building interface
Supports multiple LLM backends (OpenAI, Claude, local models, etc.)
Key Features:
Uses Pigsty-managed PostgreSQL instead of Dify’s built-in database
Uses pgvector as vector storage (replaces Weaviate/Qdrant)
Supports HTTPS and custom domain names
Data persisted to independent directory /data/dify
Access:
# Dify Web interfacehttp://dify.pigsty:5001
# Or via Nginx proxyhttps://dify.pigsty
Use Cases:
Enterprise internal AI application development platform
RAG knowledge base Q&A systems
LLM-driven automated workflows
AI Agent development and deployment
Notes:
Must change SECRET_KEY, generate with openssl rand -base64 42
Configure LLM API keys (e.g., OpenAI API Key)
Docker network needs access to PostgreSQL (172.17.0.0/16 HBA rule configured)
Recommend configuring proxy to accelerate Python package downloads
8.26 - app/electric
Deploy Electric real-time sync service using Pigsty-managed PostgreSQL
The app/electric configuration template provides a reference configuration for deploying Electric SQL real-time sync service, enabling real-time data synchronization from PostgreSQL to clients.
Overview
Config Name: app/electric
Node Count: Single node
Description: Deploy Electric real-time sync using Pigsty-managed PostgreSQL
---#==============================================================## File : electric.yml# Desc : pigsty config for running 1-node electric app# Ctime : 2025-03-29# Mtime : 2025-12-12# Docs : https://doc.pgsty.com/app/odoo# License : Apache-2.0 @ https://pigsty.io/docs/about/license/# Copyright : 2018-2026 Ruohang Feng / Vonng ([email protected])#==============================================================## tutorial: https://doc.pgsty.com/app/electric# quick start: https://electric-sql.com/docs/quickstart# how to use this template:## curl -fsSL https://repo.pigsty.io/get | bash; cd ~/pigsty# ./bootstrap # prepare local repo & ansible# ./configure -c app/electric # use this dify config template# vi pigsty.yml # IMPORTANT: CHANGE CREDENTIALS!!# ./deploy.yml # install pigsty & pgsql & minio# ./docker.yml # install docker & docker-compose# ./app.yml # install dify with docker-composeall:children:# infra cluster for proxy, monitor, alert, etc..infra:hosts:{10.10.10.10:{infra_seq:1}}vars:app:electricapps:# define all applicationselectric:# app name, should have corresponding ~/pigsty/app/electric folderconf: # override /opt/electric/.env config file :https://electric-sql.com/docs/api/configDATABASE_URL:'postgresql://electric:[email protected]:5432/electric?sslmode=require'ELECTRIC_PORT:8002ELECTRIC_PROMETHEUS_PORT:8003ELECTRIC_INSECURE:true#ELECTRIC_SECRET: 1U6ItbhoQb4kGUU5wXBLbxvNf# etcd cluster for ha postgresetcd:{hosts:{10.10.10.10:{etcd_seq: 1 } }, vars:{etcd_cluster:etcd } }# minio cluster, s3 compatible object storage#minio: { hosts: { 10.10.10.10: { minio_seq: 1 } }, vars: { minio_cluster: minio } }# postgres example cluster: pg-metapg-meta:hosts:{10.10.10.10:{pg_seq: 1, pg_role:primary } }vars:pg_cluster:pg-metapg_users:- {name: electric ,password: DBUser.Electric ,pgbouncer: true , replication: true ,roles: [dbrole_admin] ,comment:electric main user }pg_databases:[{name: electric , owner:electric }]pg_hba_rules:- {user: electric , db: replication ,addr: infra ,auth: ssl ,title:'allow electric intranet/docker ssl access'}#==============================================================## Global Parameters#==============================================================#vars:#----------------------------------## Meta Data#----------------------------------#version:v4.0.0 # pigsty version stringadmin_ip:10.10.10.10# admin node ip addressregion: default # upstream mirror region:default|china|europenode_tune: oltp # node tuning specs:oltp,olap,tiny,critpg_conf: oltp.yml # pgsql tuning specs:{oltp,olap,tiny,crit}.ymldocker_enabled:true# enable docker on app group#docker_registry_mirrors: ["https://docker.1panel.live","https://docker.1ms.run","https://docker.xuanyuan.me","https://registry-1.docker.io"]proxy_env:# global proxy env when downloading packagesno_proxy:"localhost,127.0.0.1,10.0.0.0/8,192.168.0.0/16,*.pigsty,*.aliyun.com,mirrors.*,*.myqcloud.com,*.tsinghua.edu.cn"# http_proxy: # set your proxy here: e.g http://user:[email protected]# https_proxy: # set your proxy here: e.g http://user:[email protected]# all_proxy: # set your proxy here: e.g http://user:[email protected]infra_portal:# domain names and upstream servershome :{domain:i.pigsty }electric:domain:elec.pigstyendpoint:"${admin_ip}:8002"websocket: true # apply free ssl cert with certbot:make certcertbot:odoo.pigsty # <----- replace with your own domain name!#----------------------------------## Safe Guard#----------------------------------## you can enable these flags after bootstrap, to prevent purging running etcd / pgsql instancesetcd_safeguard:false# prevent purging running etcd instance?pg_safeguard:false# prevent purging running postgres instance? false by default#----------------------------------## Repo, Node, Packages#----------------------------------#repo_enabled:falsenode_repo_modules:node,infra,pgsqlpg_version:18# default postgres version#pg_extensions: [ pg18-time ,pg18-gis ,pg18-rag ,pg18-fts ,pg18-olap ,pg18-feat ,pg18-lang ,pg18-type ,pg18-util ,pg18-func ,pg18-admin ,pg18-stat ,pg18-sec ,pg18-fdw ,pg18-sim ,pg18-etl]#----------------------------------------------## PASSWORD : https://doc.pgsty.com/config/security#----------------------------------------------#grafana_admin_password:pigstygrafana_view_password:DBUser.Viewerpg_admin_password:DBUser.DBApg_monitor_password:DBUser.Monitorpg_replication_password:DBUser.Replicatorpatroni_password:Patroni.APIhaproxy_admin_password:pigstyminio_secret_key:S3User.MinIOetcd_root_password:Etcd.Root...
Explanation
The app/electric template provides a one-click deployment solution for Electric SQL real-time sync service.
What is Electric:
PostgreSQL to client real-time data sync service
Supports Local-first application architecture
Real-time syncs data changes via logical replication
Provides HTTP API for frontend application consumption
Key Features:
Uses Pigsty-managed PostgreSQL as data source
Captures data changes via Logical Replication
Supports SSL encrypted connections
Built-in Prometheus metrics endpoint
Access:
# Electric API endpointhttp://elec.pigsty:8002
# Prometheus metricshttp://elec.pigsty:8003/metrics
Use Cases:
Building Local-first applications
Real-time data sync to clients
Mobile and PWA data synchronization
Real-time updates for collaborative applications
Notes:
Electric user needs replication permission
PostgreSQL logical replication must be enabled
Production environments should use SSL connection (configured with sslmode=require)
8.27 - app/maybe
Deploy Maybe personal finance management system using Pigsty-managed PostgreSQL
The app/maybe configuration template provides a reference configuration for deploying Maybe open-source personal finance management system, using Pigsty-managed PostgreSQL as the database.
Overview
Config Name: app/maybe
Node Count: Single node
Description: Deploy Maybe finance management using Pigsty-managed PostgreSQL
Provides investment portfolio analysis and net worth calculation
Beautiful modern web interface
Key Features:
Uses Pigsty-managed PostgreSQL instead of Maybe’s built-in database
Data persisted to independent directory /data/maybe
Supports HTTPS and custom domain names
Multi-user permission management
Access:
# Maybe Web interfacehttp://maybe.pigsty:5002
# Or via Nginx proxyhttps://maybe.pigsty
Use Cases:
Personal or family finance management
Investment portfolio tracking and analysis
Multi-account asset aggregation
Alternative to commercial services like Mint, YNAB
Notes:
Must change SECRET_KEY_BASE, generate with openssl rand -hex 64
First access requires registering an admin account
Optionally configure Synth API for stock price data
8.28 - app/teable
Deploy Teable open-source Airtable alternative using Pigsty-managed PostgreSQL
The app/teable configuration template provides a reference configuration for deploying Teable open-source no-code database, using Pigsty-managed PostgreSQL as the database.
Overview
Config Name: app/teable
Node Count: Single node
Description: Deploy Teable using Pigsty-managed PostgreSQL
---#==============================================================## File : teable.yml# Desc : pigsty config for running 1-node teable app# Ctime : 2025-02-24# Mtime : 2025-12-12# Docs : https://doc.pgsty.com/app/odoo# License : Apache-2.0 @ https://pigsty.io/docs/about/license/# Copyright : 2018-2026 Ruohang Feng / Vonng ([email protected])#==============================================================## tutorial: https://doc.pgsty.com/app/teable# how to use this template:## curl -fsSL https://repo.pigsty.io/get | bash; cd ~/pigsty# ./bootstrap # prepare local repo & ansible# ./configure -c app/teable # use this teable config template# vi pigsty.yml # IMPORTANT: CHANGE CREDENTIALS!!# ./deploy.yml # install pigsty & pgsql & minio# ./docker.yml # install docker & docker-compose# ./app.yml # install teable with docker-compose## To replace domain name:# sed -ie 's/teable.pigsty/teable.pigsty.cc/g' pigsty.ymlall:children:# the teable applicationteable:hosts:{10.10.10.10:{}}vars:app:teable # specify app name to be installed (in the apps)apps:# define all applicationsteable:# app name, ~/pigsty/app/teable folderconf:# override /opt/teable/.env config file# https://github.com/teableio/teable/blob/develop/dockers/examples/standalone/.env# https://help.teable.io/en/deploy/envPOSTGRES_HOST:"10.10.10.10"POSTGRES_PORT:"5432"POSTGRES_DB:"teable"POSTGRES_USER:"dbuser_teable"POSTGRES_PASSWORD:"DBUser.Teable"PRISMA_DATABASE_URL:"postgresql://dbuser_teable:[email protected]:5432/teable"PUBLIC_ORIGIN:"http://tea.pigsty"PUBLIC_DATABASE_PROXY:"10.10.10.10:5432"TIMEZONE:"UTC"# Need to support sending emails to enable the following configurations#BACKEND_MAIL_HOST: smtp.teable.io#BACKEND_MAIL_PORT: 465#BACKEND_MAIL_SECURE: true#BACKEND_MAIL_SENDER: noreply.teable.io#BACKEND_MAIL_SENDER_NAME: Teable#BACKEND_MAIL_AUTH_USER: username#BACKEND_MAIL_AUTH_PASS: passwordpg-meta:hosts:{10.10.10.10:{pg_seq: 1, pg_role:primary } }vars:pg_cluster:pg-metapg_users:- {name: dbuser_teable ,password: DBUser.Teable ,pgbouncer: true ,roles: [ dbrole_admin ] ,superuser: true ,comment:teable superuser }pg_databases:- {name: teable ,owner: dbuser_teable ,comment:teable database }pg_hba_rules:- {user: teable ,db: all ,addr: 172.17.0.0/16 ,auth: pwd ,title:'allow teable access from local docker network'}node_crontab:['00 01 * * * postgres /pg/bin/pg-backup full']# make a full backup every 1aminfra:{hosts:{10.10.10.10:{infra_seq:1}}}etcd:{hosts:{10.10.10.10:{etcd_seq: 1 } }, vars:{etcd_cluster:etcd } }minio:{hosts:{10.10.10.10:{minio_seq: 1 } }, vars:{minio_cluster:minio } }vars:# global variablesversion:v4.0.0 # pigsty version stringadmin_ip:10.10.10.10# admin node ip addressregion: default # upstream mirror region:default|china|europenode_tune: oltp # node tuning specs:oltp,olap,tiny,critpg_conf: oltp.yml # pgsql tuning specs:{oltp,olap,tiny,crit}.ymldocker_enabled:true# enable docker on app group#docker_registry_mirrors: ["https://docker.1panel.live","https://docker.1ms.run","https://docker.xuanyuan.me","https://registry-1.docker.io"]proxy_env:# global proxy env when downloading packages & pull docker imagesno_proxy:"localhost,127.0.0.1,10.0.0.0/8,192.168.0.0/16,*.pigsty,*.aliyun.com,mirrors.*,*.tsinghua.edu.cn"#http_proxy: 127.0.0.1:12345 # add your proxy env here for downloading packages or pull images#https_proxy: 127.0.0.1:12345 # usually the proxy is format as http://user:[email protected]#all_proxy: 127.0.0.1:12345infra_portal:# domain names and upstream servershome :{domain:i.pigsty }#minio : { domain: m.pigsty ,endpoint: "${admin_ip}:9001" ,scheme: https ,websocket: true }teable:# nginx server config for teabledomain:tea.pigsty # REPLACE IT WITH YOUR OWN DOMAIN!endpoint:"10.10.10.10:8890"# teable service endpoint: IP:PORTwebsocket:true# add websocket supportcertbot:tea.pigsty # certbot cert name, apply with `make cert`repo_enabled:falsenode_repo_modules:node,infra,pgsqlpg_version:18#----------------------------------------------## PASSWORD : https://doc.pgsty.com/config/security#----------------------------------------------#grafana_admin_password:pigstygrafana_view_password:DBUser.Viewerpg_admin_password:DBUser.DBApg_monitor_password:DBUser.Monitorpg_replication_password:DBUser.Replicatorpatroni_password:Patroni.APIhaproxy_admin_password:pigstyminio_secret_key:S3User.MinIOetcd_root_password:Etcd.Root...
Explanation
The app/teable template provides a one-click deployment solution for Teable open-source no-code database.
What is Teable:
Open-source Airtable alternative
No-code database built on PostgreSQL
Supports table, kanban, calendar, form, and other views
Provides API and automation workflows
Key Features:
Uses Pigsty-managed PostgreSQL as underlying storage
Data is stored in real PostgreSQL tables
Supports direct SQL queries
Can integrate with other PostgreSQL tools and extensions
Access:
# Teable Web interfacehttp://tea.pigsty:8890
# Or via Nginx proxyhttps://tea.pigsty
# Direct SQL access to underlying datapsql postgresql://dbuser_teable:[email protected]:5432/teable
Use Cases:
Need Airtable-like functionality but want to self-host
Team collaboration data management
Need both API and SQL access
Want data stored in real PostgreSQL
Notes:
Teable user needs superuser privileges
Must configure PUBLIC_ORIGIN to external access address
Deploy Docker Registry image proxy and private registry using Pigsty
The app/registry configuration template provides a reference configuration for deploying Docker Registry as an image proxy, usable as Docker Hub mirror acceleration or private image registry.
Overview
Config Name: app/registry
Node Count: Single node
Description: Deploy Docker Registry image proxy and private registry
---#==============================================================## File : el.yml# Desc : Default parameters for EL System in Pigsty# Ctime : 2020-05-22# Mtime : 2025-12-27# Docs : https://doc.pgsty.com/config# License : Apache-2.0 @ https://pigsty.io/docs/about/license/# Copyright : 2018-2026 Ruohang Feng / Vonng ([email protected])#==============================================================##==============================================================## Sandbox (4-node) ##==============================================================## admin user : vagrant (nopass ssh & sudo already set) ## 1. meta : 10.10.10.10 (2 Core | 4GB) pg-meta ## 2. node-1 : 10.10.10.11 (1 Core | 1GB) pg-test-1 ## 3. node-2 : 10.10.10.12 (1 Core | 1GB) pg-test-2 ## 4. node-3 : 10.10.10.13 (1 Core | 1GB) pg-test-3 ## (replace these ip if your 4-node env have different ip addr) ## VIP 2: (l2 vip is available inside same LAN ) ## pg-meta ---> 10.10.10.2 ---> 10.10.10.10 ## pg-test ---> 10.10.10.3 ---> 10.10.10.1{1,2,3} ##==============================================================#all:################################################################### CLUSTERS #################################################################### meta nodes, nodes, pgsql, redis, pgsql clusters are defined as# k:v pair inside `all.children`. Where the key is cluster name# and value is cluster definition consist of two parts:# `hosts`: cluster members ip and instance level variables# `vars` : cluster level variables##################################################################children:# groups definition# infra cluster for proxy, monitor, alert, etc..infra:{hosts:{10.10.10.10:{infra_seq:1}}}# etcd cluster for ha postgresetcd:{hosts:{10.10.10.10:{etcd_seq: 1 } }, vars:{etcd_cluster:etcd } }# minio cluster, s3 compatible object storageminio:{hosts:{10.10.10.10:{minio_seq: 1 } }, vars:{minio_cluster:minio } }#----------------------------------## pgsql cluster: pg-meta (CMDB) ##----------------------------------#pg-meta:hosts:{10.10.10.10:{pg_seq: 1, pg_role: primary , pg_offline_query:true}}vars:pg_cluster:pg-meta# define business databases here: https://doc.pgsty.com/pgsql/dbpg_databases:# define business databases on this cluster, array of database definition- name:meta # REQUIRED, `name` is the only mandatory field of a database definition#state: create # optional, create|absent|recreate, create by defaultbaseline: cmdb.sql # optional, database sql baseline path, (relative path among ansible search path, e.g:files/)schemas:[pigsty] # optional, additional schemas to be created, array of schema namesextensions: # optional, additional extensions to be installed:array of `{name[,schema]}`- {name:vector } # install pgvector extension on this database by defaultcomment:pigsty meta database # optional, comment string for this database#pgbouncer: true # optional, add this database to pgbouncer database list? true by default#owner: postgres # optional, database owner, current user if not specified#template: template1 # optional, which template to use, template1 by default#strategy: FILE_COPY # optional, clone strategy: FILE_COPY or WAL_LOG (PG15+), default to PG's default#encoding: UTF8 # optional, inherited from template / cluster if not defined (UTF8)#locale: C # optional, inherited from template / cluster if not defined (C)#lc_collate: C # optional, inherited from template / cluster if not defined (C)#lc_ctype: C # optional, inherited from template / cluster if not defined (C)#locale_provider: libc # optional, locale provider: libc, icu, builtin (PG15+)#icu_locale: en-US # optional, icu locale for icu locale provider (PG15+)#icu_rules: '' # optional, icu rules for icu locale provider (PG16+)#builtin_locale: C.UTF-8 # optional, builtin locale for builtin locale provider (PG17+)#tablespace: pg_default # optional, default tablespace, pg_default by default#is_template: false # optional, mark database as template, allowing clone by any user with CREATEDB privilege#allowconn: true # optional, allow connection, true by default. false will disable connect at all#revokeconn: false # optional, revoke public connection privilege. false by default. (leave connect with grant option to owner)#register_datasource: true # optional, register this database to grafana datasources? true by default#connlimit: -1 # optional, database connection limit, default -1 disable limit#pool_auth_user: dbuser_meta # optional, all connection to this pgbouncer database will be authenticated by this user#pool_mode: transaction # optional, pgbouncer pool mode at database level, default transaction#pool_size: 64 # optional, pgbouncer pool size at database level, default 64#pool_size_reserve: 32 # optional, pgbouncer pool size reserve at database level, default 32#pool_size_min: 0 # optional, pgbouncer pool size min at database level, default 0#pool_max_db_conn: 100 # optional, max database connections at database level, default 100#- { name: grafana ,owner: dbuser_grafana ,revokeconn: true ,comment: grafana primary database }#- { name: bytebase ,owner: dbuser_bytebase ,revokeconn: true ,comment: bytebase primary database }#- { name: kong ,owner: dbuser_kong ,revokeconn: true ,comment: kong the api gateway database }#- { name: gitea ,owner: dbuser_gitea ,revokeconn: true ,comment: gitea meta database }#- { name: wiki ,owner: dbuser_wiki ,revokeconn: true ,comment: wiki meta database }# define business users here: https://doc.pgsty.com/pgsql/userpg_users:# define business users/roles on this cluster, array of user definition- name:dbuser_meta # REQUIRED, `name` is the only mandatory field of a user definitionpassword:DBUser.Meta # optional, password, can be a scram-sha-256 hash string or plain text#login: true # optional, can log in, true by default (new biz ROLE should be false)#superuser: false # optional, is superuser? false by default#createdb: false # optional, can create database? false by default#createrole: false # optional, can create role? false by default#inherit: true # optional, can this role use inherited privileges? true by default#replication: false # optional, can this role do replication? false by default#bypassrls: false # optional, can this role bypass row level security? false by default#pgbouncer: true # optional, add this user to pgbouncer user-list? false by default (production user should be true explicitly)#connlimit: -1 # optional, user connection limit, default -1 disable limit#expire_in: 3650 # optional, now + n days when this role is expired (OVERWRITE expire_at)#expire_at: '2030-12-31' # optional, YYYY-MM-DD 'timestamp' when this role is expired (OVERWRITTEN by expire_in)#comment: pigsty admin user # optional, comment string for this user/role#roles: [dbrole_admin] # optional, belonged roles. default roles are: dbrole_{admin,readonly,readwrite,offline}#parameters: {} # optional, role level parameters with `ALTER ROLE SET`#pool_mode: transaction # optional, pgbouncer pool mode at user level, transaction by default#pool_connlimit: -1 # optional, max database connections at user level, default -1 disable limit- {name: dbuser_view ,password: DBUser.Viewer ,pgbouncer: true ,roles: [dbrole_readonly], comment:read-only viewer for meta database}#- {name: dbuser_grafana ,password: DBUser.Grafana ,pgbouncer: true ,roles: [dbrole_admin] ,comment: admin user for grafana database }#- {name: dbuser_bytebase ,password: DBUser.Bytebase ,pgbouncer: true ,roles: [dbrole_admin] ,comment: admin user for bytebase database }#- {name: dbuser_gitea ,password: DBUser.Gitea ,pgbouncer: true ,roles: [dbrole_admin] ,comment: admin user for gitea service }#- {name: dbuser_wiki ,password: DBUser.Wiki ,pgbouncer: true ,roles: [dbrole_admin] ,comment: admin user for wiki.js service }# define business service here: https://doc.pgsty.com/pgsql/servicepg_services:# extra services in addition to pg_default_services, array of service definition# standby service will route {ip|name}:5435 to sync replica's pgbouncer (5435->6432 standby)- name: standby # required, service name, the actual svc name will be prefixed with `pg_cluster`, e.g:pg-meta-standbyport:5435# required, service exposed port (work as kubernetes service node port mode)ip:"*"# optional, service bind ip address, `*` for all ip by defaultselector:"[]"# required, service member selector, use JMESPath to filter inventorydest:default # optional, destination port, default|postgres|pgbouncer|<port_number>, 'default' by defaultcheck:/sync # optional, health check url path, / by defaultbackup:"[? pg_role == `primary`]"# backup server selectormaxconn:3000# optional, max allowed front-end connectionbalance: roundrobin # optional, haproxy load balance algorithm (roundrobin by default, other:leastconn)options:'inter 3s fastinter 1s downinter 5s rise 3 fall 3 on-marked-down shutdown-sessions slowstart 30s maxconn 3000 maxqueue 128 weight 100'# define pg extensions: https://doc.pgsty.com/pgsql/extensionpg_libs:'pg_stat_statements, auto_explain'# add timescaledb to shared_preload_libraries#pg_extensions: [] # extensions to be installed on this cluster# define HBA rules here: https://doc.pgsty.com/pgsql/hbapg_hba_rules:- {user: dbuser_view , db: all ,addr: infra ,auth: pwd ,title:'allow grafana dashboard access cmdb from infra nodes'}pg_vip_enabled:truepg_vip_address:10.10.10.2/24pg_vip_interface:eth1node_crontab:# make a full backup 1 am everyday- '00 01 * * * postgres /pg/bin/pg-backup full'#----------------------------------## pgsql cluster: pg-test (3 nodes) ##----------------------------------## pg-test ---> 10.10.10.3 ---> 10.10.10.1{1,2,3}pg-test:# define the new 3-node cluster pg-testhosts:10.10.10.11:{pg_seq: 1, pg_role:primary } # primary instance, leader of cluster10.10.10.12:{pg_seq: 2, pg_role:replica } # replica instance, follower of leader10.10.10.13:{pg_seq: 3, pg_role: replica, pg_offline_query:true}# replica with offline accessvars:pg_cluster:pg-test # define pgsql cluster namepg_users:[{name: test , password: test , pgbouncer: true , roles:[dbrole_admin ] }]pg_databases:[{name:test }]# create a database and user named 'test'node_tune:tinypg_conf:tiny.ymlpg_vip_enabled:truepg_vip_address:10.10.10.3/24pg_vip_interface:eth1node_crontab:# make a full backup on monday 1am, and an incremental backup during weekdays- '00 01 * * 1 postgres /pg/bin/pg-backup full'- '00 01 * * 2,3,4,5,6,7 postgres /pg/bin/pg-backup'#----------------------------------## redis ms, sentinel, native cluster#----------------------------------#redis-ms:# redis classic primary & replicahosts:{10.10.10.10:{redis_node: 1 , redis_instances:{6379:{}, 6380:{replica_of:'10.10.10.10 6379'}}}}vars:{redis_cluster: redis-ms ,redis_password: 'redis.ms' ,redis_max_memory:64MB }redis-meta:# redis sentinel x 3hosts:{10.10.10.11:{redis_node: 1 , redis_instances:{26379:{} ,26380:{} ,26381:{}}}}vars:redis_cluster:redis-metaredis_password:'redis.meta'redis_mode:sentinelredis_max_memory:16MBredis_sentinel_monitor:# primary list for redis sentinel, use cls as name, primary ip:port- {name: redis-ms, host: 10.10.10.10, port: 6379 ,password: redis.ms, quorum:2}redis-test: # redis native cluster:3m x 3shosts:10.10.10.12:{redis_node: 1 ,redis_instances:{6379:{} ,6380:{} ,6381:{}}}10.10.10.13:{redis_node: 2 ,redis_instances:{6379:{} ,6380:{} ,6381:{}}}vars:{redis_cluster: redis-test ,redis_password: 'redis.test' ,redis_mode: cluster, redis_max_memory:32MB }##################################################################### VARS #####################################################################vars:# global variables#================================================================## VARS: INFRA ##================================================================##-----------------------------------------------------------------# META#-----------------------------------------------------------------version:v4.0.0 # pigsty version stringadmin_ip:10.10.10.10# admin node ip addressregion: default # upstream mirror region:default,china,europelanguage: en # default language:en, zhproxy_env:# global proxy env when downloading packagesno_proxy:"localhost,127.0.0.1,10.0.0.0/8,192.168.0.0/16,*.pigsty,*.aliyun.com,mirrors.*,*.myqcloud.com,*.tsinghua.edu.cn"# http_proxy: # set your proxy here: e.g http://user:[email protected]# https_proxy: # set your proxy here: e.g http://user:[email protected]# all_proxy: # set your proxy here: e.g http://user:[email protected]#-----------------------------------------------------------------# CA#-----------------------------------------------------------------ca_create:true# create ca if not exists? or just abortca_cn:pigsty-ca # ca common name, fixed as pigsty-cacert_validity:7300d # cert validity, 20 years by default#-----------------------------------------------------------------# INFRA_IDENTITY#-----------------------------------------------------------------#infra_seq: 1 # infra node identity, explicitly requiredinfra_portal:# infra services exposed via portalhome :{domain:i.pigsty } # default domain nameinfra_data:/data/infra # default data path for infrastructure data#-----------------------------------------------------------------# REPO#-----------------------------------------------------------------repo_enabled:true# create a yum repo on this infra node?repo_home:/www # repo home dir, `/www` by defaultrepo_name:pigsty # repo name, pigsty by defaultrepo_endpoint:http://${admin_ip}:80# access point to this repo by domain or ip:portrepo_remove:true# remove existing upstream reporepo_modules:infra,node,pgsql # which repo modules are installed in repo_upstreamrepo_upstream:# where to download- {name: pigsty-local ,description: 'Pigsty Local' ,module: local ,releases: [8,9,10] ,arch: [x86_64, aarch64] ,baseurl:{default:'http://${admin_ip}/pigsty'}}# used by intranet nodes- {name: pigsty-infra ,description: 'Pigsty INFRA' ,module: infra ,releases: [8,9,10] ,arch: [x86_64, aarch64] ,baseurl:{default: 'https://repo.pigsty.io/yum/infra/$basearch' ,china:'https://repo.pigsty.cc/yum/infra/$basearch'}}- {name: pigsty-pgsql ,description: 'Pigsty PGSQL' ,module: pgsql ,releases: [8,9,10] ,arch: [x86_64, aarch64] ,baseurl:{default: 'https://repo.pigsty.io/yum/pgsql/el$releasever.$basearch' ,china:'https://repo.pigsty.cc/yum/pgsql/el$releasever.$basearch'}}- {name: nginx ,description: 'Nginx Repo' ,module: infra ,releases: [8,9,10] ,arch: [x86_64, aarch64] ,baseurl:{default:'https://nginx.org/packages/rhel/$releasever/$basearch/'}}- {name: docker-ce ,description: 'Docker CE' ,module: infra ,releases: [8,9,10] ,arch: [x86_64, aarch64] ,baseurl:{default: 'https://download.docker.com/linux/centos/$releasever/$basearch/stable' ,china: 'https://mirrors.aliyun.com/docker-ce/linux/centos/$releasever/$basearch/stable' ,europe:'https://mirrors.xtom.de/docker-ce/linux/centos/$releasever/$basearch/stable'}}- {name: baseos ,description: 'EL 8+ BaseOS' ,module: node ,releases: [8,9,10] ,arch: [x86_64, aarch64] ,baseurl:{default: 'https://dl.rockylinux.org/pub/rocky/$releasever/BaseOS/$basearch/os/' ,china: 'https://mirrors.aliyun.com/rockylinux/$releasever/BaseOS/$basearch/os/' ,europe:'https://mirrors.xtom.de/rocky/$releasever/BaseOS/$basearch/os/'}}- {name: appstream ,description: 'EL 8+ AppStream' ,module: node ,releases: [8,9,10] ,arch: [x86_64, aarch64] ,baseurl:{default: 'https://dl.rockylinux.org/pub/rocky/$releasever/AppStream/$basearch/os/' ,china: 'https://mirrors.aliyun.com/rockylinux/$releasever/AppStream/$basearch/os/' ,europe:'https://mirrors.xtom.de/rocky/$releasever/AppStream/$basearch/os/'}}- {name: extras ,description: 'EL 8+ Extras' ,module: node ,releases: [8,9,10] ,arch: [x86_64, aarch64] ,baseurl:{default: 'https://dl.rockylinux.org/pub/rocky/$releasever/extras/$basearch/os/' ,china: 'https://mirrors.aliyun.com/rockylinux/$releasever/extras/$basearch/os/' ,europe:'https://mirrors.xtom.de/rocky/$releasever/extras/$basearch/os/'}}- {name: powertools ,description: 'EL 8 PowerTools' ,module: node ,releases: [8 ] ,arch: [x86_64, aarch64] ,baseurl:{default: 'https://dl.rockylinux.org/pub/rocky/$releasever/PowerTools/$basearch/os/' ,china: 'https://mirrors.aliyun.com/rockylinux/$releasever/PowerTools/$basearch/os/' ,europe:'https://mirrors.xtom.de/rocky/$releasever/PowerTools/$basearch/os/'}}- {name: crb ,description: 'EL 9 CRB' ,module: node ,releases: [ 9,10] ,arch: [x86_64, aarch64] ,baseurl:{default: 'https://dl.rockylinux.org/pub/rocky/$releasever/CRB/$basearch/os/' ,china: 'https://mirrors.aliyun.com/rockylinux/$releasever/CRB/$basearch/os/' ,europe:'https://mirrors.xtom.de/rocky/$releasever/CRB/$basearch/os/'}}- {name: epel ,description: 'EL 8+ EPEL' ,module: node ,releases: [8,9 ] ,arch: [x86_64, aarch64] ,baseurl:{default: 'https://mirrors.edge.kernel.org/fedora-epel/$releasever/Everything/$basearch/' ,china: 'https://mirrors.aliyun.com/epel/$releasever/Everything/$basearch/' ,europe:'https://mirrors.xtom.de/epel/$releasever/Everything/$basearch/'}}- {name: epel ,description: 'EL 10 EPEL' ,module: node ,releases: [ 10] ,arch: [x86_64, aarch64] ,baseurl:{default: 'https://mirrors.edge.kernel.org/fedora-epel/$releasever.0/Everything/$basearch/' ,china: 'https://mirrors.aliyun.com/epel/$releasever.0/Everything/$basearch/' ,europe:'https://mirrors.xtom.de/epel/$releasever.0/Everything/$basearch/'}}- {name: pgdg-common ,description: 'PostgreSQL Common' ,module: pgsql ,releases: [8,9,10] ,arch: [x86_64, aarch64] ,baseurl:{default: 'https://download.postgresql.org/pub/repos/yum/common/redhat/rhel-$releasever-$basearch' ,china: 'https://mirrors.aliyun.com/postgresql/repos/yum/common/redhat/rhel-$releasever-$basearch' ,europe:'https://mirrors.xtom.de/postgresql/repos/yum/common/redhat/rhel-$releasever-$basearch'}}- {name: pgdg-el8fix ,description: 'PostgreSQL EL8FIX' ,module: pgsql ,releases: [8 ] ,arch: [x86_64, aarch64] ,baseurl:{default: 'https://download.postgresql.org/pub/repos/yum/common/pgdg-centos8-sysupdates/redhat/rhel-8-$basearch/' ,china: 'https://mirrors.aliyun.com/postgresql/repos/yum/common/pgdg-centos8-sysupdates/redhat/rhel-8-$basearch/' ,europe:'https://mirrors.xtom.de/postgresql/repos/yum/common/pgdg-centos8-sysupdates/redhat/rhel-8-$basearch/'}}- {name: pgdg-el9fix ,description: 'PostgreSQL EL9FIX' ,module: pgsql ,releases: [ 9 ] ,arch: [x86_64, aarch64] ,baseurl:{default: 'https://download.postgresql.org/pub/repos/yum/common/pgdg-rocky9-sysupdates/redhat/rhel-9-$basearch/' ,china: 'https://mirrors.aliyun.com/postgresql/repos/yum/common/pgdg-rocky9-sysupdates/redhat/rhel-9-$basearch/' ,europe:'https://mirrors.xtom.de/postgresql/repos/yum/common/pgdg-rocky9-sysupdates/redhat/rhel-9-$basearch/'}}- {name: pgdg-el10fix ,description: 'PostgreSQL EL10FIX' ,module: pgsql ,releases: [ 10] ,arch: [x86_64, aarch64] ,baseurl:{default: 'https://download.postgresql.org/pub/repos/yum/common/pgdg-rocky10-sysupdates/redhat/rhel-10-$basearch/' ,china: 'https://mirrors.aliyun.com/postgresql/repos/yum/common/pgdg-rocky10-sysupdates/redhat/rhel-10-$basearch/' ,europe:'https://mirrors.xtom.de/postgresql/repos/yum/common/pgdg-rocky10-sysupdates/redhat/rhel-10-$basearch/'}}- {name: pgdg13 ,description: 'PostgreSQL 13' ,module: pgsql ,releases: [8,9,10] ,arch: [x86_64, aarch64] ,baseurl:{default: 'https://download.postgresql.org/pub/repos/yum/13/redhat/rhel-$releasever-$basearch' ,china: 'https://mirrors.aliyun.com/postgresql/repos/yum/13/redhat/rhel-$releasever-$basearch' ,europe:'https://mirrors.xtom.de/postgresql/repos/yum/13/redhat/rhel-$releasever-$basearch'}}- {name: pgdg14 ,description: 'PostgreSQL 14' ,module: pgsql ,releases: [8,9,10] ,arch: [x86_64, aarch64] ,baseurl:{default: 'https://download.postgresql.org/pub/repos/yum/14/redhat/rhel-$releasever-$basearch' ,china: 'https://mirrors.aliyun.com/postgresql/repos/yum/14/redhat/rhel-$releasever-$basearch' ,europe:'https://mirrors.xtom.de/postgresql/repos/yum/14/redhat/rhel-$releasever-$basearch'}}- {name: pgdg15 ,description: 'PostgreSQL 15' ,module: pgsql ,releases: [8,9,10] ,arch: [x86_64, aarch64] ,baseurl:{default: 'https://download.postgresql.org/pub/repos/yum/15/redhat/rhel-$releasever-$basearch' ,china: 'https://mirrors.aliyun.com/postgresql/repos/yum/15/redhat/rhel-$releasever-$basearch' ,europe:'https://mirrors.xtom.de/postgresql/repos/yum/15/redhat/rhel-$releasever-$basearch'}}- {name: pgdg16 ,description: 'PostgreSQL 16' ,module: pgsql ,releases: [8,9,10] ,arch: [x86_64, aarch64] ,baseurl:{default: 'https://download.postgresql.org/pub/repos/yum/16/redhat/rhel-$releasever-$basearch' ,china: 'https://mirrors.aliyun.com/postgresql/repos/yum/16/redhat/rhel-$releasever-$basearch' ,europe:'https://mirrors.xtom.de/postgresql/repos/yum/16/redhat/rhel-$releasever-$basearch'}}- {name: pgdg17 ,description: 'PostgreSQL 17' ,module: pgsql ,releases: [8,9,10] ,arch: [x86_64, aarch64] ,baseurl:{default: 'https://download.postgresql.org/pub/repos/yum/17/redhat/rhel-$releasever-$basearch' ,china: 'https://mirrors.aliyun.com/postgresql/repos/yum/17/redhat/rhel-$releasever-$basearch' ,europe:'https://mirrors.xtom.de/postgresql/repos/yum/17/redhat/rhel-$releasever-$basearch'}}- {name: pgdg18 ,description: 'PostgreSQL 18' ,module: pgsql ,releases: [8,9,10] ,arch: [x86_64, aarch64] ,baseurl:{default: 'https://download.postgresql.org/pub/repos/yum/18/redhat/rhel-$releasever-$basearch' ,china: 'https://mirrors.aliyun.com/postgresql/repos/yum/18/redhat/rhel-$releasever-$basearch' ,europe:'https://mirrors.xtom.de/postgresql/repos/yum/18/redhat/rhel-$releasever-$basearch'}}- {name: pgdg-beta ,description: 'PostgreSQL Testing' ,module: beta ,releases: [8,9,10] ,arch: [x86_64, aarch64] ,baseurl:{default: 'https://download.postgresql.org/pub/repos/yum/testing/19/redhat/rhel-$releasever-$basearch' ,china: 'https://mirrors.aliyun.com/postgresql/repos/yum/testing/19/redhat/rhel-$releasever-$basearch' ,europe:'https://mirrors.xtom.de/postgresql/repos/yum/testing/19/redhat/rhel-$releasever-$basearch'}}- {name: pgdg-extras ,description: 'PostgreSQL Extra' ,module: extra ,releases: [8,9,10] ,arch: [x86_64, aarch64] ,baseurl:{default: 'https://download.postgresql.org/pub/repos/yum/extras/redhat/rhel-$releasever-$basearch' ,china: 'https://mirrors.aliyun.com/postgresql/repos/yum/extras/redhat/rhel-$releasever-$basearch' ,europe:'https://mirrors.xtom.de/postgresql/repos/yum/extras/redhat/rhel-$releasever-$basearch'}}- {name: pgdg13-nonfree ,description: 'PostgreSQL 13+' ,module: extra ,releases: [8,9,10] ,arch: [x86_64 ] ,baseurl:{default: 'https://download.postgresql.org/pub/repos/yum/non-free/13/redhat/rhel-$releasever-$basearch' ,china: 'https://mirrors.aliyun.com/postgresql/repos/yum/non-free/13/redhat/rhel-$releasever-$basearch' ,europe:'https://mirrors.xtom.de/postgresql/repos/yum/non-free/13/redhat/rhel-$releasever-$basearch'}}- {name: pgdg14-nonfree ,description: 'PostgreSQL 14+' ,module: extra ,releases: [8,9,10] ,arch: [x86_64 ] ,baseurl:{default: 'https://download.postgresql.org/pub/repos/yum/non-free/14/redhat/rhel-$releasever-$basearch' ,china: 'https://mirrors.aliyun.com/postgresql/repos/yum/non-free/14/redhat/rhel-$releasever-$basearch' ,europe:'https://mirrors.xtom.de/postgresql/repos/yum/non-free/14/redhat/rhel-$releasever-$basearch'}}- {name: pgdg15-nonfree ,description: 'PostgreSQL 15+' ,module: extra ,releases: [8,9,10] ,arch: [x86_64 ] ,baseurl:{default: 'https://download.postgresql.org/pub/repos/yum/non-free/15/redhat/rhel-$releasever-$basearch' ,china: 'https://mirrors.aliyun.com/postgresql/repos/yum/non-free/15/redhat/rhel-$releasever-$basearch' ,europe:'https://mirrors.xtom.de/postgresql/repos/yum/non-free/15/redhat/rhel-$releasever-$basearch'}}- {name: pgdg16-nonfree ,description: 'PostgreSQL 16+' ,module: extra ,releases: [8,9,10] ,arch: [x86_64 ] ,baseurl:{default: 'https://download.postgresql.org/pub/repos/yum/non-free/16/redhat/rhel-$releasever-$basearch' ,china: 'https://mirrors.aliyun.com/postgresql/repos/yum/non-free/16/redhat/rhel-$releasever-$basearch' ,europe:'https://mirrors.xtom.de/postgresql/repos/yum/non-free/16/redhat/rhel-$releasever-$basearch'}}- {name: pgdg17-nonfree ,description: 'PostgreSQL 17+' ,module: extra ,releases: [8,9,10] ,arch: [x86_64 ] ,baseurl:{default: 'https://download.postgresql.org/pub/repos/yum/non-free/17/redhat/rhel-$releasever-$basearch' ,china: 'https://mirrors.aliyun.com/postgresql/repos/yum/non-free/17/redhat/rhel-$releasever-$basearch' ,europe:'https://mirrors.xtom.de/postgresql/repos/yum/non-free/17/redhat/rhel-$releasever-$basearch'}}- {name: pgdg18-nonfree ,description: 'PostgreSQL 18+' ,module: extra ,releases: [8,9,10] ,arch: [x86_64 ] ,baseurl:{default: 'https://download.postgresql.org/pub/repos/yum/non-free/18/redhat/rhel-$releasever-$basearch' ,china: 'https://mirrors.aliyun.com/postgresql/repos/yum/non-free/18/redhat/rhel-$releasever-$basearch' ,europe:'https://mirrors.xtom.de/postgresql/repos/yum/non-free/18/redhat/rhel-$releasever-$basearch'}}- {name: timescaledb ,description: 'TimescaleDB' ,module: extra ,releases: [8,9 ] ,arch: [x86_64, aarch64] ,baseurl:{default:'https://packagecloud.io/timescale/timescaledb/el/$releasever/$basearch'}}- {name: percona ,description: 'Percona TDE' ,module: percona ,releases: [8,9,10] ,arch: [x86_64, aarch64] ,baseurl:{default: 'https://repo.pigsty.io/yum/percona/el$releasever.$basearch' ,china: 'https://repo.pigsty.cc/yum/percona/el$releasever.$basearch' ,origin:'http://repo.percona.com/ppg-18.1/yum/release/$releasever/RPMS/$basearch'}}- {name: wiltondb ,description: 'WiltonDB' ,module: mssql ,releases: [8,9 ] ,arch: [x86_64, aarch64] ,baseurl:{default: 'https://repo.pigsty.io/yum/mssql/el$releasever.$basearch', china: 'https://repo.pigsty.cc/yum/mssql/el$releasever.$basearch' , origin:'https://download.copr.fedorainfracloud.org/results/wiltondb/wiltondb/epel-$releasever-$basearch/'}}- {name: groonga ,description: 'Groonga' ,module: groonga ,releases: [8,9,10] ,arch: [x86_64, aarch64] ,baseurl:{default:'https://packages.groonga.org/almalinux/$releasever/$basearch/'}}- {name: mysql ,description: 'MySQL' ,module: mysql ,releases: [8,9 ] ,arch: [x86_64, aarch64] ,baseurl:{default:'https://repo.mysql.com/yum/mysql-8.4-community/el/$releasever/$basearch/'}}- {name: mongo ,description: 'MongoDB' ,module: mongo ,releases: [8,9 ] ,arch: [x86_64, aarch64] ,baseurl:{default: 'https://repo.mongodb.org/yum/redhat/$releasever/mongodb-org/8.0/$basearch/' ,china:'https://mirrors.aliyun.com/mongodb/yum/redhat/$releasever/mongodb-org/8.0/$basearch/'}}- {name: redis ,description: 'Redis' ,module: redis ,releases: [8,9,10] ,arch: [x86_64, aarch64] ,baseurl:{default:'https://rpmfind.net/linux/remi/enterprise/$releasever/redis72/$basearch/'}}- {name: grafana ,description: 'Grafana' ,module: grafana ,releases: [8,9,10] ,arch: [x86_64, aarch64] ,baseurl:{default: 'https://rpm.grafana.com', china:'https://mirrors.aliyun.com/grafana/yum/'}}- {name: kubernetes ,description: 'Kubernetes' ,module: kube ,releases: [8,9,10] ,arch: [x86_64, aarch64] ,baseurl:{default: 'https://pkgs.k8s.io/core:/stable:/v1.33/rpm/', china:'https://mirrors.aliyun.com/kubernetes-new/core/stable/v1.33/rpm/'}}- {name: gitlab-ee ,description: 'Gitlab EE' ,module: gitlab ,releases: [8,9 ] ,arch: [x86_64, aarch64] ,baseurl:{default:'https://packages.gitlab.com/gitlab/gitlab-ee/el/$releasever/$basearch'}}- {name: gitlab-ce ,description: 'Gitlab CE' ,module: gitlab ,releases: [8,9 ] ,arch: [x86_64, aarch64] ,baseurl:{default:'https://packages.gitlab.com/gitlab/gitlab-ce/el/$releasever/$basearch'}}- {name: clickhouse ,description: 'ClickHouse' ,module: click ,releases: [8,9,10] ,arch: [x86_64, aarch64] ,baseurl:{default: 'https://packages.clickhouse.com/rpm/stable/', china:'https://mirrors.aliyun.com/clickhouse/rpm/stable/'}}repo_packages:[node-bootstrap, infra-package, infra-addons, node-package1, node-package2, pgsql-utility, extra-modules ]repo_extra_packages:[pgsql-main ]repo_url_packages:[]#-----------------------------------------------------------------# INFRA_PACKAGE#-----------------------------------------------------------------infra_packages:# packages to be installed on infra nodes- grafana,grafana-plugins,grafana-victorialogs-ds,grafana-victoriametrics-ds,victoria-metrics,victoria-logs,victoria-traces,vmutils,vlogscli,alertmanager- node_exporter,blackbox_exporter,nginx_exporter,pg_exporter,pev2,nginx,dnsmasq,ansible,etcd,python3-requests,redis,mcli,restic,certbot,python3-certbot-nginxinfra_packages_pip:''# pip installed packages for infra nodes#-----------------------------------------------------------------# NGINX#-----------------------------------------------------------------nginx_enabled:true# enable nginx on this infra node?nginx_clean:false# clean existing nginx config during init?nginx_exporter_enabled:true# enable nginx_exporter on this infra node?nginx_exporter_port:9113# nginx_exporter listen port, 9113 by defaultnginx_sslmode:enable # nginx ssl mode? disable,enable,enforcenginx_cert_validity:397d # nginx self-signed cert validity, 397d by defaultnginx_home:/www # nginx content dir, `/www` by default (soft link to nginx_data)nginx_data:/data/nginx # nginx actual data dir, /data/nginx by defaultnginx_users:{admin : pigsty } # nginx basic auth users:name and pass dictnginx_port:80# nginx listen port, 80 by defaultnginx_ssl_port:443# nginx ssl listen port, 443 by defaultcertbot_sign:false# sign nginx cert with certbot during setup?certbot_email:[email protected]# certbot email address, used for free sslcertbot_options:''# certbot extra options#-----------------------------------------------------------------# DNS#-----------------------------------------------------------------dns_enabled:true# setup dnsmasq on this infra node?dns_port:53# dns server listen port, 53 by defaultdns_records:# dynamic dns records resolved by dnsmasq- "${admin_ip} i.pigsty"- "${admin_ip} m.pigsty supa.pigsty api.pigsty adm.pigsty cli.pigsty ddl.pigsty"#-----------------------------------------------------------------# VICTORIA#-----------------------------------------------------------------vmetrics_enabled:true# enable victoria-metrics on this infra node?vmetrics_clean:false# whether clean existing victoria metrics data during init?vmetrics_port:8428# victoria-metrics listen port, 8428 by defaultvmetrics_scrape_interval:10s # victoria global scrape interval, 10s by defaultvmetrics_scrape_timeout:8s # victoria global scrape timeout, 8s by defaultvmetrics_options:>- -retentionPeriod=15d
-promscrape.fileSDCheckInterval=5svlogs_enabled:true# enable victoria-logs on this infra node?vlogs_clean:false# clean victoria-logs data during init?vlogs_port:9428# victoria-logs listen port, 9428 by defaultvlogs_options:>- -retentionPeriod=15d
-retention.maxDiskSpaceUsageBytes=50GiB
-insert.maxLineSizeBytes=1MB
-search.maxQueryDuration=120svtraces_enabled:true# enable victoria-traces on this infra node?vtraces_clean:false# clean victoria-trace data during inti?vtraces_port:10428# victoria-traces listen port, 10428 by defaultvtraces_options:>- -retentionPeriod=15d
-retention.maxDiskSpaceUsageBytes=50GiBvmalert_enabled:true# enable vmalert on this infra node?vmalert_port:8880# vmalert listen port, 8880 by defaultvmalert_options:''# vmalert extra server options#-----------------------------------------------------------------# PROMETHEUS#-----------------------------------------------------------------blackbox_enabled:true# setup blackbox_exporter on this infra node?blackbox_port:9115# blackbox_exporter listen port, 9115 by defaultblackbox_options:''# blackbox_exporter extra server optionsalertmanager_enabled:true# setup alertmanager on this infra node?alertmanager_port:9059# alertmanager listen port, 9059 by defaultalertmanager_options:''# alertmanager extra server optionsexporter_metrics_path:/metrics # exporter metric path, `/metrics` by default#-----------------------------------------------------------------# GRAFANA#-----------------------------------------------------------------grafana_enabled:true# enable grafana on this infra node?grafana_port:3000# default listen port for grafanagrafana_clean:false# clean grafana data during init?grafana_admin_username:admin # grafana admin username, `admin` by defaultgrafana_admin_password:pigsty # grafana admin password, `pigsty` by defaultgrafana_auth_proxy:false# enable grafana auth proxy?grafana_pgurl:''# external postgres database url for grafana if givengrafana_view_password:DBUser.Viewer# password for grafana meta pg datasource#================================================================## VARS: NODE ##================================================================##-----------------------------------------------------------------# NODE_IDENTITY#-----------------------------------------------------------------#nodename: # [INSTANCE] # node instance identity, use hostname if missing, optionalnode_cluster:nodes # [CLUSTER]# node cluster identity, use 'nodes' if missing, optionalnodename_overwrite:true# overwrite node's hostname with nodename?nodename_exchange:false# exchange nodename among play hosts?node_id_from_pg:true# use postgres identity as node identity if applicable?#-----------------------------------------------------------------# NODE_DNS#-----------------------------------------------------------------node_write_etc_hosts:true# modify `/etc/hosts` on target node?node_default_etc_hosts:# static dns records in `/etc/hosts`- "${admin_ip} i.pigsty"node_etc_hosts:[]# extra static dns records in `/etc/hosts`node_dns_method: add # how to handle dns servers:add,none,overwritenode_dns_servers:['${admin_ip}']# dynamic nameserver in `/etc/resolv.conf`node_dns_options:# dns resolv options in `/etc/resolv.conf`- options single-request-reopen timeout:1#-----------------------------------------------------------------# NODE_PACKAGE#-----------------------------------------------------------------node_repo_modules:local # upstream repo to be added on node, local by defaultnode_repo_remove:true# remove existing repo on node?node_packages:[openssh-server] # packages to be installed current nodes with latest versionnode_default_packages:# default packages to be installed on all nodes- lz4,unzip,bzip2,pv,jq,git,ncdu,make,patch,bash,lsof,wget,uuid,tuned,nvme-cli,numactl,sysstat,iotop,htop,rsync,tcpdump- python3,python3-pip,socat,lrzsz,net-tools,ipvsadm,telnet,ca-certificates,openssl,keepalived,etcd,haproxy,chrony,pig- zlib,yum,audit,bind-utils,readline,vim-minimal,node_exporter,grubby,openssh-server,openssh-clients,chkconfig,vector#-----------------------------------------------------------------# NODE_SEC#-----------------------------------------------------------------node_selinux_mode: permissive # set selinux mode:enforcing,permissive,disablednode_firewall_mode: zone # firewall mode:off,none, zone, zone by defaultnode_firewall_intranet:# which intranet cidr considered as internal network- 10.0.0.0/8- 192.168.0.0/16- 172.16.0.0/12node_firewall_public_port:# expose these ports to public network in (zone, strict) mode- 22# enable ssh access- 80# enable http access- 443# enable https access- 5432# enable postgresql access (think twice before exposing it!)#-----------------------------------------------------------------# NODE_TUNE#-----------------------------------------------------------------node_disable_numa:false# disable node numa, reboot requirednode_disable_swap:false# disable node swap, use with cautionnode_static_network:true# preserve dns resolver settings after rebootnode_disk_prefetch:false# setup disk prefetch on HDD to increase performancenode_kernel_modules:[softdog, ip_vs, ip_vs_rr, ip_vs_wrr, ip_vs_sh ]node_hugepage_count:0# number of 2MB hugepage, take precedence over rationode_hugepage_ratio:0# node mem hugepage ratio, 0 disable it by defaultnode_overcommit_ratio:0# node mem overcommit ratio, 0 disable it by defaultnode_tune: oltp # node tuned profile:none,oltp,olap,crit,tinynode_sysctl_params:{}# sysctl parameters in k:v format in addition to tuned#-----------------------------------------------------------------# NODE_ADMIN#-----------------------------------------------------------------node_data:/data # node main data directory, `/data` by defaultnode_admin_enabled:true# create a admin user on target node?node_admin_uid:88# uid and gid for node admin usernode_admin_username:dba # name of node admin user, `dba` by defaultnode_admin_sudo:nopass # admin sudo privilege, all,nopass. nopass by defaultnode_admin_ssh_exchange:true# exchange admin ssh key among node clusternode_admin_pk_current:true# add current user's ssh pk to admin authorized_keysnode_admin_pk_list:[]# ssh public keys to be added to admin usernode_aliases:{}# extra shell aliases to be added, k:v dict#-----------------------------------------------------------------# NODE_TIME#-----------------------------------------------------------------node_timezone:''# setup node timezone, empty string to skipnode_ntp_enabled:true# enable chronyd time sync service?node_ntp_servers:# ntp servers in `/etc/chrony.conf`- pool pool.ntp.org iburstnode_crontab_overwrite:true# overwrite or append to `/etc/crontab`?node_crontab:[]# crontab entries in `/etc/crontab`#-----------------------------------------------------------------# NODE_VIP#-----------------------------------------------------------------vip_enabled:false# enable vip on this node cluster?# vip_address: [IDENTITY] # node vip address in ipv4 format, required if vip is enabled# vip_vrid: [IDENTITY] # required, integer, 1-254, should be unique among same VLANvip_role:backup # optional, `master|backup`, backup by default, use as init rolevip_preempt:false# optional, `true/false`, false by default, enable vip preemptionvip_interface:eth0 # node vip network interface to listen, `eth0` by defaultvip_dns_suffix:''# node vip dns name suffix, empty string by defaultvip_exporter_port:9650# keepalived exporter listen port, 9650 by default#-----------------------------------------------------------------# HAPROXY#-----------------------------------------------------------------haproxy_enabled:true# enable haproxy on this node?haproxy_clean:false# cleanup all existing haproxy config?haproxy_reload:true# reload haproxy after config?haproxy_auth_enabled:true# enable authentication for haproxy admin pagehaproxy_admin_username:admin # haproxy admin username, `admin` by defaulthaproxy_admin_password:pigsty # haproxy admin password, `pigsty` by defaulthaproxy_exporter_port:9101# haproxy admin/exporter port, 9101 by defaulthaproxy_client_timeout:24h # client side connection timeout, 24h by defaulthaproxy_server_timeout:24h # server side connection timeout, 24h by defaulthaproxy_services:[]# list of haproxy service to be exposed on node#-----------------------------------------------------------------# NODE_EXPORTER#-----------------------------------------------------------------node_exporter_enabled:true# setup node_exporter on this node?node_exporter_port:9100# node exporter listen port, 9100 by defaultnode_exporter_options:'--no-collector.softnet --no-collector.nvme --collector.tcpstat --collector.processes'#-----------------------------------------------------------------# VECTOR#-----------------------------------------------------------------vector_enabled:true# enable vector log collector?vector_clean:false# purge vector data dir during init?vector_data:/data/vector # vector data dir, /data/vector by defaultvector_port:9598# vector metrics port, 9598 by defaultvector_read_from:beginning # vector read from beginning or endvector_log_endpoint:[infra ] # if defined, sending vector log to this endpoint.#================================================================## VARS: DOCKER ##================================================================#docker_enabled:false# enable docker on this node?docker_data:/data/docker # docker data directory, /data/docker by defaultdocker_storage_driver:overlay2 # docker storage driver, can be zfs, btrfsdocker_cgroups_driver: systemd # docker cgroup fs driver:cgroupfs,systemddocker_registry_mirrors:[]# docker registry mirror listdocker_exporter_port:9323# docker metrics exporter port, 9323 by defaultdocker_image:[]# docker image to be pulled after bootstrapdocker_image_cache:/tmp/docker/*.tgz# docker image cache glob pattern#================================================================## VARS: ETCD ##================================================================##etcd_seq: 1 # etcd instance identifier, explicitly requiredetcd_cluster:etcd # etcd cluster & group name, etcd by defaultetcd_safeguard:false# prevent purging running etcd instance?etcd_clean:true# purging existing etcd during initialization?etcd_data:/data/etcd # etcd data directory, /data/etcd by defaultetcd_port:2379# etcd client port, 2379 by defaultetcd_peer_port:2380# etcd peer port, 2380 by defaultetcd_init:new # etcd initial cluster state, new or existingetcd_election_timeout:1000# etcd election timeout, 1000ms by defaultetcd_heartbeat_interval:100# etcd heartbeat interval, 100ms by defaultetcd_root_password:Etcd.Root # etcd root password for RBAC, change it!#================================================================## VARS: MINIO ##================================================================##minio_seq: 1 # minio instance identifier, REQUIREDminio_cluster:minio # minio cluster identifier, REQUIREDminio_clean:false# cleanup minio during init?, false by defaultminio_user:minio # minio os user, `minio` by defaultminio_https:true# use https for minio, true by defaultminio_node:'${minio_cluster}-${minio_seq}.pigsty'# minio node name patternminio_data:'/data/minio'# minio data dir(s), use {x...y} to specify multi drivers#minio_volumes: # minio data volumes, override defaults if specifiedminio_domain:sss.pigsty # minio external domain name, `sss.pigsty` by defaultminio_port:9000# minio service port, 9000 by defaultminio_admin_port:9001# minio console port, 9001 by defaultminio_access_key:minioadmin # root access key, `minioadmin` by defaultminio_secret_key:S3User.MinIO # root secret key, `S3User.MinIO` by defaultminio_extra_vars:''# extra environment variablesminio_provision:true# run minio provisioning tasks?minio_alias:sss # alias name for local minio deployment#minio_endpoint: https://sss.pigsty:9000 # if not specified, overwritten by defaultsminio_buckets:# list of minio bucket to be created- {name:pgsql }- {name: meta ,versioning:true}- {name:data }minio_users:# list of minio user to be created- {access_key: pgbackrest ,secret_key: S3User.Backup ,policy:pgsql }- {access_key: s3user_meta ,secret_key: S3User.Meta ,policy:meta }- {access_key: s3user_data ,secret_key: S3User.Data ,policy:data }#================================================================## VARS: REDIS ##================================================================##redis_cluster: <CLUSTER> # redis cluster name, required identity parameter#redis_node: 1 <NODE> # redis node sequence number, node int id required#redis_instances: {} <NODE> # redis instances definition on this redis noderedis_fs_main:/data # redis main data mountpoint, `/data` by defaultredis_exporter_enabled:true# install redis exporter on redis nodes?redis_exporter_port:9121# redis exporter listen port, 9121 by defaultredis_exporter_options:''# cli args and extra options for redis exporterredis_safeguard:false# prevent purging running redis instance?redis_clean:true# purging existing redis during init?redis_rmdata:true# remove redis data when purging redis server?redis_mode: standalone # redis mode:standalone,cluster,sentinelredis_conf:redis.conf # redis config template path, except sentinelredis_bind_address:'0.0.0.0'# redis bind address, empty string will use host ipredis_max_memory:1GB # max memory used by each redis instanceredis_mem_policy:allkeys-lru # redis memory eviction policyredis_password:''# redis password, empty string will disable passwordredis_rdb_save:['1200 1']# redis rdb save directives, disable with empty listredis_aof_enabled:false# enable redis append only file?redis_rename_commands:{}# rename redis dangerous commandsredis_cluster_replicas:1# replica number for one master in redis clusterredis_sentinel_monitor:[]# sentinel master list, works on sentinel cluster only#================================================================## VARS: PGSQL ##================================================================##-----------------------------------------------------------------# PG_IDENTITY#-----------------------------------------------------------------pg_mode: pgsql #CLUSTER # pgsql cluster mode:pgsql,citus,gpsql,mssql,mysql,ivory,polar# pg_cluster: #CLUSTER # pgsql cluster name, required identity parameter# pg_seq: 0 #INSTANCE # pgsql instance seq number, required identity parameter# pg_role: replica #INSTANCE # pgsql role, required, could be primary,replica,offline# pg_instances: {} #INSTANCE # define multiple pg instances on node in `{port:ins_vars}` format# pg_upstream: #INSTANCE # repl upstream ip addr for standby cluster or cascade replica# pg_shard: #CLUSTER # pgsql shard name, optional identity for sharding clusters# pg_group: 0 #CLUSTER # pgsql shard index number, optional identity for sharding clusters# gp_role: master #CLUSTER # greenplum role of this cluster, could be master or segmentpg_offline_query:false#INSTANCE # set to true to enable offline queries on this instance#-----------------------------------------------------------------# PG_BUSINESS#-----------------------------------------------------------------# postgres business object definition, overwrite in group varspg_users:[]# postgres business userspg_databases:[]# postgres business databasespg_services:[]# postgres business servicespg_hba_rules:[]# business hba rules for postgrespgb_hba_rules:[]# business hba rules for pgbouncer# global credentials, overwrite in global varspg_dbsu_password:''# dbsu password, empty string means no dbsu password by defaultpg_replication_username:replicatorpg_replication_password:DBUser.Replicatorpg_admin_username:dbuser_dbapg_admin_password:DBUser.DBApg_monitor_username:dbuser_monitorpg_monitor_password:DBUser.Monitor#-----------------------------------------------------------------# PG_INSTALL#-----------------------------------------------------------------pg_dbsu:postgres # os dbsu name, postgres by default, better not change itpg_dbsu_uid:26# os dbsu uid and gid, 26 for default postgres users and groupspg_dbsu_sudo:limit # dbsu sudo privilege, none,limit,all,nopass. limit by defaultpg_dbsu_home:/var/lib/pgsql # postgresql home directory, `/var/lib/pgsql` by defaultpg_dbsu_ssh_exchange:true# exchange postgres dbsu ssh key among same pgsql clusterpg_version:18# postgres major version to be installed, 17 by defaultpg_bin_dir:/usr/pgsql/bin # postgres binary dir, `/usr/pgsql/bin` by defaultpg_log_dir:/pg/log/postgres # postgres log dir, `/pg/log/postgres` by defaultpg_packages:# pg packages to be installed, alias can be used- pgsql-main pgsql-commonpg_extensions:[]# pg extensions to be installed, alias can be used#-----------------------------------------------------------------# PG_BOOTSTRAP#-----------------------------------------------------------------pg_data:/pg/data # postgres data directory, `/pg/data` by defaultpg_fs_main:/data/postgres # postgres main data directory, `/data/postgres` by defaultpg_fs_backup:/data/backups # postgres backup data directory, `/data/backups` by defaultpg_storage_type:SSD # storage type for pg main data, SSD,HDD, SSD by defaultpg_dummy_filesize:64MiB # size of `/pg/dummy`, hold 64MB disk space for emergency usepg_listen:'0.0.0.0'# postgres/pgbouncer listen addresses, comma separated listpg_port:5432# postgres listen port, 5432 by defaultpg_localhost:/var/run/postgresql# postgres unix socket dir for localhost connectionpatroni_enabled:true# if disabled, no postgres cluster will be created during initpatroni_mode: default # patroni working mode:default,pause,removepg_namespace:/pg # top level key namespace in etcd, used by patroni & vippatroni_port:8008# patroni listen port, 8008 by defaultpatroni_log_dir:/pg/log/patroni # patroni log dir, `/pg/log/patroni` by defaultpatroni_ssl_enabled:false# secure patroni RestAPI communications with SSL?patroni_watchdog_mode: off # patroni watchdog mode:automatic,required,off. off by defaultpatroni_username:postgres # patroni restapi username, `postgres` by defaultpatroni_password:Patroni.API # patroni restapi password, `Patroni.API` by defaultpg_etcd_password:''# etcd password for this pg cluster, '' to use pg_clusterpg_primary_db:postgres # primary database name, used by citus,etc... ,postgres by defaultpg_parameters:{}# extra parameters in postgresql.auto.confpg_files:[]# extra files to be copied to postgres data directory (e.g. license)pg_conf: oltp.yml # config template:oltp,olap,crit,tiny. `oltp.yml` by defaultpg_max_conn:auto # postgres max connections, `auto` will use recommended valuepg_shared_buffer_ratio:0.25# postgres shared buffers ratio, 0.25 by default, 0.1~0.4pg_io_method:worker # io method for postgres, auto,fsync,worker,io_uring, worker by defaultpg_rto:30# recovery time objective in seconds, `30s` by defaultpg_rpo:1048576# recovery point objective in bytes, `1MiB` at most by defaultpg_libs:'pg_stat_statements, auto_explain'# preloaded libraries, `pg_stat_statements,auto_explain` by defaultpg_delay:0# replication apply delay for standby cluster leaderpg_checksum:true# enable data checksum for postgres cluster?pg_encoding:UTF8 # database cluster encoding, `UTF8` by defaultpg_locale:C # database cluster local, `C` by defaultpg_lc_collate:C # database cluster collate, `C` by defaultpg_lc_ctype:C # database character type, `C` by default#pgsodium_key: "" # pgsodium key, 64 hex digit, default to sha256(pg_cluster)#pgsodium_getkey_script: "" # pgsodium getkey script path, pgsodium_getkey by default#-----------------------------------------------------------------# PG_PROVISION#-----------------------------------------------------------------pg_provision:true# provision postgres cluster after bootstrappg_init:pg-init # provision init script for cluster template, `pg-init` by defaultpg_default_roles:# default roles and users in postgres cluster- {name: dbrole_readonly ,login: false ,comment:role for global read-only access }- {name: dbrole_offline ,login: false ,comment:role for restricted read-only access }- {name: dbrole_readwrite ,login: false ,roles: [dbrole_readonly] ,comment:role for global read-write access }- {name: dbrole_admin ,login: false ,roles: [pg_monitor, dbrole_readwrite] ,comment:role for object creation }- {name: postgres ,superuser: true ,comment:system superuser }- {name: replicator ,replication: true ,roles: [pg_monitor, dbrole_readonly] ,comment:system replicator }- {name: dbuser_dba ,superuser: true ,roles: [dbrole_admin] ,pgbouncer: true ,pool_mode: session, pool_connlimit: 16 ,comment:pgsql admin user }- {name: dbuser_monitor ,roles: [pg_monitor] ,pgbouncer: true ,parameters:{log_min_duration_statement: 1000 } ,pool_mode: session ,pool_connlimit: 8 ,comment:pgsql monitor user }pg_default_privileges:# default privileges when created by admin user- GRANT USAGE ON SCHEMAS TO dbrole_readonly- GRANT SELECT ON TABLES TO dbrole_readonly- GRANT SELECT ON SEQUENCES TO dbrole_readonly- GRANT EXECUTE ON FUNCTIONS TO dbrole_readonly- GRANT USAGE ON SCHEMAS TO dbrole_offline- GRANT SELECT ON TABLES TO dbrole_offline- GRANT SELECT ON SEQUENCES TO dbrole_offline- GRANT EXECUTE ON FUNCTIONS TO dbrole_offline- GRANT INSERT ON TABLES TO dbrole_readwrite- GRANT UPDATE ON TABLES TO dbrole_readwrite- GRANT DELETE ON TABLES TO dbrole_readwrite- GRANT USAGE ON SEQUENCES TO dbrole_readwrite- GRANT UPDATE ON SEQUENCES TO dbrole_readwrite- GRANT TRUNCATE ON TABLES TO dbrole_admin- GRANT REFERENCES ON TABLES TO dbrole_admin- GRANT TRIGGER ON TABLES TO dbrole_admin- GRANT CREATE ON SCHEMAS TO dbrole_adminpg_default_schemas:[monitor ] # default schemas to be createdpg_default_extensions:# default extensions to be created- {name: pg_stat_statements ,schema:monitor }- {name: pgstattuple ,schema:monitor }- {name: pg_buffercache ,schema:monitor }- {name: pageinspect ,schema:monitor }- {name: pg_prewarm ,schema:monitor }- {name: pg_visibility ,schema:monitor }- {name: pg_freespacemap ,schema:monitor }- {name: postgres_fdw ,schema:public }- {name: file_fdw ,schema:public }- {name: btree_gist ,schema:public }- {name: btree_gin ,schema:public }- {name: pg_trgm ,schema:public }- {name: intagg ,schema:public }- {name: intarray ,schema:public }- {name:pg_repack }pg_reload:true# reload postgres after hba changespg_default_hba_rules:# postgres default host-based authentication rules, order by `order`- {user:'${dbsu}',db: all ,addr: local ,auth: ident ,title: 'dbsu access via local os user ident' ,order:100}- {user:'${dbsu}',db: replication ,addr: local ,auth: ident ,title: 'dbsu replication from local os ident' ,order:150}- {user:'${repl}',db: replication ,addr: localhost ,auth: pwd ,title: 'replicator replication from localhost',order:200}- {user:'${repl}',db: replication ,addr: intra ,auth: pwd ,title: 'replicator replication from intranet' ,order:250}- {user:'${repl}',db: postgres ,addr: intra ,auth: pwd ,title: 'replicator postgres db from intranet' ,order:300}- {user:'${monitor}',db: all ,addr: localhost ,auth: pwd ,title: 'monitor from localhost with password' ,order:350}- {user:'${monitor}',db: all ,addr: infra ,auth: pwd ,title: 'monitor from infra host with password',order:400}- {user:'${admin}',db: all ,addr: infra ,auth: ssl ,title: 'admin @ infra nodes with pwd & ssl' ,order:450}- {user:'${admin}',db: all ,addr: world ,auth: ssl ,title: 'admin @ everywhere with ssl & pwd' ,order:500}- {user: '+dbrole_readonly',db: all ,addr: localhost ,auth: pwd ,title: 'pgbouncer read/write via local socket',order:550}- {user: '+dbrole_readonly',db: all ,addr: intra ,auth: pwd ,title: 'read/write biz user via password' ,order:600}- {user: '+dbrole_offline' ,db: all ,addr: intra ,auth: pwd ,title: 'allow etl offline tasks from intranet',order:650}pgb_default_hba_rules:# pgbouncer default host-based authentication rules, order by `order`- {user:'${dbsu}',db: pgbouncer ,addr: local ,auth: peer ,title: 'dbsu local admin access with os ident',order:100}- {user: 'all' ,db: all ,addr: localhost ,auth: pwd ,title: 'allow all user local access with pwd' ,order:150}- {user:'${monitor}',db: pgbouncer ,addr: intra ,auth: pwd ,title: 'monitor access via intranet with pwd' ,order:200}- {user:'${monitor}',db: all ,addr: world ,auth: deny ,title: 'reject all other monitor access addr' ,order:250}- {user:'${admin}',db: all ,addr: intra ,auth: pwd ,title: 'admin access via intranet with pwd' ,order:300}- {user:'${admin}',db: all ,addr: world ,auth: deny ,title: 'reject all other admin access addr' ,order:350}- {user: 'all' ,db: all ,addr: intra ,auth: pwd ,title: 'allow all user intra access with pwd' ,order:400}#-----------------------------------------------------------------# PG_BACKUP#-----------------------------------------------------------------pgbackrest_enabled:true# enable pgbackrest on pgsql host?pgbackrest_log_dir:/pg/log/pgbackrest# pgbackrest log dir, `/pg/log/pgbackrest` by defaultpgbackrest_method: local # pgbackrest repo method:local,minio,[user-defined...]pgbackrest_init_backup:true# take a full backup after pgbackrest is initialized?pgbackrest_repo: # pgbackrest repo:https://pgbackrest.org/configuration.html#section-repositorylocal:# default pgbackrest repo with local posix fspath:/pg/backup # local backup directory, `/pg/backup` by defaultretention_full_type:count # retention full backups by countretention_full:2# keep 2, at most 3 full backups when using local fs repominio:# optional minio repo for pgbackresttype:s3 # minio is s3-compatible, so s3 is useds3_endpoint:sss.pigsty # minio endpoint domain name, `sss.pigsty` by defaults3_region:us-east-1 # minio region, us-east-1 by default, useless for minios3_bucket:pgsql # minio bucket name, `pgsql` by defaults3_key:pgbackrest # minio user access key for pgbackrests3_key_secret:S3User.Backup # minio user secret key for pgbackrests3_uri_style:path # use path style uri for minio rather than host stylepath:/pgbackrest # minio backup path, default is `/pgbackrest`storage_port:9000# minio port, 9000 by defaultstorage_ca_file:/etc/pki/ca.crt # minio ca file path, `/etc/pki/ca.crt` by defaultblock:y# Enable block incremental backupbundle:y# bundle small files into a single filebundle_limit:20MiB # Limit for file bundles, 20MiB for object storagebundle_size:128MiB # Target size for file bundles, 128MiB for object storagecipher_type:aes-256-cbc # enable AES encryption for remote backup repocipher_pass:pgBackRest # AES encryption password, default is 'pgBackRest'retention_full_type:time # retention full backup by time on minio reporetention_full:14# keep full backup for the the last 14 days#-----------------------------------------------------------------# PG_ACCESS#-----------------------------------------------------------------pgbouncer_enabled:true# if disabled, pgbouncer will not be launched on pgsql hostpgbouncer_port:6432# pgbouncer listen port, 6432 by defaultpgbouncer_log_dir:/pg/log/pgbouncer # pgbouncer log dir, `/pg/log/pgbouncer` by defaultpgbouncer_auth_query:false# query postgres to retrieve unlisted business users?pgbouncer_poolmode: transaction # pooling mode:transaction,session,statement, transaction by defaultpgbouncer_sslmode:disable # pgbouncer client ssl mode, disable by defaultpgbouncer_ignore_param:[extra_float_digits, application_name, TimeZone, DateStyle, IntervalStyle, search_path ]pg_weight:100#INSTANCE # relative load balance weight in service, 100 by default, 0-255pg_service_provider:''# dedicate haproxy node group name, or empty string for local nodes by defaultpg_default_service_dest:pgbouncer# default service destination if svc.dest='default'pg_default_services:# postgres default service definitions- {name: primary ,port: 5433 ,dest: default ,check: /primary ,selector:"[]"}- {name: replica ,port: 5434 ,dest: default ,check: /read-only ,selector:"[]", backup:"[? pg_role == `primary` || pg_role == `offline` ]"}- {name: default ,port: 5436 ,dest: postgres ,check: /primary ,selector:"[]"}- {name: offline ,port: 5438 ,dest: postgres ,check: /replica ,selector:"[? pg_role == `offline` || pg_offline_query ]", backup:"[? pg_role == `replica` && !pg_offline_query]"}pg_vip_enabled:false# enable a l2 vip for pgsql primary? false by defaultpg_vip_address:127.0.0.1/24 # vip address in `<ipv4>/<mask>` format, require if vip is enabledpg_vip_interface:eth0 # vip network interface to listen, eth0 by defaultpg_dns_suffix:''# pgsql dns suffix, '' by defaultpg_dns_target:auto # auto, primary, vip, none, or ad hoc ip#-----------------------------------------------------------------# PG_MONITOR#-----------------------------------------------------------------pg_exporter_enabled:true# enable pg_exporter on pgsql hosts?pg_exporter_config:pg_exporter.yml # pg_exporter configuration file namepg_exporter_cache_ttls:'1,10,60,300'# pg_exporter collector ttl stage in seconds, '1,10,60,300' by defaultpg_exporter_port:9630# pg_exporter listen port, 9630 by defaultpg_exporter_params:'sslmode=disable'# extra url parameters for pg_exporter dsnpg_exporter_url:''# overwrite auto-generate pg dsn if specifiedpg_exporter_auto_discovery:true# enable auto database discovery? enabled by defaultpg_exporter_exclude_database:'template0,template1,postgres'# csv of database that WILL NOT be monitored during auto-discoverypg_exporter_include_database:''# csv of database that WILL BE monitored during auto-discoverypg_exporter_connect_timeout:200# pg_exporter connect timeout in ms, 200 by defaultpg_exporter_options:''# overwrite extra options for pg_exporterpgbouncer_exporter_enabled:true# enable pgbouncer_exporter on pgsql hosts?pgbouncer_exporter_port:9631# pgbouncer_exporter listen port, 9631 by defaultpgbouncer_exporter_url:''# overwrite auto-generate pgbouncer dsn if specifiedpgbouncer_exporter_options:''# overwrite extra options for pgbouncer_exporterpgbackrest_exporter_enabled:true# enable pgbackrest_exporter on pgsql hosts?pgbackrest_exporter_port:9854# pgbackrest_exporter listen port, 9854 by defaultpgbackrest_exporter_options:> --collect.interval=120
--log.level=info#-----------------------------------------------------------------# PG_REMOVE#-----------------------------------------------------------------pg_safeguard:false# stop pg_remove running if pg_safeguard is enabled, false by defaultpg_rm_data:true# remove postgres data during remove? true by defaultpg_rm_backup:true# remove pgbackrest backup during primary remove? true by defaultpg_rm_pkg:true# uninstall postgres packages during remove? true by default...
Explanation
The demo/el template is optimized for Enterprise Linux family distributions.
Supported Distributions:
RHEL 8/9/10
Rocky Linux 8/9/10
Alma Linux 8/9/10
Oracle Linux 8/9
Key Features:
Uses EPEL and PGDG repositories
Optimized for YUM/DNF package manager
Supports EL-specific package names
Use Cases:
Enterprise production environments (RHEL/Rocky/Alma recommended)
Long-term support and stability requirements
Environments using Red Hat ecosystem
8.32 - demo/debian
Configuration template optimized for Debian/Ubuntu
The demo/debian configuration template is optimized for Debian and Ubuntu distributions.
---#==============================================================## File : debian.yml# Desc : Default parameters for Debian/Ubuntu in Pigsty# Ctime : 2020-05-22# Mtime : 2025-12-27# Docs : https://doc.pgsty.com/config# License : Apache-2.0 @ https://pigsty.io/docs/about/license/# Copyright : 2018-2026 Ruohang Feng / Vonng ([email protected])#==============================================================##==============================================================## Sandbox (4-node) ##==============================================================## admin user : vagrant (nopass ssh & sudo already set) ## 1. meta : 10.10.10.10 (2 Core | 4GB) pg-meta ## 2. node-1 : 10.10.10.11 (1 Core | 1GB) pg-test-1 ## 3. node-2 : 10.10.10.12 (1 Core | 1GB) pg-test-2 ## 4. node-3 : 10.10.10.13 (1 Core | 1GB) pg-test-3 ## (replace these ip if your 4-node env have different ip addr) ## VIP 2: (l2 vip is available inside same LAN ) ## pg-meta ---> 10.10.10.2 ---> 10.10.10.10 ## pg-test ---> 10.10.10.3 ---> 10.10.10.1{1,2,3} ##==============================================================#all:################################################################### CLUSTERS #################################################################### meta nodes, nodes, pgsql, redis, pgsql clusters are defined as# k:v pair inside `all.children`. Where the key is cluster name# and value is cluster definition consist of two parts:# `hosts`: cluster members ip and instance level variables# `vars` : cluster level variables##################################################################children:# groups definition# infra cluster for proxy, monitor, alert, etc..infra:{hosts:{10.10.10.10:{infra_seq:1}}}# etcd cluster for ha postgresetcd:{hosts:{10.10.10.10:{etcd_seq: 1 } }, vars:{etcd_cluster:etcd } }# minio cluster, s3 compatible object storageminio:{hosts:{10.10.10.10:{minio_seq: 1 } }, vars:{minio_cluster:minio } }#----------------------------------## pgsql cluster: pg-meta (CMDB) ##----------------------------------#pg-meta:hosts:{10.10.10.10:{pg_seq: 1, pg_role: primary , pg_offline_query:true}}vars:pg_cluster:pg-meta# define business databases here: https://doc.pgsty.com/pgsql/dbpg_databases:# define business databases on this cluster, array of database definition- name:meta # REQUIRED, `name` is the only mandatory field of a database definition#state: create # optional, create|absent|recreate, create by defaultbaseline: cmdb.sql # optional, database sql baseline path, (relative path among ansible search path, e.g:files/)schemas:[pigsty] # optional, additional schemas to be created, array of schema namesextensions: # optional, additional extensions to be installed:array of `{name[,schema]}`- {name:vector } # install pgvector extension on this database by defaultcomment:pigsty meta database # optional, comment string for this database#pgbouncer: true # optional, add this database to pgbouncer database list? true by default#owner: postgres # optional, database owner, current user if not specified#template: template1 # optional, which template to use, template1 by default#strategy: FILE_COPY # optional, clone strategy: FILE_COPY or WAL_LOG (PG15+), default to PG's default#encoding: UTF8 # optional, inherited from template / cluster if not defined (UTF8)#locale: C # optional, inherited from template / cluster if not defined (C)#lc_collate: C # optional, inherited from template / cluster if not defined (C)#lc_ctype: C # optional, inherited from template / cluster if not defined (C)#locale_provider: libc # optional, locale provider: libc, icu, builtin (PG15+)#icu_locale: en-US # optional, icu locale for icu locale provider (PG15+)#icu_rules: '' # optional, icu rules for icu locale provider (PG16+)#builtin_locale: C.UTF-8 # optional, builtin locale for builtin locale provider (PG17+)#tablespace: pg_default # optional, default tablespace, pg_default by default#is_template: false # optional, mark database as template, allowing clone by any user with CREATEDB privilege#allowconn: true # optional, allow connection, true by default. false will disable connect at all#revokeconn: false # optional, revoke public connection privilege. false by default. (leave connect with grant option to owner)#register_datasource: true # optional, register this database to grafana datasources? true by default#connlimit: -1 # optional, database connection limit, default -1 disable limit#pool_auth_user: dbuser_meta # optional, all connection to this pgbouncer database will be authenticated by this user#pool_mode: transaction # optional, pgbouncer pool mode at database level, default transaction#pool_size: 64 # optional, pgbouncer pool size at database level, default 64#pool_size_reserve: 32 # optional, pgbouncer pool size reserve at database level, default 32#pool_size_min: 0 # optional, pgbouncer pool size min at database level, default 0#pool_max_db_conn: 100 # optional, max database connections at database level, default 100#- { name: grafana ,owner: dbuser_grafana ,revokeconn: true ,comment: grafana primary database }#- { name: bytebase ,owner: dbuser_bytebase ,revokeconn: true ,comment: bytebase primary database }#- { name: kong ,owner: dbuser_kong ,revokeconn: true ,comment: kong the api gateway database }#- { name: gitea ,owner: dbuser_gitea ,revokeconn: true ,comment: gitea meta database }#- { name: wiki ,owner: dbuser_wiki ,revokeconn: true ,comment: wiki meta database }# define business users here: https://doc.pgsty.com/pgsql/userpg_users:# define business users/roles on this cluster, array of user definition- name:dbuser_meta # REQUIRED, `name` is the only mandatory field of a user definitionpassword:DBUser.Meta # optional, password, can be a scram-sha-256 hash string or plain text#login: true # optional, can log in, true by default (new biz ROLE should be false)#superuser: false # optional, is superuser? false by default#createdb: false # optional, can create database? false by default#createrole: false # optional, can create role? false by default#inherit: true # optional, can this role use inherited privileges? true by default#replication: false # optional, can this role do replication? false by default#bypassrls: false # optional, can this role bypass row level security? false by default#pgbouncer: true # optional, add this user to pgbouncer user-list? false by default (production user should be true explicitly)#connlimit: -1 # optional, user connection limit, default -1 disable limit#expire_in: 3650 # optional, now + n days when this role is expired (OVERWRITE expire_at)#expire_at: '2030-12-31' # optional, YYYY-MM-DD 'timestamp' when this role is expired (OVERWRITTEN by expire_in)#comment: pigsty admin user # optional, comment string for this user/role#roles: [dbrole_admin] # optional, belonged roles. default roles are: dbrole_{admin,readonly,readwrite,offline}#parameters: {} # optional, role level parameters with `ALTER ROLE SET`#pool_mode: transaction # optional, pgbouncer pool mode at user level, transaction by default#pool_connlimit: -1 # optional, max database connections at user level, default -1 disable limit- {name: dbuser_view ,password: DBUser.Viewer ,pgbouncer: true ,roles: [dbrole_readonly], comment:read-only viewer for meta database}#- {name: dbuser_grafana ,password: DBUser.Grafana ,pgbouncer: true ,roles: [dbrole_admin] ,comment: admin user for grafana database }#- {name: dbuser_bytebase ,password: DBUser.Bytebase ,pgbouncer: true ,roles: [dbrole_admin] ,comment: admin user for bytebase database }#- {name: dbuser_gitea ,password: DBUser.Gitea ,pgbouncer: true ,roles: [dbrole_admin] ,comment: admin user for gitea service }#- {name: dbuser_wiki ,password: DBUser.Wiki ,pgbouncer: true ,roles: [dbrole_admin] ,comment: admin user for wiki.js service }# define business service here: https://doc.pgsty.com/pgsql/servicepg_services:# extra services in addition to pg_default_services, array of service definition# standby service will route {ip|name}:5435 to sync replica's pgbouncer (5435->6432 standby)- name: standby # required, service name, the actual svc name will be prefixed with `pg_cluster`, e.g:pg-meta-standbyport:5435# required, service exposed port (work as kubernetes service node port mode)ip:"*"# optional, service bind ip address, `*` for all ip by defaultselector:"[]"# required, service member selector, use JMESPath to filter inventorydest:default # optional, destination port, default|postgres|pgbouncer|<port_number>, 'default' by defaultcheck:/sync # optional, health check url path, / by defaultbackup:"[? pg_role == `primary`]"# backup server selectormaxconn:3000# optional, max allowed front-end connectionbalance: roundrobin # optional, haproxy load balance algorithm (roundrobin by default, other:leastconn)options:'inter 3s fastinter 1s downinter 5s rise 3 fall 3 on-marked-down shutdown-sessions slowstart 30s maxconn 3000 maxqueue 128 weight 100'# define pg extensions: https://doc.pgsty.com/pgsql/extensionpg_libs:'pg_stat_statements, auto_explain'# add timescaledb to shared_preload_libraries#pg_extensions: [] # extensions to be installed on this cluster# define HBA rules here: https://doc.pgsty.com/pgsql/hbapg_hba_rules:- {user: dbuser_view , db: all ,addr: infra ,auth: pwd ,title:'allow grafana dashboard access cmdb from infra nodes'}pg_vip_enabled:truepg_vip_address:10.10.10.2/24pg_vip_interface:eth1node_crontab:# make a full backup 1 am everyday- '00 01 * * * postgres /pg/bin/pg-backup full'#----------------------------------## pgsql cluster: pg-test (3 nodes) ##----------------------------------## pg-test ---> 10.10.10.3 ---> 10.10.10.1{1,2,3}pg-test:# define the new 3-node cluster pg-testhosts:10.10.10.11:{pg_seq: 1, pg_role:primary } # primary instance, leader of cluster10.10.10.12:{pg_seq: 2, pg_role:replica } # replica instance, follower of leader10.10.10.13:{pg_seq: 3, pg_role: replica, pg_offline_query:true}# replica with offline accessvars:pg_cluster:pg-test # define pgsql cluster namepg_users:[{name: test , password: test , pgbouncer: true , roles:[dbrole_admin ] }]pg_databases:[{name:test }]# create a database and user named 'test'node_tune:tinypg_conf:tiny.ymlpg_vip_enabled:truepg_vip_address:10.10.10.3/24pg_vip_interface:eth1node_crontab:# make a full backup on monday 1am, and an incremental backup during weekdays- '00 01 * * 1 postgres /pg/bin/pg-backup full'- '00 01 * * 2,3,4,5,6,7 postgres /pg/bin/pg-backup'#----------------------------------## redis ms, sentinel, native cluster#----------------------------------#redis-ms:# redis classic primary & replicahosts:{10.10.10.10:{redis_node: 1 , redis_instances:{6379:{}, 6380:{replica_of:'10.10.10.10 6379'}}}}vars:{redis_cluster: redis-ms ,redis_password: 'redis.ms' ,redis_max_memory:64MB }redis-meta:# redis sentinel x 3hosts:{10.10.10.11:{redis_node: 1 , redis_instances:{26379:{} ,26380:{} ,26381:{}}}}vars:redis_cluster:redis-metaredis_password:'redis.meta'redis_mode:sentinelredis_max_memory:16MBredis_sentinel_monitor:# primary list for redis sentinel, use cls as name, primary ip:port- {name: redis-ms, host: 10.10.10.10, port: 6379 ,password: redis.ms, quorum:2}redis-test: # redis native cluster:3m x 3shosts:10.10.10.12:{redis_node: 1 ,redis_instances:{6379:{} ,6380:{} ,6381:{}}}10.10.10.13:{redis_node: 2 ,redis_instances:{6379:{} ,6380:{} ,6381:{}}}vars:{redis_cluster: redis-test ,redis_password: 'redis.test' ,redis_mode: cluster, redis_max_memory:32MB }##################################################################### VARS #####################################################################vars:# global variables#================================================================## VARS: INFRA ##================================================================##-----------------------------------------------------------------# META#-----------------------------------------------------------------version:v4.0.0 # pigsty version stringadmin_ip:10.10.10.10# admin node ip addressregion: default # upstream mirror region:default,china,europelanguage: en # default language:en, zhproxy_env:# global proxy env when downloading packagesno_proxy:"localhost,127.0.0.1,10.0.0.0/8,192.168.0.0/16,*.pigsty,*.aliyun.com,mirrors.*,*.myqcloud.com,*.tsinghua.edu.cn"# http_proxy: # set your proxy here: e.g http://user:[email protected]# https_proxy: # set your proxy here: e.g http://user:[email protected]# all_proxy: # set your proxy here: e.g http://user:[email protected]#-----------------------------------------------------------------# CA#-----------------------------------------------------------------ca_create:true# create ca if not exists? or just abortca_cn:pigsty-ca # ca common name, fixed as pigsty-cacert_validity:7300d # cert validity, 20 years by default#-----------------------------------------------------------------# INFRA_IDENTITY#-----------------------------------------------------------------#infra_seq: 1 # infra node identity, explicitly requiredinfra_portal:# infra services exposed via portalhome :{domain:i.pigsty } # default domain nameinfra_data:/data/infra # default data path for infrastructure data#-----------------------------------------------------------------# REPO#-----------------------------------------------------------------repo_enabled:true# create a yum repo on this infra node?repo_home:/www # repo home dir, `/www` by defaultrepo_name:pigsty # repo name, pigsty by defaultrepo_endpoint:http://${admin_ip}:80# access point to this repo by domain or ip:portrepo_remove:true# remove existing upstream reporepo_modules:infra,node,pgsql # which repo modules are installed in repo_upstreamrepo_upstream:# where to download- {name: pigsty-local ,description: 'Pigsty Local' ,module: local ,releases: [11,12,13,20,22,24] ,arch: [x86_64, aarch64] ,baseurl:{default:'http://${admin_ip}/pigsty ./'}}- {name: pigsty-pgsql ,description: 'Pigsty PgSQL' ,module: pgsql ,releases: [11,12,13,20,22,24] ,arch: [x86_64, aarch64] ,baseurl:{default:'https://repo.pigsty.io/apt/pgsql/${distro_codename} ${distro_codename} main', china:'https://repo.pigsty.cc/apt/pgsql/${distro_codename} ${distro_codename} main'}}- {name: pigsty-infra ,description: 'Pigsty Infra' ,module: infra ,releases: [11,12,13,20,22,24] ,arch: [x86_64, aarch64] ,baseurl:{default: 'https://repo.pigsty.io/apt/infra/ generic main' ,china:'https://repo.pigsty.cc/apt/infra/ generic main'}}- {name: nginx ,description: 'Nginx' ,module: infra ,releases: [11,12,13,20,22,24] ,arch: [x86_64, aarch64] ,baseurl:{default:'http://nginx.org/packages/${distro_name} ${distro_codename} nginx'}}- {name: docker-ce ,description: 'Docker' ,module: infra ,releases: [11,12,13,20,22,24] ,arch: [x86_64, aarch64] ,baseurl:{default:'https://download.docker.com/linux/${distro_name} ${distro_codename} stable',china:'https://mirrors.aliyun.com/docker-ce/linux/${distro_name} ${distro_codename} stable'}}- {name: base ,description: 'Debian Basic' ,module: node ,releases: [11,12,13 ] ,arch: [x86_64, aarch64] ,baseurl:{default:'http://deb.debian.org/debian/ ${distro_codename} main non-free-firmware',china:'https://mirrors.aliyun.com/debian/ ${distro_codename} main restricted universe multiverse'}}- {name: updates ,description: 'Debian Updates' ,module: node ,releases: [11,12,13 ] ,arch: [x86_64, aarch64] ,baseurl:{default:'http://deb.debian.org/debian/ ${distro_codename}-updates main non-free-firmware',china:'https://mirrors.aliyun.com/debian/ ${distro_codename}-updates main restricted universe multiverse'}}- {name: security ,description: 'Debian Security' ,module: node ,releases: [11,12,13 ] ,arch: [x86_64, aarch64] ,baseurl:{default:'http://security.debian.org/debian-security ${distro_codename}-security main non-free-firmware',china:'https://mirrors.aliyun.com/debian-security/ ${distro_codename}-security main non-free-firmware'}}- {name: base ,description: 'Ubuntu Basic' ,module: node ,releases: [ 20,22,24] ,arch: [x86_64 ] ,baseurl:{default:'https://mirrors.edge.kernel.org/ubuntu/ ${distro_codename} main universe multiverse restricted',china:'https://mirrors.aliyun.com/ubuntu/ ${distro_codename} main restricted universe multiverse'}}- {name: updates ,description: 'Ubuntu Updates' ,module: node ,releases: [ 20,22,24] ,arch: [x86_64 ] ,baseurl:{default:'https://mirrors.edge.kernel.org/ubuntu/ ${distro_codename}-backports main restricted universe multiverse',china:'https://mirrors.aliyun.com/ubuntu/ ${distro_codename}-updates main restricted universe multiverse'}}- {name: backports ,description: 'Ubuntu Backports' ,module: node ,releases: [ 20,22,24] ,arch: [x86_64 ] ,baseurl:{default:'https://mirrors.edge.kernel.org/ubuntu/ ${distro_codename}-security main restricted universe multiverse',china:'https://mirrors.aliyun.com/ubuntu/ ${distro_codename}-backports main restricted universe multiverse'}}- {name: security ,description: 'Ubuntu Security' ,module: node ,releases: [ 20,22,24] ,arch: [x86_64 ] ,baseurl:{default:'https://mirrors.edge.kernel.org/ubuntu/ ${distro_codename}-updates main restricted universe multiverse',china:'https://mirrors.aliyun.com/ubuntu/ ${distro_codename}-security main restricted universe multiverse'}}- {name: base ,description: 'Ubuntu Basic' ,module: node ,releases: [ 20,22,24] ,arch: [ aarch64] ,baseurl:{default:'http://ports.ubuntu.com/ubuntu-ports/ ${distro_codename} main universe multiverse restricted',china:'https://mirrors.aliyun.com/ubuntu-ports/ ${distro_codename} main restricted universe multiverse'}}- {name: updates ,description: 'Ubuntu Updates' ,module: node ,releases: [ 20,22,24] ,arch: [ aarch64] ,baseurl:{default:'http://ports.ubuntu.com/ubuntu-ports/ ${distro_codename}-backports main restricted universe multiverse',china:'https://mirrors.aliyun.com/ubuntu-ports/ ${distro_codename}-updates main restricted universe multiverse'}}- {name: backports ,description: 'Ubuntu Backports' ,module: node ,releases: [ 20,22,24] ,arch: [ aarch64] ,baseurl:{default:'http://ports.ubuntu.com/ubuntu-ports/ ${distro_codename}-security main restricted universe multiverse',china:'https://mirrors.aliyun.com/ubuntu-ports/ ${distro_codename}-backports main restricted universe multiverse'}}- {name: security ,description: 'Ubuntu Security' ,module: node ,releases: [ 20,22,24] ,arch: [ aarch64] ,baseurl:{default:'http://ports.ubuntu.com/ubuntu-ports/ ${distro_codename}-updates main restricted universe multiverse',china:'https://mirrors.aliyun.com/ubuntu-ports/ ${distro_codename}-security main restricted universe multiverse'}}- {name: pgdg ,description: 'PGDG' ,module: pgsql ,releases: [11,12,13, 22,24] ,arch: [x86_64, aarch64] ,baseurl:{default:'http://apt.postgresql.org/pub/repos/apt/ ${distro_codename}-pgdg main',china:'https://mirrors.aliyun.com/postgresql/repos/apt/ ${distro_codename}-pgdg main'}}- {name: pgdg-beta ,description: 'PGDG Beta' ,module: beta ,releases: [11,12,13, 22,24] ,arch: [x86_64, aarch64] ,baseurl:{default:'http://apt.postgresql.org/pub/repos/apt/ ${distro_codename}-pgdg-testing main 19',china:'https://mirrors.aliyun.com/postgresql/repos/apt/ ${distro_codename}-pgdg-testing main 19'}}- {name: timescaledb ,description: 'TimescaleDB' ,module: extra ,releases: [11,12,13,20,22,24] ,arch: [x86_64, aarch64] ,baseurl:{default:'https://packagecloud.io/timescale/timescaledb/${distro_name}/ ${distro_codename} main'}}- {name: citus ,description: 'Citus' ,module: extra ,releases: [11,12, 20,22 ] ,arch: [x86_64, aarch64] ,baseurl:{default:'https://packagecloud.io/citusdata/community/${distro_name}/ ${distro_codename} main'}}- {name: percona ,description: 'Percona TDE' ,module: percona ,releases: [11,12,13,20,22,24] ,arch: [x86_64, aarch64] ,baseurl:{default:'https://repo.pigsty.io/apt/percona ${distro_codename} main',china:'https://repo.pigsty.cc/apt/percona ${distro_codename} main',origin:'http://repo.percona.com/ppg-18.1/apt ${distro_codename} main'}}- {name: wiltondb ,description: 'WiltonDB' ,module: mssql ,releases: [ 20,22,24] ,arch: [x86_64, aarch64] ,baseurl:{default:'https://repo.pigsty.io/apt/mssql/ ${distro_codename} main',china:'https://repo.pigsty.cc/apt/mssql/ ${distro_codename} main',origin:'https://ppa.launchpadcontent.net/wiltondb/wiltondb/ubuntu/ ${distro_codename} main'}}- {name: groonga ,description: 'Groonga Debian' ,module: groonga ,releases: [11,12,13 ] ,arch: [x86_64, aarch64] ,baseurl:{default:'https://packages.groonga.org/debian/ ${distro_codename} main'}}- {name: groonga ,description: 'Groonga Ubuntu' ,module: groonga ,releases: [ 20,22,24] ,arch: [x86_64, aarch64] ,baseurl:{default:'https://ppa.launchpadcontent.net/groonga/ppa/ubuntu/ ${distro_codename} main'}}- {name: mysql ,description: 'MySQL' ,module: mysql ,releases: [11,12, 20,22,24] ,arch: [x86_64, aarch64] ,baseurl:{default:'https://repo.mysql.com/apt/${distro_name} ${distro_codename} mysql-8.0 mysql-tools', china:'https://mirrors.tuna.tsinghua.edu.cn/mysql/apt/${distro_name} ${distro_codename} mysql-8.0 mysql-tools'}}- {name: mongo ,description: 'MongoDB' ,module: mongo ,releases: [11,12, 20,22,24] ,arch: [x86_64, aarch64] ,baseurl:{default:'https://repo.mongodb.org/apt/${distro_name} ${distro_codename}/mongodb-org/8.0 multiverse', china:'https://mirrors.aliyun.com/mongodb/apt/${distro_name} ${distro_codename}/mongodb-org/8.0 multiverse'}}- {name: redis ,description: 'Redis' ,module: redis ,releases: [11,12, 20,22,24] ,arch: [x86_64, aarch64] ,baseurl:{default:'https://packages.redis.io/deb ${distro_codename} main'}}- {name: llvm ,description: 'LLVM' ,module: llvm ,releases: [11,12,13,20,22,24] ,arch: [x86_64, aarch64] ,baseurl:{default:'http://apt.llvm.org/${distro_codename}/ llvm-toolchain-${distro_codename} main',china:'https://mirrors.tuna.tsinghua.edu.cn/llvm-apt/${distro_codename}/ llvm-toolchain-${distro_codename} main'}}- {name: haproxyd ,description: 'Haproxy Debian' ,module: haproxy ,releases: [11,12 ] ,arch: [x86_64, aarch64] ,baseurl:{default:'http://haproxy.debian.net/ ${distro_codename}-backports-3.1 main'}}- {name: haproxyu ,description: 'Haproxy Ubuntu' ,module: haproxy ,releases: [ 20,22,24] ,arch: [x86_64, aarch64] ,baseurl:{default:'https://ppa.launchpadcontent.net/vbernat/haproxy-3.1/ubuntu/ ${distro_codename} main'}}- {name: grafana ,description: 'Grafana' ,module: grafana ,releases: [11,12,13,20,22,24] ,arch: [x86_64, aarch64] ,baseurl:{default: 'https://apt.grafana.com stable main' ,china:'https://mirrors.aliyun.com/grafana/apt/ stable main'}}- {name: kubernetes ,description: 'Kubernetes' ,module: kube ,releases: [11,12,13,20,22,24] ,arch: [x86_64, aarch64] ,baseurl:{default: 'https://pkgs.k8s.io/core:/stable:/v1.33/deb/ /', china:'https://mirrors.aliyun.com/kubernetes-new/core/stable/v1.33/deb/ /'}}- {name: gitlab-ee ,description: 'Gitlab EE' ,module: gitlab ,releases: [11,12,13,20,22,24] ,arch: [x86_64, aarch64] ,baseurl:{default:'https://packages.gitlab.com/gitlab/gitlab-ee/${distro_name}/ ${distro_codename} main'}}- {name: gitlab-ce ,description: 'Gitlab CE' ,module: gitlab ,releases: [11,12,13,20,22,24] ,arch: [x86_64, aarch64] ,baseurl:{default:'https://packages.gitlab.com/gitlab/gitlab-ce/${distro_name}/ ${distro_codename} main'}}- {name: clickhouse ,description: 'ClickHouse' ,module: click ,releases: [11,12,13,20,22,24] ,arch: [x86_64, aarch64] ,baseurl:{default: 'https://packages.clickhouse.com/deb/ stable main', china:'https://mirrors.aliyun.com/clickhouse/deb/ stable main'}}repo_packages:[node-bootstrap, infra-package, infra-addons, node-package1, node-package2, pgsql-utility, extra-modules ]repo_extra_packages:[pgsql-main ]repo_url_packages:[]#-----------------------------------------------------------------# INFRA_PACKAGE#-----------------------------------------------------------------infra_packages:# packages to be installed on infra nodes- grafana,grafana-plugins,grafana-victorialogs-ds,grafana-victoriametrics-ds,victoria-metrics,victoria-logs,victoria-traces,vmutils,vlogscli,alertmanager- node-exporter,blackbox-exporter,nginx-exporter,pg-exporter,pev2,nginx,dnsmasq,ansible,etcd,python3-requests,redis,mcli,restic,certbot,python3-certbot-nginxinfra_packages_pip:''# pip installed packages for infra nodes#-----------------------------------------------------------------# NGINX#-----------------------------------------------------------------nginx_enabled:true# enable nginx on this infra node?nginx_clean:false# clean existing nginx config during init?nginx_exporter_enabled:true# enable nginx_exporter on this infra node?nginx_exporter_port:9113# nginx_exporter listen port, 9113 by defaultnginx_sslmode:enable # nginx ssl mode? disable,enable,enforcenginx_cert_validity:397d # nginx self-signed cert validity, 397d by defaultnginx_home:/www # nginx content dir, `/www` by default (soft link to nginx_data)nginx_data:/data/nginx # nginx actual data dir, /data/nginx by defaultnginx_users:{admin : pigsty } # nginx basic auth users:name and pass dictnginx_port:80# nginx listen port, 80 by defaultnginx_ssl_port:443# nginx ssl listen port, 443 by defaultcertbot_sign:false# sign nginx cert with certbot during setup?certbot_email:[email protected]# certbot email address, used for free sslcertbot_options:''# certbot extra options#-----------------------------------------------------------------# DNS#-----------------------------------------------------------------dns_enabled:true# setup dnsmasq on this infra node?dns_port:53# dns server listen port, 53 by defaultdns_records:# dynamic dns records resolved by dnsmasq- "${admin_ip} i.pigsty"- "${admin_ip} m.pigsty supa.pigsty api.pigsty adm.pigsty cli.pigsty ddl.pigsty"#-----------------------------------------------------------------# VICTORIA#-----------------------------------------------------------------vmetrics_enabled:true# enable victoria-metrics on this infra node?vmetrics_clean:false# whether clean existing victoria metrics data during init?vmetrics_port:8428# victoria-metrics listen port, 8428 by defaultvmetrics_scrape_interval:10s # victoria global scrape interval, 10s by defaultvmetrics_scrape_timeout:8s # victoria global scrape timeout, 8s by defaultvmetrics_options:>- -retentionPeriod=15d
-promscrape.fileSDCheckInterval=5svlogs_enabled:true# enable victoria-logs on this infra node?vlogs_clean:false# clean victoria-logs data during init?vlogs_port:9428# victoria-logs listen port, 9428 by defaultvlogs_options:>- -retentionPeriod=15d
-retention.maxDiskSpaceUsageBytes=50GiB
-insert.maxLineSizeBytes=1MB
-search.maxQueryDuration=120svtraces_enabled:true# enable victoria-traces on this infra node?vtraces_clean:false# clean victoria-trace data during inti?vtraces_port:10428# victoria-traces listen port, 10428 by defaultvtraces_options:>- -retentionPeriod=15d
-retention.maxDiskSpaceUsageBytes=50GiBvmalert_enabled:true# enable vmalert on this infra node?vmalert_port:8880# vmalert listen port, 8880 by defaultvmalert_options:''# vmalert extra server options#-----------------------------------------------------------------# PROMETHEUS#-----------------------------------------------------------------blackbox_enabled:true# setup blackbox_exporter on this infra node?blackbox_port:9115# blackbox_exporter listen port, 9115 by defaultblackbox_options:''# blackbox_exporter extra server optionsalertmanager_enabled:true# setup alertmanager on this infra node?alertmanager_port:9059# alertmanager listen port, 9059 by defaultalertmanager_options:''# alertmanager extra server optionsexporter_metrics_path:/metrics # exporter metric path, `/metrics` by default#-----------------------------------------------------------------# GRAFANA#-----------------------------------------------------------------grafana_enabled:true# enable grafana on this infra node?grafana_port:3000# default listen port for grafanagrafana_clean:false# clean grafana data during init?grafana_admin_username:admin # grafana admin username, `admin` by defaultgrafana_admin_password:pigsty # grafana admin password, `pigsty` by defaultgrafana_auth_proxy:false# enable grafana auth proxy?grafana_pgurl:''# external postgres database url for grafana if givengrafana_view_password:DBUser.Viewer# password for grafana meta pg datasource#================================================================## VARS: NODE ##================================================================##-----------------------------------------------------------------# NODE_IDENTITY#-----------------------------------------------------------------#nodename: # [INSTANCE] # node instance identity, use hostname if missing, optionalnode_cluster:nodes # [CLUSTER]# node cluster identity, use 'nodes' if missing, optionalnodename_overwrite:true# overwrite node's hostname with nodename?nodename_exchange:false# exchange nodename among play hosts?node_id_from_pg:true# use postgres identity as node identity if applicable?#-----------------------------------------------------------------# NODE_DNS#-----------------------------------------------------------------node_write_etc_hosts:true# modify `/etc/hosts` on target node?node_default_etc_hosts:# static dns records in `/etc/hosts`- "${admin_ip} i.pigsty"node_etc_hosts:[]# extra static dns records in `/etc/hosts`node_dns_method: add # how to handle dns servers:add,none,overwritenode_dns_servers:['${admin_ip}']# dynamic nameserver in `/etc/resolv.conf`node_dns_options:# dns resolv options in `/etc/resolv.conf`- options single-request-reopen timeout:1#-----------------------------------------------------------------# NODE_PACKAGE#-----------------------------------------------------------------node_repo_modules:local # upstream repo to be added on node, local by defaultnode_repo_remove:true# remove existing repo on node?node_packages:[openssh-server] # packages to be installed current nodes with latest versionnode_default_packages:# default packages to be installed on all nodes- lz4,unzip,bzip2,pv,jq,git,ncdu,make,patch,bash,lsof,wget,uuid,tuned,nvme-cli,numactl,sysstat,iotop,htop,rsync,tcpdump- python3,python3-pip,socat,lrzsz,net-tools,ipvsadm,telnet,ca-certificates,openssl,keepalived,etcd,haproxy,chrony,pig- zlib1g,acl,dnsutils,libreadline-dev,vim-tiny,node-exporter,openssh-server,openssh-client,vector#-----------------------------------------------------------------# NODE_SEC#-----------------------------------------------------------------node_selinux_mode: permissive # set selinux mode:enforcing,permissive,disablednode_firewall_mode: zone # firewall mode:off,none, zone, zone by defaultnode_firewall_intranet:# which intranet cidr considered as internal network- 10.0.0.0/8- 192.168.0.0/16- 172.16.0.0/12node_firewall_public_port:# expose these ports to public network in (zone, strict) mode- 22# enable ssh access- 80# enable http access- 443# enable https access- 5432# enable postgresql access (think twice before exposing it!)#-----------------------------------------------------------------# NODE_TUNE#-----------------------------------------------------------------node_disable_numa:false# disable node numa, reboot requirednode_disable_swap:false# disable node swap, use with cautionnode_static_network:true# preserve dns resolver settings after rebootnode_disk_prefetch:false# setup disk prefetch on HDD to increase performancenode_kernel_modules:[softdog, ip_vs, ip_vs_rr, ip_vs_wrr, ip_vs_sh ]node_hugepage_count:0# number of 2MB hugepage, take precedence over rationode_hugepage_ratio:0# node mem hugepage ratio, 0 disable it by defaultnode_overcommit_ratio:0# node mem overcommit ratio, 0 disable it by defaultnode_tune: oltp # node tuned profile:none,oltp,olap,crit,tinynode_sysctl_params:{}# sysctl parameters in k:v format in addition to tuned#-----------------------------------------------------------------# NODE_ADMIN#-----------------------------------------------------------------node_data:/data # node main data directory, `/data` by defaultnode_admin_enabled:true# create a admin user on target node?node_admin_uid:88# uid and gid for node admin usernode_admin_username:dba # name of node admin user, `dba` by defaultnode_admin_sudo:nopass # admin sudo privilege, all,nopass. nopass by defaultnode_admin_ssh_exchange:true# exchange admin ssh key among node clusternode_admin_pk_current:true# add current user's ssh pk to admin authorized_keysnode_admin_pk_list:[]# ssh public keys to be added to admin usernode_aliases:{}# extra shell aliases to be added, k:v dict#-----------------------------------------------------------------# NODE_TIME#-----------------------------------------------------------------node_timezone:''# setup node timezone, empty string to skipnode_ntp_enabled:true# enable chronyd time sync service?node_ntp_servers:# ntp servers in `/etc/chrony.conf`- pool pool.ntp.org iburstnode_crontab_overwrite:true# overwrite or append to `/etc/crontab`?node_crontab:[]# crontab entries in `/etc/crontab`#-----------------------------------------------------------------# NODE_VIP#-----------------------------------------------------------------vip_enabled:false# enable vip on this node cluster?# vip_address: [IDENTITY] # node vip address in ipv4 format, required if vip is enabled# vip_vrid: [IDENTITY] # required, integer, 1-254, should be unique among same VLANvip_role:backup # optional, `master|backup`, backup by default, use as init rolevip_preempt:false# optional, `true/false`, false by default, enable vip preemptionvip_interface:eth0 # node vip network interface to listen, `eth0` by defaultvip_dns_suffix:''# node vip dns name suffix, empty string by defaultvip_exporter_port:9650# keepalived exporter listen port, 9650 by default#-----------------------------------------------------------------# HAPROXY#-----------------------------------------------------------------haproxy_enabled:true# enable haproxy on this node?haproxy_clean:false# cleanup all existing haproxy config?haproxy_reload:true# reload haproxy after config?haproxy_auth_enabled:true# enable authentication for haproxy admin pagehaproxy_admin_username:admin # haproxy admin username, `admin` by defaulthaproxy_admin_password:pigsty # haproxy admin password, `pigsty` by defaulthaproxy_exporter_port:9101# haproxy admin/exporter port, 9101 by defaulthaproxy_client_timeout:24h # client side connection timeout, 24h by defaulthaproxy_server_timeout:24h # server side connection timeout, 24h by defaulthaproxy_services:[]# list of haproxy service to be exposed on node#-----------------------------------------------------------------# NODE_EXPORTER#-----------------------------------------------------------------node_exporter_enabled:true# setup node_exporter on this node?node_exporter_port:9100# node exporter listen port, 9100 by defaultnode_exporter_options:'--no-collector.softnet --no-collector.nvme --collector.tcpstat --collector.processes'#-----------------------------------------------------------------# VECTOR#-----------------------------------------------------------------vector_enabled:true# enable vector log collector?vector_clean:false# purge vector data dir during init?vector_data:/data/vector # vector data dir, /data/vector by defaultvector_port:9598# vector metrics port, 9598 by defaultvector_read_from:beginning # vector read from beginning or endvector_log_endpoint:[infra ] # if defined, sending vector log to this endpoint.#================================================================## VARS: DOCKER ##================================================================#docker_enabled:false# enable docker on this node?docker_data:/data/docker # docker data directory, /data/docker by defaultdocker_storage_driver:overlay2 # docker storage driver, can be zfs, btrfsdocker_cgroups_driver: systemd # docker cgroup fs driver:cgroupfs,systemddocker_registry_mirrors:[]# docker registry mirror listdocker_exporter_port:9323# docker metrics exporter port, 9323 by defaultdocker_image:[]# docker image to be pulled after bootstrapdocker_image_cache:/tmp/docker/*.tgz# docker image cache glob pattern#================================================================## VARS: ETCD ##================================================================##etcd_seq: 1 # etcd instance identifier, explicitly requiredetcd_cluster:etcd # etcd cluster & group name, etcd by defaultetcd_safeguard:false# prevent purging running etcd instance?etcd_clean:true# purging existing etcd during initialization?etcd_data:/data/etcd # etcd data directory, /data/etcd by defaultetcd_port:2379# etcd client port, 2379 by defaultetcd_peer_port:2380# etcd peer port, 2380 by defaultetcd_init:new # etcd initial cluster state, new or existingetcd_election_timeout:1000# etcd election timeout, 1000ms by defaultetcd_heartbeat_interval:100# etcd heartbeat interval, 100ms by defaultetcd_root_password:Etcd.Root # etcd root password for RBAC, change it!#================================================================## VARS: MINIO ##================================================================##minio_seq: 1 # minio instance identifier, REQUIREDminio_cluster:minio # minio cluster identifier, REQUIREDminio_clean:false# cleanup minio during init?, false by defaultminio_user:minio # minio os user, `minio` by defaultminio_https:true# use https for minio, true by defaultminio_node:'${minio_cluster}-${minio_seq}.pigsty'# minio node name patternminio_data:'/data/minio'# minio data dir(s), use {x...y} to specify multi drivers#minio_volumes: # minio data volumes, override defaults if specifiedminio_domain:sss.pigsty # minio external domain name, `sss.pigsty` by defaultminio_port:9000# minio service port, 9000 by defaultminio_admin_port:9001# minio console port, 9001 by defaultminio_access_key:minioadmin # root access key, `minioadmin` by defaultminio_secret_key:S3User.MinIO # root secret key, `S3User.MinIO` by defaultminio_extra_vars:''# extra environment variablesminio_provision:true# run minio provisioning tasks?minio_alias:sss # alias name for local minio deployment#minio_endpoint: https://sss.pigsty:9000 # if not specified, overwritten by defaultsminio_buckets:# list of minio bucket to be created- {name:pgsql }- {name: meta ,versioning:true}- {name:data }minio_users:# list of minio user to be created- {access_key: pgbackrest ,secret_key: S3User.Backup ,policy:pgsql }- {access_key: s3user_meta ,secret_key: S3User.Meta ,policy:meta }- {access_key: s3user_data ,secret_key: S3User.Data ,policy:data }#================================================================## VARS: REDIS ##================================================================##redis_cluster: <CLUSTER> # redis cluster name, required identity parameter#redis_node: 1 <NODE> # redis node sequence number, node int id required#redis_instances: {} <NODE> # redis instances definition on this redis noderedis_fs_main:/data # redis main data mountpoint, `/data` by defaultredis_exporter_enabled:true# install redis exporter on redis nodes?redis_exporter_port:9121# redis exporter listen port, 9121 by defaultredis_exporter_options:''# cli args and extra options for redis exporterredis_safeguard:false# prevent purging running redis instance?redis_clean:true# purging existing redis during init?redis_rmdata:true# remove redis data when purging redis server?redis_mode: standalone # redis mode:standalone,cluster,sentinelredis_conf:redis.conf # redis config template path, except sentinelredis_bind_address:'0.0.0.0'# redis bind address, empty string will use host ipredis_max_memory:1GB # max memory used by each redis instanceredis_mem_policy:allkeys-lru # redis memory eviction policyredis_password:''# redis password, empty string will disable passwordredis_rdb_save:['1200 1']# redis rdb save directives, disable with empty listredis_aof_enabled:false# enable redis append only file?redis_rename_commands:{}# rename redis dangerous commandsredis_cluster_replicas:1# replica number for one master in redis clusterredis_sentinel_monitor:[]# sentinel master list, works on sentinel cluster only#================================================================## VARS: PGSQL ##================================================================##-----------------------------------------------------------------# PG_IDENTITY#-----------------------------------------------------------------pg_mode: pgsql #CLUSTER # pgsql cluster mode:pgsql,citus,gpsql,mssql,mysql,ivory,polar# pg_cluster: #CLUSTER # pgsql cluster name, required identity parameter# pg_seq: 0 #INSTANCE # pgsql instance seq number, required identity parameter# pg_role: replica #INSTANCE # pgsql role, required, could be primary,replica,offline# pg_instances: {} #INSTANCE # define multiple pg instances on node in `{port:ins_vars}` format# pg_upstream: #INSTANCE # repl upstream ip addr for standby cluster or cascade replica# pg_shard: #CLUSTER # pgsql shard name, optional identity for sharding clusters# pg_group: 0 #CLUSTER # pgsql shard index number, optional identity for sharding clusters# gp_role: master #CLUSTER # greenplum role of this cluster, could be master or segmentpg_offline_query:false#INSTANCE # set to true to enable offline queries on this instance#-----------------------------------------------------------------# PG_BUSINESS#-----------------------------------------------------------------# postgres business object definition, overwrite in group varspg_users:[]# postgres business userspg_databases:[]# postgres business databasespg_services:[]# postgres business servicespg_hba_rules:[]# business hba rules for postgrespgb_hba_rules:[]# business hba rules for pgbouncer# global credentials, overwrite in global varspg_dbsu_password:''# dbsu password, empty string means no dbsu password by defaultpg_replication_username:replicatorpg_replication_password:DBUser.Replicatorpg_admin_username:dbuser_dbapg_admin_password:DBUser.DBApg_monitor_username:dbuser_monitorpg_monitor_password:DBUser.Monitor#-----------------------------------------------------------------# PG_INSTALL#-----------------------------------------------------------------pg_dbsu:postgres # os dbsu name, postgres by default, better not change itpg_dbsu_uid:543# os dbsu uid and gid, 26 for default postgres users and groupspg_dbsu_sudo:limit # dbsu sudo privilege, none,limit,all,nopass. limit by defaultpg_dbsu_home:/var/lib/pgsql # postgresql home directory, `/var/lib/pgsql` by defaultpg_dbsu_ssh_exchange:true# exchange postgres dbsu ssh key among same pgsql clusterpg_version:18# postgres major version to be installed, 18 by defaultpg_bin_dir:/usr/pgsql/bin # postgres binary dir, `/usr/pgsql/bin` by defaultpg_log_dir:/pg/log/postgres # postgres log dir, `/pg/log/postgres` by defaultpg_packages:# pg packages to be installed, alias can be used- pgsql-main pgsql-commonpg_extensions:[]# pg extensions to be installed, alias can be used#-----------------------------------------------------------------# PG_BOOTSTRAP#-----------------------------------------------------------------pg_data:/pg/data # postgres data directory, `/pg/data` by defaultpg_fs_main:/data/postgres # postgres main data directory, `/data/postgres` by defaultpg_fs_backup:/data/backups # postgres backup data directory, `/data/backups` by defaultpg_storage_type:SSD # storage type for pg main data, SSD,HDD, SSD by defaultpg_dummy_filesize:64MiB # size of `/pg/dummy`, hold 64MB disk space for emergency usepg_listen:'0.0.0.0'# postgres/pgbouncer listen addresses, comma separated listpg_port:5432# postgres listen port, 5432 by defaultpg_localhost:/var/run/postgresql# postgres unix socket dir for localhost connectionpatroni_enabled:true# if disabled, no postgres cluster will be created during initpatroni_mode: default # patroni working mode:default,pause,removepg_namespace:/pg # top level key namespace in etcd, used by patroni & vippatroni_port:8008# patroni listen port, 8008 by defaultpatroni_log_dir:/pg/log/patroni # patroni log dir, `/pg/log/patroni` by defaultpatroni_ssl_enabled:false# secure patroni RestAPI communications with SSL?patroni_watchdog_mode: off # patroni watchdog mode:automatic,required,off. off by defaultpatroni_username:postgres # patroni restapi username, `postgres` by defaultpatroni_password:Patroni.API # patroni restapi password, `Patroni.API` by defaultpg_etcd_password:''# etcd password for this pg cluster, '' to use pg_clusterpg_primary_db:postgres # primary database name, used by citus,etc... ,postgres by defaultpg_parameters:{}# extra parameters in postgresql.auto.confpg_files:[]# extra files to be copied to postgres data directory (e.g. license)pg_conf: oltp.yml # config template:oltp,olap,crit,tiny. `oltp.yml` by defaultpg_max_conn:auto # postgres max connections, `auto` will use recommended valuepg_shared_buffer_ratio:0.25# postgres shared buffers ratio, 0.25 by default, 0.1~0.4pg_io_method:worker # io method for postgres, auto,fsync,worker,io_uring, worker by defaultpg_rto:30# recovery time objective in seconds, `30s` by defaultpg_rpo:1048576# recovery point objective in bytes, `1MiB` at most by defaultpg_libs:'pg_stat_statements, auto_explain'# preloaded libraries, `pg_stat_statements,auto_explain` by defaultpg_delay:0# replication apply delay for standby cluster leaderpg_checksum:true# enable data checksum for postgres cluster?pg_encoding:UTF8 # database cluster encoding, `UTF8` by defaultpg_locale:C # database cluster local, `C` by defaultpg_lc_collate:C # database cluster collate, `C` by defaultpg_lc_ctype:C # database character type, `C` by default#pgsodium_key: "" # pgsodium key, 64 hex digit, default to sha256(pg_cluster)#pgsodium_getkey_script: "" # pgsodium getkey script path, pgsodium_getkey by default#-----------------------------------------------------------------# PG_PROVISION#-----------------------------------------------------------------pg_provision:true# provision postgres cluster after bootstrappg_init:pg-init # provision init script for cluster template, `pg-init` by defaultpg_default_roles:# default roles and users in postgres cluster- {name: dbrole_readonly ,login: false ,comment:role for global read-only access }- {name: dbrole_offline ,login: false ,comment:role for restricted read-only access }- {name: dbrole_readwrite ,login: false ,roles: [dbrole_readonly] ,comment:role for global read-write access }- {name: dbrole_admin ,login: false ,roles: [pg_monitor, dbrole_readwrite] ,comment:role for object creation }- {name: postgres ,superuser: true ,comment:system superuser }- {name: replicator ,replication: true ,roles: [pg_monitor, dbrole_readonly] ,comment:system replicator }- {name: dbuser_dba ,superuser: true ,roles: [dbrole_admin] ,pgbouncer: true ,pool_mode: session, pool_connlimit: 16 ,comment:pgsql admin user }- {name: dbuser_monitor ,roles: [pg_monitor] ,pgbouncer: true ,parameters:{log_min_duration_statement: 1000 } ,pool_mode: session ,pool_connlimit: 8 ,comment:pgsql monitor user }pg_default_privileges:# default privileges when created by admin user- GRANT USAGE ON SCHEMAS TO dbrole_readonly- GRANT SELECT ON TABLES TO dbrole_readonly- GRANT SELECT ON SEQUENCES TO dbrole_readonly- GRANT EXECUTE ON FUNCTIONS TO dbrole_readonly- GRANT USAGE ON SCHEMAS TO dbrole_offline- GRANT SELECT ON TABLES TO dbrole_offline- GRANT SELECT ON SEQUENCES TO dbrole_offline- GRANT EXECUTE ON FUNCTIONS TO dbrole_offline- GRANT INSERT ON TABLES TO dbrole_readwrite- GRANT UPDATE ON TABLES TO dbrole_readwrite- GRANT DELETE ON TABLES TO dbrole_readwrite- GRANT USAGE ON SEQUENCES TO dbrole_readwrite- GRANT UPDATE ON SEQUENCES TO dbrole_readwrite- GRANT TRUNCATE ON TABLES TO dbrole_admin- GRANT REFERENCES ON TABLES TO dbrole_admin- GRANT TRIGGER ON TABLES TO dbrole_admin- GRANT CREATE ON SCHEMAS TO dbrole_adminpg_default_schemas:[monitor ] # default schemas to be createdpg_default_extensions:# default extensions to be created- {name: pg_stat_statements ,schema:monitor }- {name: pgstattuple ,schema:monitor }- {name: pg_buffercache ,schema:monitor }- {name: pageinspect ,schema:monitor }- {name: pg_prewarm ,schema:monitor }- {name: pg_visibility ,schema:monitor }- {name: pg_freespacemap ,schema:monitor }- {name: postgres_fdw ,schema:public }- {name: file_fdw ,schema:public }- {name: btree_gist ,schema:public }- {name: btree_gin ,schema:public }- {name: pg_trgm ,schema:public }- {name: intagg ,schema:public }- {name: intarray ,schema:public }- {name:pg_repack }pg_reload:true# reload postgres after hba changespg_default_hba_rules:# postgres default host-based authentication rules, order by `order`- {user:'${dbsu}',db: all ,addr: local ,auth: ident ,title: 'dbsu access via local os user ident' ,order:100}- {user:'${dbsu}',db: replication ,addr: local ,auth: ident ,title: 'dbsu replication from local os ident' ,order:150}- {user:'${repl}',db: replication ,addr: localhost ,auth: pwd ,title: 'replicator replication from localhost',order:200}- {user:'${repl}',db: replication ,addr: intra ,auth: pwd ,title: 'replicator replication from intranet' ,order:250}- {user:'${repl}',db: postgres ,addr: intra ,auth: pwd ,title: 'replicator postgres db from intranet' ,order:300}- {user:'${monitor}',db: all ,addr: localhost ,auth: pwd ,title: 'monitor from localhost with password' ,order:350}- {user:'${monitor}',db: all ,addr: infra ,auth: pwd ,title: 'monitor from infra host with password',order:400}- {user:'${admin}',db: all ,addr: infra ,auth: ssl ,title: 'admin @ infra nodes with pwd & ssl' ,order:450}- {user:'${admin}',db: all ,addr: world ,auth: ssl ,title: 'admin @ everywhere with ssl & pwd' ,order:500}- {user: '+dbrole_readonly',db: all ,addr: localhost ,auth: pwd ,title: 'pgbouncer read/write via local socket',order:550}- {user: '+dbrole_readonly',db: all ,addr: intra ,auth: pwd ,title: 'read/write biz user via password' ,order:600}- {user: '+dbrole_offline' ,db: all ,addr: intra ,auth: pwd ,title: 'allow etl offline tasks from intranet',order:650}pgb_default_hba_rules:# pgbouncer default host-based authentication rules, order by `order`- {user:'${dbsu}',db: pgbouncer ,addr: local ,auth: peer ,title: 'dbsu local admin access with os ident',order:100}- {user: 'all' ,db: all ,addr: localhost ,auth: pwd ,title: 'allow all user local access with pwd' ,order:150}- {user:'${monitor}',db: pgbouncer ,addr: intra ,auth: pwd ,title: 'monitor access via intranet with pwd' ,order:200}- {user:'${monitor}',db: all ,addr: world ,auth: deny ,title: 'reject all other monitor access addr' ,order:250}- {user:'${admin}',db: all ,addr: intra ,auth: pwd ,title: 'admin access via intranet with pwd' ,order:300}- {user:'${admin}',db: all ,addr: world ,auth: deny ,title: 'reject all other admin access addr' ,order:350}- {user: 'all' ,db: all ,addr: intra ,auth: pwd ,title: 'allow all user intra access with pwd' ,order:400}#-----------------------------------------------------------------# PG_BACKUP#-----------------------------------------------------------------pgbackrest_enabled:true# enable pgbackrest on pgsql host?pgbackrest_log_dir:/pg/log/pgbackrest# pgbackrest log dir, `/pg/log/pgbackrest` by defaultpgbackrest_method: local # pgbackrest repo method:local,minio,[user-defined...]pgbackrest_init_backup:true# take a full backup after pgbackrest is initialized?pgbackrest_repo: # pgbackrest repo:https://pgbackrest.org/configuration.html#section-repositorylocal:# default pgbackrest repo with local posix fspath:/pg/backup # local backup directory, `/pg/backup` by defaultretention_full_type:count # retention full backups by countretention_full:2# keep 2, at most 3 full backups when using local fs repominio:# optional minio repo for pgbackresttype:s3 # minio is s3-compatible, so s3 is useds3_endpoint:sss.pigsty # minio endpoint domain name, `sss.pigsty` by defaults3_region:us-east-1 # minio region, us-east-1 by default, useless for minios3_bucket:pgsql # minio bucket name, `pgsql` by defaults3_key:pgbackrest # minio user access key for pgbackrests3_key_secret:S3User.Backup # minio user secret key for pgbackrests3_uri_style:path # use path style uri for minio rather than host stylepath:/pgbackrest # minio backup path, default is `/pgbackrest`storage_port:9000# minio port, 9000 by defaultstorage_ca_file:/etc/pki/ca.crt # minio ca file path, `/etc/pki/ca.crt` by defaultblock:y# Enable block incremental backupbundle:y# bundle small files into a single filebundle_limit:20MiB # Limit for file bundles, 20MiB for object storagebundle_size:128MiB # Target size for file bundles, 128MiB for object storagecipher_type:aes-256-cbc # enable AES encryption for remote backup repocipher_pass:pgBackRest # AES encryption password, default is 'pgBackRest'retention_full_type:time # retention full backup by time on minio reporetention_full:14# keep full backup for the the last 14 days#-----------------------------------------------------------------# PG_ACCESS#-----------------------------------------------------------------pgbouncer_enabled:true# if disabled, pgbouncer will not be launched on pgsql hostpgbouncer_port:6432# pgbouncer listen port, 6432 by defaultpgbouncer_log_dir:/pg/log/pgbouncer # pgbouncer log dir, `/pg/log/pgbouncer` by defaultpgbouncer_auth_query:false# query postgres to retrieve unlisted business users?pgbouncer_poolmode: transaction # pooling mode:transaction,session,statement, transaction by defaultpgbouncer_sslmode:disable # pgbouncer client ssl mode, disable by defaultpgbouncer_ignore_param:[extra_float_digits, application_name, TimeZone, DateStyle, IntervalStyle, search_path ]pg_weight:100#INSTANCE # relative load balance weight in service, 100 by default, 0-255pg_service_provider:''# dedicate haproxy node group name, or empty string for local nodes by defaultpg_default_service_dest:pgbouncer# default service destination if svc.dest='default'pg_default_services:# postgres default service definitions- {name: primary ,port: 5433 ,dest: default ,check: /primary ,selector:"[]"}- {name: replica ,port: 5434 ,dest: default ,check: /read-only ,selector:"[]", backup:"[? pg_role == `primary` || pg_role == `offline` ]"}- {name: default ,port: 5436 ,dest: postgres ,check: /primary ,selector:"[]"}- {name: offline ,port: 5438 ,dest: postgres ,check: /replica ,selector:"[? pg_role == `offline` || pg_offline_query ]", backup:"[? pg_role == `replica` && !pg_offline_query]"}pg_vip_enabled:false# enable a l2 vip for pgsql primary? false by defaultpg_vip_address:127.0.0.1/24 # vip address in `<ipv4>/<mask>` format, require if vip is enabledpg_vip_interface:eth0 # vip network interface to listen, eth0 by defaultpg_dns_suffix:''# pgsql dns suffix, '' by defaultpg_dns_target:auto # auto, primary, vip, none, or ad hoc ip#-----------------------------------------------------------------# PG_MONITOR#-----------------------------------------------------------------pg_exporter_enabled:true# enable pg_exporter on pgsql hosts?pg_exporter_config:pg_exporter.yml # pg_exporter configuration file namepg_exporter_cache_ttls:'1,10,60,300'# pg_exporter collector ttl stage in seconds, '1,10,60,300' by defaultpg_exporter_port:9630# pg_exporter listen port, 9630 by defaultpg_exporter_params:'sslmode=disable'# extra url parameters for pg_exporter dsnpg_exporter_url:''# overwrite auto-generate pg dsn if specifiedpg_exporter_auto_discovery:true# enable auto database discovery? enabled by defaultpg_exporter_exclude_database:'template0,template1,postgres'# csv of database that WILL NOT be monitored during auto-discoverypg_exporter_include_database:''# csv of database that WILL BE monitored during auto-discoverypg_exporter_connect_timeout:200# pg_exporter connect timeout in ms, 200 by defaultpg_exporter_options:''# overwrite extra options for pg_exporterpgbouncer_exporter_enabled:true# enable pgbouncer_exporter on pgsql hosts?pgbouncer_exporter_port:9631# pgbouncer_exporter listen port, 9631 by defaultpgbouncer_exporter_url:''# overwrite auto-generate pgbouncer dsn if specifiedpgbouncer_exporter_options:''# overwrite extra options for pgbouncer_exporterpgbackrest_exporter_enabled:true# enable pgbackrest_exporter on pgsql hosts?pgbackrest_exporter_port:9854# pgbackrest_exporter listen port, 9854 by defaultpgbackrest_exporter_options:> --collect.interval=120
--log.level=info#-----------------------------------------------------------------# PG_REMOVE#-----------------------------------------------------------------pg_safeguard:false# stop pg_remove running if pg_safeguard is enabled, false by defaultpg_rm_data:true# remove postgres data during remove? true by defaultpg_rm_backup:true# remove pgbackrest backup during primary remove? true by defaultpg_rm_pkg:true# uninstall postgres packages during remove? true by default...
Explanation
The demo/debian template is optimized for Debian and Ubuntu distributions.
Supported Distributions:
Debian 12 (Bookworm)
Debian 13 (Trixie)
Ubuntu 22.04 LTS (Jammy)
Ubuntu 24.04 LTS (Noble)
Key Features:
Uses PGDG APT repositories
Optimized for APT package manager
Supports Debian/Ubuntu-specific package names
Use Cases:
Cloud servers (Ubuntu widely used)
Container environments (Debian commonly used as base image)
Development and testing environments
8.33 - demo/demo
Pigsty public demo site configuration, showcasing SSL certificates, domain exposure, and full extension installation
The demo/demo configuration template is used by Pigsty’s public demo site, demonstrating how to expose services publicly, configure SSL certificates, and install all available extensions.
If you want to set up your own public service on a cloud server, you can use this template as a reference.
Overview
Config Name: demo/demo
Node Count: Single node
Description: Pigsty public demo site configuration
Some extensions are not available on ARM64 architecture
8.34 - demo/minio
Four-node x four-drive high-availability multi-node multi-disk MinIO cluster demo
The demo/minio configuration template demonstrates how to deploy a four-node x four-drive, 16-disk total high-availability MinIO cluster, providing S3-compatible object storage services.
For more tutorials, see the MINIO module documentation.
L2 VIP High Availability: Virtual IP binding via Keepalived
HAProxy Load Balancing: Unified access endpoint on port 9002
Fine-grained Permissions: Separate users and buckets for different applications
Access:
# Configure MinIO alias with mcli (via HAProxy load balancing)mcli aliasset sss https://sss.pigsty:9002 minioadmin S3User.MinIO
# List bucketsmcli ls sss/
# Use console# Visit https://m.pigsty or https://m10-m13.pigsty
The build/oss configuration template is the build environment configuration for Pigsty open-source edition offline packages, used to batch-build offline installation packages across multiple operating systems.
This configuration is intended for developers and contributors only.
Overview
Config Name: build/oss
Node Count: Six nodes (el9, el10, d12, d13, u22, u24)
Pigsty professional edition offline package build environment configuration (multi-version)
The build/pro configuration template is the build environment configuration for Pigsty professional edition offline packages, including PostgreSQL 13-18 all versions and additional commercial components.
This configuration is intended for developers and contributors only.
Overview
Config Name: build/pro
Node Count: Six nodes (el9, el10, d12, d13, u22, u24)
Description: Pigsty professional edition offline package build environment (multi-version)
OS Distro: el9, el10, d12, d13, u22, u24
OS Arch: x86_64
Usage:
cp conf/build/pro.yml pigsty.yml
Note: This is a build template with fixed IP addresses, intended for internal use only.
The build/pro template is the build configuration for Pigsty professional edition offline packages, containing more content than the open-source edition.
Differences from OSS Edition:
Includes all six major PostgreSQL versions 13-18
Includes additional commercial/enterprise components: Kafka, PolarDB, IvorySQL, etc.
Includes Java runtime and Sealos tools
Output directory is dist/${version}/pro/
Build Contents:
PostgreSQL 13, 14, 15, 16, 17, 18 all versions
All categorized extension packages for each version
Kafka message queue
PolarDB and IvorySQL kernels
TigerBeetle distributed database
Sealos container platform
Use Cases:
Enterprise customers requiring multi-version support
uninstall postgres pkgs during remove? true by default
Tutorials
Tutorials for using/managing PostgreSQL in Pigsty.
Clone an existing PostgreSQL cluster
Create an online standby cluster of existing PostgreSQL cluster
Create a delayed standby cluster of existing PostgreSQL cluster
Monitor an existing postgres instance
Migrate from external PostgreSQL to Pigsty-managed PostgreSQL using logical replication
Use MinIO as centralized pgBackRest backup repo
Use dedicated etcd cluster as PostgreSQL / Patroni DCS
Use dedicated haproxy load balancer cluster to expose PostgreSQL services
Use pg-meta CMDB instead of pigsty.yml as inventory source
Use PostgreSQL as Grafana backend storage
Use PostgreSQL as Prometheus backend storage
10.1 - Core Concepts
Core concepts and architecture design
10.2 - Architecture
Introduction to the overall architecture and implementation details of PostgreSQL clusters.
10.2.1 - Entity-Relationship
Introduction to the entity-relationship model, ER diagram, entity definitions, and naming conventions for PostgreSQL clusters in Pigsty.
First understand “what objects exist and how they reference each other” before discussing deployment and operations. Pigsty’s PGSQL module is built around a stable ER diagram of several core entities. Understanding this diagram helps you design clear configurations and automation workflows.
The PGSQL module organizes in the form of clusters in production environments. These clusters are logical entities composed of a group of database instances associated through primary-replica relationships.
Each cluster is an autonomous business unit consisting of at least one primary instance and exposes capabilities through services.
There are four types of core entities in Pigsty’s PGSQL module:
Cluster: An autonomous PostgreSQL business unit, serving as the top-level namespace for other entities.
Service: A named abstraction for exposing capabilities, routing traffic, and exposing services via node ports.
Instance: A single PostgreSQL server consisting of running processes and database files on a single node.
Node: An abstraction of hardware resources running Linux + Systemd environment, which can be bare metal, VMs, containers, or Pods.
Together with two business entities “Database” and “Role”, they form a complete logical view, as shown below:
Naming Conventions (following Pigsty’s early constraints)
Cluster names should be valid DNS domain names without any dots, matching the regex: [a-zA-Z0-9-]+
Service names should be prefixed with the cluster name and suffixed with specific words: primary, replica, offline, delayed, connected with -.
Instance names are prefixed with the cluster name and suffixed with a positive integer instance number, connected with -, e.g., ${cluster}-${seq}.
Nodes are identified by their primary internal IP address. Since the PGSQL module deploys database and host 1:1, the hostname is typically the same as the instance name.
10.2.2 - Components
Introduction to the components in PostgreSQL clusters in Pigsty, as well as their interactions and dependencies.
Overview
The following is a detailed description of PostgreSQL module components and their interactions, from top to bottom:
Cluster DNS is resolved by DNSMASQ on infra nodes
Cluster VIP is managed by the vip-manager component, which binds pg_vip_address to the cluster primary node.
vip-manager obtains cluster leader information written by patroni from the etcd cluster
Cluster services are exposed by Haproxy on nodes, with different services distinguished by different node ports (543x).
Haproxy port 9101: monitoring metrics & statistics & admin page
Haproxy port 5433: routes to primary pgbouncer by default: read-write service
Haproxy port 5434: routes to replica pgbouncer by default: read-only service
Haproxy port 5436: routes to primary postgres by default: default service
Haproxy port 5438: routes to offline postgres by default: offline service
HAProxy routes traffic based on health check information provided by patroni.
Pgbouncer is a connection pool middleware that listens on port 6432 by default, capable of buffering connections, exposing additional metrics, and providing extra flexibility.
Pgbouncer is stateless and deployed 1:1 with the Postgres server via local Unix socket.
Production traffic (primary/replica) will go through pgbouncer by default (can be skipped by specifying pg_default_service_dest)
Default/offline services will always bypass pgbouncer and connect directly to the target Postgres.
PostgreSQL listens on port 5432, providing relational database services
Installing the PGSQL module on multiple nodes with the same cluster name will automatically form a high-availability cluster based on streaming replication
PostgreSQL processes are managed by patroni by default.
Patroni listens on port 8008 by default, supervising the PostgreSQL server process
Patroni spawns the Postgres server as a child process
Patroni uses etcd as DCS: storing configuration, fault detection, and leader election.
Patroni provides Postgres information through health checks (such as primary/replica), and HAProxy uses this information to distribute service traffic
Patroni metrics will be scraped by VictoriaMetrics on infra nodes
PG Exporter exposes postgres metrics on port 9630
PostgreSQL metrics will be scraped by VictoriaMetrics on infra nodes
Pgbouncer Exporter exposes pgbouncer metrics on port 9631
Pgbouncer metrics will be scraped by VictoriaMetrics on infra nodes
pgBackRest uses local backup repository by default (pgbackrest_method = local)
If local (default) is used as the backup repository, pgBackRest will create a local repository under the primary node’s pg_fs_bkup
If minio is used as the backup repository, pgBackRest will create a backup repository on a dedicated MinIO cluster: pgbackrest_repo.minio
Postgres-related logs (postgres, pgbouncer, patroni, pgbackrest) are collected by vector
Vector listens on port 9598 and also exposes its own monitoring metrics to VictoriaMetrics on infra nodes
Vector sends logs to VictoriaLogs on infra nodes
Cluster DNS
Cluster DNS service is maintained by DNSMASQ on infra nodes, providing stable FQDNs (<cluster>.<pg_dns_suffix>) for each pg_cluster. DNS records point to the primary or VIP, for access by business sides, automation processes, and cross-cluster data services without needing to directly care about real-time node IPs. DNS relies on inventory information written during deployment and only updates during VIP or primary node drift at runtime. Its upstream is vip-manager and the primary node status in etcd.
DNS’s downstream includes clients and third-party service endpoints, and it also provides unified target addresses for intermediate layers like HAProxy. This component is optional; it can be skipped when the cluster runs in an isolated network or when business ends directly use IPs, but it is recommended for most production environments to avoid hard-coding node addresses.
Key Parameters
pg_dns_suffix: Defines the unified suffix for cluster DNS records.
pg_dns_target: Controls whether the resolution target points to VIP, primary, or explicit IP.
Primary Virtual IP (vip-manager)
vip-manager runs on each PG node, monitors the leader key written by Patroni in etcd, and binds pg_vip_address to the current primary node, achieving transparent L2 drift. It depends on the health status of the DCS and requires that the target network interface can be controlled by the current node, so that VIP is immediately released and rebound during failover, ensuring the old primary does not continue responding.
VIP’s downstream includes DNS, self-built clients, legacy systems, and other accessors needing fixed endpoints. This component is optional: only enabled when pg_vip_enabled is true and business requires static addresses. When enabled, all participating nodes must have the same VLAN access, otherwise VIP cannot drift correctly.
pg_namespace: Namespace in etcd, shared by Patroni and vip-manager.
Service Entry and Traffic Scheduling (HAProxy)
HAProxy is installed on PG nodes (or dedicated service nodes), uniformly exposing database service port groups: 5433/5434 (read-write/read-only, via Pgbouncer), 5436/5438 (direct primary/offline), and 9101 management interface. Each backend pool relies on role and health information provided by patroni REST API for routing decisions and forwards traffic to corresponding instances or connection pools.
This component is the entry point for the entire cluster, with downstream directly facing applications, ETL, and management tools. You can point pg_service_provider to dedicated HA nodes to carry higher traffic, or publish locally on instances. HAProxy has no dependency on VIP but usually works with DNS and VIP to create a unified access point. Service definitions are composed of pg_default_services and pg_services, allowing fine-grained configuration of ports, load balancing strategies, and targets.
Key Parameters
pg_default_services: Defines global default service ports, targets, and check methods.
pg_services: Appends or overrides business services for specific clusters.
pg_service_provider: Specifies HAProxy node group publishing services (empty means local).
pg_default_service_dest: Determines whether default service forwards to Pgbouncer or Postgres.
pg_weight: Configures a single instance’s weight in specific services.
Connection Pool (Pgbouncer)
Pgbouncer runs in a stateless manner on each instance, preferentially connecting to PostgreSQL via local Unix Socket, used to absorb transient connections, stabilize sessions, and provide additional metrics. Pigsty routes production traffic (5433/5434) via Pgbouncer by default, with only default/offline services bypassing it to directly connect to PostgreSQL. Pgbouncer has no dependency on VIP and can scale independently with HAProxy and Patroni. When Pgbouncer stops, PostgreSQL can still provide direct connection services.
Pgbouncer’s downstream consists of massive short-connection clients and the unified entry HAProxy. It allows dynamic user loading based on auth_query and can configure SSL as needed. Component is optional. When disabled via pgbouncer_enabled, default services will point directly to PostgreSQL, requiring corresponding adjustments to connection counts and session management strategies.
Key Parameters
pgbouncer_enabled: Determines whether to enable local connection pool.
The PostgreSQL process is the core of the entire module, listening on 5432 by default and managed by Patroni. Installing the PGSQL module on multiple nodes with the same pg_cluster will automatically build a primary-replica topology based on physical streaming replication; primary/replica/offline roles are controlled by pg_role, and multiple instances can run on the same node via pg_instances when necessary. Instances depend on local data disks, OS kernel tuning, and system services provided by the NODE module.
This component’s downstream includes business read-write traffic, pgBackRest, pg_exporter, etc.; upstream includes Patroni, Ansible bootstrap scripts, and metadata in etcd. You can switch OLTP/OLAP configurations via pg_conf templates and define cascading replication via pg_upstream. If using citus/gpsql, further set pg_shard and pg_group. pg_hba_rules and pg_default_hba_rules determine access control policies.
Patroni listens on 8008, taking over PostgreSQL’s startup, configuration, and health status, writing leader and member information to etcd (namespace defined by pg_namespace). It is responsible for automatic failover, maintaining replication factor, coordinating parameters, and providing REST API for HAProxy, monitoring, and administrators to query. Patroni can enable watchdog to forcibly isolate the old primary to avoid split-brain.
Patroni’s upstream includes etcd cluster and system services (systemd, Keepalive), and downstream includes vip-manager, HAProxy, Pgbackrest, and monitoring components. You can switch to pause/remove mode via patroni_mode for maintenance or cluster deletion. Disabling Patroni is only used when managing external PG instances.
Key Parameters
patroni_enabled: Determines whether PostgreSQL is managed by Patroni.
pgBackRest creates local or remote repositories on the primary for full/incremental backups and WAL archiving. It cooperates with PostgreSQL to execute control commands, supports multiple targets like local disk (default) and MinIO, and can cover PITR, backup chain verification, and remote bootstrap. Upstream is the primary’s data and archive stream, downstream is object storage or local backup disk, and observability provided by pgbackrest_exporter.
Component can run on-demand, usually initiating a full backup immediately after initialization completion; also supports disabling (experimental environments or external backup systems). When enabling minio repository, a reachable object storage service and credentials are needed. Recovery process integrates with Patroni, and replicas can be bootstrapped as new primary or replica via pgbackrest command.
Key Parameters
pgbackrest_enabled: Controls whether to install and activate backup subsystem.
pg_exporter runs on PG nodes, logs in using local socket, exports metrics covering sessions, buffer hits, replication lag, transaction rate, etc., for Prometheus on infra nodes to scrape. It is tightly coupled with PostgreSQL, automatically reconnecting when PostgreSQL restarts, listening externally on 9630 (default). Exporter has no dependency on VIP and decouples from HA topology.
pgbouncer_exporter starts on nodes, reads Pgbouncer’s statistics view, providing metrics for connection pool utilization, wait queue, and hit rate. It depends on Pgbouncer’s admin user and exposes to Prometheus via independent port. If Pgbouncer is disabled, this component should also be disabled.
pgbackrest_exporter parses pgBackRest status on this node, generating metrics for recent backup time, size, type, etc. Prometheus collects these metrics via 9854 (default), combined with alert policies to quickly detect backup expiration or failure. Component depends on pgBackRest metadata directory and should also be disabled when backup system is turned off.
pg_cluster determines all derived names: instances, services, monitoring labels.
pg_seq binds 1:1 with nodes, expressing topology order and expected priority.
pg_role drives Patroni/HAProxy behavior: primary is unique, replica serves online read-only, offline only accepts offline services, delayed is used for delayed clusters.
Pigsty does not provide default values for the above parameters and they must be explicitly specified in the inventory.
Entity Identifiers
Pigsty’s PostgreSQL entity identifiers are automatically generated based on the core identity parameters above:
Entity
Generation Rule
Example
Instance
{{ pg_cluster }}-{{ pg_seq }}
pg-test-1
Service
{{ pg_cluster }}-{{ pg_role }}
pg-test-primary
Node Name
Defaults to instance name, but can be explicitly overridden
pg-test-1
Service suffixes follow built-in conventions: primary, replica, default, offline, delayed, etc. HAProxy/pgbouncer read these identifiers to automatically build routing. Naming maintains prefix consistency, allowing direct queries or filtering via pg-test-*.
Monitoring Label System
In the PGSQL module, all monitoring metrics use the following label system:
For VictoriaMetrics, the job name for collecting PostgreSQL metrics is fixed as pgsql;
The job name for monitoring remote PG instances is fixed as pgrds.
For VictoriaLogs, the job name for collecting PostgreSQL CSV logs is fixed as postgres;
The job name for collecting pgbackrest logs is fixed as pgbackrest, while other components collect logs via syslog.
In-depth introduction to the architecture design, component interaction, failure scenarios and recovery mechanisms of PostgreSQL high availability clusters in Pigsty.
Pigsty’s PostgreSQL clusters come with an out-of-the-box high availability solution, powered by Patroni, Etcd, and HAProxy.
When your PostgreSQL cluster contains two or more instances, you gain hardware failure self-healing database high availability capability without any configuration — as long as any instance in the cluster is alive, the cluster can provide complete service to the outside world. Clients only need to connect to any node in the cluster to obtain complete service without worrying about primary-replica topology changes.
With default configuration, the primary failure Recovery Time Objective (RTO) ≈ 30s, Recovery Point Objective (RPO) < 1MB; replica failure RPO = 0, RTO ≈ 0 (brief interruption); in consistency-first mode, zero data loss during failover can be ensured: RPO = 0. All these metrics can be configured on-demand according to your actual hardware conditions and reliability requirements.
Pigsty has built-in HAProxy load balancer for automatic traffic switching, providing various access methods such as DNS/VIP/LVS for clients to choose from. Failover and switchover are almost imperceptible to the business side except for occasional brief interruptions, and applications do not need to modify connection strings and restart.
The minimal maintenance window requirement brings great flexibility and convenience: you can perform rolling maintenance and upgrades of the entire cluster without application cooperation. The feature that hardware failures can be handled the next day allows developers, operations, and DBAs to sleep soundly during failures.
Many large organizations and core institutions have been using Pigsty in production environments for a long time. The largest deployment has 25K CPU cores and 220+ PostgreSQL extra-large instances (64c / 512g / 3TB NVMe SSD); in this deployment case, dozens of hardware failures and various incidents occurred within five years, but it still maintained an overall availability record of more than 99.999%.
Architecture Overview
Pigsty’s high availability architecture consists of four core components that work together to achieve automatic failure detection, leader election, and traffic switching:
Listen to leader key in Etcd (/pg/<cluster>/leader)
When this node becomes leader, bind VIP to specified NIC
Send gratuitous ARP to notify network devices to update MAC mapping
When losing leader status, unbind VIP
Configuration Example:
interval:1000# Check interval (milliseconds)trigger-key:"/pg/pg-test/leader"# Etcd key to listen totrigger-value:"pg-test-1"# Leader value to matchip:10.10.10.100# VIP addressnetmask:24# Subnet maskinterface:eth0 # Bind NICdcs-type:etcd # DCS typeretry-num:2# Retry countretry-after:250# Retry interval (milliseconds)
Usage Limitations:
Requires all nodes in the same Layer 2 network
Cloud environments usually don’t support, need to use cloud provider VIP or DNS solutions
Switching time about 1-2 seconds
Control Flow and Data Flow
Normal Operation State
Control Flow: Heartbeat and lease management between Patroni and Etcd
flowchart LR
subgraph Control["⚙️ Control Flow"]
direction LR
P1["Patroni<br/>(Primary)"]
P2["Patroni<br/>(Replica)"]
ETCD[("Etcd<br/>Cluster")]
P1 -->|"Renew/Heartbeat"| ETCD
P2 -->|"Renew/Heartbeat"| ETCD
ETCD -->|"Lease/Config"| P1
ETCD -->|"Lease/Config"| P2
end
style ETCD fill:#FF9800,color:#fff
Data Flow: Client requests and WAL replication
flowchart LR
subgraph Data["📊 Data Flow"]
direction LR
CLIENT["Client"]
HAP["HAProxy"]
PGB["PgBouncer"]
PG_P[("PostgreSQL<br/>[Primary]")]
PG_R[("PostgreSQL<br/>[Replica]")]
PATRONI["Patroni :8008"]
CLIENT -->|"SQL Request"| HAP
HAP -->|"Route"| PGB
PGB --> PG_P
HAP -.->|"Health Check<br/>/primary /replica"| PATRONI
PG_P ==>|"WAL Stream"| PG_R
end
style PG_P fill:#4CAF50,color:#fff
style PG_R fill:#2196F3,color:#fff
Failover Process
When primary failure occurs, the system goes through the following phases:
sequenceDiagram
autonumber
participant Primary as 🟢 Primary
participant Patroni_P as Patroni (Primary)
participant Etcd as 🟠 Etcd Cluster
participant Patroni_R as Patroni (Replica)
participant Replica as 🔵 Replica
participant HAProxy as HAProxy
Note over Primary: T=0s Primary failure occurs
rect rgb(255, 235, 235)
Note right of Primary: Failure Detection Phase (0-10s)
Primary-x Patroni_P: Process crash
Patroni_P--x Etcd: Stop lease renewal
HAProxy--x Patroni_P: Health check fails
Etcd->>Etcd: Lease countdown starts
end
rect rgb(255, 248, 225)
Note right of Etcd: Election Phase (10-20s)
Etcd->>Etcd: Lease expires, release leader lock
Patroni_R->>Etcd: Check eligibility (LSN, replication lag)
Etcd->>Patroni_R: Grant leader lock
end
rect rgb(232, 245, 233)
Note right of Replica: Promotion Phase (20-30s)
Patroni_R->>Replica: Execute PROMOTE
Replica-->>Replica: Promote to new primary
Patroni_R->>Etcd: Update state
HAProxy->>Patroni_R: Health check /primary
Patroni_R-->>HAProxy: 200 OK
end
Note over HAProxy: T≈30s Service recovery
HAProxy->>Replica: Route write traffic to new primary
Key Timing Formula:
RTO ≈ TTL + Election_Time + Promote_Time + HAProxy_Detection
Where:
- TTL = pg_rto (default 30s)
- Election_Time ≈ 1-2s
- Promote_Time ≈ 1-5s
- HAProxy_Detection = fall × inter + rise × fastinter ≈ 12s
Actual RTO usually between 15-40s, depending on:
- Network latency
- Replica WAL replay progress
- PostgreSQL recovery speed
High Availability Deployment Modes
Three-Node Standard Mode
Most recommended production deployment mode, providing complete automatic failover capability:
# 1. Confirm surviving node statuspatronictl -c /etc/patroni/patroni.yml list
# 2. If surviving node is replica, manually promotepg_ctl promote -D /pg/data
# 3. Or use pg-promote script/pg/bin/pg-promote
# 4. Modify HAProxy config, point directly to surviving node# Comment out health checks, hard-code routing# 5. After Etcd cluster recovers, reinitialize
Two Nodes, One Failed (1/2 Failure)
Scenario: 2-node cluster, primary fails
Problem:
Etcd has only 2 nodes, no majority
Cannot complete election
Replica cannot auto-promote
Solutions:
Solution 1: Add external Etcd arbiter node
Solution 2: Manual intervention to promote replica
Recovery Time Objective (RTO) consists of multiple phases:
gantt
title RTO Time Breakdown (Default config pg_rto=30s)
dateFormat ss
axisFormat %S seconds
section Failure Detection
Patroni detect/stop renewal :a1, 00, 10s
section Election Phase
Etcd lease expires :a2, after a1, 2s
Candidate election (compare LSN) :a3, after a2, 3s
section Promotion Phase
Execute promote :a4, after a3, 3s
Update Etcd state :a5, after a4, 2s
section Traffic Switch
HAProxy detect new primary :a6, after a5, 5s
HAProxy confirm (rise) :a7, after a6, 3s
Service recovery :milestone, after a7, 0s
Key Parameters Affecting RTO
Parameter
Impact
Tuning Recommendation
pg_rto
Baseline for TTL/loop_wait/retry_timeout
Can reduce to 15-20s with stable network
ttl
Failure detection time window
= pg_rto
loop_wait
Patroni check interval
= pg_rto / 3
inter
HAProxy health check interval
Can reduce to 1-2s
fall
Failure determination count
Can reduce to 2
rise
Recovery determination count
Can reduce to 2
Aggressive Configuration (RTO ≈ 15s):
pg_rto:15# Shorter TTL# HAProxy configurationdefault-server inter 1s fastinter 500ms fall 2 rise 2
Warning: Too short RTO increases risk of false-positive switching!
RPO Timing Breakdown
Recovery Point Objective (RPO) depends on replication mode:
Asynchronous Replication Mode (Default)
sequenceDiagram
participant P as 🟢 Primary
participant W as WAL
participant R as 🔵 Replica
Note over P: T=0 Commit
P->>W: WAL write locally
P-->>P: Return success to client
Note over P,R: T+Δ (replication lag)
P->>R: WAL send
R->>R: WAL receive & replay
Note over P: T+X Failure occurs
Note over P: ❌ Unsent WAL lost
Note over R: RPO = Δ ≈ tens of KB ~ 1MB
Replication Lag Monitoring:
-- Check replication lag
SELECTclient_addr,state,sent_lsn,write_lsn,flush_lsn,replay_lsn,pg_wal_lsn_diff(sent_lsn,replay_lsn)ASlag_bytesFROMpg_stat_replication;
Synchronous Replication Mode (RPO = 0)
sequenceDiagram
participant P as 🟢 Primary
participant W as WAL
participant R as 🔵 Sync Replica
Note over P: T=0 Commit
P->>W: WAL write locally
P->>R: WAL send
R->>R: WAL receive
R-->>P: Confirm receipt ✓
P-->>P: Return success to client
Note over P: Failure occurs
Note over R: ✅ All committed data on replica
Note over P,R: RPO = 0 (zero data loss)
Enable Synchronous Replication:
# Use crit.yml templatepg_conf:crit.yml# Or set RPO = 0pg_rpo:0# Patroni will auto-configure:# synchronous_mode: true# synchronous_standby_names: '*'
RTO / RPO Trade-off Matrix
Config Mode
pg_rto
pg_rpo
Actual RTO
Actual RPO
Use Case
Default (OLTP)
30s
1MB
20-40s
< 1MB
Regular business systems
Fast Switch
15s
1MB
10-20s
< 1MB
Low latency requirements
Zero Loss (CRIT)
30s
0
20-40s
0
Financial core systems
Conservative
60s
1MB
40-80s
< 1MB
Unstable network
Configuration Examples:
# Fast switch modepg_rto:15pg_rpo:1048576pg_conf:oltp.yml# Zero loss modepg_rto:30pg_rpo:0pg_conf:crit.yml# Conservative mode (unstable network)pg_rto:60pg_rpo:1048576pg_conf:oltp.yml
Trade-offs
Availability-First vs Consistency-First
Dimension
Availability-First (Default)
Consistency-First (crit)
Sync Replication
Off
On
Failover
Fast, may lose data
Cautious, zero data loss
Write Latency
Low
High (one more network round-trip)
Throughput
High
Lower
Replica Failure Impact
None
May block writes
RPO
< 1MB
= 0
RTO Trade-offs
Smaller RTO
Larger RTO
✅ Fast failure recovery
✅ Low false-positive risk
✅ Short business interruption
✅ High network jitter tolerance
❌ High false-positive switching risk
❌ Slow failure recovery
❌ Strict network requirements
❌ Long business interruption
RPO Trade-offs
Larger RPO
RPO = 0
✅ High performance
✅ Zero data loss
✅ High availability (single replica failure no impact)
✅ Financial compliance
❌ May lose data on failure
❌ Increased write latency
❌ Sync replica failure affects writes
Best Practices
Production Environment Checklist
Infrastructure:
At least 3 nodes (PostgreSQL)
At least 3 nodes (Etcd, can share with PG)
Nodes distributed across different failure domains (racks/availability zones)
Network latency < 10ms (same city) or < 50ms (cross-region)
10 Gigabit network (recommended)
Parameter Configuration:
pg_rto adjust according to network conditions (15-60s)
pg_rpo set according to business requirements (0 or 1MB)
pg_conf choose appropriate template (oltp/crit)
patroni_watchdog_mode evaluate if needed
Monitoring & Alerting:
Patroni status monitoring (leader/replication lag)
Etcd cluster health monitoring
Replication lag alerting (lag > 1MB)
failsafe_mode activation alerting
Disaster Recovery Drills:
Regularly execute failover drills
Verify RTO/RPO meets expectations
Test backup recovery process
Verify monitoring alert effectiveness
Common Issue Troubleshooting
Failover Failure:
# Check Patroni statuspatronictl -c /etc/patroni/patroni.yml list
# Check Etcd cluster healthetcdctl endpoint health
# Check replication lagpsql -c "SELECT * FROM pg_stat_replication"# View Patroni logsjournalctl -u patroni -f
Split-Brain Scenario Handling:
# 1. Confirm which is the "true" primarypsql -c "SELECT pg_is_in_recovery()"# 2. Stop "false" primarysystemctl stop patroni
# 3. Use pg_rewind to syncpg_rewind --target-pgdata=/pg/data --source-server="host=<true_primary>"# 4. Restart Patronisystemctl start patroni
Introduction to the implementation architecture, principles, trade-offs and implementation details of PostgreSQL Point-in-Time Recovery in Pigsty.
You can restore and roll back your cluster to any point in the past, avoiding data loss caused by software defects and human errors.
Pigsty’s PostgreSQL clusters come with automatically configured Point-in-Time Recovery (PITR) solution, provided by backup component pgBackRest and optional object storage repository MinIO.
The High Availability solution can solve hardware failures, but is powerless against data deletion/overwrite/database drops caused by software defects and human errors.
For this situation, Pigsty provides out-of-the-box Point-in-Time Recovery (PITR) capability, enabled by default without additional configuration.
Pigsty provides default configuration for base backups and WAL archiving. You can use local directories and disks, or dedicated MinIO clusters or S3 object storage services to store backups and implement off-site disaster recovery.
When using local disks, by default, the ability to recover to any point in time within the past day is retained. When using MinIO or S3, by default, the ability to recover to any point in time within the past week is retained.
As long as storage space is sufficient, you can keep any length of recoverable time period, depending on your needs.
What problems does Point-in-Time Recovery (PITR) solve?
Enhanced disaster recovery capability: RPO reduced from ∞ to tens of MB, RTO reduced from ∞ to several hours/quarters.
Ensure data security: Data Integrity in C/I/A: avoid data consistency issues caused by accidental deletion.
Ensure data security: Data Availability in C/I/A: provide fallback for “permanently unavailable” disaster situations
Single Instance Configuration Strategy
Event
RTO
RPO
Do Nothing
Outage
Permanent Loss
Total Loss
Base Backup
Outage
Depends on backup size and bandwidth (hours)
Loss of data since last backup (hours to days)
Base Backup + WAL Archive
Outage
Depends on backup size and bandwidth (hours)
Loss of last unarchived data (tens of MB)
What is the cost of Point-in-Time Recovery?
Reduced confidentiality in data security: Confidentiality: creates additional leakage points, requires additional protection of backups.
Additional resource consumption: local storage or network traffic/bandwidth overhead, usually not a problem.
Increased complexity cost: users need to bear backup management costs.
Limitations of Point-in-Time Recovery
If only PITR is used for failure recovery, RTO and RPO metrics are inferior compared to the High Availability solution. Usually, both should be used in combination.
RTO: If only single instance + PITR, recovery time depends on backup size and network/disk bandwidth, ranging from tens of minutes to hours or days.
RPO: If only single instance + PITR, some data may be lost during outage, one or several WAL log segment files may not yet be archived, with data loss ranging from 16 MB to tens of MB.
In addition to PITR, you can also use Delayed Clusters in Pigsty to solve data misoperation or software defect-induced data deletion and modification problems.
Principles
Point-in-Time Recovery allows you to restore and roll back your cluster to any “moment” in the past, avoiding data loss caused by software defects and human errors. To do this, two preparatory tasks are required: Base Backup and WAL Archive.
Having Base Backup allows users to restore the database to the state at the time of backup, while having WAL Archive starting from a base backup allows users to restore the database to any point in time after the base backup moment.
Pigsty uses pgbackrest to manage PostgreSQL backups. pgBackRest initializes empty repositories on all cluster instances, but only actually uses the repository on the cluster primary.
pgBackRest supports three backup modes: Full Backup, Incremental Backup, and Differential Backup, with the first two being most commonly used.
Full backup takes a complete physical snapshot of the database cluster at the current moment, while incremental backup records the difference between the current database cluster and the previous full backup.
Pigsty provides wrapper commands for backups: /pg/bin/pg-backup [full|incr]. You can schedule base backups as needed through Crontab or any other task scheduling system.
WAL Archive
Pigsty enables WAL archiving on the cluster primary by default, using the pgbackrest command-line tool to continuously push WAL segment files to the backup repository.
pgBackRest automatically manages required WAL files and timely cleans up expired backups and their corresponding WAL archive files according to the backup retention policy.
If you don’t need PITR functionality, you can disable WAL archiving through Cluster Configuration: archive_mode: off, and remove the node_crontab to stop scheduled backup tasks.
Implementation
By default, Pigsty provides two preset backup strategies: the default uses a local filesystem backup repository, where a full backup is performed daily to ensure users can roll back to any point in time within one day. The alternative strategy uses a dedicated MinIO cluster or S3 storage for backups, with weekly full backups and daily incremental backups, retaining two weeks of backups and WAL archives by default.
Pigsty uses pgBackRest to manage backups, receive WAL archives, and execute PITR. The backup repository can be flexibly configured (pgbackrest_repo): the default uses the primary’s local filesystem (local), but can also use other disk paths, or use the optional built-in MinIO service (minio) or cloud-based S3 services.
pgbackrest_enabled:true# Enable pgBackRest on pgsql hosts?pgbackrest_clean:true# Remove pg backup data during init?pgbackrest_log_dir:/pg/log/pgbackrest# pgbackrest log directory, default `/pg/log/pgbackrest`pgbackrest_method: local # pgbackrest repo method:local, minio, [user-defined...]pgbackrest_repo: # pgbackrest repository:https://pgbackrest.org/configuration.html#section-repositorylocal:# default pgbackrest repo using local posix fspath:/pg/backup # local backup directory, default `/pg/backup`retention_full_type:count # retain full backup by countretention_full:2# keep 3 full backups at most, 2 at least with local fs repominio:# optional minio repo for pgbackresttype:s3 # minio is s3-compatible, so use s3s3_endpoint:sss.pigsty # minio endpoint domain name, default `sss.pigsty`s3_region:us-east-1 # minio region, default us-east-1, useless for minios3_bucket:pgsql # minio bucket name, default `pgsql`s3_key:pgbackrest # minio user access key for pgbackrests3_key_secret:S3User.Backup # minio user secret key for pgbackrests3_uri_style:path # use path style uri for minio rather than host stylepath:/pgbackrest # minio backup path, default `/pgbackrest`storage_port:9000# minio port, default 9000storage_ca_file:/etc/pki/ca.crt # minio ca file path, default `/etc/pki/ca.crt`bundle:y# bundle small files into a single filecipher_type:aes-256-cbc # enable AES encryption for remote backup repocipher_pass:pgBackRest # AES encryption password, default 'pgBackRest'retention_full_type:time # retain full backup by time on minio reporetention_full:14# keep full backup in last 14 days# You can also add other optional backup repositories, such as S3, for off-site disaster recovery
Pigsty parameter pgbackrest_repo target repositories are converted to repository definitions in the /etc/pgbackrest/pgbackrest.conf configuration file.
For example, if you define an S3 repository in US West region for cold backup storage, you can use the following reference configuration.
You can directly use the following wrapper commands for Point-in-Time Recovery of PostgreSQL database clusters.
Pigsty uses incremental differential parallel recovery by default, allowing you to restore to a specified point in time at the fastest speed.
pg-pitr # Restore to the end of WAL archive stream (use in case of entire data center failure)pg-pitr -i # Restore to the time when the most recent backup completed (less common)pg-pitr --time="2022-12-30 14:44:44+08"# Restore to specified point in time (use when database or table was dropped)pg-pitr --name="my-restore-point"# Restore to named restore point created with pg_create_restore_pointpg-pitr --lsn="0/7C82CB8" -X # Restore immediately before LSNpg-pitr --xid="1234567" -X -P # Restore immediately before specified transaction ID, then promote cluster directly to primarypg-pitr --backup=latest # Restore to latest backup setpg-pitr --backup=20221108-105325 # Restore to specific backup set, backup sets can be listed using pgbackrest infopg-pitr # pgbackrest --stanza=pg-meta restorepg-pitr -i # pgbackrest --stanza=pg-meta --type=immediate restorepg-pitr -t "2022-12-30 14:44:44+08"# pgbackrest --stanza=pg-meta --type=time --target="2022-12-30 14:44:44+08" restorepg-pitr -n "my-restore-point"# pgbackrest --stanza=pg-meta --type=name --target=my-restore-point restorepg-pitr -b 20221108-105325F # pgbackrest --stanza=pg-meta --type=name --set=20221230-120101F restorepg-pitr -l "0/7C82CB8" -X # pgbackrest --stanza=pg-meta --type=lsn --target="0/7C82CB8" --target-exclusive restorepg-pitr -x 1234567 -X -P # pgbackrest --stanza=pg-meta --type=xid --target="0/7C82CB8" --target-exclusive --target-action=promote restore
When executing PITR, you can use the Pigsty monitoring system to observe the cluster LSN position status to determine whether you have successfully restored to the specified point in time, transaction point, LSN position, or other points.
10.2.6 - Security and Compliance
Detailed explanation of security features and compliance capabilities of PostgreSQL clusters in Pigsty
Pigsty v4.0 provides Enterprise-grade PostgreSQL security configuration, covering multiple dimensions including identity authentication, access control, communication encryption, audit logging, data integrity, backup and recovery, etc.
This document uses China Level 3 MLPS (GB/T 22239-2019) and SOC 2 Type II security compliance requirements as reference, comparing and verifying Pigsty’s security capabilities item by item.
Each security dimension includes two parts:
Default Configuration: Security compliance status when using conf/meta.yml and default parameters (Personal use)
Available Configuration: Enhanced security status achievable by adjusting Pigsty parameters (Enterprise-grade configuration achievable)
Compliance Summary
Level 3 MLPS Core Requirements Comparison
Requirement
Default Met
Config Available
Description
Identity Uniqueness
✅
✅
Role system ensures unique user identification
Password Complexity
⚠️
✅
Can enable passwordcheck / credcheck to enforce password complexity
Password Periodic Change
⚠️
✅
Set user validity period via expire_in/expire_at and refresh periodically
Login Failure Handling
⚠️
✅
Failed login requests recorded in logs, can work with fail2ban for auto-blocking
Two-Factor Auth
⚠️
✅
Password + Client SSL certificate auth
Access Control
✅
✅
HBA rules + RBAC + SELinux
Least Privilege
✅
✅
Tiered role system
Privilege Separation
✅
✅
DBA / Monitor / App Read/Write/ETL/Personal user separation
Communication Encryption
✅
✅
SSL enabled by default, can enforce SSL
Data Integrity
✅
✅
Data checksums enabled by default
Storage Encryption
⚠️
✅
Backup encryption + Percona TDE kernel support
Audit Logging
✅
✅
Logs record DDL and sensitive operations, can record all operations
Log Protection
✅
✅
File permission isolation, VictoriaLogs centralized collection for tamper-proofing
Backup Recovery
✅
✅
pgBackRest automatic backup
Network Isolation
✅
✅
Firewall + HBA
SOC 2 Type II Control Points Comparison
Control Point
Default Met
Config Available
Description
CC6.1 Logical Access Control
✅
✅
HBA + RBAC + SELinux
CC6.2 User Registration Auth
✅
✅
Ansible declarative management
CC6.3 Least Privilege
✅
✅
Tiered roles
CC6.6 Transmission Encryption
✅
✅
SSL/TLS globally enabled
CC6.7 Static Encryption
⚠️
✅
Can use Percona PGTDE kernel, and pgsodium/vault extensions
CC6.8 Malware Protection
⚠️
✅
Minimal installation + audit
CC7.1 Intrusion Detection
⚠️
✅
Set log Auth Fail monitoring alert rules
CC7.2 System Monitoring
✅
✅
VictoriaMetrics + Grafana
CC7.3 Event Response
✅
✅
Alertmanager
CC9.1 Business Continuity
✅
✅
HA + automatic failover
A1.2 Data Recovery
✅
✅
PITR backup recovery
Legend: ✅ Default met ⚠️ Requires additional configuration
Identity Authentication
MLPS Requirement: Users logging in should be identified and authenticated, with unique identity identification; two or more combined authentication techniques such as passwords, cryptographic technology, and biometric technology should be used.
SOC 2: CC6.1 - Logical and physical access control; user authentication mechanisms.
User Identity Identification
PostgreSQL implements user identity identification through the Role system, with each user having a unique role name.
Available Configuration: Users can define business users via pg_users, supporting account validity period, connection limits, etc.:
pg_users:- name:dbuser_apppassword:'SecurePass123!'roles:[dbrole_readwrite]expire_in:365# Expires after 365 daysconnlimit:100# Maximum 100 connectionscomment:'Application user'
Default Configuration: Pigsty implements tiered authentication strategy based on source address:
pg_default_hba_rules:- {user:'${dbsu}',db: all ,addr: local ,auth: ident ,title:'dbsu local ident auth'}- {user:'${dbsu}',db: replication ,addr: local ,auth: ident ,title:'dbsu local replication'}- {user:'${repl}',db: replication ,addr: localhost ,auth: pwd ,title:'replication user local password auth'}- {user:'${repl}',db: replication ,addr: intra ,auth: pwd ,title:'replication user intranet password auth'}- {user:'${repl}',db: postgres ,addr: intra ,auth: pwd ,title:'replication user intranet access postgres'}- {user:'${monitor}',db: all ,addr: localhost ,auth: pwd ,title:'monitor user local password auth'}- {user:'${monitor}',db: all ,addr: infra ,auth: pwd ,title:'monitor user access from infra nodes'}- {user:'${admin}',db: all ,addr: infra ,auth: ssl ,title:'admin SSL+password auth'}- {user:'${admin}',db: all ,addr: world ,auth: ssl ,title:'admin global SSL+password auth'}- {user: '+dbrole_readonly',db: all ,addr: localhost ,auth: pwd ,title:'readonly role local password auth'}- {user: '+dbrole_readonly',db: all ,addr: intra ,auth: pwd ,title:'readonly role intranet password auth'}- {user: '+dbrole_offline' ,db: all ,addr: intra ,auth: pwd ,title:'offline role intranet password auth'}
Supported authentication method aliases:
Alias
Actual Method
Description
deny
reject
Reject connection
pwd
scram-sha-256
Password auth (default encrypted)
ssl
scram-sha-256 + hostssl
SSL + password auth
cert
cert
Client certificate auth
os/ident/peer
ident/peer
OS user mapping
trust
trust
Unconditional trust (not recommended)
Available Configuration:
Enable client certificate authentication for two-factor auth:
MLPS Requirement: Management users should be granted minimum necessary privileges, implementing privilege separation for management users; access control policies should be configured by authorized entities.
SOC 2: CC6.3 - Role-based access control and least privilege principle.
Privilege Separation
Default Configuration: Pigsty implements clear separation of duties model:
Role
Privileges
Purpose
postgres
SUPERUSER
System superuser, local OS auth only
dbuser_dba
SUPERUSER + dbrole_admin
Database administrator
replicator
REPLICATION + pg_monitor
Replication and monitoring
dbuser_monitor
pg_monitor + dbrole_readonly
Read-only monitoring
dbrole_admin
CREATE + dbrole_readwrite
Object management (DDL)
dbrole_readwrite
INSERT/UPDATE/DELETE + dbrole_readonly
Data read-write
dbrole_readonly
SELECT
Read-only access
dbrole_offline
SELECT (restricted)
Offline/ETL queries
Available Configuration:
Fine-grained privilege control implemented via pg_default_privileges:
pg_default_privileges:- GRANT USAGE ON SCHEMAS TO dbrole_readonly- GRANT SELECT ON TABLES TO dbrole_readonly- GRANT SELECT ON SEQUENCES TO dbrole_readonly- GRANT EXECUTE ON FUNCTIONS TO dbrole_readonly- GRANT INSERT ON TABLES TO dbrole_readwrite- GRANT UPDATE ON TABLES TO dbrole_readwrite- GRANT DELETE ON TABLES TO dbrole_readwrite- GRANT TRUNCATE ON TABLES TO dbrole_admin- GRANT CREATE ON SCHEMAS TO dbrole_admin
ETCD as Patroni’s DCS (Distributed Configuration Store), uses mTLS (mutual TLS) authentication by default:
etcd3:hosts:'10.10.10.10:2379'protocol:httpscacert:/pg/cert/ca.crtcert:/pg/cert/server.crtkey:/pg/cert/server.keyusername:'pg-meta'# Cluster-specific accountpassword:'pg-meta'# Default same as cluster name
Data Encryption
MLPS Requirement: Cryptographic technology should be used to ensure confidentiality of important data during storage.
SOC 2: CC6.1 - Data encryption storage.
Backup Encryption
Config Item
Default
Description
cipher_type
aes-256-cbc
Backup encryption algorithm (MinIO repo)
cipher_pass
pgBackRest
Encryption password (needs modification)
Default Configuration:
Local backup (pgbackrest_method: local) not encrypted by default
Enable backup encryption (recommended for remote storage):
pgbackrest_method:miniopgbackrest_repo:minio:type:s3s3_endpoint:sss.pigstys3_bucket:pgsqls3_key:pgbackrests3_key_secret:S3User.Backupcipher_type:aes-256-cbccipher_pass:'YourSecureBackupPassword!'# Must modify!retention_full_type:timeretention_full:14
Transparent Data Encryption (TDE)
PostgreSQL community edition doesn’t support native TDE, but storage encryption can be implemented via:
Filesystem-level encryption: Use LUKS/dm-crypt to encrypt storage volumes
MLPS Requirement: Security auditing should be enabled, covering each user, auditing important user behaviors and security events.
SOC 2: CC7.2 - System monitoring and logging; CC7.3 - Security event detection.
Database Audit Logging
Config Item
Default
Description
logging_collector
on
Enable log collector
log_destination
csvlog
CSV format logs
log_statement
ddl
Record DDL statements
log_min_duration_statement
100ms
Slow query threshold
log_connections
authorization (PG18) / on
Connection audit
log_disconnections
on (crit template)
Disconnection audit
log_checkpoints
on
Checkpoint logs
log_lock_waits
on
Lock wait logs
log_replication_commands
on
Replication command logs
Default Configuration:
# oltp.yml template audit configurationlog_destination:csvloglogging_collector:'on'log_directory:/pg/log/postgreslog_filename:'postgresql-%a.log'# Rotate by weekdaylog_file_mode:'0640'# Restrict log file permissionslog_rotation_age:'1d'log_truncate_on_rotation:'on'log_checkpoints:'on'log_lock_waits:'on'log_replication_commands:'on'log_statement:ddl # Record all DDLlog_min_duration_statement:100# Record slow queries >100ms
Available Configuration (crit.yml critical business template):
# crit.yml provides more comprehensive auditinglog_connections:'receipt,authentication,authorization'# PG18 full connection auditlog_disconnections:'on'# Record disconnectionslog_lock_failures:'on'# Record lock failures (PG18)track_activity_query_size:32768# Full query recording
Enable pgaudit extension for fine-grained auditing:
Send logs to VictoriaLogs for centralized storage via Vector:
# Logs automatically collected to VictoriaLogsvlogs_enabled:truevlogs_port:9428vlogs_options:>- -retentionPeriod=15d
-retention.maxDiskSpaceUsageBytes=50GiB
Network Security
MLPS Requirement: Access control devices should be deployed at network boundaries to implement access control for data flows entering and leaving the network.
SOC 2: CC6.1 - Boundary protection and network security.
MLPS Requirement: Should follow minimal installation principle, only installing necessary components and applications; should be able to detect intrusion attempts on important nodes, providing alerts for serious intrusion events.
pg_extensions:[pg18-sec ] # Install security extension group
Alerting and Monitoring
Default Configuration:
VictoriaMetrics + Alertmanager provide monitoring and alerting
Preset PostgreSQL alert rules
Grafana visualization dashboards
Key security-related alerts:
Excessive authentication failures
Excessive replication lag
Backup failures
Disk space shortage
Connection exhaustion
10.3 - Configuration
Choose the appropriate instance and cluster types based on your requirements to configure PostgreSQL database clusters that meet your needs.
Pigsty is a “configuration-driven” PostgreSQL platform: all behaviors come from the combination of inventory files in ~/pigsty/conf/*.yml and PGSQL parameters.
Once you’ve written the configuration, you can replicate a customized cluster with instances, users, databases, access control, extensions, and tuning policies in just a few minutes.
Configuration Entry
Prepare Inventory: Copy a pigsty/conf/*.yml template or write an Ansible Inventory from scratch, placing cluster groups (all.children.<cls>.hosts) and global variables (all.vars) in the same file.
Define Parameters: Override the required PGSQL parameters in the vars block. The override order from global → cluster → host determines the final value.
Apply Configuration: Run ./configure -c <conf> or bin/pgsql-add <cls> and other playbooks to apply the configuration. Pigsty will generate the configuration files needed for Patroni/pgbouncer/pgbackrest based on the parameters.
Pigsty’s default demo inventory conf/pgsql.yml is a minimal example: one pg-meta cluster, global pg_version: 18, and a few business user and database definitions. You can expand with more clusters from this base.
Focus Areas & Documentation Index
Pigsty’s PostgreSQL configuration can be organized from the following dimensions. Subsequent documentation will explain “how to configure” each:
Kernel Version: Select the core version, flavor, and tuning templates using pg_version, pg_mode, pg_packages, pg_extensions, pg_conf, and other parameters.
Users/Roles: Declare system roles, business accounts, password policies, and connection pool attributes in pg_default_roles and pg_users.
Database Objects: Create databases as needed using pg_databases, baseline, schemas, extensions, pool_* fields and automatically integrate with pgbouncer/Grafana.
Access Control (HBA): Maintain host-based authentication policies using pg_default_hba_rules and pg_hba_rules to ensure access boundaries for different roles/networks.
Privilege Model (ACL): Converge object privileges through pg_default_privileges, pg_default_roles, pg_revoke_public parameters, providing an out-of-the-box layered role system.
After understanding these parameters, you can write declarative inventory manifests as “configuration as infrastructure” for any business requirement. Pigsty will handle execution and ensure idempotency.
A Typical Example
The following snippet shows how to control instance topology, kernel version, extensions, users, and databases in the same configuration file:
This configuration is concise and self-describing, consisting only of identity parameters. Note that the Ansible Group name should match pg_cluster.
Use the following command to create this cluster:
bin/pgsql-add pg-test
For demos, development testing, hosting temporary requirements, or performing non-critical analytical tasks, a single database instance may not be a big problem. However, such a single-node cluster has no high availability. When hardware failures occur, you’ll need to use PITR or other recovery methods to ensure the cluster’s RTO/RPO. For this reason, you may consider adding several read-only replicas to the cluster.
Replica
To add a read-only replica instance, you can add a new node to pg-test and set its pg_role to replica.
If the entire cluster doesn’t exist, you can directly create the complete cluster. If the cluster primary has already been initialized, you can add a replica to the existing cluster:
bin/pgsql-add pg-test # initialize the entire cluster at oncebin/pgsql-add pg-test 10.10.10.12 # add replica to existing cluster
When the cluster primary fails, the read-only instance (Replica) can take over the primary’s work with the help of the high availability system. Additionally, read-only instances can be used to execute read-only queries: many businesses have far more read requests than write requests, and most read-only query loads can be handled by replica instances.
Offline
Offline instances are dedicated read-only replicas specifically for serving slow queries, ETL, OLAP traffic, and interactive queries. Slow queries/long transactions have adverse effects on the performance and stability of online business, so it’s best to isolate them from online business.
To add an offline instance, assign it a new instance and set pg_role to offline.
Dedicated offline instances work similarly to common replica instances, but they serve as backup servers in the pg-test-replica service. That is, only when all replica instances are down will the offline and primary instances provide this read-only service.
In many cases, database resources are limited, and using a separate server as an offline instance is not economical. As a compromise, you can select an existing replica instance and mark it with the pg_offline_query flag to indicate it can handle “offline queries”. In this case, this read-only replica will handle both online read-only requests and offline queries. You can use pg_default_hba_rules and pg_hba_rules for additional access control on offline instances.
Sync Standby
When Sync Standby is enabled, PostgreSQL will select one replica as the sync standby, with all other replicas as candidates. The primary database will wait for the standby instance to flush to disk before confirming commits. The standby instance always has the latest data with no replication lag, and primary-standby switchover to the sync standby will have no data loss.
PostgreSQL uses asynchronous streaming replication by default, which may have small replication lag (on the order of 10KB/10ms). When the primary fails, there may be a small data loss window (which can be controlled using pg_rpo), but this is acceptable for most scenarios.
However, in some critical scenarios (e.g., financial transactions), data loss is completely unacceptable, or read replication lag is unacceptable. In such cases, you can use synchronous commit to solve this problem. To enable sync standby mode, you can simply use the crit.yml template in pg_conf.
To enable sync standby on an existing cluster, configure the cluster and enable synchronous_mode:
$ pg edit-config pg-test # run as admin user on admin node+++
-synchronous_mode: false# <--- old value+synchronous_mode: true# <--- new value synchronous_mode_strict: falseApply these changes? [y/N]: y
In this case, the PostgreSQL configuration parameter synchronous_standby_names is automatically managed by Patroni.
One replica will be elected as the sync standby, and its application_name will be written to the PostgreSQL primary configuration file and applied.
Quorum Commit
Quorum Commit provides more powerful control than sync standby: especially when you have multiple replicas, you can set criteria for successful commits, achieving higher/lower consistency levels (and trade-offs with availability).
synchronous_mode:true# ensure synchronous commit is enabledsynchronous_node_count:2# specify "at least" how many replicas must successfully commit
If you want to use more sync replicas, modify the synchronous_node_count value. When the cluster size changes, you should ensure this configuration is still valid to avoid service unavailability.
In this case, the PostgreSQL configuration parameter synchronous_standby_names is automatically managed by Patroni.
Another scenario is using any n replicas to confirm commits. In this case, the configuration is slightly different. For example, if we only need any one replica to confirm commits:
synchronous_mode:quorum # use quorum commitpostgresql:parameters:# modify PostgreSQL's configuration parameter synchronous_standby_names, using `ANY n ()` syntaxsynchronous_standby_names:'ANY 1 (*)'# you can specify a specific replica list or use * to wildcard all replicas.
Example: Enable ANY quorum commit
$ pg edit-config pg-test
+ synchronous_standby_names: 'ANY 1 (*)'# in ANY mode, this parameter is needed- synchronous_node_count: 2# in ANY mode, this parameter is not neededApply these changes? [y/N]: y
After applying, the configuration takes effect, and all standbys become regular replicas in Patroni. However, in pg_stat_replication, you can see sync_state becomes quorum.
Standby Cluster
You can clone an existing cluster and create a standby cluster for data migration, horizontal splitting, multi-region deployment, or disaster recovery.
Under normal circumstances, the standby cluster will follow the upstream cluster and keep content synchronized. You can promote the standby cluster to become a truly independent cluster.
The standby cluster definition is basically the same as a normal cluster definition, except that the pg_upstream parameter is additionally defined on the primary. The primary of the standby cluster is called the Standby Leader.
For example, below defines a pg-test cluster and its standby cluster pg-test2. The configuration inventory might look like this:
# pg-test is the original clusterpg-test:hosts:10.10.10.11:{pg_seq: 1, pg_role:primary }vars:{pg_cluster:pg-test }# pg-test2 is the standby cluster of pg-testpg-test2:hosts:10.10.10.12:{pg_seq: 1, pg_role: primary , pg_upstream:10.10.10.11}# <--- pg_upstream defined here10.10.10.13:{pg_seq: 2, pg_role:replica }vars:{pg_cluster:pg-test2 }
The primary node pg-test2-1 of the pg-test2 cluster will be a downstream replica of pg-test and serve as the Standby Leader in the pg-test2 cluster.
Just ensure the pg_upstream parameter is configured on the standby cluster’s primary node to automatically pull backups from the original upstream.
If necessary (e.g., upstream primary-standby switchover/failover), you can change the standby cluster’s replication upstream through cluster configuration.
To do this, simply change standby_cluster.host to the new upstream IP address and apply.
$ pg edit-config pg-test2
standby_cluster:
create_replica_methods:
- basebackup
- host: 10.10.10.13 # <--- old upstream+ host: 10.10.10.12 # <--- new upstream port: 5432 Apply these changes? [y/N]: y
Example: Promote standby cluster
You can promote the standby cluster to an independent cluster at any time, so the cluster can independently handle write requests and diverge from the original cluster.
To do this, you must configure the cluster and completely erase the standby_cluster section, then apply.
$ pg edit-config pg-test2
-standby_cluster:
- create_replica_methods:
- - basebackup
- host: 10.10.10.11
- port: 5432Apply these changes? [y/N]: y
Example: Cascade replication
If you specify pg_upstream on a replica instead of the primary, you can configure cascade replication for the cluster.
When configuring cascade replication, you must use the IP address of an instance in the cluster as the parameter value, otherwise initialization will fail. The replica performs streaming replication from a specific instance rather than the primary.
The instance acting as a WAL relay is called a Bridge Instance. Using a bridge instance can share the burden of sending WAL from the primary. When you have dozens of replicas, using bridge instance cascade replication is a good idea.
A Delayed Cluster is a special type of standby cluster used to quickly recover “accidentally deleted” data.
For example, if you want a cluster named pg-testdelay whose data content is the same as the pg-test cluster from one hour ago:
# pg-test is the original clusterpg-test:hosts:10.10.10.11:{pg_seq: 1, pg_role:primary }vars:{pg_cluster:pg-test }# pg-testdelay is the delayed cluster of pg-testpg-testdelay:hosts:10.10.10.12:{pg_seq: 1, pg_role: primary , pg_upstream: 10.10.10.11, pg_delay:1d }10.10.10.13:{pg_seq: 2, pg_role:replica }vars:{pg_cluster:pg-testdelay }
$ pg edit-config pg-testdelay
standby_cluster:
create_replica_methods:
- basebackup
host: 10.10.10.11
port: 5432+ recovery_min_apply_delay: 1h # <--- add delay duration here, e.g. 1 hourApply these changes? [y/N]: y
When some tuples and tables are accidentally deleted, you can modify this parameter to advance this delayed cluster to an appropriate point in time, read data from it, and quickly fix the original cluster.
Delayed clusters require additional resources, but are much faster than PITR and have much less impact on the system. For very critical clusters, consider setting up delayed clusters.
To define a Citus cluster, you need to specify the following parameters:
pg_mode must be set to citus, not the default pgsql
The shard name pg_shard and shard number pg_group must be defined on each shard cluster
pg_primary_db must be defined to specify the database managed by Patroni.
If you want to use pg_dbsupostgres instead of the default pg_admin_username to execute admin commands, then pg_dbsu_password must be set to a non-empty plaintext password
Additionally, extra hba rules are needed to allow SSL access from localhost and other data nodes. As shown below:
all:children:pg-citus0:# citus shard 0hosts:{10.10.10.10:{pg_seq: 1, pg_role:primary } }vars:{pg_cluster: pg-citus0 , pg_group:0}pg-citus1:# citus shard 1hosts:{10.10.10.11:{pg_seq: 1, pg_role:primary } }vars:{pg_cluster: pg-citus1 , pg_group:1}pg-citus2:# citus shard 2hosts:{10.10.10.12:{pg_seq: 1, pg_role:primary } }vars:{pg_cluster: pg-citus2 , pg_group:2}pg-citus3:# citus shard 3hosts:10.10.10.13:{pg_seq: 1, pg_role:primary }10.10.10.14:{pg_seq: 2, pg_role:replica }vars:{pg_cluster: pg-citus3 , pg_group:3}vars:# global parameters for all Citus clusterspg_mode: citus # pgsql cluster mode must be set to:cituspg_shard: pg-citus # citus horizontal shard name:pg-cituspg_primary_db: meta # citus database name:metapg_dbsu_password:DBUser.Postgres# if using dbsu, need to configure a password for itpg_users:[{name: dbuser_meta ,password: DBUser.Meta ,pgbouncer: true ,roles:[dbrole_admin ] } ]pg_databases:[{name: meta ,extensions:[{name:citus }, { name: postgis }, { name: timescaledb } ] } ]pg_hba_rules:- {user: 'all' ,db: all ,addr: 127.0.0.1/32 ,auth: ssl ,title:'all user ssl access from localhost'}- {user: 'all' ,db: all ,addr: intra ,auth: ssl ,title:'all user ssl access from intranet'}
On the coordinator node, you can create distributed tables and reference tables and query them from any data node. Starting from 11.2, any Citus database node can act as a coordinator.
How to choose the appropriate PostgreSQL kernel and major version.
Choosing a “kernel” in Pigsty means determining the PostgreSQL major version, mode/distribution, packages to install, and tuning templates to load.
Pigsty supports PostgreSQL from version 10 onwards. The current version packages core software for versions 13-18 by default and provides a complete extension set for 17/18. The following content shows how to make these choices through configuration files.
Major Version and Packages
pg_version: Specify the PostgreSQL major version (default 18). Pigsty will automatically map to the correct package name prefix based on the version.
pg_packages: Define the core package set to install, supports using package aliases (default pgsql-main pgsql-common, includes kernel + patroni/pgbouncer/pgbackrest and other common tools).
pg_extensions: List of additional extension packages to install, also supports aliases; defaults to empty meaning only core dependencies are installed.
Effect: Ansible will pull packages corresponding to pg_version=17 during installation, pre-install extensions to the system, and database initialization scripts can then directly CREATE EXTENSION.
Extension support varies across versions in Pigsty’s offline repository: 12/13 only provide core and tier-1 extensions, while 15/17/18 cover all extensions. If an extension is not pre-packaged, it can be added via repo_packages_extra.
Kernel Mode (pg_mode)
pg_mode controls the kernel “flavor” to deploy. Default pgsql indicates standard PostgreSQL. Pigsty currently supports the following modes:
Mode
Scenario
pgsql
Standard PostgreSQL, HA + replication
citus
Citus distributed cluster, requires additional pg_shard / pg_group
gpsql
Greenplum / MatrixDB
mssql
Babelfish for PostgreSQL
mysql
OpenGauss/HaloDB compatible with MySQL protocol
polar
Alibaba PolarDB (based on pg polar distribution)
ivory
IvorySQL (Oracle-compatible syntax)
oriole
OrioleDB storage engine
oracle
PostgreSQL + ora compatibility (pg_mode: oracle)
After selecting a mode, Pigsty will automatically load corresponding templates, dependency packages, and Patroni configurations. For example, deploying Citus:
Effect: All members will install Citus-related packages, Patroni writes to etcd in shard mode, and automatically CREATE EXTENSION citus in the meta database.
Extensions and Pre-installed Objects
Besides system packages, you can control components automatically loaded after database startup through the following parameters:
pg_libs: List to write to shared_preload_libraries. For example: pg_libs: 'timescaledb, pg_stat_statements, auto_explain'.
pg_default_extensions / pg_default_schemas: Control schemas and extensions pre-created in template1 and postgres by initialization scripts.
pg_parameters: Append ALTER SYSTEM SET for all instances (written to postgresql.auto.conf).
Example: Enable TimescaleDB, pgvector and customize some system parameters.
Effect: During initialization, template1 creates extensions, Patroni’s postgresql.conf injects corresponding parameters, and all business databases inherit these settings.
Tuning Template (pg_conf)
pg_conf points to Patroni templates in roles/pgsql/templates/*.yml. Pigsty includes four built-in general templates:
Template
Applicable Scenario
oltp.yml
Default template, for 4–128 core TP workload
olap.yml
Optimized for analytical scenarios
crit.yml
Emphasizes sync commit/minimal latency, suitable for zero-loss scenarios like finance
Effect: Copy crit.yml as Patroni configuration, overlay pg_parameters written to postgresql.auto.conf, making instances run immediately in synchronous commit mode.
First primary + one replica, using olap.yml tuning.
Install PG18 + RAG common extensions, automatically load pgvector/pgml at system level.
Patroni/pgbouncer/pgbackrest generated by Pigsty, no manual intervention needed.
Replace the above parameters according to business needs to complete all kernel-level customization.
10.3.3 - Package Alias
Pigsty provides a package alias translation mechanism that shields the differences in binary package details across operating systems, making installation easier.
PostgreSQL package naming conventions vary significantly across different operating systems:
EL systems (RHEL/Rocky/Alma/…) use formats like pgvector_17, postgis36_17*
Debian/Ubuntu systems use formats like postgresql-17-pgvector, postgresql-17-postgis-3
This difference adds cognitive burden to users: you need to remember different package name rules for different systems, and handle the embedding of PostgreSQL version numbers.
Package Alias
Pigsty solves this problem through the Package Alias mechanism: you only need to use unified aliases, and Pigsty will handle all the details:
# Using aliases - simple, unified, cross-platformpg_extensions:[postgis, pgvector, timescaledb ]# Equivalent to actual package names on EL9 + PG17pg_extensions:[postgis36_17*, pgvector_17*, timescaledb-tsl_17* ]# Equivalent to actual package names on Ubuntu 24 + PG17pg_extensions:[postgresql-17-postgis-3, postgresql-17-pgvector, postgresql-17-timescaledb-tsl ]
Alias Translation
Aliases can also group a set of packages as a whole. For example, Pigsty’s default installed packages - the default value of pg_packages is:
pg_packages:# pg packages to be installed, alias can be used- pgsql-main pgsql-common
Pigsty will query the current operating system alias list (assuming el10.x86_64) and translate it to PGSQL kernel, extensions, and toolkits:
Through this approach, Pigsty shields the complexity of packages, allowing users to simply specify the functional components they want.
Which Variables Can Use Aliases?
You can use package aliases in the following four parameters, and the aliases will be automatically converted to actual package names according to the translation process:
repo_packages - Package download parameter: packages to download to local repository
repo_packages_extra - Extension installation parameter: additional packages to download to local repository
Alias List
You can find the alias mapping files for each operating system and architecture in the roles/node_id/vars/ directory of the Pigsty project source code:
User config alias --> Detect OS --> Find alias mapping table ---> Replace $v placeholder ---> Install actual packages
↓ ↓ ↓ ↓
postgis el9.x86_64 postgis36_$v* postgis36_17*
postgis u24.x86_64 postgresql-$v-postgis-3 postgresql-17-postgis-3
Version Placeholder
Pigsty’s alias system uses $v as a placeholder for the PostgreSQL version number. When you specify a PostgreSQL version using pg_version, all $v in aliases will be replaced with the actual version number.
For example, when pg_version: 17:
Alias Definition (EL)
Expanded Result
postgresql$v*
postgresql17*
pgvector_$v*
pgvector_17*
timescaledb-tsl_$v*
timescaledb-tsl_17*
Alias Definition (Debian/Ubuntu)
Expanded Result
postgresql-$v
postgresql-17
postgresql-$v-pgvector
postgresql-17-pgvector
postgresql-$v-timescaledb-tsl
postgresql-17-timescaledb-tsl
Wildcard Matching
On EL systems, many aliases use the * wildcard to match related subpackages. For example:
postgis36_17* will match postgis36_17, postgis36_17-client, postgis36_17-utils, etc.
postgresql17* will match postgresql17, postgresql17-server, postgresql17-libs, postgresql17-contrib, etc.
This design ensures you don’t need to list each subpackage individually - one alias can install the complete extension.
10.3.4 - User/Role
User/Role refers to logical objects created by the SQL command CREATE USER/ROLE within a database cluster.
In this context, user refers to logical objects created by the SQL command CREATE USER/ROLE within a database cluster.
In PostgreSQL, users belong directly to the database cluster rather than a specific database. Therefore, when creating business databases and business users, the principle of “users first, databases later” should be followed.
Define Users
Pigsty defines roles and users in database clusters through two config parameters:
pg_users: Define business users and roles at the database cluster level
The former defines roles and users shared across the entire env, while the latter defines business roles and users specific to a single cluster. Both have the same format as arrays of user definition objects.
You can define multiple users/roles. They will be created sequentially: first global, then cluster, and finally by array order. So later users can belong to roles defined earlier.
Here is the business user definition in the default pg-meta cluster in the Pigsty demo env:
pg-meta:hosts:{10.10.10.10:{pg_seq: 1, pg_role:primary } }vars:pg_cluster:pg-metapg_users:- {name: dbuser_meta ,password: DBUser.Meta ,pgbouncer: true ,roles: [dbrole_admin] ,comment:pigsty admin user }- {name: dbuser_view ,password: DBUser.Viewer ,pgbouncer: true ,roles: [dbrole_readonly] ,comment:read-only viewer for meta database }- {name: dbuser_grafana ,password: DBUser.Grafana ,pgbouncer: true ,roles: [dbrole_admin] ,comment:admin user for grafana database }- {name: dbuser_bytebase ,password: DBUser.Bytebase ,pgbouncer: true ,roles: [dbrole_admin] ,comment:admin user for bytebase database }- {name: dbuser_kong ,password: DBUser.Kong ,pgbouncer: true ,roles: [dbrole_admin] ,comment:admin user for kong api gateway }- {name: dbuser_gitea ,password: DBUser.Gitea ,pgbouncer: true ,roles: [dbrole_admin] ,comment:admin user for gitea service }- {name: dbuser_wiki ,password: DBUser.Wiki ,pgbouncer: true ,roles: [dbrole_admin] ,comment:admin user for wiki.js service }- {name: dbuser_noco ,password: DBUser.Noco ,pgbouncer: true ,roles: [dbrole_admin] ,comment:admin user for nocodb service }- {name: dbuser_remove ,state: absent } # use state:absent to delete user
Each user/role definition is an object that may include the following fields, using dbuser_meta user as an example:
- name:dbuser_meta # Required, `name` is the only mandatory fieldstate: create # Optional, user state:create (default), absent (delete)password:DBUser.Meta # Optional, password, can be scram-sha-256 hash or plaintextlogin:true# Optional, can login by defaultsuperuser:false# Optional, default false, is it a superuser?createdb:false# Optional, default false, can create databases?createrole:false# Optional, default false, can create roles?inherit:true# Optional, can this role use inherited privileges by default?replication:false# Optional, default false, can this role perform replication?bypassrls:false# Optional, default false, can bypass row-level security?pgbouncer:true# Optional, default false, add to pgbouncer user list? (prod users should set to true)connlimit:-1# Optional, user connection limit, default -1 disables limitexpire_in:3650# Optional, expire after n days from creation (higher priority than expire_at)expire_at:'2030-12-31'# Optional, expiration date in YYYY-MM-DD format (lower priority than expire_in)comment:pigsty admin user # Optional, description and comment stringroles: [dbrole_admin] # Optional, default roles:dbrole_{admin,readonly,readwrite,offline}parameters:# Optional, role-level params via `ALTER ROLE SET`search_path:public # e.g., set default search_pathpool_mode:transaction # Optional, pgbouncer pool mode, default transactionpool_connlimit:-1# Optional, user-level max pool connections, -1 disables limit
The only required field is name, which should be a valid and unique username in the PostgreSQL cluster.
Username must match regex ^[a-z_][a-z0-9_]{0,62}$ (lowercase letters, digits, underscores, starts with letter or underscore, max 63 chars).
Roles don’t need password, but for login-able business users, a password is usually needed.
password can be plaintext or scram-sha-256 / md5 hash string. Please avoid using plaintext passwords.
Users/roles are created sequentially in array order, so ensure role/group definitions come before their members.
login, superuser, createdb, createrole, inherit, replication, bypassrls are boolean flags.
pgbouncer is disabled by default: to add business users to the pgbouncer user list, you should explicitly set it to true.
Parameter Overview
Field
Category
Type
Mutability
Description
name
Basic
string
Required
Username, must be valid and unique identifier
state
Basic
enum
Optional
User state: create (default), absent
password
Basic
string
Mutable
User password, plaintext or hash
comment
Basic
string
Mutable
User comment/description
login
Privilege
bool
Mutable
Can login, default true
superuser
Privilege
bool
Mutable
Is superuser, default false
createdb
Privilege
bool
Mutable
Can create database, default false
createrole
Privilege
bool
Mutable
Can create role, default false
inherit
Privilege
bool
Mutable
Inherit role privileges, default true
replication
Privilege
bool
Mutable
Can replicate, default false
bypassrls
Privilege
bool
Mutable
Can bypass RLS, default false
connlimit
Privilege
int
Mutable
Connection limit, -1 means no limit
expire_in
Validity
int
Mutable
Expire N days from now (higher priority than expire_at)
expire_at
Validity
string
Mutable
Expiration date, YYYY-MM-DD format
roles
Role
array
Incremental
Roles array, supports string or object format
parameters
Params
object
Mutable
Role-level parameters
pgbouncer
Pool
bool
Mutable
Add to connection pool, default false
pool_mode
Pool
enum
Mutable
Pool mode: transaction (default)
pool_connlimit
Pool
int
Mutable
Pool user max connections
Mutability Notes
Mutability
Meaning
Required
Must be specified
Optional
Optional field with default value
Mutable
Can be modified by re-running playbook
Incremental
Only adds new content, doesn’t remove existing
Basic Parameters
name
Type: string
Mutability: Required
Description: Username, unique identifier within cluster
Username must be a valid PostgreSQL identifier matching regex ^[a-z_][a-z0-9_]{0,62}$:
Starts with lowercase letter or underscore
Contains only lowercase letters, digits, underscores
Object format supports finer-grained role membership control:
- name:dbuser_approles:- dbrole_readwrite # simple string:GRANT role- {name: dbrole_admin, admin:true}# GRANT WITH ADMIN OPTION- {name: pg_monitor, set: false } # PG16+:REVOKE SET OPTION- {name: pg_signal_backend, inherit: false } # PG16+:REVOKE INHERIT OPTION- {name: old_role, state:absent } # REVOKE role membership
Object Format Parameters
Param
Type
Description
name
string
Role name (required)
state
enum
grant (default) or absent/revoke: control membership
admin
bool
true: WITH ADMIN OPTION / false: REVOKE ADMIN
set
bool
PG16+: true: WITH SET TRUE / false: REVOKE SET
inherit
bool
PG16+: true: WITH INHERIT TRUE / false: REVOKE INHERIT
PostgreSQL 16+ New Features
PostgreSQL 16 introduced finer-grained role membership control:
ADMIN OPTION: Allow granting role to other users
SET OPTION: Allow using SET ROLE to switch to this role
INHERIT OPTION: Auto-inherit this role’s privileges
# PostgreSQL 16+ complete example- name:dbuser_approles:# Normal membership- dbrole_readwrite# Can grant dbrole_admin to other users- {name: dbrole_admin, admin:true}# Cannot SET ROLE to pg_monitor (can only inherit privileges)- {name: pg_monitor, set:false}# Don't auto-inherit pg_execute_server_program privileges (need explicit SET ROLE)- {name: pg_execute_server_program, inherit:false}# Revoke old_role membership- {name: old_role, state:absent }
Note: set and inherit options only work in PostgreSQL 16+. On earlier versions they’re ignored with warning comments.
Role-Level Parameters
parameters
Type: object
Mutability: Mutable
Description: Role-level config parameters
Set via ALTER ROLE ... SET, params apply to all sessions for this user.
Use special value DEFAULT (case-insensitive) to reset param to PostgreSQL default:
- name:dbuser_appparameters:work_mem:DEFAULT # reset to PostgreSQL defaultstatement_timeout:'30s'# set new value
Common Role-Level Parameters
Parameter
Description
Example
work_mem
Query work memory
'64MB'
statement_timeout
Statement timeout
'30s'
lock_timeout
Lock wait timeout
'10s'
idle_in_transaction_session_timeout
Idle transaction timeout
'10min'
search_path
Schema search path
'app,public'
log_statement
Log level
'ddl'
temp_file_limit
Temp file size limit
'10GB'
Connection Pool Parameters
These params control user behavior in Pgbouncer connection pool.
pgbouncer
Type: bool
Mutability: Mutable
Default: false
Description: Add user to Pgbouncer user list
Important
For prod users needing connection pool access, you must explicitly set pgbouncer: true.
Default false prevents accidentally exposing internal users to the connection pool.
# Prod user: needs connection pool- name:dbuser_apppassword:DBUser.Apppgbouncer:true# Internal user: no connection pool needed- name:dbuser_internalpassword:DBUser.Internalpgbouncer:false# default, can be omitted
pool_mode
Type: enum
Mutability: Mutable
Values: transaction, session, statement
Default: transaction
Description: User-level pool mode
Mode
Description
Use Case
transaction
Return connection after txn (default)
Most OLTP apps
session
Return connection after session
Apps needing session state
statement
Return connection after statement
Simple stateless queries
# DBA user: session mode (may need SET commands etc.)- name:dbuser_dbapgbouncer:truepool_mode:session# Normal business user: transaction mode- name:dbuser_apppgbouncer:truepool_mode:transaction
pool_connlimit
Type: int
Mutability: Mutable
Default: -1 (no limit)
Description: User-level max pool connections
- name:dbuser_apppgbouncer:truepool_connlimit:50# max 50 pool connections for this user
ACL System
Pigsty has a built-in, out-of-the-box access control / ACL system. You only need to assign these four default roles to business users:
dbrole_readwrite: Global read-write access role (primary business prod accounts should have this)
dbrole_readonly: Global read-only access role (for other businesses needing read-only access)
dbrole_admin: DDL privileges role (business admins, scenarios requiring table creation in apps)
dbrole_offline: Restricted read-only role (can only access offline instances, typically for individual users)
If you want to redesign your own ACL system, consider customizing:
When you create users, Pgbouncer’s user list definition file will be refreshed and take effect via online config reload, without affecting existing connections.
Pgbouncer runs with the same dbsu as PostgreSQL, defaulting to the postgres OS user. You can use the pgb alias to access pgbouncer admin functions using dbsu.
Note that the pgbouncer_auth_query param allows dynamic query for connection pool user auth—a compromise when you’re lazy about managing pool users.
Database refers to logical objects created by the SQL command CREATE DATABASE within a database cluster.
In this context, database refers to logical objects created by the SQL command CREATE DATABASE within a database cluster.
A PostgreSQL server can serve multiple databases simultaneously. In Pigsty, you can define the required databases in the cluster config.
Pigsty modifies and customizes the default template database template1, creating default schemas, installing default extensions, and configuring default privileges. Newly created databases will inherit these settings from template1 by default.
By default, all business databases are added 1:1 to the Pgbouncer connection pool; pg_exporter will automatically discover all business databases through an auto-discovery mechanism and monitor objects within them.
Define Database
Business databases are defined in the cluster parameter pg_databases, which is an array of database definition objects.
Databases in the array are created sequentially in definition order, so databases defined later can use previously defined databases as templates.
Here is the database definition in the default pg-meta cluster in the Pigsty demo env:
Grants admin, owner connection privilege (WITH GRANT OPTION)
When set to false:
Restores PUBLIC CONNECT privilege
- name:secure_dbowner:dbuser_securerevokeconn:true# only specified users can connect
connlimit
Type: int
Mutability: Mutable
Default: -1 (no limit)
Description: Database max connection limit
- name:limited_dbconnlimit:50# max 50 concurrent connections
Initialization Parameters
baseline
Type: string
Mutability: One-time
Description: SQL baseline file path
Specifies SQL file to execute after database creation for initializing table structure, data, etc.
Path is relative to Ansible search path (usually files/ directory)
Only executes on first database creation
Re-executes when using state: recreate
- name:myappbaseline:myapp_init.sql # will search files/myapp_init.sql
schemas
Type: (string | object)[]
Mutability: Incremental
Description: Schema definitions to create
Supports two formats:
schemas:# Simple format: schema name only- app- api# Full format: object definition- name:core # schema name (required)owner:dbuser_app # schema owner (optional)- name:old_schemastate:absent # delete schema
Schema owner: Use owner to specify schema owner, generates AUTHORIZATION clause:
- name:myappowner:dbuser_myappschemas:- name:appowner:dbuser_myapp # schema owner same as database owner- name:auditowner:dbuser_audit # schema owner is different user
Create operations are incremental, uses IF NOT EXISTS
Delete operations use CASCADE, deletes all objects in schema
extensions
Type: object[]
Mutability: Incremental
Description: Extension definitions to install
Supports two formats:
extensions:# Simple format: extension name only- postgis- pg_trgm# Full format: object definition- name:vector # extension name (required)schema:public # install to specified schema (optional)version:'0.5.1'# specify version (optional)state:absent # set absent to uninstall extension (optional)
Uninstall extension: Use state: absent to uninstall:
These params control database behavior in Pgbouncer connection pool.
pgbouncer
Type: bool
Mutability: Mutable
Default: true
Description: Add database to Pgbouncer connection pool
- name:internal_dbpgbouncer:false# not accessed via connection pool
pool_mode
Type: enum
Mutability: Mutable
Values: transaction, session, statement
Default: transaction
Description: Database-level pool mode
Mode
Description
Use Case
transaction
Return connection after txn
Most OLTP apps
session
Return connection after session
Apps needing session state
statement
Return connection after statement
Simple stateless queries
pool_size
Type: int
Mutability: Mutable
Default: 64
Description: Database default pool size
pool_size_min
Type: int
Mutability: Mutable
Default: 0
Description: Minimum pool size, pre-warmed connections
pool_reserve
Type: int
Mutability: Mutable
Default: 32
Description: Reserve connections, extra burst connections available when default pool exhausted
pool_connlimit
Type: int
Mutability: Mutable
Default: 100
Description: Max connections accessing this database via pool
pool_auth_user
Type: string
Mutability: Mutable
Description: Auth query user
Requires pgbouncer_auth_query enabled.
When specified, all connections to this database use this user to query passwords.
Monitoring Parameter
register_datasource
Type: bool
Mutability: Mutable
Default: true
Description: Register to Grafana datasource
Set to false to skip Grafana datasource registration, suitable for temporary databases not needing monitoring.
Template Inheritance
Many params inherit from template database if not explicitly specified. Default template is template1, whose encoding settings are determined by cluster init params:
Newly created databases are forked from template1 by default. This template database is customized during PG_PROVISION phase:
configured with extensions, schemas, and default privileges, so newly created databases also inherit these configs, unless you explicitly use another database as template.
Detailed explanation of PostgreSQL and Pgbouncer Host-Based Authentication (HBA) rules configuration in Pigsty.
HBA (Host-Based Authentication) controls “who can connect to the database from where and how”.
Pigsty manages HBA rules declaratively through pg_default_hba_rules and pg_hba_rules.
Overview
Pigsty renders the following config files during cluster init or HBA refresh:
Role filtering: Rules support role field, auto-filter based on instance’s pg_role
Order sorting: Rules support order field, controls position in final config file
Two syntaxes: Supports alias form (simplified) and raw form (direct HBA text)
Parameter Reference
pg_default_hba_rules
PostgreSQL global default HBA rule list, usually defined in all.vars, provides base access control for all PostgreSQL clusters.
Type: rule[]
Level: Global (G)
Default: See below
pg_default_hba_rules:- {user:'${dbsu}',db: all ,addr: local ,auth: ident ,title: 'dbsu access via local os user ident' ,order:100}- {user:'${dbsu}',db: replication ,addr: local ,auth: ident ,title: 'dbsu replication from local os ident' ,order:150}- {user:'${repl}',db: replication ,addr: localhost ,auth: pwd ,title: 'replicator replication from localhost',order:200}- {user:'${repl}',db: replication ,addr: intra ,auth: pwd ,title: 'replicator replication from intranet' ,order:250}- {user:'${repl}',db: postgres ,addr: intra ,auth: pwd ,title: 'replicator postgres db from intranet' ,order:300}- {user:'${monitor}',db: all ,addr: localhost ,auth: pwd ,title: 'monitor from localhost with password' ,order:350}- {user:'${monitor}',db: all ,addr: infra ,auth: pwd ,title: 'monitor from infra host with password',order:400}- {user:'${admin}',db: all ,addr: infra ,auth: ssl ,title: 'admin @ infra nodes with pwd & ssl' ,order:450}- {user:'${admin}',db: all ,addr: world ,auth: ssl ,title: 'admin @ everywhere with ssl & pwd' ,order:500}- {user: '+dbrole_readonly',db: all ,addr: localhost ,auth: pwd ,title: 'pgbouncer read/write via local socket',order:550}- {user: '+dbrole_readonly',db: all ,addr: intra ,auth: pwd ,title: 'read/write biz user via password' ,order:600}- {user: '+dbrole_offline' ,db: all ,addr: intra ,auth: pwd ,title: 'allow etl offline tasks from intranet',order:650}
pg_hba_rules
PostgreSQL cluster/instance-level additional HBA rules, can be overridden at cluster or instance level, merged with default rules and sorted by order.
Pgbouncer global default HBA rule list, usually defined in all.vars.
Type: rule[]
Level: Global (G)
Default: See below
pgb_default_hba_rules:- {user:'${dbsu}',db: pgbouncer ,addr: local ,auth: peer ,title: 'dbsu local admin access with os ident',order:100}- {user: 'all' ,db: all ,addr: localhost ,auth: pwd ,title: 'allow all user local access with pwd' ,order:150}- {user:'${monitor}',db: pgbouncer ,addr: intra ,auth: pwd ,title: 'monitor access via intranet with pwd' ,order:200}- {user:'${monitor}',db: all ,addr: world ,auth: deny ,title: 'reject all other monitor access addr' ,order:250}- {user:'${admin}',db: all ,addr: intra ,auth: pwd ,title: 'admin access via intranet with pwd' ,order:300}- {user:'${admin}',db: all ,addr: world ,auth: deny ,title: 'reject all other admin access addr' ,order:350}- {user: 'all' ,db: all ,addr: intra ,auth: pwd ,title: 'allow all user intra access with pwd' ,order:400}
The role field in HBA rules controls which instances the rule applies to:
Role
Description
common
Default, applies to all instances
primary
Primary instance only
replica
Replica instance only
offline
Offline instance only (pg_role: offline or pg_offline_query: true)
standby
Standby instance
delayed
Delayed replica instance
Role filtering matches based on instance’s pg_role variable. Non-matching rules are commented out (prefixed with #).
pg_hba_rules:# Only applies on primary- {user: writer, db: all, addr: intra, auth: pwd, role: primary, title:'writer only on primary'}# Only applies on offline instances- {user: '+dbrole_offline', db: all, addr: '172.20.0.0/16', auth: ssl, role: offline, title:'offline dedicated'}
Order Sorting
PostgreSQL HBA is first-match-wins, rule order is critical. Pigsty controls rule rendering order via the order field.
Order Interval Convention
Interval
Usage
0 - 99
User high-priority rules (before all default rules)
100 - 650
Default rule zone (spaced by 50 for easy insertion)
1000+
User rule default (rules without order append to end)
Default Rule Order Assignment
PostgreSQL Default Rules:
Order
Rule Description
100
dbsu local ident
150
dbsu replication local
200
replicator localhost
250
replicator intra replication
300
replicator intra postgres
350
monitor localhost
400
monitor infra
450
admin infra ssl
500
admin world ssl
550
dbrole_readonly localhost
600
dbrole_readonly intra
650
dbrole_offline intra
Pgbouncer Default Rules:
Order
Rule Description
100
dbsu local peer
150
all localhost pwd
200
monitor pgbouncer intra
250
monitor world deny
300
admin intra pwd
350
admin world deny
400
all intra pwd
Sorting Example
pg_hba_rules:# order: 0, before all default rules (blacklist)- {user: all, db: all, addr: '10.1.1.100/32', auth: deny, order: 0, title:'blacklist bad ip'}# order: 120, between dbsu(100) and replicator(200)- {user: auditor, db: all, addr: local, auth: ident, order: 120, title:'auditor access'}# order: 420, between monitor(400) and admin(450)- {user: exporter, db: all, addr: infra, auth: pwd, order: 420, title:'prometheus exporter'}# no order, defaults to 1000, appends after all default rules- {user: app_user, db: app_db, addr: intra, auth: pwd, title:'app user access'}
pg_hba_rules:- title:allow intranet password accessrole:commonrules:- host all all 10.0.0.0/8 scram-sha-256- host all all 172.16.0.0/12 scram-sha-256- host all all 192.168.0.0/16 scram-sha-256
Rendered result:
# allow intranet password access [common]
host all all 10.0.0.0/8 scram-sha-256
host all all 172.16.0.0/12 scram-sha-256
host all all 192.168.0.0/16 scram-sha-256
Default role system and privilege model provided by Pigsty
Access control is determined by the combination of “role system + privilege templates + HBA”. This section focuses on how to declare roles and object privileges through configuration parameters.
Pigsty provides a streamlined ACL model, fully described by the following parameters:
pg_default_roles: System roles and system users.
pg_users: Business users and roles.
pg_default_privileges: Default privileges for objects created by administrators/owners.
pg_revoke_public, pg_default_schemas, pg_default_extensions: Control the default behavior of template1.
After understanding these parameters, you can write fully reproducible privilege configurations.
Default Role System (pg_default_roles)
By default, it includes 4 business roles + 4 system users:
Name
Type
Description
dbrole_readonly
NOLOGIN
Shared by all business, has SELECT/USAGE
dbrole_readwrite
NOLOGIN
Inherits read-only role, with INSERT/UPDATE/DELETE
dbrole_admin
NOLOGIN
Inherits pg_monitor + read-write role, can create objects and triggers
dbrole_offline
NOLOGIN
Restricted read-only role, only allowed to access offline instances
postgres
User
System superuser, same as pg_dbsu
replicator
User
Used for streaming replication and backup, inherits monitoring and read-only privileges
dbuser_dba
User
Primary admin account, also synced to pgbouncer
dbuser_monitor
User
Monitoring account, has pg_monitor privilege, records slow SQL by default
These definitions are in pg_default_roles. They can theoretically be customized, but if you replace names, you must synchronize updates in HBA/ACL/script references.
Example: Add an additional dbrole_etl for offline tasks:
Effect: All users inheriting dbrole_admin automatically have dbrole_etl privileges, can access offline instances and execute ETL.
Default Users and Credential Parameters
System user usernames/passwords are controlled by the following parameters:
Parameter
Default Value
Purpose
pg_dbsu
postgres
Database/system superuser
pg_dbsu_password
Empty string
dbsu password (disabled by default)
pg_replication_username
replicator
Replication username
pg_replication_password
DBUser.Replicator
Replication user password
pg_admin_username
dbuser_dba
Admin username
pg_admin_password
DBUser.DBA
Admin password
pg_monitor_username
dbuser_monitor
Monitoring user
pg_monitor_password
DBUser.Monitor
Monitoring user password
If you modify these parameters, please synchronize updates to the corresponding user definitions in pg_default_roles to avoid role attribute inconsistencies.
Business Roles and Authorization (pg_users)
Business users are declared through pg_users (see User Configuration for detailed fields), where the roles field controls the granted business roles.
Example: Create one read-only and one read-write user:
By inheriting dbrole_* to control access privileges, no need to GRANT for each database separately. Combined with pg_hba_rules, you can distinguish access sources.
For finer-grained ACL, you can use standard GRANT/REVOKE in baseline SQL or subsequent playbooks. Pigsty won’t prevent you from granting additional privileges.
pg_default_privileges will set DEFAULT PRIVILEGE on postgres, dbuser_dba, dbrole_admin (after business admin SET ROLE). The default template is as follows:
pg_default_privileges:- GRANT USAGE ON SCHEMAS TO dbrole_readonly- GRANT SELECT ON TABLES TO dbrole_readonly- GRANT SELECT ON SEQUENCES TO dbrole_readonly- GRANT EXECUTE ON FUNCTIONS TO dbrole_readonly- GRANT USAGE ON SCHEMAS TO dbrole_offline- GRANT SELECT ON TABLES TO dbrole_offline- GRANT SELECT ON SEQUENCES TO dbrole_offline- GRANT EXECUTE ON FUNCTIONS TO dbrole_offline- GRANT INSERT ON TABLES TO dbrole_readwrite- GRANT UPDATE ON TABLES TO dbrole_readwrite- GRANT DELETE ON TABLES TO dbrole_readwrite- GRANT USAGE ON SEQUENCES TO dbrole_readwrite- GRANT UPDATE ON SEQUENCES TO dbrole_readwrite- GRANT TRUNCATE ON TABLES TO dbrole_admin- GRANT REFERENCES ON TABLES TO dbrole_admin- GRANT TRIGGER ON TABLES TO dbrole_admin- GRANT CREATE ON SCHEMAS TO dbrole_admin
As long as objects are created by the above administrators, they will automatically carry the corresponding privileges without manual GRANT. If business needs a custom template, simply replace this array.
Additional notes:
pg_revoke_public defaults to true, meaning automatic revocation of PUBLIC’s CREATE privilege on databases and the public schema.
pg_default_schemas and pg_default_extensions control pre-created schemas/extensions in template1/postgres, typically used for monitoring objects (monitor schema, pg_stat_statements, etc.).
Effect: Partner account only has default read-only privileges after login, and can only access the analytics database via TLS from the specified network segment.
Business administrators can inherit the default DDL privilege template by SET ROLE dbrole_admin or logging in directly as app_admin.
Customize Default Privileges
pg_default_privileges:- GRANT INSERT,UPDATE,DELETE ON TABLES TO dbrole_admin- GRANT SELECT,UPDATE ON SEQUENCES TO dbrole_admin- GRANT SELECT ON TABLES TO reporting_group
After replacing the default template, all objects created by administrators will carry the new privilege definitions, avoiding per-object authorization.
Coordination with Other Components
HBA Rules: Use pg_hba_rules to bind roles with sources (e.g., only allow dbrole_offline to access offline instances).
Pgbouncer: Users with pgbouncer: true will be written to userlist.txt, and pool_mode/pool_connlimit can control connection pool-level quotas.
Grafana/Monitoring: dbuser_monitor’s privileges come from pg_default_roles. If you add a new monitoring user, remember to grant pg_monitor + access to the monitor schema.
Through these parameters, you can version the privilege system along with code, truly achieving “configuration as policy”.
10.4 - Service/Access
Split read and write operations, route traffic correctly, and reliably deliver PostgreSQL cluster capabilities.
Split read and write operations, route traffic correctly, and reliably deliver PostgreSQL cluster capabilities.
Service is an abstraction: it is the form in which database clusters provide capabilities externally, encapsulating the details of the underlying cluster.
Service is critical for stable access in production environments, showing its value during high availability cluster automatic failovers. Personal users typically don’t need to worry about this concept.
Personal User
The concept of “service” is for production environments. Personal users/single-machine clusters can skip the complexity and directly access the database using instance names/IP addresses.
For example, Pigsty’s default single-node pg-meta.meta database can be directly connected using three different users:
psql postgres://dbuser_dba:[email protected]/meta # Direct connection with DBA superuserpsql postgres://dbuser_meta:[email protected]/meta # Connect with default business admin userpsql postgres://dbuser_view:DBUser.View@pg-meta/meta # Connect with default read-only user via instance domain name
Service Overview
In real-world production environments, we use primary-replica database clusters based on replication. Within the cluster, there is one and only one instance as the leader (primary) that can accept writes.
Other instances (replicas) continuously fetch change logs from the cluster leader to stay synchronized. Additionally, replicas can handle read-only requests, significantly offloading the primary in read-heavy, write-light scenarios.
Therefore, distinguishing between write requests and read-only requests to the cluster is a very common practice.
Moreover, for production environments with high-frequency short connections, we pool requests through connection pooling middleware (Pgbouncer) to reduce the overhead of connection and backend process creation. But for scenarios like ETL and change execution, we need to bypass the connection pool and directly access the database.
At the same time, high-availability clusters may experience failover during failures, which causes a change in the cluster leader. Therefore, high-availability database solutions require write traffic to automatically adapt to cluster leader changes.
These different access requirements (read-write separation, pooling vs. direct connection, automatic adaptation to failovers) ultimately abstract the concept of Service.
Typically, database clusters must provide this most basic service:
Read-write service (primary): Can read and write to the database
For production database clusters, at least these two services should be provided:
Read-write service (primary): Write data: Only carried by the primary.
Read-only service (replica): Read data: Can be carried by replicas, but can also be carried by the primary if no replicas are available
Additionally, depending on specific business scenarios, there might be other services, such as:
Default direct access service (default): Service that allows (admin) users to bypass the connection pool and directly access the database
Offline replica service (offline): Dedicated replica that doesn’t handle online read-only traffic, used for ETL and analytical queries
Synchronous replica service (standby): Read-only service with no replication delay, handled by synchronous standby/primary for read-only queries
Delayed replica service (delayed): Access older data from the same cluster from a certain time ago, handled by delayed replicas
Default Service
Pigsty provides four different services by default for each PostgreSQL database cluster. Here are the default services and their definitions:
Taking the default pg-meta cluster as an example, it provides four default services:
psql postgres://dbuser_meta:DBUser.Meta@pg-meta:5433/meta # pg-meta-primary : production read-write via primary pgbouncer(6432)psql postgres://dbuser_meta:DBUser.Meta@pg-meta:5434/meta # pg-meta-replica : production read-only via replica pgbouncer(6432)psql postgres://dbuser_dba:DBUser.DBA@pg-meta:5436/meta # pg-meta-default : direct connection via primary postgres(5432)psql postgres://dbuser_stats:DBUser.Stats@pg-meta:5438/meta # pg-meta-offline : direct connection via offline postgres(5432)
From the sample cluster architecture diagram, you can see how these four services work:
Note that the pg-meta domain name points to the cluster’s L2 VIP, which in turn points to the haproxy load balancer on the cluster primary, responsible for routing traffic to different instances. See Access Service for details.
Service Implementation
In Pigsty, services are implemented using haproxy on nodes, differentiated by different ports on the host node.
Haproxy is enabled by default on every node managed by Pigsty to expose services, and database nodes are no exception.
Although nodes in the cluster have primary-replica distinctions from the database perspective, from the service perspective, all nodes are the same:
This means even if you access a replica node, as long as you use the correct service port, you can still use the primary’s read-write service.
This design seals the complexity: as long as you can access any instance on the PostgreSQL cluster, you can fully access all services.
This design is similar to the NodePort service in Kubernetes. Similarly, in Pigsty, every service includes these two core elements:
Access endpoints exposed via NodePort (port number, from where to access?)
Target instances chosen through Selectors (list of instances, who will handle it?)
The boundary of Pigsty’s service delivery stops at the cluster’s HAProxy. Users can access these load balancers in various ways. Please refer to Access Service.
All services are declared through configuration files. For instance, the default PostgreSQL service is defined by the pg_default_services parameter:
You can also define additional services in pg_services. Both pg_default_services and pg_services are arrays of Service Definition objects.
Define Service
Pigsty allows you to define your own services:
pg_default_services: Services uniformly exposed by all PostgreSQL clusters, with four by default.
pg_services: Additional PostgreSQL services, can be defined at global or cluster level as needed.
haproxy_services: Directly customize HAProxy service content, can be used for other component access
For PostgreSQL clusters, you typically only need to focus on the first two.
Each service definition will generate a new configuration file in the configuration directory of all related HAProxy instances: /etc/haproxy/<svcname>.cfg
Here’s a custom service example standby: When you want to provide a read-only service with no replication delay, you can add this record in pg_services:
- name: standby # required, service name, the actual svc name will be prefixed with `pg_cluster`, e.g:pg-meta-standbyport:5435# required, service exposed port (work as kubernetes service node port mode)ip:"*"# optional, service bind ip address, `*` for all ip by defaultselector:"[]"# required, service member selector, use JMESPath to filter inventorybackup:"[? pg_role == `primary`]"# optional, backup server selector, these instances will only be used when default selector instances are all downdest:default # optional, destination port, default|postgres|pgbouncer|<port_number>, 'default' by default, which means use pg_default_service_dest valuecheck: /sync # optional, health check url path, / by default, here using Patroni API:/sync, only sync standby and primary will return 200 healthy statusmaxconn:5000# optional, max allowed front-end connection, default 5000balance: roundrobin # optional, haproxy load balance algorithm (roundrobin by default, other options:leastconn)options:'inter 3s fastinter 1s downinter 5s rise 3 fall 3 on-marked-down shutdown-sessions slowstart 30s maxconn 3000 maxqueue 128 weight 100'
The service definition above will be translated to a haproxy config file /etc/haproxy/pg-test-standby.conf on the sample three-node pg-test:
#---------------------------------------------------------------------# service: pg-test-standby @ 10.10.10.11:5435#---------------------------------------------------------------------# service instances 10.10.10.11, 10.10.10.13, 10.10.10.12# service backups 10.10.10.11listen pg-test-standbybind *:5435 # <--- Binds to port 5435 on all IP addressesmode tcp # <--- Load balancer works on TCP protocolmaxconn 5000 # <--- Max connections 5000, can be increased as neededbalance roundrobin # <--- Load balance algorithm is rr round-robin, can also use leastconnoption httpchk # <--- Enable HTTP health checkoption http-keep-alive# <--- Keep HTTP connectionshttp-check send meth OPTIONS uri /sync # <---- Using /sync here, Patroni health check API, only sync standby and primary will return 200 healthy statushttp-check expect status 200 # <---- Health check return code 200 means healthydefault-server inter 3s fastinter 1s downinter 5s rise 3 fall 3 on-marked-down shutdown-sessions slowstart 30s maxconn 3000 maxqueue 128 weight 100# servers: All three instances of pg-test cluster are selected by selector: "[]", as there are no filtering conditions, they will all be backend servers for pg-test-replica service. But due to /sync health check, only primary and sync standby can actually serve requests.server pg-test-1 10.10.10.11:6432 check port 8008 weight 100 backup # <----- Only primary satisfies condition pg_role == `primary`, selected by backup selector.server pg-test-3 10.10.10.13:6432 check port 8008 weight 100 # Therefore acts as fallback instance:normally doesn't serve requests, only serves read-only requests after all other replicas are down, maximizing avoidance of read-write service being affected by read-only serviceserver pg-test-2 10.10.10.12:6432 check port 8008 weight 100 #
Here, all three instances of the pg-test cluster are selected by selector: "[]" and rendered into the backend server list of the pg-test-replica service. But due to the /sync health check, the Patroni Rest API only returns HTTP 200 status code representing healthy on the primary and synchronous standby, so only the primary and sync standby can actually serve requests.
Additionally, the primary satisfies the condition pg_role == primary and is selected by the backup selector, marked as a backup server, and will only be used when no other instances (i.e., sync standby) can satisfy the requirement.
Primary Service
The Primary service is probably the most critical service in production environments. It provides read-write capability to the database cluster on port 5433, with the service definition as follows:
The selector parameter selector: "[]" means all cluster members will be included in the Primary service
But only the primary can pass the health check (check: /primary), actually serving Primary service traffic.
The destination parameter dest: default means the Primary service destination is affected by the pg_default_service_dest parameter
The default value of dest is default which will be replaced with the value of pg_default_service_dest, defaulting to pgbouncer.
By default, the Primary service destination is the connection pool on the primary, i.e., the port specified by pgbouncer_port, defaulting to 6432
If the value of pg_default_service_dest is postgres, then the primary service destination will bypass the connection pool and directly use the PostgreSQL database port (pg_port, default value 5432), which is very useful for scenarios where you don’t want to use a connection pool.
Example: pg-test-primary haproxy configuration
listen pg-test-primarybind *:5433 # <--- primary service defaults to port 5433mode tcpmaxconn 5000balance roundrobinoption httpchkoption http-keep-alivehttp-check send meth OPTIONS uri /primary# <--- primary service defaults to using Patroni RestAPI /primary health checkhttp-check expect status 200default-server inter 3s fastinter 1s downinter 5s rise 3 fall 3 on-marked-down shutdown-sessions slowstart 30s maxconn 3000 maxqueue 128 weight 100# serversserver pg-test-1 10.10.10.11:6432 check port 8008 weight 100server pg-test-3 10.10.10.13:6432 check port 8008 weight 100server pg-test-2 10.10.10.12:6432 check port 8008 weight 100
Patroni’s high availability mechanism ensures that at most one instance’s /primary health check is true at any time, so the Primary service will always route traffic to the primary instance.
One benefit of using the Primary service instead of directly connecting to the database is that if the cluster experiences a split-brain situation (for example, killing the primary Patroni with kill -9 without watchdog), Haproxy can still avoid split-brain in this situation, because it only distributes traffic when Patroni is alive and returns primary status.
Replica Service
The Replica service is second only to the Primary service in importance in production environments. It provides read-only capability to the database cluster on port 5434, with the service definition as follows:
The selector parameter selector: "[]" means all cluster members will be included in the Replica service
All instances can pass the health check (check: /read-only), serving Replica service traffic.
Backup selector: [? pg_role == 'primary' || pg_role == 'offline' ] marks the primary and offline replicas as backup servers.
Only when all regular replicas are down will the Replica service be served by the primary or offline replicas.
The destination parameter dest: default means the Replica service destination is also affected by the pg_default_service_dest parameter
The default value of dest is default which will be replaced with the value of pg_default_service_dest, defaulting to pgbouncer, same as the Primary service
By default, the Replica service destination is the connection pool on replicas, i.e., the port specified by pgbouncer_port, defaulting to 6432
Example: pg-test-replica haproxy configuration
listen pg-test-replicabind *:5434mode tcpmaxconn 5000balance roundrobinoption httpchkoption http-keep-alivehttp-check send meth OPTIONS uri /read-onlyhttp-check expect status 200default-server inter 3s fastinter 1s downinter 5s rise 3 fall 3 on-marked-down shutdown-sessions slowstart 30s maxconn 3000 maxqueue 128 weight 100# serversserver pg-test-1 10.10.10.11:6432 check port 8008 weight 100 backupserver pg-test-3 10.10.10.13:6432 check port 8008 weight 100server pg-test-2 10.10.10.12:6432 check port 8008 weight 100
The Replica service is very flexible: If there are living dedicated Replica instances, it will prioritize using these instances to serve read-only requests. Only when all replica instances are down will the primary serve as a fallback for read-only requests. For the common one-primary-one-replica two-node cluster: use the replica as long as it’s alive, use the primary only when the replica is down.
Additionally, unless all dedicated read-only instances are down, the Replica service will not use dedicated Offline instances, thus avoiding mixing online fast queries with offline slow queries and their mutual interference.
Default Service
The Default service provides service on port 5436, and it’s a variant of the Primary service.
The Default service always bypasses the connection pool and directly connects to PostgreSQL on the primary, which is useful for admin connections, ETL writes, CDC change data capture, etc.
If pg_default_service_dest is changed to postgres, then the Default service is completely equivalent to the Primary service except for port and name. In this case, you can consider removing Default from default services.
Example: pg-test-default haproxy configuration
listen pg-test-defaultbind *:5436 # <--- Except for listening port/target port and service name, other configurations are the same as primary servicemode tcpmaxconn 5000balance roundrobinoption httpchkoption http-keep-alivehttp-check send meth OPTIONS uri /primaryhttp-check expect status 200default-server inter 3s fastinter 1s downinter 5s rise 3 fall 3 on-marked-down shutdown-sessions slowstart 30s maxconn 3000 maxqueue 128 weight 100# serversserver pg-test-1 10.10.10.11:5432 check port 8008 weight 100server pg-test-3 10.10.10.13:5432 check port 8008 weight 100server pg-test-2 10.10.10.12:5432 check port 8008 weight 100
Offline Service
The Offline service provides service on port 5438, and it also bypasses the connection pool to directly access PostgreSQL database, typically used for slow queries/analytical queries/ETL reads/personal user interactive queries, with service definition as follows:
The selector parameter filters two types of instances from the cluster: offline replicas with pg_role = offline, or regular read-only instances marked with pg_offline_query = true
The main difference between dedicated offline replicas and marked regular replicas is: the former doesn’t serve Replica service requests by default, avoiding mixing fast and slow queries, while the latter does serve by default.
The backup selector parameter filters one type of instance from the cluster: regular replicas without the offline mark, which means if offline instances or marked regular replicas are down, other regular replicas can be used to serve Offline service.
Health check /replica only returns 200 for replicas, primary returns error, so Offline service will never distribute traffic to the primary instance, even if only the primary remains in the cluster.
At the same time, the primary instance is neither selected by the selector nor by the backup selector, so it will never serve Offline service. Therefore, Offline service can always avoid users accessing the primary, thus avoiding impact on the primary.
Example: pg-test-offline haproxy configuration
listen pg-test-offlinebind *:5438mode tcpmaxconn 5000balance roundrobinoption httpchkoption http-keep-alivehttp-check send meth OPTIONS uri /replicahttp-check expect status 200default-server inter 3s fastinter 1s downinter 5s rise 3 fall 3 on-marked-down shutdown-sessions slowstart 30s maxconn 3000 maxqueue 128 weight 100# serversserver pg-test-3 10.10.10.13:5432 check port 8008 weight 100server pg-test-2 10.10.10.12:5432 check port 8008 weight 100 backup
The Offline service provides restricted read-only service, typically used for two types of queries: interactive queries (personal users), slow queries and long transactions (analytics/ETL).
The Offline service requires extra maintenance care: When the cluster undergoes primary-replica switchover or automatic failover, the instance roles will change, but Haproxy configuration won’t automatically change. For clusters with multiple replicas, this is usually not a problem.
However, for streamlined small clusters with one-primary-one-replica where the replica runs Offline queries, primary-replica switchover means the replica becomes primary (health check fails), and the original primary becomes replica (not in Offline backend list), so no instance can serve Offline service, requiring manual reload service to make changes effective.
If your business model is relatively simple, you can consider removing Default service and Offline service, using Primary service and Replica service to directly connect to the database.
Reload Service
When cluster membership changes, such as adding/removing replicas, switchover/failover, or adjusting relative weights, you need to reload service to make the changes take effect.
bin/pgsql-svc <cls> [ip...]# reload service for lb cluster or lb instance# ./pgsql.yml -t pg_service # the actual ansible task to reload service
Access Service
The boundary of Pigsty’s service delivery stops at the cluster’s HAProxy. Users can access these load balancers in various ways.
The typical approach is to use DNS or VIP access, binding to all or any number of load balancers in the cluster.
You can use different host & port combinations, which provide PostgreSQL services in different ways.
Host
Type
Example
Description
Cluster Domain Name
pg-test
Access via cluster domain name (resolved by dnsmasq @ infra nodes)
Cluster VIP Address
10.10.10.3
Access via L2 VIP address managed by vip-manager, bound to primary
Instance Hostname
pg-test-1
Access via any instance hostname (resolved by dnsmasq @ infra nodes)
Instance IP Address
10.10.10.11
Access any instance IP address
Port
Pigsty uses different ports to distinguish pg services
Port
Service
Type
Description
5432
postgres
database
Direct access to postgres server
6432
pgbouncer
middleware
Go through connection pool middleware before postgres
5433
primary
service
Access primary pgbouncer (or postgres)
5434
replica
service
Access replica pgbouncer (or postgres)
5436
default
service
Access primary postgres
5438
offline
service
Access offline postgres
Combinations
# Access via cluster domainpostgres://test@pg-test:5432/test # DNS -> L2 VIP -> primary direct connectionpostgres://test@pg-test:6432/test # DNS -> L2 VIP -> primary connection pool -> primarypostgres://test@pg-test:5433/test # DNS -> L2 VIP -> HAProxy -> Primary Connection Pool -> Primarypostgres://test@pg-test:5434/test # DNS -> L2 VIP -> HAProxy -> Replica Connection Pool -> Replicapostgres://dbuser_dba@pg-test:5436/test # DNS -> L2 VIP -> HAProxy -> Primary direct connection (for Admin)postgres://dbuser_stats@pg-test:5438/test # DNS -> L2 VIP -> HAProxy -> offline direct connection (for ETL/personal queries)# Direct access via cluster VIPpostgres://[email protected]:5432/test # L2 VIP -> Primary direct accesspostgres://[email protected]:6432/test # L2 VIP -> Primary Connection Pool -> Primarypostgres://[email protected]:5433/test # L2 VIP -> HAProxy -> Primary Connection Pool -> Primarypostgres://[email protected]:5434/test # L2 VIP -> HAProxy -> Replica Connection Pool -> Replicapostgres://[email protected]:5436/test # L2 VIP -> HAProxy -> Primary direct connection (for Admin)postgres://[email protected]::5438/test # L2 VIP -> HAProxy -> offline direct connect (for ETL/personal queries)# Specify any cluster instance name directlypostgres://test@pg-test-1:5432/test # DNS -> Database Instance Direct Connect (singleton access)postgres://test@pg-test-1:6432/test # DNS -> connection pool -> databasepostgres://test@pg-test-1:5433/test # DNS -> HAProxy -> connection pool -> database read/writepostgres://test@pg-test-1:5434/test # DNS -> HAProxy -> connection pool -> database read-onlypostgres://dbuser_dba@pg-test-1:5436/test # DNS -> HAProxy -> database direct connectpostgres://dbuser_stats@pg-test-1:5438/test # DNS -> HAProxy -> database offline read/write# Directly specify any cluster instance IP accesspostgres://[email protected]:5432/test # Database instance direct connection (directly specify instance, no automatic traffic distribution)postgres://[email protected]:6432/test # Connection Pool -> Databasepostgres://[email protected]:5433/test # HAProxy -> connection pool -> database read/writepostgres://[email protected]:5434/test # HAProxy -> connection pool -> database read-onlypostgres://[email protected]:5436/test # HAProxy -> Database Direct Connectionspostgres://[email protected]:5438/test # HAProxy -> database offline read-write# Smart client automatic read/write separationpostgres://[email protected]:6432,10.10.10.12:6432,10.10.10.13:6432/test?target_session_attrs=primary
postgres://[email protected]:6432,10.10.10.12:6432,10.10.10.13:6432/test?target_session_attrs=prefer-standby
Override Service
You can override the default service configuration in several ways. A common requirement is to have Primary service and Replica service bypass Pgbouncer connection pool and directly access PostgreSQL database.
To achieve this, you can change pg_default_service_dest to postgres, so all services with svc.dest='default' in the service definition will use postgres instead of the default pgbouncer as the target.
If you don’t need to distinguish between personal interactive queries and analytics/ETL slow queries, you can consider removing the Offline service from the default service list pg_default_services.
If you don’t need read-only replicas to share online read-only traffic, you can also remove Replica service from the default service list.
Delegate Service
Pigsty exposes PostgreSQL services with haproxy on nodes. All haproxy instances in the cluster are configured with the same service definition.
However, you can delegate pg service to a specific node group (e.g., dedicated haproxy lb cluster) rather than haproxy on PostgreSQL cluster members.
For example, this configuration will expose pg cluster primary service on haproxy node group proxy with port 10013.
pg_service_provider:proxy # use load balancer on group `proxy` with port 10013pg_default_services:[{name: primary ,port: 10013 ,dest: postgres ,check: /primary ,selector:"[]"}]
It’s user’s responsibility to make sure each delegate service port is unique among the proxy cluster.
A dedicated load balancer cluster example is provided in the 43-node production environment simulation sandbox: prod.yml
10.5 - Access Control
Default role system and privilege model provided by Pigsty
Access control is crucial, yet many users struggle to implement it properly. Therefore, Pigsty provides a streamlined, battery-included access control model to provide a safety net for your cluster security.
Read-Only (dbrole_readonly): Role for global read-only access. If other business applications need read-only access to this database, they can use this role.
Read-Write (dbrole_readwrite): Role for global read-write access, the primary business production account should have database read-write privileges.
Admin (dbrole_admin): Role with DDL privileges, typically used for business administrators or scenarios requiring table creation in applications (such as various business software).
Offline (dbrole_offline): Restricted read-only access role (can only access offline instances, typically for personal users and ETL tool accounts).
Default roles are defined in pg_default_roles. Unless you really know what you’re doing, it’s recommended not to change the default role names.
- {name: dbrole_readonly , login: false , comment:role for global read-only access } # production read-only role- {name: dbrole_offline , login: false , comment:role for restricted read-only access (offline instance) } # restricted read-only role- {name: dbrole_readwrite , login: false , roles: [dbrole_readonly], comment:role for global read-write access } # production read-write role- {name: dbrole_admin , login: false , roles: [pg_monitor, dbrole_readwrite] , comment:role for object creation }# production DDL change role
Default Users
Pigsty also has four default users (system users):
Superuser (postgres), the owner and creator of the cluster, same name as the OS dbsu.
Replication user (replicator), the system user used for primary-replica replication.
Monitor user (dbuser_monitor), a user used to monitor database and connection pool metrics.
Admin user (dbuser_dba), the admin user who performs daily operations and database changes.
The usernames/passwords for these 4 default users are defined through 4 pairs of dedicated parameters, referenced in many places:
pg_dbsu: OS dbsu name, defaults to postgres, better not to change it
pg_dbsu_password: dbsu password, empty string by default means no password is set for dbsu, best not to set it.
Remember to change these passwords in production deployment! Do not use the default values!
pg_dbsu:postgres # database superuser name, better not to change this username.pg_dbsu_password:''# database superuser password, it's recommended to leave this empty! Disable dbsu password login.pg_replication_username:replicator # system replication usernamepg_replication_password:DBUser.Replicator # system replication password, must change this password!pg_monitor_username:dbuser_monitor # system monitor usernamepg_monitor_password:DBUser.Monitor # system monitor password, must change this password!pg_admin_username:dbuser_dba # system admin usernamepg_admin_password:DBUser.DBA # system admin password, must change this password!
Pigsty has a battery-included privilege model that works with default roles.
All users have access to all schemas.
Read-Only users (dbrole_readonly) can read from all tables. (SELECT, EXECUTE)
Read-Write users (dbrole_readwrite) can write to all tables and run DML. (INSERT, UPDATE, DELETE).
Admin users (dbrole_admin) can create objects and run DDL (CREATE, USAGE, TRUNCATE, REFERENCES, TRIGGER).
Offline users (dbrole_offline) are similar to read-only users but with restricted access, only allowed to access offline instances (pg_role = 'offline' or pg_offline_query = true)
Objects created by admin users will have correct privileges.
Default privileges are configured on all databases, including template databases.
Database connect privileges are managed by database definitions.
The CREATE privilege on database and public schema is revoked from PUBLIC by default.
Object Privileges
Default privileges for newly created objects in the database are controlled by the parameter pg_default_privileges:
- GRANT USAGE ON SCHEMAS TO dbrole_readonly- GRANT SELECT ON TABLES TO dbrole_readonly- GRANT SELECT ON SEQUENCES TO dbrole_readonly- GRANT EXECUTE ON FUNCTIONS TO dbrole_readonly- GRANT USAGE ON SCHEMAS TO dbrole_offline- GRANT SELECT ON TABLES TO dbrole_offline- GRANT SELECT ON SEQUENCES TO dbrole_offline- GRANT EXECUTE ON FUNCTIONS TO dbrole_offline- GRANT INSERT ON TABLES TO dbrole_readwrite- GRANT UPDATE ON TABLES TO dbrole_readwrite- GRANT DELETE ON TABLES TO dbrole_readwrite- GRANT USAGE ON SEQUENCES TO dbrole_readwrite- GRANT UPDATE ON SEQUENCES TO dbrole_readwrite- GRANT TRUNCATE ON TABLES TO dbrole_admin- GRANT REFERENCES ON TABLES TO dbrole_admin- GRANT TRIGGER ON TABLES TO dbrole_admin- GRANT CREATE ON SCHEMAS TO dbrole_admin
Objects newly created by admin users will have the above privileges by default. Use \ddp+ to view these default privileges:
Type
Access privileges
function
=X
dbrole_readonly=X
dbrole_offline=X
dbrole_admin=X
schema
dbrole_readonly=U
dbrole_offline=U
dbrole_admin=UC
sequence
dbrole_readonly=r
dbrole_offline=r
dbrole_readwrite=wU
dbrole_admin=rwU
table
dbrole_readonly=r
dbrole_offline=r
dbrole_readwrite=awd
dbrole_admin=arwdDxt
Default Privileges
ALTER DEFAULT PRIVILEGES allows you to set the privileges that will be applied to objects created in the future. It does not affect privileges assigned to already-existing objects, nor objects created by non-admin users.
In Pigsty, default privileges are defined for three roles:
{%forprivinpg_default_privileges%}ALTERDEFAULTPRIVILEGESFORROLE{{pg_dbsu}}{{priv}};{%endfor%}{%forprivinpg_default_privileges%}ALTERDEFAULTPRIVILEGESFORROLE{{pg_admin_username}}{{priv}};{%endfor%}-- For other business administrators, they should execute SET ROLE dbrole_admin before running DDL to use the corresponding default privilege configuration.
{%forprivinpg_default_privileges%}ALTERDEFAULTPRIVILEGESFORROLE"dbrole_admin"{{priv}};{%endfor%}
These contents will be used by the PG cluster initialization template pg-init-template.sql, rendered and output to /pg/tmp/pg-init-template.sql during cluster initialization.
This command will be executed on template1 and postgres databases, and newly created databases will inherit these default privilege configurations through template template1.
That is to say, to maintain correct object privileges, you must run DDL with admin users, which could be:
Business admin users granted with dbrole_admin role (switch to dbrole_admin identity via SET ROLE)
It’s wise to use postgres as the global object owner. If you wish to create objects with business admin user, you must use SET ROLE dbrole_admin before running DDL to maintain correct privileges.
Of course, you can also explicitly grant default privileges to business admins in the database with ALTER DEFAULT PRIVILEGE FOR ROLE <some_biz_admin> XXX.
There are 3 database-level privileges: CONNECT, CREATE, TEMP, and a special ‘privilege’: OWNERSHIP.
- name:meta # required, `name` is the only mandatory field in database definitionowner:postgres # optional, database owner, defaults to postgresallowconn:true# optional, allow connection, true by default. false will completely disable connection to this databaserevokeconn:false# optional, revoke public connection privilege. false by default, when set to true, CONNECT privilege will be revoked from users other than owner and admin
If owner parameter exists, it will be used as the database owner instead of the default {{ pg_dbsu }} (usually postgres)
If revokeconn is false, all users have the database’s CONNECT privilege, this is the default behavior.
If revokeconn is explicitly set to true:
The database’s CONNECT privilege will be revoked from PUBLIC: ordinary users cannot connect to this database
CONNECT privilege will be explicitly granted to {{ pg_replication_username }}, {{ pg_monitor_username }} and {{ pg_admin_username }}
CONNECT privilege will be granted to the database owner with GRANT OPTION, the database owner can then grant connection privileges to other users.
The revokeconn option can be used to isolate cross-database access within the same cluster. You can create different business users as owners for each database and set the revokeconn option for them.
For security considerations, Pigsty revokes the CREATE privilege on database from PUBLIC by default, and this has been the default behavior since PostgreSQL 15.
The database owner can always adjust CREATE privileges as needed based on actual requirements.
10.6 - Administration
Database administration and operation tasks
10.7 - Administration
Standard Operating Procedures (SOP) for database administration tasks
How to maintain existing PostgreSQL clusters with Pigsty?
This section provides standard operating procedures (SOP) for common PostgreSQL administration tasks:
SOP: Standard operating procedures for creating/removing clusters and instances, backup & restore, rolling upgrades, etc.
Failure: Common failure troubleshooting strategies and handling methods, such as disk exhaustion, connection exhaustion, XID wraparound, etc.
Drop: Emergency procedures for handling accidental data deletion, table drops, and database drops
Maintain: Maintenance tasks including regular inspections, post-failover cleanup, bloat management, VACUUM FREEZE, etc.
Tuning: Automatic optimization strategies and adjustment methods for memory, CPU, storage parameters, etc.
10.7.1 - Troubleshooting
Common failures and analysis troubleshooting approaches
This document lists potential failures in PostgreSQL and Pigsty, as well as SOPs for locating, handling, and analyzing issues.
Disk Space Exhausted
Disk space exhaustion is the most common type of failure.
Symptoms
When the disk space where the database resides is exhausted, PostgreSQL will not work normally and may exhibit the following symptoms: database logs repeatedly report “no space left on device” errors, new data cannot be written, and PostgreSQL may even trigger a PANIC and force shutdown.
Pigsty includes a NodeFsSpaceFull alert rule that triggers when filesystem available space is less than 10%.
Use the monitoring system’s NODE Instance panel to review the FS metrics panel to locate the issue.
Diagnosis
You can also log into the database node and use df -h to view the usage of each mounted partition to determine which partition is full.
For database nodes, focus on checking the following directories and their sizes to determine which category of files has filled up the space:
Data directory (/pg/data/base): Stores data files for tables and indexes; pay attention to heavy writes and temporary files
WAL directory (e.g., pg/data/pg_wal): Stores PG WAL; WAL accumulation/replication slot retention is a common cause of disk exhaustion.
Database log directory (e.g., pg/log): If PG logs are not rotated in time and large amounts of errors are written, they may also consume significant space.
Local backup directory (e.g., data/backups): When using pgBackRest or similar tools to save backups locally, this may also fill up the disk.
If the issue occurs on the Pigsty admin node or monitoring node, also consider:
Monitoring data: VictoriaMetrics time-series metrics and VictoriaLogs log storage both consume disk space; check retention policies.
Object storage data: Pigsty’s integrated MinIO object storage may be used for PG backup storage.
After identifying the directory consuming the most space, you can further use du -sh <directory> to drill down and find specific large files or subdirectories.
Resolution
Disk exhaustion is an emergency issue requiring immediate action to free up space and ensure the database continues to operate.
When the data disk is not separated from the system disk, a full disk may prevent shell commands from executing. In this case, you can delete the /pg/dummy placeholder file to free up a small amount of emergency space so shell commands can work again.
If the database has crashed due to pg_wal filling up, you need to restart the database service after clearing space and carefully check data integrity.
Transaction ID Wraparound
PostgreSQL cyclically uses 32-bit transaction IDs (XIDs), and when exhausted, a “transaction ID wraparound” failure occurs (XID Wraparound).
Symptoms
The typical sign in the first phase is when the age saturation in the PGSQL Persist - Age Usage panel enters the warning zone.
Database logs begin to show messages like: WARNING: database "postgres" must be vacuumed within xxxxxxxx transactions.
If the problem continues to worsen, PostgreSQL enters protection mode: when remaining transaction IDs drop to about 1 million, the database switches to read-only mode; when reaching the limit of about 2.1 billion (2^31), it refuses any new transactions and forces the server to shut down to avoid data corruption.
Diagnosis
PostgreSQL and Pigsty enable automatic garbage collection (AutoVacuum) by default, so the occurrence of this type of failure usually has deeper root causes.
Common causes include: very long transactions (SAGE), misconfigured Autovacuum, replication slot blockage, insufficient resources, storage engine/extension bugs, disk bad blocks.
First identify the database with the highest age, then use the Pigsty PGCAT Database - Tables panel to confirm the age distribution of tables.
Also review the database error logs, which usually contain clues to locate the root cause.
Resolution
Immediately freeze old transactions: If the database has not yet entered read-only protection mode, immediately execute a manual VACUUM FREEZE on the affected database. You can start by freezing the most severely aged tables one by one rather than doing the entire database at once to accelerate the effect. Connect to the database as a superuser and run VACUUM FREEZE table_name; on tables identified with the largest relfrozenxid, prioritizing tables with the highest XID age. This can quickly reclaim large amounts of transaction ID space.
Single-user mode rescue: If the database is already refusing writes or has crashed for protection, you need to start the database in single-user mode to perform freeze operations. In single-user mode, run VACUUM FREEZE database_name; to freeze and clean the entire database. After completion, restart the database in multi-user mode. This can lift the wraparound lock and make the database writable again. Be very careful when operating in single-user mode and ensure sufficient transaction ID margin to complete the freeze.
Standby node takeover: In some complex scenarios (e.g., when hardware issues prevent vacuum from completing), consider promoting a read-only standby node in the cluster to primary to obtain a relatively clean environment for handling the freeze. For example, if the primary cannot vacuum due to bad blocks, you can manually failover to promote the standby to the new primary, then perform emergency vacuum freeze on it. After ensuring the new primary has frozen old transactions, switch the load back.
Connection Exhaustion
PostgreSQL has a maximum connections configuration (max_connections). When client connections exceed this limit, new connection requests will be rejected. The typical symptom is that applications cannot connect to the database and report errors like
FATAL: remaining connection slots are reserved for non-replication superuser connections or too many clients already.
This indicates that regular connections are exhausted, leaving only slots reserved for superusers or replication.
Diagnosis
Connection exhaustion is usually caused by a large number of concurrent client requests. You can directly review the database’s current active sessions through PGCAT Instance / PGCAT Database / PGCAT Locks.
Determine what types of queries are filling the system and proceed with further handling. Pay special attention to whether there are many connections in the “Idle in Transaction” state and long-running transactions (as well as slow queries).
Resolution
Kill queries: For situations where exhaustion has already blocked business operations, typically use pg_terminate_backend(pid) immediately for emergency pressure relief.
For cases using connection pooling, you can adjust the connection pool size parameters and execute a reload to reduce the number of connections at the database level.
You can also modify the max_connections parameter to a larger value, but this parameter requires a database restart to take effect.
etcd Quota Exhausted
An exhausted etcd quota will cause the PG high availability control plane to fail and prevent configuration changes.
Diagnosis
Pigsty uses etcd as the distributed configuration store (DCS) when implementing high availability. etcd itself has a storage quota (default is about 2GB).
When etcd storage usage reaches the quota limit, etcd will refuse write operations and report “etcdserver: mvcc: database space exceeded”. In this case, Patroni cannot write heartbeats or update configuration to etcd, causing cluster management functions to fail.
Resolution
Versions between Pigsty v2.0.0 and v2.5.1 are affected by this issue by default. Pigsty v2.6.0 added auto-compaction configuration for deployed etcd. If you only use it for PG high availability leases, this issue will no longer occur in regular use cases.
Defective Storage Engine
Currently, TimescaleDB’s experimental storage engine Hypercore has been proven to have defects, with cases of VACUUM being unable to reclaim leading to XID wraparound failures.
Users using this feature should migrate to PostgreSQL native tables or TimescaleDB’s default engine promptly.
Database management: create, modify, delete, rebuild databases, and clone databases using templates
In Pigsty, database management follows an IaC (Infrastructure as Code) approach—define in the configuration inventory, then execute playbooks.
When no baseline SQL is defined, executing the pgsql-db.yml playbook is idempotent. It adjusts the specified database in the specified cluster to match the target state in the configuration inventory.
Note that some parameters can only be specified at creation time. Modifying these parameters requires deleting and recreating the database (using state: recreate to rebuild).
Define Database
Business databases are defined in the cluster parameter pg_databases, which is an array of database definition objects. Databases in the array are created in definition order, so later-defined databases can use previously-defined databases as templates.
Here’s the database definition from the default cluster pg-meta in Pigsty’s demo environment:
The only required field is name, which should be a valid and unique database name within the current PostgreSQL cluster—all other parameters have sensible defaults. For complete database definition parameter reference, see Database Configuration Reference.
Create Database
To create a new business database on an existing PostgreSQL cluster, add the database definition to all.children.<cls>.pg_databases, then execute:
We don’t recommend creating business databases manually with SQL, especially when using Pgbouncer connection pooling.
Using bin/pgsql-db automatically handles connection pool configuration and monitoring registration.
Modify Database
Modify database properties by updating the configuration and re-executing the playbook:
bin/pgsql-db <cls> <dbname> # Idempotent operation, can be executed repeatedly
Schema deletion uses the CASCADE option, which also deletes all objects within the schema (tables, views, functions, etc.).
Ensure you understand the impact before executing delete operations.
Manage Extensions
Extensions are configured via the extensions array, supporting install and uninstall operations.
Install Extensions
- name:myappextensions:# Simple form: extension name only- postgis- pg_trgm# Full form: specify schema and version- {name: vector, schema:public }- {name: pg_stat_statements, schema: monitor, version:'1.10'}
Extension uninstall uses the CASCADE option, which also drops all objects depending on that extension (views, functions, etc.).
Ensure you understand the impact before executing uninstall operations.
Delete Database
To delete a database, set its state to absent and execute the playbook:
pg_databases:- name:olddbstate:absent
bin/pgsql-db <cls> olddb
Delete operation will:
If database is marked is_template: true, first execute ALTER DATABASE ... IS_TEMPLATE false
Force drop database with DROP DATABASE ... WITH (FORCE) (PG13+)
Terminate all active connections to the database
Remove database from Pgbouncer connection pool
Unregister from Grafana data sources
Protection mechanisms:
System databases postgres, template0, template1 cannot be deleted
Delete operations only execute on the primary—streaming replication syncs to replicas automatically
Dangerous Operation Warning
Deleting a database is an irreversible operation that permanently removes all data in that database.
Before executing, ensure:
You have the latest database backup
No applications are using the database
Relevant stakeholders have been notified
Rebuild Database
The recreate state rebuilds a database, equivalent to delete then create:
pg_databases:- name:testdbstate:recreateowner:dbuser_testbaseline:test_init.sql # Execute initialization after rebuild
Automatically preserves Pgbouncer and Grafana configuration
Automatically loads baseline initialization script after execution
Clone Database
You can use an existing database as a template to create a new database, enabling quick replication of database structures.
Basic Clone
pg_databases:# 1. First define the template database- name:app_templateowner:dbuser_appschemas:[core, api]extensions:[postgis, pg_trgm]baseline:app_schema.sql# 2. Create business database using template- name:app_prodtemplate:app_templateowner:dbuser_app
Specify Clone Strategy (PG15+)
- name:app_stagingtemplate:app_templatestrategy:FILE_COPY # Or WAL_LOGowner:dbuser_app
Strategy
Description
Use Case
FILE_COPY
Direct data file copy
Large templates, general scenarios
WAL_LOG
Copy via WAL logs
Small templates, doesn’t block template connections
Use Custom Template Database
When using non-system templates (not template0/template1), Pigsty automatically terminates connections to the template database to allow cloning.
- name:new_dbtemplate:existing_db # Use existing business database as templateowner:dbuser_app
Mark as Template Database
By default, only superusers or database owners can use regular databases as templates.
Using is_template: true allows any user with CREATEDB privilege to clone:
- name:shared_templateis_template:true# Allow any user with CREATEDB privilege to cloneowner:dbuser_app
Use ICU Locale Provider
When using the icu locale provider, you must specify template: template0:
- name:myapp_icutemplate:template0 # Must use template0locale_provider:icuicu_locale:en-USencoding:UTF8
Connection Pool Config
By default, all business databases are added to the Pgbouncer connection pool.
Database-Level Connection Pool Parameters
- name:myapppgbouncer:true# Include in connection pool (default true)pool_mode: transaction # Pool mode:transaction/session/statementpool_size:64# Default pool sizepool_size_min:0# Minimum pool sizepool_reserve:32# Reserved connectionspool_connlimit:100# Maximum database connectionspool_auth_user:dbuser_meta # Auth query user
Generated Configuration
Configuration file located at /etc/pgbouncer/database.txt:
Warning: Don’t edit these files directly—they will be overwritten the next time a playbook runs. All changes should be made in pigsty.yml.
Verify HBA Rules
View Currently Active HBA Rules
# Use psql to view PostgreSQL HBA rulespsql -c "TABLE pg_hba_file_rules"# Or view the config file directlycat /pg/data/pg_hba.conf
# View Pgbouncer HBA rulescat /etc/pgbouncer/pgb_hba.conf
Check HBA Configuration Syntax
# PostgreSQL config reload (validates syntax)psql -c "SELECT pg_reload_conf()"# If there are syntax errors, check the logstail -f /pg/log/postgresql-*.log
Test Connection Authentication
# Test connection for specific user from specific addresspsql -h <host> -p 5432 -U <user> -d <database> -c "SELECT 1"# See which HBA rule matches the connectionpsql -c "SELECT * FROM pg_hba_file_rules WHERE database @> ARRAY['<dbname>']::text[]"
Common Management Scenarios
Add New HBA Rule
Edit pigsty.yml, add rule to the cluster’s pg_hba_rules:
Problem: Manual changes will be overwritten the next time an Ansible playbook runs.
Correct approach: Always modify in pigsty.yml, then run bin/pgsql-hba to refresh.
Pgbouncer HBA Management
Pgbouncer HBA management is similar to PostgreSQL, with some differences:
Configuration Differences
Config file: /etc/pgbouncer/pgb_hba.conf
Doesn’t support db: replication
Authentication method: local connections use peer instead of ident
Refresh Commands
# Refresh Pgbouncer HBA only./pgsql.yml -l pg-meta -t pgbouncer_hba,pgbouncer_reload
# Or use unified script (refreshes both PostgreSQL and Pgbouncer)bin/pgsql-hba pg-meta
View Pgbouncer HBA
cat /etc/pgbouncer/pgb_hba.conf
Best Practices
Always manage in config files: Don’t directly edit pg_hba.conf—all changes through pigsty.yml
Verify in test environment first: HBA changes can cause connection issues—verify in test environment first
Use order to control priority: Blocklist rules use order: 0 to ensure priority matching
Refresh promptly: Refresh HBA after adding/removing instances or failover
Principle of least privilege: Only open necessary access—avoid addr: world + auth: trust
Monitor authentication failures: Watch for authentication failures in pg_stat_activity
Backup configuration: Backup pigsty.yml before important changes
pb info # print pgbackrest repo infopg-backup # make a backup, incr, or full backup if necessarypg-backup full # make a full backuppg-backup diff # make a differential backuppg-backup incr # make a incremental backuppg-pitr -i # restore to most recent backup completion time (not common)pg-pitr --time="2022-12-30 14:44:44+08"# restore to specific time point (e.g., in case of table/database drop)pg-pitr --name="my-restore-point"# restore to named restore point created by pg_create_restore_pointpg-pitr --lsn="0/7C82CB8" -X # restore immediately before LSNpg-pitr --xid="1234567" -X -P # restore immediately before specific transaction ID, then promote to primarypg-pitr --backup=latest # restore to latest backup setpg-pitr --backup=20221108-105325 # restore to specific backup set, can be checked with pgbackrest info
Use the pg-drop-role script to safely delete the user
Automatically disable user login and terminate active connections
Automatically transfer database/tablespace ownership to postgres
Automatically handle object ownership and permissions in all databases
Revoke all role memberships
Create an audit log for traceability
Remove the user from the Pgbouncer user list (if previously added)
Reload Pgbouncer configuration
Protected System Users:
The following system users cannot be deleted via state: absent and will be automatically skipped:
postgres (superuser)
replicator (or the user configured in pg_replication_username)
dbuser_dba (or the user configured in pg_admin_username)
dbuser_monitor (or the user configured in pg_monitor_username)
Example: pg-drop-role Script Usage
# Check user dependencies (read-only operation)pg-drop-role dbuser_old --check
# Preview deletion operation (don't actually execute)pg-drop-role dbuser_old --dry-run -v
# Delete user, transfer objects to postgrespg-drop-role dbuser_old
# Delete user, transfer objects to specified userpg-drop-role dbuser_old dbuser_new
# Force delete (terminate active connections)pg-drop-role dbuser_old --force
Create Database
To create a new database on an existing Postgres cluster, add the database definition to all.children.<cls>.pg_databases, then create the database as follows:
Note: If the database specifies a non-default owner, the owner user must already exist, otherwise you must Create User first.
Example: Create Business Database
Reload Service
Services are access points exposed by PostgreSQL (reachable via PGURL), served by HAProxy on host nodes.
Use this task when cluster membership changes, for example: append/remove replicas, switchover/failover / exposing new services, or updating existing service configurations (e.g., LB weights)
To create new services or reload existing services on entire proxy cluster or specific instances:
When your Postgres/Pgbouncer HBA rules change, you may need to reload HBA to apply the changes.
If you have any role-specific HBA rules, or IP address ranges referencing cluster member aliases, you may also need to reload HBA after switchover/cluster scaling.
To reload postgres and pgbouncer HBA rules on entire cluster or specific instances:
To change configuration of an existing Postgres cluster, you need to issue control commands on the admin node using the admin user (the user who installed Pigsty, with nopass ssh/sudo):
Alternatively, on any node in the database cluster, using dbsu (default postgres), you can execute admin commands, but only for this cluster.
pg edit-config <cls> # interactive config a cluster with patronictl
Change patroni parameters and postgresql.parameters, save and apply changes according to prompts.
Example: Non-Interactive Cluster Configuration
You can skip interactive mode and override postgres parameters using the -p option, for example:
Note: Patroni sensitive API access (e.g., restart) is restricted to requests from infra/admin nodes, with HTTP basic authentication (username/password) and optional HTTPS protection.
Example: Configure Cluster with patronictl
Append Replica
To add a new replica to an existing PostgreSQL cluster, add its definition to the inventory all.children.<cls>.hosts, then:
bin/node-add <ip> # add node <ip> to Pigsty managementbin/pgsql-add <cls> <ip> # init <ip> as new replica of cluster <cls>
This will add node <ip> to pigsty and initialize it as a replica of cluster <cls>.
Cluster services will be reloaded to accept the new member.
Example: Add Replica to pg-test
For example, if you want to add pg-test-3 / 10.10.10.13 to existing cluster pg-test, first update the inventory:
pg-test:
hosts:
10.10.10.11: { pg_seq: 1, pg_role: primary }# existing member 10.10.10.12: { pg_seq: 2, pg_role: replica }# existing member 10.10.10.13: { pg_seq: 3, pg_role: replica }# <--- new member vars: { pg_cluster: pg-test }
Then apply the changes as follows:
bin/node-add 10.10.10.13 # add node to pigstybin/pgsql-add pg-test 10.10.10.13 # init new replica for cluster pg-test on 10.10.10.13
This is similar to cluster initialization but works on a single instance:
[ OK ] Initialize instance 10.10.10.11 in pgsql cluster 'pg-test':
[WARN] Reminder: add nodes to pigsty first, then install module 'pgsql'[HINT] $ bin/node-add 10.10.10.11 # run this first except for infra nodes[WARN] Init instance from cluster:
[ OK ] $ ./pgsql.yml -l '10.10.10.11,&pg-test'[WARN] Reload pg_service on existing instances:
[ OK ] $ ./pgsql.yml -l 'pg-test,!10.10.10.11' -t pg_service
Remove Replica
To remove a replica from an existing PostgreSQL cluster:
This will remove instance <ip> from cluster <cls>. Cluster services will be reloaded to remove the instance from load balancers.
Example: Remove Replica from pg-test
For example, if you want to remove pg-test-3 / 10.10.10.13 from existing cluster pg-test:
bin/pgsql-rm pg-test 10.10.10.13 # remove pgsql instance 10.10.10.13 from pg-testbin/node-rm 10.10.10.13 # remove node from pigsty (optional)vi pigsty.yml # remove instance definition from inventorybin/pgsql-svc pg-test # refresh pg_service on existing instances to remove from load balancer
[ OK ] Remove pgsql instance 10.10.10.13 from 'pg-test':
[WARN] Remove instance from cluster:
[ OK ] $ ./pgsql-rm.yml -l '10.10.10.13,&pg-test'
And remove the instance definition from inventory:
pg-test:hosts:10.10.10.11:{pg_seq: 1, pg_role:primary }10.10.10.12:{pg_seq: 2, pg_role:replica }10.10.10.13:{pg_seq: 3, pg_role:replica }# <--- remove this line after executionvars:{pg_cluster:pg-test }
Finally, you can reload PG service to remove the instance from load balancers:
bin/pgsql-svc pg-test # reload service on pg-test
Remove Cluster
To remove an entire Postgres cluster, simply run:
bin/pgsql-rm <cls> # ./pgsql-rm.yml -l <cls>
Example: Remove Cluster
Example: Force Remove Cluster
Note: If pg_safeguard is configured for this cluster (or globally set to true), pgsql-rm.yml will abort to avoid accidental cluster removal.
You can explicitly override it with playbook command line parameters to force removal:
./pgsql-rm.yml -l pg-meta -e pg_safeguard=false# force remove pg cluster pg-meta
Switchover
You can use the patroni command line tool to perform PostgreSQL cluster switchover.
pg switchover <cls> # interactive mode, you can skip the wizard with the following parameter combinationpg switchover --leader pg-test-1 --candidate=pg-test-2 --scheduled=now --force pg-test
Example: pg-test Switchover
$ pg switchover pg-test
Master [pg-test-1]:
Candidate ['pg-test-2', 'pg-test-3'][]: pg-test-2
When should the switchover take place (e.g. 2022-12-26T07:39 )[now]: now
Current cluster topology
+ Cluster: pg-test (7181325041648035869) -----+----+-----------+-----------------+
| Member | Host | Role | State | TL | Lag in MB | Tags |+-----------+-------------+---------+---------+----+-----------+-----------------+
| pg-test-1 | 10.10.10.11 | Leader | running |1|| clonefrom: true|||||||| conf: tiny.yml |||||||| spec: 1C.2G.50G |||||||| version: '15'|+-----------+-------------+---------+---------+----+-----------+-----------------+
| pg-test-2 | 10.10.10.12 | Replica | running |1|0| clonefrom: true|||||||| conf: tiny.yml |||||||| spec: 1C.2G.50G |||||||| version: '15'|+-----------+-------------+---------+---------+----+-----------+-----------------+
| pg-test-3 | 10.10.10.13 | Replica | running |1|0| clonefrom: true|||||||| conf: tiny.yml |||||||| spec: 1C.2G.50G |||||||| version: '15'|+-----------+-------------+---------+---------+----+-----------+-----------------+
Are you sure you want to switchover cluster pg-test, demoting current master pg-test-1? [y/N]: y
2022-12-26 06:39:58.02468 Successfully switched over to "pg-test-2"+ Cluster: pg-test (7181325041648035869) -----+----+-----------+-----------------+
| Member | Host | Role | State | TL | Lag in MB | Tags |+-----------+-------------+---------+---------+----+-----------+-----------------+
| pg-test-1 | 10.10.10.11 | Replica | stopped || unknown | clonefrom: true|||||||| conf: tiny.yml |||||||| spec: 1C.2G.50G |||||||| version: '15'|+-----------+-------------+---------+---------+----+-----------+-----------------+
| pg-test-2 | 10.10.10.12 | Leader | running |1|| clonefrom: true|||||||| conf: tiny.yml |||||||| spec: 1C.2G.50G |||||||| version: '15'|+-----------+-------------+---------+---------+----+-----------+-----------------+
| pg-test-3 | 10.10.10.13 | Replica | running |1|0| clonefrom: true|||||||| conf: tiny.yml |||||||| spec: 1C.2G.50G |||||||| version: '15'|+-----------+-------------+---------+---------+----+-----------+-----------------+
To perform this via Patroni API (e.g., switch primary from instance 2 to instance 1 at a specified time):
After either switchover or failover, you need to refresh services and HBA rules after cluster membership changes. You should complete this promptly (e.g., within a few hours or a day) after the change:
bin/pgsql-svc <cls>
bin/pgsql-hba <cls>
Backup Cluster
To create backups using pgBackRest, run the following commands as local dbsu (default postgres):
pg-backup # make a backup, incremental or full if necessarypg-backup full # make a full backuppg-backup diff # make a differential backuppg-backup incr # make an incremental backuppb info # print backup info (pgbackrest info)
You can add crontab to node_crontab to specify your backup strategy.
# Full backup daily at 1 AM- '00 01 * * * postgres /pg/bin/pg-backup full'# Full backup on Monday at 1 AM, incremental backups on other weekdays- '00 01 * * 1 postgres /pg/bin/pg-backup full'- '00 01 * * 2,3,4,5,6,7 postgres /pg/bin/pg-backup'
Restore Cluster
To restore a cluster to a previous point in time (PITR), run the Pigsty helper script pg-pitr as local dbsu user (default postgres):
pg-pitr -i # restore to most recent backup completion time (not common)pg-pitr --time="2022-12-30 14:44:44+08"# restore to specific time point (e.g., in case of table/database drop)pg-pitr --name="my-restore-point"# restore to named restore point created by pg_create_restore_pointpg-pitr --lsn="0/7C82CB8" -X # restore immediately before LSNpg-pitr --xid="1234567" -X -P # restore immediately before specific transaction ID, then promote cluster to primarypg-pitr --backup=latest # restore to latest backup setpg-pitr --backup=20221108-105325 # restore to specific backup set, can be listed with pgbackrest info
The command will output an operations manual, follow the instructions. See Backup & Restore - PITR for details.
Example: PITR Using Raw pgBackRest Commands
# Restore to latest available point (e.g., hardware failure)pgbackrest --stanza=pg-meta restore
# PITR to specific time point (e.g., accidental table drop)pgbackrest --stanza=pg-meta --type=time --target="2022-11-08 10:58:48"\
--target-action=promote restore
# Restore specific backup point, then promote (or pause|shutdown)pgbackrest --stanza=pg-meta --type=immediate --target-action=promote \
--set=20221108-105325F_20221108-105938I restore
Use ./infra.yml -t repo_build subtask to rebuild local repo on Infra node. Then you can install these packages using ansible’s package module:
ansible pg-test -b -m package -a "name=pg_cron_15,topn_15,pg_stat_monitor_15*"# install some packages with ansible
Example: Manually Update Packages in Local Repo
# Add upstream repo on infra/admin node, then manually download required packagescd ~/pigsty; ./infra.yml -t repo_upstream,repo_cache # add upstream repo (internet)cd /www/pigsty; repotrack "some_new_package_name"# download latest RPM packages# Update local repo metadatacd ~/pigsty; ./infra.yml -t repo_create # recreate local repo./node.yml -t node_repo # refresh YUM/APT cache on all nodes# You can also manually refresh YUM/APT cache on nodes using Ansibleansible all -b -a 'yum clean all'# clean node repo cacheansible all -b -a 'yum makecache'# rebuild yum/apt cache from new repoansible all -b -a 'apt clean'# clean APT cache (Ubuntu/Debian)ansible all -b -a 'apt update'# rebuild APT cache (Ubuntu/Debian)
For example, you can install or upgrade packages as follows:
ansible pg-test -b -m package -a "name=postgresql15* state=latest"
Install Extension
If you want to install extensions on a PostgreSQL cluster, add them to pg_extensions, then execute:
./pgsql.yml -t pg_extension # install extensions
Some extensions need to be loaded in shared_preload_libraries to take effect. You can add them to pg_libs, or configure an existing cluster.
Finally, execute CREATE EXTENSION <extname>; on the cluster’s primary to complete extension installation.
Example: Install pg_cron Extension on pg-test Cluster
ansible pg-test -b -m package -a "name=pg_cron_15"# install pg_cron package on all nodes# Add pg_cron to shared_preload_librariespg edit-config --force -p shared_preload_libraries='timescaledb, pg_cron, pg_stat_statements, auto_explain'pg restart --force pg-test # restart clusterpsql -h pg-test -d postgres -c 'CREATE EXTENSION pg_cron;'# install pg_cron on primary
The easiest way to perform a major upgrade is to create a new cluster using the new version, then perform online migration through logical replication and blue-green deployment.
You can also perform in-place major upgrades. When using only the database kernel itself, this is not complicated - use PostgreSQL’s built-in pg_upgrade:
Suppose you want to upgrade PostgreSQL major version from 14 to 15. First add packages to the repo and ensure core extension plugins are installed with the same version numbers on both major versions.
To create a new database on an existing Postgres cluster, add the database definition to all.children.<cls>.pg_databases, then create the database as follows:
Note: If the database specifies a non-default owner, the owner user must already exist, otherwise you must Create User first.
Example: Create Business Database
Reload Service
Services are access points exposed by PostgreSQL (reachable via PGURL), served by HAProxy on host nodes.
Use this task when cluster membership changes, for example: append/remove replicas, switchover/failover / exposing new services, or updating existing service configurations (e.g., LB weights)
To create new services or reload existing services on entire proxy cluster or specific instances:
When your Postgres/Pgbouncer HBA rules change, you may need to reload HBA to apply the changes.
If you have any role-specific HBA rules, or IP address ranges referencing cluster member aliases, you may also need to reload HBA after switchover/cluster scaling.
To reload postgres and pgbouncer HBA rules on entire cluster or specific instances:
To change configuration of an existing Postgres cluster, you need to issue control commands on the admin node using the admin user (the user who installed Pigsty, with nopass ssh/sudo):
Alternatively, on any node in the database cluster, using dbsu (default postgres), you can execute admin commands, but only for this cluster.
pg edit-config <cls> # interactive config a cluster with patronictl
Change patroni parameters and postgresql.parameters, save and apply changes according to prompts.
Example: Non-Interactive Cluster Configuration
You can skip interactive mode and override postgres parameters using the -p option, for example:
Note: Patroni sensitive API access (e.g., restart) is restricted to requests from infra/admin nodes, with HTTP basic authentication (username/password) and optional HTTPS protection.
Example: Configure Cluster with patronictl
Append Replica
To add a new replica to an existing PostgreSQL cluster, add its definition to the inventory all.children.<cls>.hosts, then:
bin/node-add <ip> # add node <ip> to Pigsty managementbin/pgsql-add <cls> <ip> # init <ip> as new replica of cluster <cls>
This will add node <ip> to pigsty and initialize it as a replica of cluster <cls>.
Cluster services will be reloaded to accept the new member.
Example: Add Replica to pg-test
For example, if you want to add pg-test-3 / 10.10.10.13 to existing cluster pg-test, first update the inventory:
pg-test:
hosts:
10.10.10.11: { pg_seq: 1, pg_role: primary }# existing member 10.10.10.12: { pg_seq: 2, pg_role: replica }# existing member 10.10.10.13: { pg_seq: 3, pg_role: replica }# <--- new member vars: { pg_cluster: pg-test }
Then apply the changes as follows:
bin/node-add 10.10.10.13 # add node to pigstybin/pgsql-add pg-test 10.10.10.13 # init new replica for cluster pg-test on 10.10.10.13
This is similar to cluster initialization but works on a single instance:
[ OK ] Initialize instance 10.10.10.11 in pgsql cluster 'pg-test':
[WARN] Reminder: add nodes to pigsty first, then install module 'pgsql'[HINT] $ bin/node-add 10.10.10.11 # run this first except for infra nodes[WARN] Init instance from cluster:
[ OK ] $ ./pgsql.yml -l '10.10.10.11,&pg-test'[WARN] Reload pg_service on existing instances:
[ OK ] $ ./pgsql.yml -l 'pg-test,!10.10.10.11' -t pg_service
Remove Replica
To remove a replica from an existing PostgreSQL cluster:
This will remove instance <ip> from cluster <cls>. Cluster services will be reloaded to remove the instance from load balancers.
Example: Remove Replica from pg-test
For example, if you want to remove pg-test-3 / 10.10.10.13 from existing cluster pg-test:
bin/pgsql-rm pg-test 10.10.10.13 # remove pgsql instance 10.10.10.13 from pg-testbin/node-rm 10.10.10.13 # remove node from pigsty (optional)vi pigsty.yml # remove instance definition from inventorybin/pgsql-svc pg-test # refresh pg_service on existing instances to remove from load balancer
[ OK ] Remove pgsql instance 10.10.10.13 from 'pg-test':
[WARN] Remove instance from cluster:
[ OK ] $ ./pgsql-rm.yml -l '10.10.10.13,&pg-test'
And remove the instance definition from inventory:
pg-test:hosts:10.10.10.11:{pg_seq: 1, pg_role:primary }10.10.10.12:{pg_seq: 2, pg_role:replica }10.10.10.13:{pg_seq: 3, pg_role:replica }# <--- remove this line after executionvars:{pg_cluster:pg-test }
Finally, you can reload PG service to remove the instance from load balancers:
bin/pgsql-svc pg-test # reload service on pg-test
Remove Cluster
To remove an entire Postgres cluster, simply run:
bin/pgsql-rm <cls> # ./pgsql-rm.yml -l <cls>
Example: Remove Cluster
Example: Force Remove Cluster
Note: If pg_safeguard is configured for this cluster (or globally set to true), pgsql-rm.yml will abort to avoid accidental cluster removal.
You can explicitly override it with playbook command line parameters to force removal:
./pgsql-rm.yml -l pg-meta -e pg_safeguard=false# force remove pg cluster pg-meta
10.7.6 - User Management
Creating PostgreSQL users/roles, managing connection pool roles, refreshing expiration times, user password rotation
Creating Users
To create a new business user on an existing Postgres cluster, add the user definition to all.children.<cls>.pg_users, then create it using the following command:
pg_users: Defines business users and roles at the database cluster level
The former is used to define roles and users shared across the entire environment, while the latter defines business roles and users specific to individual clusters. Both have the same format, being arrays of user definition objects.
You can define multiple users/roles. They will be created sequentially first globally, then by cluster, and finally in array order, so later users can belong to previously defined roles.
Below is the business user definition in the default cluster pg-meta in the Pigsty demo environment:
pg-meta:hosts:{10.10.10.10:{pg_seq: 1, pg_role:primary } }vars:pg_cluster:pg-metapg_users:- {name: dbuser_meta ,password: DBUser.Meta ,pgbouncer: true ,roles: [dbrole_admin] ,comment:pigsty admin user }- {name: dbuser_view ,password: DBUser.Viewer ,pgbouncer: true ,roles: [dbrole_readonly] ,comment:read-only viewer for meta database }- {name: dbuser_grafana ,password: DBUser.Grafana ,pgbouncer: true ,roles: [dbrole_admin] ,comment:admin user for grafana database }- {name: dbuser_bytebase ,password: DBUser.Bytebase ,pgbouncer: true ,roles: [dbrole_admin] ,comment:admin user for bytebase database }- {name: dbuser_kong ,password: DBUser.Kong ,pgbouncer: true ,roles: [dbrole_admin] ,comment:admin user for kong api gateway }- {name: dbuser_gitea ,password: DBUser.Gitea ,pgbouncer: true ,roles: [dbrole_admin] ,comment:admin user for gitea service }- {name: dbuser_wiki ,password: DBUser.Wiki ,pgbouncer: true ,roles: [dbrole_admin] ,comment:admin user for wiki.js service }- {name: dbuser_noco ,password: DBUser.Noco ,pgbouncer: true ,roles: [dbrole_admin] ,comment:admin user for nocodb service }
Each user/role definition is an object that may include the following fields, using the dbuser_meta user as an example:
- name:dbuser_meta # Required, `name` is the only mandatory field in a user definitionpassword:DBUser.Meta # Optional, password, can be a scram-sha-256 hash string or plaintextlogin:true# Optional, can log in by defaultsuperuser:false# Optional, default is false, is this a superuser?createdb:false# Optional, default is false, can create databases?createrole:false# Optional, default is false, can create roles?inherit:true# Optional, by default, can this role use inherited permissions?replication:false# Optional, default is false, can this role perform replication?bypassrls:false# Optional, default is false, can this role bypass row-level security?pgbouncer:true# Optional, default is false, add this user to the pgbouncer user list? (production users using connection pooling should explicitly set to true)connlimit:-1# Optional, user connection limit, default -1 disables limitexpire_in: 3650 # Optional, expiration time for this role:calculated as created time + n days (higher priority than expire_at)expire_at:'2030-12-31'# Optional, time point when this role expires, specify a specific date using YYYY-MM-DD format string (lower priority than expire_in)comment:pigsty admin user # Optional, description and comment string for this user/roleroles: [dbrole_admin] # Optional, default roles are:dbrole_{admin,readonly,readwrite,offline}parameters:{}# Optional, configure role-level database parameters for this role using `ALTER ROLE SET`pool_mode:transaction # Optional, pgbouncer pool mode defaulting to transaction, at user levelpool_connlimit:-1# Optional, maximum database connections at user level, default -1 disables limitsearch_path:public # Optional, key-value configuration parameters according to postgresql documentation (e.g., use pigsty as default search_path)
The only required field is name, which should be a valid and unique username in the PostgreSQL cluster.
Roles don’t need a password, but for login-enabled business users, it’s usually necessary to specify a password.
password can be plaintext or a scram-sha-256 / md5 hash string; please avoid using plaintext passwords.
Users/roles are created sequentially in array order, so ensure role/group definitions come before members.
login, superuser, createdb, createrole, inherit, replication, bypassrls are boolean flags.
pgbouncer is disabled by default: to add business users to the pgbouncer user list, you should explicitly set it to true.
ACL System
Pigsty has a built-in, out-of-the-box access control / ACL system. You can easily use it by assigning the following four default roles to business users:
dbrole_readwrite: Role with global read-write access (production accounts primarily used by business should have database read-write permissions)
dbrole_readonly: Role with global read-only access (if other businesses want read-only access, they can use this role)
dbrole_admin: Role with DDL permissions (business administrators, scenarios requiring table creation in applications)
dbrole_offline: Role with restricted read-only access (can only access offline instances, typically for personal users)
If you want to redesign your own ACL system, consider customizing the following parameters and templates:
Users and roles defined in pg_default_roles and pg_users will be automatically created sequentially during the PROVISION phase of cluster initialization.
If you want to create users on an existing cluster, you can use the bin/pgsql-user tool.
Add the new user/role definition to all.children.<cls>.pg_users and create the database using the following method:
Unlike databases, the user creation playbook is always idempotent. When the target user already exists, Pigsty will modify the target user’s attributes to conform to the configuration. So running it repeatedly on existing clusters typically won’t cause issues.
Please Use Playbook to Create Users
We do not recommend manually creating new business users, especially when you want to create users that use the default pgbouncer connection pool: unless you’re willing to manually maintain the user list in Pgbouncer and keep it consistent with PostgreSQL.
When creating a new database using the bin/pgsql-user tool or the pgsql-user.yml playbook, this database will also be added to the Pgbouncer Users list.
Modifying Users
The method for modifying PostgreSQL user attributes is the same as Creating Users.
First, adjust your user definition, modify the attributes that need adjustment, then execute the following command to apply:
Note that modifying users does not delete users but modifies user attributes using the ALTER USER command; it also doesn’t revoke user permissions and groups, and uses the GRANT command to grant new roles.
Deleting Users
To delete a user, set its state to absent and execute the playbook:
pg_users:- name:dbuser_oldstate:absent
bin/pgsql-user <cls> dbuser_old
The deletion process will:
Use the pg-drop-role script to safely delete the user
Automatically disable user login and terminate active connections
Automatically transfer database/tablespace ownership to postgres
Automatically handle object ownership and permissions in all databases
Revoke all role memberships
Create an audit log for traceability
Remove the user from the Pgbouncer user list (if previously added)
Reload Pgbouncer configuration
Protected System Users:
The following system users cannot be deleted via state: absent and will be automatically skipped:
postgres (superuser)
replicator (or the user configured in pg_replication_username)
dbuser_dba (or the user configured in pg_admin_username)
dbuser_monitor (or the user configured in pg_monitor_username)
Safe Deletion
Pigsty uses the pg-drop-role script to safely delete users. This script will:
Automatically handle objects owned by the user (databases, tablespaces, schemas, tables, etc.)
Automatically terminate active connections (using --force)
Transfer object ownership to the postgres user
Create an audit log at /tmp/pg_drop_role_<user>_<timestamp>.log
No need to manually handle dependent objects - the script handles everything automatically.
pg-drop-role Script
pg-drop-role is a safe user deletion script provided by Pigsty, located at /pg/bin/pg-drop-role.
When you create a database, Pgbouncer’s database list definition file will be refreshed and take effect through online configuration reload, without affecting existing connections.
Pgbouncer runs with the same dbsu as PostgreSQL, defaulting to the postgres OS user. You can use the pgb alias to access pgbouncer management functions using dbsu.
Pigsty also provides a utility function pgb-route that can quickly switch pgbouncer database traffic to other nodes in the cluster for zero-downtime migration:
Connection pool user configuration files userlist.txt and useropts.txt will be automatically refreshed when you create users and take effect through online configuration reload, normally without affecting existing connections.
Note that the pgbouncer_auth_query parameter allows you to use dynamic queries to complete connection pool user authentication, which is a compromise solution when you don’t want to manage users in the connection pool.
10.7.7 - Parameter Tuning
Tuning Postgres Parameters
Pigsty provides four scenario-based parameter templates by default, which can be specified and used through the pg_conf parameter.
tiny.yml: Optimized for small nodes, VMs, and small demos (1-8 cores, 1-16GB)
oltp.yml: Optimized for OLTP workloads and latency-sensitive applications (4C8GB+) (default template)
olap.yml: Optimized for OLAP workloads and throughput (4C8G+)
crit.yml: Optimized for data consistency and critical applications (4C8G+)
Pigsty adopts different parameter optimization strategies for these four default scenarios, as shown below:
Memory Parameter Tuning
Pigsty automatically detects the system’s memory size and uses it as the basis for setting the maximum number of connections and memory-related parameters.
pg_max_conn: PostgreSQL maximum connections, auto will use recommended values for different scenarios
By default, Pigsty uses 25% of memory as PostgreSQL shared buffers, with the remaining 75% as the operating system cache.
By default, if the user has not set a pg_max_conn maximum connections value, Pigsty will use defaults according to the following rules:
oltp: 500 (pgbouncer) / 1000 (postgres)
crit: 500 (pgbouncer) / 1000 (postgres)
tiny: 300
olap: 300
For OLTP and CRIT templates, if the service is not pointing to the pgbouncer connection pool but directly connects to the postgres database, the maximum connections will be doubled to 1000.
After determining the maximum connections, work_mem is calculated from shared memory size / maximum connections and limited to the range of 64MB ~ 1GB.
{% raw %}{% if pg_max_conn != 'auto' and pg_max_conn|int >= 20 %}{% set pg_max_connections = pg_max_conn|int %}{% else %}{% if pg_default_service_dest|default('postgres') == 'pgbouncer' %}{% set pg_max_connections = 500 %}{% else %}{% set pg_max_connections = 1000 %}{% endif %}{% endif %}{% set pg_max_prepared_transactions = pg_max_connections if 'citus' in pg_libs else 0 %}{% set pg_max_locks_per_transaction = (2 * pg_max_connections)|int if 'citus' in pg_libs or 'timescaledb' in pg_libs else pg_max_connections %}{% set pg_shared_buffers = (node_mem_mb|int * pg_shared_buffer_ratio|float) | round(0, 'ceil') | int %}{% set pg_maintenance_mem = (pg_shared_buffers|int * 0.25)|round(0, 'ceil')|int %}{% set pg_effective_cache_size = node_mem_mb|int - pg_shared_buffers|int %}{% set pg_workmem = ([ ([ (pg_shared_buffers / pg_max_connections)|round(0,'floor')|int , 64 ])|max|int , 1024])|min|int %}{% endraw %}
CPU Parameter Tuning
In PostgreSQL, there are 4 important parameters related to parallel queries. Pigsty automatically optimizes parameters based on the current system’s CPU cores.
In all strategies, the total number of parallel processes (total budget) is usually set to CPU cores + 8, with a minimum of 16, to reserve enough background workers for logical replication and extensions. The OLAP and TINY templates vary slightly based on scenarios.
OLTP
Setting Logic
Range Limits
max_worker_processes
max(100% CPU + 8, 16)
CPU cores + 4, minimum 12
max_parallel_workers
max(ceil(50% CPU), 2)
1/2 CPU rounded up, minimum 2
max_parallel_maintenance_workers
max(ceil(33% CPU), 2)
1/3 CPU rounded up, minimum 2
max_parallel_workers_per_gather
min(max(ceil(20% CPU), 2),8)
1/5 CPU rounded down, minimum 2, max 8
OLAP
Setting Logic
Range Limits
max_worker_processes
max(100% CPU + 12, 20)
CPU cores + 12, minimum 20
max_parallel_workers
max(ceil(80% CPU, 2))
4/5 CPU rounded up, minimum 2
max_parallel_maintenance_workers
max(ceil(33% CPU), 2)
1/3 CPU rounded up, minimum 2
max_parallel_workers_per_gather
max(floor(50% CPU), 2)
1/2 CPU rounded up, minimum 2
CRIT
Setting Logic
Range Limits
max_worker_processes
max(100% CPU + 8, 16)
CPU cores + 8, minimum 16
max_parallel_workers
max(ceil(50% CPU), 2)
1/2 CPU rounded up, minimum 2
max_parallel_maintenance_workers
max(ceil(33% CPU), 2)
1/3 CPU rounded up, minimum 2
max_parallel_workers_per_gather
0, enable as needed
TINY
Setting Logic
Range Limits
max_worker_processes
max(100% CPU + 4, 12)
CPU cores + 4, minimum 12
max_parallel_workers
max(ceil(50% CPU) 1)
50% CPU rounded down, minimum 1
max_parallel_maintenance_workers
max(ceil(33% CPU), 1)
33% CPU rounded down, minimum 1
max_parallel_workers_per_gather
0, enable as needed
Note that the CRIT and TINY templates disable parallel queries by setting max_parallel_workers_per_gather = 0.
Users can enable parallel queries as needed by setting this parameter.
Both OLTP and CRIT templates additionally set the following parameters, doubling the parallel query cost to reduce the tendency to use parallel queries.
parallel_setup_cost:2000# double from 100 to increase parallel costparallel_tuple_cost:0.2# double from 0.1 to increase parallel costmin_parallel_table_scan_size:16MB # double from 8MB to increase parallel costmin_parallel_index_scan_size:1024# double from 512 to increase parallel cost
Note that adjustments to the max_worker_processes parameter only take effect after a restart. Additionally, when a replica’s configuration value for this parameter is higher than the primary’s, the replica will fail to start.
This parameter must be adjusted through Patroni configuration management, which ensures consistent primary-replica configuration and prevents new replicas from failing to start during failover.
Storage Space Parameters
Pigsty automatically detects the total space of the disk where the /data/postgres main data directory is located and uses it as the basis for specifying the following parameters:
{% raw %}min_wal_size:{{([pg_size_twentieth, 200])|min }}GB # 1/20 disk size, max 200GBmax_wal_size:{{([pg_size_twentieth * 4, 2000])|min }}GB # 2/10 disk size, max 2000GBmax_slot_wal_keep_size:{{([pg_size_twentieth * 6, 3000])|min }}GB # 3/10 disk size, max 3000GBtemp_file_limit:{{([pg_size_twentieth, 200])|min }}GB # 1/20 of disk size, max 200GB{% endraw %}
temp_file_limit defaults to 5% of disk space, capped at 200GB.
min_wal_size defaults to 5% of disk space, capped at 200GB.
max_wal_size defaults to 20% of disk space, capped at 2TB.
max_slot_wal_keep_size defaults to 30% of disk space, capped at 3TB.
As a special case, the OLAP template allows 20% for temp_file_limit, capped at 2TB.
Manual Parameter Tuning
In addition to using Pigsty’s automatically configured parameters, you can also manually tune PostgreSQL parameters.
Use the pg edit-config <cluster> command to interactively edit cluster configuration:
pg edit-config pg-meta
Or use the -p parameter to directly set parameters:
Handling accidental data deletion, table deletion, and database deletion
Accidental Data Deletion
If it’s a small-scale DELETE misoperation, you can consider using the pg_surgery or pg_dirtyread extension for in-place surgical recovery.
-- Immediately disable Auto Vacuum on this table and abort Auto Vacuum worker processes for this table
ALTERTABLEpublic.some_tableSET(autovacuum_enabled=off,toast.autovacuum_enabled=off);CREATEEXTENSIONpg_dirtyread;SELECT*FROMpg_dirtyread('tablename')ASt(col1type1,col2type2,...);
If the deleted data has already been reclaimed by VACUUM, then use the general accidental deletion recovery process.
Accidental Object Deletion
When DROP/DELETE type misoperations occur, typically decide on a recovery plan according to the following process:
Confirm whether this data can be recovered from the business system or other data systems. If yes, recover directly from the business side.
Confirm whether there is a delayed replica. If yes, advance the delayed replica to the time point before deletion and query the data for recovery.
If the data has been confirmed deleted, confirm backup information and whether the backup range covers the deletion time point. If it does, start PITR.
Confirm whether to perform in-place cluster PITR rollback, or start a new server for replay, or use a replica for replay, and execute the recovery strategy.
Accidental Cluster Deletion
If an entire database cluster is accidentally deleted through Pigsty management commands, for example, incorrectly executing the pgsql-rm.yml playbook or the bin/pgsql-rm command.
Unless you have set the pg_rm_backup parameter to false, the backup will be deleted along with the database cluster.
Warning: In this situation, your data will be unrecoverable! Please think three times before proceeding!
Recommendation: For production environments, you can globally configure this parameter to false in the configuration manifest to preserve backups when removing clusters.
10.7.9 - Clone Replicas
How to clone databases, database instances, and database clusters?
PostgreSQL can already replicate data through physical replicas and logical replicas, but sometimes you may need to quickly clone a database, database instance, or entire database cluster. The cloned database can be written to, evolve independently, and not affect the original database. In Pigsty, there are several cloning methods:
Clone Database: Clone a new database within the same cluster
Clone Instance: Clone a new instance on the same PG node
Clone Cluster: Create a new database cluster using PITR mechanism and restore to any point in time of the specified cluster
Clone Database
You can copy a PostgreSQL database through the template mechanism, but no active connections to the template database are allowed during this period.
If you want to clone the postgres database, you must execute the following two statements at the same time. Ensure all connections to the postgres database are cleaned up before executing Clone:
If you are using PostgreSQL 18 or higher, Pigsty sets file_copy_method by default. This parameter allows you to clone a database in O(1) (~200ms) time complexity without copying data files.
However, you must explicitly use the FILE_COPY strategy to create the database. Since the STRATEGY parameter of CREATE DATABASE was introduced in PostgreSQL 15, the default value has been WAL_LOG. You need to explicitly specify FILE_COPY for instant cloning.
For example, cloning a 30 GB database: normal clone (WAL_LOG) takes 18 seconds, while instant clone (FILE_COPY) only needs constant time of 200 milliseconds.
Since Pigsty v4.0, you can use strategy: FILE_COPY in the pg_databases parameter to achieve instant database cloning.
pg-meta:hosts:10.10.10.10:{pg_seq: 1, pg_role:primary }vars:pg_cluster:pg-metapg_version:18pg_databases:- name:meta- name:meta_devtemplate:metastrategy:FILE_COPY # <---- Introduced in PG 15, instant in PG18
After configuration, use the standard database creation SOP to create the database:
bin/pgsql-db pg-meta meta_dev
Limitations and Notes
This feature is only available on supported file systems (xfs, btrfs, zfs, apfs). If the file system doesn’t support it, PostgreSQL will fail with an error.
By default, mainstream OS distributions’ xfs have reflink=1 enabled by default, so you don’t need to worry about this in most cases.
If your PostgreSQL version is below 15, specifying strategy will have no effect.
Please don’t use the postgres database as a template database for cloning, as management connections typically connect to the postgres database, which prevents the cloning operation.
Use instant cloning with caution in extremely high concurrency/throughput production environments, as it requires clearing all connections to the template database within the cloning window (200ms), otherwise the clone will fail.
10.7.10 - Maintenance
Common system maintenance tasks
To ensure Pigsty and PostgreSQL clusters run healthily and stably, some routine maintenance work is required.
Regular Monitoring Review
Pigsty provides an out-of-the-box monitoring platform. We recommend you browse the monitoring dashboards once a day to keep track of system status.
At a minimum, we recommend you review the monitoring at least once a week, paying attention to alert events that occur, which can help you avoid most failures and issues in advance.
Here is a list of pre-defined alert rules in Pigsty.
Failover Follow-up
Pigsty’s high availability architecture allows PostgreSQL clusters to automatically perform primary-replica switchovers, meaning operations and DBAs don’t need to intervene or respond immediately.
However, users still need to perform the following follow-up work at an appropriate time (e.g., the next business day), including:
Investigate and confirm the cause of the failure to prevent recurrence
Restore the cluster’s original primary-replica topology as appropriate, or modify the configuration manifest to match the new primary-replica status.
Refresh load balancer configuration through bin/pgsql-svc to update service routing status
Refresh the cluster’s HBA rules through bin/pgsql-hba to avoid primary-replica-specific rule drift
If necessary, use bin/pgsql-rm to remove the failed server and expand with a new replica through bin/pgsql-add
Table Bloat Management
Long-running PostgreSQL will experience “table bloat” / “index bloat” phenomena, leading to system performance degradation.
Regularly using pg_repack to perform online rebuilding of tables and indexes helps maintain PostgreSQL’s good performance.
Pigsty has already installed and enabled this extension by default in all databases, so you can use it directly.
You can use Pigsty’s PGCAT Database - Table Bloat panel to
confirm table bloat and index bloat in the database. Select tables and indexes with high bloat rates (larger tables with bloat rates above 50%) and use pg_repack for online reorganization:
pg_repack dbname -t schema.table
Reorganization does not affect normal read and write operations, but the switching moment after reorganization completes requires an AccessExclusive lock on the table, blocking all access.
Therefore, for high-throughput businesses, it’s recommended to perform this during off-peak periods or maintenance windows. For more details, please refer to: Managing Relation Bloat
VACUUM FREEZE
Freezing expired transaction IDs (VACUUM FREEZE) is an important PostgreSQL maintenance task used to prevent transaction ID (XID) exhaustion leading to downtime.
Although PostgreSQL already provides an automatic vacuum (AutoVacuum) mechanism, for high-standard production environments,
we still recommend combining both automatic and manual approaches, regularly executing database-wide VACUUM FREEZE to ensure XID safety.
You can manually execute VACUUM FREEZE on a database using the following commands:
-- Execute VACUUM FREEZE on the entire database
VACUUMFREEZE;-- Execute VACUUM FREEZE on a specific table
VACUUMFREEZEschema.table_name;
Or set up a scheduled task through crontab, for example, execute every Sunday morning:
# Execute VACUUM FREEZE on all databases every Sunday at 3 AM03 * * 0 postgres psql -c 'VACUUM FREEZE;' dbname
10.7.11 - Version Upgrade
How to upgrade (or downgrade) PostgreSQL minor version kernel, and how to perform major version upgrades
Minor Version Upgrade
To perform a minor version server upgrade/downgrade, you first need to add software to your local software repository: the latest PG minor version RPM/DEB.
First perform a rolling upgrade/downgrade on all replicas, then execute a cluster switchover to upgrade/downgrade the primary.
Add 15.1 packages to the software repository and refresh the node’s yum/apt cache:
cd ~/pigsty; ./infra.yml -t repo_upstream # Add upstream repositorycd /www/pigsty; repotrack postgresql15-*-15.1 # Add 15.1 packages to yum repositorycd ~/pigsty; ./infra.yml -t repo_create # Rebuild repository metadataansible pg-test -b -a 'yum clean all'# Clean node repository cacheansible pg-test -b -a 'yum makecache'# Regenerate yum cache from new repository# For Ubuntu/Debian users, use apt instead of yumansible pg-test -b -a 'apt clean'# Clean node repository cacheansible pg-test -b -a 'apt update'# Regenerate apt cache from new repository
Execute downgrade and restart cluster:
ansible pg-test -b -a "yum downgrade -y postgresql15*"# Downgrade packagespg restart --force pg-test # Restart entire cluster to complete upgrade
Major Version Upgrade
The simplest way to perform a major version upgrade is to create a new cluster using the new version, then perform online migration through logical replication and blue-green deployment.
You can also perform an in-place major version upgrade. When you only use the database kernel itself, this is not complicated; use PostgreSQL’s built-in pg_upgrade:
Suppose you want to upgrade PostgreSQL major version from 14 to 15. You first need to add software to the repository and ensure that core extension plugins installed on both sides of the two major versions also have the same version numbers.
Pigsty uses pgBackRest to manage PostgreSQL backups, arguably the most powerful open-source backup tool in the ecosystem.
It supports incremental/parallel backup and restore, encryption, MinIO/S3, and many other features. Pigsty configures backup functionality by default for each PGSQL cluster.
Pigsty makes every effort to provide a reliable PITR solution, but we accept no responsibility for data loss resulting from PITR operations. Use at your own risk. If you need professional support, please consider our professional services.
The first question is when to backup your database - this is a tradeoff between backup frequency and recovery time.
Since you need to replay WAL logs from the last backup to the recovery target point, the more frequent the backups, the less WAL logs need to be replayed, and the faster the recovery.
Daily Full Backup
For production databases, it’s recommended to start with the simplest daily full backup strategy.
This is also Pigsty’s default backup strategy, implemented via crontab.
node_crontab:['00 01 * * * postgres /pg/bin/pg-backup full']pgbackrest_method: local # Choose backup repository method:`local`, `minio`, or other custom repositorypgbackrest_repo: # pgbackrest repository configuration:https://pgbackrest.org/configuration.html#section-repositorylocal:# Default pgbackrest repository using local POSIX filesystempath:/pg/backup # Local backup directory, defaults to `/pg/backup`retention_full_type:count # Retain full backups by countretention_full:2# Keep 2, up to 3 full backups when using local filesystem repository
When used with the default local local filesystem backup repository, this provides a 24~48 hour recovery window.
Assuming your database size is 100GB and writes 10GB of data per day, the backup size is as follows:
This will consume 2~3 times the database size in space, plus 2 days of WAL logs.
Therefore, in practice, you may need to prepare at least 3~5 times the database size for backup disk to use the default backup strategy.
Full + Incremental Backup
You can optimize backup space usage by adjusting these parameters.
If using MinIO / S3 as a centralized backup repository, you can use storage space beyond local disk limitations.
In this case, consider using full + incremental backup with a 2-week retention policy:
node_crontab:# Full backup at 1 AM on Monday, incremental backups on weekdays- '00 01 * * 1 postgres /pg/bin/pg-backup full'- '00 01 * * 2,3,4,5,6,7 postgres /pg/bin/pg-backup'pgbackrest_method:miniopgbackrest_repo: # pgbackrest repository configuration:https://pgbackrest.org/configuration.html#section-repositoryminio:# Optional minio repositorytype:s3 # minio is S3 compatibles3_endpoint:sss.pigsty # minio endpoint domain, defaults to `sss.pigsty`s3_region:us-east-1 # minio region, defaults to us-east-1, meaningless for minios3_bucket:pgsql # minio bucket name, defaults to `pgsql`s3_key:pgbackrest # minio user access key for pgbackrests3_key_secret:S3User.Backup # minio user secret for pgbackrests3_uri_style:path # minio uses path-style URIs instead of host-stylepath:/pgbackrest # minio backup path, defaults to `/pgbackrest`storage_port:9000# minio port, defaults to 9000storage_ca_file:/etc/pki/ca.crt # minio CA certificate path, defaults to `/etc/pki/ca.crt`block:y# Enable block-level incremental backupbundle:y# Bundle small files into a single filebundle_limit:20MiB # Bundle size limit, recommended 20MiB for object storagebundle_size:128MiB # Bundle target size, recommended 128MiB for object storagecipher_type:aes-256-cbc # Enable AES encryption for remote backup repositorycipher_pass:pgBackRest # AES encryption password, defaults to 'pgBackRest'retention_full_type:time # Retain full backups by timeretention_full:14# Keep full backups from the last 14 days
When used with the built-in minio backup repository, this provides a guaranteed 1-week PITR recovery window.
Assuming your database size is 100GB and writes 10GB of data per day, the backup size is as follows:
Backup Location
By default, Pigsty provides two default backup repository definitions: local and minio backup repositories.
local: Default option, uses local /pg/backup directory (symlink to pg_fs_backup: /data/backups)
minio: Uses SNSD single-node MinIO cluster (supported by Pigsty, but not enabled by default)
pgbackrest_method: local # Choose backup repository method:`local`, `minio`, or other custom repositorypgbackrest_repo: # pgbackrest repository configuration:https://pgbackrest.org/configuration.html#section-repositorylocal:# Default pgbackrest repository using local POSIX filesystempath:/pg/backup # Local backup directory, defaults to `/pg/backup`retention_full_type:count # Retain full backups by countretention_full:2# Keep 2, up to 3 full backups when using local filesystem repositoryminio:# Optional minio repositorytype:s3 # minio is S3 compatibles3_endpoint:sss.pigsty # minio endpoint domain, defaults to `sss.pigsty`s3_region:us-east-1 # minio region, defaults to us-east-1, meaningless for minios3_bucket:pgsql # minio bucket name, defaults to `pgsql`s3_key:pgbackrest # minio user access key for pgbackrests3_key_secret:S3User.Backup # minio user secret for pgbackrests3_uri_style:path # minio uses path-style URIs instead of host-stylepath:/pgbackrest # minio backup path, defaults to `/pgbackrest`storage_port:9000# minio port, defaults to 9000storage_ca_file:/etc/pki/ca.crt # minio CA certificate path, defaults to `/etc/pki/ca.crt`block:y# Enable block-level incremental backupbundle:y# Bundle small files into a single filebundle_limit:20MiB # Bundle size limit, recommended 20MiB for object storagebundle_size:128MiB # Bundle target size, recommended 128MiB for object storagecipher_type:aes-256-cbc # Enable AES encryption for remote backup repositorycipher_pass:pgBackRest # AES encryption password, defaults to 'pgBackRest'retention_full_type:time # Retain full backups by timeretention_full:14# Keep full backups from the last 14 days
10.8.2 - Backup Mechanism
Backup scripts, cron jobs, backup repository and infrastructure
Backups can be invoked via built-in scripts, scheduled using node crontab,
managed by pgbackrest, and stored in backup repositories,
which can be local disk filesystems or MinIO / S3, supporting different retention policies.
Scripts
You can create backups using the pg_dbsu user (defaults to postgres) to execute pgbackrest commands:
pgbackrest --stanza=pg-meta --type=full backup # Create full backup for cluster pg-meta
tmp: /pg/spool used as temporary spool directory for pgbackrest
data: /pg/backup used to store data (when using the default local filesystem backup repository)
Additionally, during PITR recovery, Pigsty creates a temporary /pg/conf/pitr.conf pgbackrest configuration file,
and writes postgres recovery logs to the /pg/tmp/recovery.log file.
When creating a postgres cluster, Pigsty automatically creates an initial backup.
Since the new cluster is almost empty, this is a very small backup.
It leaves a /etc/pgbackrest/initial.done marker file to avoid recreating the initial backup.
If you don’t want an initial backup, set pgbackrest_init_backup to false.
Management
Enable Backup
If pgbackrest_enabled is set to true when the database cluster is created, backups will be automatically enabled.
If this value was false at creation time, you can enable the pgbackrest component with the following command:
./pgsql.yml -t pg_backup # Run pgbackrest subtask
Remove Backup
When removing the primary instance (pg_role = primary), Pigsty will delete the pgbackrest backup stanza.
Use the pg_backup subtask to remove backups only, and the pg_rm_backup parameter (set to false) to preserve backups.
If your backup repository is locked (e.g., S3 / MinIO has locking options), this operation will fail.
Backup Deletion
Deleting backups may result in permanent data loss. This is a dangerous operation, please proceed with caution.
List Backups
This command will list all backups in the pgbackrest repository (shared across all clusters)
pgbackrest info
Manual Backup
Pigsty provides a built-in script /pg/bin/pg-backup that wraps the pgbackrest backup command.
pg-backup # Perform incremental backuppg-backup full # Perform full backuppg-backup incr # Perform incremental backuppg-backup diff # Perform differential backup
Base Backup
Pigsty provides an alternative backup script /pg/bin/pg-basebackup that does not depend on pgbackrest and directly provides a physical copy of the database cluster.
The default backup directory is /pg/backup.
NAME
pg-basebackup -- make base backup from PostgreSQL instance
SYNOPSIS
pg-basebackup -sdfeukr
pg-basebackup --src postgres:/// --dst . --file backup.tar.lz4
DESCRIPTION
-s, --src, --url Backup source URL, optional, defaults to "postgres:///", password should be provided in url, ENV, or .pgpass if required
-d, --dst, --dir Location to store backup file, defaults to "/pg/backup"-f, --file Override default backup filename, "backup_${tag}_${date}.tar.lz4"-r, --remove Remove .lz4 files older than n minutes, defaults to 1200(20 hours)-t, --tag Backup file tag, uses target cluster name or local IP address if not set, also used for default filename
-k, --key Encryption key when --encrypt is specified, defaults to ${tag}-u, --upload Upload backup file to cloud storage (needs to be implemented by yourself)-e, --encryption Use OpenSSL RC4 encryption, uses tag as key if not specified
-h, --help Print this help information
postgres@pg-meta-1:~$ pg-basebackup
[2025-07-13 06:16:05][INFO]================================================================[2025-07-13 06:16:05][INFO][INIT] pg-basebackup begin, checking parameters
[2025-07-13 06:16:05][DEBUG][INIT] filename (-f) : backup_pg-meta_20250713.tar.lz4
[2025-07-13 06:16:05][DEBUG][INIT] src (-s) : postgres:///
[2025-07-13 06:16:05][DEBUG][INIT] dst (-d) : /pg/backup
[2025-07-13 06:16:05][INFO][LOCK] lock acquired success on /tmp/backup.lock, pid=107417[2025-07-13 06:16:05][INFO][BKUP] backup begin, from postgres:/// to /pg/backup/backup_pg-meta_20250713.tar.lz4
pg_basebackup: initiating base backup, waiting for checkpoint to completepg_basebackup: checkpoint completed
pg_basebackup: write-ahead log start point: 0/7000028 on timeline 1pg_basebackup: write-ahead log end point: 0/7000FD8
pg_basebackup: syncing data to disk ...
pg_basebackup: base backup completed
[2025-07-13 06:16:06][INFO][BKUP] backup complete!
[2025-07-13 06:16:06][INFO][DONE] backup procedure complete!
[2025-07-13 06:16:06][INFO]================================================================
The backup uses lz4 compression. You can decompress and extract the tarball with the following command:
mkdir -p /tmp/data # Extract backup to this directorycat /pg/backup/backup_pg-meta_20250713.tar.lz4 | unlz4 -d -c | tar -xC /tmp/data
Logical Backup
You can also perform logical backups using the pg_dump command.
Logical backups cannot be used for PITR (Point-in-Time Recovery), but are very useful for migrating data between different major versions or implementing flexible data export logic.
Bootstrap from Repository
Suppose you have an existing cluster pg-meta and want to clone it as pg-meta2:
You need to create a new pg-meta2 cluster branch and then run pitr on it.
You can configure the backup storage location by specifying the pgbackrest_repo parameter.
You can define multiple repositories here, and Pigsty will choose which one to use based on the value of pgbackrest_method.
Default Repositories
By default, Pigsty provides two default backup repository definitions: local and minio backup repositories.
local: Default option, uses local /pg/backup directory (symlink to pg_fs_backup: /data/backups)
minio: Uses SNSD single-node MinIO cluster (supported by Pigsty, but not enabled by default)
pgbackrest_method: local # Choose backup repository method:`local`, `minio`, or other custom repositorypgbackrest_repo: # pgbackrest repository configuration:https://pgbackrest.org/configuration.html#section-repositorylocal:# Default pgbackrest repository using local POSIX filesystempath:/pg/backup # Local backup directory, defaults to `/pg/backup`retention_full_type:count # Retain full backups by countretention_full:2# Keep 2, up to 3 full backups when using local filesystem repositoryminio:# Optional minio repositorytype:s3 # minio is S3 compatibles3_endpoint:sss.pigsty # minio endpoint domain, defaults to `sss.pigsty`s3_region:us-east-1 # minio region, defaults to us-east-1, meaningless for minios3_bucket:pgsql # minio bucket name, defaults to `pgsql`s3_key:pgbackrest # minio user access key for pgbackrests3_key_secret:S3User.Backup # minio user secret for pgbackrests3_uri_style:path # minio uses path-style URIs instead of host-stylepath:/pgbackrest # minio backup path, defaults to `/pgbackrest`storage_port:9000# minio port, defaults to 9000storage_ca_file:/etc/pki/ca.crt # minio CA certificate path, defaults to `/etc/pki/ca.crt`block:y# Enable block-level incremental backupbundle:y# Bundle small files into a single filebundle_limit:20MiB # Bundle size limit, recommended 20MiB for object storagebundle_size:128MiB # Bundle target size, recommended 128MiB for object storagecipher_type:aes-256-cbc # Enable AES encryption for remote backup repositorycipher_pass:pgBackRest # AES encryption password, defaults to 'pgBackRest'retention_full_type:time # Retain full backups by timeretention_full:14# Keep full backups from the last 14 days
Repository Retention Policy
If you backup daily but don’t delete old backups, the backup repository will grow indefinitely and exhaust disk space.
You need to define a retention policy to keep only a limited number of backups.
The default backup policy is defined in the pgbackrest_repo parameter and can be adjusted as needed.
local: Keep the latest 2 full backups, allowing up to 3 during backup
minio: Keep all full backups from the last 14 days
Space Planning
Object storage provides almost unlimited storage capacity, so there’s no need to worry about disk space.
You can use a hybrid full + differential backup strategy to optimize space usage.
For local disk backup repositories, Pigsty recommends using a policy that keeps the latest 2 full backups,
meaning the disk will retain the two most recent full backups (there may be a third copy while running a new backup).
This guarantees at least a 24-hour recovery window. See Backup Policy for details.
Other Repository Options
You can also use other services as backup repositories, refer to the pgbackrest documentation for details:
You can enable MinIO locking by adding the lock flag in minio_buckets:
minio_buckets:- {name: pgsql , lock:true}- {name: meta ,versioning:true}- {name:data }
Using Object Storage
Object storage services provide almost unlimited storage capacity and provide remote disaster recovery capability for your system.
If you don’t have an object storage service, Pigsty has built-in MinIO support.
MinIO
You can enable the MinIO backup repository by uncommenting the following settings.
Note that pgbackrest only supports HTTPS / domain names, so you must run MinIO with domain names and HTTPS endpoints.
all:vars:pgbackrest_method:minio # Use minio as default backup repositorychildren:# Define a single-node minio SNSD clusterminio:{hosts:{10.10.10.10:{minio_seq: 1 }} ,vars:{minio_cluster:minio }}
S3
If you only have one node, a meaningful backup strategy would be to use cloud provider object storage services like AWS S3, Alibaba Cloud OSS, or Google Cloud, etc.
To do this, you can define a new repository:
pgbackrest_method:s3 # Use 'pgbackrest_repo.s3' as backup repositorypgbackrest_repo: # pgbackrest repository configuration:https://pgbackrest.org/configuration.html#section-repositorys3:# Alibaba Cloud OSS (S3 compatible) object storage servicetype:s3 # oss is S3 compatibles3_endpoint:oss-cn-beijing-internal.aliyuncs.coms3_region:oss-cn-beijings3_bucket:<your_bucket_name>s3_key:<your_access_key>s3_key_secret:<your_secret_key>s3_uri_style:hostpath:/pgbackrestbundle:y# Bundle small files into a single filebundle_limit:20MiB # Bundle size limit, recommended 20MiB for object storagebundle_size:128MiB # Bundle target size, recommended 128MiB for object storagecipher_type:aes-256-cbc # Enable AES encryption for remote backup repositorycipher_pass:pgBackRest # AES encryption password, defaults to 'pgBackRest'retention_full_type:time # Retain full backups by timeretention_full:14# Keep full backups from the last 14 dayslocal:# Default pgbackrest repository using local POSIX filesystempath:/pg/backup # Local backup directory, defaults to `/pg/backup`retention_full_type:count # Retain full backups by countretention_full:2# Keep 2, up to 3 full backups when using local filesystem repository
Managing Backups
Enable Backup
If pgbackrest_enabled is set to true when the database cluster is created, backups will be automatically enabled.
If this value was false at creation time, you can enable the pgbackrest component with the following command:
./pgsql.yml -t pg_backup # Run pgbackrest subtask
Remove Backup
When removing the primary instance (pg_role = primary), Pigsty will delete the pgbackrest backup stanza.
Use the pg_backup subtask to remove backups only, and the pg_rm_backup parameter (set to false) to preserve backups.
If your backup repository is locked (e.g., S3 / MinIO has locking options), this operation will fail.
Backup Deletion
Deleting backups may result in permanent data loss. This is a dangerous operation, please proceed with caution.
List Backups
This command will list all backups in the pgbackrest repository (shared across all clusters)
pgbackrest info
Manual Backup
Pigsty provides a built-in script /pg/bin/pg-backup that wraps the pgbackrest backup command.
pg-backup # Perform incremental backuppg-backup full # Perform full backuppg-backup incr # Perform incremental backuppg-backup diff # Perform differential backup
Base Backup
Pigsty provides an alternative backup script /pg/bin/pg-basebackup that does not depend on pgbackrest and directly provides a physical copy of the database cluster.
The default backup directory is /pg/backup.
NAME
pg-basebackup -- make base backup from PostgreSQL instance
SYNOPSIS
pg-basebackup -sdfeukr
pg-basebackup --src postgres:/// --dst . --file backup.tar.lz4
DESCRIPTION
-s, --src, --url Backup source URL, optional, defaults to "postgres:///", password should be provided in url, ENV, or .pgpass if required
-d, --dst, --dir Location to store backup file, defaults to "/pg/backup"-f, --file Override default backup filename, "backup_${tag}_${date}.tar.lz4"-r, --remove Remove .lz4 files older than n minutes, defaults to 1200(20 hours)-t, --tag Backup file tag, uses target cluster name or local IP address if not set, also used for default filename
-k, --key Encryption key when --encrypt is specified, defaults to ${tag}-u, --upload Upload backup file to cloud storage (needs to be implemented by yourself)-e, --encryption Use OpenSSL RC4 encryption, uses tag as key if not specified
-h, --help Print this help information
postgres@pg-meta-1:~$ pg-basebackup
[2025-07-13 06:16:05][INFO]================================================================[2025-07-13 06:16:05][INFO][INIT] pg-basebackup begin, checking parameters
[2025-07-13 06:16:05][DEBUG][INIT] filename (-f) : backup_pg-meta_20250713.tar.lz4
[2025-07-13 06:16:05][DEBUG][INIT] src (-s) : postgres:///
[2025-07-13 06:16:05][DEBUG][INIT] dst (-d) : /pg/backup
[2025-07-13 06:16:05][INFO][LOCK] lock acquired success on /tmp/backup.lock, pid=107417[2025-07-13 06:16:05][INFO][BKUP] backup begin, from postgres:/// to /pg/backup/backup_pg-meta_20250713.tar.lz4
pg_basebackup: initiating base backup, waiting for checkpoint to completepg_basebackup: checkpoint completed
pg_basebackup: write-ahead log start point: 0/7000028 on timeline 1pg_basebackup: write-ahead log end point: 0/7000FD8
pg_basebackup: syncing data to disk ...
pg_basebackup: base backup completed
[2025-07-13 06:16:06][INFO][BKUP] backup complete!
[2025-07-13 06:16:06][INFO][DONE] backup procedure complete!
[2025-07-13 06:16:06][INFO]================================================================
The backup uses lz4 compression. You can decompress and extract the tarball with the following command:
mkdir -p /tmp/data # Extract backup to this directorycat /pg/backup/backup_pg-meta_20250713.tar.lz4 | unlz4 -d -c | tar -xC /tmp/data
Logical Backup
You can also perform logical backups using the pg_dump command.
Logical backups cannot be used for PITR (Point-in-Time Recovery), but are very useful for migrating data between different major versions or implementing flexible data export logic.
Bootstrap from Repository
Suppose you have an existing cluster pg-meta and want to clone it as pg-meta2:
You need to create a new pg-meta2 cluster branch and then run pitr on it.
10.8.4 - Admin Commands
Managing backup repositories and backups
Enable Backup
If pgbackrest_enabled is set to true when the database cluster is created, backups will be automatically enabled.
If this value was false at creation time, you can enable the pgbackrest component with the following command:
./pgsql.yml -t pg_backup # Run pgbackrest subtask
Remove Backup
When removing the primary instance (pg_role = primary), Pigsty will delete the pgbackrest backup stanza.
Use the pg_backup subtask to remove backups only, and the pg_rm_backup parameter (set to false) to preserve backups.
If your backup repository is locked (e.g., S3 / MinIO has locking options), this operation will fail.
Backup Deletion
Deleting backups may result in permanent data loss. This is a dangerous operation, please proceed with caution.
List Backups
This command will list all backups in the pgbackrest repository (shared across all clusters)
pgbackrest info
Manual Backup
Pigsty provides a built-in script /pg/bin/pg-backup that wraps the pgbackrest backup command.
pg-backup # Perform incremental backuppg-backup full # Perform full backuppg-backup incr # Perform incremental backuppg-backup diff # Perform differential backup
Base Backup
Pigsty provides an alternative backup script /pg/bin/pg-basebackup that does not depend on pgbackrest and directly provides a physical copy of the database cluster.
The default backup directory is /pg/backup.
NAME
pg-basebackup -- make base backup from PostgreSQL instance
SYNOPSIS
pg-basebackup -sdfeukr
pg-basebackup --src postgres:/// --dst . --file backup.tar.lz4
DESCRIPTION
-s, --src, --url Backup source URL, optional, defaults to "postgres:///", password should be provided in url, ENV, or .pgpass if required
-d, --dst, --dir Location to store backup file, defaults to "/pg/backup"-f, --file Override default backup filename, "backup_${tag}_${date}.tar.lz4"-r, --remove Remove .lz4 files older than n minutes, defaults to 1200(20 hours)-t, --tag Backup file tag, uses target cluster name or local IP address if not set, also used for default filename
-k, --key Encryption key when --encrypt is specified, defaults to ${tag}-u, --upload Upload backup file to cloud storage (needs to be implemented by yourself)-e, --encryption Use OpenSSL RC4 encryption, uses tag as key if not specified
-h, --help Print this help information
postgres@pg-meta-1:~$ pg-basebackup
[2025-07-13 06:16:05][INFO]================================================================[2025-07-13 06:16:05][INFO][INIT] pg-basebackup begin, checking parameters
[2025-07-13 06:16:05][DEBUG][INIT] filename (-f) : backup_pg-meta_20250713.tar.lz4
[2025-07-13 06:16:05][DEBUG][INIT] src (-s) : postgres:///
[2025-07-13 06:16:05][DEBUG][INIT] dst (-d) : /pg/backup
[2025-07-13 06:16:05][INFO][LOCK] lock acquired success on /tmp/backup.lock, pid=107417[2025-07-13 06:16:05][INFO][BKUP] backup begin, from postgres:/// to /pg/backup/backup_pg-meta_20250713.tar.lz4
pg_basebackup: initiating base backup, waiting for checkpoint to completepg_basebackup: checkpoint completed
pg_basebackup: write-ahead log start point: 0/7000028 on timeline 1pg_basebackup: write-ahead log end point: 0/7000FD8
pg_basebackup: syncing data to disk ...
pg_basebackup: base backup completed
[2025-07-13 06:16:06][INFO][BKUP] backup complete!
[2025-07-13 06:16:06][INFO][DONE] backup procedure complete!
[2025-07-13 06:16:06][INFO]================================================================
The backup uses lz4 compression. You can decompress and extract the tarball with the following command:
mkdir -p /tmp/data # Extract backup to this directorycat /pg/backup/backup_pg-meta_20250713.tar.lz4 | unlz4 -d -c | tar -xC /tmp/data
Logical Backup
You can also perform logical backups using the pg_dump command.
Logical backups cannot be used for PITR (Point-in-Time Recovery), but are very useful for migrating data between different major versions or implementing flexible data export logic.
Bootstrap from Repository
Suppose you have an existing cluster pg-meta and want to clone it as pg-meta2:
You need to create a new pg-meta2 cluster branch and then run pitr on it.
10.8.5 - Restore Operations
Restore PostgreSQL from backups
You can perform Point-in-Time Recovery (PITR) in Pigsty using pre-configured pgbackrest.
Manual Approach: Manually execute PITR using pg-pitr prompt scripts, more flexible but more complex.
Playbook Approach: Automatically execute PITR using pgsql-pitr.yml playbook, highly automated but less flexible and error-prone.
If you are very familiar with the configuration, you can use the fully automated playbook, otherwise manual step-by-step operation is recommended.
Quick Start
If you want to roll back the pg-meta cluster to a previous point in time, add the pg_pitr parameter:
pg-meta:hosts:{10.10.10.10:{pg_seq: 1, pg_role:primary } }vars:pg_cluster:pg-meta2pg_pitr:{time:'2025-07-13 10:00:00+00'}# Recover from latest backup
Then run the pgsql-pitr.yml playbook, which will roll back the pg-meta cluster to the specified point in time.
./pgsql-pitr.yml -l pg-meta
Post-Recovery
The recovered cluster will have archive_modedisabled to prevent accidental WAL writes.
If the recovered database state is normal, you can enable archive_mode and perform a full backup.
psql -c 'ALTER SYSTEM RESET archive_mode; SELECT pg_reload_conf();'pg-backup full # Perform new full backup
Recovery Target
You can specify different types of recovery targets in pg_pitr, but they are mutually exclusive:
name: Recover to a named restore point (created by pg_create_restore_point)
xid: Recover to a specific transaction ID (TXID/XID)
lsn: Recover to a specific LSN (Log Sequence Number) point
If any of the above parameters are specified, the recovery type will be set accordingly,
otherwise it will be set to latest (end of WAL archive stream).
The special immediate type can be used to instruct pgbackrest to minimize recovery time by stopping at the first consistent point.
Target Types
pg_pitr:{}# Recover to latest state (end of WAL archive stream)
pg_pitr:{time:"2025-07-13 10:00:00+00"}
pg_pitr:{lsn:"0/4001C80"}
pg_pitr:{xid:"250000"}
pg_pitr:{name:"some_restore_point"}
pg_pitr:{type:"immediate"}
Recover by Time
The most commonly used target is a point in time; you can specify the time point to recover to:
If you have a transaction that accidentally deleted some data, the best way to recover is to restore the database to the state before that transaction.
You can find the exact transaction ID from monitoring dashboards or from the TXID field in CSVLOG.
Inclusive vs Exclusive
Target parameters are “inclusive” by default, meaning recovery will include the target point.
The exclusive flag will exclude that exact target, e.g., xid 24999 will be the last transaction replayed.
PostgreSQL uses LSN (Log Sequence Number) to identify the location of WAL records.
You can find it in many places, such as the PG LSN panel in Pigsty dashboards.
To recover to an exact position in the WAL stream, you can also specify the timeline parameter (defaults to latest)
Recovery Source
cluster: From which cluster to recover? Defaults to current pg_cluster, you can use any other cluster in the same pgbackrest repository
repo: Override backup repository, uses same format as pgbackrest_repo
set: Defaults to latest backup set, but you can specify a specific pgbackrest backup by label
Pigsty will recover from the pgbackrest backup repository. If you use a centralized backup repository (like MinIO/S3),
you can specify another “stanza” (another cluster’s backup directory) as the recovery source.
pg_pitr:# Define PITR taskcluster:"some_pg_cls_name"# Source cluster nametype: latest # Recovery target type:time, xid, name, lsn, immediate, latesttime:"2025-01-01 10:00:00+00"# Recovery target: time, mutually exclusive with xid, name, lsnname:"some_restore_point"# Recovery target: named restore point, mutually exclusive with time, xid, lsnxid:"100000"# Recovery target: transaction ID, mutually exclusive with time, name, lsnlsn:"0/3000000"# Recovery target: log sequence number, mutually exclusive with time, name, xidtimeline:latest # Target timeline, can be integer, defaults to latestexclusive:false# Whether to exclude target point, defaults to falseaction: pause # Post-recovery action:pause, promote, shutdownarchive:false# Whether to keep archive settings? Defaults to falsedb_exclude:[template0, template1 ]db_include:[]link_map:pg_wal:'/data/wal'pg_xact:'/data/pg_xact'process:4# Number of parallel recovery processesrepo:{}# Recovery source repositorydata:/pg/data # Data recovery locationport:5432# Listening port for recovered instance
10.8.6 - Clone Database Cluster
How to use PITR to create a new PostgreSQL cluster and restore to a specified point in time?
Quick Start
Create an online replica of an existing cluster using Standby Cluster
Create a point-in-time snapshot of an existing cluster using PITR
Perform post-PITR cleanup to ensure the new cluster’s backup process works properly
You can use the PG PITR mechanism to clone an entire database cluster.
Reset a Cluster’s State
You can also consider creating a brand new empty cluster, then use PITR to reset it to a specific state of the pg-meta cluster.
Using this technique, you can clone any point-in-time (within backup retention period) state of the existing cluster pg-meta to a new cluster.
Using the Pigsty 4-node sandbox environment as an example, use the following command to reset the pg-test cluster to the latest state of the pg-meta cluster:
When you restore a cluster using PITR, the new cluster’s PITR functionality is disabled. This is because if it also tries to generate backups and archive WAL, it could dirty the backup repository of the previous cluster.
Therefore, after confirming that the state of this PITR-restored new cluster meets expectations, you need to perform the following cleanup:
Upgrade the backup repository Stanza to accept new backups from different clusters (only when restoring from another cluster)
Enable archive_mode to allow the new cluster to archive WAL logs (requires cluster restart)
Perform a new full backup to ensure the new cluster’s data is included (optional, can also wait for crontab scheduled execution)
pb stanza-upgrade
psql -c 'ALTER SYSTEM RESET archive_mode;'pg-backup full
Through these operations, your new cluster will have its own backup history starting from the first full backup. If you skip these steps, the new cluster’s backups will not work, and WAL archiving will not take effect, meaning you cannot perform any backup or PITR operations on the new cluster.
Consequences of Not Cleaning Up
Suppose you performed PITR recovery on the pg-test cluster using data from another cluster pg-meta, but did not perform cleanup.
Then at the next routine backup, you will see the following error:
postgres@pg-test-1:~$ pb backup
2025-12-27 10:20:29.336 P00 INFO: backup command begin...
2025-12-27 10:20:29.357 P00 ERROR: [051]: PostgreSQL version 18, system-id 7588470953413201282do not match stanza version 18, system-id 7588470974940466058 HINT: is this the correct stanza?
Clone a New Cluster
For example, suppose you have a cluster pg-meta, and now you want to clone a new cluster pg-meta2 from pg-meta.
You can consider using the Standby Cluster method to create a new cluster pg-meta2.
pgBackrest supports incremental backup/restore, so if you have already pulled pg-meta’s data through physical replication, the incremental PITR restore is usually very fast.
Using this technique, you can not only clone the latest state of the pg-meta cluster, but also clone to any point in time.
10.8.7 - Instance Recovery
Clone instances and perform point-in-time recovery on the same machine
Pigsty provides two utility scripts for quickly cloning instances and performing point-in-time recovery on the same machine:
pg-fork: Quickly clone a new PostgreSQL instance on the same machine
pg-pitr: Manually perform point-in-time recovery using pgbackrest
These two scripts can be used together: first use pg-fork to clone the instance, then use pg-pitr to restore the cloned instance to a specified point in time.
pg-fork
pg-fork can quickly clone a new PostgreSQL instance on the same machine.
Quick Start
Execute the following command as the postgres user (dbsu) to create a new instance:
pg-fork 1# Clone from /pg/data to /pg/data1, port 15432pg-fork 2 -d /pg/data1 # Clone from /pg/data1 to /pg/data2, port 25432pg-fork 3 -D /tmp/test -P 5555# Clone to custom directory and port
Clone instance number (1-9), determines default port and data directory
Optional Parameters:
Parameter
Description
Default
-d, --data <datadir>
Source instance data directory
/pg/data or $PG_DATA
-D, --dst <dst_dir>
Target data directory
/pg/data<FORK_ID>
-p, --port <port>
Source instance port
5432 or $PG_PORT
-P, --dst-port <port>
Target instance port
<FORK_ID>5432
-s, --skip
Skip backup API, use cold copy mode
-
-y, --yes
Skip confirmation prompts
-
-h, --help
Show help information
-
How It Works
pg-fork supports two working modes:
Hot Backup Mode (default, source instance running):
Call pg_backup_start() to start backup
Use cp --reflink=auto to copy data directory
Call pg_backup_stop() to end backup
Modify configuration files to avoid conflicts with source instance
Cold Copy Mode (using -s parameter or source instance not running):
Directly use cp --reflink=auto to copy data directory
Modify configuration files
If you use XFS (with reflink enabled), Btrfs, or ZFS file systems, pg-fork will leverage Copy-on-Write features. The data directory copy completes in a few hundred milliseconds and takes almost no additional storage space.
pg-pitr
pg-pitr is a script for manually performing point-in-time recovery, based on pgbackrest.
Quick Start
pg-pitr -d # Restore to latest statepg-pitr -i # Restore to backup completion timepg-pitr -t "2025-01-01 12:00:00+08"# Restore to specified time pointpg-pitr -n my-savepoint # Restore to named restore pointpg-pitr -l "0/7C82CB8"# Restore to specified LSNpg-pitr -x 12345678 -X # Restore to before transactionpg-pitr -b 20251225-120000F # Restore to specified backup set
Command Syntax
pg-pitr [options][recovery_target]
Recovery Target (choose one):
Parameter
Description
-d, --default
Restore to end of WAL archive stream (latest state)
-i, --immediate
Restore to database consistency point (fastest recovery)
-t, --time <timestamp>
Restore to specified time point
-n, --name <restore_point>
Restore to named restore point
-l, --lsn <lsn>
Restore to specified LSN
-x, --xid <xid>
Restore to specified transaction ID
-b, --backup <label>
Restore to specified backup set
Optional Parameters:
Parameter
Description
Default
-D, --data <path>
Recovery target data directory
/pg/data
-s, --stanza <name>
pgbackrest stanza name
Auto-detect
-X, --exclusive
Exclude target point (restore to before target)
-
-P, --promote
Auto-promote after recovery (default pauses)
-
-c, --check
Dry run mode, only print commands
-
-y, --yes
Skip confirmation and countdown
-
Post-Recovery Processing
After recovery completes, the instance will be in recovery paused state (unless -P parameter is used). You need to:
Start instance: pg_ctl -D /pg/data start
Verify data: Check if data meets expectations
Promote instance: pg_ctl -D /pg/data promote
Enable archiving: psql -c "ALTER SYSTEM SET archive_mode = on;"
Restart instance: pg_ctl -D /pg/data restart
Execute backup: pg-backup full
Combined Usage
pg-fork and pg-pitr can be combined for a safe PITR verification workflow:
# 1. Clone current instancepg-fork 1 -y
# 2. Execute PITR on cloned instance (doesn't affect production)pg-pitr -D /pg/data1 -t "2025-12-27 10:00:00+08"# 3. Start cloned instancepg_ctl -D /pg/data1 start
# 4. Verify recovery resultspsql -p 15432 -c "SELECT count(*) FROM orders WHERE created_at < '2025-12-27 10:00:00';"# 5. After confirmation, you can choose:# - Option A: Execute the same PITR on production instance# - Option B: Promote cloned instance as new production instance# 6. Clean up test instancepg_ctl -D /pg/data1 stop
rm -rf /pg/data1
Notes
Runtime Requirements
Must be executed as postgres user (or postgres group member)
pg-pitr requires stopping target instance’s PostgreSQL before execution
pg-fork hot backup mode requires source instance to be running
File System
XFS (with reflink enabled) or Btrfs file system recommended
Cloning on CoW file systems is almost instant and takes no extra space
Non-CoW file systems will perform full copy, taking longer
Port Planning
FORK_ID
Default Port
Default Data Directory
1
15432
/pg/data1
2
25432
/pg/data2
3
35432
/pg/data3
…
…
…
9
95432
/pg/data9
10.8.8 - Clone Database
How to clone an existing database within a PostgreSQL cluster using instant XFS cloning
Clone Database
You can copy a PostgreSQL database through the template mechanism, but no active connections to the template database are allowed during this period.
If you want to clone the postgres database, you must execute the following two statements at the same time. Ensure all connections to the postgres database are cleaned up before executing Clone:
If you are using PostgreSQL 18 or higher, Pigsty sets file_copy_method by default. This parameter allows you to clone a database in O(1) (~200ms) time complexity without copying data files.
However, you must explicitly use the FILE_COPY strategy to create the database. Since the STRATEGY parameter of CREATE DATABASE was introduced in PostgreSQL 15, the default value has been WAL_LOG. You need to explicitly specify FILE_COPY for instant cloning.
For example, cloning a 30 GB database: normal clone (WAL_LOG) takes 18 seconds, while instant clone (FILE_COPY) only needs constant time of 200 milliseconds.
However, you still need to ensure no active connections to the template database during cloning, but this time can be very short, making it practical for production environments.
If you need a new database copy for testing or development, instant cloning is an excellent choice. It doesn’t introduce additional storage overhead because it uses the file system’s CoW (Copy on Write) mechanism.
Since Pigsty v4.0, you can use strategy: FILE_COPY in the pg_databases parameter to achieve instant database cloning.
pg-meta:hosts:10.10.10.10:{pg_seq: 1, pg_role:primary }vars:pg_cluster:pg-metapg_version:18pg_databases:- name:meta- name:meta_devtemplate:metastrategy:FILE_COPY # <---- Introduced in PG 15, instant in PG18#comment: "meta clone" # <---- Database comment#pgbouncer: false # <---- Not added to connection pool?#register_datasource: false # <---- Not added to Grafana datasource?
After configuration, use the standard database creation SOP to create the database:
bin/pgsql-db pg-meta meta_dev
Limitations and Notes
This feature is only available on supported file systems (xfs, btrfs, zfs, apfs). If the file system doesn’t support it, PostgreSQL will fail with an error.
By default, mainstream OS distributions’ xfs have reflink=1 enabled by default, so you don’t need to worry about this in most cases.
OpenZFS requires explicit configuration to support CoW, but due to prior data corruption incidents, it’s not recommended for production use.
If your PostgreSQL version is below 15, specifying strategy will have no effect.
Please don’t use the postgres database as a template database for cloning, as management connections typically connect to the postgres database, which prevents the cloning operation.
Use instant cloning with caution in extremely high concurrency/throughput production environments, as it requires clearing all connections to the template database within the cloning window (200ms), otherwise the clone will fail.
10.8.9 - Manual Recovery
Manually perform PITR following prompt scripts in sandbox environment
You can use the pgsql-pitr.yml playbook to perform PITR, but in some cases, you may want to manually execute PITR using pgbackrest primitives directly for fine-grained control.
We will use a four-node sandbox cluster with MinIO backup repository to demonstrate the process.
Initialize Sandbox
Use vagrant or terraform to prepare a four-node sandbox environment, then:
curl https://repo.pigsty.io/get | bash;cd ~/pigsty/
./configure -c full
./install
Now operate as the admin user (or dbsu) on the admin node.
Check Backup
To check backup status, you need to switch to the postgres user and use the pb command:
sudo su - postgres # Switch to dbsu: postgres userpb info # Print pgbackrest backup info
pb is an alias for pgbackrest that automatically retrieves the stanza name from pgbackrest configuration.
function pb(){localstanza=$(grep -o '\[[^][]*]' /etc/pgbackrest/pgbackrest.conf | head -n1 | sed 's/.*\[\([^]]*\)].*/\1/') pgbackrest --stanza=$stanza$@}
You can see the initial backup information, which is a full backup:
The backup completed at 2025-07-13 02:27:33+00, which is the earliest time you can restore to.
Since WAL archiving is active, you can restore to any point in time after the backup, up to the end of WAL (i.e., now).
Generate Heartbeats
You can generate some heartbeats to simulate workload. /pg-bin/pg-heartbeat is for this purpose,
it writes a heartbeat timestamp to the monitor.heartbeat table every second.
make rh # Run heartbeat: ssh 10.10.10.10 'sudo -iu postgres /pg/bin/pg-heartbeat'
while true;do pgbench -nv -P1 -c4 --rate=64 -T10 postgres://dbuser_meta:[email protected]:5433/meta;donepgbench (17.5 (Homebrew), server 17.4 (Ubuntu 17.4-1.pgdg24.04+2))progress: 1.0 s, 60.9 tps, lat 7.295 ms stddev 4.219, 0 failed, lag 1.818 ms
progress: 2.0 s, 69.1 tps, lat 6.296 ms stddev 1.983, 0 failed, lag 1.397 ms
...
PITR Manual
Now let’s choose a recovery point in time, such as 2025-07-13 03:03:03+00, which is a point after the initial backup (and heartbeat).
To perform manual PITR, use the pg-pitr tool:
$ pg-pitr -t "2025-07-13 03:03:00+00"
It will generate instructions for performing the recovery, typically requiring four steps:
Perform time PITR on pg-meta
[1. Stop PostgreSQL]=========================================== 1.1 Pause Patroni (if there are any replicas) $ pg pause <cls> # Pause patroni auto-failover 1.2 Shutdown Patroni
$ pt-stop # sudo systemctl stop patroni 1.3 Shutdown Postgres
$ pg-stop # pg_ctl -D /pg/data stop -m fast[2. Perform PITR]=========================================== 2.1 Restore Backup
$ pgbackrest --stanza=pg-meta --type=time --target='2025-07-13 03:03:00+00' restore
2.2 Start PG to Replay WAL
$ pg-start # pg_ctl -D /pg/data start 2.3 Validate and Promote
- If database content is ok, promote it to finish recovery, otherwise goto 2.1
$ pg-promote # pg_ctl -D /pg/data promote
[3. Restore Primary]=========================================== 3.1 Enable Archive Mode (Restart Required) $ psql -c 'ALTER SYSTEM SET archive_mode = on;' 3.1 Restart Postgres to Apply Changes
$ pg-restart # pg_ctl -D /pg/data restart 3.3 Restart Patroni
$ pt-restart # sudo systemctl restart patroni[4. Restore Cluster]=========================================== 4.1 Re-Init All [**REPLICAS**](if any) - 4.1.1 option 1: restore replicas with same pgbackrest cmd (require central backup repo) $ pgbackrest --stanza=pg-meta --type=time --target='2025-07-13 03:03:00+00' restore
- 4.1.2 option 2: nuke the replica data dir and restart patroni (may take long time to restore) $ rm -rf /pg/data/*; pt-restart
- 4.1.3 option 3: reinit with patroni, which may fail if primary lsn < replica lsn
$ pg reinit pg-meta
4.2 Resume Patroni
$ pg resume pg-meta
4.3 Full Backup (optional) $ pg-backup full # Recommended to perform new full backup after PITR
Single Node Example
Let’s start with the simple single-node pg-meta cluster as a simpler example.
# Optional, because postgres will be shutdown by patroni if patroni is not paused$ pg_stop # pg_ctl -D /pg/data stop -m fast, shutdown postgrespg_ctl: PID file "/pg/data/postmaster.pid" does not exist
Is server running?
$ pg-ps # Print postgres related processes UID PID PPID C STIME TTY STAT TIME CMD
postgres 3104810 02:27 ? Ssl 0:19 /usr/sbin/pgbouncer /etc/pgbouncer/pgbouncer.ini
postgres 3202610 02:28 ? Ssl 0:03 /usr/bin/pg_exporter ...
postgres 35510354800 03:01 pts/2 S+ 0:00 /bin/bash /pg/bin/pg-heartbeat
Make sure local postgres is not running, then execute the recovery commands given in the manual:
We don’t want patroni HA to take over until we’re sure the data is correct, so start postgres manually:
pg-start
waiting for server to start....2025-07-13 03:19:33.133 UTC [39294] LOG: redirecting log output to logging collector process
2025-07-13 03:19:33.133 UTC [39294] HINT: Future log output will appear in directory "/pg/log/postgres".
doneserver started
Now you can check the data to see if it’s at the point in time you want.
You can verify by checking the latest timestamp in business tables, or in this case, check via the heartbeat table.
The timestamp is just before our specified point in time! (2025-07-13 03:03:00+00).
If this is not the point in time you want, you can repeat the recovery with a different time point.
Since recovery is performed incrementally and in parallel, it’s very fast.
You can retry until you find the correct point in time.
Promote Primary
The recovered postgres cluster is in recovery mode, so it will reject any write operations until promoted to primary.
These recovery parameters are generated by pgBackRest in the configuration file.
postgres@pg-meta-1:~$ cat /pg/data/postgresql.auto.conf# Do not edit this file or use ALTER SYSTEM manually!# It is managed by Pigsty & Ansible automatically!# Recovery settings generated by pgBackRest restore on 2025-07-13 03:17:08archive_mode='off'restore_command='pgbackrest --stanza=pg-meta archive-get %f "%p"'recovery_target_time='2025-07-13 03:03:00+00'
If the data is correct, you can promote it to primary, marking it as the new leader and ready to accept writes.
pg-promote
waiting for server to promote.... doneserver promoted
psql -c 'SELECT pg_is_in_recovery()'# 'f' means promoted to primary pg_is_in_recovery
-------------------
f
(1 row)
New Timeline and Split Brain
Once promoted, the database cluster will enter a new timeline (leader epoch).
If there is any write traffic, it will be written to the new timeline.
Restore Cluster
Finally, not only do you need to restore data, but also restore cluster state, such as:
patroni takeover
archive mode
backup set
replicas
Patroni Takeover
Your postgres was started directly. To restore HA takeover, you need to start the patroni service:
archive_mode is disabled during recovery by pgbackrest.
If you want new leader writes to be archived to the backup repository, you also need to enable the archive_mode configuration.
psql -c 'show archive_mode' archive_mode
--------------
off
# You can also directly edit postgresql.auto.conf and reload with pg_ctlsed -i '/archive_mode/d' /pg/data/postgresql.auto.conf
pg_ctl -D /pg/data reload
Backup Set
It’s generally recommended to perform a new full backup after PITR, but this is optional.
Replicas
If your postgres cluster has replicas, you also need to perform PITR on each replica.
Alternatively, a simpler approach is to remove the replica data directory and restart patroni, which will reinitialize the replica from the primary.
We’ll cover this scenario in the next multi-node cluster example.
Multi-Node Example
Now let’s use the three-node pg-test cluster as a PITR example.
10.9 - Data Migration
How to migrate an existing PostgreSQL cluster to a new Pigsty-managed PostgreSQL cluster with minimal downtime?
Pigsty includes a built-in playbook pgsql-migration.yml that implements online database migration based on logical replication.
With pre-generated automation scripts, application downtime can be reduced to just a few seconds. However, note that logical replication requires PostgreSQL 10 or later to work.
Of course, if you have sufficient downtime budget, you can always use the pg_dump | psql approach for offline migration.
Defining Migration Tasks
To use Pigsty’s online migration playbook, you need to create a definition file that describes the migration task details.
This migration task will online migrate pg-meta.meta to pg-test.test, where the former is called the Source Cluster (SRC) and the latter is called the Destination Cluster (DST).
Logical replication-based migration works on a per-database basis. You need to specify the database name to migrate, as well as the IP addresses of the source and destination cluster primary nodes and superuser connection information.
---#-----------------------------------------------------------------# PG_MIGRATION#-----------------------------------------------------------------context_dir:~/migration # Directory for migration manual & scripts#-----------------------------------------------------------------# SRC Cluster (Old Cluster)#-----------------------------------------------------------------src_cls:pg-meta # Source cluster name <Required>src_db:meta # Source database name <Required>src_ip:10.10.10.10# Source cluster primary IP <Required>#src_pg: '' # If defined, use this as source dbsu pgurl instead of:# # postgres://{{ pg_admin_username }}@{{ src_ip }}/{{ src_db }}# # e.g.: 'postgres://dbuser_dba:[email protected]:5432/meta'#sub_conn: '' # If defined, use this as subscription connection string instead of:# # host={{ src_ip }} dbname={{ src_db }} user={{ pg_replication_username }}'# # e.g.: 'host=10.10.10.10 dbname=meta user=replicator password=DBUser.Replicator'#-----------------------------------------------------------------# DST Cluster (New Cluster)#-----------------------------------------------------------------dst_cls:pg-test # Destination cluster name <Required>dst_db:test # Destination database name <Required>dst_ip:10.10.10.11# Destination cluster primary IP <Required>#dst_pg: '' # If defined, use this as destination dbsu pgurl instead of:# # postgres://{{ pg_admin_username }}@{{ dst_ip }}/{{ dst_db }}# # e.g.: 'postgres://dbuser_dba:[email protected]:5432/test'#-----------------------------------------------------------------# PGSQL#-----------------------------------------------------------------pg_dbsu:postgrespg_replication_username:replicatorpg_replication_password:DBUser.Replicatorpg_admin_username:dbuser_dbapg_admin_password:DBUser.DBApg_monitor_username:dbuser_monitorpg_monitor_password:DBUser.Monitor#-----------------------------------------------------------------...
By default, the superuser connection strings on both source and destination sides are constructed using the global admin user and the respective primary IP addresses, but you can always override these defaults through the src_pg and dst_pg parameters.
Similarly, you can override the subscription connection string default through the sub_conn parameter.
Generating Migration Plan
This playbook does not actively perform cluster migration, but it generates the operation manual and automation scripts needed for migration.
By default, you will find the migration context directory at ~/migration/pg-meta.meta.
Follow the instructions in README.md and execute these scripts in sequence to complete the database migration!
# Activate migration context: enable related environment variables. ~/migration/pg-meta.meta/activate
# These scripts check src cluster status and help generate new cluster definitions in pigsty./check-user # Check src users./check-db # Check src databases./check-hba # Check src hba rules./check-repl # Check src replication identity./check-misc # Check src special objects# These scripts establish logical replication between existing src cluster and pigsty-managed dst cluster, data except sequences will sync in real-time./copy-schema # Copy schema to destination./create-pub # Create publication on src./create-sub # Create subscription on dst./copy-progress # Print logical replication progress./copy-diff # Quick compare src and dst differences by counting tables# These scripts run during online migration, which stops src cluster and copies sequence numbers (logical replication doesn't replicate sequences!)./copy-seq [n]# Sync sequence numbers, if n is given, apply additional offset# You must switch application traffic to the new cluster based on your access method (dns,vip,haproxy,pgbouncer,etc.)!#./disable-src # Restrict src cluster access to admin nodes and new cluster (your implementation)#./re-routing # Re-route application traffic from SRC to DST! (your implementation)# Then cleanup to remove subscription and publication./drop-sub # Drop subscription on dst after migration./drop-pub # Drop publication on src after migration
Notes
If you’re worried about primary key conflicts when copying sequence numbers, you can advance all sequences forward by some distance when copying, for example +1000. You can use ./copy-seq with a parameter 1000 to achieve this.
You must implement your own ./re-routing script to route your application traffic from src to dst. Because we don’t know how your traffic is routed (e.g., dns, VIP, haproxy, or pgbouncer). Of course, you can also do this manually…
You can implement a ./disable-src script to restrict application access to the src cluster—this is optional: if you can ensure all application traffic is cleanly switched in ./re-routing, you don’t really need this step.
But if you have various access from unknown sources that can’t be cleanly sorted out, it’s better to use more thorough methods: change HBA rules and reload to implement (recommended), or simply stop the postgres, pgbouncer, or haproxy processes on the source primary.
10.10 - Tutorials
Step-by-step guides for common PostgreSQL tasks and scenarios.
This section provides step-by-step tutorials for common PostgreSQL tasks and scenarios.
Citus Cluster: Deploy and manage Citus distributed clusters
Disaster Drill: Emergency recovery when 2 of 3 nodes fail
HA scenario response plan: When two of three nodes fail and auto-failover doesn’t work, how to recover from the emergency state?
If a classic 3-node HA deployment experiences simultaneous failure of two nodes (majority), the system typically cannot complete automatic failover and requires manual intervention.
First, assess the status of the other two servers. If they can be brought up quickly, prioritize recovering those two servers. Otherwise, enter the Emergency Recovery Procedure.
The Emergency Recovery Procedure assumes your admin node has failed and only a single regular database node survives. In this case, the fastest recovery process is:
Adjust HAProxy configuration to direct traffic to the primary.
Stop Patroni and manually promote the PostgreSQL replica to primary.
Adjust HAProxy Configuration
If you access the cluster bypassing HAProxy, you can skip this step. If you access the database cluster through HAProxy, you need to adjust the load balancer configuration to manually direct read/write traffic to the primary.
Edit the /etc/haproxy/<pg_cluster>-primary.cfg configuration file, where <pg_cluster> is your PostgreSQL cluster name, e.g., pg-meta.
Comment out the health check configuration options to stop health checks.
Comment out the other two failed machines in the server list, keeping only the current primary server.
listen pg-meta-primarybind *:5433mode tcpmaxconn 5000balance roundrobin# Comment out the following four health check lines#option httpchk # <---- remove this#option http-keep-alive # <---- remove this#http-check send meth OPTIONS uri /primary # <---- remove this#http-check expect status 200 # <---- remove thisdefault-server inter 3s fastinter 1s downinter 5s rise 3 fall 3 on-marked-down shutdown-sessions slowstart 30s maxconn 3000 maxqueue 128 weight 100server pg-meta-1 10.10.10.10:6432 check port 8008 weight 100# Comment out the other two failed machines#server pg-meta-2 10.10.10.11:6432 check port 8008 weight 100 <---- comment this#server pg-meta-3 10.10.10.12:6432 check port 8008 weight 100 <---- comment this
After adjusting the configuration, don’t rush to execute systemctl reload haproxy to reload. Wait until after promoting the primary, then execute together. The effect of this configuration is that HAProxy will no longer perform primary health checks (which by default use Patroni), but will directly direct write traffic to the current primary.
Manually Promote Replica
Log in to the target server, switch to the dbsu user, execute CHECKPOINT to flush to disk, stop Patroni, restart PostgreSQL, and execute Promote.
sudo su - postgres # Switch to database dbsu userpsql -c 'checkpoint; checkpoint;'# Two Checkpoints to flush dirty pages, avoid long PG restartsudo systemctl stop patroni # Stop Patronipg-restart # Restart PostgreSQLpg-promote # Promote PostgreSQL replica to primarypsql -c 'SELECT pg_is_in_recovery();'# If result is f, it has been promoted to primary
If you adjusted the HAProxy configuration above, you can now execute systemctl reload haproxy to reload the HAProxy configuration and direct traffic to the new primary.
systemctl reload haproxy # Reload HAProxy configuration to direct write traffic to current instance
Avoid Split Brain
After emergency recovery, the second priority is: Avoid Split Brain. Users should prevent the other two servers from coming back online and forming a split brain with the current primary, causing data inconsistency.
Simple approaches:
Power off/disconnect network the other two servers to ensure they don’t come online uncontrollably.
Adjust the database connection string used by applications to point directly to the surviving server’s primary.
Then decide the next steps based on the specific situation:
A: The two servers have temporary failures (e.g., network/power outage) and can be repaired in place to continue service.
B: The two failed servers have permanent failures (e.g., hardware damage) and will be removed and decommissioned.
Recovery After Temporary Failure
If the other two servers have temporary failures and can be repaired to continue service, follow these steps for repair and rebuild:
Handle one failed server at a time, prioritize the admin node / INFRA node.
Start the failed server and stop Patroni after startup.
After the ETCD cluster quorum is restored, it will resume work. Then start Patroni on the surviving server (current primary) to take over the existing PostgreSQL and regain cluster leadership. After Patroni starts, enter maintenance mode.
systemctl restart patroni
pg pause <pg_cluster>
On the other two instances, create the touch /pg/data/standby.signal marker file as the postgres user to mark them as replicas, then start Patroni:
systemctl restart patroni
After confirming Patroni cluster identity/roles are correct, exit maintenance mode:
pg resume <pg_cluster>
Recovery After Permanent Failure
After permanent failure, first recover the ~/pigsty directory on the admin node. The key files needed are pigsty.yml and files/pki/ca/ca.key.
If you cannot retrieve or don’t have backups of these two files, you can deploy a new Pigsty and migrate the existing cluster to the new deployment via Backup Cluster.
Please regularly backup the pigsty directory (e.g., using Git for version control). Learn from this and avoid such mistakes in the future.
Configuration Repair
You can use the surviving node as the new admin node, copy the ~/pigsty directory to the new admin node, then start adjusting the configuration. For example, replace the original default admin node 10.10.10.10 with the surviving node 10.10.10.12:
all:vars:admin_ip:10.10.10.12# Use new admin node addressnode_etc_hosts:[10.10.10.12h.pigsty a.pigsty p.pigsty g.pigsty sss.pigsty]infra_portal:{}# Also modify other configs referencing old admin IP (10.10.10.10)children:infra:# Adjust Infra clusterhosts:# 10.10.10.10: { infra_seq: 1 } # Old Infra node10.10.10.12:{infra_seq:3}# New Infra nodeetcd:# Adjust ETCD clusterhosts:#10.10.10.10: { etcd_seq: 1 } # Comment out this failed node#10.10.10.11: { etcd_seq: 2 } # Comment out this failed node10.10.10.12:{etcd_seq:3}# Keep surviving nodevars:etcd_cluster:etcdpg-meta:# Adjust PGSQL cluster configurationhosts:#10.10.10.10: { pg_seq: 1, pg_role: primary }#10.10.10.11: { pg_seq: 2, pg_role: replica }#10.10.10.12: { pg_seq: 3, pg_role: replica , pg_offline_query: true }10.10.10.12:{pg_seq: 3, pg_role: primary , pg_offline_query:true}vars:pg_cluster:pg-meta
ETCD Repair
Then execute the following command to reset ETCD to a single-node cluster:
If the surviving node doesn’t have the INFRA module, configure and install a new INFRA module on the current node. Execute the following command to deploy the INFRA module to the surviving node:
After repairing each module, you can follow the standard expansion process to add new nodes to the cluster and restore cluster high availability.
10.10.2 - Bind a L2 VIP to PostgreSQL Primary with VIP-Manager
You can define an OPTIONAL L2 VIP on a PostgreSQL cluster, provided that all nodes in the cluster are in the same L2 network.
This VIP works on Master-Backup mode and always points to the node where the primary instance of the database cluster is located.
This VIP is managed by the VIP-Manager, which reads the Leader Key written by Patroni from DCS (etcd) to determine whether it is the master.
Enable VIP
Define pg_vip_enabled parameter as true in the cluster level to enable the VIP component on the cluster. You can also enable this configuration in the global configuration.
Beware that pg_vip_address must be a valid IP address with subnet and available in the current L2 network.
Beware that pg_vip_interface must be a valid network interface name and should be the same as the one using IPv4 address in the inventory.
If the network interface name is different among cluster members, users should explicitly specify the pg_vip_interface parameter for each instance, for example:
To refresh the VIP configuration and restart the VIP-Manager, use the following command:
./pgsql.yml -t pg_vip
10.10.3 - Citus: Deploy HA Citus Cluster
How to deploy a Citus high-availability distributed cluster?
Citus is a PostgreSQL extension that transforms PostgreSQL into a distributed database, enabling horizontal scaling across multiple nodes to handle large amounts of data and queries.
Patroni v3.0+ provides native high-availability support for Citus, simplifying the setup of Citus clusters. Pigsty also provides native support for this.
Note: The current Citus version (12.1.6) supports PostgreSQL 16, 15, and 14, but not PostgreSQL 17 yet. There is no official ARM64 support. Pigsty extension repo provides Citus ARM64 packages, but use with caution on ARM architecture.
Citus Cluster
Pigsty natively supports Citus. See conf/citus.yml for reference.
Here we use the Pigsty 4-node sandbox to define a Citus cluster pg-citus, which includes a 2-node coordinator cluster pg-citus0 and two Worker clusters pg-citus1 and pg-citus2.
pg-citus:hosts:10.10.10.10:{pg_group: 0, pg_cluster: pg-citus0 ,pg_vip_address: 10.10.10.2/24 ,pg_seq: 1, pg_role:primary }10.10.10.11:{pg_group: 0, pg_cluster: pg-citus0 ,pg_vip_address: 10.10.10.2/24 ,pg_seq: 2, pg_role:replica }10.10.10.12:{pg_group: 1, pg_cluster: pg-citus1 ,pg_vip_address: 10.10.10.3/24 ,pg_seq: 1, pg_role:primary }10.10.10.13:{pg_group: 2, pg_cluster: pg-citus2 ,pg_vip_address: 10.10.10.4/24 ,pg_seq: 1, pg_role:primary }vars:pg_mode: citus # pgsql cluster mode:cituspg_version:16# citus does not have pg16 availablepg_shard: pg-citus # citus shard name:pg-cituspg_primary_db:citus # primary database used by cituspg_vip_enabled:true# enable vip for citus clusterpg_vip_interface:eth1 # vip interface for all memberspg_dbsu_password:DBUser.Postgres # all dbsu password access for citus clusterpg_extensions:[citus, postgis, pgvector, topn, pg_cron, hll ] # install these extensionspg_libs:'citus, pg_cron, pg_stat_statements'# citus will be added by patroni automaticallypg_users:[{name: dbuser_citus ,password: DBUser.Citus ,pgbouncer: true ,roles:[dbrole_admin ] }]pg_databases:[{name: citus ,owner: dbuser_citus ,extensions:[citus, vector, topn, pg_cron, hll ] }]pg_parameters:cron.database_name:cituscitus.node_conninfo:'sslmode=require sslrootcert=/pg/cert/ca.crt sslmode=verify-full'pg_hba_rules:- {user: 'all' ,db: all ,addr: 127.0.0.1/32 ,auth: ssl ,title:'all user ssl access from localhost'}- {user: 'all' ,db: all ,addr: intra ,auth: ssl ,title:'all user ssl access from intranet'}
Compared to standard PostgreSQL clusters, Citus cluster configuration has some special requirements. First, you need to ensure the Citus extension is downloaded, installed, loaded, and enabled, which involves the following four parameters:
repo_packages: Must include the citus extension, or you need to use a PostgreSQL offline package that includes Citus.
pg_extensions: Must include the citus extension, i.e., you must install the citus extension on each node.
pg_libs: Must include the citus extension at the first position, though Patroni now handles this automatically.
pg_databases: Define a primary database that must have the citus extension installed.
Second, you need to ensure the Citus cluster is configured correctly:
pg_mode: Must be set to citus to tell Patroni to use Citus mode.
pg_primary_db: Must specify the name of the primary database with citus extension, named citus here.
pg_shard: Must specify a unified name as the cluster name prefix for all horizontal shard PG clusters, pg-citus here.
pg_group: Must specify a shard number, integers starting from zero. 0 represents the coordinator cluster, others are Worker clusters.
You can treat each horizontal shard cluster as an independent PGSQL cluster and manage them with the pg (patronictl) command. Note that when using the pg command to manage Citus clusters, you need to use the --group parameter to specify the cluster shard number:
pg list pg-citus --group 0# Use --group 0 to specify cluster shard number
Citus has a system table called pg_dist_node that records Citus cluster node information. Patroni automatically maintains this table.
PGURL=postgres://postgres:[email protected]/citus
psql $PGURL -c 'SELECT * FROM pg_dist_node;'# View node information nodeid | groupid | nodename | nodeport | noderack | hasmetadata | isactive | noderole | nodecluster | metadatasynced | shouldhaveshards
--------+---------+-------------+----------+----------+-------------+----------+-----------+-------------+----------------+------------------
1|0| 10.10.10.10 |5432| default | t | t | primary | default | t | f
4|1| 10.10.10.12 |5432| default | t | t | primary | default | t | t
5|2| 10.10.10.13 |5432| default | t | t | primary | default | t | t
6|0| 10.10.10.11 |5432| default | t | t | secondary | default | t | f
You can also view user authentication information (superuser access only):
$ psql $PGURL -c 'SELECT * FROM pg_dist_authinfo;'# View node auth info (superuser only)
Then you can use a regular business user (e.g., dbuser_citus with DDL privileges) to access the Citus cluster:
psql postgres://dbuser_citus:[email protected]/citus -c 'SELECT * FROM pg_dist_node;'
Using Citus Cluster
When using Citus clusters, we strongly recommend reading the Citus official documentation to understand its architecture and core concepts.
The key is understanding the five types of tables in Citus and their characteristics and use cases:
Distributed Table
Reference Table
Local Table
Local Management Table
Schema Table
On the coordinator node, you can create distributed tables and reference tables and query them from any data node. Since 11.2, any Citus database node can act as a coordinator.
We can use pgbench to create some tables and distribute the main table (pgbench_accounts) across nodes, then use other small tables as reference tables:
pgbench -nv -P1 -c10 -T500 postgres://dbuser_citus:[email protected]/citus # Direct connect to coordinator port 5432pgbench -nv -P1 -c10 -T500 postgres://dbuser_citus:[email protected]:6432/citus # Through connection pool, reduce client connection pressurepgbench -nv -P1 -c10 -T500 postgres://dbuser_citus:[email protected]/citus # Any primary node can act as coordinatorpgbench --select-only -nv -P1 -c10 -T500 postgres://dbuser_citus:[email protected]/citus # Read-only queries
Production Deployment
For production use of Citus, you typically need to set up streaming replication physical replicas for the Coordinator and each Worker cluster.
For example, simu.yml defines a 10-node Citus cluster:
pg-citus:# citus grouphosts:10.10.10.50:{pg_group: 0, pg_cluster: pg-citus0 ,pg_vip_address: 10.10.10.60/24 ,pg_seq: 0, pg_role:primary }10.10.10.51:{pg_group: 0, pg_cluster: pg-citus0 ,pg_vip_address: 10.10.10.60/24 ,pg_seq: 1, pg_role:replica }10.10.10.52:{pg_group: 1, pg_cluster: pg-citus1 ,pg_vip_address: 10.10.10.61/24 ,pg_seq: 0, pg_role:primary }10.10.10.53:{pg_group: 1, pg_cluster: pg-citus1 ,pg_vip_address: 10.10.10.61/24 ,pg_seq: 1, pg_role:replica }10.10.10.54:{pg_group: 2, pg_cluster: pg-citus2 ,pg_vip_address: 10.10.10.62/24 ,pg_seq: 0, pg_role:primary }10.10.10.55:{pg_group: 2, pg_cluster: pg-citus2 ,pg_vip_address: 10.10.10.62/24 ,pg_seq: 1, pg_role:replica }10.10.10.56:{pg_group: 3, pg_cluster: pg-citus3 ,pg_vip_address: 10.10.10.63/24 ,pg_seq: 0, pg_role:primary }10.10.10.57:{pg_group: 3, pg_cluster: pg-citus3 ,pg_vip_address: 10.10.10.63/24 ,pg_seq: 1, pg_role:replica }10.10.10.58:{pg_group: 4, pg_cluster: pg-citus4 ,pg_vip_address: 10.10.10.64/24 ,pg_seq: 0, pg_role:primary }10.10.10.59:{pg_group: 4, pg_cluster: pg-citus4 ,pg_vip_address: 10.10.10.64/24 ,pg_seq: 1, pg_role:replica }vars:pg_mode: citus # pgsql cluster mode:cituspg_version:16# citus does not have pg16 availablepg_shard: pg-citus # citus shard name:pg-cituspg_primary_db:citus # primary database used by cituspg_vip_enabled:true# enable vip for citus clusterpg_vip_interface:eth1 # vip interface for all memberspg_dbsu_password:DBUser.Postgres # enable dbsu password access for cituspg_extensions:[citus, postgis, pgvector, topn, pg_cron, hll ] # install these extensionspg_libs:'citus, pg_cron, pg_stat_statements'# citus will be added by patroni automaticallypg_users:[{name: dbuser_citus ,password: DBUser.Citus ,pgbouncer: true ,roles:[dbrole_admin ] }]pg_databases:[{name: citus ,owner: dbuser_citus ,extensions:[citus, vector, topn, pg_cron, hll ] }]pg_parameters:cron.database_name:cituscitus.node_conninfo:'sslrootcert=/pg/cert/ca.crt sslmode=verify-full'pg_hba_rules:- {user: 'all' ,db: all ,addr: 127.0.0.1/32 ,auth: ssl ,title:'all user ssl access from localhost'}- {user: 'all' ,db: all ,addr: intra ,auth: ssl ,title:'all user ssl access from intranet'}
We will cover a series of advanced Citus topics in subsequent tutorials:
Read/write separation
Failure handling
Consistent backup and recovery
Advanced monitoring and diagnostics
Connection pooling
10.11 - Reference
Parameters and reference documentation
10.12 - Monitoring
Overview of Pigsty’s monitoring system architecture and how to monitor existing PostgreSQL instances
This document introduces Pigsty’s monitoring system architecture, including metrics, logs, and target management. It also covers how to monitor existing PG clusters and remote RDS services.
Monitoring Overview
Pigsty uses a modern observability stack for PostgreSQL monitoring:
Grafana for metrics visualization and PostgreSQL datasource
VictoriaMetrics for collecting metrics from PostgreSQL / Pgbouncer / Patroni / HAProxy / Node
VictoriaLogs for logging PostgreSQL / Pgbouncer / Patroni / pgBackRest and host component logs
Battery-included Grafana dashboards showcasing all aspects of PostgreSQL
Metrics
PostgreSQL monitoring metrics are fully defined by the pg_exporter configuration file: pg_exporter.yml
They are further processed by Prometheus recording rules and alert rules: files/prometheus/rules/pgsql.yml.
Pigsty uses three identity labels: cls, ins, ip, which are attached to all metrics and logs. Additionally, metrics from Pgbouncer, host nodes (NODE), and load balancers are also used by Pigsty, with the same labels used whenever possible for correlation analysis.
PostgreSQL-related logs are collected by Vector and sent to the VictoriaLogs log storage/query service on infra nodes.
pg_log_dir: postgres log directory, defaults to /pg/log/postgres
pgbouncer_log_dir: pgbouncer log directory, defaults to /pg/log/pgbouncer
patroni_log_dir: patroni log directory, defaults to /pg/log/patroni
pgbackrest_log_dir: pgbackrest log directory, defaults to /pg/log/pgbackrest
Target Management
Prometheus monitoring targets are defined in static files under /etc/prometheus/targets/pgsql/, with each instance having a corresponding file. Taking pg-meta-1 as an example:
# pg-meta-1 [primary] @ 10.10.10.10- labels:{cls: pg-meta, ins: pg-meta-1, ip:10.10.10.10}targets:- 10.10.10.10:9630# <--- pg_exporter for PostgreSQL metrics- 10.10.10.10:9631# <--- pg_exporter for pgbouncer metrics- 10.10.10.10:8008# <--- patroni metrics (when API SSL is not enabled)
When the global flag patroni_ssl_enabled is set, patroni targets will be moved to a separate file /etc/prometheus/targets/patroni/<ins>.yml, as it uses the https scrape endpoint. When monitoring RDS instances, monitoring targets are placed separately in the /etc/prometheus/targets/pgrds/ directory and managed by cluster.
When removing a cluster using bin/pgsql-rm or pgsql-rm.yml, the Prometheus monitoring targets will be removed. You can also remove them manually or use subtasks from the playbook:
bin/pgmon-rm <cls|ins> # Remove prometheus monitoring targets from all infra nodes
Remote RDS monitoring targets are placed in /etc/prometheus/targets/pgrds/<cls>.yml, created by the pgsql-monitor.yml playbook or bin/pgmon-add script.
Monitoring Modes
Pigsty provides three monitoring modes to suit different monitoring needs.
Databases fully managed by Pigsty are automatically monitored with the best support and typically require no configuration. For existing PostgreSQL clusters or RDS services, if the target DB nodes can be managed by Pigsty (ssh accessible, sudo available), you can consider managed deployment for a monitoring experience similar to native Pigsty. If you can only access the target database via PGURL (database connection string), such as remote RDS services, you can use basic mode to monitor the target database.
Monitor Existing Cluster
If the target DB nodes can be managed by Pigsty (ssh accessible and sudo available), you can use the pg_exporter task in the pgsql.yml playbook to deploy monitoring components (PG Exporter) on target nodes in the same way as standard deployments. You can also use the pgbouncer and pgbouncer_exporter tasks from that playbook to deploy connection pools and their monitoring on existing instance nodes. Additionally, you can use node_exporter, haproxy, and vector from node.yml to deploy host monitoring, load balancing, and log collection components, achieving an experience identical to native Pigsty database instances.
The definition method for existing clusters is exactly the same as for clusters managed by Pigsty. You selectively execute partial tasks from the pgsql.yml playbook instead of running the entire playbook.
./node.yml -l <cls> -t node_repo,node_pkg # Add YUM repos from INFRA nodes and install packages on host nodes./node.yml -l <cls> -t node_exporter,node_register # Configure host monitoring and add to VictoriaMetrics./node.yml -l <cls> -t vector # Configure host log collection and send to VictoriaLogs./pgsql.yml -l <cls> -t pg_exporter,pg_register # Configure PostgreSQL monitoring and register with VictoriaMetrics/Grafana
If you can only access the target database via PGURL (database connection string), you can configure according to the instructions here. In this mode, Pigsty deploys corresponding PG Exporters on INFRA nodes to scrape remote database metrics, as shown below:
In this mode, the monitoring system will not have metrics from hosts, connection pools, load balancers, or high availability components, but the database itself and real-time status information from the data catalog are still available. Pigsty provides two dedicated monitoring dashboards focused on PostgreSQL metrics: PGRDS Cluster and PGRDS Instance, while overview and database-level monitoring reuses existing dashboards. Since Pigsty cannot manage your RDS, users need to configure monitoring objects on the target database in advance.
Limitations when monitoring external Postgres instances
pgBouncer connection pool metrics are not available
Patroni high availability component metrics are not available
Host node monitoring metrics are not available, including node HAProxy and Keepalived metrics
Log collection and log-derived metrics are not available
Here we use the sandbox environment as an example: suppose the pg-meta cluster is an RDS instance pg-foo-1 to be monitored, and the pg-test cluster is an RDS cluster pg-bar to be monitored:
Create monitoring schemas, users, and permissions on the target. Refer to Monitor Setup for details
Declare the cluster in the configuration inventory. For example, if we want to monitor “remote” pg-meta & pg-test clusters:
infra:# Infra cluster for proxies, monitoring, alerts, etc.hosts:{10.10.10.10:{infra_seq:1}}vars:# Install pg_exporter on group 'infra' for remote postgres RDSpg_exporters:# List all remote instances here, assign a unique unused local port for k20001:{pg_cluster: pg-foo, pg_seq: 1, pg_host: 10.10.10.10 , pg_databases:[{name:meta }] }# Register meta database as Grafana datasource20002:{pg_cluster: pg-bar, pg_seq: 1, pg_host: 10.10.10.11 , pg_port:5432}# Different connection string methods20003:{pg_cluster: pg-bar, pg_seq: 2, pg_host: 10.10.10.12 , pg_exporter_url:'postgres://dbuser_monitor:[email protected]:5432/postgres?sslmode=disable'}20004:{pg_cluster: pg-bar, pg_seq: 3, pg_host: 10.10.10.13 , pg_monitor_username: dbuser_monitor, pg_monitor_password:DBUser.Monitor }
Databases listed in the pg_databases field will be registered in Grafana as PostgreSQL datasources, providing data support for PGCAT monitoring dashboards. If you don’t want to use PGCAT and register databases in Grafana, simply set pg_databases to an empty array or leave it blank.
Execute the add monitoring command: bin/pgmon-add <clsname>
bin/pgmon-add pg-foo # Bring pg-foo cluster into monitoringbin/pgmon-add pg-bar # Bring pg-bar cluster into monitoring
To remove remote cluster monitoring targets, use bin/pgmon-rm <clsname>
bin/pgmon-rm pg-foo # Remove pg-foo from Pigsty monitoringbin/pgmon-rm pg-bar # Remove pg-bar from Pigsty monitoring
You can use more parameters to override default pg_exporter options. Here’s an example configuration for monitoring Aliyun RDS for PostgreSQL and PolarDB with Pigsty:
Example: Monitoring Aliyun RDS for PostgreSQL and PolarDB
infra:# Infra cluster for proxies, monitoring, alerts, etc.hosts:{10.10.10.10:{infra_seq:1}}vars:pg_exporters:# List all remote RDS PG instances to be monitored here20001:# Assign a unique unused local port for local monitoring agent, this is a PolarDB primarypg_cluster:pg-polar # RDS cluster name (identity parameter, manually assigned name in monitoring system)pg_seq:1# RDS instance number (identity parameter, manually assigned name in monitoring system)pg_host:pc-2ze379wb1d4irc18x.polardbpg.rds.aliyuncs.com# RDS host addresspg_port:1921# RDS port (from console connection info)pg_exporter_auto_discovery:true# Disable new database auto-discovery featurepg_exporter_include_database:'test'# Only monitor databases in this list (comma-separated)pg_monitor_username:dbuser_monitor # Monitoring username, overrides global configpg_monitor_password:DBUser_Monitor # Monitoring password, overrides global configpg_databases:[{name:test }] # List of databases to enable PGCAT for, only name field needed, set register_datasource to false to not register20002:# This is a PolarDB standbypg_cluster:pg-polar # RDS cluster name (identity parameter, manually assigned name in monitoring system)pg_seq:2# RDS instance number (identity parameter, manually assigned name in monitoring system)pg_host:pe-2ze7tg620e317ufj4.polarpgmxs.rds.aliyuncs.com# RDS host addresspg_port:1521# RDS port (from console connection info)pg_exporter_auto_discovery:true# Disable new database auto-discovery featurepg_exporter_include_database:'test,postgres'# Only monitor databases in this list (comma-separated)pg_monitor_username:dbuser_monitor # Monitoring usernamepg_monitor_password:DBUser_Monitor # Monitoring passwordpg_databases:[{name:test } ] # List of databases to enable PGCAT for, only name field needed, set register_datasource to false to not register20004:# This is a basic single-node RDS for PostgreSQL instancepg_cluster:pg-rds # RDS cluster name (identity parameter, manually assigned name in monitoring system)pg_seq:1# RDS instance number (identity parameter, manually assigned name in monitoring system)pg_host:pgm-2zern3d323fe9ewk.pg.rds.aliyuncs.com # RDS host addresspg_port:5432# RDS port (from console connection info)pg_exporter_auto_discovery:true# Disable new database auto-discovery featurepg_exporter_include_database:'rds'# Only monitor databases in this list (comma-separated)pg_monitor_username:dbuser_monitor # Monitoring usernamepg_monitor_password:DBUser_Monitor # Monitoring passwordpg_databases:[{name:rds } ] # List of databases to enable PGCAT for, only name field needed, set register_datasource to false to not register20005:# This is a high-availability RDS for PostgreSQL cluster primarypg_cluster:pg-rdsha # RDS cluster name (identity parameter, manually assigned name in monitoring system)pg_seq:1# RDS instance number (identity parameter, manually assigned name in monitoring system)pg_host:pgm-2ze3d35d27bq08wu.pg.rds.aliyuncs.com # RDS host addresspg_port:5432# RDS port (from console connection info)pg_exporter_include_database:'rds'# Only monitor databases in this list (comma-separated)pg_databases:[{name:rds }, {name : test} ] # Include these two databases in PGCAT management, register as Grafana datasources20006:# This is a high-availability RDS for PostgreSQL cluster read-only instance (standby)pg_cluster:pg-rdsha # RDS cluster name (identity parameter, manually assigned name in monitoring system)pg_seq:2# RDS instance number (identity parameter, manually assigned name in monitoring system)pg_host:pgr-2zexqxalk7d37edt.pg.rds.aliyuncs.com # RDS host addresspg_port:5432# RDS port (from console connection info)pg_exporter_include_database:'rds'# Only monitor databases in this list (comma-separated)pg_databases:[{name:rds }, {name : test} ] # Include these two databases in PGCAT management, register as Grafana datasources
Monitor Setup
When you want to monitor existing instances, whether RDS or self-built PostgreSQL instances, you need to configure the target database so that Pigsty can access them.
To monitor an external existing PostgreSQL instance, you need a connection string that can access that instance/cluster. Any accessible connection string (business user, superuser) can be used, but we recommend using a dedicated monitoring user to avoid permission leaks.
Monitor User: The default username is dbuser_monitor, which should belong to the pg_monitor role group or have access to relevant views
Monitor Authentication: Default password authentication is used; ensure HBA policies allow the monitoring user to access databases from the admin node or DB node locally
Monitor Schema: Fixed schema name monitor is used for installing additional monitoring views and extension plugins; optional but recommended
Monitor Extension: Strongly recommended to enable the built-in monitoring extension pg_stat_statements
Monitor Views: Monitoring views are optional but can provide additional metric support
Monitor User
Using the default monitoring user dbuser_monitor as an example, create the following user on the target database cluster.
CREATEUSERdbuser_monitor;-- Create monitoring user
COMMENTONROLEdbuser_monitorIS'system monitor user';-- Comment on monitoring user
GRANTpg_monitorTOdbuser_monitor;-- Grant pg_monitor privilege to monitoring user, otherwise some metrics cannot be collected
ALTERUSERdbuser_monitorPASSWORD'DBUser.Monitor';-- Modify monitoring user password as needed (strongly recommended! but keep consistent with Pigsty config)
ALTERUSERdbuser_monitorSETlog_min_duration_statement=1000;-- Recommended to avoid logs filling up with monitoring slow queries
ALTERUSERdbuser_monitorSETsearch_path=monitor,public;-- Recommended to ensure pg_stat_statements extension works properly
Configure the database pg_hba.conf file, adding the following rules to allow the monitoring user to access all databases from localhost and the admin machine using password authentication.
# allow local role monitor with passwordlocal all dbuser_monitor md5host all dbuser_monitor 127.0.0.1/32 md5host all dbuser_monitor <admin_machine_IP>/32 md5
If your RDS doesn’t support defining HBA, simply whitelist the internal IP address of the machine running Pigsty.
Monitor Schema
The monitoring schema is optional; even without it, the main functionality of Pigsty’s monitoring system can work properly, but we strongly recommend creating this schema.
CREATESCHEMAIFNOTEXISTSmonitor;-- Create dedicated monitoring schema
GRANTUSAGEONSCHEMAmonitorTOdbuser_monitor;-- Allow monitoring user to use it
Monitor Extension
The monitoring extension is optional, but we strongly recommend enabling the pg_stat_statements extension, which provides important data about query performance.
Note: This extension must be listed in the database parameter shared_preload_libraries to take effect, and modifying that parameter requires a database restart.
Please note that you should install this extension in the default admin database postgres. Sometimes RDS doesn’t allow you to create a monitoring schema in the postgres database. In such cases, you can install the pg_stat_statements plugin in the default public schema, as long as you ensure the monitoring user’s search_path is configured as above so it can find the pg_stat_statements view.
CREATEEXTENSIONIFNOTEXISTS"pg_stat_statements";ALTERUSERdbuser_monitorSETsearch_path=monitor,public;-- Recommended to ensure pg_stat_statements extension works properly
Monitor Views
Monitoring views provide several commonly used pre-processed results and encapsulate permissions for monitoring metrics that require high privileges (such as shared memory allocation), making them convenient for querying and use. Strongly recommended to create in all databases requiring monitoring.
Monitoring schema and monitoring view definitions
----------------------------------------------------------------------
-- Table bloat estimate : monitor.pg_table_bloat
----------------------------------------------------------------------
DROPVIEWIFEXISTSmonitor.pg_table_bloatCASCADE;CREATEORREPLACEVIEWmonitor.pg_table_bloatASSELECTCURRENT_CATALOGASdatname,nspname,relname,tblid,bs*tblpagesASsize,CASEWHENtblpages-est_tblpages_ff>0THEN(tblpages-est_tblpages_ff)/tblpages::FLOATELSE0ENDASratioFROM(SELECTceil(reltuples/((bs-page_hdr)*fillfactor/(tpl_size*100)))+ceil(toasttuples/4)ASest_tblpages_ff,tblpages,fillfactor,bs,tblid,nspname,relname,is_naFROM(SELECT(4+tpl_hdr_size+tpl_data_size+(2*ma)-CASEWHENtpl_hdr_size%ma=0THENmaELSEtpl_hdr_size%maEND-CASEWHENceil(tpl_data_size)::INT%ma=0THENmaELSEceil(tpl_data_size)::INT%maEND)AStpl_size,(heappages+toastpages)AStblpages,heappages,toastpages,reltuples,toasttuples,bs,page_hdr,tblid,nspname,relname,fillfactor,is_naFROM(SELECTtbl.oidAStblid,ns.nspname,tbl.relname,tbl.reltuples,tbl.relpagesASheappages,coalesce(toast.relpages,0)AStoastpages,coalesce(toast.reltuples,0)AStoasttuples,coalesce(substring(array_to_string(tbl.reloptions,' ')FROM'fillfactor=([0-9]+)')::smallint,100)ASfillfactor,current_setting('block_size')::numericASbs,CASEWHENversion()~'mingw32'ORversion()~'64-bit|x86_64|ppc64|ia64|amd64'THEN8ELSE4ENDASma,24ASpage_hdr,23+CASEWHENMAX(coalesce(s.null_frac,0))>0THEN(7+count(s.attname))/8ELSE0::intEND+CASEWHENbool_or(att.attname='oid'andatt.attnum<0)THEN4ELSE0ENDAStpl_hdr_size,sum((1-coalesce(s.null_frac,0))*coalesce(s.avg_width,0))AStpl_data_size,bool_or(att.atttypid='pg_catalog.name'::regtype)ORsum(CASEWHENatt.attnum>0THEN1ELSE0END)<>count(s.attname)ASis_naFROMpg_attributeASattJOINpg_classAStblONatt.attrelid=tbl.oidJOINpg_namespaceASnsONns.oid=tbl.relnamespaceLEFTJOINpg_statsASsONs.schemaname=ns.nspnameANDs.tablename=tbl.relnameANDs.inherited=falseANDs.attname=att.attnameLEFTJOINpg_classAStoastONtbl.reltoastrelid=toast.oidWHERENOTatt.attisdroppedANDtbl.relkind='r'ANDnspnameNOTIN('pg_catalog','information_schema')GROUPBY1,2,3,4,5,6,7,8,9,10)ASs)ASs2)ASs3WHERENOTis_na;COMMENTONVIEWmonitor.pg_table_bloatIS'postgres table bloat estimate';GRANTSELECTONmonitor.pg_table_bloatTOpg_monitor;----------------------------------------------------------------------
-- Index bloat estimate : monitor.pg_index_bloat
----------------------------------------------------------------------
DROPVIEWIFEXISTSmonitor.pg_index_bloatCASCADE;CREATEORREPLACEVIEWmonitor.pg_index_bloatASSELECTCURRENT_CATALOGASdatname,nspname,idxnameASrelname,tblid,idxid,relpages::BIGINT*bsASsize,COALESCE((relpages-(reltuples*(6+ma-(CASEWHENindex_tuple_hdr%ma=0THENmaELSEindex_tuple_hdr%maEND)+nulldatawidth+ma-(CASEWHENnulldatawidth%ma=0THENmaELSEnulldatawidth%maEND))/(bs-pagehdr)::FLOAT+1)),0)/relpages::FLOATASratioFROM(SELECTnspname,idxname,indrelidAStblid,indexrelidASidxid,reltuples,relpages,current_setting('block_size')::INTEGERASbs,(CASEWHENversion()~'mingw32'ORversion()~'64-bit|x86_64|ppc64|ia64|amd64'THEN8ELSE4END)ASma,24ASpagehdr,(CASEWHENmax(COALESCE(pg_stats.null_frac,0))=0THEN2ELSE6END)ASindex_tuple_hdr,sum((1.0-COALESCE(pg_stats.null_frac,0.0))*COALESCE(pg_stats.avg_width,1024))::INTEGERASnulldatawidthFROMpg_attributeJOIN(SELECTpg_namespace.nspname,ic.relnameASidxname,ic.reltuples,ic.relpages,pg_index.indrelid,pg_index.indexrelid,tc.relnameAStablename,regexp_split_to_table(pg_index.indkey::TEXT,' ')::INTEGERASattnum,pg_index.indexrelidASindex_oidFROMpg_indexJOINpg_classicONpg_index.indexrelid=ic.oidJOINpg_classtcONpg_index.indrelid=tc.oidJOINpg_namespaceONpg_namespace.oid=ic.relnamespaceJOINpg_amONic.relam=pg_am.oidWHEREpg_am.amname='btree'ANDic.relpages>0ANDnspnameNOTIN('pg_catalog','information_schema'))ind_attsONpg_attribute.attrelid=ind_atts.indexrelidANDpg_attribute.attnum=ind_atts.attnumJOINpg_statsONpg_stats.schemaname=ind_atts.nspnameAND((pg_stats.tablename=ind_atts.tablenameANDpg_stats.attname=pg_get_indexdef(pg_attribute.attrelid,pg_attribute.attnum,TRUE))OR(pg_stats.tablename=ind_atts.idxnameANDpg_stats.attname=pg_attribute.attname))WHEREpg_attribute.attnum>0GROUPBY1,2,3,4,5,6)est;COMMENTONVIEWmonitor.pg_index_bloatIS'postgres index bloat estimate (btree-only)';GRANTSELECTONmonitor.pg_index_bloatTOpg_monitor;----------------------------------------------------------------------
-- Relation Bloat : monitor.pg_bloat
----------------------------------------------------------------------
DROPVIEWIFEXISTSmonitor.pg_bloatCASCADE;CREATEORREPLACEVIEWmonitor.pg_bloatASSELECTcoalesce(ib.datname,tb.datname)ASdatname,coalesce(ib.nspname,tb.nspname)ASnspname,coalesce(ib.tblid,tb.tblid)AStblid,coalesce(tb.nspname||'.'||tb.relname,ib.nspname||'.'||ib.tblid::RegClass)AStblname,tb.sizeAStbl_size,CASEWHENtb.ratio<0THEN0ELSEround(tb.ratio::NUMERIC,6)ENDAStbl_ratio,(tb.size*(CASEWHENtb.ratio<0THEN0ELSEtb.ratio::NUMERICEND))::BIGINTAStbl_wasted,ib.idxid,ib.nspname||'.'||ib.relnameASidxname,ib.sizeASidx_size,CASEWHENib.ratio<0THEN0ELSEround(ib.ratio::NUMERIC,5)ENDASidx_ratio,(ib.size*(CASEWHENib.ratio<0THEN0ELSEib.ratio::NUMERICEND))::BIGINTASidx_wastedFROMmonitor.pg_index_bloatibFULLOUTERJOINmonitor.pg_table_bloattbONib.tblid=tb.tblid;COMMENTONVIEWmonitor.pg_bloatIS'postgres relation bloat detail';GRANTSELECTONmonitor.pg_bloatTOpg_monitor;----------------------------------------------------------------------
-- monitor.pg_index_bloat_human
----------------------------------------------------------------------
DROPVIEWIFEXISTSmonitor.pg_index_bloat_humanCASCADE;CREATEORREPLACEVIEWmonitor.pg_index_bloat_humanASSELECTidxnameASname,tblname,idx_wastedASwasted,pg_size_pretty(idx_size)ASidx_size,round(100*idx_ratio::NUMERIC,2)ASidx_ratio,pg_size_pretty(idx_wasted)ASidx_wasted,pg_size_pretty(tbl_size)AStbl_size,round(100*tbl_ratio::NUMERIC,2)AStbl_ratio,pg_size_pretty(tbl_wasted)AStbl_wastedFROMmonitor.pg_bloatWHEREidxnameISNOTNULL;COMMENTONVIEWmonitor.pg_index_bloat_humanIS'postgres index bloat info in human-readable format';GRANTSELECTONmonitor.pg_index_bloat_humanTOpg_monitor;----------------------------------------------------------------------
-- monitor.pg_table_bloat_human
----------------------------------------------------------------------
DROPVIEWIFEXISTSmonitor.pg_table_bloat_humanCASCADE;CREATEORREPLACEVIEWmonitor.pg_table_bloat_humanASSELECTtblnameASname,idx_wasted+tbl_wastedASwasted,pg_size_pretty(idx_wasted+tbl_wasted)ASall_wasted,pg_size_pretty(tbl_wasted)AStbl_wasted,pg_size_pretty(tbl_size)AStbl_size,tbl_ratio,pg_size_pretty(idx_wasted)ASidx_wasted,pg_size_pretty(idx_size)ASidx_size,round(idx_wasted::NUMERIC*100.0/idx_size,2)ASidx_ratioFROM(SELECTdatname,nspname,tblname,coalesce(max(tbl_wasted),0)AStbl_wasted,coalesce(max(tbl_size),1)AStbl_size,round(100*coalesce(max(tbl_ratio),0)::NUMERIC,2)AStbl_ratio,coalesce(sum(idx_wasted),0)ASidx_wasted,coalesce(sum(idx_size),1)ASidx_sizeFROMmonitor.pg_bloatWHEREtblnameISNOTNULLGROUPBY1,2,3)d;COMMENTONVIEWmonitor.pg_table_bloat_humanIS'postgres table bloat info in human-readable format';GRANTSELECTONmonitor.pg_table_bloat_humanTOpg_monitor;----------------------------------------------------------------------
-- Activity Overview: monitor.pg_session
----------------------------------------------------------------------
DROPVIEWIFEXISTSmonitor.pg_sessionCASCADE;CREATEORREPLACEVIEWmonitor.pg_sessionASSELECTcoalesce(datname,'all')ASdatname,numbackends,active,idle,ixact,max_duration,max_tx_duration,max_conn_durationFROM(SELECTdatname,count(*)ASnumbackends,count(*)FILTER(WHEREstate='active')ASactive,count(*)FILTER(WHEREstate='idle')ASidle,count(*)FILTER(WHEREstate='idle in transaction'ORstate='idle in transaction (aborted)')ASixact,max(extract(epochfromnow()-state_change))FILTER(WHEREstate='active')ASmax_duration,max(extract(epochfromnow()-xact_start))ASmax_tx_duration,max(extract(epochfromnow()-backend_start))ASmax_conn_durationFROMpg_stat_activityWHEREbackend_type='client backend'ANDpid<>pg_backend_pid()GROUPBYROLLUP(1)ORDERBY1NULLSFIRST)t;COMMENTONVIEWmonitor.pg_sessionIS'postgres activity group by session';GRANTSELECTONmonitor.pg_sessionTOpg_monitor;----------------------------------------------------------------------
-- Sequential Scan: monitor.pg_seq_scan
----------------------------------------------------------------------
DROPVIEWIFEXISTSmonitor.pg_seq_scanCASCADE;CREATEORREPLACEVIEWmonitor.pg_seq_scanASSELECTschemanameASnspname,relname,seq_scan,seq_tup_read,seq_tup_read/seq_scanASseq_tup_avg,idx_scan,n_live_tup+n_dead_tupAStuples,round(n_live_tup*100.0::NUMERIC/(n_live_tup+n_dead_tup),2)ASlive_ratioFROMpg_stat_user_tablesWHEREseq_scan>0and(n_live_tup+n_dead_tup)>0ORDERBYseq_scanDESC;COMMENTONVIEWmonitor.pg_seq_scanIS'table that have seq scan';GRANTSELECTONmonitor.pg_seq_scanTOpg_monitor;
Function for viewing shared memory allocation (PG13 and above)
DROPFUNCTIONIFEXISTSmonitor.pg_shmem()CASCADE;CREATEORREPLACEFUNCTIONmonitor.pg_shmem()RETURNSSETOFpg_shmem_allocationsAS$$SELECT*FROMpg_shmem_allocations;$$LANGUAGESQLSECURITYDEFINER;COMMENTONFUNCTIONmonitor.pg_shmem()IS'security wrapper for system view pg_shmem';REVOKEALLONFUNCTIONmonitor.pg_shmem()FROMPUBLIC;GRANTEXECUTEONFUNCTIONmonitor.pg_shmem()TOpg_monitor;
10.12.1 - Monitoring Dashboards
Pigsty provides many out-of-the-box Grafana monitoring dashboards for PostgreSQL
Pigsty provides many out-of-the-box Grafana monitoring dashboards for PostgreSQL: Demo & Gallery.
There are 26 PostgreSQL-related monitoring dashboards in Pigsty, organized hierarchically into Overview, Cluster, Instance, and Database categories, and by data source into PGSQL, PGCAT, and PGLOG categories.
Client connections that have sent queries but have not yet got a server connection
pgbouncer_stat_avg_query_count
gauge
datname, job, ins, ip, instance, cls
Average queries per second in last stat period
pgbouncer_stat_avg_query_time
gauge
datname, job, ins, ip, instance, cls
Average query duration, in seconds
pgbouncer_stat_avg_recv
gauge
datname, job, ins, ip, instance, cls
Average received (from clients) bytes per second
pgbouncer_stat_avg_sent
gauge
datname, job, ins, ip, instance, cls
Average sent (to clients) bytes per second
pgbouncer_stat_avg_wait_time
gauge
datname, job, ins, ip, instance, cls
Time spent by clients waiting for a server, in seconds (average per second).
pgbouncer_stat_avg_xact_count
gauge
datname, job, ins, ip, instance, cls
Average transactions per second in last stat period
pgbouncer_stat_avg_xact_time
gauge
datname, job, ins, ip, instance, cls
Average transaction duration, in seconds
pgbouncer_stat_total_query_count
gauge
datname, job, ins, ip, instance, cls
Total number of SQL queries pooled by pgbouncer
pgbouncer_stat_total_query_time
counter
datname, job, ins, ip, instance, cls
Total number of seconds spent when executing queries
pgbouncer_stat_total_received
counter
datname, job, ins, ip, instance, cls
Total volume in bytes of network traffic received by pgbouncer
pgbouncer_stat_total_sent
counter
datname, job, ins, ip, instance, cls
Total volume in bytes of network traffic sent by pgbouncer
pgbouncer_stat_total_wait_time
counter
datname, job, ins, ip, instance, cls
Time spent by clients waiting for a server, in seconds
pgbouncer_stat_total_xact_count
gauge
datname, job, ins, ip, instance, cls
Total number of SQL transactions pooled by pgbouncer
pgbouncer_stat_total_xact_time
counter
datname, job, ins, ip, instance, cls
Total number of seconds spent when in a transaction
pgbouncer_up
gauge
job, ins, ip, instance, cls
last scrape was able to connect to the server: 1 for yes, 0 for no
pgbouncer_version
gauge
job, ins, ip, instance, cls
server version number
process_cpu_seconds_total
counter
job, ins, ip, instance, cls
Total user and system CPU time spent in seconds.
process_max_fds
gauge
job, ins, ip, instance, cls
Maximum number of open file descriptors.
process_open_fds
gauge
job, ins, ip, instance, cls
Number of open file descriptors.
process_resident_memory_bytes
gauge
job, ins, ip, instance, cls
Resident memory size in bytes.
process_start_time_seconds
gauge
job, ins, ip, instance, cls
Start time of the process since unix epoch in seconds.
process_virtual_memory_bytes
gauge
job, ins, ip, instance, cls
Virtual memory size in bytes.
process_virtual_memory_max_bytes
gauge
job, ins, ip, instance, cls
Maximum amount of virtual memory available in bytes.
promhttp_metric_handler_requests_in_flight
gauge
job, ins, ip, instance, cls
Current number of scrapes being served.
promhttp_metric_handler_requests_total
counter
code, job, ins, ip, instance, cls
Total number of scrapes by HTTP status code.
scrape_duration_seconds
Unknown
job, ins, ip, instance, cls
N/A
scrape_samples_post_metric_relabeling
Unknown
job, ins, ip, instance, cls
N/A
scrape_samples_scraped
Unknown
job, ins, ip, instance, cls
N/A
scrape_series_added
Unknown
job, ins, ip, instance, cls
N/A
up
Unknown
job, ins, ip, instance, cls
N/A
10.13 - Parameters
Customize PostgreSQL clusters with 120 parameters in the PGSQL module
The PGSQL module needs to be installed on nodes managed by Pigsty (i.e., nodes that have the NODE module configured), and also requires an available ETCD cluster in your deployment to store cluster metadata.
Installing the PGSQL module on a single node will create a standalone PGSQL server/instance, i.e., a primary instance.
Installing on additional nodes will create read replicas, which can serve as standby instances and handle read-only requests.
You can also create offline instances for ETL/OLAP/interactive queries, use sync standby and quorum commit to improve data consistency,
or even set up standby clusters and delayed clusters to quickly respond to data loss caused by human errors and software defects.
You can define multiple PGSQL clusters and further organize them into a horizontal sharding cluster: Pigsty natively supports Citus cluster groups, allowing you to upgrade your standard PGSQL cluster in-place to a distributed database cluster.
Pigsty v4.0 uses PostgreSQL 18 by default and introduces new parameters such as pg_io_method and pgbackrest_exporter.
PostgreSQL instance cleanup and uninstall configuration
Parameter Overview
PG_ID parameters are used to define PostgreSQL cluster and instance identity, including cluster name, instance sequence number, role, shard, and other core identity parameters.
pg extensions to be installed, ${pg_version} will be replaced
PG_BOOTSTRAP parameters are used to configure PostgreSQL cluster initialization, including Patroni high availability, data directory, storage, networking, encoding, and other core settings.
PG_PROVISION parameters are used to configure PostgreSQL cluster template provisioning, including default roles, privileges, schemas, extensions, and HBA rules.
extra command line options for pgbackrest_exporter
PG_REMOVE parameters are used to configure PostgreSQL instance cleanup and uninstall behavior, including data directory, backup, and package removal control.
pg_cluster: Identifies the cluster name, configured at cluster level.
pg_role: Configured at instance level, identifies the role of the instance. Only primary role is treated specially. If not specified, defaults to replica role, with special delayed and offline roles.
pg_seq: Used to identify instances within a cluster, typically an integer starting from 0 or 1, once assigned it doesn’t change.
All other parameters can be inherited from global or default configuration, but identity parameters must be explicitly specified and manually assigned.
pg_mode
Parameter Name: pg_mode, Type: enum, Level: C
PostgreSQL cluster mode, default value is pgsql, i.e., standard PostgreSQL cluster.
If pg_mode is set to citus or gpsql, two additional required identity parameters pg_shard and pg_group are needed to define the horizontal sharding cluster identity.
In both cases, each PostgreSQL cluster is part of a larger business unit.
pg_cluster
Parameter Name: pg_cluster, Type: string, Level: C
PostgreSQL cluster name, required identity parameter, no default value.
The cluster name is used as the namespace for resources.
Cluster naming must follow a specific pattern: [a-z][a-z0-9-]*, i.e., only numbers and lowercase letters, not starting with a number, to meet different identifier constraints.
pg_seq
Parameter Name: pg_seq, Type: int, Level: I
PostgreSQL instance sequence number, required identity parameter, no default value.
The sequence number of this instance, uniquely assigned within its cluster, typically using natural numbers starting from 0 or 1, usually not recycled or reused.
pg_role
Parameter Name: pg_role, Type: enum, Level: I
PostgreSQL instance role, required identity parameter, no default value. Values can be: primary, replica, offline
The role of a PGSQL instance can be: primary, replica, standby, or offline.
primary: Primary instance, there is one and only one in a cluster.
replica: Replica for serving online read-only traffic, may have slight replication delay under high load (10ms~100ms, 100KB).
offline: Offline replica for handling offline read-only traffic, such as analytics/ETL/personal queries.
pg_instances
Parameter Name: pg_instances, Type: dict, Level: I
Define multiple PostgreSQL instances on a single host using {port:ins_vars} format.
This parameter is reserved for multi-instance deployment on a single node. Pigsty has not yet implemented this feature and strongly recommends dedicated node deployment.
pg_upstream
Parameter Name: pg_upstream, Type: ip, Level: I
Upstream instance IP address for standby cluster or cascade replica.
Setting pg_upstream on the primary instance of a cluster indicates this cluster is a standby cluster, and this instance will act as a standby leader, receiving and applying changes from the upstream cluster.
Setting pg_upstream on a non-primary instance specifies a specific instance as the upstream for physical replication. If different from the primary instance IP address, this instance becomes a cascade replica. It is the user’s responsibility to ensure the upstream IP address is another instance in the same cluster.
pg_shard
Parameter Name: pg_shard, Type: string, Level: C
PostgreSQL horizontal shard name, required identity parameter for sharding clusters (e.g., citus clusters).
When multiple standard PostgreSQL clusters serve the same business together in a horizontal sharding manner, Pigsty marks this group of clusters as a horizontal sharding cluster.
pg_shard is the shard group name. It is typically a prefix of pg_cluster.
For example, if we have a shard group pg-citus with 4 clusters, their identity parameters would be:
If you want to monitor remote PostgreSQL instances, define them in the pg_exporters parameter on the cluster where the monitoring system resides (Infra node), and use the pgsql-monitor.yml playbook to complete the deployment.
pg_exporters:# list all remote instances here, alloc a unique unused local port as k20001:{pg_cluster: pg-foo, pg_seq: 1, pg_host:10.10.10.10}20004:{pg_cluster: pg-foo, pg_seq: 2, pg_host:10.10.10.11}20002:{pg_cluster: pg-bar, pg_seq: 1, pg_host:10.10.10.12}20003:{pg_cluster: pg-bar, pg_seq: 1, pg_host:10.10.10.13}
pg_offline_query
Parameter Name: pg_offline_query, Type: bool, Level: I
Set to true to enable offline queries on this instance, default is false.
When this parameter is enabled on a PostgreSQL instance, users belonging to the dbrole_offline group can directly connect to this PostgreSQL instance to execute offline queries (slow queries, interactive queries, ETL/analytics queries).
Instances with this flag have an effect similar to setting pg_role = offline for the instance, with the only difference being that offline instances by default do not serve replica service requests and exist as dedicated offline/analytics replica instances.
If you don’t have spare instances available for this purpose, you can select a regular replica and enable this parameter at the instance level to handle offline queries when needed.
PG_BUSINESS
Customize cluster templates: users, databases, services, and permission rules.
Users should pay close attention to this section of parameters, as this is where business declares its required database objects.
# postgres business object definition, overwrite in group varspg_users:[]# postgres business userspg_databases:[]# postgres business databasespg_services:[]# postgres business servicespg_hba_rules:[]# business hba rules for postgrespgb_hba_rules:[]# business hba rules for pgbouncer# global credentials, overwrite in global varspg_dbsu_password:''# dbsu password, empty string means no dbsu password by defaultpg_replication_username:replicatorpg_replication_password:DBUser.Replicatorpg_admin_username:dbuser_dbapg_admin_password:DBUser.DBApg_monitor_username:dbuser_monitorpg_monitor_password:DBUser.Monitor
pg_users
Parameter Name: pg_users, Type: user[], Level: C
PostgreSQL business user list, needs to be defined at the PG cluster level. Default value: [] empty list.
Each array element is a user/role definition, for example:
- name:dbuser_meta # required, `name` is the only required field for user definitionpassword:DBUser.Meta # optional, password, can be scram-sha-256 hash string or plaintextlogin:true# optional, can login by defaultsuperuser:false# optional, default false, is superuser?createdb:false# optional, default false, can create database?createrole:false# optional, default false, can create role?inherit:true# optional, by default, can this role use inherited privileges?replication:false# optional, default false, can this role do replication?bypassrls:false# optional, default false, can this role bypass row-level security?pgbouncer:true# optional, default false, add this user to pgbouncer user list? (production users using connection pool should explicitly set to true)connlimit:-1# optional, user connection limit, default -1 disables limitexpire_in: 3650 # optional, this role expires:calculated from creation + n days (higher priority than expire_at)expire_at:'2030-12-31'# optional, when this role expires, use YYYY-MM-DD format string to specify a specific date (lower priority than expire_in)comment:pigsty admin user # optional, description and comment string for this user/roleroles: [dbrole_admin] # optional, default roles are:dbrole_{admin,readonly,readwrite,offline}parameters:{}# optional, use `ALTER ROLE SET` for this role, configure role-level database parameterspool_mode:transaction # optional, pgbouncer pool mode at user level, default transactionpool_connlimit:-1# optional, user-level max database connections, default -1 disables limitsearch_path:public # optional, key-value config parameter per postgresql docs (e.g., use pigsty as default search_path)
pg_databases
Parameter Name: pg_databases, Type: database[], Level: C
PostgreSQL business database list, needs to be defined at the PG cluster level. Default value: [] empty list.
- name:meta # required, `name` is the only required field for database definitionbaseline:cmdb.sql # optional, database sql baseline file path (relative path in ansible search path, e.g., files/)pgbouncer:true# optional, add this database to pgbouncer database list? default trueschemas:[pigsty] # optional, additional schemas to create, array of schema name stringsextensions: # optional, additional extensions to install:array of extension objects- {name: postgis , schema:public } # can specify which schema to install extension into, or not (if not specified, installs to first schema in search_path)- {name:timescaledb } # some extensions create and use fixed schemas, so no need to specify schemacomment:pigsty meta database # optional, description and comment for the databaseowner:postgres # optional, database owner, default is postgrestemplate:template1 # optional, template to use, default is template1, target must be a template databaseencoding:UTF8 # optional, database encoding, default UTF8 (must match template database)locale:C # optional, database locale setting, default C (must match template database)lc_collate:C # optional, database collate rule, default C (must match template database), no reason to changelc_ctype:C # optional, database ctype character set, default C (must match template database)tablespace:pg_default # optional, default tablespace, default is 'pg_default'allowconn:true# optional, allow connections, default true. Explicitly set false to completely forbid connectionsrevokeconn:false# optional, revoke public connect privileges. default false, when true, CONNECT privilege revoked from users other than owner and adminregister_datasource:true# optional, register this database to grafana datasource? default true, explicitly false skips registrationconnlimit:-1# optional, database connection limit, default -1 means no limit, positive integer limits connectionspool_auth_user:dbuser_meta # optional, all connections to this pgbouncer database will authenticate using this user (useful when pgbouncer_auth_query enabled)pool_mode:transaction # optional, database-level pgbouncer pooling mode, default transactionpool_size:64# optional, database-level pgbouncer default pool size, default 64pool_size_reserve:32# optional, database-level pgbouncer pool reserve, default 32, max additional burst connections when default pool insufficientpool_size_min:0# optional, database-level pgbouncer pool minimum size, default 0pool_max_db_conn:100# optional, database-level max database connections, default 100
In each database definition object, only name is a required field, all other fields are optional.
pg_services
Parameter Name: pg_services, Type: service[], Level: C
PostgreSQL service list, needs to be defined at the PG cluster level. Default value: [], empty list.
Used to define additional services at the database cluster level. Each object in the array defines a service. A complete service definition example:
- name:standby # required, service name, final svc name will use `pg_cluster` as prefix, e.g., pg-meta-standbyport:5435# required, exposed service port (as kubernetes service node port mode)ip:"*"# optional, IP address to bind service, default is all IP addressesselector:"[]"# required, service member selector, use JMESPath to filter inventorybackup:"[? pg_role == `primary`]"# optional, service member selector (backup), service is handled by these instances when default selector instances are all downdest:default # optional, target port, default|postgres|pgbouncer|<port_number>, default is 'default', Default means use pg_default_service_dest value to decidecheck: /sync # optional, health check URL path, default is /, here uses Patroni API:/sync, only sync standby and primary return 200 health statusmaxconn:5000# optional, max frontend connections allowed, default 5000balance: roundrobin # optional, haproxy load balancing algorithm (default roundrobin, other option:leastconn)options:'inter 3s fastinter 1s downinter 5s rise 3 fall 3 on-marked-down shutdown-sessions slowstart 30s maxconn 3000 maxqueue 128 weight 100'
Note that this parameter is used to add additional services at the cluster level. If you want to globally define services that all PostgreSQL databases should provide, use the pg_default_services parameter.
pg_hba_rules
Parameter Name: pg_hba_rules, Type: hba[], Level: C
Client IP whitelist/blacklist rules for database cluster/instance. Default: [] empty list.
Array of objects, each object represents a rule. HBA rule object definition:
- title:allow intranet password accessrole:commonrules:- host all all 10.0.0.0/8 md5- host all all 172.16.0.0/12 md5- host all all 192.168.0.0/16 md5
title: Rule title name, rendered as comment in HBA file.
rules: Rule array, each element is a standard HBA rule string.
role: Rule application scope, which instance roles will enable this rule?
common: Applies to all instances
primary, replica, offline: Only applies to instances with specific pg_role.
Special case: role: 'offline' rules apply to instances with pg_role : offline, and also to instances with pg_offline_query flag.
In addition to the native HBA rule definition above, Pigsty also provides a more convenient alias form:
- addr:'intra'# world|intra|infra|admin|local|localhost|cluster|<cidr>auth:'pwd'# trust|pwd|ssl|cert|deny|<official auth method>user:'all'# all|${dbsu}|${repl}|${admin}|${monitor}|<user>|<group>db:'all'# all|replication|....rules:[]# raw hba string precedence over above alltitle:allow intranet password access
pg_default_hba_rules is similar to this parameter, but it’s used to define global HBA rules, while this parameter is typically used to customize HBA rules for specific clusters/instances.
pgb_hba_rules
Parameter Name: pgb_hba_rules, Type: hba[], Level: C
Pgbouncer business HBA rules, default value: [], empty array.
This parameter is similar to pg_hba_rules, both are arrays of hba rule objects, the difference is that this parameter is for Pgbouncer.
pgb_default_hba_rules is similar to this parameter, but it’s used to define global connection pool HBA rules, while this parameter is typically used to customize HBA rules for specific connection pool clusters/instances.
pg_replication_username
Parameter Name: pg_replication_username, Type: username, Level: G
PostgreSQL physical replication username, default is replicator, not recommended to change this parameter.
pg_replication_password
Parameter Name: pg_replication_password, Type: password, Level: G
PostgreSQL physical replication user password, default value: DBUser.Replicator.
Warning: Please change this password in production environments!
pg_admin_username
Parameter Name: pg_admin_username, Type: username, Level: G
This is the globally used database administrator with database Superuser privileges and connection pool traffic management permissions. Please control its usage scope.
pg_admin_password
Parameter Name: pg_admin_password, Type: password, Level: G
This is a database/connection pool user for monitoring, not recommended to change this username.
However, if your existing database uses a different monitor user, you can use this parameter to specify the monitor username when defining monitoring targets.
pg_monitor_password
Parameter Name: pg_monitor_password, Type: password, Level: G
Password used by PostgreSQL/Pgbouncer monitor user, default: DBUser.Monitor.
Try to avoid using characters like @:/ that can be confused with URL delimiters in passwords to reduce unnecessary trouble.
Warning: Please change this password in production environments!
PostgreSQL pg_dbsu superuser password, default is empty string, meaning no password is set.
We don’t recommend configuring password login for dbsu as it increases the attack surface. The exception is: pg_mode = citus, in which case you need to configure a password for each shard cluster’s dbsu to allow connections within the shard cluster.
PG_INSTALL
This section is responsible for installing PostgreSQL and its extensions. If you want to install different major versions and extension plugins, just modify pg_version and pg_extensions. Note that not all extensions are available for all major versions.
pg_dbsu:postgres # os dbsu name, default is postgres, better not change itpg_dbsu_uid:26# os dbsu uid and gid, default is 26, for default postgres user and grouppg_dbsu_sudo:limit # dbsu sudo privilege, none,limit,all,nopass. default is limitpg_dbsu_home:/var/lib/pgsql # postgresql home directory, default is `/var/lib/pgsql`pg_dbsu_ssh_exchange:true# exchange postgres dbsu ssh key among same pgsql clusterpg_version:18# postgres major version to be installed, default is 18pg_bin_dir:/usr/pgsql/bin # postgres binary dir, default is `/usr/pgsql/bin`pg_log_dir:/pg/log/postgres # postgres log dir, default is `/pg/log/postgres`pg_packages:# pg packages to be installed, alias can be used- pgsql-main pgsql-commonpg_extensions:[]# pg extensions to be installed, alias can be used
pg_dbsu
Parameter Name: pg_dbsu, Type: username, Level: C
OS dbsu username used by PostgreSQL, default is postgres, changing this username is not recommended.
However, in certain situations, you may need a username different from postgres, for example, when installing and configuring Greenplum / MatrixDB, you need to use gpadmin / mxadmin as the corresponding OS superuser.
pg_dbsu_uid
Parameter Name: pg_dbsu_uid, Type: int, Level: C
OS database superuser uid and gid, 26 is the default postgres user UID/GID from PGDG RPM.
For Debian/Ubuntu systems, there is no default value, and user 26 is often taken. Therefore, when Pigsty detects the installation environment is Debian-based and uid is 26, it will automatically use the replacement pg_dbsu_uid = 543.
pg_dbsu_sudo
Parameter Name: pg_dbsu_sudo, Type: enum, Level: C
Database superuser sudo privilege, can be none, limit, all, or nopass. Default is limit
none: No sudo privilege
limit: Limited sudo privilege for executing systemctl commands for database-related components (default option).
all: Full sudo privilege, requires password.
nopass: Full sudo privilege without password (not recommended).
Default value is limit, only allows executing sudo systemctl <start|stop|reload> <postgres|patroni|pgbouncer|...>.
pg_dbsu_home
Parameter Name: pg_dbsu_home, Type: path, Level: C
PostgreSQL home directory, default is /var/lib/pgsql, consistent with official pgdg RPM.
pg_dbsu_ssh_exchange
Parameter Name: pg_dbsu_ssh_exchange, Type: bool, Level: C
Whether to exchange OS dbsu ssh keys within the same PostgreSQL cluster?
Default is true, meaning database superusers in the same cluster can ssh to each other.
pg_version
Parameter Name: pg_version, Type: enum, Level: C
PostgreSQL major version to install, default is 18.
Note that PostgreSQL physical streaming replication cannot cross major versions, so it’s best not to configure this at the instance level.
You can use parameters in pg_packages and pg_extensions to install different packages and extensions for specific PG major versions.
pg_bin_dir
Parameter Name: pg_bin_dir, Type: path, Level: C
PostgreSQL binary directory, default is /usr/pgsql/bin.
The default value is a symlink manually created during installation, pointing to the specific installed Postgres version directory.
For example /usr/pgsql -> /usr/pgsql-15. On Ubuntu/Debian it points to /usr/lib/postgresql/15/bin.
PostgreSQL log directory, default: /pg/log/postgres. The Vector log agent uses this variable to collect PostgreSQL logs.
Note that if the log directory pg_log_dir is prefixed with the data directory pg_data, it won’t be explicitly created (created automatically during data directory initialization).
pg_packages
Parameter Name: pg_packages, Type: string[], Level: C
PostgreSQL packages to install (RPM/DEB), this is an array of package names where elements can be space or comma-separated package aliases.
Pigsty v4 converges the default value to two aliases:
pg_packages:- pgsql-main pgsql-common
pgsql-main: Maps to PostgreSQL kernel, client, PL languages, and core extensions like pg_repack, wal2json, pgvector on the current platform.
pgsql-common: Maps to companion components required for running the database, such as Patroni, Pgbouncer, pgBackRest, pg_exporter, vip-manager, and other daemons.
Alias definitions can be found in pg_package_map under roles/node_id/vars/. Pigsty first resolves aliases based on OS and architecture, then replaces $v/${pg_version} with the actual major version pg_version, and finally installs the real packages. This shields package name differences between distributions.
If additional packages are needed (e.g., specific FDW or extensions), you can append aliases or real package names directly to pg_packages. But remember to keep pgsql-main pgsql-common, otherwise core components will be missing.
PostgreSQL extension packages to install (RPM/DEB), this is an array of extension package names or aliases.
Starting from v4, the default value is an empty list []. Pigsty no longer forces installation of large extensions, users can choose as needed to avoid extra disk and dependency usage.
To install extensions, fill in like this:
pg_extensions:- postgis timescaledb pgvector- pgsql-fdw # use alias to install common FDWs at once
pg_package_map provides many aliases to shield package name differences between distributions. Here are available extension combinations for EL9 platform for reference (pick as needed):
Bootstrap PostgreSQL cluster with Patroni and set up 1:1 corresponding Pgbouncer connection pool.
It also initializes the database cluster with default roles, users, privileges, schemas, and extensions defined in PG_PROVISION.
pg_data:/pg/data # postgres data directory, `/pg/data` by defaultpg_fs_main:/data/postgres # postgres main data directory, `/data/postgres` by defaultpg_fs_backup:/data/backups # postgres backup data directory, `/data/backups` by defaultpg_storage_type:SSD # storage type for pg main data, SSD,HDD, SSD by defaultpg_dummy_filesize:64MiB # size of `/pg/dummy`, hold 64MB disk space for emergency usepg_listen:'0.0.0.0'# postgres/pgbouncer listen addresses, comma separated listpg_port:5432# postgres listen port, 5432 by defaultpg_localhost:/var/run/postgresql# postgres unix socket dir for localhost connectionpatroni_enabled:true# if disabled, no postgres cluster will be created during initpatroni_mode: default # patroni working mode:default,pause,removepg_namespace:/pg # top level key namespace in etcd, used by patroni & vippatroni_port:8008# patroni listen port, 8008 by defaultpatroni_log_dir:/pg/log/patroni # patroni log dir, `/pg/log/patroni` by defaultpatroni_ssl_enabled:false# secure patroni RestAPI communications with SSL?patroni_watchdog_mode: off # patroni watchdog mode:automatic,required,off. off by defaultpatroni_username:postgres # patroni restapi username, `postgres` by defaultpatroni_password:Patroni.API # patroni restapi password, `Patroni.API` by defaultpg_etcd_password:''# etcd password for this pg cluster, '' to use pg_clusterpg_primary_db:postgres # primary database name, used by citus,etc... ,postgres by defaultpg_parameters:{}# extra parameters in postgresql.auto.confpg_files:[]# extra files to be copied to postgres data directory (e.g. license)pg_conf: oltp.yml # config template:oltp,olap,crit,tiny. `oltp.yml` by defaultpg_max_conn:auto # postgres max connections, `auto` will use recommended valuepg_shared_buffer_ratio:0.25# postgres shared buffers ratio, 0.25 by default, 0.1~0.4pg_io_method:worker # io method for postgres, auto,fsync,worker,io_uring, worker by defaultpg_rto:30# recovery time objective in seconds, `30s` by defaultpg_rpo:1048576# recovery point objective in bytes, `1MiB` at most by defaultpg_libs:'pg_stat_statements, auto_explain'# preloaded libraries, `pg_stat_statements,auto_explain` by defaultpg_delay:0# replication apply delay for standby cluster leaderpg_checksum:true# enable data checksum for postgres cluster?pg_pwd_enc: scram-sha-256 # passwords encryption algorithm:fixed to scram-sha-256pg_encoding:UTF8 # database cluster encoding, `UTF8` by defaultpg_locale:C # database cluster local, `C` by defaultpg_lc_collate:C # database cluster collate, `C` by defaultpg_lc_ctype:C # database character type, `C` by default#pgsodium_key: "" # pgsodium key, 64 hex digit, default to sha256(pg_cluster)#pgsodium_getkey_script: "" # pgsodium getkey script path, pgsodium_getkey by default
pg_data
Parameter Name: pg_data, Type: path, Level: C
Postgres data directory, default is /pg/data.
This is a symlink to the underlying actual data directory, used in multiple places, please don’t modify it. See PGSQL File Structure for details.
pg_fs_main
Parameter Name: pg_fs_main, Type: path, Level: C
Mount point/file system path for PostgreSQL main data disk, default is /data/postgres.
Default value: /data/postgres, which will be used directly as the parent directory of PostgreSQL main data directory.
NVME SSD is recommended for PostgreSQL main data storage. Pigsty is optimized for SSD storage by default, but also supports HDD.
You can change pg_storage_type to HDD for HDD storage optimization.
pg_fs_backup
Parameter Name: pg_fs_backup, Type: path, Level: C
Mount point/file system path for PostgreSQL backup data disk, default is /data/backups.
If you’re using the default pgbackrest_method = local, it’s recommended to use a separate disk for backup storage.
The backup disk should be large enough to hold all backups, at least sufficient for 3 base backups + 2 days of WAL archives. Usually capacity isn’t a big issue since you can use cheap large HDDs as backup disks.
It’s recommended to use a separate disk for backup storage, otherwise Pigsty will fall back to the main data disk and consume main data disk capacity and IO.
pg_storage_type
Parameter Name: pg_storage_type, Type: enum, Level: C
Type of PostgreSQL data storage media: SSD or HDD, default is SSD.
Default value: SSD, which affects some tuning parameters like random_page_cost and effective_io_concurrency.
pg_dummy_filesize
Parameter Name: pg_dummy_filesize, Type: size, Level: C
Size of /pg/dummy, default is 64MiB, 64MB disk space for emergency use.
When disk is full, deleting the placeholder file can free some space for emergency use. Recommend at least 8GiB for production.
For production environments with high security requirements, it’s recommended to restrict listen IP addresses.
pg_port
Parameter Name: pg_port, Type: port, Level: C
Port that PostgreSQL server listens on, default is 5432.
pg_localhost
Parameter Name: pg_localhost, Type: path, Level: C
Unix socket directory for localhost PostgreSQL connection, default is /var/run/postgresql.
Unix socket directory for PostgreSQL and Pgbouncer local connections. pg_exporter and patroni will preferentially use Unix sockets to access PostgreSQL.
pg_namespace
Parameter Name: pg_namespace, Type: path, Level: C
Top-level namespace used in etcd, used by patroni and vip-manager, default is: /pg, not recommended to change.
patroni_enabled
Parameter Name: patroni_enabled, Type: bool, Level: C
Enable Patroni? Default is: true.
If disabled, no Postgres cluster will be created during initialization. Pigsty will skip the task of starting patroni, which can be used when trying to add some components to existing postgres instances.
patroni_mode
Parameter Name: patroni_mode, Type: enum, Level: C
Patroni working mode: default, pause, remove. Default: default.
default: Normal use of Patroni to bootstrap PostgreSQL cluster
pause: Similar to default, but enters maintenance mode after bootstrap
remove: Use Patroni to initialize cluster, then remove Patroni and use raw PostgreSQL.
patroni_port
Parameter Name: patroni_port, Type: port, Level: C
Patroni listen port, default is 8008, not recommended to change.
Patroni API server listens on this port for health checks and API requests.
patroni_log_dir
Parameter Name: patroni_log_dir, Type: path, Level: C
Patroni log directory, default is /pg/log/patroni, collected by Vector log agent.
patroni_ssl_enabled
Parameter Name: patroni_ssl_enabled, Type: bool, Level: G
Secure patroni RestAPI communications with SSL? Default is false.
This parameter is a global flag that can only be set before deployment. Because if SSL is enabled for patroni, you will have to use HTTPS instead of HTTP for health checks, fetching metrics, and calling APIs.
patroni_watchdog_mode
Parameter Name: patroni_watchdog_mode, Type: string, Level: C
Patroni watchdog mode: automatic, required, off, default is off.
In case of primary failure, Patroni can use watchdog to force shutdown old primary node to avoid split-brain.
off: Don’t use watchdog. No fencing at all (default behavior)
automatic: Enable watchdog if kernel has softdog module enabled and watchdog belongs to dbsu.
required: Force enable watchdog, refuse to start Patroni/PostgreSQL if softdog unavailable.
Default is off. You should not enable watchdog on Infra nodes. Critical systems where data consistency takes priority over availability, especially business clusters involving money, can consider enabling this option.
Note that if all your access traffic uses HAproxy health check service access, there is normally no split-brain risk.
patroni_username
Parameter Name: patroni_username, Type: username, Level: C
Patroni REST API username, default is postgres, used with patroni_password.
Patroni’s dangerous REST APIs (like restarting cluster) are protected by additional username/password. See Configure Cluster and Patroni RESTAPI for details.
patroni_password
Parameter Name: patroni_password, Type: password, Level: C
Patroni REST API password, default is Patroni.API.
Warning: Must change this parameter in production environments!
pg_primary_db
Parameter Name: pg_primary_db, Type: string, Level: C
Specify the primary database name in the cluster, used for citus and other business databases, default is postgres.
For example, when using Patroni to manage HA Citus clusters, you must choose a “primary database”.
Additionally, the database name specified here will be displayed in the printed connection string after PGSQL module installation is complete.
Used to specify and manage configuration parameters in postgresql.auto.conf.
After all cluster instances are initialized, the pg_param task will write the key/value pairs from this dictionary sequentially to /pg/data/postgresql.auto.conf.
Note: Do not manually modify this configuration file, or modify cluster configuration parameters via ALTER SYSTEM, changes will be overwritten on the next configuration sync.
This variable has higher priority than cluster configuration in Patroni / DCS (i.e., higher priority than cluster configuration edited by Patroni edit-config), so it can typically be used to override cluster default parameters at instance level.
When your cluster members have different specifications (not recommended!), you can use this parameter for fine-grained configuration management of each instance.
Note that some important cluster parameters (with requirements on primary/replica parameter values) are managed directly by Patroni via command line arguments, have highest priority, and cannot be overridden this way. For these parameters, you must use Patroni edit-config for management and configuration.
PostgreSQL parameters that must be consistent on primary and replicas (inconsistency will cause replica to fail to start!):
wal_level
max_connections
max_locks_per_transaction
max_worker_processes
max_prepared_transactions
track_commit_timestamp
Parameters that should preferably be consistent on primary and replicas (considering possibility of failover):
listen_addresses
port
cluster_name
hot_standby
wal_log_hints
max_wal_senders
max_replication_slots
wal_keep_segments
wal_keep_size
You can set non-existent parameters (e.g., GUCs from extensions, thus configuring “not yet existing” parameters that ALTER SYSTEM cannot modify), but modifying existing configuration to illegal values may cause PostgreSQL to fail to start, configure with caution!
pg_files
Parameter Name: pg_files, Type: path[], Level: C
Used to specify a list of files to be copied to the PGDATA directory, default is empty array: []
Files specified in this parameter will be copied to the {{ pg_data }} directory, mainly used to distribute license files required by special commercial PostgreSQL kernels.
Currently only PolarDB (Oracle compatible) kernel requires license files. For example, you can place the license.lic file in the files/ directory and specify in pg_files:
pg_files:[license.lic ]
pg_conf
Parameter Name: pg_conf, Type: enum, Level: C
Configuration template: {oltp,olap,crit,tiny}.yml, default is oltp.yml.
tiny.yml: Optimized for small nodes, VMs, small demos (1-8 cores, 1-16GB)
oltp.yml: Optimized for OLTP workloads and latency-sensitive applications (4C8GB+) (default template)
olap.yml: Optimized for OLAP workloads and throughput (4C8G+)
crit.yml: Optimized for data consistency and critical applications (4C8G+)
Default is oltp.yml, but the configure script will set this to tiny.yml when current node is a small node.
You can have your own templates, just place them under templates/<mode>.yml and set this value to the template name to use.
pg_max_conn
Parameter Name: pg_max_conn, Type: int, Level: C
PostgreSQL server max connections. You can choose a value between 50 and 5000, or use auto for recommended value.
Not recommended to set this value above 5000, otherwise you’ll need to manually increase haproxy service connection limits.
Pgbouncer’s transaction pool can mitigate excessive OLTP connection issues, so setting a large connection count is not recommended by default.
For OLAP scenarios, change pg_default_service_dest to postgres to bypass connection pooling.
pg_shared_buffer_ratio
Parameter Name: pg_shared_buffer_ratio, Type: float, Level: C
Postgres shared buffer memory ratio, default is 0.25, normal range is 0.1~0.4.
Default: 0.25, meaning 25% of node memory will be used as PostgreSQL’s shared buffer. If you want to enable huge pages for PostgreSQL, this value should be appropriately smaller than node_hugepage_ratio.
Setting this value above 0.4 (40%) is usually not a good idea, but may be useful in extreme cases.
Note that shared buffers are only part of PostgreSQL’s shared memory. To calculate total shared memory, use show shared_memory_size_in_huge_pages;.
pg_rto
Parameter Name: pg_rto, Type: int, Level: C
Recovery Time Objective (RTO) in seconds. This is used to calculate Patroni’s TTL value, default is 30 seconds.
If the primary instance is missing for this long, a new leader election will be triggered. This value is not the lower the better, it involves trade-offs:
Reducing this value can reduce unavailable time (unable to write) during cluster failover, but makes the cluster more sensitive to short-term network jitter, thus increasing the chance of false positives triggering failover.
You need to configure this value based on network conditions and business constraints, making a trade-off between failure probability and failure impact. Default is 30s, which affects the following Patroni parameters:
# TTL for acquiring leader lease (in seconds). Think of it as the time before starting automatic failover. Default: 30ttl:{{pg_rto }}# Seconds the loop will sleep. Default: 10, this is patroni check loop intervalloop_wait:{{(pg_rto / 3)|round(0, 'ceil')|int }}# Timeout for DCS and PostgreSQL operation retries (in seconds). DCS or network issues shorter than this won't cause Patroni to demote leader. Default: 10retry_timeout:{{(pg_rto / 3)|round(0, 'ceil')|int }}# Time (in seconds) allowed for primary to recover from failure before triggering failover, max RTO: 2x loop_wait + primary_start_timeoutprimary_start_timeout:{{(pg_rto / 3)|round(0, 'ceil')|int }}
pg_rpo
Parameter Name: pg_rpo, Type: int, Level: C
Recovery Point Objective (RPO) in bytes, default: 1048576.
Default is 1MiB, meaning up to 1MiB of data loss can be tolerated during failover.
When the primary goes down and all replicas are lagging, you must make a difficult choice, trade-off between availability and consistency:
Promote a replica to become new primary and restore service ASAP, but at the cost of acceptable data loss (e.g., less than 1MB).
Wait for primary to come back online (may never happen), or manual intervention to avoid any data loss.
You can use the crit.ymlconf template to ensure no data loss during failover, but this sacrifices some performance.
pg_libs
Parameter Name: pg_libs, Type: string, Level: C
Preloaded dynamic shared libraries, default is pg_stat_statements,auto_explain, two PostgreSQL built-in extensions that are strongly recommended to enable.
For existing clusters, you can directly configure clustershared_preload_libraries parameter and apply.
If you want to use TimescaleDB or Citus extensions, you need to add timescaledb or citus to this list. timescaledb and citus should be placed at the front of this list, for example:
citus,timescaledb,pg_stat_statements,auto_explain
Other extensions requiring dynamic loading can also be added to this list, such as pg_cron, pgml, etc. Typically citus and timescaledb have highest priority and should be added to the front of the list.
pg_delay
Parameter Name: pg_delay, Type: interval, Level: I
Delayed standby replication delay, default: 0.
If this value is set to a positive value, the standby cluster leader will be delayed by this time before applying WAL changes. Setting to 1h means data in this cluster will always lag the original cluster by one hour.
Enable data checksum for PostgreSQL cluster? Default is true, enabled.
This parameter can only be set before PGSQL deployment (but you can enable it manually later).
Data checksums help detect disk corruption and hardware failures. This feature is enabled by default since Pigsty v3.5 to ensure data integrity.
pg_pwd_enc
Parameter Name: pg_pwd_enc, Type: enum, Level: C
Password encryption algorithm, fixed to scram-sha-256 since Pigsty v4.
All new users will use SCRAM credentials. md5 has been deprecated. For compatibility with old clients, upgrade to SCRAM in business connection pools or client drivers.
pg_encoding
Parameter Name: pg_encoding, Type: enum, Level: C
Database cluster encoding, default is UTF8.
Using other non-UTF8 encodings is not recommended.
pg_locale
Parameter Name: pg_locale, Type: enum, Level: C
Database cluster locale, default is C.
This parameter controls the database’s default Locale setting, affecting collation, character classification, and other behaviors. Using C or POSIX provides best performance and predictable sorting behavior.
If you need specific language localization support, you can set it to the corresponding Locale, such as en_US.UTF-8 or zh_CN.UTF-8. Note that Locale settings affect index sort order, so they cannot be changed after cluster initialization.
pg_lc_collate
Parameter Name: pg_lc_collate, Type: enum, Level: C
Database cluster collation, default is C.
Unless you know what you’re doing, modifying cluster-level collation settings is not recommended.
pg_lc_ctype
Parameter Name: pg_lc_ctype, Type: enum, Level: C
Database character set CTYPE, default is C.
Starting from Pigsty v3.5, to be consistent with pg_lc_collate, the default value changed to C.
pg_io_method
Parameter Name: pg_io_method, Type: enum, Level: C
PostgreSQL IO method, default is worker. Available options include:
auto: Automatically select based on operating system, uses io_uring on Debian-based systems or EL 10+, otherwise uses worker
sync: Use traditional synchronous IO method
worker: Use background worker processes to handle IO (default option)
io_uring: Use Linux’s io_uring asynchronous IO interface
This parameter only applies to PostgreSQL 17 and above, controlling PostgreSQL’s data block layer IO strategy.
In PostgreSQL 17, io_uring can provide higher IO performance, but requires operating system kernel support (Linux 5.1+) and the liburing library installed.
In PostgreSQL 18, the default IO method changed from sync to worker, using background worker processes for asynchronous IO without additional dependencies.
If you’re using Debian 12/Ubuntu 22+ or EL 10+ systems and want optimal IO performance, consider setting this to io_uring.
Note that setting this value on systems that don’t support io_uring may cause PostgreSQL startup to fail, so auto or worker are safer choices.
pg_etcd_password
Parameter Name: pg_etcd_password, Type: password, Level: C
The password used by this PostgreSQL cluster in etcd, default is empty string ''.
If set to empty string, the pg_cluster parameter value will be used as the password (for Citus clusters, the pg_shard parameter value is used).
This password is used for authentication when Patroni connects to etcd and when vip-manager accesses etcd.
pgsodium_key
Parameter Name: pgsodium_key, Type: string, Level: C
The encryption master key for the pgsodium extension, consisting of 64 hexadecimal digits.
This parameter is not set by default. If not specified, Pigsty will automatically generate a deterministic key using the value of sha256(pg_cluster).
pgsodium is a PostgreSQL extension based on libsodium that provides encryption functions and transparent column encryption capabilities.
If you need to use pgsodium’s encryption features, it’s recommended to explicitly specify a secure random key and keep it safe.
Parameter Name: pgsodium_getkey_script, Type: path, Level: C
Path to the pgsodium key retrieval script, default uses the pgsodium_getkey script from Pigsty templates.
This script is used to retrieve pgsodium’s master key when PostgreSQL starts. The default script reads the key from environment variables or configuration files.
If you have custom key management requirements (such as using HashiCorp Vault, AWS KMS, etc.), you can provide a custom script path.
PG_PROVISION
If PG_BOOTSTRAP is about creating a new cluster, then PG_PROVISION is about creating default objects in the cluster, including:
pg_provision:true# provision postgres cluster after bootstrappg_init:pg-init # init script for cluster template, default is `pg-init`pg_default_roles:# default roles and users in postgres cluster- {name: dbrole_readonly ,login: false ,comment:role for global read-only access }- {name: dbrole_offline ,login: false ,comment:role for restricted read-only access }- {name: dbrole_readwrite ,login: false ,roles: [dbrole_readonly] ,comment:role for global read-write access }- {name: dbrole_admin ,login: false ,roles: [pg_monitor, dbrole_readwrite] ,comment:role for object creation }- {name: postgres ,superuser: true ,comment:system superuser }- {name: replicator ,replication: true ,roles: [pg_monitor, dbrole_readonly] ,comment:system replicator }- {name: dbuser_dba ,superuser: true ,roles: [dbrole_admin] ,pgbouncer: true ,pool_mode: session, pool_connlimit: 16 ,comment:pgsql admin user }- {name: dbuser_monitor ,roles: [pg_monitor, dbrole_readonly] ,pgbouncer: true ,parameters:{log_min_duration_statement: 1000 } ,pool_mode: session ,pool_connlimit: 8 ,comment:pgsql monitor user }pg_default_privileges:# default privileges when admin user creates objects- GRANT USAGE ON SCHEMAS TO dbrole_readonly- GRANT SELECT ON TABLES TO dbrole_readonly- GRANT SELECT ON SEQUENCES TO dbrole_readonly- GRANT EXECUTE ON FUNCTIONS TO dbrole_readonly- GRANT USAGE ON SCHEMAS TO dbrole_offline- GRANT SELECT ON TABLES TO dbrole_offline- GRANT SELECT ON SEQUENCES TO dbrole_offline- GRANT EXECUTE ON FUNCTIONS TO dbrole_offline- GRANT INSERT ON TABLES TO dbrole_readwrite- GRANT UPDATE ON TABLES TO dbrole_readwrite- GRANT DELETE ON TABLES TO dbrole_readwrite- GRANT USAGE ON SEQUENCES TO dbrole_readwrite- GRANT UPDATE ON SEQUENCES TO dbrole_readwrite- GRANT TRUNCATE ON TABLES TO dbrole_admin- GRANT REFERENCES ON TABLES TO dbrole_admin- GRANT TRIGGER ON TABLES TO dbrole_admin- GRANT CREATE ON SCHEMAS TO dbrole_adminpg_default_schemas:[monitor ] # default schemaspg_default_extensions:# default extensions- {name: pg_stat_statements ,schema:monitor }- {name: pgstattuple ,schema:monitor }- {name: pg_buffercache ,schema:monitor }- {name: pageinspect ,schema:monitor }- {name: pg_prewarm ,schema:monitor }- {name: pg_visibility ,schema:monitor }- {name: pg_freespacemap ,schema:monitor }- {name: postgres_fdw ,schema:public }- {name: file_fdw ,schema:public }- {name: btree_gist ,schema:public }- {name: btree_gin ,schema:public }- {name: pg_trgm ,schema:public }- {name: intagg ,schema:public }- {name: intarray ,schema:public }- {name:pg_repack }pg_reload:true# reload config after HBA changes?pg_default_hba_rules:# postgres default HBA rules, ordered by `order`- {user:'${dbsu}',db: all ,addr: local ,auth: ident ,title: 'dbsu access via local os user ident' ,order:100}- {user:'${dbsu}',db: replication ,addr: local ,auth: ident ,title: 'dbsu replication from local os ident' ,order:150}- {user:'${repl}',db: replication ,addr: localhost ,auth: pwd ,title: 'replicator replication from localhost',order:200}- {user:'${repl}',db: replication ,addr: intra ,auth: pwd ,title: 'replicator replication from intranet' ,order:250}- {user:'${repl}',db: postgres ,addr: intra ,auth: pwd ,title: 'replicator postgres db from intranet' ,order:300}- {user:'${monitor}',db: all ,addr: localhost ,auth: pwd ,title: 'monitor from localhost with password' ,order:350}- {user:'${monitor}',db: all ,addr: infra ,auth: pwd ,title: 'monitor from infra host with password',order:400}- {user:'${admin}',db: all ,addr: infra ,auth: ssl ,title: 'admin @ infra nodes with pwd & ssl' ,order:450}- {user:'${admin}',db: all ,addr: world ,auth: ssl ,title: 'admin @ everywhere with ssl & pwd' ,order:500}- {user: '+dbrole_readonly',db: all ,addr: localhost ,auth: pwd ,title: 'pgbouncer read/write via local socket',order:550}- {user: '+dbrole_readonly',db: all ,addr: intra ,auth: pwd ,title: 'read/write biz user via password' ,order:600}- {user: '+dbrole_offline' ,db: all ,addr: intra ,auth: pwd ,title: 'allow etl offline tasks from intranet',order:650}pgb_default_hba_rules:# pgbouncer default HBA rules, ordered by `order`- {user:'${dbsu}',db: pgbouncer ,addr: local ,auth: peer ,title: 'dbsu local admin access with os ident',order:100}- {user: 'all' ,db: all ,addr: localhost ,auth: pwd ,title: 'allow all user local access with pwd' ,order:150}- {user:'${monitor}',db: pgbouncer ,addr: intra ,auth: pwd ,title: 'monitor access via intranet with pwd' ,order:200}- {user:'${monitor}',db: all ,addr: world ,auth: deny ,title: 'reject all other monitor access addr' ,order:250}- {user:'${admin}',db: all ,addr: intra ,auth: pwd ,title: 'admin access via intranet with pwd' ,order:300}- {user:'${admin}',db: all ,addr: world ,auth: deny ,title: 'reject all other admin access addr' ,order:350}- {user: 'all' ,db: all ,addr: intra ,auth: pwd ,title: 'allow all user intra access with pwd' ,order:400}
pg_provision
Parameter Name: pg_provision, Type: bool, Level: C
Complete the PostgreSQL cluster provisioning work defined in this section after the cluster is bootstrapped. Default value is true.
If disabled, the PostgreSQL cluster will not be provisioned. For some special “PostgreSQL” clusters, such as Greenplum, you can disable this option to skip the provisioning phase.
pg_init
Parameter Name: pg_init, Type: string, Level: G/C
Location of the shell script for initializing database templates, default is pg-init. This script is copied to /pg/bin/pg-init and then executed.
You can add your own logic to this script, or provide a new script in the templates/ directory and set pg_init to the new script name. When using a custom script, please preserve the existing initialization logic.
Default privileges (DEFAULT PRIVILEGE) settings in each database:
pg_default_privileges:# default privileges when admin user creates objects- GRANT USAGE ON SCHEMAS TO dbrole_readonly- GRANT SELECT ON TABLES TO dbrole_readonly- GRANT SELECT ON SEQUENCES TO dbrole_readonly- GRANT EXECUTE ON FUNCTIONS TO dbrole_readonly- GRANT USAGE ON SCHEMAS TO dbrole_offline- GRANT SELECT ON TABLES TO dbrole_offline- GRANT SELECT ON SEQUENCES TO dbrole_offline- GRANT EXECUTE ON FUNCTIONS TO dbrole_offline- GRANT INSERT ON TABLES TO dbrole_readwrite- GRANT UPDATE ON TABLES TO dbrole_readwrite- GRANT DELETE ON TABLES TO dbrole_readwrite- GRANT USAGE ON SEQUENCES TO dbrole_readwrite- GRANT UPDATE ON SEQUENCES TO dbrole_readwrite- GRANT TRUNCATE ON TABLES TO dbrole_admin- GRANT REFERENCES ON TABLES TO dbrole_admin- GRANT TRIGGER ON TABLES TO dbrole_admin- GRANT CREATE ON SCHEMAS TO dbrole_admin
Pigsty provides corresponding default privilege settings based on the default role system. Please check PGSQL Access Control: Privileges for details.
Default schemas to create, default value is: [ monitor ]. This will create a monitor schema on all databases for placing various monitoring extensions, tables, views, and functions.
The only third-party extension is pg_repack, which is important for database maintenance. All other extensions are built-in PostgreSQL Contrib extensions.
Monitoring-related extensions are installed in the monitor schema by default, which is created by pg_default_schemas.
pg_reload
Parameter Name: pg_reload, Type: bool, Level: A
Reload PostgreSQL after HBA changes, default value is true.
Set it to false to disable automatic configuration reload when you want to check before applying HBA changes.
PostgreSQL host-based authentication rules, global default rules definition. Default value is:
pg_default_hba_rules:# postgres default host-based authentication rules, ordered by `order`- {user:'${dbsu}',db: all ,addr: local ,auth: ident ,title: 'dbsu access via local os user ident' ,order:100}- {user:'${dbsu}',db: replication ,addr: local ,auth: ident ,title: 'dbsu replication from local os ident' ,order:150}- {user:'${repl}',db: replication ,addr: localhost ,auth: pwd ,title: 'replicator replication from localhost',order:200}- {user:'${repl}',db: replication ,addr: intra ,auth: pwd ,title: 'replicator replication from intranet' ,order:250}- {user:'${repl}',db: postgres ,addr: intra ,auth: pwd ,title: 'replicator postgres db from intranet' ,order:300}- {user:'${monitor}',db: all ,addr: localhost ,auth: pwd ,title: 'monitor from localhost with password' ,order:350}- {user:'${monitor}',db: all ,addr: infra ,auth: pwd ,title: 'monitor from infra host with password',order:400}- {user:'${admin}',db: all ,addr: infra ,auth: ssl ,title: 'admin @ infra nodes with pwd & ssl' ,order:450}- {user:'${admin}',db: all ,addr: world ,auth: ssl ,title: 'admin @ everywhere with ssl & pwd' ,order:500}- {user: '+dbrole_readonly',db: all ,addr: localhost ,auth: pwd ,title: 'pgbouncer read/write via local socket',order:550}- {user: '+dbrole_readonly',db: all ,addr: intra ,auth: pwd ,title: 'read/write biz user via password' ,order:600}- {user: '+dbrole_offline' ,db: all ,addr: intra ,auth: pwd ,title: 'allow etl offline tasks from intranet',order:650}
The default value provides a fair security level for common scenarios. Please check PGSQL Authentication for details.
This parameter is an array of HBA rule objects, identical in format to pg_hba_rules.
It’s recommended to configure unified pg_default_hba_rules globally, and use pg_hba_rules for additional customization on specific clusters. Rules from both parameters are applied sequentially, with the latter having higher priority.
Pgbouncer default host-based authentication rules, array of HBA rule objects.
Default value provides a fair security level for common scenarios. Check PGSQL Authentication for details.
pgb_default_hba_rules:# pgbouncer default host-based authentication rules, ordered by `order`- {user:'${dbsu}',db: pgbouncer ,addr: local ,auth: peer ,title: 'dbsu local admin access with os ident',order:100}- {user: 'all' ,db: all ,addr: localhost ,auth: pwd ,title: 'allow all user local access with pwd' ,order:150}- {user:'${monitor}',db: pgbouncer ,addr: intra ,auth: pwd ,title: 'monitor access via intranet with pwd' ,order:200}- {user:'${monitor}',db: all ,addr: world ,auth: deny ,title: 'reject all other monitor access addr' ,order:250}- {user:'${admin}',db: all ,addr: intra ,auth: pwd ,title: 'admin access via intranet with pwd' ,order:300}- {user:'${admin}',db: all ,addr: world ,auth: deny ,title: 'reject all other admin access addr' ,order:350}- {user: 'all' ,db: all ,addr: intra ,auth: pwd ,title: 'allow all user intra access with pwd' ,order:400}
The default Pgbouncer HBA rules are simple:
Allow login from localhost with password
Allow login from intranet with password
Users can customize according to their own needs.
This parameter is identical in format to pgb_hba_rules. It’s recommended to configure unified pgb_default_hba_rules globally, and use pgb_hba_rules for additional customization on specific clusters. Rules from both parameters are applied sequentially, with the latter having higher priority.
PG_BACKUP
This section defines variables for pgBackRest, which is used for PGSQL Point-in-Time Recovery (PITR).
pgbackrest_enabled:true# enable pgBackRest on pgsql host?pgbackrest_clean:true# remove pg backup data during init?pgbackrest_log_dir:/pg/log/pgbackrest# pgbackrest log dir, default is `/pg/log/pgbackrest`pgbackrest_method: local # pgbackrest repo method:local, minio, [user defined...]pgbackrest_init_backup:true# perform a full backup immediately after pgbackrest init?pgbackrest_repo: # pgbackrest repo:https://pgbackrest.org/configuration.html#section-repositorylocal:# default pgbackrest repo with local posix filesystempath:/pg/backup # local backup directory, default is `/pg/backup`retention_full_type:count # retain full backup by countretention_full:2# keep at most 3 full backups when using local filesystem repo, at least 2minio:# optional minio repo for pgbackresttype:s3 # minio is s3-compatible, so use s3s3_endpoint:sss.pigsty # minio endpoint domain, default is `sss.pigsty`s3_region:us-east-1 # minio region, default is us-east-1, not effective for minios3_bucket:pgsql # minio bucket name, default is `pgsql`s3_key:pgbackrest # minio user access key for pgbackrests3_key_secret:S3User.Backup # minio user secret key for pgbackrests3_uri_style:path # use path style uri for minio, instead of host stylepath:/pgbackrest # minio backup path, default is `/pgbackrest`storage_port:9000# minio port, default is 9000storage_ca_file:/etc/pki/ca.crt # minio ca file path, default is `/etc/pki/ca.crt`block:y# enable block-level incremental backup (pgBackRest 2.46+)bundle:y# bundle small files into one filebundle_limit:20MiB # object storage file bundling threshold, default 20MiBbundle_size:128MiB # object storage file bundling target size, default 128MiBcipher_type:aes-256-cbc # enable AES encryption for remote backup repocipher_pass:pgBackRest # AES encryption password, default is 'pgBackRest'retention_full_type:time # retain full backup by time on minio reporetention_full:14# keep full backups from the past 14 days
pgbackrest_enabled
Parameter Name: pgbackrest_enabled, Type: bool, Level: C
Enable pgBackRest on PGSQL nodes? Default value is: true
When using local filesystem backup repository (local), only the cluster primary will actually enable pgbackrest. Other instances will only initialize an empty repository.
pgbackrest_clean
Parameter Name: pgbackrest_clean, Type: bool, Level: C
Remove PostgreSQL backup data during initialization? Default value is true.
pgbackrest_log_dir
Parameter Name: pgbackrest_log_dir, Type: path, Level: C
pgBackRest log directory, default is /pg/log/pgbackrest. The Vector log agent references this parameter for log collection.
pgbackrest_method
Parameter Name: pgbackrest_method, Type: enum, Level: C
pgBackRest repository method: default options are local, minio, or other user-defined methods, default is local.
This parameter determines which repository to use for pgBackRest. All available repository methods are defined in pgbackrest_repo.
Pigsty uses the local backup repository by default, which creates a backup repository in the /pg/backup directory on the primary instance. The underlying storage path is specified by pg_fs_backup.
pgbackrest_init_backup
Parameter Name: pgbackrest_init_backup, Type: bool, Level: C
Perform a full backup immediately after pgBackRest initialization completes? Default is true.
This operation is only executed on cluster primary and non-cascading replicas (no pg_upstream defined). Enabling this parameter ensures you have a base backup immediately after cluster initialization for recovery when needed.
Default value includes two repository methods: local and minio, defined as follows:
pgbackrest_repo: # pgbackrest repo:https://pgbackrest.org/configuration.html#section-repositorylocal:# default pgbackrest repo with local posix filesystempath:/pg/backup # local backup directory, default is `/pg/backup`retention_full_type:count # retain full backup by countretention_full:2# keep at most 3 full backups when using local filesystem repo, at least 2minio:# optional minio repo for pgbackresttype:s3 # minio is s3-compatible, so use s3s3_endpoint:sss.pigsty # minio endpoint domain, default is `sss.pigsty`s3_region:us-east-1 # minio region, default is us-east-1, not effective for minios3_bucket:pgsql # minio bucket name, default is `pgsql`s3_key:pgbackrest # minio user access key for pgbackrests3_key_secret:S3User.Backup # minio user secret key for pgbackrests3_uri_style:path # use path style uri for minio, instead of host stylepath:/pgbackrest # minio backup path, default is `/pgbackrest`storage_port:9000# minio port, default is 9000storage_ca_file:/etc/pki/ca.crt # minio ca file path, default is `/etc/pki/ca.crt`block:y# enable block-level incremental backup (pgBackRest 2.46+)bundle:y# bundle small files into one filebundle_limit:20MiB # object storage file bundling threshold, default 20MiBbundle_size:128MiB # object storage file bundling target size, default 128MiBcipher_type:aes-256-cbc # enable AES encryption for remote backup repocipher_pass:pgBackRest # AES encryption password, default is 'pgBackRest'retention_full_type:time # retain full backup by time on minio reporetention_full:14# keep full backups from the past 14 days
You can define new backup repositories, such as using AWS S3, GCP, or other cloud providers’ S3-compatible storage services.
Block Incremental Backup: Starting from pgBackRest 2.46, the block: y option enables block-level incremental backup.
This means during incremental backups, pgBackRest only backs up changed data blocks instead of entire changed files, significantly reducing backup data volume and backup time.
This feature is particularly useful for large databases, and it’s recommended to enable this option on object storage repositories.
PG_ACCESS
This section handles database access paths, including:
Deploy Pgbouncer connection pooler on each PGSQL node and set default behavior
Publish service ports through local or dedicated haproxy nodes
Bind optional L2 VIP and register DNS records
pgbouncer_enabled:true# if disabled, pgbouncer will not be launched on pgsql hostpgbouncer_port:6432# pgbouncer listen port, 6432 by defaultpgbouncer_log_dir:/pg/log/pgbouncer # pgbouncer log dir, `/pg/log/pgbouncer` by defaultpgbouncer_auth_query:false# query postgres to retrieve unlisted business users?pgbouncer_poolmode: transaction # pooling mode:transaction,session,statement, transaction by defaultpgbouncer_sslmode:disable # pgbouncer client ssl mode, disable by defaultpgbouncer_ignore_param:[extra_float_digits, application_name, TimeZone, DateStyle, IntervalStyle, search_path ]pg_weight:100#INSTANCE # relative load balance weight in service, 100 by default, 0-255pg_service_provider:''# dedicate haproxy node group name, or empty string for local nodes by defaultpg_default_service_dest:pgbouncer# default service destination if svc.dest='default'pg_default_services:# postgres default service definitions- {name: primary ,port: 5433 ,dest: default ,check: /primary ,selector:"[]"}- {name: replica ,port: 5434 ,dest: default ,check: /read-only ,selector:"[]", backup:"[? pg_role == `primary` || pg_role == `offline` ]"}- {name: default ,port: 5436 ,dest: postgres ,check: /primary ,selector:"[]"}- {name: offline ,port: 5438 ,dest: postgres ,check: /replica ,selector:"[? pg_role == `offline` || pg_offline_query ]", backup:"[? pg_role == `replica` && !pg_offline_query]"}pg_vip_enabled:false# enable a l2 vip for pgsql primary? false by defaultpg_vip_address:127.0.0.1/24 # vip address in `<ipv4>/<mask>` format, require if vip is enabledpg_vip_interface:eth0 # vip network interface to listen, eth0 by defaultpg_dns_suffix:''# pgsql dns suffix, '' by defaultpg_dns_target:auto # auto, primary, vip, none, or ad hoc ip
pgbouncer_enabled
Parameter Name: pgbouncer_enabled, Type: bool, Level: C
Default value is true. If disabled, the Pgbouncer connection pooler will not be configured on PGSQL nodes.
pgbouncer_port
Parameter Name: pgbouncer_port, Type: port, Level: C
Pgbouncer listen port, default is 6432.
pgbouncer_log_dir
Parameter Name: pgbouncer_log_dir, Type: path, Level: C
Pgbouncer log directory, default is /pg/log/pgbouncer. The Vector log agent collects Pgbouncer logs based on this parameter.
pgbouncer_auth_query
Parameter Name: pgbouncer_auth_query, Type: bool, Level: C
Allow Pgbouncer to query PostgreSQL to allow users not explicitly listed to access PostgreSQL through the connection pool? Default value is false.
If enabled, pgbouncer users will authenticate against the postgres database using SELECT username, password FROM monitor.pgbouncer_auth($1). Otherwise, only business users with pgbouncer: true are allowed to connect to the Pgbouncer connection pool.
pgbouncer_poolmode
Parameter Name: pgbouncer_poolmode, Type: enum, Level: C
Pgbouncer connection pool pooling mode: transaction, session, statement, default is transaction.
session: Session-level pooling with best feature compatibility.
transaction: Transaction-level pooling with better performance (many small connections), may break some session-level features like NOTIFY/LISTEN, etc.
statements: Statement-level pooling for simple read-only queries.
If your application has feature compatibility issues, consider changing this parameter to session.
pgbouncer_sslmode
Parameter Name: pgbouncer_sslmode, Type: enum, Level: C
Pgbouncer client SSL mode, default is disable.
Note that enabling SSL may have a significant performance impact on your pgbouncer.
disable: Ignore if client requests TLS (default)
allow: Use TLS if client requests it. Use plain TCP if not. Does not verify client certificate.
prefer: Same as allow.
require: Client must use TLS. Reject client connection if not. Does not verify client certificate.
verify-ca: Client must use TLS with a valid client certificate.
verify-full: Same as verify-ca.
pgbouncer_ignore_param
Parameter Name: pgbouncer_ignore_param, Type: string[], Level: C
List of startup parameters ignored by PgBouncer, default value is:
These parameters are configured in the ignore_startup_parameters option in the PgBouncer configuration file. When clients set these parameters during connection, PgBouncer will not create new connections due to parameter mismatch in the connection pool.
This allows different clients to use the same connection pool even if they set different values for these parameters. This parameter was added in Pigsty v3.5.
pg_weight
Parameter Name: pg_weight, Type: int, Level: I
Relative load balancing weight in service, default is 100, range 0-255.
Default value: 100. You must define it in instance variables and reload service for it to take effect.
It should be your node’s primary network interface name, i.e., the IP address used in your inventory.
If your nodes have multiple network interfaces with different names, you can override it in instance variables:
pg-test:hosts:10.10.10.11:{pg_seq: 1, pg_role: replica ,pg_vip_interface:eth0 }10.10.10.12:{pg_seq: 2, pg_role: primary ,pg_vip_interface:eth1 }10.10.10.13:{pg_seq: 3, pg_role: replica ,pg_vip_interface:eth2 }vars:pg_vip_enabled:true# enable L2 VIP for this cluster, binds to primary by defaultpg_vip_address: 10.10.10.3/24 # L2 network CIDR: 10.10.10.0/24, vip address:10.10.10.3# pg_vip_interface: eth1 # if your nodes have a unified interface, you can define it here
pg_dns_suffix
Parameter Name: pg_dns_suffix, Type: string, Level: C
PostgreSQL DNS name suffix, default is empty string.
By default, the PostgreSQL cluster name is registered as a DNS domain in dnsmasq on Infra nodes for external resolution.
You can specify a domain suffix with this parameter, which will use {{ pg_cluster }}{{ pg_dns_suffix }} as the cluster DNS name.
For example, if you set pg_dns_suffix to .db.vip.company.tld, the pg-test cluster DNS name will be pg-test.db.vip.company.tld.
pg_dns_target
Parameter Name: pg_dns_target, Type: enum, Level: C
Could be: auto, primary, vip, none, or an ad hoc IP address, which will be the target IP address of cluster DNS record.
Default value: auto, which will bind to pg_vip_address if pg_vip_enabled, or fallback to cluster primary instance IP address.
vip: bind to pg_vip_address
primary: resolve to cluster primary instance IP address
auto: resolve to pg_vip_address if pg_vip_enabled, or fallback to cluster primary instance IP address
none: do not bind to any IP address
<ipv4>: bind to the given IP address
PG_MONITOR
The PG_MONITOR group parameters are used to monitor the status of PostgreSQL databases, Pgbouncer connection pools, and pgBackRest backup systems.
This parameter group defines three Exporter configurations: pg_exporter for monitoring PostgreSQL, pgbouncer_exporter for monitoring connection pools, and pgbackrest_exporter for monitoring backup status.
pg_exporter_enabled:true# enable pg_exporter on pgsql host?pg_exporter_config:pg_exporter.yml # pg_exporter config file namepg_exporter_cache_ttls:'1,10,60,300'# pg_exporter collector ttl stages (seconds), default is '1,10,60,300'pg_exporter_port:9630# pg_exporter listen port, default is 9630pg_exporter_params:'sslmode=disable'# extra url parameters for pg_exporter dsnpg_exporter_url:''# if specified, will override auto-generated pg dsnpg_exporter_auto_discovery:true# enable auto database discovery? enabled by defaultpg_exporter_exclude_database:'template0,template1,postgres'# csv list of databases not monitored during auto-discoverypg_exporter_include_database:''# csv list of databases monitored during auto-discoverypg_exporter_connect_timeout:200# pg_exporter connection timeout (ms), default is 200pg_exporter_options:''# extra options to override pg_exporterpgbouncer_exporter_enabled:true# enable pgbouncer_exporter on pgsql host?pgbouncer_exporter_port:9631# pgbouncer_exporter listen port, default is 9631pgbouncer_exporter_url:''# if specified, will override auto-generated pgbouncer dsnpgbouncer_exporter_options:''# extra options to override pgbouncer_exporterpgbackrest_exporter_enabled:true# enable pgbackrest_exporter on pgsql host?pgbackrest_exporter_port:9854# pgbackrest_exporter listen port, default is 9854pgbackrest_exporter_options:''# extra options to override pgbackrest_exporter
pg_exporter_enabled
Parameter Name: pg_exporter_enabled, Type: bool, Level: C
Enable pg_exporter on PGSQL nodes? Default value is: true.
PG Exporter is used to monitor PostgreSQL database instances. Set to false if you don’t want to install pg_exporter.
pg_exporter_config
Parameter Name: pg_exporter_config, Type: string, Level: C
pg_exporter configuration file name, both PG Exporter and PGBouncer Exporter will use this configuration file. Default value: pg_exporter.yml.
If you want to use a custom configuration file, you can define it here. Your custom configuration file should be placed in files/<name>.yml.
For example, when you want to monitor a remote PolarDB database instance, you can use the sample configuration: files/polar_exporter.yml.
pg_exporter_cache_ttls
Parameter Name: pg_exporter_cache_ttls, Type: string, Level: C
pg_exporter collector TTL stages (seconds), default is ‘1,10,60,300’.
Default value: 1,10,60,300, which will use different TTL values for different metric collectors: 1s, 10s, 60s, 300s.
PG Exporter has a built-in caching mechanism to avoid the improper impact of multiple Prometheus scrapes on the database. All metric collectors are divided into four categories by TTL:
For example, with default configuration, liveness metrics are cached for at most 1s, most common metrics are cached for 10s (should match the monitoring scrape interval victoria_scrape_interval).
A few slow-changing queries have 60s TTL, and very few high-overhead monitoring queries have 300s TTL.
pg_exporter_port
Parameter Name: pg_exporter_port, Type: port, Level: C
pg_exporter listen port, default value is: 9630
pg_exporter_params
Parameter Name: pg_exporter_params, Type: string, Level: C
Extra URL path parameters in the DSN used by pg_exporter.
Default value: sslmode=disable, which disables SSL for monitoring connections (since local unix sockets are used by default).
pg_exporter_url
Parameter Name: pg_exporter_url, Type: pgurl, Level: C
If specified, will override the auto-generated PostgreSQL DSN and use the specified DSN to connect to PostgreSQL. Default value is empty string.
If not specified, PG Exporter will use the following connection string to access PostgreSQL by default:
Use this parameter when you want to monitor a remote PostgreSQL instance, or need to use different monitoring user/password or configuration options.
pg_exporter_auto_discovery
Parameter Name: pg_exporter_auto_discovery, Type: bool, Level: C
Enable auto database discovery? Enabled by default: true.
By default, PG Exporter connects to the database specified in the DSN (default is the admin database postgres) to collect global metrics. If you want to collect metrics from all business databases, enable this option.
PG Exporter will automatically discover all databases in the target PostgreSQL instance and collect database-level monitoring metrics from these databases.
pg_exporter_exclude_database
Parameter Name: pg_exporter_exclude_database, Type: string, Level: C
If database auto-discovery is enabled (enabled by default), databases in this parameter’s list will not be monitored.
Default value is: template0,template1,postgres, meaning the admin database postgres and template databases are excluded from auto-monitoring.
As an exception, the database specified in the DSN is not affected by this parameter. For example, if PG Exporter connects to the postgres database, it will be monitored even if postgres is in this list.
pg_exporter_include_database
Parameter Name: pg_exporter_include_database, Type: string, Level: C
If database auto-discovery is enabled (enabled by default), only databases in this parameter’s list will be monitored. Default value is empty string, meaning this feature is not enabled.
The parameter format is a comma-separated list of database names, e.g., db1,db2,db3.
This parameter has higher priority than pg_exporter_exclude_database, acting as a whitelist mode. Use this parameter if you only want to monitor specific databases.
pg_exporter_connect_timeout
Parameter Name: pg_exporter_connect_timeout, Type: int, Level: C
pg_exporter connection timeout (milliseconds), default is 200 (in milliseconds).
How long will PG Exporter wait when trying to connect to a PostgreSQL database? Beyond this time, PG Exporter will give up the connection and report an error.
The default value of 200ms is sufficient for most scenarios (e.g., same availability zone monitoring), but if your monitored remote PostgreSQL is on another continent, you may need to increase this value to avoid connection timeouts.
pg_exporter_options
Parameter Name: pg_exporter_options, Type: arg, Level: C
Command line arguments passed to PG Exporter, default value is: "" empty string.
When using empty string, the default command arguments will be used:
Parameter Name: pgbackrest_exporter_enabled, Type: bool, Level: C
Enable pgbackrest_exporter on PGSQL nodes? Default value is: true.
pgbackrest_exporter is used to monitor the status of the pgBackRest backup system, including key metrics such as backup size, time, type, and duration.
pgbackrest_exporter_port
Parameter Name: pgbackrest_exporter_port, Type: port, Level: C
pgbackrest_exporter listen port, default value is: 9854.
This port needs to be referenced in the Prometheus service discovery configuration to scrape backup-related monitoring metrics.
pgbackrest_exporter_options
Parameter Name: pgbackrest_exporter_options, Type: arg, Level: C
Command line arguments passed to pgbackrest_exporter, default value is: "" empty string.
When using empty string, the default command argument configuration will be used. You can specify additional parameter options here to adjust the exporter’s behavior.
PG_REMOVE
pgsql-rm.yml invokes the pg_remove role to safely remove PostgreSQL instances. This section’s parameters control cleanup behavior to avoid accidental deletion.
pg_rm_data:true# remove postgres data during remove? true by defaultpg_rm_backup:true# remove pgbackrest backup during primary remove? true by defaultpg_rm_pkg:true# uninstall postgres packages during remove? true by defaultpg_safeguard:false# stop pg_remove running if pg_safeguard is enabled, false by default
Whether to clean up pg_data and symlinks when removing PGSQL instances, default is true.
This switch affects both pgsql-rm.yml and other scenarios that trigger pg_remove. Set to false to preserve the data directory for manual inspection or remounting.
Whether to also clean up the pgBackRest repository and configuration when removing the primary, default is true.
This parameter only applies to primary instances with pg_role=primary: pg_remove will first stop pgBackRest, delete the current cluster’s stanza, and remove data in pg_fs_backup when pgbackrest_method == 'local'. Standby clusters or upstream backups are not affected.
Whether to uninstall all packages installed by pg_packages when cleaning up PGSQL instances, default is true.
If you only want to temporarily stop and preserve binaries, set it to false. Otherwise, pg_remove will call the system package manager to completely uninstall PostgreSQL-related components.
Accidental deletion protection, default is false. When explicitly set to true, pg_remove will immediately terminate with a prompt, and will only continue after using -e pg_safeguard=false or disabling it in variables.
It’s recommended to enable this switch before batch cleanup in production environments, verify the commands and target nodes are correct, then disable it to avoid accidental deletion of instances.
10.14 - Playbook
How to manage PostgreSQL clusters with Ansible playbooks
Pigsty provides a series of playbooks for cluster provisioning, scaling, user/database management, monitoring, backup & recovery, and migration.
Be extra cautious when using PGSQL playbooks. Misuse of pgsql.yml and pgsql-rm.yml can lead to accidental database deletion!
Always add the -l parameter to limit the execution scope, and ensure you’re executing the right tasks on the right targets.
Limiting scope to a single cluster is recommended. Running pgsql.yml without parameters in production is a high-risk operation—think twice before proceeding.
To prevent accidental deletion, Pigsty’s PGSQL module provides a safeguard mechanism controlled by the pg_safeguard parameter.
When pg_safeguard is set to true, the pgsql-rm.yml playbook will abort immediately, protecting your database cluster.
# Will abort execution, protecting data./pgsql-rm.yml -l pg-test
# Force override the safeguard via command line parameter./pgsql-rm.yml -l pg-test -e pg_safeguard=false
In addition to pg_safeguard, pgsql-rm.yml provides finer-grained control parameters:
Do not run this playbook on a primary that still has replicas—otherwise, remaining replicas will trigger automatic failover. Always remove all replicas first, then remove the primary. This is not a concern when removing the entire cluster at once.
Refresh cluster services after removing instances. When you remove a replica from a cluster, it remains in the load balancer configuration file. Since health checks will fail, the removed instance won’t affect cluster services. However, you should Reload Service at an appropriate time to ensure consistency between the production environment and configuration inventory.
pgsql-user.yml
The pgsql-user.yml playbook is used to add new business users to existing PostgreSQL clusters.
The pgsql-migration.yml playbook generates migration manuals and scripts for zero-downtime logical replication-based migration of existing PostgreSQL clusters.
The pgsql-pitr.yml playbook performs PostgreSQL Point-In-Time Recovery (PITR).
Basic Usage
# Recover to latest state (end of WAL archive stream)./pgsql-pitr.yml -l pg-meta -e '{"pg_pitr": {}}'# Recover to specific point in time./pgsql-pitr.yml -l pg-meta -e '{"pg_pitr": {"time": "2025-07-13 10:00:00+00"}}'# Recover to specific LSN./pgsql-pitr.yml -l pg-meta -e '{"pg_pitr": {"lsn": "0/4001C80"}}'# Recover to specific transaction ID./pgsql-pitr.yml -l pg-meta -e '{"pg_pitr": {"xid": "250000"}}'# Recover to named restore point./pgsql-pitr.yml -l pg-meta -e '{"pg_pitr": {"name": "some_restore_point"}}'# Recover from another cluster's backup./pgsql-pitr.yml -l pg-test -e '{"pg_pitr": {"cluster": "pg-meta"}}'
PITR Task Parameters
pg_pitr:# Define PITR taskcluster:"pg-meta"# Source cluster name (for restoring from another cluster's backup)type: latest # Recovery target type:time, xid, name, lsn, immediate, latesttime:"2025-01-01 10:00:00+00"# Recovery target: point in timename:"some_restore_point"# Recovery target: named restore pointxid:"100000"# Recovery target: transaction IDlsn:"0/3000000"# Recovery target: log sequence numberset: latest # Backup set to restore from, default:latesttimeline: latest # Target timeline, can be integer, default:latestexclusive: false # Exclude target point, default:falseaction: pause # Post-recovery action:pause, promote, shutdownarchive: false # Keep archive settings, default:falsebackup: false # Backup existing data to /pg/data-backup before restore? default:falsedb_include:[]# Include only these databasesdb_exclude:[]# Exclude these databaseslink_map:{}# Tablespace link mappingprocess:4# Parallel recovery processesrepo:{}# Recovery source repo configurationdata:/pg/data # Recovery data directoryport:5432# Recovery instance listen port
Subtasks
This playbook contains the following subtasks:
# down : stop HA and shutdown patroni and postgres# - pause : pause patroni auto failover# - stop : stop patroni and postgres services# - stop_patroni : stop patroni service# - stop_postgres : stop postgres service## pitr : execute PITR recovery process# - config : generate pgbackrest config and recovery script# - backup : perform optional backup to original data# - restore : run pgbackrest restore command# - recovery : start postgres and complete recovery# - verify : verify recovered cluster control data## up : start postgres/patroni and restore HA# - etcd : clean etcd metadata before startup# - start : start patroni and postgres services# - start_postgres : start postgres service# - start_patroni : start patroni service# - resume : resume patroni auto failover
Recovery Target Types
Type
Description
Example
latest
Recover to end of WAL archive stream (latest state)
Harness the synergistic power of PostgreSQL extensions
Pigsty provides 440+ extensions, covering 16 major categories including time-series, geospatial, vector, full-text search, analytics, and feature enhancements, ready to use out-of-the-box.
Core concepts of PostgreSQL extensions and the Pigsty extension ecosystem
Extensions are the soul of PostgreSQL. Pigsty includes 440+ pre-compiled, out-of-the-box extension plugins, fully unleashing PostgreSQL’s potential.
What are Extensions
PostgreSQL extensions are a modular mechanism that allows enhancing database functionality without modifying the core code.
An extension typically consists of three parts:
Control file (.control): Required, contains extension metadata
SQL scripts (.sql): Optional, defines functions, types, operators, and other database objects
Dynamic library (.so): Optional, provides high-performance functionality implemented in C
Extensions can add to PostgreSQL: new data types, index methods, functions and operators, foreign data access, procedural languages, performance monitoring, security auditing, and more.
Core Extensions
Among the extensions included in Pigsty, the following are most representative:
Extension package aliases and category naming conventions
Pigsty uses a package alias mechanism to simplify extension installation and management.
Package Alias Mechanism
Managing extensions involves multiple layers of name mapping:
Layer
Example pgvector
Example postgis
Extension Name
vector
postgis, postgis_topology, …
Package Alias
pgvector
postgis
RPM Package Name
pgvector_18
postgis36_18*
DEB Package Name
postgresql-18-pgvector
postgresql-18-postgis-3*
Pigsty provides a package alias abstraction layer, so users don’t need to worry about specific RPM/DEB package names:
pg_extensions:[pgvector, postgis, timescaledb ] # Use package aliases
Pigsty automatically translates to the correct package names based on the operating system and PostgreSQL version.
Note: When using CREATE EXTENSION, you use the extension name (e.g., vector), not the package alias (pgvector).
Category Aliases
All extensions are organized into 16 categories, which can be batch installed using category aliases:
# Use generic category aliases (auto-adapt to current PG version)pg_extensions:[pgsql-gis, pgsql-rag, pgsql-fts ]# Or use version-specific category aliasespg_extensions:[pg18-gis, pg18-rag, pg18-fts ]
Except for the olap category, all category extensions can be installed simultaneously. Within the olap category, there are conflicts: pg_duckdb and pg_mooncake are mutually exclusive.
Category List
Category
Description
Typical Extensions
time
Time-series
timescaledb, pg_cron, periods
gis
Geospatial
postgis, h3, pgrouting
rag
Vector/RAG
pgvector, pgml, vchord
fts
Full-text Search
pg_trgm, zhparser, pgroonga
olap
Analytics
citus, pg_duckdb, pg_analytics
feat
Feature
age, pg_graphql, rum
lang
Language
plpython3u, pljava, plv8
type
Data Type
hstore, ltree, citext
util
Utility
http, pg_net, pgjwt
func
Function
pgcrypto, uuid-ossp, pg_uuidv7
admin
Admin
pg_repack, pgagent, pg_squeeze
stat
Statistics
pg_stat_statements, pg_qualstats, auto_explain
sec
Security
pgaudit, pgcrypto, pgsodium
fdw
Foreign Data Wrapper
postgres_fdw, mysql_fdw, oracle_fdw
sim
Compatibility
orafce, babelfishpg_tds
etl
Data/ETL
pglogical, wal2json, decoderbufs
Browse Extension Catalog
You can browse detailed information about all available extensions on the Pigsty Extension Catalog website, including:
Extension name, description, version
Supported PostgreSQL versions
Supported OS distributions
Installation methods, preloading requirements
License, source repository
10.15.4 - Download
Download extension packages from software repositories to local
Before installing extensions, ensure that extension packages are downloaded to the local repository or available from upstream.
Default Behavior
Pigsty automatically downloads mainstream extensions available for the default PostgreSQL version to the local software repository during installation.
The Pigsty repository only includes extensions not present in the PGDG repository. Once an extension enters the PGDG repository, the Pigsty repository will remove it or keep it consistent.
pg_packages is typically used to specify base components needed by all clusters (PostgreSQL kernel, Patroni, pgBouncer, etc.) and essential extensions.
pg_extensions is used to specify extensions needed by specific clusters.
pg_packages:# Global base packages- pgsql-main pgsql-commonpg_extensions:# Cluster extensions- postgis timescaledb pgvector
Install During Cluster Initialization
Declare extensions in cluster configuration, and they will be automatically installed during initialization:
Preload extension libraries and configure extension parameters
Some extensions require preloading dynamic libraries or configuring parameters before use. This section describes how to configure extensions.
Preload Extensions
Most extensions can be enabled directly with CREATE EXTENSION after installation, but some extensions using PostgreSQL’s Hook mechanism require preloading.
Preloading is specified via the shared_preload_libraries parameter and requires a database restart to take effect.
Extensions Requiring Preload
Common extensions that require preloading:
Extension
Description
timescaledb
Time-series database extension, must be placed first
citus
Distributed database extension, must be placed first
pg_stat_statements
SQL statement statistics, enabled by default in Pigsty
auto_explain
Automatically log slow query execution plans, enabled by default in Pigsty
pg_cron
Scheduled task scheduling
pg_net
Asynchronous HTTP requests
pg_tle
Trusted language extensions
pgaudit
Audit logging
pg_stat_kcache
Kernel statistics
pg_squeeze
Online table space reclamation
pgml
PostgresML machine learning
For the complete list, see the Extension Catalog (marked with LOAD).
Preload Order
The loading order of extensions in shared_preload_libraries is important:
timescaledb and citus must be placed first
If using both, citus should come before timescaledb
Statistics extensions should come after pg_stat_statements to use the same query_id
pg-meta:vars:pg_cluster:pg-metapg_libs:'pg_cron, pg_stat_statements, auto_explain'pg_parameters:cron.database_name:postgres # Database used by pg_cronpg_stat_statements.track:all # Track all statementsauto_explain.log_min_duration:1000# Log queries exceeding 1 second
# Modify using patronictlpg edit-config pg-meta --force -p 'pg_stat_statements.track=all'
Important Notes
Preload errors prevent startup: If an extension in shared_preload_libraries doesn’t exist or fails to load, PostgreSQL will not start. Ensure extensions are properly installed before adding to preload.
Modification requires restart: Changes to shared_preload_libraries require restarting the PostgreSQL service to take effect.
Partial functionality available: Some extensions can be partially used without preloading, but full functionality requires preloading.
View current configuration: Use the following command to view current preload libraries:
SHOWshared_preload_libraries;
10.15.7 - Create
Create and enable extensions in databases
After installing extension packages, you need to execute CREATE EXTENSION in the database to use extension features.
View Available Extensions
After installing extension packages, you can view available extensions:
-- View all available extensions
SELECT*FROMpg_available_extensions;-- View specific extension
SELECT*FROMpg_available_extensionsWHEREname='vector';-- View enabled extensions
SELECT*FROMpg_extension;
Create Extensions
Use CREATE EXTENSION to enable extensions in the database:
-- Create extension
CREATEEXTENSIONvector;-- Create extension in specific schema
CREATEEXTENSIONpostgisSCHEMApublic;-- Automatically install dependent extensions
CREATEEXTENSIONpostgis_topologyCASCADE;-- Create if not exists
CREATEEXTENSIONIFNOTEXISTSvector;
Note: CREATE EXTENSION uses the extension name (e.g., vector), not the package alias (pgvector).
Create During Cluster Initialization
Declare extensions in pg_databases, and they will be automatically created during cluster initialization:
If you try to create without preloading, you will receive an error message.
Common extensions requiring preload: timescaledb, citus, pg_cron, pg_net, pgaudit, etc. See Configure Extensions.
Extension Dependencies
Some extensions depend on other extensions and need to be created in order:
-- postgis_topology depends on postgis
CREATEEXTENSIONpostgis;CREATEEXTENSIONpostgis_topology;-- Or use CASCADE to automatically install dependencies
CREATEEXTENSIONpostgis_topologyCASCADE;
Extensions Not Requiring Creation
A few extensions don’t provide SQL interfaces and don’t need CREATE EXTENSION:
Extension
Description
wal2json
Logical decoding plugin, used directly in replication slots
decoderbufs
Logical decoding plugin
decoder_raw
Logical decoding plugin
These extensions can be used immediately after installation, for example:
-- Create logical replication slot using wal2json
SELECT*FROMpg_create_logical_replication_slot('test_slot','wal2json');
View Extension Information
-- View extension details
\dx+vector-- View objects contained in extension
SELECT*FROMpg_extension_config_dump('vector');-- View extension version
SELECTextversionFROMpg_extensionWHEREextname='vector';
10.15.8 - Update
Upgrade PostgreSQL extension versions
Extension updates involve two levels: package updates (operating system level) and extension object updates (database level).
Update Packages
Use package managers to update extension packages:
PostgreSQL extensions typically don’t support direct rollback. To rollback:
Restore from backup
Or: Uninstall new version extension, install old version package, recreate extension
10.15.9 - Remove
Uninstall PostgreSQL extensions
Removing extensions involves two levels: dropping extension objects (database level) and uninstalling packages (operating system level).
Drop Extension Objects
Use DROP EXTENSION to remove extensions from the database:
-- Drop extension
DROPEXTENSIONpgvector;-- If there are dependent objects, cascade delete is required
DROPEXTENSIONpgvectorCASCADE;
Warning: CASCADE will drop all objects that depend on this extension (tables, functions, views, etc.). Use with caution.
Check Extension Dependencies
It’s recommended to check dependencies before dropping:
-- View objects that depend on an extension
SELECTclassid::regclass,objid,deptypeFROMpg_dependWHERErefobjid=(SELECToidFROMpg_extensionWHEREextname='pgvector');-- View tables using extension types
SELECTc.relnameAStable_name,a.attnameAScolumn_name,t.typnameAStype_nameFROMpg_attributeaJOINpg_classcONa.attrelid=c.oidJOINpg_typetONa.atttypid=t.oidWHEREt.typname='vector';
Remove Preload
If the extension is in shared_preload_libraries, it must be removed from the preload list after dropping:
Applicable to Debian 11/12/13 and Ubuntu 22.04/24.04 and compatible systems.
Add Repository
# Add GPG public keycurl -fsSL https://repo.pigsty.io/key | sudo gpg --dearmor -o /etc/apt/keyrings/pigsty.gpg
# Get distribution codename and add repositorydistro_codename=$(lsb_release -cs)sudo tee /etc/apt/sources.list.d/pigsty.list > /dev/null <<EOF
deb [signed-by=/etc/apt/keyrings/pigsty.gpg] https://repo.pigsty.io/apt/infra generic main
deb [signed-by=/etc/apt/keyrings/pigsty.gpg] https://repo.pigsty.io/apt/pgsql ${distro_codename} main
EOF# Refresh cachesudo apt update
China Mainland Mirror
curl -fsSL https://repo.pigsty.cc/key | sudo gpg --dearmor -o /etc/apt/keyrings/pigsty.gpg
distro_codename=$(lsb_release -cs)sudo tee /etc/apt/sources.list.d/pigsty.list > /dev/null <<EOF
deb [signed-by=/etc/apt/keyrings/pigsty.gpg] https://repo.pigsty.cc/apt/infra generic main
deb [signed-by=/etc/apt/keyrings/pigsty.gpg] https://repo.pigsty.cc/apt/pgsql/${distro_codename} ${distro_codename} main
EOF
How to use other PostgreSQL kernel forks in Pigsty? Such as Citus, Babelfish, IvorySQL, PolarDB, etc.
In Pigsty, you can replace the “native PG kernel” with different “flavors” of PostgreSQL forks to achieve special features and effects.
Pigsty supports various PostgreSQL kernels and compatible forks, enabling you to simulate different database systems while leveraging PostgreSQL’s ecosystem. Each kernel provides unique capabilities and compatibility layers.
Supabase is an open-source Firebase alternative that wraps PostgreSQL and provides authentication, out-of-the-box APIs, edge functions, real-time subscriptions, object storage, and vector embedding capabilities.
This is a low-code all-in-one backend platform that lets you skip most backend development work, requiring only database design and frontend knowledge to quickly ship products!
Supabase’s motto is: “Build in a weekend, Scale to millions”. Indeed, Supabase is extremely cost-effective at small to micro scales (4c8g), like a cyber bodhisattva.
— But when you really scale to millions of users — you should seriously consider self-hosting Supabase — whether for functionality, performance, or cost considerations.
Pigsty provides you with a complete one-click self-hosting solution for Supabase. Self-hosted Supabase enjoys full PostgreSQL monitoring, IaC, PITR, and high availability,
and compared to Supabase cloud services, it provides up to 440 out-of-the-box PostgreSQL extensions and can more fully utilize the performance and cost advantages of modern hardware.
Pigsty’s default supa.yml configuration template defines a single-node Supabase.
First, use Pigsty’s standard installation process to install the MinIO and PostgreSQL instances required for Supabase:
curl -fsSL https://repo.pigsty.io/get | bash
./bootstrap # environment check, install dependencies./configure -c supa # Important: please modify passwords and other key information in the configuration file!./deploy.yml # install Pigsty, deploy PGSQL and MINIO!
Before deploying Supabase, please modify the Supabase parameters in the pigsty.yml configuration file according to your actual situation (mainly passwords!)
Then, run supabase.yml to complete the remaining work and deploy Supabase containers
./supabase.yml # install Docker and deploy stateless Supabase components!
For users in China, please configure appropriate Docker mirror sites or proxy servers to bypass GFW to pull DockerHub images.
For professional subscriptions, we provide the ability to offline install Pigsty and Supabase without internet access.
Pigsty exposes web services through Nginx on the admin node/INFRA node by default. You can add DNS resolution for supa.pigsty pointing to this node locally,
then access https://supa.pigsty through a browser to enter the Supabase Studio management interface.
Default username and password: supabase / pigsty
Architecture Overview
Pigsty uses the Docker Compose template provided by Supabase as a blueprint, extracting the stateless components to be handled by Docker Compose. The stateful database and object storage containers are replaced with external PostgreSQL clusters and MinIO services managed by Pigsty.
After transformation, Supabase itself is stateless, so you can run, stop, or even run multiple stateless Supabase containers simultaneously on the same PGSQL/MINIO for scaling.
Pigsty uses a single-node PostgreSQL instance on the local machine as Supabase’s core backend database by default. For serious production deployments, we recommend using Pigsty to deploy a PG high-availability cluster with at least three nodes. Or at least use external object storage as a PITR backup repository for failover.
Pigsty uses the SNSD MinIO service on the local machine as file storage by default. For serious production environment deployments, you can use external S3-compatible object storage services, or use other multi-node multi-drive MinIO clusters independently deployed by Pigsty.
Configuration Details
When self-hosting Supabase, the directory app/supabase containing resources required for Docker Compose will be copied entirely to the target node (default supabase group) at /opt/supabase, and deployed in the background using docker compose up -d.
All configuration parameters are defined in the .env file and docker-compose.yml template.
But you usually don’t need to modify these two templates directly. You can specify parameters in .env in supa_config, and these configurations will automatically override or append to the final /opt/supabase/.env core configuration file.
The most critical parameters here are jwt_secret, and the corresponding anon_key and service_role_key. For serious production use, please be sure to refer to the instructions and tools in the Supabase Self-Hosting Manual for settings.
If you want to provide services using a domain name, you can specify your domain name in site_url, api_external_url, and supabase_public_url.
Pigsty uses local MinIO by default. If you want to use S3 or MinIO as file storage, you need to configure parameters such as s3_bucket, s3_endpoint, s3_access_key, s3_secret_key.
Generally speaking, you also need to use an external SMTP service to send emails. Email services are not recommended for self-hosting, please consider using mature third-party services such as Mailchimp, Aliyun Mail Push, etc.
For users in mainland China, we recommend you configure docker_registry_mirrors mirror sites, or use proxy_env to specify available proxy servers to bypass GFW, otherwise pulling images from DockerHub may fail or be extremely slow!
# launch supabase stateless part with docker compose:# ./supabase.ymlsupabase:hosts:10.10.10.10:{supa_seq:1}# instance idvars:supa_cluster:supa # cluster namedocker_enabled:true# enable docker# use these to pull docker images via proxy and mirror registries#docker_registry_mirrors: ['https://docker.xxxxx.io']#proxy_env: # add [OPTIONAL] proxy env to /etc/docker/daemon.json configuration file# no_proxy: "localhost,127.0.0.1,10.0.0.0/8,192.168.0.0/16,*.pigsty,*.aliyun.com,mirrors.*,*.myqcloud.com,*.tsinghua.edu.cn"# #all_proxy: http://user:pass@host:port# these configuration entries will OVERWRITE or APPEND to /opt/supabase/.env file (src template: app/supabase/.env)# check https://github.com/pgsty/pigsty/blob/main/app/supabase/.env for default valuessupa_config:# IMPORTANT: CHANGE JWT_SECRET AND REGENERATE CREDENTIAL ACCORDING!!!!!!!!!!!# https://supabase.com/docs/guides/self-hosting/docker#securing-your-servicesjwt_secret:your-super-secret-jwt-token-with-at-least-32-characters-longanon_key:eyJhbGciOiJIUzI1NiIsInR5cCI6IkpXVCJ9.eyAgCiAgICAicm9sZSI6ICJhbm9uIiwKICAgICJpc3MiOiAic3VwYWJhc2UtZGVtbyIsCiAgICAiaWF0IjogMTY0MTc2OTIwMCwKICAgICJleHAiOiAxNzk5NTM1NjAwCn0.dc_X5iR_VP_qT0zsiyj_I_OZ2T9FtRU2BBNWN8Bu4GEservice_role_key:eyJhbGciOiJIUzI1NiIsInR5cCI6IkpXVCJ9.eyAgCiAgICAicm9sZSI6ICJzZXJ2aWNlX3JvbGUiLAogICAgImlzcyI6ICJzdXBhYmFzZS1kZW1vIiwKICAgICJpYXQiOiAxNjQxNzY5MjAwLAogICAgImV4cCI6IDE3OTk1MzU2MDAKfQ.DaYlNEoUrrEn2Ig7tqibS-PHK5vgusbcbo7X36XVt4Qdashboard_username:supabasedashboard_password:pigsty# postgres connection string (use the correct ip and port)postgres_host:10.10.10.10postgres_port:5436# access via the 'default' service, which always route to the primary postgrespostgres_db:postgrespostgres_password:DBUser.Supa # password for supabase_admin and multiple supabase users# expose supabase via domain namesite_url:http://supa.pigstyapi_external_url:http://supa.pigstysupabase_public_url:http://supa.pigsty# if using s3/minio as file storages3_bucket:supas3_endpoint:https://sss.pigsty:9000s3_access_key:supabases3_secret_key:S3User.Supabases3_force_path_style:trues3_protocol:httpss3_region:stubminio_domain_ip:10.10.10.10# sss.pigsty domain name will resolve to this ip statically# if using SMTP (optional)#smtp_admin_email: [email protected]#smtp_host: supabase-mail#smtp_port: 2500#smtp_user: fake_mail_user#smtp_pass: fake_mail_password#smtp_sender_name: fake_sender#enable_anonymous_users: false
10.16.3 - Percona
Percona Postgres distribution with TDE transparent encryption support
Percona Postgres is a patched Postgres kernel with pg_tde (Transparent Data Encryption) extension.
It’s compatible with PostgreSQL 18.1 and available on all Pigsty-supported platforms.
curl -fsSL https://repo.pigsty.io/get | bash;cd ~/pigsty;./configure -c pgtde # Use percona postgres kernel./deploy.yml # Set up everything with pigsty
Configuration
The following parameters need to be adjusted to deploy a Percona cluster:
pg-meta:hosts:10.10.10.10:{pg_seq: 1, pg_role:primary }vars:pg_cluster:pg-metapg_users:- {name: dbuser_meta ,password: DBUser.Meta ,pgbouncer: true ,roles: [dbrole_admin ] ,comment:pgsql admin user }- {name: dbuser_view ,password: DBUser.Viewer ,pgbouncer: true ,roles: [dbrole_readonly] ,comment:read-only viewer }pg_databases:- name:metabaseline:cmdb.sqlcomment:pigsty tde databaseschemas:[pigsty]extensions:[vector, postgis, pg_tde ,pgaudit, { name: pg_stat_monitor, schema: monitor } ]pg_hba_rules:- {user: dbuser_view , db: all ,addr: infra ,auth: pwd ,title:'allow grafana dashboard access cmdb from infra nodes'}node_crontab:['00 01 * * * postgres /pg/bin/pg-backup full']# Full backup at 1 AM daily# Percona PostgreSQL TDE specific settingspg_packages:[percona-main, pgsql-common ] # Install percona postgres packagespg_libs:'pg_tde, pgaudit, pg_stat_statements, pg_stat_monitor, auto_explain'
Extensions
Percona provides 80 available extensions, including pg_tde, pgvector, postgis, pgaudit, set_user, pg_stat_monitor, and other useful third-party extensions.
Extension
Version
Description
pg_tde
2.1
Percona transparent data encryption access method
vector
0.8.1
Vector data type and ivfflat and hnsw access methods
postgis
3.5.4
PostGIS geometry and geography types and functions
pgaudit
18.0
Provides auditing functionality
pg_stat_monitor
2.3
PostgreSQL query performance monitoring tool
set_user
4.2.0
Similar to SET ROLE but with additional logging
pg_repack
1.5.3
Reorganize tables in PostgreSQL databases with minimal locks
hstore
1.8
Data type for storing sets of (key, value) pairs
ltree
1.3
Data type for hierarchical tree-like structures
pg_trgm
1.6
Text similarity measurement and index searching based on trigrams
curl -fsSL https://repo.pigsty.io/get | bash;cd ~/pigsty;./configure -c mysql # Use MySQL (openHalo) configuration template./deploy.yml # Install, for production deployment please modify passwords in pigsty.yml first
For production deployment, ensure you modify the password parameters in the pigsty.yml configuration file before running the install playbook.
Configuration
pg-meta:hosts:10.10.10.10:{pg_seq: 1, pg_role:primary }vars:pg_cluster:pg-metapg_users:- {name: dbuser_meta ,password: DBUser.Meta ,pgbouncer: true ,roles: [dbrole_admin] ,comment:pigsty admin user }- {name: dbuser_view ,password: DBUser.Viewer ,pgbouncer: true ,roles: [dbrole_readonly] ,comment:read-only viewer for meta database }pg_databases:- {name: postgres, extensions:[aux_mysql]}# mysql compatible database- {name: meta ,baseline: cmdb.sql ,comment: pigsty meta database ,schemas:[pigsty]}pg_hba_rules:- {user: dbuser_view , db: all ,addr: infra ,auth: pwd ,title:'allow grafana dashboard access cmdb from infra nodes'}node_crontab:['00 01 * * * postgres /pg/bin/pg-backup full']# Full backup at 1 AM daily# OpenHalo specific settingspg_mode:mysql # HaloDB's MySQL compatibility modepg_version:14# Current HaloDB compatible PG major version 14pg_packages:[openhalodb, pgsql-common ] # Install openhalodb instead of postgresql kernel
Usage
When accessing MySQL, the actual connection uses the postgres database. Please note that the concept of “database” in MySQL actually corresponds to “Schema” in PostgreSQL. Therefore, use mysql actually uses the mysql Schema within the postgres database.
The username and password for MySQL are the same as in PostgreSQL. You can manage users and permissions using standard PostgreSQL methods.
Client Access
OpenHalo provides MySQL wire protocol compatibility, listening on port 3306 by default, allowing MySQL clients and drivers to connect directly.
Pigsty’s conf/mysql configuration installs the mysql client tool by default.
You can access MySQL using the following command:
mysql -h 127.0.0.1 -u dbuser_dba
Currently, OpenHalo officially ensures Navicat can properly access this MySQL port, but Intellij IDEA’s DataGrip access will cause errors.
Changed the default database name from halo0root back to postgres
Removed the 1.0. prefix from the default version number, restoring it to 14.10
Modified the default configuration file to enable MySQL compatibility and listen on port 3306 by default
Please note that Pigsty does not provide any warranty for using the OpenHalo kernel. Any issues or requirements encountered when using this kernel should be addressed with the original vendor.
Warning: Currently experimental - thoroughly evaluate before production use.
10.16.5 - OrioleDB
Next-generation OLTP engine for PostgreSQL
OrioleDB is a PostgreSQL storage engine extension that claims to provide 4x OLTP performance, no xid wraparound and table bloat issues, and “cloud-native” (data stored in S3) capabilities.
You can run OrioleDB as an RDS using Pigsty. It’s compatible with PG 17 and available on all supported Linux platforms.
The latest version is beta12, based on PG 17_11 patch.
curl -fsSL https://repo.pigsty.io/get | bash;cd ~/pigsty;./configure -c oriole # Use OrioleDB configuration template./deploy.yml # Install Pigsty with OrioleDB
For production deployment, ensure you modify the password parameters in the pigsty.yml configuration before running the install playbook.
Configuration
pg-meta:hosts:10.10.10.10:{pg_seq: 1, pg_role:primary }vars:pg_cluster:pg-metapg_users:- {name: dbuser_meta ,password: DBUser.Meta ,pgbouncer: true ,roles: [dbrole_admin] ,comment:pigsty admin user }- {name: dbuser_view ,password: DBUser.Viewer ,pgbouncer: true ,roles: [dbrole_readonly] ,comment:read-only viewer for meta database }pg_databases:- {name: meta ,baseline: cmdb.sql ,comment: pigsty meta database ,schemas: [pigsty], extensions:[orioledb]}pg_hba_rules:- {user: dbuser_view , db: all ,addr: infra ,auth: pwd ,title:'allow grafana dashboard access cmdb from infra nodes'}node_crontab:['00 01 * * * postgres /pg/bin/pg-backup full']# Full backup at 1 AM daily# OrioleDB specific settingspg_mode:oriole # oriole compatibility modepg_packages:[orioledb, pgsql-common ] # Install OrioleDB kernelpg_libs:'orioledb, pg_stat_statements, auto_explain'# Load OrioleDB extension
Usage
To use OrioleDB, you need to install the orioledb_17 and oriolepg_17 packages (currently only RPM versions are available).
Initialize TPC-B-like tables with pgbench using 100 warehouses:
pgbench -is 100 meta
pgbench -nv -P1 -c10 -S -T1000 meta
pgbench -nv -P1 -c50 -S -T1000 meta
pgbench -nv -P1 -c10 -T1000 meta
pgbench -nv -P1 -c50 -T1000 meta
Next, you can rebuild these tables using the orioledb storage engine and observe the performance difference:
-- Create OrioleDB tables
CREATETABLEpgbench_accounts_o(LIKEpgbench_accountsINCLUDINGALL)USINGorioledb;CREATETABLEpgbench_branches_o(LIKEpgbench_branchesINCLUDINGALL)USINGorioledb;CREATETABLEpgbench_history_o(LIKEpgbench_historyINCLUDINGALL)USINGorioledb;CREATETABLEpgbench_tellers_o(LIKEpgbench_tellersINCLUDINGALL)USINGorioledb;-- Copy data from regular tables to OrioleDB tables
INSERTINTOpgbench_accounts_oSELECT*FROMpgbench_accounts;INSERTINTOpgbench_branches_oSELECT*FROMpgbench_branches;INSERTINTOpgbench_history_oSELECT*FROMpgbench_history;INSERTINTOpgbench_tellers_oSELECT*FROMpgbench_tellers;-- Drop original tables and rename OrioleDB tables
DROPTABLEpgbench_accounts,pgbench_branches,pgbench_history,pgbench_tellers;ALTERTABLEpgbench_accounts_oRENAMETOpgbench_accounts;ALTERTABLEpgbench_branches_oRENAMETOpgbench_branches;ALTERTABLEpgbench_history_oRENAMETOpgbench_history;ALTERTABLEpgbench_tellers_oRENAMETOpgbench_tellers;
Key Features
No XID Wraparound: Eliminates transaction ID wraparound maintenance
No Table Bloat: Advanced storage management prevents table bloat
Cloud Storage: Native support for S3-compatible object storage
OLTP Optimized: Designed for transactional workloads
Improved Performance: Better space utilization and query performance
Note: Currently in Beta stage - thoroughly evaluate before production use.
10.16.6 - Citus
Deploy native high-availability Citus horizontally sharded clusters with Pigsty, seamlessly scaling PostgreSQL across multiple shards and accelerating OLTP/OLAP queries.
Pigsty natively supports Citus. This is a distributed horizontal scaling extension based on the native PostgreSQL kernel.
Installation
Citus is a PostgreSQL extension plugin that can be installed and enabled on a native PostgreSQL cluster following the standard plugin installation process.
To define a citus cluster, you need to specify the following parameters:
pg_mode must be set to citus instead of the default pgsql
You must define the shard name pg_shard and shard number pg_group on each shard cluster
You must define pg_primary_db to specify the database managed by Patroni
If you want to use postgres from pg_dbsu instead of the default pg_admin_username to execute admin commands, then pg_dbsu_password must be set to a non-empty plaintext password
Additionally, you need extra hba rules to allow SSL access from localhost and other data nodes.
You can define each Citus cluster as a separate group, like standard PostgreSQL clusters, as shown in conf/dbms/citus.yml:
all:children:pg-citus0:# citus shard 0hosts:{10.10.10.10:{pg_seq: 1, pg_role:primary } }vars:{pg_cluster: pg-citus0 , pg_group:0}pg-citus1:# citus shard 1hosts:{10.10.10.11:{pg_seq: 1, pg_role:primary } }vars:{pg_cluster: pg-citus1 , pg_group:1}pg-citus2:# citus shard 2hosts:{10.10.10.12:{pg_seq: 1, pg_role:primary } }vars:{pg_cluster: pg-citus2 , pg_group:2}pg-citus3:# citus shard 3hosts:10.10.10.13:{pg_seq: 1, pg_role:primary }10.10.10.14:{pg_seq: 2, pg_role:replica }vars:{pg_cluster: pg-citus3 , pg_group:3}vars:# Global parameters for all Citus clusterspg_mode: citus # pgsql cluster mode must be set to:cituspg_shard: pg-citus # citus horizontal shard name:pg-cituspg_primary_db: meta # citus database name:metapg_dbsu_password:DBUser.Postgres# If using dbsu, you need to configure a password for itpg_users:[{name: dbuser_meta ,password: DBUser.Meta ,pgbouncer: true ,roles:[dbrole_admin ] } ]pg_databases:[{name: meta ,extensions:[{name:citus }, { name: postgis }, { name: timescaledb } ] } ]pg_hba_rules:- {user: 'all' ,db: all ,addr: 127.0.0.1/32 ,auth: ssl ,title:'all user ssl access from localhost'}- {user: 'all' ,db: all ,addr: intra ,auth: ssl ,title:'all user ssl access from intranet'}
You can also specify identity parameters for all Citus cluster members within a single group, as shown in prod.yml:
#==========================================================## pg-citus: 10 node citus cluster (5 x primary-replica pair)#==========================================================#pg-citus:# citus grouphosts:10.10.10.50:{pg_group: 0, pg_cluster: pg-citus0 ,pg_vip_address: 10.10.10.60/24 ,pg_seq: 0, pg_role:primary }10.10.10.51:{pg_group: 0, pg_cluster: pg-citus0 ,pg_vip_address: 10.10.10.60/24 ,pg_seq: 1, pg_role:replica }10.10.10.52:{pg_group: 1, pg_cluster: pg-citus1 ,pg_vip_address: 10.10.10.61/24 ,pg_seq: 0, pg_role:primary }10.10.10.53:{pg_group: 1, pg_cluster: pg-citus1 ,pg_vip_address: 10.10.10.61/24 ,pg_seq: 1, pg_role:replica }10.10.10.54:{pg_group: 2, pg_cluster: pg-citus2 ,pg_vip_address: 10.10.10.62/24 ,pg_seq: 0, pg_role:primary }10.10.10.55:{pg_group: 2, pg_cluster: pg-citus2 ,pg_vip_address: 10.10.10.62/24 ,pg_seq: 1, pg_role:replica }10.10.10.56:{pg_group: 3, pg_cluster: pg-citus3 ,pg_vip_address: 10.10.10.63/24 ,pg_seq: 0, pg_role:primary }10.10.10.57:{pg_group: 3, pg_cluster: pg-citus3 ,pg_vip_address: 10.10.10.63/24 ,pg_seq: 1, pg_role:replica }10.10.10.58:{pg_group: 4, pg_cluster: pg-citus4 ,pg_vip_address: 10.10.10.64/24 ,pg_seq: 0, pg_role:primary }10.10.10.59:{pg_group: 4, pg_cluster: pg-citus4 ,pg_vip_address: 10.10.10.64/24 ,pg_seq: 1, pg_role:replica }vars:pg_mode: citus # pgsql cluster mode:cituspg_shard: pg-citus # citus shard name:pg-cituspg_primary_db:test # primary database used by cituspg_dbsu_password:DBUser.Postgres# all dbsu password access for citus clusterpg_vip_enabled:truepg_vip_interface:eth1pg_extensions:['citus postgis timescaledb pgvector']pg_libs:'citus, timescaledb, pg_stat_statements, auto_explain'# citus will be added by patroni automaticallypg_users:[{name: test ,password: test ,pgbouncer: true ,roles:[dbrole_admin ] } ]pg_databases:[{name: test ,owner: test ,extensions:[{name:citus }, { name: postgis } ] } ]pg_hba_rules:- {user: 'all' ,db: all ,addr: 10.10.10.0/24 ,auth: trust ,title:'trust citus cluster members'}- {user: 'all' ,db: all ,addr: 127.0.0.1/32 ,auth: ssl ,title:'all user ssl access from localhost'}- {user: 'all' ,db: all ,addr: intra ,auth: ssl ,title:'all user ssl access from intranet'}
Usage
You can access any node just like accessing a regular cluster:
When a node fails, the native high availability support provided by Patroni will promote the standby node and automatically take over.
test=# select * from pg_dist_node; nodeid | groupid | nodename | nodeport | noderack | hasmetadata | isactive | noderole | nodecluster | metadatasynced | shouldhaveshards
--------+---------+-------------+----------+----------+-------------+----------+----------+-------------+----------------+------------------
1|0| 10.10.10.51 |5432| default | t | t | primary | default | t | f
2|2| 10.10.10.54 |5432| default | t | t | primary | default | t | t
5|1| 10.10.10.52 |5432| default | t | t | primary | default | t | t
3|4| 10.10.10.58 |5432| default | t | t | primary | default | t | t
4|3| 10.10.10.56 |5432| default | t | t | primary | default | t | t
10.16.7 - Babelfish
Create Microsoft SQL Server compatible PostgreSQL clusters using WiltonDB and Babelfish! (Wire protocol level compatibility)
Babelfish is an MSSQL (Microsoft SQL Server) compatibility solution based on PostgreSQL, open-sourced by AWS.
Overview
Pigsty allows users to create Microsoft SQL Server compatible PostgreSQL clusters using Babelfish and WiltonDB!
Babelfish: An MSSQL (Microsoft SQL Server) compatibility extension plugin open-sourced by AWS
WiltonDB: A PostgreSQL kernel distribution focusing on integrating Babelfish
Babelfish is a PostgreSQL extension, but it only works on a slightly modified PostgreSQL kernel fork. WiltonDB provides compiled fork kernel binaries and extension binary packages on EL/Ubuntu systems.
Pigsty can replace the native PostgreSQL kernel with WiltonDB, providing an out-of-the-box MSSQL compatible cluster. Using and managing an MSSQL cluster is no different from a standard PostgreSQL 15 cluster. You can use all the features provided by Pigsty, such as high availability, backup, monitoring, etc.
WiltonDB comes with several extension plugins including Babelfish, but cannot use native PostgreSQL extension plugins.
After the MSSQL compatible cluster starts, in addition to listening on the PostgreSQL default port, it also listens on the MSSQL default port 1433, providing MSSQL services via the TDS Wire Protocol on this port.
You can connect to the MSSQL service provided by Pigsty using any MSSQL client, such as SQL Server Management Studio, or using the sqlcmd command-line tool.
Installation
WiltonDB conflicts with the native PostgreSQL kernel. Only one kernel can be installed on a node. Use the following command to install the WiltonDB kernel online.
Please note that WiltonDB is only available on EL and Ubuntu systems. Debian support is not currently provided.
The Pigsty Professional Edition provides offline installation packages for WiltonDB, which can be installed from local software sources.
Configuration
When installing and deploying the MSSQL module, please pay special attention to the following:
WiltonDB is available on EL (7/8/9) and Ubuntu (20.04/22.04), but not available on Debian systems.
WiltonDB is currently compiled based on PostgreSQL 15, so you need to specify pg_version: 15.
On EL systems, the wiltondb binary is installed by default in the /usr/bin/ directory, while on Ubuntu systems it is installed in the /usr/lib/postgresql/15/bin/ directory, which is different from the official PostgreSQL binary placement.
In WiltonDB compatibility mode, the HBA password authentication rule needs to use md5 instead of scram-sha-256. Therefore, you need to override Pigsty’s default HBA rule set and insert the md5 authentication rule required by SQL Server before the dbrole_readonly wildcard authentication rule.
WiltonDB can only be enabled for one primary database, and you should designate a user as the Babelfish superuser, allowing Babelfish to create databases and users. The default is mssql and dbuser_mssql. If you change this, please also modify the user in files/mssql.sql.
The WiltonDB TDS wire protocol compatibility plugin babelfishpg_tds needs to be enabled in shared_preload_libraries.
After enabling the WiltonDB extension, it listens on the MSSQL default port 1433. You can override Pigsty’s default service definitions to point the primary and replica services to port 1433 instead of 5432 / 6432.
The following parameters need to be configured for the MSSQL database cluster:
#----------------------------------## PGSQL & MSSQL (Babelfish & Wilton)#----------------------------------## PG Installationnode_repo_modules:local,node,mssql# add mssql and os upstream repospg_mode:mssql # Microsoft SQL Server Compatible Modepg_libs:'babelfishpg_tds, pg_stat_statements, auto_explain'# add timescaledb to shared_preload_librariespg_version:15# The current WiltonDB major version is 15pg_packages:- wiltondb # install forked version of postgresql with babelfishpg support- patroni pgbouncer pgbackrest pg_exporter pgbadger vip-managerpg_extensions:[]# do not install any vanilla postgresql extensions# PG Provisionpg_default_hba_rules:# overwrite default HBA rules for babelfish cluster- {user:'${dbsu}',db: all ,addr: local ,auth: ident ,title:'dbsu access via local os user ident'}- {user:'${dbsu}',db: replication ,addr: local ,auth: ident ,title:'dbsu replication from local os ident'}- {user:'${repl}',db: replication ,addr: localhost ,auth: pwd ,title:'replicator replication from localhost'}- {user:'${repl}',db: replication ,addr: intra ,auth: pwd ,title:'replicator replication from intranet'}- {user:'${repl}',db: postgres ,addr: intra ,auth: pwd ,title:'replicator postgres db from intranet'}- {user:'${monitor}',db: all ,addr: localhost ,auth: pwd ,title:'monitor from localhost with password'}- {user:'${monitor}',db: all ,addr: infra ,auth: pwd ,title:'monitor from infra host with password'}- {user:'${admin}',db: all ,addr: infra ,auth: ssl ,title:'admin @ infra nodes with pwd & ssl'}- {user:'${admin}',db: all ,addr: world ,auth: ssl ,title:'admin @ everywhere with ssl & pwd'}- {user: dbuser_mssql ,db: mssql ,addr: intra ,auth: md5 ,title:'allow mssql dbsu intranet access'}# <--- use md5 auth method for mssql user- {user: '+dbrole_readonly',db: all ,addr: localhost ,auth: pwd ,title:'pgbouncer read/write via local socket'}- {user: '+dbrole_readonly',db: all ,addr: intra ,auth: pwd ,title:'read/write biz user via password'}- {user: '+dbrole_offline' ,db: all ,addr: intra ,auth: pwd ,title:'allow etl offline tasks from intranet'}pg_default_services:# route primary & replica service to mssql port 1433- {name: primary ,port: 5433 ,dest: 1433 ,check: /primary ,selector:"[]"}- {name: replica ,port: 5434 ,dest: 1433 ,check: /read-only ,selector:"[]", backup:"[? pg_role == `primary` || pg_role == `offline` ]"}- {name: default ,port: 5436 ,dest: postgres ,check: /primary ,selector:"[]"}- {name: offline ,port: 5438 ,dest: postgres ,check: /replica ,selector:"[? pg_role == `offline` || pg_offline_query ]", backup:"[? pg_role == `replica` && !pg_offline_query]"}
You can define MSSQL business databases and business users:
#----------------------------------## pgsql (singleton on current node)#----------------------------------## this is an example single-node postgres cluster with postgis & timescaledb installed, with one biz database & two biz userspg-meta:hosts:10.10.10.10:{pg_seq: 1, pg_role:primary }# <---- primary instance with read-write capabilityvars:pg_cluster:pg-testpg_users:# create MSSQL superuser- {name: dbuser_mssql ,password: DBUser.MSSQL ,superuser: true, pgbouncer: true ,roles: [dbrole_admin], comment:superuser & owner for babelfish }pg_primary_db:mssql # use `mssql` as the primary sql server databasepg_databases:- name:mssqlbaseline:mssql.sql # init babelfish database & userextensions:- {name:uuid-ossp }- {name:babelfishpg_common }- {name:babelfishpg_tsql }- {name:babelfishpg_tds }- {name:babelfishpg_money }- {name:pg_hint_plan }- {name:system_stats }- {name:tds_fdw }owner:dbuser_mssqlparameters:{'babelfishpg_tsql.migration_mode' :'multi-db'}comment:babelfish cluster, a MSSQL compatible pg cluster
Access
You can use any SQL Server compatible client tool to access this database cluster.
Microsoft provides sqlcmd as the official command-line tool.
In addition, they also provide a Go version command-line tool go-sqlcmd.
Install go-sqlcmd:
curl -LO https://github.com/microsoft/go-sqlcmd/releases/download/v1.4.0/sqlcmd-v1.4.0-linux-amd64.tar.bz2
tar xjvf sqlcmd-v1.4.0-linux-amd64.tar.bz2
sudo mv sqlcmd* /usr/bin/
Quick start with go-sqlcmd:
$ sqlcmd -S 10.10.10.10,1433 -U dbuser_mssql -P DBUser.MSSQL
1> select @@version
2> go
version
----------------------------------------------------------------------------------------------------------------------------------------------------------------------------------------------------------------------------------------------------------------
Babelfish for PostgreSQL with SQL Server Compatibility - 12.0.2000.8
Oct 222023 17:48:32
Copyright (c) Amazon Web Services
PostgreSQL 15.4 (EL 1:15.4.wiltondb3.3_2-2.el8) on x86_64-redhat-linux-gnu (Babelfish 3.3.0)(1 row affected)
Using the service mechanism provided by Pigsty, you can use ports 5433 / 5434 to always connect to port 1433 on the primary/replica.
# Access port 5433 on any cluster member, pointing to port 1433 MSSQL port on the primarysqlcmd -S 10.10.10.11,5433 -U dbuser_mssql -P DBUser.MSSQL
# Access port 5434 on any cluster member, pointing to port 1433 MSSQL port on any readable replicasqlcmd -S 10.10.10.11,5434 -U dbuser_mssql -P DBUser.MSSQL
Extensions
Most of the PGSQL module’s extension plugins (non-pure SQL class) cannot be directly used on the WiltonDB kernel of the MSSQL module and need to be recompiled.
Currently, WiltonDB comes with the following extension plugins. In addition to PostgreSQL Contrib extensions and the four BabelfishPG core extensions, it also provides three third-party extensions: pg_hint_plan, tds_fdw, and system_stats.
Extension Name
Version
Description
dblink
1.2
connect to other PostgreSQL databases from within a database
adminpack
2.1
administrative functions for PostgreSQL
dict_int
1.0
text search dictionary template for integers
intagg
1.1
integer aggregator and enumerator (obsolete)
dict_xsyn
1.0
text search dictionary template for extended synonym processing
amcheck
1.3
functions for verifying relation integrity
autoinc
1.0
functions for autoincrementing fields
bloom
1.0
bloom access method - signature file based index
fuzzystrmatch
1.1
determine similarities and distance between strings
intarray
1.5
functions, operators, and index support for 1-D arrays of integers
btree_gin
1.3
support for indexing common datatypes in GIN
btree_gist
1.7
support for indexing common datatypes in GiST
hstore
1.8
data type for storing sets of (key, value) pairs
hstore_plperl
1.0
transform between hstore and plperl
isn
1.2
data types for international product numbering standards
hstore_plperlu
1.0
transform between hstore and plperlu
jsonb_plperl
1.0
transform between jsonb and plperl
citext
1.6
data type for case-insensitive character strings
jsonb_plperlu
1.0
transform between jsonb and plperlu
jsonb_plpython3u
1.0
transform between jsonb and plpython3u
cube
1.5
data type for multidimensional cubes
hstore_plpython3u
1.0
transform between hstore and plpython3u
earthdistance
1.1
calculate great-circle distances on the surface of the Earth
lo
1.1
Large Object maintenance
file_fdw
1.0
foreign-data wrapper for flat file access
insert_username
1.0
functions for tracking who changed a table
ltree
1.2
data type for hierarchical tree-like structures
ltree_plpython3u
1.0
transform between ltree and plpython3u
pg_walinspect
1.0
functions to inspect contents of PostgreSQL Write-Ahead Log
moddatetime
1.0
functions for tracking last modification time
old_snapshot
1.0
utilities in support of old_snapshot_threshold
pgcrypto
1.3
cryptographic functions
pgrowlocks
1.2
show row-level locking information
pageinspect
1.11
inspect the contents of database pages at a low level
pg_surgery
1.0
extension to perform surgery on a damaged relation
seg
1.4
data type for representing line segments or floating-point intervals
pgstattuple
1.5
show tuple-level statistics
pg_buffercache
1.3
examine the shared buffer cache
pg_freespacemap
1.2
examine the free space map (FSM)
postgres_fdw
1.1
foreign-data wrapper for remote PostgreSQL servers
pg_prewarm
1.2
prewarm relation data
tcn
1.0
Triggered change notifications
pg_trgm
1.6
text similarity measurement and index searching based on trigrams
xml2
1.1
XPath querying and XSLT
refint
1.0
functions for implementing referential integrity (obsolete)
pg_visibility
1.2
examine the visibility map (VM) and page-level visibility info
pg_stat_statements
1.10
track planning and execution statistics of all SQL statements executed
sslinfo
1.2
information about SSL certificates
tablefunc
1.0
functions that manipulate whole tables, including crosstab
tsm_system_rows
1.0
TABLESAMPLE method which accepts number of rows as a limit
tsm_system_time
1.0
TABLESAMPLE method which accepts time in milliseconds as a limit
unaccent
1.1
text search dictionary that removes accents
uuid-ossp
1.1
generate universally unique identifiers (UUIDs)
plpgsql
1.0
PL/pgSQL procedural language
babelfishpg_money
1.1.0
babelfishpg_money
system_stats
2.0
EnterpriseDB system statistics for PostgreSQL
tds_fdw
2.0.3
Foreign data wrapper for querying a TDS database (Sybase or Microsoft SQL Server)
babelfishpg_common
3.3.3
Transact SQL Datatype Support
babelfishpg_tds
1.0.0
TDS protocol extension
pg_hint_plan
1.5.1
babelfishpg_tsql
3.3.1
Transact SQL compatibility
The Pigsty Professional Edition provides offline installation capabilities for MSSQL compatible modules
Pigsty Professional Edition provides optional MSSQL compatible kernel extension porting and customization services, which can port extensions available in the PGSQL module to MSSQL clusters.
10.16.8 - IvorySQL
Use HighGo’s open-source IvorySQL kernel to achieve Oracle syntax/PLSQL compatibility based on PostgreSQL clusters.
IvorySQL is an open-source PostgreSQL kernel fork that aims to provide “Oracle compatibility” based on PG.
Overview
The IvorySQL kernel is supported in the Pigsty open-source version. Your server needs internet access to download relevant packages directly from IvorySQL’s official repository.
Please note that adding IvorySQL directly to Pigsty’s default software repository will affect the installation of the native PostgreSQL kernel. Pigsty Professional Edition provides offline installation solutions including the IvorySQL kernel.
The current latest version of IvorySQL is 5.0, corresponding to PostgreSQL version 18. Please note that IvorySQL is currently only available on EL8/EL9.
The last IvorySQL version supporting EL7 was 3.3, corresponding to PostgreSQL 16.3; the last version based on PostgreSQL 17 is IvorySQL 4.4
Installation
If your environment has internet access, you can add the IvorySQL repository directly to the node using the following method, then execute the PGSQL playbook for installation:
The following parameters need to be configured for IvorySQL database clusters:
#----------------------------------## Ivory SQL Configuration#----------------------------------#node_repo_modules:local,node,pgsql,ivory # add ivorysql upstream repopg_mode:ivory # IvorySQL Oracle Compatible Modepg_packages:['ivorysql patroni pgbouncer pgbackrest pg_exporter pgbadger vip-manager']pg_libs:'liboracle_parser, pg_stat_statements, auto_explain'pg_extensions:[]# do not install any vanilla postgresql extensions
When using Oracle compatibility mode, you need to dynamically load the liboracle_parser extension plugin.
Client Access
IvorySQL is equivalent to PostgreSQL 16, and any client tool compatible with the PostgreSQL wire protocol can access IvorySQL clusters.
Extension List
Most of the PGSQL module’s extensions (non-pure SQL types) cannot be used directly on the IvorySQL kernel. If you need to use them, please recompile and install from source for the new kernel.
Currently, the IvorySQL kernel comes with the following 101 extension plugins.
(The extension table remains unchanged as it’s already in English)
Please note that Pigsty does not assume any warranty responsibility for using the IvorySQL kernel. Any issues or requirements encountered when using this kernel should be addressed with the original vendor.
10.16.9 - PolarDB PG
Using Alibaba Cloud’s open-source PolarDB for PostgreSQL kernel to provide domestic innovation qualification support, with Oracle RAC-like user experience.
Overview
Pigsty allows you to create PostgreSQL clusters with “domestic innovation qualification” credentials using PolarDB!
PolarDB for PostgreSQL is essentially equivalent to PostgreSQL 15. Any client tool compatible with the PostgreSQL wire protocol can access PolarDB clusters.
Pigsty’s PGSQL repository provides PolarDB PG open-source installation packages for EL7 / EL8, but they are not downloaded to the local software repository during Pigsty installation.
If your environment has internet access, you can add the Pigsty PGSQL and dependency repositories to the node using the following method:
node_repo_modules:local,node,pgsql
Then in pg_packages, replace the native postgresql package with polardb.
Configuration
The following parameters need special configuration for PolarDB database clusters:
#----------------------------------## PGSQL & PolarDB#----------------------------------#pg_version:15pg_packages:['polardb patroni pgbouncer pgbackrest pg_exporter pgbadger vip-manager']pg_extensions:[]# do not install any vanilla postgresql extensionspg_mode:polar # PolarDB Compatible Modepg_default_roles:# default roles and users in postgres cluster- {name: dbrole_readonly ,login: false ,comment:role for global read-only access }- {name: dbrole_offline ,login: false ,comment:role for restricted read-only access }- {name: dbrole_readwrite ,login: false ,roles: [dbrole_readonly] ,comment:role for global read-write access }- {name: dbrole_admin ,login: false ,roles: [pg_monitor, dbrole_readwrite] ,comment:role for object creation }- {name: postgres ,superuser: true ,comment:system superuser }- {name: replicator ,superuser: true ,replication: true ,roles: [pg_monitor, dbrole_readonly] ,comment:system replicator }# <- superuser is required for replication- {name: dbuser_dba ,superuser: true ,roles: [dbrole_admin] ,pgbouncer: true ,pool_mode: session, pool_connlimit: 16 ,comment:pgsql admin user }- {name: dbuser_monitor ,roles: [pg_monitor] ,pgbouncer: true ,parameters:{log_min_duration_statement: 1000 } ,pool_mode: session ,pool_connlimit: 8 ,comment:pgsql monitor user }
Note particularly that PolarDB PG requires the replicator replication user to be a Superuser, unlike native PG.
Extension List
Most PGSQL module extension plugins (non-pure SQL types) cannot be used directly on the PolarDB kernel. If needed, please recompile and install from source for the new kernel.
Currently, the PolarDB kernel comes with the following 61 extension plugins. Apart from Contrib extensions, the additional extensions provided include:
polar_csn 1.0 : polar_csn
polar_monitor 1.2 : examine the polardb information
polar_monitor_preload 1.1 : examine the polardb information
polar_parameter_check 1.0 : kernel extension for parameter validation
polar_px 1.0 : Parallel Execution extension
polar_stat_env 1.0 : env stat functions for PolarDB
polar_stat_sql 1.3 : Kernel statistics gathering, and sql plan nodes information gathering
polar_tde_utils 1.0 : Internal extension for TDE
polar_vfs 1.0 : polar_vfs
polar_worker 1.0 : polar_worker
timetravel 1.0 : functions for implementing time travel
vector 0.5.1 : vector data type and ivfflat and hnsw access methods
smlar 1.0 : compute similary of any one-dimensional arrays
Complete list of available PolarDB plugins:
name
version
comment
hstore_plpython2u
1.0
transform between hstore and plpython2u
dict_int
1.0
text search dictionary template for integers
adminpack
2.0
administrative functions for PostgreSQL
hstore_plpython3u
1.0
transform between hstore and plpython3u
amcheck
1.1
functions for verifying relation integrity
hstore_plpythonu
1.0
transform between hstore and plpythonu
autoinc
1.0
functions for autoincrementing fields
insert_username
1.0
functions for tracking who changed a table
bloom
1.0
bloom access method - signature file based index
file_fdw
1.0
foreign-data wrapper for flat file access
dblink
1.2
connect to other PostgreSQL databases from within a database
btree_gin
1.3
support for indexing common datatypes in GIN
fuzzystrmatch
1.1
determine similarities and distance between strings
lo
1.1
Large Object maintenance
intagg
1.1
integer aggregator and enumerator (obsolete)
btree_gist
1.5
support for indexing common datatypes in GiST
hstore
1.5
data type for storing sets of (key, value) pairs
intarray
1.2
functions, operators, and index support for 1-D arrays of integers
citext
1.5
data type for case-insensitive character strings
cube
1.4
data type for multidimensional cubes
hstore_plperl
1.0
transform between hstore and plperl
isn
1.2
data types for international product numbering standards
jsonb_plperl
1.0
transform between jsonb and plperl
dict_xsyn
1.0
text search dictionary template for extended synonym processing
hstore_plperlu
1.0
transform between hstore and plperlu
earthdistance
1.1
calculate great-circle distances on the surface of the Earth
pg_prewarm
1.2
prewarm relation data
jsonb_plperlu
1.0
transform between jsonb and plperlu
pg_stat_statements
1.6
track execution statistics of all SQL statements executed
jsonb_plpython2u
1.0
transform between jsonb and plpython2u
jsonb_plpython3u
1.0
transform between jsonb and plpython3u
jsonb_plpythonu
1.0
transform between jsonb and plpythonu
pg_trgm
1.4
text similarity measurement and index searching based on trigrams
pgstattuple
1.5
show tuple-level statistics
ltree
1.1
data type for hierarchical tree-like structures
ltree_plpython2u
1.0
transform between ltree and plpython2u
pg_visibility
1.2
examine the visibility map (VM) and page-level visibility info
ltree_plpython3u
1.0
transform between ltree and plpython3u
ltree_plpythonu
1.0
transform between ltree and plpythonu
seg
1.3
data type for representing line segments or floating-point intervals
moddatetime
1.0
functions for tracking last modification time
pgcrypto
1.3
cryptographic functions
pgrowlocks
1.2
show row-level locking information
pageinspect
1.7
inspect the contents of database pages at a low level
pg_buffercache
1.3
examine the shared buffer cache
pg_freespacemap
1.2
examine the free space map (FSM)
tcn
1.0
Triggered change notifications
plperl
1.0
PL/Perl procedural language
uuid-ossp
1.1
generate universally unique identifiers (UUIDs)
plperlu
1.0
PL/PerlU untrusted procedural language
refint
1.0
functions for implementing referential integrity (obsolete)
xml2
1.1
XPath querying and XSLT
plpgsql
1.0
PL/pgSQL procedural language
plpython3u
1.0
PL/Python3U untrusted procedural language
pltcl
1.0
PL/Tcl procedural language
pltclu
1.0
PL/TclU untrusted procedural language
polar_csn
1.0
polar_csn
sslinfo
1.2
information about SSL certificates
polar_monitor
1.2
examine the polardb information
polar_monitor_preload
1.1
examine the polardb information
polar_parameter_check
1.0
kernel extension for parameter validation
polar_px
1.0
Parallel Execution extension
tablefunc
1.0
functions that manipulate whole tables, including crosstab
polar_stat_env
1.0
env stat functions for PolarDB
smlar
1.0
compute similary of any one-dimensional arrays
timetravel
1.0
functions for implementing time travel
tsm_system_rows
1.0
TABLESAMPLE method which accepts number of rows as a limit
polar_stat_sql
1.3
Kernel statistics gathering, and sql plan nodes information gathering
tsm_system_time
1.0
TABLESAMPLE method which accepts time in milliseconds as a limit
polar_tde_utils
1.0
Internal extension for TDE
polar_vfs
1.0
polar_vfs
polar_worker
1.0
polar_worker
unaccent
1.1
text search dictionary that removes accents
postgres_fdw
1.0
foreign-data wrapper for remote PostgreSQL servers
Pigsty Professional Edition provides PolarDB offline installation support, extension plugin compilation support, and monitoring and management support specifically adapted for PolarDB clusters.
Pigsty collaborates with the Alibaba Cloud kernel team and can provide paid kernel backup support services.
10.16.10 - PolarDB Oracle
Using Alibaba Cloud’s commercial PolarDB for Oracle kernel (closed source, PG14, only available in special enterprise edition customization)
Pigsty allows you to create PolarDB for Oracle clusters with “domestic innovation qualification” credentials using PolarDB!
PolarDB for Oracle is an Oracle-compatible version developed based on PolarDB for PostgreSQL. Both share the same kernel, distinguished by the --compatibility-mode parameter.
We collaborate with the Alibaba Cloud kernel team to provide a complete database solution based on PolarDB v2.0 kernel and Pigsty v3.0 RDS. Please contact sales for inquiries, or purchase on Alibaba Cloud Marketplace.
The PolarDB for Oracle kernel is currently only available on EL systems.
Extensions
Currently, the PolarDB 2.0 (Oracle compatible) kernel comes with the following 188 extension plugins:
name
default_version
comment
cube
1.5
data type for multidimensional cubes
ip4r
2.4
NULL
adminpack
2.1
administrative functions for PostgreSQL
dict_xsyn
1.0
text search dictionary template for extended synonym processing
amcheck
1.4
functions for verifying relation integrity
autoinc
1.0
functions for autoincrementing fields
hstore
1.8
data type for storing sets of (key, value) pairs
bloom
1.0
bloom access method - signature file based index
earthdistance
1.1
calculate great-circle distances on the surface of the Earth
hstore_plperl
1.0
transform between hstore and plperl
bool_plperl
1.0
transform between bool and plperl
file_fdw
1.0
foreign-data wrapper for flat file access
bool_plperlu
1.0
transform between bool and plperlu
fuzzystrmatch
1.1
determine similarities and distance between strings
hstore_plperlu
1.0
transform between hstore and plperlu
btree_gin
1.3
support for indexing common datatypes in GIN
hstore_plpython2u
1.0
transform between hstore and plpython2u
btree_gist
1.6
support for indexing common datatypes in GiST
hll
2.17
type for storing hyperloglog data
hstore_plpython3u
1.0
transform between hstore and plpython3u
citext
1.6
data type for case-insensitive character strings
hstore_plpythonu
1.0
transform between hstore and plpythonu
hypopg
1.3.1
Hypothetical indexes for PostgreSQL
insert_username
1.0
functions for tracking who changed a table
dblink
1.2
connect to other PostgreSQL databases from within a database
decoderbufs
0.1.0
Logical decoding plugin that delivers WAL stream changes using a Protocol Buffer format
intagg
1.1
integer aggregator and enumerator (obsolete)
dict_int
1.0
text search dictionary template for integers
intarray
1.5
functions, operators, and index support for 1-D arrays of integers
isn
1.2
data types for international product numbering standards
jsonb_plperl
1.0
transform between jsonb and plperl
jsonb_plperlu
1.0
transform between jsonb and plperlu
jsonb_plpython2u
1.0
transform between jsonb and plpython2u
jsonb_plpython3u
1.0
transform between jsonb and plpython3u
jsonb_plpythonu
1.0
transform between jsonb and plpythonu
lo
1.1
Large Object maintenance
log_fdw
1.0
foreign-data wrapper for csvlog
ltree
1.2
data type for hierarchical tree-like structures
ltree_plpython2u
1.0
transform between ltree and plpython2u
ltree_plpython3u
1.0
transform between ltree and plpython3u
ltree_plpythonu
1.0
transform between ltree and plpythonu
moddatetime
1.0
functions for tracking last modification time
old_snapshot
1.0
utilities in support of old_snapshot_threshold
oracle_fdw
1.2
foreign data wrapper for Oracle access
oss_fdw
1.1
foreign-data wrapper for OSS access
pageinspect
2.1
inspect the contents of database pages at a low level
pase
0.0.1
ant ai similarity search
pg_bigm
1.2
text similarity measurement and index searching based on bigrams
pg_freespacemap
1.2
examine the free space map (FSM)
pg_hint_plan
1.4
controls execution plan with hinting phrases in comment of special form
pg_buffercache
1.5
examine the shared buffer cache
pg_prewarm
1.2
prewarm relation data
pg_repack
1.4.8-1
Reorganize tables in PostgreSQL databases with minimal locks
pg_sphere
1.0
spherical objects with useful functions, operators and index support
pg_cron
1.5
Job scheduler for PostgreSQL
pg_jieba
1.1.0
a parser for full-text search of Chinese
pg_stat_kcache
2.2.1
Kernel statistics gathering
pg_stat_statements
1.9
track planning and execution statistics of all SQL statements executed
pg_surgery
1.0
extension to perform surgery on a damaged relation
pg_trgm
1.6
text similarity measurement and index searching based on trigrams
pg_visibility
1.2
examine the visibility map (VM) and page-level visibility info
pg_wait_sampling
1.1
sampling based statistics of wait events
pgaudit
1.6.2
provides auditing functionality
pgcrypto
1.3
cryptographic functions
pgrowlocks
1.2
show row-level locking information
pgstattuple
1.5
show tuple-level statistics
pgtap
1.2.0
Unit testing for PostgreSQL
pldbgapi
1.1
server-side support for debugging PL/pgSQL functions
plperl
1.0
PL/Perl procedural language
plperlu
1.0
PL/PerlU untrusted procedural language
plpgsql
1.0
PL/pgSQL procedural language
plpython2u
1.0
PL/Python2U untrusted procedural language
plpythonu
1.0
PL/PythonU untrusted procedural language
plsql
1.0
Oracle compatible PL/SQL procedural language
pltcl
1.0
PL/Tcl procedural language
pltclu
1.0
PL/TclU untrusted procedural language
polar_bfile
1.0
The BFILE data type enables access to binary file LOBs that are stored in file systems outside Database
polar_bpe
1.0
polar_bpe
polar_builtin_cast
1.1
Internal extension for builtin casts
polar_builtin_funcs
2.0
implement polar builtin functions
polar_builtin_type
1.5
polar_builtin_type for PolarDB
polar_builtin_view
1.5
polar_builtin_view
polar_catalog
1.2
polardb pg extend catalog
polar_channel
1.0
polar_channel
polar_constraint
1.0
polar_constraint
polar_csn
1.0
polar_csn
polar_dba_views
1.0
polar_dba_views
polar_dbms_alert
1.2
implement polar_dbms_alert - supports asynchronous notification of database events.
polar_dbms_application_info
1.0
implement polar_dbms_application_info - record names of executing modules or transactions in the database.
polar_dbms_pipe
1.1
implements polar_dbms_pipe - package lets two or more sessions in the same instance communicate.
polar_dbms_aq
1.2
implement dbms_aq - provides an interface to Advanced Queuing.
polar_dbms_lob
1.3
implement dbms_lob - provides subprograms to operate on BLOBs, CLOBs, and NCLOBs.
polar_dbms_output
1.2
implement polar_dbms_output - enables you to send messages from stored procedures.
polar_dbms_lock
1.0
implement polar_dbms_lock - provides an interface to Oracle Lock Management services.
polar_dbms_aqadm
1.3
polar_dbms_aqadm - procedures to manage Advanced Queuing configuration and administration information.
polar_dbms_assert
1.0
implement polar_dbms_assert - provide an interface to validate properties of the input value.
polar_dbms_metadata
1.0
implement polar_dbms_metadata - provides a way for you to retrieve metadata from the database dictionary.
polar_dbms_random
1.0
implement polar_dbms_random - a built-in random number generator, not intended for cryptography
polar_dbms_crypto
1.1
implement dbms_crypto - provides an interface to encrypt and decrypt stored data.
polar_dbms_redact
1.0
implement polar_dbms_redact - provides an interface to mask data from queries by an application.
polar_dbms_debug
1.1
server-side support for debugging PL/SQL functions
polar_dbms_job
1.0
polar_dbms_job
polar_dbms_mview
1.1
implement polar_dbms_mview - enables to refresh materialized views.
polar_dbms_job_preload
1.0
polar_dbms_job_preload
polar_dbms_obfuscation_toolkit
1.1
implement polar_dbms_obfuscation_toolkit - enables an application to get data md5.
polar_dbms_rls
1.1
implement polar_dbms_rls - a fine-grained access control administrative built-in package
polar_multi_toast_utils
1.0
polar_multi_toast_utils
polar_dbms_session
1.2
implement polar_dbms_session - support to set preferences and security levels.
polar_odciconst
1.0
implement ODCIConst - Provide some built-in constants in Oracle.
polar_dbms_sql
1.2
implement polar_dbms_sql - provides an interface to execute dynamic SQL.
polar_osfs_toolkit
1.0
osfs library tools and functions extension
polar_dbms_stats
14.0
stabilize plans by fixing statistics
polar_monitor
1.5
monitor functions for PolarDB
polar_osfs_utils
1.0
osfs library utils extension
polar_dbms_utility
1.3
implement polar_dbms_utility - provides various utility subprograms.
polar_parameter_check
1.0
kernel extension for parameter validation
polar_dbms_xmldom
1.0
implement dbms_xmldom and dbms_xmlparser - support standard DOM interface and xml parser object
polar_parameter_manager
1.1
Extension to select parameters for manger.
polar_faults
1.0.0
simulate some database faults for end user or testing system.
polar_monitor_preload
1.1
examine the polardb information
polar_proxy_utils
1.0
Extension to provide operations about proxy.
polar_feature_utils
1.2
PolarDB feature utilization
polar_global_awr
1.0
PolarDB Global AWR Report
polar_publication
1.0
support polardb pg logical replication
polar_global_cache
1.0
polar_global_cache
polar_px
1.0
Parallel Execution extension
polar_serverless
1.0
polar serverless extension
polar_resource_manager
1.0
a background process that forcibly frees user session process memory
polar_sys_context
1.1
implement polar_sys_context - returns the value of parameter associated with the context namespace at the current instant.
polar_gpc
1.3
polar_gpc
polar_tde_utils
1.0
Internal extension for TDE
polar_gtt
1.1
polar_gtt
polar_utl_encode
1.2
implement polar_utl_encode - provides functions that encode RAW data into a standard encoded format
polar_htap
1.1
extension for PolarDB HTAP
polar_htap_db
1.0
extension for PolarDB HTAP database level operation
polar_io_stat
1.0
polar io stat in multi dimension
polar_utl_file
1.0
implement utl_file - support PL/SQL programs can read and write operating system text files
polar_ivm
1.0
polar_ivm
polar_sql_mapping
1.2
Record error sqls and mapping them to correct one
polar_stat_sql
1.0
Kernel statistics gathering, and sql plan nodes information gathering
tds_fdw
2.0.2
Foreign data wrapper for querying a TDS database (Sybase or Microsoft SQL Server)
xml2
1.1
XPath querying and XSLT
polar_upgrade_catalogs
1.1
Upgrade catalogs for old version instance
polar_utl_i18n
1.1
polar_utl_i18n
polar_utl_raw
1.0
implement utl_raw - provides SQL functions for manipulating RAW datatypes.
timescaledb
2.9.2
Enables scalable inserts and complex queries for time-series data
polar_vfs
1.0
polar virtual file system for different storage
polar_worker
1.0
polar_worker
postgres_fdw
1.1
foreign-data wrapper for remote PostgreSQL servers
refint
1.0
functions for implementing referential integrity (obsolete)
roaringbitmap
0.5
support for Roaring Bitmaps
tsm_system_time
1.0
TABLESAMPLE method which accepts time in milliseconds as a limit
vector
0.5.0
vector data type and ivfflat and hnsw access methods
rum
1.3
RUM index access method
unaccent
1.1
text search dictionary that removes accents
seg
1.4
data type for representing line segments or floating-point intervals
sequential_uuids
1.0.2
generator of sequential UUIDs
uuid-ossp
1.1
generate universally unique identifiers (UUIDs)
smlar
1.0
compute similary of any one-dimensional arrays
varbitx
1.1
varbit functions pack
sslinfo
1.2
information about SSL certificates
tablefunc
1.0
functions that manipulate whole tables, including crosstab
tcn
1.0
Triggered change notifications
zhparser
1.0
a parser for full-text search of Chinese
address_standardizer
3.3.2
Ganos PostGIS address standardizer
address_standardizer_data_us
3.3.2
Ganos PostGIS address standardizer data us
ganos_fdw
6.0
Ganos Spatial FDW extension for POLARDB
ganos_geometry
6.0
Ganos geometry lite extension for POLARDB
ganos_geometry_pyramid
6.0
Ganos Geometry Pyramid extension for POLARDB
ganos_geometry_sfcgal
6.0
Ganos geometry lite sfcgal extension for POLARDB
ganos_geomgrid
6.0
Ganos geometry grid extension for POLARDB
ganos_importer
6.0
Ganos Spatial importer extension for POLARDB
ganos_networking
6.0
Ganos networking
ganos_pointcloud
6.0
Ganos pointcloud extension For POLARDB
ganos_pointcloud_geometry
6.0
Ganos_pointcloud LIDAR data and ganos_geometry data for POLARDB
ganos_raster
6.0
Ganos raster extension for POLARDB
ganos_scene
6.0
Ganos scene extension for POLARDB
ganos_sfmesh
6.0
Ganos surface mesh extension for POLARDB
ganos_spatialref
6.0
Ganos spatial reference extension for POLARDB
ganos_trajectory
6.0
Ganos trajectory extension for POLARDB
ganos_vomesh
6.0
Ganos volumn mesh extension for POLARDB
postgis_tiger_geocoder
3.3.2
Ganos PostGIS tiger geocoder
postgis_topology
3.3.2
Ganos PostGIS topology
10.16.11 - PostgresML
How to deploy PostgresML with Pigsty: ML, training, inference, Embedding, RAG inside DB.
PostgresML is a PostgreSQL extension that supports the latest large language models (LLM), vector operations, classical machine learning, and traditional Postgres application workloads.
PostgresML (pgml) is a PostgreSQL extension written in Rust. You can run standalone Docker images, but this documentation is not a docker-compose template introduction, for reference only.
PostgresML officially supports Ubuntu 22.04, but we also maintain RPM versions for EL 8/9, if you don’t need CUDA and NVIDIA-related features.
You need internet access on database nodes to download Python dependencies from PyPI and models from HuggingFace.
PostgresML is Deprecated
Because the company behind it has ceased operations.
Configuration
PostgresML is an extension written in Rust, officially supporting Ubuntu. Pigsty maintains RPM versions of PostgresML on EL8 and EL9.
Creating a New Cluster
PostgresML 2.7.9 is available for PostgreSQL 15, supporting Ubuntu 22.04 (official), Debian 12, and EL 8/9 (maintained by Pigsty). To enable pgml, you first need to install the extension:
pg-meta:hosts:{10.10.10.10:{pg_seq: 1, pg_role:primary } }vars:pg_cluster:pg-metapg_users:- {name: dbuser_meta ,password: DBUser.Meta ,pgbouncer: true ,roles: [dbrole_admin] ,comment:pigsty admin user }- {name: dbuser_view ,password: DBUser.Viewer ,pgbouncer: true ,roles: [dbrole_readonly] ,comment:read-only viewer for meta database }pg_databases:- {name: meta ,baseline: cmdb.sql ,comment: pigsty meta database ,schemas: [pigsty] ,extensions:[{name: postgis, schema:public}, {name: timescaledb}]}pg_hba_rules:- {user: dbuser_view , db: all ,addr: infra ,auth: pwd ,title:'allow grafana dashboard access cmdb from infra nodes'}pg_libs:'pgml, pg_stat_statements, auto_explain'pg_extensions:['pgml_15 pgvector_15 wal2json_15 repack_15']# ubuntu#pg_extensions: [ 'postgresql-pgml-15 postgresql-15-pgvector postgresql-15-wal2json postgresql-15-repack' ] # ubuntu
On EL 8/9, the extension name is pgml_15, corresponding to the Ubuntu/Debian name postgresql-pgml-15. You also need to add pgml to pg_libs.
Enabling on an Existing Cluster
To enable pgml on an existing cluster, you can install it using Ansible’s package module:
ansible pg-meta -m package -b -a 'name=pgml_15'# ansible el8,el9 -m package -b -a 'name=pgml_15' # EL 8/9# ansible u22 -m package -b -a 'name=postgresql-pgml-15' # Ubuntu 22.04 jammy
Python Dependencies
You also need to install PostgresML’s Python dependencies on cluster nodes. Official tutorial: Installation Guide
Install Python and PIP
Ensure python3, pip, and venv are installed:
# Ubuntu 22.04 (python3.10), need to install pip and venv using aptsudo apt install -y python3 python3-pip python3-venv
For EL 8 / EL9 and compatible distributions, you can use python3.11:
# EL 8/9, can upgrade the default pip and virtualenvsudo yum install -y python3.11 python3.11-pip # install latest python3.11python3.11 -m pip install --upgrade pip virtualenv # use python3.11 on EL8 / EL9
Using PyPI Mirrors
For users in mainland China, we recommend using Tsinghua University’s PyPI mirror.
pip config set global.index-url https://pypi.tuna.tsinghua.edu.cn/simple # set global mirror (recommended)pip install -i https://pypi.tuna.tsinghua.edu.cn/simple some-package # use for single installation
If you’re using EL 8/9, replace python3 with python3.11 in the following commands.
su - postgres;# create virtual environment as database superusermkdir -p /data/pgml;cd /data/pgml;# create virtual environment directorypython3 -m venv /data/pgml # create virtual environment directory (Ubuntu 22.04)source /data/pgml/bin/activate # activate virtual environment# write Python dependencies and install with pipcat > /data/pgml/requirments.txt <<EOF
accelerate==0.22.0
auto-gptq==0.4.2
bitsandbytes==0.41.1
catboost==1.2
ctransformers==0.2.27
datasets==2.14.5
deepspeed==0.10.3
huggingface-hub==0.17.1
InstructorEmbedding==1.0.1
lightgbm==4.1.0
orjson==3.9.7
pandas==2.1.0
rich==13.5.2
rouge==1.0.1
sacrebleu==2.3.1
sacremoses==0.0.53
scikit-learn==1.3.0
sentencepiece==0.1.99
sentence-transformers==2.2.2
tokenizers==0.13.3
torch==2.0.1
torchaudio==2.0.2
torchvision==0.15.2
tqdm==4.66.1
transformers==4.33.1
xgboost==2.0.0
langchain==0.0.287
einops==0.6.1
pynvml==11.5.0
EOF# install dependencies using pip in the virtual environmentpython3 -m pip install -r /data/pgml/requirments.txt
python3 -m pip install xformers==0.0.21 --no-dependencies
# additionally, 3 Python packages need to be installed globally using sudo!sudo python3 -m pip install xgboost lightgbm scikit-learn
Enable PostgresML
After installing the pgml extension and Python dependencies on all cluster nodes, you can enable pgml on the PostgreSQL cluster.
Use the patronictl command to configure the cluster, add pgml to shared_preload_libraries, and specify your virtual environment directory in pgml.venv:
Then restart the database cluster and create the extension using SQL commands:
CREATEEXTENSIONvector;-- also recommend installing pgvector!
CREATEEXTENSIONpgml;-- create PostgresML in the current database
SELECTpgml.version();-- print PostgresML version information
If everything is normal, you should see output similar to the following:
# create extension pgml;INFO: Python version: 3.11.2 (main, Oct 5 2023, 16:06:03)[GCC 8.5.0 20210514(Red Hat 8.5.0-18)]INFO: Scikit-learn 1.3.0, XGBoost 2.0.0, LightGBM 4.1.0, NumPy 1.26.1
CREATE EXTENSION
# SELECT pgml.version(); -- print PostgresML version information version
---------
2.7.8
Deploy/Monitor Greenplum clusters with Pigsty, build Massively Parallel Processing (MPP) PostgreSQL data warehouse clusters!
Pigsty supports deploying Greenplum clusters and its derivative distribution YMatrixDB, and provides the capability to integrate existing Greenplum deployments into Pigsty monitoring.
Overview
Greenplum / YMatrix cluster deployment capabilities are only available in the professional/enterprise editions and are not currently open source.
Installation
Pigsty provides installation packages for Greenplum 6 (@el7) and Greenplum 7 (@el8). Open source users can install and configure them manually.
# EL 7 Only (Greenplum6)./node.yml -t node_install -e '{"node_repo_modules":"pgsql","node_packages":["open-source-greenplum-db-6"]}'# EL 8 Only (Greenplum7)./node.yml -t node_install -e '{"node_repo_modules":"pgsql","node_packages":["open-source-greenplum-db-7"]}'
Configuration
To define a Greenplum cluster, you need to use pg_mode = gpsql and additional identity parameters pg_shard and gp_role.
#================================================================## GPSQL Clusters ##================================================================##----------------------------------## cluster: mx-mdw (gp master)#----------------------------------#mx-mdw:hosts:10.10.10.10:{pg_seq: 1, pg_role: primary , nodename:mx-mdw-1 }vars:gp_role:master # this cluster is used as greenplum masterpg_shard:mx # pgsql sharding name & gpsql deployment namepg_cluster:mx-mdw # this master cluster name is mx-mdwpg_databases:- {name: matrixmgr , extensions:[{name:matrixdbts } ] }- {name:meta }pg_users:- {name: meta , password: DBUser.Meta , pgbouncer:true}- {name: dbuser_monitor , password: DBUser.Monitor , roles: [ dbrole_readonly ], superuser:true}pgbouncer_enabled:true# enable pgbouncer for greenplum masterpgbouncer_exporter_enabled:false# enable pgbouncer_exporter for greenplum masterpg_exporter_params:'host=127.0.0.1&sslmode=disable'# use 127.0.0.1 as local monitor host#----------------------------------## cluster: mx-sdw (gp master)#----------------------------------#mx-sdw:hosts:10.10.10.11:nodename:mx-sdw-1 # greenplum segment nodepg_instances:# greenplum segment instances6000:{pg_cluster: mx-seg1, pg_seq: 1, pg_role: primary , pg_exporter_port:9633}6001:{pg_cluster: mx-seg2, pg_seq: 2, pg_role: replica , pg_exporter_port:9634}10.10.10.12:nodename:mx-sdw-2pg_instances:6000:{pg_cluster: mx-seg2, pg_seq: 1, pg_role: primary , pg_exporter_port:9633}6001:{pg_cluster: mx-seg3, pg_seq: 2, pg_role: replica , pg_exporter_port:9634}10.10.10.13:nodename:mx-sdw-3pg_instances:6000:{pg_cluster: mx-seg3, pg_seq: 1, pg_role: primary , pg_exporter_port:9633}6001:{pg_cluster: mx-seg1, pg_seq: 2, pg_role: replica , pg_exporter_port:9634}vars:gp_role:segment # these are nodes for gp segmentspg_shard:mx # pgsql sharding name & gpsql deployment namepg_cluster:mx-sdw # these segment clusters name is mx-sdwpg_preflight_skip:true# skip preflight check (since pg_seq & pg_role & pg_cluster not exists)pg_exporter_config:pg_exporter_basic.yml # use basic config to avoid segment server crashpg_exporter_params:'options=-c%20gp_role%3Dutility&sslmode=disable'# use gp_role = utility to connect to segments
Additionally, PG Exporter requires extra connection parameters to connect to Greenplum Segment instances for metric collection.
10.16.13 - Cloudberry
Deploy/Monitor Cloudberry clusters with Pigsty, an MPP data warehouse cluster forked from Greenplum!
Installation
Pigsty provides installation packages for Greenplum 6 (@el7) and Greenplum 7 (@el8). Open source users can install and configure them manually.
# EL 7 Only (Greenplum6)./node.yml -t node_install -e '{"node_repo_modules":"pgsql","node_packages":["cloudberrydb"]}'# EL 8 Only (Greenplum7)./node.yml -t node_install -e '{"node_repo_modules":"pgsql","node_packages":["cloudberrydb"]}'
10.16.14 - Neon
Use Neon’s open-source Serverless PostgreSQL kernel to build flexible, scale-to-zero, forkable PG services.
Neon adopts a storage and compute separation architecture, providing seamless autoscaling, scale to zero, and unique database branching capabilities.
The compiled binaries of Neon are excessively large and are currently not available to open-source users. It is currently in the pilot stage. If you have requirements, please contact Pigsty sales.
10.17 - FAQ
Frequently asked questions about PostgreSQL
Why can’t my current user use the pg admin alias?
Starting from Pigsty v4.0, permissions to manage global Patroni / PostgreSQL clusters using the pg admin alias have been tightened to the admin group (admin) on admin nodes.
The admin user (dba) created by the node.yml playbook has this permission by default. If your current user wants this permission, you need to explicitly add them to the admin group:
sudo usermod -aG admin <username>
PGSQL Init Fails: Fail to wait for postgres/patroni primary
There are multiple possible causes for this error. You need to check Ansible, Systemd / Patroni / PostgreSQL logs to find the real cause.
Possibility 1: Cluster config error - find and fix the incorrect config items.
Possibility 2: A cluster with the same name exists, or the previous same-named cluster primary was improperly removed.
Possibility 3: Residual garbage metadata from a same-named cluster in DCS - decommissioning wasn’t completed properly. Use etcdctl del --prefix /pg/<cls> to manually delete residual data (be careful).
Possibility 4: Your PostgreSQL or node-related RPM pkgs were not successfully installed.
Possibility 5: Your Watchdog kernel module was not properly enabled/loaded.
Possibility 6: The locale you specified during database init doesn’t exist (e.g., used en_US.UTF8 but English language pack or Locale support wasn’t installed).
If you encounter other causes, please submit an Issue or ask the community for help.
PGSQL Init Fails: Fail to wait for postgres/patroni replica
There are several possible causes:
Immediate failure: Usually due to config errors, network issues, corrupted DCS metadata, etc. You must check /pg/log to find the actual cause.
Failure after a while: This might be due to source instance data corruption. See PGSQL FAQ: How to create a replica when data is corrupted?
Timeout after a long time: If the wait for postgres replica task takes 30 minutes or longer and fails due to timeout, this is common for large clusters (e.g., 1TB+, may take hours to create a replica).
In this case, the underlying replica creation process is still ongoing. You can use pg list <cls> to check cluster status and wait for the replica to catch up with the primary. Then use the following command to continue with remaining tasks and complete the full replica init:
PGSQL Init Fails: ABORT due to pg_safeguard enabled
This means the PostgreSQL instance being cleaned has the deletion safeguard enabled. Disable pg_safeguard to remove the Postgres instance.
If the deletion safeguard pg_safeguard is enabled, you cannot remove running PGSQL instances using bin/pgsql-rm or the pgsql-rm.yml playbook.
To disable pg_safeguard, you can set pg_safeguard to false in the config inventory, or use the command param -e pg_safeguard=false when executing the playbook.
./pgsql-rm.yml -e pg_safeguard=false -l <cls_to_remove> # Force override pg_safeguard
How to Enable HugePages for PostgreSQL?
Use node_hugepage_count and node_hugepage_ratio or /pg/bin/pg-tune-hugepage
HugePages have pros and cons for databases. The advantage is that memory is managed exclusively, eliminating concerns about being reallocated and reducing database OOM risk. The disadvantage is that it may negatively impact performance in certain scenarios.
Before PostgreSQL starts, you need to allocate enough huge pages. The wasted portion can be reclaimed using the pg-tune-hugepage script, but this script is only available for PostgreSQL 15+.
If your PostgreSQL is already running, you can enable huge pages using the following method (PG15+ only):
sync;echo3 > /proc/sys/vm/drop_caches # Flush disk, release system cache (be prepared for database perf impact)sudo /pg/bin/pg-tune-hugepage # Write nr_hugepages to /etc/sysctl.d/hugepage.confpg restart <cls> # Restart postgres to use hugepage
How to Ensure No Data Loss During Failover?
Use the crit.yml param template, set pg_rpo to 0, or config the cluster for sync commit mode.
If the disk is full and even Shell commands cannot execute, rm -rf /pg/dummy can release some emergency space.
By default, pg_dummy_filesize is set to 64MB. In prod envs, it’s recommended to increase it to 8GB or larger.
It will be placed at /pg/dummy path on the PGSQL main data disk. You can delete this file to free up some emergency space: at least it will allow you to run some shell scripts on that node to further reclaim other space.
How to Create a Replica When Cluster Data is Corrupted?
Pigsty sets the clonefrom: true tag in the patroni config of all instances, marking the instance as available for creating replicas.
If an instance has corrupted data files causing errors when creating new replicas, you can set clonefrom: false to avoid pulling data from the corrupted instance. Here’s how:
What is the Perf Overhead of PostgreSQL Monitoring?
A regular PostgreSQL instance scrape takes about 200ms. The scrape interval defaults to 10 seconds, which is almost negligible for a prod multi-core database instance.
Note that Pigsty enables in-database object monitoring by default, so if your database has hundreds of thousands of table/index objects, scraping may increase to several seconds.
You can modify Prometheus’s scrape frequency. Please ensure: the scrape cycle should be significantly longer than the duration of a single scrape.
How to Monitor an Existing PostgreSQL Instance?
Detailed monitoring config instructions are provided in PGSQL Monitor.
How to Manually Remove PostgreSQL Monitoring Targets?
./pgsql-rm.yml -t rm_metrics -l <cls> # Remove all instances of cluster 'cls' from victoria
bin/pgmon-rm <ins> # Remove a single instance 'ins' monitoring object from Victoria, especially suitable for removing added external instances
10.18 - Misc
Miscellaneous Topics
10.18.1 - Service / Access
Separate read and write operations, route traffic correctly, and deliver PostgreSQL cluster capabilities reliably.
Separate read and write operations, route traffic correctly, and deliver PostgreSQL cluster capabilities reliably.
Service is an abstraction: it is the form in which database clusters provide capabilities to the outside world and encapsulates the details of the underlying cluster.
Services are critical for stable access in production environments and show their value when high availability clusters automatically fail over. Single-node users typically don’t need to worry about this concept.
Single-Node Users
The concept of “service” is for production environments. Personal users/single-node clusters can simply access the database directly using instance name/IP address.
For example, Pigsty’s default single-node pg-meta.meta database can be connected directly using three different users:
psql postgres://dbuser_dba:[email protected]/meta # Connect directly with DBA superuserpsql postgres://dbuser_meta:[email protected]/meta # Connect with default business admin userpsql postgres://dbuser_view:DBUser.View@pg-meta/meta # Connect with default read-only user via instance domain name
Service Overview
In real-world production environments, we use replication-based primary-replica database clusters. In a cluster, there is one and only one instance as the leader (primary) that can accept writes.
Other instances (replicas) continuously fetch change logs from the cluster leader and stay consistent with it. At the same time, replicas can also handle read-only requests, significantly reducing the load on the primary in read-heavy scenarios.
Therefore, separating write requests and read-only requests to the cluster is a very common practice.
In addition, for production environments with high-frequency short connections, we also pool requests through a connection pool middleware (Pgbouncer) to reduce the overhead of creating connections and backend processes. But for scenarios such as ETL and change execution, we need to bypass the connection pool and access the database directly.
At the same time, high-availability clusters will experience failover when failures occur, and failover will cause changes to the cluster’s leader. Therefore, high-availability database solutions require that write traffic can automatically adapt to changes in the cluster’s leader.
These different access requirements (read-write separation, pooling and direct connection, automatic failover adaptation) ultimately abstract the concept of Service.
Typically, database clusters must provide this most basic service:
Read-Write Service (primary): Can read and write to the database
For production database clusters, at least these two services should be provided:
Read-Write Service (primary): Write data: can only be carried by the primary.
Read-Only Service (replica): Read data: can be carried by replicas, or by the primary if there are no replicas
In addition, depending on specific business scenarios, there may be other services, such as:
Default Direct Service (default): Allows (admin) users to access the database directly, bypassing the connection pool
Offline Replica Service (offline): Dedicated replicas that do not handle online read-only traffic, used for ETL and analytical queries
Standby Replica Service (standby): Read-only service without replication lag, handled by sync standby/primary for read-only queries
Delayed Replica Service (delayed): Access old data from the same cluster at a previous point in time, handled by delayed replica
Default Services
Pigsty provides four different services by default for each PostgreSQL database cluster. Here are the default services and their definitions:
Taking the default pg-meta cluster as an example, it provides four default services:
psql postgres://dbuser_meta:DBUser.Meta@pg-meta:5433/meta # pg-meta-primary : production read-write via primary pgbouncer(6432)psql postgres://dbuser_meta:DBUser.Meta@pg-meta:5434/meta # pg-meta-replica : production read-only via replica pgbouncer(6432)psql postgres://dbuser_dba:DBUser.DBA@pg-meta:5436/meta # pg-meta-default : direct connection via primary postgres(5432)psql postgres://dbuser_stats:DBUser.Stats@pg-meta:5438/meta # pg-meta-offline : direct connection via offline postgres(5432)
You can see how these four services work from the sample cluster architecture diagram:
Note that the pg-meta domain name points to the cluster’s L2 VIP, which in turn points to the haproxy load balancer on the cluster primary, which routes traffic to different instances. See Accessing Services for details.
Service Implementation
In Pigsty, services are implemented using haproxy on nodes, differentiated by different ports on host nodes.
Haproxy is enabled by default on each node managed by Pigsty to expose services, and database nodes are no exception.
Although nodes in a cluster have primary-replica distinctions from the database perspective, from the service perspective, each node is the same:
This means that even if you access a replica node, as long as you use the correct service port, you can still use the primary’s read-write service.
This design can hide complexity: so as long as you can access any instance on a PostgreSQL cluster, you can completely access all services.
This design is similar to NodePort services in Kubernetes. Similarly, in Pigsty, each service includes the following two core elements:
Access endpoints exposed through NodePort (port number, where to access?)
Target instances selected through Selectors (instance list, who carries the load?)
Pigsty’s service delivery boundary stops at the cluster’s HAProxy, and users can access these load balancers in various ways. See Accessing Services.
All services are declared through configuration files. For example, the PostgreSQL default services are defined by the pg_default_services parameter:
You can also define additional services in pg_services. Both pg_default_services and pg_services are arrays of service definition objects.
Defining Services
Pigsty allows you to define your own services:
pg_default_services: Services uniformly exposed by all PostgreSQL clusters, four by default.
pg_services: Additional PostgreSQL services, can be defined at global or cluster level as needed.
haproxy_services: Directly customize HAProxy service content, can be used for accessing other components
For PostgreSQL clusters, you typically only need to focus on the first two.
Each service definition generates a new configuration file in the configuration directory of all related HAProxy instances: /etc/haproxy/<svcname>.cfg
Here’s a custom service example standby: when you want to provide a read-only service without replication lag, you can add this record to pg_services:
- name: standby # Required, service name, final svc name uses `pg_cluster` as prefix, e.g.:pg-meta-standbyport:5435# Required, exposed service port (as kubernetes service node port mode)ip:"*"# Optional, IP address the service binds to, all IP addresses by defaultselector:"[]"# Required, service member selector, uses JMESPath to filter configuration manifestbackup:"[? pg_role == `primary`]"# Optional, service member selector (backup), instances selected here only carry the service when all default selector instances are downdest:default # Optional, target port, default|postgres|pgbouncer|<port_number>, defaults to 'default', Default means using pg_default_service_dest value to ultimately decidecheck: /sync # Optional, health check URL path, defaults to /, here uses Patroni API:/sync, only sync standby and primary return 200 healthy status codemaxconn:5000# Optional, maximum number of allowed frontend connections, defaults to 5000balance: roundrobin # Optional, haproxy load balancing algorithm (defaults to roundrobin, other options:leastconn)options:'inter 3s fastinter 1s downinter 5s rise 3 fall 3 on-marked-down shutdown-sessions slowstart 30s maxconn 3000 maxqueue 128 weight 100'
The above service definition will be converted to haproxy configuration file /etc/haproxy/pg-test-standby.conf on the sample three-node pg-test:
#---------------------------------------------------------------------# service: pg-test-standby @ 10.10.10.11:5435#---------------------------------------------------------------------# service instances 10.10.10.11, 10.10.10.13, 10.10.10.12# service backups 10.10.10.11listen pg-test-standbybind *:5435 # <--- Binds port 5435 on all IP addressesmode tcp # <--- Load balancer works on TCP protocolmaxconn 5000 # <--- Maximum connections 5000, can be increased as neededbalance roundrobin # <--- Load balancing algorithm is rr round-robin, can also use leastconnoption httpchk # <--- Enable HTTP health checkoption http-keep-alive# <--- Keep HTTP connectionhttp-check send meth OPTIONS uri /sync # <---- Here uses /sync, Patroni health check API, only sync standby and primary return 200 healthy status codehttp-check expect status 200 # <---- Health check return code 200 means normaldefault-server inter 3s fastinter 1s downinter 5s rise 3 fall 3 on-marked-down shutdown-sessions slowstart 30s maxconn 3000 maxqueue 128 weight 100# servers: # All three instances of pg-test cluster are selected by selector: "[]", since there are no filter conditions, they all become backend servers for pg-test-replica service. But due to /sync health check, only primary and sync standby can actually handle requestsserver pg-test-1 10.10.10.11:6432 check port 8008 weight 100 backup # <----- Only primary satisfies condition pg_role == `primary`, selected by backup selectorserver pg-test-3 10.10.10.13:6432 check port 8008 weight 100 # Therefore serves as service fallback instance:normally doesn't handle requests, only handles read-only requests when all other replicas fail, thus maximally avoiding read-write service being affected by read-only serviceserver pg-test-2 10.10.10.12:6432 check port 8008 weight 100 #
Here, all three instances of the pg-test cluster are selected by selector: "[]", rendered into the backend server list of the pg-test-replica service. But due to the /sync health check, Patroni Rest API only returns healthy HTTP 200 status code on the primary and sync standby, so only the primary and sync standby can actually handle requests.
Additionally, the primary satisfies the condition pg_role == primary, is selected by the backup selector, and is marked as a backup server, only used when no other instances (i.e., sync standby) can meet the demand.
Primary Service
The Primary service is perhaps the most critical service in production environments. It provides read-write capability to the database cluster on port 5433. The service definition is as follows:
The selector parameter selector: "[]" means all cluster members will be included in the Primary service
But only the primary can pass the health check (check: /primary) and actually carry Primary service traffic.
The destination parameter dest: default means the Primary service destination is affected by the pg_default_service_dest parameter
The default value default of dest will be replaced by the value of pg_default_service_dest, which defaults to pgbouncer.
By default, the Primary service destination is the connection pool on the primary, which is the port specified by pgbouncer_port, defaulting to 6432
If the value of pg_default_service_dest is postgres, then the primary service destination will bypass the connection pool and use the PostgreSQL database port directly (pg_port, default 5432). This parameter is very useful for scenarios that don’t want to use a connection pool.
Example: haproxy configuration for pg-test-primary
listen pg-test-primarybind *:5433 # <--- primary service defaults to port 5433mode tcpmaxconn 5000balance roundrobinoption httpchkoption http-keep-alivehttp-check send meth OPTIONS uri /primary# <--- primary service defaults to Patroni RestAPI /primary health checkhttp-check expect status 200default-server inter 3s fastinter 1s downinter 5s rise 3 fall 3 on-marked-down shutdown-sessions slowstart 30s maxconn 3000 maxqueue 128 weight 100# serversserver pg-test-1 10.10.10.11:6432 check port 8008 weight 100server pg-test-3 10.10.10.13:6432 check port 8008 weight 100server pg-test-2 10.10.10.12:6432 check port 8008 weight 100
Patroni’s high availability mechanism ensures that at most one instance’s /primary health check is true at any time, so the Primary service will always route traffic to the primary instance.
One benefit of using the Primary service instead of direct database connection is that if the cluster has a split-brain situation for some reason (e.g., kill -9 killing the primary Patroni without watchdog), Haproxy can still avoid split-brain in this case, because it will only distribute traffic when Patroni is alive and returns primary status.
Replica Service
The Replica service is second only to the Primary service in importance in production environments. It provides read-only capability to the database cluster on port 5434. The service definition is as follows:
The selector parameter selector: "[]" means all cluster members will be included in the Replica service
All instances can pass the health check (check: /read-only) and carry Replica service traffic.
Backup selector: [? pg_role == 'primary' || pg_role == 'offline' ] marks the primary and offline replicas as backup servers.
Only when all normal replicas are down will the Replica service be carried by the primary or offline replicas.
The destination parameter dest: default means the Replica service destination is also affected by the pg_default_service_dest parameter
The default value default of dest will be replaced by the value of pg_default_service_dest, which defaults to pgbouncer, same as the Primary service
By default, the Replica service destination is the connection pool on the replicas, which is the port specified by pgbouncer_port, defaulting to 6432
Example: haproxy configuration for pg-test-replica
listen pg-test-replicabind *:5434mode tcpmaxconn 5000balance roundrobinoption httpchkoption http-keep-alivehttp-check send meth OPTIONS uri /read-onlyhttp-check expect status 200default-server inter 3s fastinter 1s downinter 5s rise 3 fall 3 on-marked-down shutdown-sessions slowstart 30s maxconn 3000 maxqueue 128 weight 100# serversserver pg-test-1 10.10.10.11:6432 check port 8008 weight 100 backupserver pg-test-3 10.10.10.13:6432 check port 8008 weight 100server pg-test-2 10.10.10.12:6432 check port 8008 weight 100
The Replica service is very flexible: if there are surviving dedicated Replica instances, it will prioritize using these instances to handle read-only requests. Only when all replica instances are down will the primary handle read-only requests. For the common one-primary-one-replica two-node cluster, this means: use the replica as long as it’s alive, use the primary when the replica is down.
Additionally, unless all dedicated read-only instances are down, the Replica service will not use dedicated Offline instances, thus avoiding mixing online fast queries and offline slow queries together, interfering with each other.
Default Service
The Default service provides services on port 5436. It is a variant of the Primary service.
The Default service always bypasses the connection pool and connects directly to PostgreSQL on the primary. This is useful for admin connections, ETL writes, CDC data change capture, etc.
If pg_default_service_dest is changed to postgres, then the Default service is completely equivalent to the Primary service except for port and name. In this case, you can consider removing Default from default services.
Example: haproxy configuration for pg-test-default
listen pg-test-defaultbind *:5436 # <--- Except for listening port/target port and service name, other configurations are exactly the same as primary servicemode tcpmaxconn 5000balance roundrobinoption httpchkoption http-keep-alivehttp-check send meth OPTIONS uri /primaryhttp-check expect status 200default-server inter 3s fastinter 1s downinter 5s rise 3 fall 3 on-marked-down shutdown-sessions slowstart 30s maxconn 3000 maxqueue 128 weight 100# serversserver pg-test-1 10.10.10.11:5432 check port 8008 weight 100server pg-test-3 10.10.10.13:5432 check port 8008 weight 100server pg-test-2 10.10.10.12:5432 check port 8008 weight 100
Offline Service
The Offline service provides services on port 5438. It also bypasses the connection pool to directly access the PostgreSQL database, typically used for slow queries/analytical queries/ETL reads/personal user interactive queries. Its service definition is as follows:
The selector parameter filters two types of instances from the cluster: offline replicas with pg_role = offline, or normal read-only instances with pg_offline_query = true
The main difference between dedicated offline replicas and flagged normal replicas is: the former does not handle Replica service requests by default, avoiding mixing fast and slow requests together, while the latter does by default.
The backup selector parameter filters one type of instance from the cluster: normal replicas without offline flag. This means if offline instances or flagged normal replicas fail, other normal replicas can be used to carry the Offline service.
The health check /replica only returns 200 for replicas, the primary returns an error, so the Offline service will never distribute traffic to the primary instance, even if only this primary is left in the cluster.
At the same time, the primary instance is neither selected by the selector nor by the backup selector, so it will never carry the Offline service. Therefore, the Offline service can always avoid user access to the primary, thus avoiding impact on the primary.
Example: haproxy configuration for pg-test-offline
listen pg-test-offlinebind *:5438mode tcpmaxconn 5000balance roundrobinoption httpchkoption http-keep-alivehttp-check send meth OPTIONS uri /replicahttp-check expect status 200default-server inter 3s fastinter 1s downinter 5s rise 3 fall 3 on-marked-down shutdown-sessions slowstart 30s maxconn 3000 maxqueue 128 weight 100# serversserver pg-test-3 10.10.10.13:5432 check port 8008 weight 100server pg-test-2 10.10.10.12:5432 check port 8008 weight 100 backup
The Offline service provides limited read-only service, typically used for two types of queries: interactive queries (personal users), slow queries and long transactions (analytics/ETL).
The Offline service requires extra maintenance care: when the cluster experiences primary-replica switchover or automatic failover, the cluster’s instance roles change, but Haproxy’s configuration does not automatically change. For clusters with multiple replicas, this is usually not a problem.
However, for simplified small clusters with one primary and one replica running Offline queries, primary-replica switchover means the replica becomes the primary (health check fails), and the original primary becomes a replica (not in the Offline backend list), so no instance can carry the Offline service. Therefore, you need to manually reload services to make the changes effective.
If your business model is relatively simple, you can consider removing the Default service and Offline service, and use the Primary service and Replica service to connect directly to the database.
Reload Services
When cluster members change, such as adding/removing replicas, primary-replica switchover, or adjusting relative weights, you need to reload services to make the changes effective.
bin/pgsql-svc <cls> [ip...]# Reload services for lb cluster or lb instance# ./pgsql.yml -t pg_service # Actual ansible task for reloading services
Accessing Services
Pigsty’s service delivery boundary stops at the cluster’s HAProxy. Users can access these load balancers in various ways.
The typical approach is to use DNS or VIP access, binding them to all or any number of load balancers in the cluster.
You can use different host & port combinations, which provide PostgreSQL services in different ways.
Host
Type
Example
Description
Cluster Domain
pg-test
Access via cluster domain name (resolved by dnsmasq @ infra node)
Cluster VIP Address
10.10.10.3
Access via L2 VIP address managed by vip-manager, bound to primary node
Instance Hostname
pg-test-1
Access via any instance hostname (resolved by dnsmasq @ infra node)
Instance IP Address
10.10.10.11
Access any instance’s IP address
Port
Pigsty uses different ports to distinguish pg services
Port
Service
Type
Description
5432
postgres
Database
Direct access to postgres server
6432
pgbouncer
Middleware
Access postgres via connection pool middleware
5433
primary
Service
Access primary pgbouncer (or postgres)
5434
replica
Service
Access replica pgbouncer (or postgres)
5436
default
Service
Access primary postgres
5438
offline
Service
Access offline postgres
Combinations
# Access via cluster domain namepostgres://test@pg-test:5432/test # DNS -> L2 VIP -> Primary direct connectionpostgres://test@pg-test:6432/test # DNS -> L2 VIP -> Primary connection pool -> Primarypostgres://test@pg-test:5433/test # DNS -> L2 VIP -> HAProxy -> Primary connection pool -> Primarypostgres://test@pg-test:5434/test # DNS -> L2 VIP -> HAProxy -> Replica connection pool -> Replicapostgres://dbuser_dba@pg-test:5436/test # DNS -> L2 VIP -> HAProxy -> Primary direct connection (for admin)postgres://dbuser_stats@pg-test:5438/test # DNS -> L2 VIP -> HAProxy -> Offline direct connection (for ETL/personal queries)# Direct access via cluster VIPpostgres://[email protected]:5432/test # L2 VIP -> Primary direct accesspostgres://[email protected]:6432/test # L2 VIP -> Primary connection pool -> Primarypostgres://[email protected]:5433/test # L2 VIP -> HAProxy -> Primary connection pool -> Primarypostgres://[email protected]:5434/test # L2 VIP -> HAProxy -> Replica connection pool -> Replicapostgres://[email protected]:5436/test # L2 VIP -> HAProxy -> Primary direct connection (for admin)postgres://[email protected]::5438/test # L2 VIP -> HAProxy -> Offline direct connection (for ETL/personal queries)# Specify any cluster instance name directlypostgres://test@pg-test-1:5432/test # DNS -> Database instance direct connection (single instance access)postgres://test@pg-test-1:6432/test # DNS -> Connection pool -> Databasepostgres://test@pg-test-1:5433/test # DNS -> HAProxy -> Connection pool -> Database read/writepostgres://test@pg-test-1:5434/test # DNS -> HAProxy -> Connection pool -> Database read-onlypostgres://dbuser_dba@pg-test-1:5436/test # DNS -> HAProxy -> Database direct connectionpostgres://dbuser_stats@pg-test-1:5438/test # DNS -> HAProxy -> Database offline read/write# Specify any cluster instance IP directlypostgres://[email protected]:5432/test # Database instance direct connection (direct instance specification, no automatic traffic distribution)postgres://[email protected]:6432/test # Connection pool -> Databasepostgres://[email protected]:5433/test # HAProxy -> Connection pool -> Database read/writepostgres://[email protected]:5434/test # HAProxy -> Connection pool -> Database read-onlypostgres://[email protected]:5436/test # HAProxy -> Database direct connectionpostgres://[email protected]:5438/test # HAProxy -> Database offline read-write# Smart client: automatic read-write separationpostgres://[email protected]:6432,10.10.10.12:6432,10.10.10.13:6432/test?target_session_attrs=primary
postgres://[email protected]:6432,10.10.10.12:6432,10.10.10.13:6432/test?target_session_attrs=prefer-standby
Overriding Services
You can override default service configuration in multiple ways. A common requirement is to have Primary service and Replica service bypass the Pgbouncer connection pool and access the PostgreSQL database directly.
To achieve this, you can change pg_default_service_dest to postgres, so all services with svc.dest='default' in their service definitions will use postgres instead of the default pgbouncer as the target.
If you have already pointed Primary service to PostgreSQL, then default service becomes redundant and can be considered for removal.
If you don’t need to distinguish between personal interactive queries and analytical/ETL slow queries, you can consider removing Offline service from the default service list pg_default_services.
If you don’t need read-only replicas to share online read-only traffic, you can also remove Replica service from the default service list.
Delegating Services
Pigsty exposes PostgreSQL services through haproxy on nodes. All haproxy instances in the entire cluster are configured with the same service definitions.
However, you can delegate pg services to specific node groups (e.g., dedicated haproxy load balancer cluster) instead of haproxy on PostgreSQL cluster members.
For example, this configuration will expose the pg cluster’s primary service on the proxy haproxy node group on port 10013.
pg_service_provider:proxy # Use load balancer from `proxy` group on port 10013pg_default_services:[{name: primary ,port: 10013 ,dest: postgres ,check: /primary ,selector:"[]"}]
Users need to ensure that the port for each delegated service is unique in the proxy cluster.
An example of using a dedicated load balancer cluster is provided in the 43-node production environment simulation sandbox: prod.yml
10.18.2 - User / Role
Users/roles refer to logical objects within a database cluster created using the SQL commands CREATE USER/ROLE.
In this context, users refer to logical objects within a database cluster created using the SQL commands CREATE USER/ROLE.
In PostgreSQL, users belong directly to the database cluster rather than to a specific database. Therefore, when creating business databases and business users, you should follow the principle of “users first, then databases.”
Defining Users
Pigsty defines roles and users in database clusters through two configuration parameters:
pg_users: Defines business users and roles at the database cluster level
The former defines roles and users shared across the entire environment, while the latter defines business roles and users specific to individual clusters. Both have the same format and are arrays of user definition objects.
You can define multiple users/roles, and they will be created sequentially—first global, then cluster-level, and finally in array order—so later users can belong to roles defined earlier.
Here is the business user definition for the default cluster pg-meta in the Pigsty demo environment:
pg-meta:hosts:{10.10.10.10:{pg_seq: 1, pg_role:primary } }vars:pg_cluster:pg-metapg_users:- {name: dbuser_meta ,password: DBUser.Meta ,pgbouncer: true ,roles: [dbrole_admin] ,comment:pigsty admin user }- {name: dbuser_view ,password: DBUser.Viewer ,pgbouncer: true ,roles: [dbrole_readonly] ,comment:read-only viewer for meta database }- {name: dbuser_grafana ,password: DBUser.Grafana ,pgbouncer: true ,roles: [dbrole_admin] ,comment:admin user for grafana database }- {name: dbuser_bytebase ,password: DBUser.Bytebase ,pgbouncer: true ,roles: [dbrole_admin] ,comment:admin user for bytebase database }- {name: dbuser_kong ,password: DBUser.Kong ,pgbouncer: true ,roles: [dbrole_admin] ,comment:admin user for kong api gateway }- {name: dbuser_gitea ,password: DBUser.Gitea ,pgbouncer: true ,roles: [dbrole_admin] ,comment:admin user for gitea service }- {name: dbuser_wiki ,password: DBUser.Wiki ,pgbouncer: true ,roles: [dbrole_admin] ,comment:admin user for wiki.js service }- {name: dbuser_noco ,password: DBUser.Noco ,pgbouncer: true ,roles: [dbrole_admin] ,comment:admin user for nocodb service }
Each user/role definition is an object that may include the following fields. Using dbuser_meta as an example:
- name:dbuser_meta # Required, `name` is the only mandatory field in user definitionpassword:DBUser.Meta # Optional, password can be scram-sha-256 hash string or plaintextlogin:true# Optional, can login by defaultsuperuser:false# Optional, default is false, is this a superuser?createdb:false# Optional, default is false, can create databases?createrole:false# Optional, default is false, can create roles?inherit:true# Optional, by default this role can use inherited privileges?replication:false# Optional, default is false, can this role perform replication?bypassrls:false# Optional, default is false, can this role bypass row-level security?pgbouncer:true# Optional, default is false, add this user to pgbouncer user list? (production users using connection pool should explicitly set to true)connlimit:-1# Optional, user connection limit, default -1 disables limitexpire_in: 3650 # Optional, this role expires:calculated from creation + n days (higher priority than expire_at)expire_at:'2030-12-31'# Optional, when this role expires, use YYYY-MM-DD format string to specify a date (lower priority than expire_in)comment:pigsty admin user # Optional, description and comment string for this user/roleroles: [dbrole_admin] # Optional, default roles are:dbrole_{admin,readonly,readwrite,offline}parameters:{}# Optional, use `ALTER ROLE SET` to configure role-level database parameters for this rolepool_mode:transaction # Optional, pgbouncer pool mode defaulting to transaction, user levelpool_connlimit:-1# Optional, user-level maximum database connections, default -1 disables limitsearch_path:public # Optional, key-value configuration parameters per postgresql documentation (e.g., use pigsty as default search_path)
The only required field is name, which should be a valid and unique username in the PostgreSQL cluster.
Roles don’t need a password, but for loginable business users, a password is usually required.
password can be plaintext or scram-sha-256 / md5 hash string; please avoid using plaintext passwords.
Users/roles are created one by one in array order, so ensure roles/groups are defined before their members.
login, superuser, createdb, createrole, inherit, replication, bypassrls are boolean flags.
pgbouncer is disabled by default: to add business users to the pgbouncer user list, you should explicitly set it to true.
ACL System
Pigsty has a built-in, out-of-the-box access control / ACL system. You can easily use it by simply assigning the following four default roles to business users:
dbrole_readwrite: Role with global read-write access (production accounts primarily used by business should have database read-write privileges)
dbrole_readonly: Role with global read-only access (if other businesses need read-only access, use this role)
dbrole_admin: Role with DDL privileges (business administrators, scenarios requiring table creation in applications)
dbrole_offline: Restricted read-only access role (can only access offline instances, typically for individual users)
If you want to redesign your own ACL system, consider customizing the following parameters and templates:
Users and roles defined in pg_default_roles and pg_users are automatically created one by one during the cluster initialization PROVISION phase.
If you want to create users on an existing cluster, you can use the bin/pgsql-user tool.
Add the new user/role definition to all.children.<cls>.pg_users and use the following method to create the user:
Unlike databases, the user creation playbook is always idempotent. When the target user already exists, Pigsty will modify the target user’s attributes to match the configuration. So running it repeatedly on existing clusters is usually not a problem.
Please Use Playbooks to Create Users
We don’t recommend manually creating new business users, especially when you want the user to use the default pgbouncer connection pool: unless you’re willing to manually maintain the user list in Pgbouncer and keep it consistent with PostgreSQL.
When creating new users with bin/pgsql-user tool or pgsql-user.yml playbook, the user will also be added to the Pgbouncer Users list.
Modifying Users
The method for modifying PostgreSQL user attributes is the same as Creating Users.
First, adjust your user definition, modify the attributes that need adjustment, then execute the following command to apply:
Note that modifying users will not delete users, but modify user attributes through the ALTER USER command; it also won’t revoke user privileges and groups, and will use the GRANT command to grant new roles.
Pgbouncer Users
Pgbouncer is enabled by default and serves as a connection pool middleware, with its users managed by default.
Pigsty adds all users in pg_users that explicitly have the pgbouncer: true flag to the pgbouncer user list.
Users in the Pgbouncer connection pool are listed in /etc/pgbouncer/userlist.txt:
When you create a database, the Pgbouncer database list definition file will be refreshed and take effect through online configuration reload, without affecting existing connections.
Pgbouncer runs with the same dbsu as PostgreSQL, which defaults to the postgres operating system user. You can use the pgb alias to access pgbouncer management functions using the dbsu.
Pigsty also provides a utility function pgb-route that can quickly switch pgbouncer database traffic to other nodes in the cluster, useful for zero-downtime migration:
The connection pool user configuration files userlist.txt and useropts.txt are automatically refreshed when you create users, and take effect through online configuration reload, normally without affecting existing connections.
Note that the pgbouncer_auth_query parameter allows you to use dynamic queries to complete connection pool user authentication—this is a compromise when you don’t want to manage users in the connection pool.
10.18.3 - Database
Database refers to the logical object created using the SQL command CREATE DATABASE within a database cluster.
In this context, Database refers to the logical object created using the SQL command CREATE DATABASE within a database cluster.
A PostgreSQL server can serve multiple databases simultaneously. In Pigsty, you can define the required databases in the cluster configuration.
Pigsty will modify and customize the default template database template1, creating default schemas, installing default extensions, and configuring default privileges. Newly created databases will inherit these settings from template1 by default.
By default, all business databases will be added to the Pgbouncer connection pool in a 1:1 manner; pg_exporter will use an auto-discovery mechanism to find all business databases and monitor objects within them.
Define Database
Business databases are defined in the database cluster parameter pg_databases, which is an array of database definition objects.
Databases in the array are created sequentially according to the definition order, so later defined databases can use previously defined databases as templates.
Below is the database definition for the default pg-meta cluster in the Pigsty demo environment:
Each database definition is an object that may include the following fields, using the meta database as an example:
- name:meta # REQUIRED, `name` is the only mandatory field of a database definitionbaseline:cmdb.sql # optional, database sql baseline path (relative path among ansible search path, e.g. files/)pgbouncer:true# optional, add this database to pgbouncer database list? true by defaultschemas:[pigsty] # optional, additional schemas to be created, array of schema namesextensions: # optional, additional extensions to be installed:array of extension objects- {name: postgis , schema:public } # can specify which schema to install the extension in, or leave it unspecified (will install in the first schema of search_path)- {name:timescaledb } # for example, some extensions create and use fixed schemas, so no schema specification is needed.comment:pigsty meta database # optional, comment string for this databaseowner:postgres # optional, database owner, postgres by defaulttemplate:template1 # optional, which template to use, template1 by default, target must be a template databaseencoding:UTF8 # optional, database encoding, UTF8 by default (MUST same as template database)locale:C # optional, database locale, C by default (MUST same as template database)lc_collate:C # optional, database collate, C by default (MUST same as template database), no reason not to recommend changing.lc_ctype:C # optional, database ctype, C by default (MUST same as template database)tablespace:pg_default # optional, default tablespace, 'pg_default' by defaultallowconn:true# optional, allow connection, true by default. false will disable connect at allrevokeconn:false# optional, revoke public connection privilege. false by default, when set to true, CONNECT privilege will be revoked from users other than owner and adminregister_datasource:true# optional, register this database to grafana datasources? true by default, explicitly set to false to skip registrationconnlimit:-1# optional, database connection limit, default -1 disable limit, set to positive integer will limit connectionspool_auth_user:dbuser_meta # optional, all connections to this pgbouncer database will be authenticated using this user (only useful when pgbouncer_auth_query is enabled)pool_mode:transaction # optional, pgbouncer pool mode at database level, default transactionpool_size:64# optional, pgbouncer pool size at database level, default 64pool_size_reserve:32# optional, pgbouncer pool size reserve at database level, default 32, when default pool is insufficient, can request at most this many burst connectionspool_size_min:0# optional, pgbouncer pool size min at database level, default 0pool_max_db_conn:100# optional, max database connections at database level, default 100
The only required field is name, which should be a valid and unique database name in the current PostgreSQL cluster, other parameters have reasonable defaults.
name: Database name, required.
baseline: SQL file path (Ansible search path, usually in files), used to initialize database content.
owner: Database owner, default is postgres
template: Template used when creating the database, default is template1
encoding: Database default character encoding, default is UTF8, default is consistent with the instance. It is recommended not to configure and modify.
locale: Database default locale, default is C, it is recommended not to configure, keep consistent with the instance.
lc_collate: Database default locale string collation, default is same as instance setting, it is recommended not to modify, must be consistent with template database. It is strongly recommended not to configure, or configure to C.
lc_ctype: Database default LOCALE, default is same as instance setting, it is recommended not to modify or set, must be consistent with template database. It is recommended to configure to C or en_US.UTF8.
allowconn: Whether to allow connection to the database, default is true, not recommended to modify.
revokeconn: Whether to revoke connection privilege to the database? Default is false. If true, PUBLIC CONNECT privilege on the database will be revoked. Only default users (dbsu|monitor|admin|replicator|owner) can connect. In addition, admin|owner will have GRANT OPTION, can grant connection privileges to other users.
tablespace: Tablespace associated with the database, default is pg_default.
connlimit: Database connection limit, default is -1, meaning no limit.
extensions: Object array, each object defines an extension in the database, and the schema in which it is installed.
parameters: KV object, each KV defines a parameter that needs to be modified for the database through ALTER DATABASE.
pgbouncer: Boolean option, whether to add this database to Pgbouncer. All databases will be added to Pgbouncer list unless explicitly specified as pgbouncer: false.
comment: Database comment information.
pool_auth_user: When pgbouncer_auth_query is enabled, all connections to this pgbouncer database will use the user specified here to execute authentication queries. You need to use a user with access to the pg_shadow table.
pool_mode: Database level pgbouncer pool mode, default is transaction, i.e., transaction pooling. If left empty, will use pgbouncer_poolmode parameter as default value.
pool_size: Database level pgbouncer default pool size, default is 64
pool_size_reserve: Database level pgbouncer pool size reserve, default is 32, when default pool is insufficient, can request at most this many burst connections.
pool_size_min: Database level pgbouncer pool size min, default is 0
pool_max_db_conn: Database level pgbouncer connection pool max database connections, default is 100
Newly created databases are forked from the template1 database by default. This template database will be customized during the PG_PROVISION phase:
configured with extensions, schemas, and default privileges, so newly created databases will also inherit these configurations unless you explicitly use another database as a template.
Databases defined in pg_databases will be automatically created during cluster initialization.
If you wish to create database on an existing cluster, you can use the bin/pgsql-db wrapper script.
Add new database definition to all.children.<cls>.pg_databases, and create that database with the following command:
Here are some considerations when creating a new database:
The create database playbook is idempotent by default, however when you use baseline scripts, it may not be: in this case, it’s usually not recommended to re-run this on existing databases unless you’re sure the provided baseline SQL is also idempotent.
We don’t recommend manually creating new databases, especially when you’re using the default pgbouncer connection pool: unless you’re willing to manually maintain the Pgbouncer database list and keep it consistent with PostgreSQL.
When creating new databases using the pgsql-db tool or pgsql-db.yml playbook, this database will also be added to the Pgbouncer Database list.
If your database definition has a non-trivial owner (default is dbsu postgres), make sure the owner user exists before creating the database.
Best practice is always to createusers before creating databases.
Pgbouncer Database
Pigsty will configure and enable a Pgbouncer connection pool for PostgreSQL instances in a 1:1 manner by default, communicating via /var/run/postgresql Unix Socket.
Connection pools can optimize short connection performance, reduce concurrency contention, avoid overwhelming the database with too many connections, and provide additional flexibility during database migration.
Pigsty adds all databases in pg_databases to pgbouncer’s database list by default.
You can disable pgbouncer connection pool support for a specific database by explicitly setting pgbouncer: false in the database definition.
The Pgbouncer database list is defined in /etc/pgbouncer/database.txt, and connection pool parameters from the database definition are reflected here:
When you create databases, the Pgbouncer database list definition file will be refreshed and take effect through online configuration reload, normally without affecting existing connections.
Pgbouncer runs with the same dbsu as PostgreSQL, defaulting to the postgres os user. You can use the pgb alias to access pgbouncer management functions using dbsu.
Pigsty also provides a utility function pgb-route, which can quickly switch pgbouncer database traffic to other nodes in the cluster for zero-downtime migration:
# route pgbouncer traffic to another cluster memberfunction pgb-route(){localip=${1-'\/var\/run\/postgresql'} sed -ie "s/host=[^[:space:]]\+/host=${ip}/g" /etc/pgbouncer/pgbouncer.ini
cat /etc/pgbouncer/pgbouncer.ini
}
10.18.4 - Authentication / HBA
Detailed explanation of Host-Based Authentication (HBA) in Pigsty.
Detailed explanation of Host-Based Authentication (HBA) in Pigsty.
Here we mainly introduce HBA: Host Based Authentication. HBA rules define which users can access which databases from which locations and in which ways.
Client Authentication
To connect to a PostgreSQL database, users must first be authenticated (password is used by default).
You can provide the password in the connection string (not secure), or pass it using the PGPASSWORD environment variable or .pgpass file. Refer to the psql documentation and PostgreSQL Connection Strings for more details.
By default, Pigsty enables server-side SSL encryption but does not verify client SSL certificates. To connect using client SSL certificates, you can provide client parameters using the PGSSLCERT and PGSSLKEY environment variables or sslkey and sslcert parameters.
These are all arrays of HBA rule objects. Each HBA rule is an object in one of the following two forms:
1. Raw Form
The raw form of HBA is almost identical to the PostgreSQL pg_hba.conf format:
- title:allow intranet password accessrole:commonrules:- host all all 10.0.0.0/8 md5- host all all 172.16.0.0/12 md5- host all all 192.168.0.0/16 md5
In this form, the rules field is an array of strings, where each line is a raw HBA rule. The title field is rendered as a comment explaining what the rules below do.
The role field specifies which instance roles the rule applies to. When an instance’s pg_role matches the role, the HBA rule will be added to that instance’s HBA.
HBA rules with role: common will be added to all instances.
HBA rules with role: primary will only be added to primary instances.
HBA rules with role: replica will only be added to replica instances.
HBA rules with role: offline will be added to offline instances (pg_role = offline or pg_offline_query = true)
2. Alias Form
The alias form allows you to maintain HBA rules in a simpler, clearer, and more convenient way: it replaces the rules field with addr, auth, user, and db fields. The title and role fields still apply.
- addr:'intra'# world|intra|infra|admin|local|localhost|cluster|<cidr>auth:'pwd'# trust|pwd|ssl|cert|deny|<official auth method>user:'all'# all|${dbsu}|${repl}|${admin}|${monitor}|<user>|<group>db:'all'# all|replication|....rules:[]# raw hba string precedence over above alltitle:allow intranet password access
addr: where - Which IP address ranges are affected by this rule?
world: All IP addresses
intra: All intranet IP address ranges: '10.0.0.0/8', '172.16.0.0/12', '192.168.0.0/16'
infra: IP addresses of Infra nodes
admin: IP addresses of admin_ip management nodes
local: Local Unix Socket
localhost: Local Unix Socket and TCP 127.0.0.1/32 loopback address
cluster: IP addresses of all members in the same PostgreSQL cluster
<cidr>: A specific CIDR address block or IP address
auth: how - What authentication method does this rule specify?
deny: Deny access
trust: Trust directly, no authentication required
pwd: Password authentication, uses md5 or scram-sha-256 authentication based on the pg_pwd_enc parameter
sha/scram-sha-256: Force use of scram-sha-256 password authentication.
md5: md5 password authentication, but can also be compatible with scram-sha-256 authentication, not recommended.
ssl: On top of password authentication pwd, require SSL to be enabled
ssl-md5: On top of password authentication md5, require SSL to be enabled
ssl-sha: On top of password authentication sha, require SSL to be enabled
os/ident: Use ident authentication with the operating system user identity
peer: Use peer authentication method, similar to os ident
cert: Use client SSL certificate-based authentication, certificate CN is the username
db: which: Which databases are affected by this rule?
all: All databases
replication: Allow replication connections (not specifying a specific database)
A specific database
3. Definition Location
Typically, global HBA is defined in all.vars. If you want to modify the global default HBA rules, you can copy one from the full.yml template to all.vars and modify it.
Here are some examples of cluster HBA rule definitions:
pg-meta:hosts:{10.10.10.10:{pg_seq: 1, pg_role:primary } }vars:pg_cluster:pg-metapg_hba_rules:- {user: dbuser_view ,db: all ,addr: infra ,auth: pwd ,title:'Allow dbuser_view password access to all databases from infrastructure nodes'}- {user: all ,db: all ,addr: 100.0.0.0/8 ,auth: pwd ,title:'Allow all users password access to all databases from K8S network'}- {user:'${admin}',db: world ,addr: 0.0.0.0/0 ,auth: cert ,title:'Allow admin user to login from anywhere with client certificate'}
Reloading HBA
HBA is a static rule configuration file that needs to be reloaded to take effect after modification. The default HBA rule set typically doesn’t need to be reloaded because it doesn’t involve Role or cluster members.
If your HBA design uses specific instance role restrictions or cluster member restrictions, then when cluster instance members change (add/remove/failover), some HBA rules’ effective conditions/scope change, and you typically also need to reload HBA to reflect the latest changes.
To reload postgres/pgbouncer hba rules:
bin/pgsql-hba <cls> # Reload hba rules for cluster `<cls>`bin/pgsql-hba <cls> ip1 ip2... # Reload hba rules for specific instances
The underlying Ansible playbook commands actually executed are:
Pigsty has a default set of HBA rules that are secure enough for most scenarios. These rules use the alias form, so they are basically self-explanatory.
pg_default_hba_rules:# postgres global default HBA rules - {user:'${dbsu}',db: all ,addr: local ,auth: ident ,title:'dbsu access via local os user ident'}- {user:'${dbsu}',db: replication ,addr: local ,auth: ident ,title:'dbsu replication from local os ident'}- {user:'${repl}',db: replication ,addr: localhost ,auth: pwd ,title:'replicator replication from localhost'}- {user:'${repl}',db: replication ,addr: intra ,auth: pwd ,title:'replicator replication from intranet'}- {user:'${repl}',db: postgres ,addr: intra ,auth: pwd ,title:'replicator postgres db from intranet'}- {user:'${monitor}',db: all ,addr: localhost ,auth: pwd ,title:'monitor from localhost with password'}- {user:'${monitor}',db: all ,addr: infra ,auth: pwd ,title:'monitor from infra host with password'}- {user:'${admin}',db: all ,addr: infra ,auth: ssl ,title:'admin @ infra nodes with pwd & ssl'}- {user:'${admin}',db: all ,addr: world ,auth: ssl ,title:'admin @ everywhere with ssl & pwd'}- {user: '+dbrole_readonly',db: all ,addr: localhost ,auth: pwd ,title:'pgbouncer read/write via local socket'}- {user: '+dbrole_readonly',db: all ,addr: intra ,auth: pwd ,title:'read/write biz user via password'}- {user: '+dbrole_offline' ,db: all ,addr: intra ,auth: pwd ,title:'allow etl offline tasks from intranet'}pgb_default_hba_rules:# pgbouncer global default HBA rules - {user:'${dbsu}',db: pgbouncer ,addr: local ,auth: peer ,title:'dbsu local admin access with os ident'}- {user: 'all' ,db: all ,addr: localhost ,auth: pwd ,title:'allow all user local access with pwd'}- {user:'${monitor}',db: pgbouncer ,addr: intra ,auth: pwd ,title:'monitor access via intranet with pwd'}- {user:'${monitor}',db: all ,addr: world ,auth: deny ,title:'reject all other monitor access addr'}- {user:'${admin}',db: all ,addr: intra ,auth: pwd ,title:'admin access via intranet with pwd'}- {user:'${admin}',db: all ,addr: world ,auth: deny ,title:'reject all other admin access addr'}- {user: 'all' ,db: all ,addr: intra ,auth: pwd ,title:'allow all user intra access with pwd'}
Example: Rendered pg_hba.conf
#==============================================================## File : pg_hba.conf# Desc : Postgres HBA Rules for pg-meta-1 [primary]# Time : 2023-01-11 15:19# Host : pg-meta-1 @ 10.10.10.10:5432# Path : /pg/data/pg_hba.conf# Note : ANSIBLE MANAGED, DO NOT CHANGE!# Author : Ruohang Feng ([email protected])# License : AGPLv3#==============================================================## addr alias# local : /var/run/postgresql# admin : 10.10.10.10# infra : 10.10.10.10# intra : 10.0.0.0/8, 172.16.0.0/12, 192.168.0.0/16# user alias# dbsu : postgres# repl : replicator# monitor : dbuser_monitor# admin : dbuser_dba# dbsu access via local os user ident [default]local all postgres ident# dbsu replication from local os ident [default]local replication postgres ident# replicator replication from localhost [default]local replication replicator scram-sha-256host replication replicator 127.0.0.1/32 scram-sha-256# replicator replication from intranet [default]host replication replicator 10.0.0.0/8 scram-sha-256host replication replicator 172.16.0.0/12 scram-sha-256host replication replicator 192.168.0.0/16 scram-sha-256# replicator postgres db from intranet [default]host postgres replicator 10.0.0.0/8 scram-sha-256host postgres replicator 172.16.0.0/12 scram-sha-256host postgres replicator 192.168.0.0/16 scram-sha-256# monitor from localhost with password [default]local all dbuser_monitor scram-sha-256host all dbuser_monitor 127.0.0.1/32 scram-sha-256# monitor from infra host with password [default]host all dbuser_monitor 10.10.10.10/32 scram-sha-256# admin @ infra nodes with pwd & ssl [default]hostssl all dbuser_dba 10.10.10.10/32 scram-sha-256# admin @ everywhere with ssl & pwd [default]hostssl all dbuser_dba 0.0.0.0/0 scram-sha-256# pgbouncer read/write via local socket [default]local all +dbrole_readonly scram-sha-256host all +dbrole_readonly 127.0.0.1/32 scram-sha-256# read/write biz user via password [default]host all +dbrole_readonly 10.0.0.0/8 scram-sha-256host all +dbrole_readonly 172.16.0.0/12 scram-sha-256host all +dbrole_readonly 192.168.0.0/16 scram-sha-256# allow etl offline tasks from intranet [default]host all +dbrole_offline 10.0.0.0/8 scram-sha-256host all +dbrole_offline 172.16.0.0/12 scram-sha-256host all +dbrole_offline 192.168.0.0/16 scram-sha-256# allow application database intranet access [common] [DISABLED]#host kong dbuser_kong 10.0.0.0/8 md5#host bytebase dbuser_bytebase 10.0.0.0/8 md5#host grafana dbuser_grafana 10.0.0.0/8 md5
Example: Rendered pgb_hba.conf
#==============================================================## File : pgb_hba.conf# Desc : Pgbouncer HBA Rules for pg-meta-1 [primary]# Time : 2023-01-11 15:28# Host : pg-meta-1 @ 10.10.10.10:5432# Path : /etc/pgbouncer/pgb_hba.conf# Note : ANSIBLE MANAGED, DO NOT CHANGE!# Author : Ruohang Feng ([email protected])# License : AGPLv3#==============================================================## PGBOUNCER HBA RULES FOR pg-meta-1 @ 10.10.10.10:6432# ansible managed: 2023-01-11 14:30:58# addr alias# local : /var/run/postgresql# admin : 10.10.10.10# infra : 10.10.10.10# intra : 10.0.0.0/8, 172.16.0.0/12, 192.168.0.0/16# user alias# dbsu : postgres# repl : replicator# monitor : dbuser_monitor# admin : dbuser_dba# dbsu local admin access with os ident [default]local pgbouncer postgres peer# allow all user local access with pwd [default]local all all scram-sha-256host all all 127.0.0.1/32 scram-sha-256# monitor access via intranet with pwd [default]host pgbouncer dbuser_monitor 10.0.0.0/8 scram-sha-256host pgbouncer dbuser_monitor 172.16.0.0/12 scram-sha-256host pgbouncer dbuser_monitor 192.168.0.0/16 scram-sha-256# reject all other monitor access addr [default]host all dbuser_monitor 0.0.0.0/0 reject# admin access via intranet with pwd [default]host all dbuser_dba 10.0.0.0/8 scram-sha-256host all dbuser_dba 172.16.0.0/12 scram-sha-256host all dbuser_dba 192.168.0.0/16 scram-sha-256# reject all other admin access addr [default]host all dbuser_dba 0.0.0.0/0 reject# allow all user intra access with pwd [default]host all all 10.0.0.0/8 scram-sha-256host all all 172.16.0.0/12 scram-sha-256host all all 192.168.0.0/16 scram-sha-256
Security Hardening
For scenarios requiring higher security, we provide a security hardening configuration template security.yml, which uses the following default HBA rule set:
pg_default_hba_rules:# postgres host-based auth rules by default- {user:'${dbsu}',db: all ,addr: local ,auth: ident ,title:'dbsu access via local os user ident'}- {user:'${dbsu}',db: replication ,addr: local ,auth: ident ,title:'dbsu replication from local os ident'}- {user:'${repl}',db: replication ,addr: localhost ,auth: ssl ,title:'replicator replication from localhost'}- {user:'${repl}',db: replication ,addr: intra ,auth: ssl ,title:'replicator replication from intranet'}- {user:'${repl}',db: postgres ,addr: intra ,auth: ssl ,title:'replicator postgres db from intranet'}- {user:'${monitor}',db: all ,addr: localhost ,auth: pwd ,title:'monitor from localhost with password'}- {user:'${monitor}',db: all ,addr: infra ,auth: ssl ,title:'monitor from infra host with password'}- {user:'${admin}',db: all ,addr: infra ,auth: ssl ,title:'admin @ infra nodes with pwd & ssl'}- {user:'${admin}',db: all ,addr: world ,auth: cert ,title:'admin @ everywhere with ssl & cert'}- {user: '+dbrole_readonly',db: all ,addr: localhost ,auth: ssl ,title:'pgbouncer read/write via local socket'}- {user: '+dbrole_readonly',db: all ,addr: intra ,auth: ssl ,title:'read/write biz user via password'}- {user: '+dbrole_offline' ,db: all ,addr: intra ,auth: ssl ,title:'allow etl offline tasks from intranet'}pgb_default_hba_rules:# pgbouncer host-based authentication rules- {user:'${dbsu}',db: pgbouncer ,addr: local ,auth: peer ,title:'dbsu local admin access with os ident'}- {user: 'all' ,db: all ,addr: localhost ,auth: pwd ,title:'allow all user local access with pwd'}- {user:'${monitor}',db: pgbouncer ,addr: intra ,auth: ssl ,title:'monitor access via intranet with pwd'}- {user:'${monitor}',db: all ,addr: world ,auth: deny ,title:'reject all other monitor access addr'}- {user:'${admin}',db: all ,addr: intra ,auth: ssl ,title:'admin access via intranet with pwd'}- {user:'${admin}',db: all ,addr: world ,auth: deny ,title:'reject all other admin access addr'}- {user: 'all' ,db: all ,addr: intra ,auth: ssl ,title:'allow all user intra access with pwd'}
Access control is important, but many users don’t do it well. Therefore, Pigsty provides a simplified, ready-to-use access control model to provide a security baseline for your cluster.
Business Read-Only (dbrole_readonly): Role for global read-only access. If other businesses need read-only access to this database, they can use this role.
Business Read-Write (dbrole_readwrite): Role for global read-write access. Production accounts used by primary business should have database read-write privileges.
Business Admin (dbrole_admin): Role with DDL permissions, typically used for business administrators or scenarios requiring table creation in applications (such as various business software).
Offline Read-Only (dbrole_offline): Restricted read-only access role (can only access offline instances, typically for personal users and ETL tool accounts).
Default roles are defined in pg_default_roles. Unless you really know what you’re doing, it’s recommended not to change the default role names.
- {name: dbrole_readonly , login: false , comment:role for global read-only access } # production read-only role- {name: dbrole_offline , login: false , comment:role for restricted read-only access (offline instance) } # restricted-read-only role- {name: dbrole_readwrite , login: false , roles: [dbrole_readonly], comment:role for global read-write access } # production read-write role- {name: dbrole_admin , login: false , roles: [pg_monitor, dbrole_readwrite] , comment:role for object creation }# production DDL change role
Default Users
Pigsty also has four default users (system users):
Superuser (postgres), the owner and creator of the cluster, same as the OS dbsu.
Replication user (replicator), the system user used for primary-replica replication.
Monitor user (dbuser_monitor), a user used to monitor database and connection pool metrics.
Admin user (dbuser_dba), the admin user who performs daily operations and database changes.
These four default users’ username/password are defined with four pairs of dedicated parameters, referenced in many places:
pg_dbsu: os dbsu name, postgres by default, better not change it
pg_dbsu_password: dbsu password, empty string by default means no password is set for dbsu, best not to set it.
Remember to change these passwords in production deployment! Don’t use default values!
pg_dbsu:postgres # database superuser name, it's recommended not to modify this username.pg_dbsu_password:''# database superuser password, it's recommended to leave this empty! Prohibit dbsu password login.pg_replication_username:replicator # system replication usernamepg_replication_password:DBUser.Replicator # system replication password, be sure to modify this password!pg_monitor_username:dbuser_monitor # system monitor usernamepg_monitor_password:DBUser.Monitor # system monitor password, be sure to modify this password!pg_admin_username:dbuser_dba # system admin usernamepg_admin_password:DBUser.DBA # system admin password, be sure to modify this password!
If you modify the default user parameters, update the corresponding role definition in pg_default_roles:
Pigsty has a battery-included privilege model that works with default roles.
All users have access to all schemas.
Read-Only users (dbrole_readonly) can read from all tables. (SELECT, EXECUTE)
Read-Write users (dbrole_readwrite) can write to all tables and run DML. (INSERT, UPDATE, DELETE).
Admin users (dbrole_admin) can create objects and run DDL (CREATE, USAGE, TRUNCATE, REFERENCES, TRIGGER).
Offline users (dbrole_offline) are like Read-Only users, but with limited access, only allowed to access offline instances (pg_role = 'offline' or pg_offline_query = true)
Objects created by admin users will have correct privileges.
Default privileges are installed on all databases, including template databases.
Database connect privilege is covered by database definition.
CREATE privileges of database & public schema are revoked from PUBLIC by default.
Object Privilege
Default object privileges for newly created objects in the database are controlled by the pg_default_privileges parameter:
- GRANT USAGE ON SCHEMAS TO dbrole_readonly- GRANT SELECT ON TABLES TO dbrole_readonly- GRANT SELECT ON SEQUENCES TO dbrole_readonly- GRANT EXECUTE ON FUNCTIONS TO dbrole_readonly- GRANT USAGE ON SCHEMAS TO dbrole_offline- GRANT SELECT ON TABLES TO dbrole_offline- GRANT SELECT ON SEQUENCES TO dbrole_offline- GRANT EXECUTE ON FUNCTIONS TO dbrole_offline- GRANT INSERT ON TABLES TO dbrole_readwrite- GRANT UPDATE ON TABLES TO dbrole_readwrite- GRANT DELETE ON TABLES TO dbrole_readwrite- GRANT USAGE ON SEQUENCES TO dbrole_readwrite- GRANT UPDATE ON SEQUENCES TO dbrole_readwrite- GRANT TRUNCATE ON TABLES TO dbrole_admin- GRANT REFERENCES ON TABLES TO dbrole_admin- GRANT TRIGGER ON TABLES TO dbrole_admin- GRANT CREATE ON SCHEMAS TO dbrole_admin
Newly created objects by admin users will have these privileges by default. Use \ddp+ to view these default privileges:
Type
Access privileges
function
=X
dbrole_readonly=X
dbrole_offline=X
dbrole_admin=X
schema
dbrole_readonly=U
dbrole_offline=U
dbrole_admin=UC
sequence
dbrole_readonly=r
dbrole_offline=r
dbrole_readwrite=wU
dbrole_admin=rwU
table
dbrole_readonly=r
dbrole_offline=r
dbrole_readwrite=awd
dbrole_admin=arwdDxt
Default Privilege
ALTER DEFAULT PRIVILEGES allows you to set the privileges that will be applied to objects created in the future. It does not affect privileges assigned to already-existing objects, nor does it affect objects created by non-admin users.
In Pigsty, default privileges are defined for three roles:
{%forprivinpg_default_privileges%}ALTERDEFAULTPRIVILEGESFORROLE{{pg_dbsu}}{{priv}};{%endfor%}{%forprivinpg_default_privileges%}ALTERDEFAULTPRIVILEGESFORROLE{{pg_admin_username}}{{priv}};{%endfor%}-- for additional business admin, they should SET ROLE dbrole_admin before executing DDL to use the corresponding default privilege configuration.
{%forprivinpg_default_privileges%}ALTERDEFAULTPRIVILEGESFORROLE"dbrole_admin"{{priv}};{%endfor%}
This content will be used by the PG cluster initialization template pg-init-template.sql, rendered during cluster initialization and output to /pg/tmp/pg-init-template.sql.
These commands will be executed on template1 and postgres databases, and newly created databases will inherit these default privilege configurations from template1.
That is to say, to maintain correct object privileges, you must execute DDL with admin users, which could be:
Business admin users granted with dbrole_admin role (by switching to dbrole_admin identity using SET ROLE)
It’s wise to use postgres as the global object owner. If you wish to create objects as business admin user, you MUST USE SET ROLE dbrole_admin before running that DDL to maintain the correct privileges.
You can also explicitly grant default privileges to business admin users in the database through ALTER DEFAULT PRIVILEGE FOR ROLE <some_biz_admin> XXX.
Database Privilege
In Pigsty, database-level privileges are covered in the database definition.
There are three database level privileges: CONNECT, CREATE, TEMP, and a special ‘privilege’: OWNERSHIP.
- name:meta # required, `name` is the only mandatory field of a database definitionowner:postgres # optional, specify a database owner, postgres by defaultallowconn:true# optional, allow connection, true by default. false will disable connect at allrevokeconn:false# optional, revoke public connection privilege. false by default. when set to true, CONNECT privilege will be revoked from users other than owner and admin
If owner exists, it will be used as the database owner instead of default {{ pg_dbsu }} (which is usually postgres)
If revokeconn is false, all users have the CONNECT privilege of the database, this is the default behavior.
If revokeconn is explicitly set to true:
CONNECT privilege of the database will be revoked from PUBLIC: regular users cannot connect to this database
CONNECT privilege will be explicitly granted to {{ pg_replication_username }}, {{ pg_monitor_username }} and {{ pg_admin_username }}
CONNECT privilege will be granted to the database owner with GRANT OPTION, the database owner can then grant connection privileges to other users.
revokeconn flag can be used for database access isolation. You can create different business users as owners for each database and set the revokeconn option for them.
Create business users, databases, modify services, HBA changes;
Execute log collection, garbage cleanup, backup, inspections, etc.
Database nodes sync time from the NTP server on INFRA/ADMIN nodes by default
If no dedicated cluster exists, the HA component Patroni uses etcd on INFRA nodes as the HA DCS.
If no dedicated cluster exists, the backup component pgbackrest uses MinIO on INFRA nodes as an optional centralized backup repository.
Nginx
Nginx is the access entry point for all WebUI services in Pigsty, using port 80 on the admin node by default.
Many infrastructure components with WebUI are exposed through Nginx, such as Grafana, VictoriaMetrics (VMUI), AlertManager, and HAProxy traffic management pages. Additionally, static file resources like yum/apt repos are served through Nginx.
Nginx routes access requests to corresponding upstream components based on domain names according to infra_portal configuration. If you use other domains or public domains, you can modify them here:
Pigsty strongly recommends using domain names to access Pigsty UI systems rather than direct IP+port access, for these reasons:
Using domains makes it easy to enable HTTPS traffic encryption, consolidate access to Nginx, audit all requests, and conveniently integrate authentication mechanisms.
Some components only listen on 127.0.0.1 by default, so they can only be accessed through Nginx proxy.
Domain names are easier to remember and provide additional configuration flexibility.
If you don’t have available internet domains or local DNS resolution, you can add local static resolution records in /etc/hosts (MacOS/Linux) or C:\Windows\System32\drivers\etc\hosts (Windows).
Pigsty creates a local software repository during installation to accelerate subsequent software installation.
This repository is served by Nginx, located by default at /www/pigsty, accessible via http://i.pigsty/pigsty.
Pigsty’s offline package is the entire software repository directory (yum/apt) compressed. When Pigsty tries to build a local repo, if it finds the local repo directory /www/pigsty already exists with the /www/pigsty/repo_complete marker file, it considers the local repo already built and skips downloading software from upstream, eliminating internet dependency.
The repo definition file is at /www/pigsty.repo, accessible by default via http://${admin_ip}/pigsty.repo
Pigsty v4.0 uses the VictoriaMetrics family to replace Prometheus/Loki, providing unified monitoring, logging, and tracing capabilities:
VictoriaMetrics listens on port 8428 by default, accessible via http://p.pigsty or https://i.pigsty/vmetrics/ for VMUI, compatible with Prometheus API.
VMAlert evaluates alert rules in /infra/rules/*.yml, listens on port 8880, and sends alert events to Alertmanager.
VictoriaLogs listens on port 9428, supports the https://i.pigsty/vlogs/ query interface. All nodes run Vector by default, pushing structured system logs, PostgreSQL logs, etc. to VictoriaLogs.
VictoriaTraces listens on port 10428 for slow SQL / Trace collection, Grafana accesses it as a Jaeger datasource.
Alertmanager listens on port 9059, accessible via http://a.pigsty or https://i.pigsty/alertmgr/ for managing alert notifications. After configuring SMTP, Webhook, etc., it can push messages.
Blackbox Exporter listens on port 9115 by default for Ping/TCP/HTTP probing, accessible via https://i.pigsty/blackbox/.
Grafana is the core of Pigsty’s WebUI, listening on port 3000 by default, accessible directly via IP:3000 or domain http://g.pigsty.
Pigsty comes with preconfigured datasources for VictoriaMetrics / Logs / Traces (vmetrics-*, vlogs-*, vtraces-*), and numerous dashboards with URL-based navigation for quick problem location.
Grafana can also be used as a general low-code visualization platform, so Pigsty installs plugins like ECharts and victoriametrics-datasource by default for building monitoring dashboards or inspection reports.
Pigsty installs Ansible on the meta node by default. Ansible is a popular operations tool with declarative configuration style and idempotent playbook design that greatly reduces system maintenance complexity.
DNSMASQ
DNSMASQ provides DNS resolution services within the environment. Domain names from other modules are registered with the DNSMASQ service on INFRA nodes.
DNS records are placed by default in the /etc/hosts.d/ directory on all INFRA nodes.
To install the INFRA module on a node, first add it to the infra group in the config inventory and assign an instance number infra_seq
# Configure single INFRA nodeinfra:{hosts:{10.10.10.10:{infra_seq:1}}}# Configure two INFRA nodesinfra:hosts:10.10.10.10:{infra_seq:1}10.10.10.11:{infra_seq:2}
Then use the infra.yml playbook to initialize the INFRA module on the nodes.
Administration
Here are some administration tasks related to the INFRA module:
Install/Uninstall Infra Module
./infra.yml # Install INFRA module on infra group./infra-rm.yml # Uninstall INFRA module from infra group
Manage Local Software Repository
You can use the following playbook subtasks to manage the local yum repo on Infra nodes:
./infra.yml -t repo # Create local repo from internet or offline package./infra.yml -t repo_dir # Create local repo directory./infra.yml -t repo_check # Check if local repo already exists./infra.yml -t repo_prepare # If exists, use existing local repo./infra.yml -t repo_build # If not exists, build local repo from upstream./infra.yml -t repo_upstream # Handle upstream repo files in /etc/yum.repos.d./infra.yml -t repo_remove # If repo_remove == true, delete existing repo files./infra.yml -t repo_add # Add upstream repo files to /etc/yum.repos.d (or /etc/apt/sources.list.d)./infra.yml -t repo_url_pkg # Download packages from internet defined by repo_url_packages./infra.yml -t repo_cache # Create upstream repo metadata cache with yum makecache / apt update./infra.yml -t repo_boot_pkg # Install bootstrap packages like createrepo_c, yum-utils... (or dpkg-)./infra.yml -t repo_pkg # Download packages & dependencies from upstream repos./infra.yml -t repo_create # Create local repo with createrepo_c & modifyrepo_c./infra.yml -t repo_use # Add newly built repo to /etc/yum.repos.d | /etc/apt/sources.list.d./infra.yml -t repo_nginx # If no nginx serving, start nginx as web server
The most commonly used commands are:
./infra.yml -t repo_upstream # Add upstream repos defined in repo_upstream to INFRA nodes./infra.yml -t repo_pkg # Download packages and dependencies from upstream repos./infra.yml -t repo_create # Create/update local yum repo with createrepo_c & modifyrepo_c
Manage Infrastructure Components
You can use the following playbook subtasks to manage various infrastructure components on Infra nodes:
./infra.yml -t infra # Configure infrastructure./infra.yml -t infra_env # Configure environment variables on admin node: env_dir, env_pg, env_var./infra.yml -t infra_pkg # Install software packages required by INFRA: infra_pkg_yum, infra_pkg_pip./infra.yml -t infra_user # Setup infra OS user group./infra.yml -t infra_cert # Issue certificates for infra components./infra.yml -t dns # Configure DNSMasq: dns_config, dns_record, dns_launch./infra.yml -t nginx # Configure Nginx: nginx_config, nginx_cert, nginx_static, nginx_launch, nginx_exporter./infra.yml -t victoria # Configure VictoriaMetrics/Logs/Traces: vmetrics|vlogs|vtraces|vmalert./infra.yml -t alertmanager # Configure AlertManager: alertmanager_config, alertmanager_launch./infra.yml -t blackbox # Configure Blackbox Exporter: blackbox_launch./infra.yml -t grafana # Configure Grafana: grafana_clean, grafana_config, grafana_plugin, grafana_launch, grafana_provision./infra.yml -t infra_register # Register infra components to VictoriaMetrics / Grafana
Other commonly used tasks include:
./infra.yml -t nginx_index # Re-render Nginx homepage content./infra.yml -t nginx_config,nginx_reload # Re-render Nginx portal config, expose new upstream services./infra.yml -t vmetrics_config,vmetrics_launch # Regenerate VictoriaMetrics main config and restart service./infra.yml -t vlogs_config,vlogs_launch # Re-render VictoriaLogs config./infra.yml -t vmetrics_clean # Clean VictoriaMetrics storage data directory./infra.yml -t grafana_plugin # Download Grafana plugins from internet
Playbooks
Pigsty provides three playbooks related to the INFRA module:
infra.yml: Initialize pigsty infrastructure on infra nodes
infra-rm.yml: Remove infrastructure components from infra nodes
deploy.yml: Complete one-time Pigsty installation on all nodes
infra.yml
The INFRA module playbook infra.yml initializes pigsty infrastructure on INFRA nodes
Executing this playbook completes the following tasks
Configure meta node directories and environment variables
Download and build a local software repository to accelerate subsequent installation. (If using offline package, skip download phase)
Add the current meta node as a regular node under Pigsty management
Deploy infrastructure components including VictoriaMetrics/Logs/Traces, VMAlert, Grafana, Alertmanager, Blackbox Exporter, etc.
Pigsty uses the current node executing this playbook as Pigsty’s INFRA node and ADMIN node by default.
During configuration, Pigsty marks the current node as Infra/Admin node and replaces the placeholder IP 10.10.10.10 in config templates with the current node’s primary IP address.
Besides initiating management and hosting infrastructure, this node is no different from a regular managed node.
In single-node installation, ETCD is also installed on this node to provide DCS service
Notes about this playbook
This is an idempotent playbook; repeated execution will wipe infrastructure components on meta nodes.
To preserve historical monitoring data, first set vmetrics_clean, vlogs_clean, vtraces_clean to false.
When offline repo /www/pigsty/repo_complete exists, this playbook skips downloading software from internet. Full execution takes about 5-8 minutes depending on machine configuration.
Downloading directly from upstream internet sources without offline package may take 10-20 minutes depending on your network conditions.
./infra-rm.yml # Remove INFRA module./infra-rm.yml -t service # Stop infrastructure services on INFRA./infra-rm.yml -t data # Remove remaining data on INFRA./infra-rm.yml -t package # Uninstall software packages installed on INFRA
deploy.yml
The INFRA module playbook deploy.yml performs a complete one-time Pigsty installation on all nodes
BlackboxExporter: Probes IP/VIP/URL reachability via ICMP/TCP/HTTP.
DNSMASQ: Provides DNS resolution for internal domain names.
Chronyd: NTP time sync service ensuring consistent time across all nodes.
PostgreSQL: CMDB and default database.
Ansible: Runs playbooks, orchestrates all infrastructure.
INFRA module is optional for PG HA. For example, Slim Install mode doesn’t install INFRA.
However, INFRA provides supporting services needed for prod-grade HA PG clusters, strongly recommended for full Pigsty DBaaS experience.
If you have existing infra (Nginx, local repo, monitoring, DNS, NTP), you can disable INFRA module and configure Pigsty to use existing infrastructure instead.
Nginx
Nginx = Pigsty web UI entry point—HTTP/HTTPS on ports 80/443 by default.
Web UIs with infrastructure components exposed via Nginx: Grafana, VictoriaMetrics (VMUI), AlertManager, and HAProxy traffic console. Local yum/apt repo static files also served via Nginx.
Nginx routes based on infra_portal configuration—domain-based proxy to upstream components. Customize for other or public domains:
Pigsty strongly recommends domain access over IP+port:
Enables HTTPS encryption, consolidates to Nginx, audits all requests, integrates auth.
Some components only listen on 127.0.0.1—only accessible via Nginx proxy.
Domains easier to remember, extra flexibility.
If no internet domain or local DNS resolution, add local static records in /etc/hosts (MacOS/Linux) or C:\Windows\System32\drivers\etc\hosts (Windows).
Pigsty creates local repo during install on INFRA nodes to accelerate subsequent software installation.
Repo served by Nginx, default location /www/pigsty, accessible via http://i.pigsty/pigsty.
Pigsty’s offline package = entire built repo directory (yum/apt) compressed. When building local repo, if /www/pigsty exists with /www/pigsty/repo_complete marker, considers repo already built—skips upstream downloads, eliminating internet dependency.
Repo definition file: /www/pigsty.repo, accessible via http://${admin_ip}/pigsty.repo.
VictoriaMetrics: Default port 8428, accessible via http://p.pigsty or https://i.pigsty/vmetrics/, Prometheus API-compatible.
VMAlert: Evaluates alert rules in /infra/rules/*.yml, port 8880, sends events to Alertmanager.
VictoriaLogs: Default port 9428, supports log search via https://i.pigsty/vlogs/. All nodes run Vector by default, pushing structured system logs, PG logs here.
VictoriaTraces: Port 10428 for slow SQL / Trace collection. Grafana accesses as Jaeger datasource.
AlertManager: Port 9059, accessible via http://a.pigsty or https://i.pigsty/alertmgr/ for managing alert notifications. Configure SMTP, Webhook, etc. to push messages.
Blackbox Exporter: Default port 9115 for Ping/TCP/HTTP probing, accessible via https://i.pigsty/blackbox/.
Grafana = Pigsty web UI core, default port 3000, accessible via IP:3000 or domain http://g.pigsty.
Pigsty includes preconfigured datasources for VictoriaMetrics / Logs / Traces (vmetrics-*, vlogs-*, vtraces-*), plus numerous dashboards with URL navigation for quick problem location.
Grafana = low-code visualization platform. Pigsty installs plugins (ECharts, victoriametrics-datasource) by default for building monitoring dashboards/inspection reports.
Pigsty installs Ansible on meta node by default. Ansible = popular ops tool with declarative config style and idempotent playbook design—reduces system maintenance complexity.
DNSMASQ
DNSMASQ provides DNS resolution for internal Pigsty domain names. Other modules’ domain names register with DNSMASQ service on INFRA nodes.
DNS records: default location /etc/hosts.d/ on all INFRA nodes.
INFRA module provides 10 sections with 70+ configurable parameters
The INFRA module is responsible for deploying Pigsty’s infrastructure components: local software repository, Nginx, DNSMasq, VictoriaMetrics, VictoriaLogs, Grafana, Alertmanager, Blackbox Exporter, and other monitoring and alerting infrastructure.
Pigsty v4.0 uses VictoriaMetrics to replace Prometheus and VictoriaLogs to replace Loki, providing a superior observability solution.
Infrastructure data directory, default /data/infra
REPO parameters configure the local software repository, including repository enable switch, directory paths, upstream source definitions, and packages to download.
This section defines Pigsty deployment metadata: version string, admin node IP address, repository mirror region, default language, and HTTP(S) proxy for downloading packages.
version:v4.0.0 # pigsty version stringadmin_ip:10.10.10.10# admin node ip addressregion: default # upstream mirror region:default,china,europelanguage: en # default language:en or zhproxy_env:# global proxy env when downloading packagesno_proxy:"localhost,127.0.0.1,10.0.0.0/8,192.168.0.0/16,*.pigsty,*.aliyun.com,mirrors.*,*.myqcloud.com,*.tsinghua.edu.cn"# http_proxy: # set your proxy here: e.g http://user:[email protected]# https_proxy: # set your proxy here: e.g http://user:[email protected]# all_proxy: # set your proxy here: e.g http://user:[email protected]
version
name: version, type: string, level: G
Pigsty version string, default value is the current version: v4.0.0.
Pigsty uses this version string internally for feature control and content rendering. Do not modify this parameter arbitrarily.
Pigsty uses semantic versioning, and the version string typically starts with the character v, e.g., v4.0.0.
admin_ip
name: admin_ip, type: ip, level: G
Admin node IP address, default is the placeholder IP address: 10.10.10.10
The node specified by this parameter will be treated as the admin node, typically pointing to the first node where Pigsty is installed, i.e., the control node.
The default value 10.10.10.10 is a placeholder that will be replaced with the actual admin node IP address during configure.
Many parameters reference this parameter, such as:
In these parameters, the string ${admin_ip} will be replaced with the actual value of admin_ip. Using this mechanism, you can specify different admin nodes for different nodes.
region
name: region, type: enum, level: G
Upstream mirror region, available options: default, china, europe, default is default
If a region other than default is set, and there’s a corresponding entry in repo_upstream with a matching baseurl, it will be used instead of the default baseurl.
For example, if your region is set to china, Pigsty will attempt to use Chinese mirror sites to accelerate downloads. If an upstream repository doesn’t have a corresponding China region mirror, the default upstream mirror site will be used instead.
Additionally, URLs defined in repo_url_packages will be replaced from repo.pigsty.io to repo.pigsty.cc to use domestic mirrors.
language
name: language, type: enum, level: G
Default language setting, options are en (English) or zh (Chinese), default is en.
This parameter affects the language preference of some Pigsty-generated configurations and content, such as the initial language setting of Grafana dashboards.
If you are a Chinese user, it is recommended to set this parameter to zh for a better Chinese support experience.
proxy_env
name: proxy_env, type: dict, level: G
Global proxy environment variables used when downloading packages, default value specifies no_proxy, which is the list of addresses that should not use a proxy:
When installing from the Internet in mainland China, certain packages may be blocked. You can use a proxy to solve this problem.
Note that if the Docker module is used, the proxy server configuration here will also be written to the Docker Daemon configuration file.
Note that if the -x parameter is specified during ./configure, the proxy configuration information in the current environment will be automatically filled into the generated pigsty.yaml file.
CA
Pigsty uses self-signed CA certificates to support advanced security features such as HTTPS access, PostgreSQL SSL connections, etc.
ca_create:true# create CA if not exists? default trueca_cn:pigsty-ca # CA CN name, fixed as pigsty-cacert_validity:7300d # certificate validity, default 20 years
ca_create
name: ca_create, type: bool, level: G
Create CA if not exists? Default value is true.
When set to true, if the CA public-private key pair does not exist in the files/pki/ca directory, Pigsty will automatically create a new CA.
If you already have a CA public-private key pair, you can copy them to the files/pki/ca directory:
files/pki/ca/ca.crt: CA public key certificate
files/pki/ca/ca.key: CA private key file
Pigsty will use the existing CA key pair instead of creating a new one. If the CA does not exist and this parameter is set to false, an error will occur.
Be sure to retain and backup the newly generated CA private key file during deployment, as it is crucial for issuing new certificates later.
Note: Pigsty v3.x used the ca_method parameter (with values create/recreate/copy), v4.0 simplifies this to the boolean ca_create.
ca_cn
name: ca_cn, type: string, level: G
CA CN (Common Name), fixed as pigsty-ca, not recommended to modify.
You can use the following command to view the Pigsty CA certificate details on a node:
openssl x509 -text -in /etc/pki/ca.crt
cert_validity
name: cert_validity, type: interval, level: G
Certificate validity period for issued certificates, default is 20 years, sufficient for most scenarios. Default value: 7300d
This parameter affects the validity of all certificates issued by the Pigsty CA, including:
PostgreSQL server certificates
Patroni API certificates
etcd server/client certificates
Other internal service certificates
Note: The validity of HTTPS certificates used by Nginx is controlled separately by nginx_cert_validity, because modern browsers have stricter requirements for website certificate validity (maximum 397 days).
INFRA_ID
Infrastructure identity and portal definition.
#infra_seq: 1 # infra node sequence, REQUIRED identity parameterinfra_portal:# infrastructure services exposed via Nginx portalhome :{domain:i.pigsty } # default home server definitioninfra_data:/data/infra # infrastructure default data directory
infra_seq
name: infra_seq, type: int, level: I
Infrastructure node sequence number, REQUIRED identity parameter that must be explicitly specified on infrastructure nodes, so no default value is provided.
This parameter is used to uniquely identify each node in multi-infrastructure node deployments, typically using positive integers starting from 1.
Infrastructure services exposed via Nginx portal. The v4.0 default value is very concise:
infra_portal:home :{domain:i.pigsty } # default home server definition
Pigsty will automatically configure the corresponding reverse proxies based on the actually enabled components. Users typically only need to define the home domain name.
Each record consists of a Key and a Value dictionary, where name is the key representing the component name, and the value is an object that can configure the following parameters:
name: REQUIRED, specifies the name of the Nginx server
Default record: home is a fixed name, please do not modify it.
Used as part of the Nginx configuration file name, corresponding to: /etc/nginx/conf.d/<name>.conf
Nginx servers without a domain field will not generate configuration files but will be used as references.
domain: OPTIONAL, when the service needs to be exposed via Nginx, this is a REQUIRED field specifying the domain name to use
In Pigsty self-signed Nginx HTTPS certificates, the domain will be added to the SAN field of the Nginx SSL certificate
Pigsty web page cross-references will use the default domain name here
endpoint: Usually used as an alternative to path, specifies the upstream server address. Setting endpoint indicates this is a reverse proxy server
${admin_ip} can be used as a placeholder in the configuration and will be dynamically replaced with admin_ip during deployment
Default reverse proxy servers use endpoint.conf as the configuration template
Reverse proxy servers can also configure websocket and schema parameters
path: Usually used as an alternative to endpoint, specifies the local file server path. Setting path indicates this is a local web server
Local web servers use path.conf as the configuration template
Local web servers can also configure the index parameter to enable file index pages
certbot: Certbot certificate name; if configured, Certbot will be used to apply for certificates
If multiple servers specify the same certbot, Pigsty will merge certificate applications; the final certificate name will be this certbot value
cert: Certificate file path; if configured, will override the default certificate path
key: Certificate key file path; if configured, will override the default certificate key path
websocket: Whether to enable WebSocket support
Only reverse proxy servers can configure this parameter; if enabled, upstream WebSocket connections will be allowed
schema: Protocol used by the upstream server; if configured, will override the default protocol
Default is http; if configured as https, it will force HTTPS connections to the upstream server
index: Whether to enable file index pages
Only local web servers can configure this parameter; if enabled, autoindex configuration will be enabled to automatically generate directory index pages
log: Nginx log file path
If specified, access logs will be written to this file; otherwise, the default log file will be used based on server type
Reverse proxy servers use /var/log/nginx/<name>.log as the default log file path
If this parameter is not specified, the default configuration template will be used
config: Nginx configuration code block
Configuration text directly injected into the Nginx Server configuration block
enforce_https: Redirect HTTP to HTTPS
Global configuration can be specified via nginx_sslmode: enforce
This configuration does not affect the default home server, which will always listen on both ports 80 and 443 to ensure compatibility
infra_data
name: infra_data, type: path, level: G
Infrastructure data directory, default value is /data/infra.
This directory is used to store data files for infrastructure components, including:
VictoriaMetrics time series database data
VictoriaLogs log data
VictoriaTraces trace data
Other infrastructure component persistent data
It is recommended to place this directory on a separate data disk for easier management and expansion.
REPO
This section is about local software repository configuration. Pigsty enables a local software repository (APT/YUM) on infrastructure nodes by default.
During initialization, Pigsty downloads all packages and their dependencies (specified by repo_packages) from the Internet upstream repository (specified by repo_upstream) to {{ nginx_home }} / {{ repo_name }} (default /www/pigsty). The total size of all software and dependencies is approximately 1GB.
When creating the local repository, if it already exists (determined by the presence of a marker file named repo_complete in the repository directory), Pigsty will consider the repository already built, skip the software download phase, and directly use the built repository.
If some packages download too slowly, you can set a download proxy using the proxy_env configuration to complete the initial download, or directly download the pre-packaged offline package, which is essentially a local software repository built on the same operating system.
repo_enabled:true# create local repo on this infra node?repo_home:/www # repo home directory, default /wwwrepo_name:pigsty # repo name, default pigstyrepo_endpoint:http://${admin_ip}:80# repo access endpointrepo_remove:true# remove existing upstream repo definitionsrepo_modules:infra,node,pgsql # enabled upstream repo modules#repo_upstream: [] # upstream repo definitions (inherited from OS variables)#repo_packages: [] # packages to download (inherited from OS variables)#repo_extra_packages: [] # extra packages to downloadrepo_url_packages:[]# extra packages downloaded via URL
repo_enabled
name: repo_enabled, type: bool, level: G/I
Create a local software repository on this infrastructure node? Default is true, meaning all Infra nodes will set up a local software repository.
If you have multiple infrastructure nodes, you can keep only 1-2 nodes as software repositories; other nodes can set this parameter to false to avoid duplicate software download builds.
repo_home
name: repo_home, type: path, level: G
Local software repository home directory, defaults to Nginx’s root directory: /www.
This directory is actually a symlink pointing to nginx_data. It’s not recommended to modify this directory. If modified, it should be consistent with nginx_home.
repo_name
name: repo_name, type: string, level: G
Local repository name, default is pigsty. Changing this repository name is not recommended.
The final repository path is {{ repo_home }}/{{ repo_name }}, defaulting to /www/pigsty.
repo_endpoint
name: repo_endpoint, type: url, level: G
Endpoint used by other nodes to access this repository, default value: http://${admin_ip}:80.
Pigsty starts Nginx on infrastructure nodes at ports 80/443 by default, providing local software repository (static files) service.
If you modify nginx_port or nginx_ssl_port, or use a different infrastructure node from the control node, adjust this parameter accordingly.
Remove existing upstream repository definitions when building the local repository? Default value: true.
When this parameter is enabled, all existing repository files in /etc/yum.repos.d will be moved and backed up to /etc/yum.repos.d/backup. On Debian systems, /etc/apt/sources.list and /etc/apt/sources.list.d are removed and backed up to /etc/apt/backup.
Since existing OS sources have uncontrollable content, using Pigsty-validated upstream software sources can improve the success rate and speed of downloading packages from the Internet.
In certain situations (e.g., your OS is some EL/Deb compatible variant that uses private sources for many packages), you may need to keep existing upstream repository definitions. In such cases, set this parameter to false.
repo_modules
name: repo_modules, type: string, level: G/A
Which upstream repository modules will be added to the local software source, default value: infra,node,pgsql
When Pigsty attempts to add upstream repositories, it filters entries in repo_upstream based on this parameter’s value. Only entries whose module field matches this parameter’s value will be added to the local software source.
Modules are comma-separated. Available module lists can be found in the repo_upstream definitions; common modules include:
Where to download upstream packages when building the local repository? This parameter has no default value. If not explicitly specified by the user in the configuration file, it will be loaded from the repo_upstream_default variable defined in roles/node_id/vars based on the current node’s OS family.
Pigsty provides complete upstream repository definitions for different OS versions (EL8/9/10, Debian 11/12/13, Ubuntu 22/24), including:
OS base repositories (BaseOS, AppStream, EPEL, etc.)
PostgreSQL official PGDG repository
Pigsty extension repository
Various third-party software repositories (Docker, Nginx, Grafana, etc.)
Each upstream repository definition contains the following fields:
- name:pigsty-pgsql # repository namedescription:'Pigsty PGSQL'# repository descriptionmodule:pgsql # module it belongs toreleases:[8,9,10]# supported OS versionsarch:[x86_64, aarch64] # supported CPU architecturesbaseurl:# repository URL, configured by regiondefault:'https://repo.pigsty.io/yum/pgsql/el$releasever.$basearch'china:'https://repo.pigsty.cc/yum/pgsql/el$releasever.$basearch'
Users typically don’t need to modify this parameter unless they have special repository requirements. For detailed repository definitions, refer to the configuration files for corresponding operating systems in the roles/node_id/vars/ directory.
repo_packages
name: repo_packages, type: string[], level: G
String array type, where each line is a space-separated list of software packages, specifying packages (and their dependencies) to download using repotrack or apt download.
This parameter has no default value, meaning its default state is undefined. If not explicitly defined, Pigsty will load the default from the repo_packages_default variable defined in roles/node_id/vars:
Each element in this parameter will be translated according to the package_map in the above files, based on the specific OS distro major version. For example, on EL systems it translates to:
As a convention, repo_packages typically includes packages unrelated to the PostgreSQL major version (such as Infra, Node, and PGDG Common parts), while PostgreSQL major version-related packages (kernel, extensions) are usually specified in repo_extra_packages to facilitate switching PG major versions.
Used to specify additional packages to download without modifying repo_packages (typically PG major version-related packages), default value is an empty list.
If not explicitly defined, Pigsty will load the default from the repo_extra_packages_default variable defined in roles/node_id/vars:
[pgsql-main ]
Elements in this parameter undergo package name translation, where $v will be replaced with pg_version, i.e., the current PG major version (default 18).
Users can typically specify PostgreSQL major version-related packages here without affecting the other PG version-independent packages defined in repo_packages.
repo_url_packages
name: repo_url_packages, type: object[] | string[], level: G
Packages downloaded directly from the Internet using URLs, default is an empty array: []
You can use URL strings directly as array elements in this parameter, or use object structures to explicitly specify URLs and filenames.
Note that this parameter is affected by the region variable. If you’re in mainland China, Pigsty will automatically replace URLs, changing repo.pigsty.io to repo.pigsty.cc.
INFRA_PACKAGE
These packages are installed only on INFRA nodes, including regular RPM/DEB packages and PIP packages.
infra_packages
name: infra_packages, type: string[], level: G
String array type, where each line is a space-separated list of software packages, specifying packages to install on Infra nodes.
This parameter has no default value, meaning its default state is undefined. If not explicitly specified by the user in the configuration file, Pigsty will load the default from the infra_packages_default variable defined in roles/node_id/vars based on the current node’s OS family.
Note: v4.0 uses the VictoriaMetrics suite to replace Prometheus and Loki, so the package list differs significantly from v3.x.
infra_packages_pip
name: infra_packages_pip, type: string, level: G
Additional packages to install using pip on Infra nodes, package names separated by commas. Default value is an empty string, meaning no additional python packages are installed.
Example:
infra_packages_pip:'requests,boto3,awscli'
NGINX
Pigsty proxies all web service access through Nginx: Home Page, Grafana, VictoriaMetrics, etc., as well as other optional tools like PGWeb, Jupyter Lab, Pgadmin, Bytebase, and static resources and reports like pev, schemaspy, and pgbadger.
Most importantly, Nginx also serves as the web server for the local software repository (Yum/Apt), used to store and distribute Pigsty packages.
nginx_enabled:true# enable Nginx on this infra node?nginx_clean:false# clean existing Nginx config during init?nginx_exporter_enabled:true# enable nginx_exporter?nginx_exporter_port:9113# nginx_exporter listen portnginx_sslmode: enable # SSL mode:disable,enable,enforcenginx_cert_validity:397d # self-signed cert validitynginx_home:/www # Nginx content directory (symlink)nginx_data:/data/nginx # Nginx actual data directorynginx_users:{}# basic auth users dictionarynginx_port:80# HTTP portnginx_ssl_port:443# HTTPS portcertbot_sign:false# sign cert with certbot?certbot_email:[email protected]# certbot emailcertbot_options:''# certbot extra options
nginx_enabled
name: nginx_enabled, type: bool, level: G/I
Enable Nginx on this Infra node? Default value: true.
Nginx is a core component of Pigsty infrastructure, responsible for:
Providing local software repository service
Reverse proxying Grafana, VictoriaMetrics, and other web services
Hosting static files and reports
nginx_clean
name: nginx_clean, type: bool, level: G/A
Clean existing Nginx configuration during initialization? Default value: false.
When set to true, all existing configuration files under /etc/nginx/conf.d/ will be deleted during Nginx initialization, ensuring a clean start.
If you’re deploying for the first time or want to completely rebuild Nginx configuration, you can set this parameter to true.
Enable nginx_exporter on this infrastructure node? Default value: true.
If this option is disabled, the /nginx health check stub will also be disabled. Consider disabling this when your Nginx version doesn’t support this feature.
nginx_exporter_port
name: nginx_exporter_port, type: port, level: G
nginx_exporter listen port, default value is 9113.
nginx_exporter is used to collect Nginx operational metrics for VictoriaMetrics to scrape and monitor.
nginx_sslmode
name: nginx_sslmode, type: enum, level: G
Nginx SSL operating mode. Three options: disable, enable, enforce, default value is enable, meaning SSL is enabled but not enforced.
disable: Only listen on the port specified by nginx_port to serve HTTP requests.
enable: Also listen on the port specified by nginx_ssl_port to serve HTTPS requests.
enforce: All links will be rendered to use https:// by default
Also redirect port 80 to port 443 for non-default servers in infra_portal
nginx_cert_validity
name: nginx_cert_validity, type: duration, level: G
Nginx self-signed certificate validity, default value is 397d (approximately 13 months).
Modern browsers require website certificate validity to be at most 397 days, hence this default value. Setting a longer validity is not recommended, as browsers may refuse to trust such certificates.
nginx_home
name: nginx_home, type: path, level: G
Nginx server static content directory, default: /www
This is a symlink that actually points to the nginx_data directory. This directory contains static resources and software repository files.
It’s best not to modify this parameter arbitrarily. If modified, it should be consistent with the repo_home parameter.
nginx_data
name: nginx_data, type: path, level: G
Nginx actual data directory, default is /data/nginx.
This is the actual storage location for Nginx static files; nginx_home is a symlink pointing to this directory.
It’s recommended to place this directory on a data disk for easier management of large package files.
nginx_users
name: nginx_users, type: dict, level: G
Nginx Basic Authentication user dictionary, default is an empty dictionary {}.
Format is { username: password } key-value pairs, for example:
nginx_users:admin:pigstyviewer:readonly
These users can be used to protect certain Nginx endpoints that require authentication.
nginx_port
name: nginx_port, type: port, level: G
Nginx default listening port (serving HTTP), default is port 80. It’s best not to modify this parameter.
When your server’s port 80 is occupied, you can consider using another port, but you need to also modify repo_endpoint and keep node_repo_local_urls consistent with the port used here.
nginx_ssl_port
name: nginx_ssl_port, type: port, level: G
Nginx SSL default listening port, default is 443. It’s best not to modify this parameter.
certbot_sign
name: certbot_sign, type: bool, level: G/A
Use certbot to sign Nginx certificates during installation? Default value is false.
When set to true, Pigsty will use certbot to automatically apply for free SSL certificates from Let’s Encrypt during the execution of infra.yml and install.yml playbooks (in the nginx role).
For domains defined in infra_portal, if a certbot parameter is defined, Pigsty will use certbot to apply for a certificate for that domain. The certificate name will be the value of the certbot parameter. If multiple servers/domains specify the same certbot parameter, Pigsty will merge and apply for certificates for these domains, using the certbot parameter value as the certificate name.
Enabling this option requires:
The current node can be accessed through a public domain name, and DNS resolution is correctly pointed to the current node’s public IP
The current node can access the Let’s Encrypt API interface
This option is disabled by default. You can manually execute the make cert command after installation, which actually calls the rendered /etc/nginx/sign-cert script to update or apply for certificates using certbot.
certbot_email
name: certbot_email, type: string, level: G/A
Email address for receiving certificate expiration reminder emails, default value is [email protected].
When certbot_sign is set to true, it’s recommended to provide this parameter. Let’s Encrypt will send reminder emails to this address when certificates are about to expire.
certbot_options
name: certbot_options, type: string, level: G/A
Additional configuration parameters passed to certbot, default value is an empty string.
You can pass additional command-line options to certbot through this parameter, for example --dry-run, which makes certbot perform a preview and test without actually applying for certificates.
DNS
Pigsty enables DNSMASQ service on Infra nodes by default to resolve auxiliary domain names such as i.pigsty, m.pigsty, api.pigsty, etc., and optionally sss.pigsty for MinIO.
Resolution records are stored in the /etc/hosts.d/default file on Infra nodes. To use this DNS server, you must add nameserver <ip> to /etc/resolv.conf. The node_dns_servers parameter handles this.
dns_enabled:true# setup dnsmasq on this infra node?dns_port:53# DNS server listen portdns_records:# dynamic DNS records- "${admin_ip} i.pigsty"- "${admin_ip} m.pigsty supa.pigsty api.pigsty adm.pigsty cli.pigsty ddl.pigsty"
dns_enabled
name: dns_enabled, type: bool, level: G/I
Enable DNSMASQ service on this Infra node? Default value: true.
If you don’t want to use the default DNS server (e.g., you already have an external DNS server, or your provider doesn’t allow you to use a DNS server), you can set this value to false to disable it, and use node_default_etc_hosts and node_etc_hosts static resolution records instead.
dns_port
name: dns_port, type: port, level: G
DNSMASQ default listening port, default is 53. It’s not recommended to modify the default DNS service port.
dns_records
name: dns_records, type: string[], level: G
Dynamic DNS records resolved by dnsmasq, generally used to resolve auxiliary domain names to the admin node. These records are written to the /etc/hosts.d/default file on infrastructure nodes.
The ${admin_ip} placeholder is used here and will be replaced with the actual admin_ip value during deployment.
Common domain name purposes:
i.pigsty: Pigsty home page
m.pigsty: VictoriaMetrics Web UI
api.pigsty: API service
adm.pigsty: Admin service
Others customized based on actual deployment needs
VICTORIA
Pigsty v4.0 uses the VictoriaMetrics suite to replace Prometheus and Loki, providing a superior observability solution:
VictoriaMetrics: Replaces Prometheus as the time series database for storing monitoring metrics
VictoriaLogs: Replaces Loki as the log aggregation storage
VictoriaTraces: Distributed trace storage
VMAlert: Replaces Prometheus Alerting for alert rule evaluation
vmetrics_enabled:true# enable VictoriaMetrics?vmetrics_clean:false# clean data during init?vmetrics_port:8428# listen portvmetrics_scrape_interval:10s # global scrape intervalvmetrics_scrape_timeout:8s # global scrape timeoutvmetrics_options:>- -retentionPeriod=15d
-promscrape.fileSDCheckInterval=5svlogs_enabled:true# enable VictoriaLogs?vlogs_clean:false# clean data during init?vlogs_port:9428# listen portvlogs_options:>- -retentionPeriod=15d
-retention.maxDiskSpaceUsageBytes=50GiB
-insert.maxLineSizeBytes=1MB
-search.maxQueryDuration=120svtraces_enabled:true# enable VictoriaTraces?vtraces_clean:false# clean data during init?vtraces_port:10428# listen portvtraces_options:>- -retentionPeriod=15d
-retention.maxDiskSpaceUsageBytes=50GiBvmalert_enabled:true# enable VMAlert?vmalert_port:8880# listen portvmalert_options:''# extra CLI options
vmetrics_enabled
name: vmetrics_enabled, type: bool, level: G/I
Enable VictoriaMetrics on this Infra node? Default value is true.
VictoriaMetrics is the core monitoring component in Pigsty v4.0, replacing Prometheus as the time series database, responsible for:
Scraping monitoring metrics from various exporters
Storing time series data
Providing PromQL-compatible query interface
Supporting Grafana data sources
vmetrics_clean
name: vmetrics_clean, type: bool, level: G/A
Clean existing VictoriaMetrics data during initialization? Default value is false.
When set to true, existing time series data will be deleted during initialization. Use this option carefully unless you’re sure you want to rebuild monitoring data.
vmetrics_port
name: vmetrics_port, type: port, level: G
VictoriaMetrics listen port, default value is 8428.
This port is used for:
HTTP API access
Web UI access
Prometheus-compatible remote write/read
Grafana data source connections
vmetrics_scrape_interval
name: vmetrics_scrape_interval, type: interval, level: G
VictoriaMetrics global metrics scrape interval, default value is 10s.
In production environments, 10-30 seconds is a suitable scrape interval. If you need finer monitoring data granularity, you can adjust this parameter, but it will increase storage and CPU overhead.
vmetrics_scrape_timeout
name: vmetrics_scrape_timeout, type: interval, level: G
VictoriaMetrics global scrape timeout, default is 8s.
Setting a scrape timeout can effectively prevent avalanches caused by monitoring system queries. The principle is that this parameter must be less than and close to vmetrics_scrape_interval to ensure each scrape duration doesn’t exceed the scrape interval.
vmetrics_options
name: vmetrics_options, type: arg, level: G
VictoriaMetrics extra command line options, default value:
Enable VMAlert on this Infra node? Default value is true.
VMAlert is responsible for alert rule evaluation, replacing Prometheus Alerting functionality, working with Alertmanager.
vmalert_port
name: vmalert_port, type: port, level: G
VMAlert listen port, default value is 8880.
vmalert_options
name: vmalert_options, type: arg, level: G
VMAlert extra command line options, default value is an empty string.
PROMETHEUS
This section now primarily contains Blackbox Exporter and Alertmanager configuration.
Note: Pigsty v4.0 uses VictoriaMetrics to replace Prometheus. The original prometheus_* and pushgateway_* parameters have been moved to the VICTORIA section.
Enable BlackboxExporter on this Infra node? Default value is true.
BlackboxExporter sends ICMP packets to node IP addresses, VIP addresses, and PostgreSQL VIP addresses to test network connectivity. It can also perform HTTP, TCP, DNS, and other probes.
blackbox_port
name: blackbox_port, type: port, level: G
Blackbox Exporter listen port, default value is 9115.
blackbox_options
name: blackbox_options, type: arg, level: G
BlackboxExporter extra command line options, default value: empty string.
Enable AlertManager on this Infra node? Default value is true.
AlertManager is responsible for receiving alert notifications from VMAlert and performing alert grouping, inhibition, silencing, routing, and other processing.
alertmanager_port
name: alertmanager_port, type: port, level: G
AlertManager listen port, default value is 9059.
If you modify this port, ensure you update the alertmanager entry’s endpoint configuration in infra_portal accordingly (if defined).
alertmanager_options
name: alertmanager_options, type: arg, level: G
AlertManager extra command line options, default value: empty string.
exporter_metrics_path
name: exporter_metrics_path, type: path, level: G
HTTP endpoint path where monitoring exporters expose metrics, default: /metrics. Not recommended to modify this parameter.
This parameter defines the standard path for all exporters to expose monitoring metrics.
GRAFANA
Pigsty uses Grafana as the monitoring system frontend. It can also serve as a data analysis and visualization platform, or for low-code data application development and data application prototyping.
This is an idempotent playbook - repeated execution will overwrite infrastructure components on Infra nodes
To preserve historical monitoring data, set vmetrics_clean, vlogs_clean, vtraces_clean to false beforehand
Unless grafana_clean is set to false, Grafana dashboards and configuration changes will be lost
When the local software repository /www/pigsty/repo_complete exists, this playbook skips downloading software from the internet
Complete execution takes approximately 1-3 minutes, depending on machine configuration and network conditions
Available Tasks
# ca: create self-signed CA on localhost files/pki
# - ca_dir : create CA directory
# - ca_private : generate ca private key: files/pki/ca/ca.key
# - ca_cert : signing ca cert: files/pki/ca/ca.crt
#
# id: generate node identity
#
# repo: bootstrap a local yum repo from internet or offline packages
# - repo_dir : create repo directory
# - repo_check : check repo exists
# - repo_prepare : use existing repo if exists
# - repo_build : build repo from upstream if not exists
# - repo_upstream : handle upstream repo files in /etc/yum.repos.d
# - repo_remove : remove existing repo file if repo_remove == true
# - repo_add : add upstream repo files to /etc/yum.repos.d
# - repo_url_pkg : download packages from internet defined by repo_url_packages
# - repo_cache : make upstream yum cache with yum makecache
# - repo_boot_pkg : install bootstrap pkg such as createrepo_c,yum-utils,...
# - repo_pkg : download packages & dependencies from upstream repo
# - repo_create : create a local yum repo with createrepo_c & modifyrepo_c
# - repo_use : add newly built repo into /etc/yum.repos.d
# - repo_nginx : launch a nginx for repo if no nginx is serving
#
# node/haproxy/docker/monitor: setup infra node as a common node
# - node_name, node_hosts, node_resolv, node_firewall, node_ca, node_repo, node_pkg
# - node_feature, node_kernel, node_tune, node_sysctl, node_profile, node_ulimit
# - node_data, node_admin, node_timezone, node_ntp, node_crontab, node_vip
# - haproxy_install, haproxy_config, haproxy_launch, haproxy_reload
# - docker_install, docker_admin, docker_config, docker_launch, docker_image
# - haproxy_register, node_exporter, node_register, vector
#
# infra: setup infra components
# - infra_env : env_dir, env_pg, env_pgadmin, env_var
# - infra_pkg : infra_pkg_yum, infra_pkg_pip
# - infra_user : setup infra os user group
# - infra_cert : issue cert for infra components
# - dns : dns_config, dns_record, dns_launch
# - nginx : nginx_config, nginx_cert, nginx_static, nginx_launch, nginx_certbot, nginx_reload, nginx_exporter
# - victoria : vmetrics_config, vmetrics_launch, vlogs_config, vlogs_launch, vtraces_config, vtraces_launch, vmalert_config, vmalert_launch
# - alertmanager : alertmanager_config, alertmanager_launch
# - blackbox : blackbox_config, blackbox_launch
# - grafana : grafana_clean, grafana_config, grafana_launch, grafana_provision
# - infra_register : register infra components to victoria
infra-rm.yml
Remove Pigsty infrastructure from Infra nodes defined in the infra group of your configuration file.
Common subtasks include:
./infra-rm.yml # Remove the INFRA module./infra-rm.yml -t service # Stop infrastructure services on INFRA./infra-rm.yml -t data # Remove retained data on INFRA./infra-rm.yml -t package # Uninstall packages installed on INFRA
install.yml
Perform a complete one-time installation of Pigsty on all nodes.
Complete list of monitoring metrics provided by the Pigsty INFRA module
Note: Pigsty v4.0 has replaced Prometheus/Loki with VictoriaMetrics/Logs/Traces. The following metric list is still based on v3.x generation, for reference when troubleshooting older versions only. To get the latest metrics, query directly in https://p.pigsty (VMUI) or Grafana. Future versions will regenerate metric reference sheets consistent with the Victoria suite.
A metric with a constant ‘1’ value labeled by version, revision, branch, goversion from which alertmanager was built, and the goos and goarch for the build.
alertmanager_cluster_alive_messages_total
counter
ins, instance, ip, peer, job, cls
Total number of received alive messages.
alertmanager_cluster_enabled
gauge
ins, instance, ip, job, cls
Indicates whether the clustering is enabled or not.
alertmanager_cluster_failed_peers
gauge
ins, instance, ip, job, cls
Number indicating the current number of failed peers in the cluster.
alertmanager_cluster_health_score
gauge
ins, instance, ip, job, cls
Health score of the cluster. Lower values are better and zero means ’totally healthy’.
alertmanager_cluster_members
gauge
ins, instance, ip, job, cls
Number indicating current number of members in cluster.
alertmanager_cluster_messages_pruned_total
counter
ins, instance, ip, job, cls
Total number of cluster messages pruned.
alertmanager_cluster_messages_queued
gauge
ins, instance, ip, job, cls
Number of cluster messages which are queued.
alertmanager_cluster_messages_received_size_total
counter
ins, instance, ip, msg_type, job, cls
Total size of cluster messages received.
alertmanager_cluster_messages_received_total
counter
ins, instance, ip, msg_type, job, cls
Total number of cluster messages received.
alertmanager_cluster_messages_sent_size_total
counter
ins, instance, ip, msg_type, job, cls
Total size of cluster messages sent.
alertmanager_cluster_messages_sent_total
counter
ins, instance, ip, msg_type, job, cls
Total number of cluster messages sent.
alertmanager_cluster_peer_info
gauge
ins, instance, ip, peer, job, cls
A metric with a constant ‘1’ value labeled by peer name.
alertmanager_cluster_peers_joined_total
counter
ins, instance, ip, job, cls
A counter of the number of peers that have joined.
alertmanager_cluster_peers_left_total
counter
ins, instance, ip, job, cls
A counter of the number of peers that have left.
alertmanager_cluster_peers_update_total
counter
ins, instance, ip, job, cls
A counter of the number of peers that have updated metadata.
alertmanager_cluster_reconnections_failed_total
counter
ins, instance, ip, job, cls
A counter of the number of failed cluster peer reconnection attempts.
alertmanager_cluster_reconnections_total
counter
ins, instance, ip, job, cls
A counter of the number of cluster peer reconnections.
alertmanager_cluster_refresh_join_failed_total
counter
ins, instance, ip, job, cls
A counter of the number of failed cluster peer joined attempts via refresh.
alertmanager_cluster_refresh_join_total
counter
ins, instance, ip, job, cls
A counter of the number of cluster peer joined via refresh.
alertmanager_config_hash
gauge
ins, instance, ip, job, cls
Hash of the currently loaded alertmanager configuration.
A metric with a constant ‘1’ value labeled by version, revision, branch, goversion from which blackbox_exporter was built, and the goos and goarch for the build.
Number of schedulers this frontend is connected to.
cortex_query_frontend_queries_in_progress
gauge
ins, instance, ip, job, cls
Number of queries in progress handled by this frontend.
cortex_query_frontend_retries_bucket
Unknown
ins, instance, ip, le, job, cls
N/A
cortex_query_frontend_retries_count
Unknown
ins, instance, ip, job, cls
N/A
cortex_query_frontend_retries_sum
Unknown
ins, instance, ip, job, cls
N/A
cortex_query_scheduler_connected_frontend_clients
gauge
ins, instance, ip, job, cls
Number of query-frontend worker clients currently connected to the query-scheduler.
cortex_query_scheduler_connected_querier_clients
gauge
ins, instance, ip, job, cls
Number of querier worker clients currently connected to the query-scheduler.
cortex_query_scheduler_inflight_requests
summary
ins, instance, ip, job, cls, quantile
Number of inflight requests (either queued or processing) sampled at a regular interval. Quantile buckets keep track of inflight requests over the last 60s.
A summary of the pause duration of garbage collection cycles.
go_gc_duration_seconds_count
Unknown
ins, instance, ip, job, cls
N/A
go_gc_duration_seconds_sum
Unknown
ins, instance, ip, job, cls
N/A
go_gc_gogc_percent
gauge
ins, instance, ip, job, cls
Heap size target percentage configured by the user, otherwise 100. This value is set by the GOGC environment variable, and the runtime/debug.SetGCPercent function.
go_gc_gomemlimit_bytes
gauge
ins, instance, ip, job, cls
Go runtime memory limit configured by the user, otherwise math.MaxInt64. This value is set by the GOMEMLIMIT environment variable, and the runtime/debug.SetMemoryLimit function.
go_gc_heap_allocs_by_size_bytes_bucket
Unknown
ins, instance, ip, le, job, cls
N/A
go_gc_heap_allocs_by_size_bytes_count
Unknown
ins, instance, ip, job, cls
N/A
go_gc_heap_allocs_by_size_bytes_sum
Unknown
ins, instance, ip, job, cls
N/A
go_gc_heap_allocs_bytes_total
Unknown
ins, instance, ip, job, cls
N/A
go_gc_heap_allocs_objects_total
Unknown
ins, instance, ip, job, cls
N/A
go_gc_heap_frees_by_size_bytes_bucket
Unknown
ins, instance, ip, le, job, cls
N/A
go_gc_heap_frees_by_size_bytes_count
Unknown
ins, instance, ip, job, cls
N/A
go_gc_heap_frees_by_size_bytes_sum
Unknown
ins, instance, ip, job, cls
N/A
go_gc_heap_frees_bytes_total
Unknown
ins, instance, ip, job, cls
N/A
go_gc_heap_frees_objects_total
Unknown
ins, instance, ip, job, cls
N/A
go_gc_heap_goal_bytes
gauge
ins, instance, ip, job, cls
Heap size target for the end of the GC cycle.
go_gc_heap_live_bytes
gauge
ins, instance, ip, job, cls
Heap memory occupied by live objects that were marked by the previous GC.
go_gc_heap_objects_objects
gauge
ins, instance, ip, job, cls
Number of objects, live or unswept, occupying heap memory.
go_gc_heap_tiny_allocs_objects_total
Unknown
ins, instance, ip, job, cls
N/A
go_gc_limiter_last_enabled_gc_cycle
gauge
ins, instance, ip, job, cls
GC cycle the last time the GC CPU limiter was enabled. This metric is useful for diagnosing the root cause of an out-of-memory error, because the limiter trades memory for CPU time when the GC’s CPU time gets too high. This is most likely to occur with use of SetMemoryLimit. The first GC cycle is cycle 1, so a value of 0 indicates that it was never enabled.
go_gc_pauses_seconds_bucket
Unknown
ins, instance, ip, le, job, cls
N/A
go_gc_pauses_seconds_count
Unknown
ins, instance, ip, job, cls
N/A
go_gc_pauses_seconds_sum
Unknown
ins, instance, ip, job, cls
N/A
go_gc_scan_globals_bytes
gauge
ins, instance, ip, job, cls
The total amount of global variable space that is scannable.
go_gc_scan_heap_bytes
gauge
ins, instance, ip, job, cls
The total amount of heap space that is scannable.
go_gc_scan_stack_bytes
gauge
ins, instance, ip, job, cls
The number of bytes of stack that were scanned last GC cycle.
go_gc_scan_total_bytes
gauge
ins, instance, ip, job, cls
The total amount space that is scannable. Sum of all metrics in /gc/scan.
Memory that is completely free and eligible to be returned to the underlying system, but has not been. This metric is the runtime’s estimate of free address space that is backed by physical memory.
go_memory_classes_heap_objects_bytes
gauge
ins, instance, ip, job, cls
Memory occupied by live objects and dead objects that have not yet been marked free by the garbage collector.
go_memory_classes_heap_released_bytes
gauge
ins, instance, ip, job, cls
Memory that is completely free and has been returned to the underlying system. This metric is the runtime’s estimate of free address space that is still mapped into the process, but is not backed by physical memory.
go_memory_classes_heap_stacks_bytes
gauge
ins, instance, ip, job, cls
Memory allocated from the heap that is reserved for stack space, whether or not it is currently in-use. Currently, this represents all stack memory for goroutines. It also includes all OS thread stacks in non-cgo programs. Note that stacks may be allocated differently in the future, and this may change.
go_memory_classes_heap_unused_bytes
gauge
ins, instance, ip, job, cls
Memory that is reserved for heap objects but is not currently used to hold heap objects.
go_memory_classes_metadata_mcache_free_bytes
gauge
ins, instance, ip, job, cls
Memory that is reserved for runtime mcache structures, but not in-use.
go_memory_classes_metadata_mcache_inuse_bytes
gauge
ins, instance, ip, job, cls
Memory that is occupied by runtime mcache structures that are currently being used.
go_memory_classes_metadata_mspan_free_bytes
gauge
ins, instance, ip, job, cls
Memory that is reserved for runtime mspan structures, but not in-use.
go_memory_classes_metadata_mspan_inuse_bytes
gauge
ins, instance, ip, job, cls
Memory that is occupied by runtime mspan structures that are currently being used.
go_memory_classes_metadata_other_bytes
gauge
ins, instance, ip, job, cls
Memory that is reserved for or used to hold runtime metadata.
go_memory_classes_os_stacks_bytes
gauge
ins, instance, ip, job, cls
Stack memory allocated by the underlying operating system. In non-cgo programs this metric is currently zero. This may change in the future.In cgo programs this metric includes OS thread stacks allocated directly from the OS. Currently, this only accounts for one stack in c-shared and c-archive build modes, and other sources of stacks from the OS are not measured. This too may change in the future.
go_memory_classes_other_bytes
gauge
ins, instance, ip, job, cls
Memory used by execution trace buffers, structures for debugging the runtime, finalizer and profiler specials, and more.
go_memory_classes_profiling_buckets_bytes
gauge
ins, instance, ip, job, cls
Memory that is used by the stack trace hash map used for profiling.
go_memory_classes_total_bytes
gauge
ins, instance, ip, job, cls
All memory mapped by the Go runtime into the current process as read-write. Note that this does not include memory mapped by code called via cgo or via the syscall package. Sum of all metrics in /memory/classes.
go_memstats_alloc_bytes
counter
ins, instance, ip, job, cls
Total number of bytes allocated, even if freed.
go_memstats_alloc_bytes_total
counter
ins, instance, ip, job, cls
Total number of bytes allocated, even if freed.
go_memstats_buck_hash_sys_bytes
gauge
ins, instance, ip, job, cls
Number of bytes used by the profiling bucket hash table.
go_memstats_frees_total
counter
ins, instance, ip, job, cls
Total number of frees.
go_memstats_gc_sys_bytes
gauge
ins, instance, ip, job, cls
Number of bytes used for garbage collection system metadata.
go_memstats_heap_alloc_bytes
gauge
ins, instance, ip, job, cls
Number of heap bytes allocated and still in use.
go_memstats_heap_idle_bytes
gauge
ins, instance, ip, job, cls
Number of heap bytes waiting to be used.
go_memstats_heap_inuse_bytes
gauge
ins, instance, ip, job, cls
Number of heap bytes that are in use.
go_memstats_heap_objects
gauge
ins, instance, ip, job, cls
Number of allocated objects.
go_memstats_heap_released_bytes
gauge
ins, instance, ip, job, cls
Number of heap bytes released to OS.
go_memstats_heap_sys_bytes
gauge
ins, instance, ip, job, cls
Number of heap bytes obtained from system.
go_memstats_last_gc_time_seconds
gauge
ins, instance, ip, job, cls
Number of seconds since 1970 of last garbage collection.
go_memstats_lookups_total
counter
ins, instance, ip, job, cls
Total number of pointer lookups.
go_memstats_mallocs_total
counter
ins, instance, ip, job, cls
Total number of mallocs.
go_memstats_mcache_inuse_bytes
gauge
ins, instance, ip, job, cls
Number of bytes in use by mcache structures.
go_memstats_mcache_sys_bytes
gauge
ins, instance, ip, job, cls
Number of bytes used for mcache structures obtained from system.
go_memstats_mspan_inuse_bytes
gauge
ins, instance, ip, job, cls
Number of bytes in use by mspan structures.
go_memstats_mspan_sys_bytes
gauge
ins, instance, ip, job, cls
Number of bytes used for mspan structures obtained from system.
go_memstats_next_gc_bytes
gauge
ins, instance, ip, job, cls
Number of heap bytes when next garbage collection will take place.
go_memstats_other_sys_bytes
gauge
ins, instance, ip, job, cls
Number of bytes used for other system allocations.
go_memstats_stack_inuse_bytes
gauge
ins, instance, ip, job, cls
Number of bytes in use by the stack allocator.
go_memstats_stack_sys_bytes
gauge
ins, instance, ip, job, cls
Number of bytes obtained from system for stack allocator.
go_memstats_sys_bytes
gauge
ins, instance, ip, job, cls
Number of bytes obtained from system.
go_sched_gomaxprocs_threads
gauge
ins, instance, ip, job, cls
The current runtime.GOMAXPROCS setting, or the number of operating system threads that can execute user-level Go code simultaneously.
go_sched_goroutines_goroutines
gauge
ins, instance, ip, job, cls
Count of live goroutines.
go_sched_latencies_seconds_bucket
Unknown
ins, instance, ip, le, job, cls
N/A
go_sched_latencies_seconds_count
Unknown
ins, instance, ip, job, cls
N/A
go_sched_latencies_seconds_sum
Unknown
ins, instance, ip, job, cls
N/A
go_sql_stats_connections_blocked_seconds
unknown
ins, instance, db_name, ip, job, cls
The total time blocked waiting for a new connection.
go_sql_stats_connections_closed_max_idle
unknown
ins, instance, db_name, ip, job, cls
The total number of connections closed due to SetMaxIdleConns.
go_sql_stats_connections_closed_max_idle_time
unknown
ins, instance, db_name, ip, job, cls
The total number of connections closed due to SetConnMaxIdleTime.
go_sql_stats_connections_closed_max_lifetime
unknown
ins, instance, db_name, ip, job, cls
The total number of connections closed due to SetConnMaxLifetime.
go_sql_stats_connections_idle
gauge
ins, instance, db_name, ip, job, cls
The number of idle connections.
go_sql_stats_connections_in_use
gauge
ins, instance, db_name, ip, job, cls
The number of connections currently in use.
go_sql_stats_connections_max_open
gauge
ins, instance, db_name, ip, job, cls
Maximum number of open connections to the database.
go_sql_stats_connections_open
gauge
ins, instance, db_name, ip, job, cls
The number of established connections both in use and idle.
A metric with a constant ‘1’ value labeled by version, revision, branch, goversion from which nginx_exporter was built, and the goos and goarch for the build.
nginx_http_requests_total
counter
ins, instance, ip, job, cls
Total http requests
nginx_up
gauge
ins, instance, ip, job, cls
Status of the last metric scrape
plugins_active_instances
gauge
ins, instance, ip, job, cls
The number of active plugin instances
plugins_datasource_instances_total
Unknown
ins, instance, ip, job, cls
N/A
process_cpu_seconds_total
counter
ins, instance, ip, job, cls
Total user and system CPU time spent in seconds.
process_max_fds
gauge
ins, instance, ip, job, cls
Maximum number of open file descriptors.
process_open_fds
gauge
ins, instance, ip, job, cls
Number of open file descriptors.
process_resident_memory_bytes
gauge
ins, instance, ip, job, cls
Resident memory size in bytes.
process_start_time_seconds
gauge
ins, instance, ip, job, cls
Start time of the process since unix epoch in seconds.
process_virtual_memory_bytes
gauge
ins, instance, ip, job, cls
Virtual memory size in bytes.
process_virtual_memory_max_bytes
gauge
ins, instance, ip, job, cls
Maximum amount of virtual memory available in bytes.
prometheus_api_remote_read_queries
gauge
ins, instance, ip, job, cls
The current number of remote read queries being executed or waiting.
A metric with a constant ‘1’ value labeled by version, revision, branch, goversion from which prometheus was built, and the goos and goarch for the build.
The timestamp of the oldest exemplar stored in circular storage. Useful to check for what timerange the current exemplar buffer limit allows. This usually means the last timestampfor all exemplars for a typical setup. This is not true though if one of the series timestamp is in future compared to rest series.
prometheus_tsdb_exemplar_max_exemplars
gauge
ins, instance, ip, job, cls
Total number of exemplars the exemplar storage can store, resizeable.
A metric with a constant ‘1’ value labeled by version, revision, branch, goversion from which pushgateway was built, and the goos and goarch for the build.
A metric with a constant ‘1’ value labeled by version, revision, branch, goversion from which pushgateway was built, and the goos and goarch for the build.
pushgateway_http_requests_total
counter
job, cls, method, code, handler, instance, ins, ip
Total HTTP requests processed by the Pushgateway, excluding scrapes.
scrape_duration_seconds
Unknown
job, cls, instance, ins, ip
N/A
scrape_samples_post_metric_relabeling
Unknown
job, cls, instance, ins, ip
N/A
scrape_samples_scraped
Unknown
job, cls, instance, ins, ip
N/A
scrape_series_added
Unknown
job, cls, instance, ins, ip
N/A
up
Unknown
job, cls, instance, ins, ip
N/A
11.7 - FAQ
Frequently asked questions about the Pigsty INFRA infrastructure module
What components are included in the INFRA module?
Ansible: Used for automation configuration, deployment, and daily operations.
Nginx: Exposes WebUIs like Grafana, VictoriaMetrics (VMUI), Alertmanager, and hosts local YUM/APT repositories.
Self-signed CA: Issues SSL/TLS certificates for components like Nginx, Patroni, pgBackRest.
Vector: Node-side log collector, pushes system/database logs to VictoriaLogs.
AlertManager: Aggregates and dispatches alert notifications.
Grafana: Monitoring/visualization platform with numerous preconfigured dashboards and datasources.
Chronyd: Provides NTP time synchronization.
DNSMasq: Provides DNS registration and resolution.
ETCD: Acts as PostgreSQL HA DCS (can also be deployed on dedicated cluster).
PostgreSQL: Acts as CMDB on the admin node (optional).
Docker: Runs stateless tools or applications on nodes (optional).
How to re-register monitoring targets to VictoriaMetrics?
VictoriaMetrics uses static service discovery through the /infra/targets/<job>/*.yml directory. If target files are accidentally deleted, use the following commands to re-register:
Other modules (like pg_monitor.yml, mongo.yml, mysql.yml) also provide corresponding *_register tags that can be executed as needed.
How to re-register PostgreSQL datasources to Grafana?
PGSQL databases defined in pg_databases are registered as Grafana datasources by default (for use by PGCAT applications).
If you accidentally delete postgres datasources registered in Grafana, you can register them again using the following command:
# Register all pgsql databases (defined in pg_databases) as grafana datasources./pgsql.yml -t register_grafana
How to re-register node HAProxy admin pages to Nginx?
If you accidentally delete the registered haproxy proxy settings in /etc/nginx/conf.d/haproxy, you can restore them using the following command:
./node.yml -t register_nginx # Register all haproxy admin page proxy settings to nginx on infra nodes
How to restore DNS registration records in DNSMASQ?
PGSQL cluster/instance domains are registered by default to /etc/hosts.d/<name> on infra nodes. You can restore them using the following command:
./pgsql.yml -t pg_dns # Register pg DNS names to dnsmasq on infra nodes
How to expose new upstream services via Nginx?
Although you can access services directly via IP:Port, we still recommend consolidating access entry points by using domain names and accessing various WebUI services through Nginx proxy.
This helps consolidate access, reduce exposed ports, and facilitate access control and auditing.
If you want to expose new WebUI services through the Nginx portal, you can add service definitions to the infra_portal parameter.
For example, here’s the Infra portal configuration used by Pigsty’s official demo, exposing several additional services:
After completing the Nginx upstream service definition, use the following configuration and commands to register new services to Nginx.
./infra.yml -t nginx_config # Regenerate Nginx configuration files./infra.yml -t nginx_launch # Update and apply Nginx configuration# You can also manually reload Nginx config with Ansibleansible infra -b -a 'nginx -s reload'# Reload Nginx config
If you want HTTPS access, you must delete files/pki/csr/pigsty.csr and files/pki/nginx/pigsty.{key,crt} to force regeneration of Nginx SSL/TLS certificates to include new upstream domains.
If you want to use certificates issued by an authoritative CA instead of Pigsty self-signed CA certificates, you can place them in the /etc/nginx/conf.d/cert/ directory and modify the corresponding configuration: /etc/nginx/conf.d/<name>.conf.
How to manually add upstream repo files to nodes?
Pigsty has a built-in wrapper script bin/repo-add that calls the ansible playbook node.yml to add repo files to corresponding nodes.
bin/repo-add <selector> [modules]bin/repo-add 10.10.10.10 # Add node repo for node 10.10.10.10bin/repo-add infra node,infra # Add node and infra repos for infra groupbin/repo-add infra node,local # Add node repo and local pigsty repo for infra groupbin/repo-add pg-test node,pgsql # Add node and pgsql repos for pg-test group
11.8 - Administration
Infrastructure components and INFRA cluster administration SOP: create, destroy, scale out, scale in, certificates, repositories…
This section covers daily administration and operations for Pigsty deployments.
Create INFRA Module
Use infra.yml playbook to install INFRA module on infra group:
./infra.yml # Install INFRA module on infra group
Uninstall INFRA Module
Use dedicated infra-rm.yml playbook to remove INFRA module from infra group:
./infra-rm.yml # Remove INFRA module from infra group
Manage Local Repository
Pigsty includes local yum/apt repo for software packages. Manage repo configuration:
Ansible is installed by default on all INFRA nodes and can be used to manage the entire deployment.
Pigsty implements automation based on Ansible, following the Infrastructure-as-Code philosophy.
Ansible knowledge is useful for managing databases and infrastructure, but not required. You only need to know how to execute Playbooks - YAML files that define a series of automated tasks.
Installation
Pigsty automatically installs ansible and its dependencies during the bootstrap process.
For manual installation, use the following commands:
To run a playbook, simply execute ./path/to/playbook.yml. Here are the most commonly used Ansible command-line parameters:
Purpose
Parameter
Description
Where
-l / --limit <pattern>
Limit target hosts/groups/patterns
What
-t / --tags <tags>
Only run tasks with specified tags
How
-e / --extra-vars <vars>
Pass extra command-line variables
Config
-i / --inventory <path>
Specify inventory file path
Limiting Hosts
Use -l|--limit <pattern> to limit execution to specific groups, hosts, or patterns:
./node.yml # Execute on all nodes./pgsql.yml -l pg-test # Only execute on pg-test cluster./pgsql.yml -l pg-* # Execute on all clusters starting with pg-./pgsql.yml -l 10.10.10.10 # Only execute on specific IP host
Running playbooks without host limits can be very dangerous! By default, most playbooks execute on all hosts. Use with caution!
Limiting Tasks
Use -t|--tags <tags> to only execute task subsets with specified tags:
./infra.yml -t repo # Only execute tasks to create local repo./infra.yml -t repo_upstream # Only execute tasks to add upstream repos./node.yml -t node_pkg # Only execute tasks to install node packages./pgsql.yml -t pg_hba # Only execute tasks to render pg_hba.conf
Passing Variables
Use -e|--extra-vars <key=value> to override variables at runtime:
./pgsql.yml -e pg_clean=true# Force clean existing PG instances./pgsql-rm.yml -e pg_rm_pkg=false# Keep packages when uninstalling./node.yml -e '{"node_tune":"tiny"}'# Pass variables in JSON format./pgsql.yml -e @/path/to/config.yml # Load variables from YAML file
Specifying Inventory
By default, Ansible uses pigsty.yml in the current directory as the inventory.
Use -i|--inventory <path> to specify a different config file:
./pgsql.yml -i files/pigsty/full.yml -l pg-test
[!NOTE]
To permanently change the default config file path, modify the inventory parameter in ansible.cfg.
11.8.2 - Playbooks
Built-in Ansible playbooks in Pigsty
Pigsty uses idempotent Ansible playbooks for management and control. Running playbooks requires ansible-playbook to be in the system PATH; users must first install Ansible before executing playbooks.
Available Playbooks
Module
Playbook
Purpose
INFRA
install.yml
One-click Pigsty installation
INFRA
infra.yml
Initialize Pigsty infrastructure on infra nodes
INFRA
infra-rm.yml
Remove infrastructure components from infra nodes
INFRA
cache.yml
Create offline installation packages from target nodes
INFRA
cert.yml
Issue certificates using Pigsty self-signed CA
NODE
node.yml
Initialize nodes, configure to desired state
NODE
node-rm.yml
Remove nodes from Pigsty
PGSQL
pgsql.yml
Initialize HA PostgreSQL cluster, or add new replica
PGSQL
pgsql-rm.yml
Remove PostgreSQL cluster, or remove replica
PGSQL
pgsql-db.yml
Add new business database to existing cluster
PGSQL
pgsql-user.yml
Add new business user to existing cluster
PGSQL
pgsql-pitr.yml
Perform point-in-time recovery (PITR) on cluster
PGSQL
pgsql-monitor.yml
Monitor remote PostgreSQL using local exporters
PGSQL
pgsql-migration.yml
Generate migration manual and scripts for PostgreSQL
PGSQL
slim.yml
Install Pigsty with minimal components
REDIS
redis.yml
Initialize Redis cluster/node/instance
REDIS
redis-rm.yml
Remove Redis cluster/node/instance
ETCD
etcd.yml
Initialize ETCD cluster, or add new member
ETCD
etcd-rm.yml
Remove ETCD cluster, or remove existing member
MINIO
minio.yml
Initialize MinIO cluster
MINIO
minio-rm.yml
Remove MinIO cluster
DOCKER
docker.yml
Install Docker on nodes
DOCKER
app.yml
Install applications using Docker Compose
FERRET
mongo.yml
Install Mongo/FerretDB on nodes
Deployment Strategy
The install.yml playbook orchestrates specialized playbooks in the following group order for complete deployment:
infra: infra.yml (-l infra)
nodes: node.yml
etcd: etcd.yml (-l etcd)
minio: minio.yml (-l minio)
pgsql: pgsql.yml
Circular Dependency Note: There is a weak circular dependency between NODE and INFRA: to register NODE to INFRA, INFRA must already exist; while INFRA module depends on NODE to work.
The solution is to initialize infra nodes first, then add other nodes. To complete all deployment at once, use install.yml.
Safety Notes
Most playbooks are idempotent, which means some deployment playbooks may wipe existing databases and create new ones when protection options are not enabled.
Use extra caution with pgsql, minio, and infra playbooks. Read the documentation carefully and proceed with caution.
Best Practices
Read playbook documentation carefully before execution
Press Ctrl-C immediately to stop when anomalies occur
Test in non-production environments first
Use -l parameter to limit target hosts, avoiding unintended hosts
Use -t parameter to specify tags, executing only specific tasks
Dry-Run Mode
Use --check --diff options to preview changes without actually executing:
# Preview changes without execution./pgsql.yml -l pg-test --check --diff
# Check specific tasks with tags./pgsql.yml -l pg-test -t pg_config --check --diff
11.8.3 - Nginx Management
Nginx management, web portal configuration, web server, upstream services
Pigsty installs Nginx on INFRA nodes as the entry point for all web services, listening on standard ports 80/443.
In Pigsty, you can configure Nginx to provide various services through inventory:
Expose web interfaces for monitoring components like Grafana, VictoriaMetrics (VMUI), Alertmanager, and VictoriaLogs
The CA private key is critical. Back it up securely:
# Backup with timestamptar -czvf pigsty-ca-$(date +%Y%m%d).tar.gz files/pki/ca/
Warning: If you lose CA private key, all certificates signed by it become unverifiable. You’ll need to regenerate everything.
Issue Certificates
Use cert.yml to issue additional certificates signed by Pigsty CA.
Basic Usage
# Issue certificate for database user (client cert)./cert.yml -e cn=dbuser_dba
# Issue certificate for monitor user./cert.yml -e cn=dbuser_monitor
Certificates generated in files/pki/misc/<cn>.{key,crt} by default.
Parameters
Parameter
Default
Description
cn
pigsty
Common Name (required)
san
[DNS:localhost, IP:127.0.0.1]
Subject Alternative Names
org
pigsty
Organization name
unit
pigsty
Organizational unit name
expire
7300d
Certificate validity (20 years)
key
files/pki/misc/<cn>.key
Private key output path
crt
files/pki/misc/<cn>.crt
Certificate output path
Advanced Examples
# Issue certificate with custom SAN (DNS and IP)./cert.yml -e cn=myservice -e san=DNS:myservice,IP:10.2.82.163
(File has more lines. Use ‘offset’ parameter to read beyond line 130)
12 - Module: NODE
Tune nodes into the desired state and monitor it, manage node, VIP, HAProxy, and exporters.
Tune nodes into the desired state and monitor it, manage node, VIP, HAProxy, and exporters.
12.1 - Configuration
Configure node identity, cluster, and identity borrowing from PostgreSQL
Pigsty uses IP address as the unique identifier for nodes. This IP should be the internal IP address on which the database instance listens and provides external services.
This IP address must be the address on which the database instance listens and provides external services, but should not be a public IP address. That said, you don’t necessarily have to connect to the database via this IP. For example, managing target nodes indirectly through SSH tunnels or jump hosts is also feasible. However, when identifying database nodes, the primary IPv4 address remains the node’s core identifier. This is critical, and you should ensure this during configuration.
The IP address is the inventory_hostname in the inventory, represented as the key in the <cluster>.hosts object. In addition, each node has two optional identity parameters:
The parameters nodename and node_cluster are optional. If not provided, the node’s existing hostname and the fixed value nodes will be used as defaults. In Pigsty’s monitoring system, these two will be used as the node’s cluster identifier (cls) and instance identifier (ins).
For PGSQL nodes, because Pigsty defaults to a 1:1 exclusive deployment of PG to node, you can use the node_id_from_pg parameter to borrow the PostgreSQL instance’s identity parameters (pg_cluster and pg_seq) for the node’s ins and cls labels. This allows database and node monitoring metrics to share the same labels for cross-analysis.
#nodename: # [instance] # node instance identity, uses existing hostname if missing, optionalnode_cluster:nodes # [cluster]# node cluster identity, uses 'nodes' if missing, optionalnodename_overwrite:true# overwrite node's hostname with nodename?nodename_exchange:false# exchange nodename among play hosts?node_id_from_pg:true# borrow postgres identity as node identity if applicable?
You can also configure rich functionality for host clusters. For example, use HAProxy on the node cluster for load balancing and service exposure, or bind an L2 VIP to the cluster.
12.2 - Parameters
NODE module provides 11 sections with 83 parameters
The NODE module tunes target nodes into the desired state and integrates them into the Pigsty monitoring system.
Each node has identity parameters that are configured through the parameters in <cluster>.hosts and <cluster>.vars.
Pigsty uses IP address as the unique identifier for database nodes. This IP address must be the one that the database instance listens on and provides services, but should not be a public IP address.
However, users don’t have to connect to the database via this IP address. For example, managing target nodes indirectly through SSH tunnels or jump servers is feasible.
When identifying database nodes, the primary IPv4 address remains the core identifier. This is very important, and users should ensure this when configuring.
The IP address is the inventory_hostname in the inventory, which is the key of the <cluster>.hosts object.
In addition, nodes have two important identity parameters in the Pigsty monitoring system: nodename and node_cluster, which are used as the instance identity (ins) and cluster identity (cls) in the monitoring system.
When executing the default PostgreSQL deployment, since Pigsty uses exclusive 1:1 deployment by default, you can borrow the database instance’s identity parameters (pg_cluster) to the node’s ins and cls labels through the node_id_from_pg parameter.
#nodename: # [instance] # node instance identity, use hostname if missing, optionalnode_cluster:nodes # [cluster]# node cluster identity, use 'nodes' if missing, optionalnodename_overwrite:true# overwrite node's hostname with nodename?nodename_exchange:false# exchange nodename among play hosts?node_id_from_pg:true# use postgres identity as node identity if applicable?
nodename
name: nodename, type: string, level: I
Node instance identity parameter. If not explicitly set, the existing hostname will be used as the node name. This parameter is optional since it has a reasonable default value.
If node_id_from_pg is enabled (default), and nodename is not explicitly specified, nodename will try to use ${pg_cluster}-${pg_seq} as the instance identity. If the PGSQL module is not defined on this cluster, it will fall back to the default, which is the node’s HOSTNAME.
node_cluster
name: node_cluster, type: string, level: C
This option allows explicitly specifying a cluster name for the node, which is only meaningful when defined at the node cluster level. Using the default empty value will use the fixed value nodes as the node cluster identity.
If node_id_from_pg is enabled (default), and node_cluster is not explicitly specified, node_cluster will try to use ${pg_cluster} as the cluster identity. If the PGSQL module is not defined on this cluster, it will fall back to the default nodes.
nodename_overwrite
name: nodename_overwrite, type: bool, level: C
Overwrite node’s hostname with nodename? Default is true. In this case, if you set a non-empty nodename, it will be used as the current host’s HOSTNAME.
When nodename is empty, if node_id_from_pg is true (default), Pigsty will try to borrow the identity parameters of the PostgreSQL instance defined 1:1 on the node as the node name, i.e., {{ pg_cluster }}-{{ pg_seq }}. If the PGSQL module is not installed on this node, it will fall back to not doing anything.
Therefore, if you leave nodename empty and don’t enable node_id_from_pg, Pigsty will not make any changes to the existing hostname.
nodename_exchange
name: nodename_exchange, type: bool, level: C
Exchange nodename among play hosts? Default is false.
When enabled, nodes executing the node.yml playbook in the same batch will exchange node names with each other, writing them to /etc/hosts.
node_id_from_pg
name: node_id_from_pg, type: bool, level: C
Borrow identity parameters from the PostgreSQL instance/cluster deployed 1:1 on the node? Default is true.
PostgreSQL instances and nodes in Pigsty use 1:1 deployment by default, so you can “borrow” identity parameters from the database instance.
This parameter is enabled by default, meaning that if a PostgreSQL cluster has no special configuration, the host node cluster and instance identity parameters will default to matching the database identity parameters. This provides extra convenience for problem analysis and monitoring data processing.
NODE_DNS
Pigsty configures static DNS records and dynamic DNS servers for nodes.
If your node provider has already configured DNS servers for you, you can set node_dns_method to none to skip DNS setup.
node_write_etc_hosts:true# modify `/etc/hosts` on target node?node_default_etc_hosts:# static dns records in `/etc/hosts`- "${admin_ip} i.pigsty"node_etc_hosts:[]# extra static dns records in `/etc/hosts`node_dns_method: add # how to handle dns servers:add,none,overwritenode_dns_servers:['${admin_ip}']# dynamic nameserver in `/etc/resolv.conf`node_dns_options:# dns resolv options in `/etc/resolv.conf`- options single-request-reopen timeout:1
Modify /etc/hosts on target node? For example, in container environments, this file usually cannot be modified.
node_default_etc_hosts
name: node_default_etc_hosts, type: string[], level: G
Static DNS records to be written to all nodes’ /etc/hosts. Default value:
["${admin_ip} i.pigsty"]
node_default_etc_hosts is an array. Each element is a DNS record with format <ip> <name>. You can specify multiple domain names separated by spaces.
This parameter is used to configure global static DNS records. If you want to configure specific static DNS records for individual clusters and instances, use the node_etc_hosts parameter.
node_etc_hosts
name: node_etc_hosts, type: string[], level: C
Extra static DNS records to write to node’s /etc/hosts. Default is [] (empty array).
Same format as node_default_etc_hosts, but suitable for configuration at the cluster/instance level.
node_dns_method
name: node_dns_method, type: enum, level: C
How to configure DNS servers? Three options: add, none, overwrite. Default is add.
add: Append the records in node_dns_servers to /etc/resolv.conf and keep existing DNS servers. (default)
overwrite: Overwrite /etc/resolv.conf with the records in node_dns_servers
none: Skip DNS server configuration. If your environment already has DNS servers configured, you can skip DNS configuration directly.
node_dns_servers
name: node_dns_servers, type: string[], level: C
Configure the dynamic DNS server list in /etc/resolv.conf. Default is ["${admin_ip}"], using the admin node as the primary DNS server.
node_dns_options
name: node_dns_options, type: string[], level: C
DNS resolution options in /etc/resolv.conf. Default value:
- "options single-request-reopen timeout:1"
If node_dns_method is configured as add or overwrite, the records in this configuration will be written to /etc/resolv.conf first. Refer to Linux documentation for /etc/resolv.conf format details.
NODE_PACKAGE
Pigsty configures software repositories and installs packages on managed nodes.
node_repo_modules:local # upstream repo to be added on node, local by default.node_repo_remove:true# remove existing repo on node?node_packages:[openssh-server] # packages to be installed current nodes with latest version#node_default_packages: # default packages to be installed on all nodes
node_repo_modules
name: node_repo_modules, type: string, level: C/A
List of software repository modules to be added on the node, same format as repo_modules. Default is local, using the local software repository specified in repo_upstream.
When Pigsty manages nodes, it filters entries in repo_upstream based on this parameter value. Only entries whose module field matches this parameter value will be added to the node’s software sources.
node_repo_remove
name: node_repo_remove, type: bool, level: C/A
Remove existing software repository definitions on the node? Default is true.
When enabled, Pigsty will remove existing configuration files in /etc/yum.repos.d on the node and back them up to /etc/yum.repos.d/backup.
On Debian/Ubuntu systems, it backs up /etc/apt/sources.list(.d) to /etc/apt/backup.
node_packages
name: node_packages, type: string[], level: C
List of software packages to install and upgrade on the current node. Default is [openssh-server], which upgrades sshd to the latest version during installation (to avoid security vulnerabilities).
Each array element is a string of comma-separated package names. Same format as node_default_packages. This parameter is usually used to specify additional packages to install at the node/cluster level.
Packages specified in this parameter will be upgraded to the latest available version. If you need to keep existing node software versions unchanged (just ensure they exist), use the node_default_packages parameter.
node_default_packages
name: node_default_packages, type: string[], level: G
Default packages to be installed on all nodes. Default value is a common RPM package list for EL 7/8/9. Array where each element is a space-separated package list string.
Packages specified in this variable only require existence, not latest. If you need to install the latest version, use the node_packages parameter.
This parameter has no default value (undefined state). If users don’t explicitly specify this parameter in the configuration file, Pigsty will load default values from the node_packages_default variable defined in roles/node_id/vars based on the current node’s OS family.
Same format as node_packages, but this parameter is usually used to specify default packages that must be installed on all nodes at the global level.
NODE_TUNE
Host node features, kernel modules, and tuning templates.
node_disable_numa:false# disable node numa, reboot requirednode_disable_swap:false# disable node swap, use with cautionnode_static_network:true# preserve dns resolver settings after rebootnode_disk_prefetch:false# setup disk prefetch on HDD to increase performancenode_kernel_modules:[softdog, ip_vs, ip_vs_rr, ip_vs_wrr, ip_vs_sh ]node_hugepage_count:0# number of 2MB hugepage, take precedence over rationode_hugepage_ratio:0# node mem hugepage ratio, 0 disable it by defaultnode_overcommit_ratio:0# node mem overcommit ratio, 0 disable it by defaultnode_tune: oltp # node tuned profile:none,oltp,olap,crit,tinynode_sysctl_params:{}# sysctl parameters in k:v format in addition to tuned
node_disable_numa
name: node_disable_numa, type: bool, level: C
Disable NUMA? Default is false (NUMA not disabled).
Note that disabling NUMA requires a machine reboot to take effect! If you don’t know how to set CPU affinity, it’s recommended to disable NUMA when using databases in production environments.
node_disable_swap
name: node_disable_swap, type: bool, level: C
Disable SWAP? Default is false (SWAP not disabled).
Disabling SWAP is generally not recommended. The exception is if you have enough memory for exclusive PostgreSQL deployment, you can disable SWAP to improve performance.
Exception: SWAP should be disabled when your node is used for Kubernetes deployments.
node_static_network
name: node_static_network, type: bool, level: C
Use static DNS servers? Default is true (enabled).
Enabling static networking means your DNS Resolv configuration won’t be overwritten by machine reboots or NIC changes. Recommended to enable, or have network engineers handle the configuration.
node_disk_prefetch
name: node_disk_prefetch, type: bool, level: C
Enable disk prefetch? Default is false (not enabled).
Can optimize performance for HDD-deployed instances. Recommended to enable when using mechanical hard drives.
node_kernel_modules
name: node_kernel_modules, type: string[], level: C
Which kernel modules to enable? Default enables the following kernel modules:
An array of kernel module names declaring the kernel modules that need to be installed on the node.
node_hugepage_count
name: node_hugepage_count, type: int, level: C
Number of 2MB hugepages to allocate on the node. Default is 0. Related parameter is node_hugepage_ratio.
If both node_hugepage_count and node_hugepage_ratio are 0 (default), hugepages will be completely disabled. This parameter has higher priority than node_hugepage_ratio because it’s more precise.
If a non-zero value is set, it will be written to /etc/sysctl.d/hugepage.conf to take effect. Negative values won’t work, and numbers higher than 90% of node memory will be capped at 90% of node memory.
If not zero, it should be slightly larger than the corresponding pg_shared_buffer_ratio value so PostgreSQL can use hugepages.
node_hugepage_ratio
name: node_hugepage_ratio, type: float, level: C
Ratio of node memory for hugepages. Default is 0. Valid range: 0 ~ 0.40.
This memory ratio will be allocated as hugepages and reserved for PostgreSQL. node_hugepage_count is the higher priority and more precise version of this parameter.
Default: 0, which sets vm.nr_hugepages=0 and completely disables hugepages.
This parameter should equal or be slightly larger than pg_shared_buffer_ratio if not zero.
For example, if you allocate 25% of memory for Postgres shared buffers by default, you can set this value to 0.27 ~ 0.30, and use /pg/bin/pg-tune-hugepage after initialization to precisely reclaim wasted hugepages.
node_overcommit_ratio
name: node_overcommit_ratio, type: int, level: C
Node memory overcommit ratio. Default is 0. This is an integer from 0 to 100+.
Default: 0, which sets vm.overcommit_memory=0. Otherwise, vm.overcommit_memory=2 will be used with this value as vm.overcommit_ratio.
Recommended to set vm.overcommit_ratio on dedicated pgsql nodes to avoid memory overcommit.
node_tune
name: node_tune, type: enum, level: C
Preset tuning profiles for machines, provided through tuned. Four preset modes:
crit: Core financial business template, optimizes dirty page count
Typically, the database tuning template pg_conf should match the machine tuning template.
node_sysctl_params
name: node_sysctl_params, type: dict, level: C
Sysctl kernel parameters in K:V format, added to the tuned profile. Default is {} (empty object).
This is a KV dictionary parameter where Key is the kernel sysctl parameter name and Value is the parameter value. You can also consider defining extra sysctl parameters directly in the tuned templates in roles/node/templates.
NODE_SEC
Node security related parameters, including SELinux and firewall configuration.
node_selinux_mode: permissive # selinux mode:disabled, permissive, enforcingnode_firewall_mode: zone # firewall mode:disabled, zone, rulesnode_firewall_intranet:# which intranet cidr considered as internal network- 10.0.0.0/8- 192.168.0.0/16- 172.16.0.0/12node_firewall_public_port:# expose these ports to public network in (zone, strict) mode- 22# enable ssh access- 80# enable http access- 443# enable https access- 5432# enable postgresql access (think twice before exposing it!)
node_selinux_mode
name: node_selinux_mode, type: enum, level: C
SELinux running mode. Default is permissive.
Options:
disabled: Completely disable SELinux (equivalent to old version’s node_disable_selinux: true)
permissive: Permissive mode, logs violations but doesn’t block (recommended, default)
If you don’t have professional OS/security experts, it’s recommended to use permissive or disabled mode.
Note that SELinux is only enabled by default on EL-based systems. If you want to enable SELinux on Debian/Ubuntu systems, you need to install and enable SELinux configuration yourself.
Also, SELinux mode changes may require a system reboot to fully take effect.
node_firewall_mode
name: node_firewall_mode, type: enum, level: C
Firewall running mode. Default is zone.
Options:
off: Turn off and disable firewall (equivalent to old version’s node_disable_firewall: true)
none: Do nothing, maintain existing firewall rules unchanged
zone: Use firewalld / ufw to configure firewall rules: trust intranet, only open specified ports to public
Uses firewalld service on EL systems, ufw service on Debian/Ubuntu systems.
If you’re deploying in a completely trusted intranet environment, or using cloud provider security groups for access control, you can choose none mode to keep existing firewall configuration, or set to off to completely disable the firewall.
This parameter defines IP address ranges considered as “internal network”. Traffic from these networks will be allowed to access all service ports without separate open rules.
Hosts within these CIDR ranges will be treated as trusted intranet hosts with more relaxed firewall rules. Also, in PG/PGB HBA rules, the intranet ranges defined here will be treated as “intranet”.
node_firewall_public_port
name: node_firewall_public_port, type: port[], level: C
Public exposed port list. Default is [22, 80, 443, 5432].
This parameter defines ports exposed to public network (non-intranet CIDR). Default exposed ports include:
22: SSH service port
80: HTTP service port
443: HTTPS service port
5432: PostgreSQL database port
You can adjust this list according to actual needs. For example, if you don’t need to expose the database port externally, remove 5432:
node_firewall_public_port:[22,80,443]
PostgreSQL default security policy in Pigsty only allows administrators to access the database port from public networks.
If you want other users to access the database from public networks, make sure to correctly configure corresponding access permissions in PG/PGB HBA rules.
If you want to expose other service ports to public networks, you can also add them to this list.
If you want to tighten firewall rules, you can remove the 5432 database port to ensure only truly needed service ports are exposed.
Note that this parameter only takes effect when node_firewall_mode is set to zone.
NODE_ADMIN
This section is about administrators on host nodes - who can log in and how.
node_data:/data # node main data directory, `/data` by defaultnode_admin_enabled:true# create a admin user on target node?node_admin_uid:88# uid and gid for node admin usernode_admin_username:dba # name of node admin user, `dba` by defaultnode_admin_sudo: nopass # admin user's sudo privilege:limited, nopass, all, nonenode_admin_ssh_exchange:true# exchange admin ssh key among node clusternode_admin_pk_current:true# add current user's ssh pk to admin authorized_keysnode_admin_pk_list:[]# ssh public keys to be added to admin usernode_aliases:{}# alias name -> IP address dict for `/etc/hosts`
node_data
name: node_data, type: path, level: C
Node’s main data directory. Default is /data.
If this directory doesn’t exist, it will be created. This directory should be owned by root with 777 permissions.
node_admin_enabled
name: node_admin_enabled, type: bool, level: C
Create a dedicated admin user on this node? Default is true.
Pigsty creates an admin user on each node by default (with password-free sudo and ssh). The default admin is named dba (uid=88), which can access other nodes in the environment from the admin node via password-free SSH and execute password-free sudo.
node_admin_uid
name: node_admin_uid, type: int, level: C
Admin user UID. Default is 88.
Please ensure the UID is the same across all nodes whenever possible to avoid unnecessary permission issues.
If the default UID 88 is already taken, you can choose another UID. Be careful about UID namespace conflicts when manually assigning.
node_admin_username
name: node_admin_username, type: username, level: C
Admin username. Default is dba.
node_admin_sudo
name: node_admin_sudo, type: enum, level: C
Admin user’s sudo privilege level. Default is nopass (password-free sudo).
Options:
none: No sudo privileges
limited: Limited sudo privileges (only allowed to execute specific commands)
nopass: Password-free sudo privileges (default, allows all commands without password)
all: Full sudo privileges (requires password)
Pigsty uses nopass mode by default, allowing admin users to execute any sudo command without password, which is very convenient for automated operations.
In production environments with high security requirements, you may need to adjust this parameter to limited or all to restrict admin privileges.
node_admin_ssh_exchange
name: node_admin_ssh_exchange, type: bool, level: C
Exchange node admin SSH keys between node clusters. Default is true.
When enabled, Pigsty will exchange SSH public keys between members during playbook execution, allowing admin node_admin_username to access each other from different nodes.
node_admin_pk_current
name: node_admin_pk_current, type: bool, level: C
Add current node & user’s public key to admin account? Default is true.
When enabled, the SSH public key (~/.ssh/id_rsa.pub) of the admin user executing this playbook on the current node will be copied to the target node admin user’s authorized_keys.
When deploying in production environments, please pay attention to this parameter, as it will install the default public key of the user currently executing the command to the admin user on all machines.
node_admin_pk_list
name: node_admin_pk_list, type: string[], level: C
List of public keys for admins who can log in. Default is [] (empty array).
Each array element is a string containing the public key to be written to the admin user’s ~/.ssh/authorized_keys. Users with the corresponding private key can log in as admin.
When deploying in production environments, please pay attention to this parameter and only add trusted keys to this list.
node_aliases
name: node_aliases, type: dict, level: C
Shell aliases to be written to host’s /etc/profile.d/node.alias.sh. Default is {} (empty dict).
This parameter allows you to configure convenient shell aliases for the host’s shell environment. The K:V dict defined here will be written to the target node’s profile.d file in the format alias k=v.
For example, the following declares an alias named dp for quickly executing docker compose pull:
node_alias:dp:'docker compose pull'
NODE_TIME
Configuration related to host time/timezone/NTP/scheduled tasks.
Time synchronization is very important for database services. Please ensure the system chronyd time service is running properly.
node_timezone:''# setup node timezone, empty string to skipnode_ntp_enabled:true# enable chronyd time sync service?node_ntp_servers:# ntp servers in `/etc/chrony.conf`- pool pool.ntp.org iburstnode_crontab_overwrite:true# overwrite or append to `/etc/crontab`?node_crontab:[]# crontab entries in `/etc/crontab`
node_timezone
name: node_timezone, type: string, level: C
Set node timezone. Empty string means skip. Default is empty string, which won’t modify the default timezone (usually UTC).
When using in China region, it’s recommended to set to Asia/Hong_Kong / Asia/Shanghai.
node_ntp_enabled
name: node_ntp_enabled, type: bool, level: C
Enable chronyd time sync service? Default is true.
Pigsty will override the node’s /etc/chrony.conf with the NTP server list specified in node_ntp_servers.
If your node already has NTP servers configured, you can set this parameter to false to skip time sync configuration.
node_ntp_servers
name: node_ntp_servers, type: string[], level: C
NTP server list used in /etc/chrony.conf. Default: ["pool pool.ntp.org iburst"]
This parameter is an array where each element is a string representing one line of NTP server configuration. Only takes effect when node_ntp_enabled is enabled.
Pigsty uses the global NTP server pool.ntp.org by default. You can modify this parameter according to your network environment, e.g., cn.pool.ntp.org iburst, or internal time services.
You can also use the ${admin_ip} placeholder in the configuration to use the time server on the admin node.
node_ntp_servers:['pool ${admin_ip} iburst']
node_crontab_overwrite
name: node_crontab_overwrite, type: bool, level: C
When handling scheduled tasks in node_crontab, append or overwrite? Default is true (overwrite).
If you want to append scheduled tasks on the node, set this parameter to false, and Pigsty will append rather than overwrite all scheduled tasks on the node’s crontab.
node_crontab
name: node_crontab, type: string[], level: C
Scheduled tasks defined in node’s /etc/crontab. Default is [] (empty array).
Each array element is a string representing one scheduled task line. Use standard cron format for definition.
For example, the following configuration will execute a full backup task as the postgres user at 1am every day:
node_crontab:- '00 01 * * * postgres /pg/bin/pg-backup full']# make a full backup every 1am
NODE_VIP
You can bind an optional L2 VIP to a node cluster. This feature is disabled by default. L2 VIP only makes sense for a group of node clusters. The VIP will switch between nodes in the cluster according to configured priorities, ensuring high availability of node services.
Note that L2 VIP can only be used within the same L2 network segment, which may impose additional restrictions on your network topology. If you don’t want this restriction, you can consider using DNS LB or HAProxy for similar functionality.
When enabling this feature, you need to explicitly assign available vip_address and vip_vrid for this L2 VIP. Users should ensure both are unique within the same network segment.
Note that NODE VIP is different from PG VIP. PG VIP is a VIP serving PostgreSQL instances, managed by vip-manager and bound to the PG cluster primary.
NODE VIP is managed by Keepalived and bound to node clusters. It can be in master-backup mode or load-balanced mode, and both can coexist.
vip_enabled:false# enable vip on this node cluster?# vip_address: [IDENTITY] # node vip address in ipv4 format, required if vip is enabled# vip_vrid: [IDENTITY] # required, integer, 1-254, should be unique among same VLANvip_role:backup # optional, `master/backup`, backup by default, use as init rolevip_preempt:false# optional, `true/false`, false by default, enable vip preemptionvip_interface:eth0 # node vip network interface to listen, `eth0` by defaultvip_dns_suffix:''# node vip dns name suffix, empty string by defaultvip_auth_pass:''# vrrp auth password, empty to use `<cls>-<vrid>` as defaultvip_exporter_port:9650# keepalived exporter listen port, 9650 by default
vip_enabled
name: vip_enabled, type: bool, level: C
Enable an L2 VIP managed by Keepalived on this node cluster? Default is false.
vip_address
name: vip_address, type: ip, level: C
Node VIP address in IPv4 format (without CIDR suffix). This is a required parameter when vip_enabled is enabled.
This parameter has no default value, meaning you must explicitly assign a unique VIP address for the node cluster.
vip_vrid
name: vip_vrid, type: int, level: C
VRID is a positive integer from 1 to 254 used to identify a VIP in the network. This is a required parameter when vip_enabled is enabled.
This parameter has no default value, meaning you must explicitly assign a unique ID within the network segment for the node cluster.
vip_role
name: vip_role, type: enum, level: I
Node VIP role. Options are master or backup. Default is backup.
This parameter value will be set as keepalived’s initial state.
vip_preempt
name: vip_preempt, type: bool, level: C/I
Enable VIP preemption? Optional parameter. Default is false (no preemption).
Preemption means when a backup node has higher priority than the currently alive and working master node, should it preempt the VIP?
vip_interface
name: vip_interface, type: string, level: C/I
Network interface for node VIP to listen on. Default is eth0.
You should use the same interface name as the node’s primary IP address (the IP address you put in the inventory).
If your nodes have different interface names, you can override it at the instance/node level.
vip_dns_suffix
name: vip_dns_suffix, type: string, level: C/I
DNS name for node cluster L2 VIP. Default is empty string, meaning the cluster name itself is used as the DNS name.
vip_auth_pass
name: vip_auth_pass, type: password, level: C
VRRP authentication password for keepalived. Default is empty string.
When empty, Pigsty will auto-generate a password using the pattern <cluster_name>-<vrid>.
For production environments with security requirements, set an explicit strong password.
vip_exporter_port
name: vip_exporter_port, type: port, level: C/I
Keepalived exporter listen port. Default is 9650.
HAPROXY
HAProxy is installed and enabled on all nodes by default, exposing services in a manner similar to Kubernetes NodePort.
haproxy_enabled:true# enable haproxy on this node?haproxy_clean:false# cleanup all existing haproxy config?haproxy_reload:true# reload haproxy after config?haproxy_auth_enabled:true# enable authentication for haproxy admin pagehaproxy_admin_username:admin # haproxy admin username, `admin` by defaulthaproxy_admin_password:pigsty # haproxy admin password, `pigsty` by defaulthaproxy_exporter_port:9101# haproxy admin/exporter port, 9101 by defaulthaproxy_client_timeout:24h # client connection timeout, 24h by defaulthaproxy_server_timeout:24h # server connection timeout, 24h by defaulthaproxy_services:[]# list of haproxy services to be exposed on node
haproxy_enabled
name: haproxy_enabled, type: bool, level: C
Enable haproxy on this node? Default is true.
haproxy_clean
name: haproxy_clean, type: bool, level: G/C/A
Cleanup all existing haproxy config? Default is false.
haproxy_reload
name: haproxy_reload, type: bool, level: A
Reload haproxy after config? Default is true, will reload haproxy after config changes.
If you want to check before applying, you can disable this option with command arguments, check, then apply.
haproxy_auth_enabled
name: haproxy_auth_enabled, type: bool, level: G
Enable authentication for haproxy admin page. Default is true, which requires HTTP basic auth for the admin page.
Not recommended to disable authentication, as your traffic control page will be exposed, which is risky.
haproxy_admin_username
name: haproxy_admin_username, type: username, level: G
HAProxy admin username. Default is admin.
haproxy_admin_password
name: haproxy_admin_password, type: password, level: G
HAProxy admin password. Default is pigsty.
PLEASE CHANGE THIS PASSWORD IN YOUR PRODUCTION ENVIRONMENT!
haproxy_exporter_port
name: haproxy_exporter_port, type: port, level: C
HAProxy traffic management/metrics exposed port. Default is 9101.
haproxy_client_timeout
name: haproxy_client_timeout, type: interval, level: C
Client connection timeout. Default is 24h.
Setting a timeout can avoid long-lived connections that are difficult to clean up. If you really need long connections, you can set it to a longer time.
haproxy_server_timeout
name: haproxy_server_timeout, type: interval, level: C
Server connection timeout. Default is 24h.
Setting a timeout can avoid long-lived connections that are difficult to clean up. If you really need long connections, you can set it to a longer time.
haproxy_services
name: haproxy_services, type: service[], level: C
List of services to expose via HAProxy on this node. Default is [] (empty array).
Each array element is a service definition. Here’s an example service definition:
haproxy_services:# list of haproxy service# expose pg-test read only replicas- name:pg-test-ro # [REQUIRED] service name, uniqueport:5440# [REQUIRED] service port, uniqueip:"*"# [OPTIONAL] service listen addr, "*" by defaultprotocol:tcp # [OPTIONAL] service protocol, 'tcp' by defaultbalance:leastconn # [OPTIONAL] load balance algorithm, roundrobin by default (or leastconn)maxconn:20000# [OPTIONAL] max allowed front-end connection, 20000 by defaultdefault:'inter 3s fastinter 1s downinter 5s rise 3 fall 3 on-marked-down shutdown-sessions slowstart 30s maxconn 3000 maxqueue 128 weight 100'options:- option httpchk- option http-keep-alive- http-check send meth OPTIONS uri /read-only- http-check expect status 200servers:- {name: pg-test-1 ,ip: 10.10.10.11 , port: 5432 , options: check port 8008 , backup:true}- {name: pg-test-2 ,ip: 10.10.10.12 , port: 5432 , options:check port 8008 }- {name: pg-test-3 ,ip: 10.10.10.13 , port: 5432 , options:check port 8008 }
Each service definition will be rendered to /etc/haproxy/<service.name>.cfg configuration file and take effect after HAProxy reload.
NODE_EXPORTER
node_exporter_enabled:true# setup node_exporter on this node?node_exporter_port:9100# node exporter listen port, 9100 by defaultnode_exporter_options:'--no-collector.softnet --no-collector.nvme --collector.tcpstat --collector.processes'
node_exporter_enabled
name: node_exporter_enabled, type: bool, level: C
Enable node metrics collector on current node? Default is true.
node_exporter_port
name: node_exporter_port, type: port, level: C
Port used to expose node metrics. Default is 9100.
node_exporter_options
name: node_exporter_options, type: arg, level: C
Command line arguments for node metrics collector. Default value:
This option enables/disables some metrics collectors. Please adjust according to your needs.
VECTOR
Vector is the log collection component used in Pigsty v4.0. It collects logs from various modules and sends them to VictoriaLogs service on infrastructure nodes.
INFRA: Infrastructure component logs, collected only on Infra nodes.
nginx-access: /var/log/nginx/access.log
nginx-error: /var/log/nginx/error.log
grafana: /var/log/grafana/grafana.log
NODES: Host-related logs, collection enabled on all nodes.
syslog: /var/log/messages (/var/log/syslog on Debian)
dmesg: /var/log/dmesg
cron: /var/log/cron
PGSQL: PostgreSQL-related logs, collection enabled only when node has PGSQL module configured.
postgres: /pg/log/postgres/*
patroni: /pg/log/patroni.log
pgbouncer: /pg/log/pgbouncer/pgbouncer.log
pgbackrest: /pg/log/pgbackrest/*.log
REDIS: Redis-related logs, collection enabled only when node has REDIS module configured.
vector_enabled:true# enable vector log collector?vector_clean:false# purge vector data dir during init?vector_data:/data/vector # vector data directory, /data/vector by defaultvector_port:9598# vector metrics port, 9598 by defaultvector_read_from:beginning # read log from beginning or endvector_log_endpoint:[infra ] # log endpoint, default send to infra group
vector_enabled
name: vector_enabled, type: bool, level: C
Enable Vector log collection service? Default is true.
Vector is the log collection agent used in Pigsty v4.0, replacing Promtail from previous versions. It collects node and service logs and sends them to VictoriaLogs.
vector_clean
name: vector_clean, type: bool, level: G/A
Clean existing data directory when installing Vector? Default is false.
By default, it won’t clean. When you choose to clean, Pigsty will remove the existing data directory vector_data when deploying Vector. This means Vector will re-collect all logs on the current node and send them to VictoriaLogs.
vector_data
name: vector_data, type: path, level: C
Vector data directory path. Default is /data/vector.
Vector stores log read offsets and buffered data in this directory.
vector_port
name: vector_port, type: port, level: C
Vector metrics listen port. Default is 9598.
This port is used to expose Vector’s own monitoring metrics, which can be scraped by VictoriaMetrics.
vector_read_from
name: vector_read_from, type: enum, level: C
Vector log reading start position. Default is beginning.
Options are beginning (start from beginning) or end (start from end). beginning reads the entire content of existing log files, end only reads newly generated logs.
vector_log_endpoint
name: vector_log_endpoint, type: string[], level: C
Log destination endpoint list. Default is [ infra ].
Specifies which node group’s VictoriaLogs service to send logs to. Default sends to nodes in the infra group.
12.3 - Playbook
How to use built-in Ansible playbooks to manage NODE clusters, with a quick reference for common commands.
Pigsty provides two playbooks related to the NODE module:
node.yml: Add nodes to Pigsty and configure them to the desired state
A metric with a constant ‘1’ value labeled by bios_date, bios_release, bios_vendor, bios_version, board_asset_tag, board_name, board_serial, board_vendor, board_version, chassis_asset_tag, chassis_serial, chassis_vendor, chassis_version, product_family, product_name, product_serial, product_sku, product_uuid, product_version, system_vendor if provided by DMI.
A metric with a constant ‘1’ value labeled by version, revision, branch, goversion from which node_exporter was built, and the goos and goarch for the build.
A metric with a constant ‘1’ value labeled by build_id, id, id_like, image_id, image_version, name, pretty_name, variant, variant_id, version, version_codename, version_id.
node_os_version
gauge
id, ip, ins, instance, job, id_like, cls
Metric containing the major.minor part of the OS version.
node_processes_max_processes
gauge
instance, ins, job, ip, cls
Number of max PIDs limit
node_processes_max_threads
gauge
instance, ins, job, ip, cls
Limit of threads in the system
node_processes_pids
gauge
instance, ins, job, ip, cls
Number of PIDs
node_processes_state
gauge
state, instance, ins, job, ip, cls
Number of processes in each state.
node_processes_threads
gauge
instance, ins, job, ip, cls
Allocated threads in system
node_processes_threads_state
gauge
instance, ins, job, thread_state, ip, cls
Number of threads in each state.
node_procs_blocked
gauge
instance, ins, job, ip, cls
Number of processes blocked waiting for I/O to complete.
node_procs_running
gauge
instance, ins, job, ip, cls
Number of processes in runnable state.
node_schedstat_running_seconds_total
counter
ip, ins, job, cpu, instance, cls
Number of seconds CPU spent running a process.
node_schedstat_timeslices_total
counter
ip, ins, job, cpu, instance, cls
Number of timeslices executed by CPU.
node_schedstat_waiting_seconds_total
counter
ip, ins, job, cpu, instance, cls
Number of seconds spent by processing waiting for this CPU.
node_scrape_collector_duration_seconds
gauge
ip, collector, ins, job, instance, cls
node_exporter: Duration of a collector scrape.
node_scrape_collector_success
gauge
ip, collector, ins, job, instance, cls
node_exporter: Whether a collector succeeded.
node_selinux_enabled
gauge
instance, ins, job, ip, cls
SELinux is enabled, 1 is true, 0 is false
node_sockstat_FRAG6_inuse
gauge
instance, ins, job, ip, cls
Number of FRAG6 sockets in state inuse.
node_sockstat_FRAG6_memory
gauge
instance, ins, job, ip, cls
Number of FRAG6 sockets in state memory.
node_sockstat_FRAG_inuse
gauge
instance, ins, job, ip, cls
Number of FRAG sockets in state inuse.
node_sockstat_FRAG_memory
gauge
instance, ins, job, ip, cls
Number of FRAG sockets in state memory.
node_sockstat_RAW6_inuse
gauge
instance, ins, job, ip, cls
Number of RAW6 sockets in state inuse.
node_sockstat_RAW_inuse
gauge
instance, ins, job, ip, cls
Number of RAW sockets in state inuse.
node_sockstat_TCP6_inuse
gauge
instance, ins, job, ip, cls
Number of TCP6 sockets in state inuse.
node_sockstat_TCP_alloc
gauge
instance, ins, job, ip, cls
Number of TCP sockets in state alloc.
node_sockstat_TCP_inuse
gauge
instance, ins, job, ip, cls
Number of TCP sockets in state inuse.
node_sockstat_TCP_mem
gauge
instance, ins, job, ip, cls
Number of TCP sockets in state mem.
node_sockstat_TCP_mem_bytes
gauge
instance, ins, job, ip, cls
Number of TCP sockets in state mem_bytes.
node_sockstat_TCP_orphan
gauge
instance, ins, job, ip, cls
Number of TCP sockets in state orphan.
node_sockstat_TCP_tw
gauge
instance, ins, job, ip, cls
Number of TCP sockets in state tw.
node_sockstat_UDP6_inuse
gauge
instance, ins, job, ip, cls
Number of UDP6 sockets in state inuse.
node_sockstat_UDPLITE6_inuse
gauge
instance, ins, job, ip, cls
Number of UDPLITE6 sockets in state inuse.
node_sockstat_UDPLITE_inuse
gauge
instance, ins, job, ip, cls
Number of UDPLITE sockets in state inuse.
node_sockstat_UDP_inuse
gauge
instance, ins, job, ip, cls
Number of UDP sockets in state inuse.
node_sockstat_UDP_mem
gauge
instance, ins, job, ip, cls
Number of UDP sockets in state mem.
node_sockstat_UDP_mem_bytes
gauge
instance, ins, job, ip, cls
Number of UDP sockets in state mem_bytes.
node_sockstat_sockets_used
gauge
instance, ins, job, ip, cls
Number of IPv4 sockets in use.
node_tcp_connection_states
gauge
state, instance, ins, job, ip, cls
Number of connection states.
node_textfile_scrape_error
gauge
instance, ins, job, ip, cls
1 if there was an error opening or reading a file, 0 otherwise
node_time_clocksource_available_info
gauge
ip, device, ins, clocksource, job, instance, cls
Available clocksources read from ‘/sys/devices/system/clocksource’.
node_time_clocksource_current_info
gauge
ip, device, ins, clocksource, job, instance, cls
Current clocksource read from ‘/sys/devices/system/clocksource’.
node_time_seconds
gauge
instance, ins, job, ip, cls
System time in seconds since epoch (1970).
node_time_zone_offset_seconds
gauge
instance, ins, job, time_zone, ip, cls
System time zone offset in seconds.
node_timex_estimated_error_seconds
gauge
instance, ins, job, ip, cls
Estimated error in seconds.
node_timex_frequency_adjustment_ratio
gauge
instance, ins, job, ip, cls
Local clock frequency adjustment.
node_timex_loop_time_constant
gauge
instance, ins, job, ip, cls
Phase-locked loop time constant.
node_timex_maxerror_seconds
gauge
instance, ins, job, ip, cls
Maximum error in seconds.
node_timex_offset_seconds
gauge
instance, ins, job, ip, cls
Time offset in between local system and reference clock.
node_timex_pps_calibration_total
counter
instance, ins, job, ip, cls
Pulse per second count of calibration intervals.
node_timex_pps_error_total
counter
instance, ins, job, ip, cls
Pulse per second count of calibration errors.
node_timex_pps_frequency_hertz
gauge
instance, ins, job, ip, cls
Pulse per second frequency.
node_timex_pps_jitter_seconds
gauge
instance, ins, job, ip, cls
Pulse per second jitter.
node_timex_pps_jitter_total
counter
instance, ins, job, ip, cls
Pulse per second count of jitter limit exceeded events.
node_timex_pps_shift_seconds
gauge
instance, ins, job, ip, cls
Pulse per second interval duration.
node_timex_pps_stability_exceeded_total
counter
instance, ins, job, ip, cls
Pulse per second count of stability limit exceeded events.
node_timex_pps_stability_hertz
gauge
instance, ins, job, ip, cls
Pulse per second stability, average of recent frequency changes.
node_timex_status
gauge
instance, ins, job, ip, cls
Value of the status array bits.
node_timex_sync_status
gauge
instance, ins, job, ip, cls
Is clock synchronized to a reliable server (1 = yes, 0 = no).
node_timex_tai_offset_seconds
gauge
instance, ins, job, ip, cls
International Atomic Time (TAI) offset.
node_timex_tick_seconds
gauge
instance, ins, job, ip, cls
Seconds between clock ticks.
node_udp_queues
gauge
ip, queue, ins, job, exported_ip, instance, cls
Number of allocated memory in the kernel for UDP datagrams in bytes.
A metric with a constant ‘1’ value labeled by version, revision, branch, goversion from which promtail was built, and the goos and goarch for the build.
promtail_config_reload_fail_total
Unknown
instance, ins, job, ip, cls
N/A
promtail_config_reload_success_total
Unknown
instance, ins, job, ip, cls
N/A
promtail_dropped_bytes_total
Unknown
host, ip, ins, job, reason, instance, cls
N/A
promtail_dropped_entries_total
Unknown
host, ip, ins, job, reason, instance, cls
N/A
promtail_encoded_bytes_total
Unknown
host, ip, ins, job, instance, cls
N/A
promtail_file_bytes_total
gauge
path, instance, ins, job, ip, cls
Number of bytes total.
promtail_files_active_total
gauge
instance, ins, job, ip, cls
Number of active files.
promtail_mutated_bytes_total
Unknown
host, ip, ins, job, reason, instance, cls
N/A
promtail_mutated_entries_total
Unknown
host, ip, ins, job, reason, instance, cls
N/A
promtail_read_bytes_total
gauge
path, instance, ins, job, ip, cls
Number of bytes read.
promtail_read_lines_total
Unknown
path, instance, ins, job, ip, cls
N/A
promtail_request_duration_seconds_bucket
Unknown
host, ip, ins, job, status_code, le, instance, cls
N/A
promtail_request_duration_seconds_count
Unknown
host, ip, ins, job, status_code, instance, cls
N/A
promtail_request_duration_seconds_sum
Unknown
host, ip, ins, job, status_code, instance, cls
N/A
promtail_sent_bytes_total
Unknown
host, ip, ins, job, instance, cls
N/A
promtail_sent_entries_total
Unknown
host, ip, ins, job, instance, cls
N/A
promtail_targets_active_total
gauge
instance, ins, job, ip, cls
Number of active total.
promtail_up
Unknown
instance, ins, job, ip, cls
N/A
request_duration_seconds_bucket
Unknown
instance, ins, job, status_code, route, ws, le, ip, cls, method
The max number of TCP connections that can be accepted (0 means no limit).
up
Unknown
instance, ins, job, ip, cls
N/A
12.7 - FAQ
Frequently asked questions about Pigsty NODE module
How to configure NTP service?
NTP is critical for various production services. If NTP is not configured, you can use public NTP services or the Chronyd on the admin node as the time standard.
If your nodes already have NTP configured, you can preserve the existing configuration without making any changes by setting node_ntp_enabled to false.
Otherwise, if you have Internet access, you can use public NTP services such as pool.ntp.org.
If you don’t have Internet access, you can use the following approach to ensure all nodes in the environment are synchronized with the admin node, or use another internal NTP time service.
node_ntp_servers: # NTP servers in /etc/chrony.conf - pool cn.pool.ntp.org iburst
- pool ${admin_ip} iburst # assume non-admin nodes do not have internet access, at least sync with admin node
How to force sync time on nodes?
Use chronyc to sync time. You must configure the NTP service first.
ansible all -b -a 'chronyc -a makestep'# sync time
You can replace all with any group or host IP address to limit the execution scope.
Remote nodes are not accessible via SSH?
If the target machine is hidden behind an SSH jump host, or some customizations prevent direct access using ssh ip, you can use Ansible connection parameters to specify various SSH connection options, such as:
When performing deployments and changes, the admin user used must have ssh and sudo privileges for all nodes. Passwordless login is not required.
You can pass ssh and sudo passwords via the -k|-K parameters when executing playbooks, or even use another user to run playbooks via -eansible_host=<another_user>.
However, Pigsty strongly recommends configuring SSH passwordless login with passwordless sudo for the admin user.
How to create a dedicated admin user with an existing admin user?
Use the following command to create a new standard admin user defined by node_admin_username using an existing admin user on that node.
Pigsty builds a local software repository on infra nodes that includes all dependencies. All regular nodes will reference and use the local software repository on Infra nodes according to the default configuration of node_repo_modules as local.
This design avoids Internet access and enhances installation stability and reliability. All original repo definition files are moved to the /etc/yum.repos.d/backup directory; you can copy them back as needed.
If you want to preserve the original repo definition files during regular node installation, set node_repo_remove to false.
If you want to preserve the original repo definition files during Infra node local repo construction, set repo_remove to false.
Why did my command line prompt change? How to restore it?
The shell command line prompt used by Pigsty is specified by the environment variable PS1, defined in the /etc/profile.d/node.sh file.
If you don’t like it and want to modify or restore it, you can remove this file and log in again.
Why did my hostname change?
Pigsty will modify your node hostname in two situations:
nodename value is explicitly defined (default is empty)
The PGSQL module is declared on the node and the node_id_from_pg parameter is enabled (default is true)
If you don’t want the hostname to be modified, you can set nodename_overwrite to false at the global/cluster/instance level (default is true).
What compatibility issues exist with Tencent OpenCloudOS?
The softdog kernel module is not available on OpenCloudOS and needs to be removed from node_kernel_modules. Add the following configuration item to the global variables in the config file to override:
One etcd cluster per Pigsty deployment serves multiple PG clusters.
Pigsty enables RBAC by default. Each PG cluster uses independent credentials for multi-tenant isolation. Admins use etcd root user with full permissions over all PG clusters.
13.1 - Configuration
Choose etcd cluster size based on requirements, provide reliable access.
Before deployment, define etcd cluster in config inventory. Typical choices:
One Node: No HA, suitable for dev, test, demo, or standalone deployments using external S3 backup for PITR
Three Nodes: Basic HA, tolerates 1 node failure, suitable for small-medium prod
Five Nodes: Better HA, tolerates 2 node failures, suitable for large prod
Even-numbered clusters don’t make sense; 5+ node clusters uncommon. Typical configs: single, 3-node, 5-node.
Cluster Size
Quorum
Fault Tolerance
Use Case
1 node
1
0
Dev, test, demo
3 nodes
2
1
Small-medium prod
5 nodes
3
2
Large prod
7 nodes
4
3
Special HA requirements
One Node
Define singleton etcd instance in Pigsty—single line of config:
all:vars:etcd_root_password:'YourSecureEtcdPassword'# change defaultetcd:hosts:10.10.10.10:{etcd_seq:1}10.10.10.11:{etcd_seq:2}10.10.10.12:{etcd_seq:3}vars:etcd_cluster:etcdetcd_safeguard:true# enable safeguard for production
Filesystem Layout
Module creates these directories/files on target hosts:
Path
Purpose
Permissions
/etc/etcd/
Config dir
0750, etcd:etcd
/etc/etcd/etcd.conf
Main config file
0644, etcd:etcd
/etc/etcd/etcd.pass
Root password file
0640, root:etcd
/etc/etcd/ca.crt
CA cert
0644, etcd:etcd
/etc/etcd/server.crt
Server cert
0644, etcd:etcd
/etc/etcd/server.key
Server private key
0600, etcd:etcd
/var/lib/etcd/
Backup data dir
0770, etcd:etcd
/data/etcd/
Main data dir (configurable)
0700, etcd:etcd
/etc/profile.d/etcdctl.sh
Client env vars
0755, root:root
/etc/systemd/system/etcd.service
Systemd service
0644, root:root
13.2 - Parameters
ETCD module provides 13 configuration parameters for fine-grained control over cluster behavior.
The ETCD module has 13 parameters, divided into two sections:
ETCD: 10 parameters for etcd cluster deployment and configuration
ETCD_REMOVE: 3 parameters for controlling etcd cluster removal
Architecture Change: Pigsty v3.6+
Since Pigsty v3.6, the etcd.yml playbook no longer includes removal functionality—removal parameters have been migrated to a standalone etcd_remove role. Starting from v4.0, RBAC authentication is enabled by default, with a new etcd_root_password parameter.
Parameter Overview
The ETCD parameter group is used for etcd cluster deployment and configuration, including instance identification, cluster name, data directory, ports, and authentication password.
#etcd_seq: 1 # etcd instance identifier, explicitly requiredetcd_cluster:etcd # etcd cluster & group name, etcd by defaultetcd_learner:false# run etcd instance as learner? default is falseetcd_data:/data/etcd # etcd data directory, /data/etcd by defaultetcd_port:2379# etcd client port, 2379 by defaultetcd_peer_port:2380# etcd peer port, 2380 by defaultetcd_init:new # etcd initial cluster state, new or existingetcd_election_timeout:1000# etcd election timeout, 1000ms by defaultetcd_heartbeat_interval:100# etcd heartbeat interval, 100ms by defaultetcd_root_password:Etcd.Root # etcd root user password for RBAC authentication (please change!)
etcd_seq
Parameter: etcd_seq, Type: int, Level: I
etcd instance identifier. This is a required parameter—you must assign a unique identifier to each etcd instance.
Here is an example of a 3-node etcd cluster with identifiers 1 through 3:
etcd:# dcs service for postgres/patroni ha consensushosts:# 1 node for testing, 3 or 5 for production10.10.10.10:{etcd_seq:1}# etcd_seq required10.10.10.11:{etcd_seq:2}# assign from 1 ~ n10.10.10.12:{etcd_seq:3}# use odd numbersvars:# cluster level parameter override roles/etcdetcd_cluster:etcd # mark etcd cluster name etcdetcd_safeguard:false# safeguard against purging
etcd_cluster
Parameter: etcd_cluster, Type: string, Level: C
etcd cluster & group name, default value is the hard-coded etcd.
You can modify this parameter when you want to deploy an additional etcd cluster for backup purposes.
etcd_learner
Parameter: etcd_learner, Type: bool, Level: I/A
Initialize etcd instance as learner? Default value is false.
When set to true, the etcd instance will be initialized as a learner, meaning it cannot participate in voting elections within the etcd cluster.
Use Cases:
Cluster Expansion: When adding new members to an existing cluster, using learner mode prevents affecting cluster quorum before data synchronization completes
Safe Migration: In rolling upgrade or migration scenarios, join as a learner first, then promote after confirming data synchronization
Workflow:
Set etcd_learner: true to initialize the new member as a learner
Wait for data synchronization to complete (check with etcdctl endpoint status)
Use etcdctl member promote <member_id> to promote it to a full member
Note
Learner instances do not count toward cluster quorum. For example, in a 3-node cluster with 1 learner, the actual voting members are 2, which cannot tolerate any node failure.
etcd_data
Parameter: etcd_data, Type: path, Level: C
etcd data directory, default is /data/etcd.
etcd_port
Parameter: etcd_port, Type: port, Level: C
etcd client port, default is 2379.
etcd_peer_port
Parameter: etcd_peer_port, Type: port, Level: C
etcd peer port, default is 2380.
etcd_init
Parameter: etcd_init, Type: enum, Level: C
etcd initial cluster state, can be new or existing, default value: new.
Option Values:
Value
Description
Use Case
new
Create a new etcd cluster
Initial deployment, cluster rebuild
existing
Join an existing etcd cluster
Cluster expansion, adding new members
Important Notes:
Must use existing when expanding
When adding new members to an existing etcd cluster, you must set etcd_init=existing. Otherwise, the new instance will attempt to create an independent new cluster, causing split-brain or initialization failure.
Usage Examples:
# Create new cluster (default behavior)./etcd.yml
# Add new member to existing cluster./etcd.yml -l <new_ip> -e etcd_init=existing
# Or use the convenience script (automatically sets etcd_init=existing)bin/etcd-add <new_ip>
etcd_election_timeout
Parameter: etcd_election_timeout, Type: int, Level: C
etcd election timeout, default is 1000 (milliseconds), i.e., 1 second.
etcd_heartbeat_interval
Parameter: etcd_heartbeat_interval, Type: int, Level: C
etcd heartbeat interval, default is 100 (milliseconds).
etcd_root_password
Parameter: etcd_root_password, Type: password, Level: G
etcd root user password for RBAC authentication, default value is Etcd.Root.
Pigsty v4.0 enables etcd RBAC (Role-Based Access Control) authentication by default. During cluster initialization, the etcd_auth task automatically creates the root user and enables authentication.
Password Storage Location:
Password is stored in /etc/etcd/etcd.pass file
File permissions are 0640 (owned by root, readable by etcd group)
The etcdctl environment script /etc/profile.d/etcdctl.sh automatically reads this file
Integration with Other Components:
Patroni uses the pg_etcd_password parameter to configure the password for connecting to etcd
If pg_etcd_password is empty, Patroni will use the cluster name as password (not recommended)
VIP-Manager also requires the same authentication credentials to connect to etcd
Security Recommendations:
Production Security
In production environments, it is strongly recommended to change the default passwordEtcd.Root. Set it in global or cluster configuration:
etcd_root_password:'YourSecurePassword'
Using configure -g will automatically generate and replace etcd_root_password
ETCD_REMOVE
This section contains parameters for the etcd_remove role,
which are action flags used by the etcd-rm.yml playbook.
etcd_safeguard:false# prevent purging running etcd instances?etcd_rm_data:true# remove etcd data and config files during removal?etcd_rm_pkg:false# uninstall etcd packages during removal?
# Stop service only, preserve data./etcd-rm.yml -e etcd_rm_data=false
etcd_rm_pkg
Parameter: etcd_rm_pkg, Type: bool, Level: G/C/A
Uninstall etcd packages during removal? Default value is false.
When enabled, the etcd-rm.yml playbook will uninstall etcd packages when removing a cluster or member.
Use Cases:
Scenario
Recommended
Description
Normal removal
false (default)
Keep packages for quick redeployment
Complete cleanup
true
Full uninstall, save disk space
# Uninstall packages during removal./etcd-rm.yml -e etcd_rm_pkg=true
Tip
Usually there’s no need to uninstall etcd packages. Keeping the packages speeds up subsequent redeployments since no re-download or installation is required.
13.3 - Administration
etcd cluster management SOP: create, destroy, scale, config, and RBAC.
e put a 10; e get a; e del a # basic KV opse member list # list cluster memberse endpoint health # check endpoint healthe endpoint status # view endpoint status
RBAC Authentication
v4.0 enables etcd RBAC auth by default. During cluster init, etcd_auth task auto-creates root user and enables auth.
Root user password set by etcd_root_password, default: Etcd.Root. Stored in /etc/etcd/etcd.pass with 0640 perms (root-owned, etcd-group readable).
Strongly recommended to change default password in prod:
# Method 1: env vars (recommended, auto-configured in /etc/profile.d/etcdctl.sh)exportETCDCTL_USER="root:$(cat /etc/etcd/etcd.pass)"# Method 2: command lineetcdctl --user root:YourSecurePassword member list
Patroni and etcd auth:
Patroni uses pg_etcd_password to configure etcd connection password. If empty, Patroni uses cluster name as password (not recommended). Configure separate etcd password per PG cluster in prod.
Reload Config
If etcd cluster membership changes (add/remove members), refresh etcd service endpoint references. These etcd refs in Pigsty need updates:
Use bin/etcd-add script to add new members to existing etcd cluster:
# First add new member definition to config inventory, then:bin/etcd-add <ip> # add single new memberbin/etcd-add <ip1> <ip2> ... # add multiple new members
Update config inventory: Add new instance to etcd group
Notify cluster: Run etcdctl member add (optional, playbook auto-does this)
Initialize new member: Run playbook with etcd_init=existing parameter
Promote member: Promote learner to full member (optional, required when using etcd_learner=true)
Reload config: Update etcd endpoint references for all clients
# After config inventory update, initialize new member./etcd.yml -l <new_ins_ip> -e etcd_init=existing
# If using learner mode, manually promoteetcdctl member promote <new_ins_server_id>
Important
When adding new members, must use etcd_init=existing parameter. New instance will create new cluster instead of joining existing one otherwise.
Detailed: Add member to etcd cluster
Detailed steps. Start from single-instance etcd cluster:
etcd:hosts:10.10.10.10:{etcd_seq:1}# <--- only existing instance in cluster10.10.10.11:{etcd_seq:2}# <--- add this new member to inventoryvars:{etcd_cluster:etcd }
Add new member using utility script (recommended):
$ bin/etcd-add 10.10.10.11
Or manual. First use etcdctl member add to announce new learner instance etcd-2 to existing etcd cluster:
$ etcdctl member add etcd-2 --learner=true --peer-urls=https://10.10.10.11:2380
Member 33631ba6ced84cf8 added to cluster 6646fbcf5debc68f
ETCD_NAME="etcd-2"ETCD_INITIAL_CLUSTER="etcd-2=https://10.10.10.11:2380,etcd-1=https://10.10.10.10:2380"ETCD_INITIAL_ADVERTISE_PEER_URLS="https://10.10.10.11:2380"ETCD_INITIAL_CLUSTER_STATE="existing"
Check member list with etcdctl member list (or em list), see unstarted new member:
33631ba6ced84cf8, unstarted, , https://10.10.10.11:2380, , true# unstarted new member here429ee12c7fbab5c1, started, etcd-1, https://10.10.10.10:2380, https://10.10.10.10:2379, false
Next, use etcd.yml playbook to initialize new etcd instance etcd-2. After completion, new member has started:
After new member initialized and running stably, promote from learner to follower:
$ etcdctl member promote 33631ba6ced84cf8 # promote learner to followerMember 33631ba6ced84cf8 promoted in cluster 6646fbcf5debc68f
$ em list # check again, new member promoted to full member33631ba6ced84cf8, started, etcd-2, https://10.10.10.11:2380, https://10.10.10.11:2379, false429ee12c7fbab5c1, started, etcd-1, https://10.10.10.10:2380, https://10.10.10.10:2379, false
New member added. Don’t forget to reload config so all clients know new member.
Repeat steps to add more members. Prod environments need at least 3 members.
Remove Member
Recommended: Utility Script
Use bin/etcd-rm script to remove members from etcd cluster:
Remove from config inventory: Comment out or delete instance, and reload config
Kick from cluster: Use etcdctl member remove command
Clean up instance: Use etcd-rm.yml playbook to clean up
# Use dedicated removal playbook (recommended)./etcd-rm.yml -l <ip>
# Or manualetcdctl member remove <server_id> # kick from cluster./etcd-rm.yml -l <ip> # clean up instance
Detailed: Remove member from etcd cluster
Example: 3-node etcd cluster, remove instance 3.
Method 1: Utility script (recommended)
$ bin/etcd-rm 10.10.10.12
Script auto-completes all operations: remove from cluster, stop service, clean up data.
Method 2: Manual
First, refresh config by commenting out member to delete, then reload config so all clients stop using this instance.
etcd:hosts:10.10.10.10:{etcd_seq:1}10.10.10.11:{etcd_seq:2}# 10.10.10.12: { etcd_seq: 3 } # <---- comment out this membervars:{etcd_cluster:etcd }
Then use removal playbook:
$ ./etcd-rm.yml -l 10.10.10.12
Playbook auto-executes:
Get member list, find corresponding member ID
Execute etcdctl member remove to kick from cluster
Stop etcd service
Clean up data and config files
If manual:
$ etcdctl member list
429ee12c7fbab5c1, started, etcd-1, https://10.10.10.10:2380, https://10.10.10.10:2379, false33631ba6ced84cf8, started, etcd-2, https://10.10.10.11:2380, https://10.10.10.11:2379, false93fcf23b220473fb, started, etcd-3, https://10.10.10.12:2380, https://10.10.10.12:2379, false# <--- remove this$ etcdctl member remove 93fcf23b220473fb # kick from clusterMember 93fcf23b220473fb removed from cluster 6646fbcf5debc68f
After execution, permanently remove from config inventory. Member removal complete.
Repeat to remove more members. Combined with Add Member, perform rolling upgrades and migrations of etcd cluster.
Utility Scripts
v3.6+ provides utility scripts to simplify etcd cluster scaling:
bin/etcd-add
Add new members to existing etcd cluster:
bin/etcd-add <ip> # add single new memberbin/etcd-add <ip1> <ip2> ... # add multiple new members
Script features:
Validates IP addresses in config inventory
Auto-sets etcd_init=existing parameter
Executes etcd.yml playbook to complete member addition
Provides safety warnings and confirmation countdown
Auto-executes etcd-rm.yml playbook
Gracefully removes members from cluster
Cleans up data and config files
13.4 - Playbook
Manage etcd clusters with Ansible playbooks and quick command reference.
The ETCD module provides two core playbooks: etcd.yml for installing and configuring etcd clusters, and etcd-rm.yml for removing etcd clusters or members.
Architecture Change: Pigsty v3.6+
Since Pigsty v3.6, the etcd.yml playbook focuses on cluster installation and member addition. All removal operations have been moved to the dedicated etcd-rm.yml playbook using the etcd_remove role.
A dedicated playbook for removing etcd clusters or individual members. The following subtasks are available in etcd-rm.yml:
etcd_safeguard : Check safeguard and abort if enabled
etcd_pause : Pause for 3 seconds, allowing user to abort with Ctrl-C
etcd_deregister : Remove etcd registration from VictoriaMetrics monitoring targets
etcd_leave : Try graceful leaving etcd cluster before purge
etcd_svc : Stop and disable etcd service with systemd
etcd_data : Remove etcd data (disable with etcd_rm_data=false)
etcd_pkg : Uninstall etcd packages (enable with etcd_rm_pkg=true)
The removal playbook uses the etcd_remove role with the following configurable parameters:
etcd_safeguard: Prevents accidental removal when set to true
etcd_rm_data: Controls whether ETCD data is deleted (default: true)
etcd_rm_pkg: Controls whether ETCD packages are uninstalled (default: false)
Demo
Cheatsheet
Etcd Installation & Configuration:
./etcd.yml # Initialize etcd cluster./etcd.yml -t etcd_launch # Restart entire etcd cluster./etcd.yml -t etcd_conf # Refresh /etc/etcd/etcd.conf with latest state./etcd.yml -t etcd_cert # Regenerate etcd TLS certificates./etcd.yml -l 10.10.10.12 -e etcd_init=existing # Scale out: add new member to existing cluster
Etcd Removal & Cleanup:
./etcd-rm.yml # Remove entire etcd cluster./etcd-rm.yml -l 10.10.10.12 # Remove single etcd member./etcd-rm.yml -e etcd_safeguard=false# Override safeguard to force removal./etcd-rm.yml -e etcd_rm_data=false# Stop service only, preserve data./etcd-rm.yml -e etcd_rm_pkg=true# Also uninstall etcd packages
Convenience Scripts:
bin/etcd-add <ip> # Add new member to existing cluster (recommended)bin/etcd-rm <ip> # Remove specific member from cluster (recommended)bin/etcd-rm # Remove entire etcd cluster
Safeguard
To prevent accidental deletion, Pigsty’s ETCD module provides a safeguard mechanism controlled by the etcd_safeguard parameter, which defaults to false (safeguard disabled).
For production etcd clusters that have been initialized, it’s recommended to enable the safeguard to prevent accidental deletion of existing etcd instances:
When etcd_safeguard is set to true, the etcd-rm.yml playbook will detect running etcd instances and abort to prevent accidental deletion. You can override this behavior using command-line parameters:
./etcd-rm.yml -e etcd_safeguard=false# Force override safeguard
Unless you clearly understand what you’re doing, we do not recommend arbitrarily removing etcd clusters.
13.5 - Monitoring
etcd monitoring dashboards, metrics, and alert rules.
Dashboards
ETCD module provides one monitoring dashboard: Etcd Overview.
Frequently asked questions about Pigsty etcd module
What is etcd’s role in Pigsty?
etcd is a distributed, reliable key-value store for critical system data. Pigsty uses etcd as DCS (Distributed Config Store) service for Patroni, storing PG HA status.
Patroni uses etcd for: cluster failure detection, auto failover, primary-replica switchover, and cluster config management.
etcd is critical for PG HA. etcd’s availability and DR ensured through multiple distributed nodes.
What’s the appropriate etcd cluster size?
If more than half (including exactly half) of etcd instances unavailable, etcd cluster enters unavailable state—refuses service.
Example: 3-node cluster allows max 1 node failure while 2 others continue; 5-node cluster tolerates 2 node failures.
Note: Learner instances don’t count toward members—3-node cluster with 1 learner = 2 actual members, zero fault tolerance.
In prod, use odd number of instances. For prod, recommend 3-node or 5-node for reliability.
Impact of etcd unavailability?
If etcd cluster unavailable, affects PG control plane but not data plane—existing PG clusters continue running, but Patroni management ops fail.
During etcd failure: PG HA can’t auto failover, can’t use patronictl for PG management (config changes, manual failover, etc.).
Ansible playbooks unaffected by etcd failure: create DB, create user, refresh HBA/Service config. During etcd failure, operate PG clusters directly.
Note: Behavior applies to Patroni >=3.0 (Pigsty >=2.0). With older Patroni (<3.0, Pigsty 1.x), etcd/consul failure causes severe global impact:
All PG clusters demote: primaries → replicas, reject writes, etcd failure amplifies to global PG failure. Patroni 3.0 introduced DCS Failsafe—significantly improved.
What data does etcd store?
In Pigsty, etcd is PG HA only—no other config/state data.
PG HA component Patroni auto-generates and manages etcd data. If lost in etcd, Patroni auto-rebuilds.
Thus, by default, etcd in Pigsty = “stateless service”—destroyable and rebuildable, simplifies maintenance.
If using etcd for other purposes (K8s metadata, custom storage), backup etcd data yourself and restore after cluster recovery.
Recover from etcd failure?
Since etcd in Pigsty = PG HA only = “stateless service”—disposable, rebuildable. Failures? “restart” or “reset” to stop bleeding.
Restart etcd cluster:
./etcd.yml -t etcd_launch
Reset etcd cluster:
./etcd.yml
For custom etcd data: backup and restore after recovery.
Etcd maintenance considerations?
Simple answer: don’t fill up etcd.
Pigsty v2.6+ enables etcd auto-compaction and 16GB backend quota—usually fine.
etcd’s data model = each write generates new version.
Frequent writes (even few keys) = growing etcd DB size. At capacity limit, etcd rejects writes → PG HA breaks.
Pigsty’s default etcd config includes optimizations:
# First add new member to config inventory, then:bin/etcd-add <ip> # add single new memberbin/etcd-add <ip1> # add multiple new members
Manual method:
etcdctl member add <etcd-?> --learner=true --peer-urls=https://<new_ins_ip>:2380 # announce new member./etcd.yml -l <new_ins_ip> -e etcd_init=existing # initialize new memberetcdctl member promote <new_ins_server_id> # promote to full member
./etcd-rm.yml -l <ins_ip> # use dedicated removal playbooketcdctl member remove <etcd_server_id> # kick from cluster./etcd-rm.yml -l <ins_ip> # clean up instance
Configure etcd RBAC authentication?
Pigsty v4.0 enables etcd RBAC auth by default. Root password set by etcd_root_password, default: Etcd.Root.
Prod recommendation: change default password
all:vars:etcd_root_password:'YourSecurePassword'
Client auth:
# On etcd nodes, env vars auto-configuredsource /etc/profile.d/etcdctl.sh
etcdctl member list
# Manual auth configexportETCDCTL_USER="root:YourSecurePassword"exportETCDCTL_CACERT=/etc/etcd/ca.crt
exportETCDCTL_CERT=/etc/etcd/server.crt
exportETCDCTL_KEY=/etc/etcd/server.key
Pigsty has built-in MinIO support, an open-source S3-compatible object storage that can be used for PGSQL cold backup storage.
MinIO is an S3-compatible multi-cloud object storage software, open-sourced under the AGPLv3 license.
MinIO can be used to store documents, images, videos, and backups. Pigsty natively supports deploying various MinIO clusters with native multi-node multi-disk high availability support, easy to scale, secure, and ready to use out of the box.
It has been used in production environments at 10PB+ scale.
MinIO is an optional module in Pigsty. You can use MinIO as an optional storage repository for PostgreSQL backups, supplementing the default local POSIX filesystem repository.
If using the MinIO backup repository, the MINIO module should be installed before any PGSQL modules. MinIO requires a trusted CA certificate to work, so it depends on the NODE module.
Quick Start
Here’s a simple example of MinIO single-node single-disk deployment:
# Define MinIO cluster in the config inventoryminio:{hosts:{10.10.10.10:{minio_seq: 1 } }, vars:{minio_cluster:minio } }
./minio.yml -l minio # Deploy MinIO module on the minio group
After deployment, you can access MinIO via:
S3 API: https://sss.pigsty:9000 (requires DNS resolution for the domain)
Web Console: https://<minio-ip>:9001 (default username/password: minioadmin / S3User.MinIO)
Command Line: mcli ls sss/ (alias pre-configured on the admin node)
S3 Compatible: Fully compatible with AWS S3 API, seamlessly integrates with various S3 clients and tools
High Availability: Native support for multi-node multi-disk deployment, tolerates node and disk failures
Secure: HTTPS encrypted transmission enabled by default, supports server-side encryption
Monitoring: Out-of-the-box Grafana dashboards and Prometheus alerting rules
Easy to Use: Pre-configured mcli client alias, one-click deployment and management
14.1 - Usage
Getting started: how to use MinIO? How to reliably access MinIO? How to use mc / rclone client tools?
After you configure and deploy the MinIO cluster with the playbook, you can start using and accessing the MinIO cluster by following the instructions here.
Deploy Cluster
Deploying an out-of-the-box single-node single-disk MinIO instance in Pigsty is straightforward. First, define a MinIO cluster in the config inventory:
Then, run the minio.yml playbook provided by Pigsty against the defined group (here minio):
./minio.yml -l minio
Note that in install.yml, pre-defined MinIO clusters will be automatically created, so you don’t need to manually run the minio.yml playbook again.
If you plan to deploy a production-grade large-scale multi-node MinIO cluster, we strongly recommend reading the Pigsty MinIO configuration documentation and the MinIO official documentation before proceeding.
Access Cluster
Note: MinIO services must be accessed via domain name and HTTPS, so make sure the MinIO service domain (default sss.pigsty) correctly points to the MinIO server node.
You can add static resolution records in node_etc_hosts, or manually modify the /etc/hosts file
You can add a record on the internal DNS server if you already have an existing DNS service
If you have enabled the DNS server on Infra nodes, you can add records in dns_records
For production environment access to MinIO, we recommend using the first method: static DNS resolution records, to avoid MinIO’s additional dependency on DNS.
You should point the MinIO service domain to the IP address and service port of the MinIO server node, or the IP address and service port of the load balancer.
Pigsty uses the default MinIO service domain sss.pigsty, which defaults to localhost for single-node deployment, serving on port 9000.
In some examples, HAProxy instances are also deployed on the MinIO cluster to expose services. In this case, 9002 is the service port used in the templates.
Adding Alias
To access the MinIO server cluster using the mcli client, you need to first configure the server alias:
mcli alias ls # list minio alias (default is sss)mcli aliasset sss https://sss.pigsty:9000 minioadmin S3User.MinIO # root usermcli aliasset sss https://sss.pigsty:9002 minioadmin S3User.MinIO # root user, using load balancer port 9002mcli aliasset pgbackrest https://sss.pigsty:9000 pgbackrest S3User.Backup # use backup user
On the admin user of the admin node, a MinIO alias named sss is pre-configured and can be used directly.
For the full functionality reference of the MinIO client tool mcli, please refer to the documentation: MinIO Client.
Note: Use Your Actual Password
The password S3User.MinIO in the above examples is the Pigsty default. If you modified minio_secret_key during deployment, please use your actual configured password.
User Management
You can manage business users in MinIO using mcli. For example, here we can create two business users using the command line:
mcli admin user list sss # list all users on sssset +o history# hide password in history and create minio usersmcli admin user add sss dba S3User.DBA
mcli admin user add sss pgbackrest S3User.Backup
set -o history
Bucket Management
You can perform CRUD operations on buckets in MinIO:
mcli ls sss/ # list all buckets on alias 'sss'mcli mb --ignore-existing sss/hello # create a bucket named 'hello'mcli rb --force sss/hello # force delete the 'hello' bucket
Object Management
You can also perform CRUD operations on objects within buckets. For details, please refer to the official documentation: Object Management
mcli cp /www/pigsty/* sss/infra/ # upload local repo content to MinIO infra bucketmcli cp sss/infra/plugins.tgz /tmp/ # download file from minio to localmcli ls sss/infra # list all files in the infra bucketmcli rm sss/infra/plugins.tgz # delete specific file in infra bucketmcli cat sss/infra/repo_complete # view file content in infra bucket
Using rclone
Pigsty repository provides rclone, a convenient multi-cloud object storage client that you can use to access MinIO services.
If MinIO uses HTTPS (default configuration), you need to ensure the client trusts Pigsty’s CA certificate (/etc/pki/ca.crt), or add no_check_certificate = true in the rclone configuration to skip certificate verification (not recommended for production).
Configure Backup Repository
In Pigsty, the default use case for MinIO is as a backup storage repository for pgBackRest.
When you modify pgbackrest_method to minio, the PGSQL module will automatically switch the backup repository to MinIO.
pgbackrest_method: local # pgbackrest repo method:local,minio,[user-defined...]pgbackrest_repo: # pgbackrest repo:https://pgbackrest.org/configuration.html#section-repositorylocal:# default pgbackrest repo with local posix fspath:/pg/backup # local backup directory, `/pg/backup` by defaultretention_full_type:count # retention full backups by countretention_full:2# keep 2, at most 3 full backup when using local fs repominio:# optional minio repo for pgbackresttype:s3 # minio is s3-compatible, so s3 is useds3_endpoint:sss.pigsty # minio endpoint domain name, `sss.pigsty` by defaults3_region:us-east-1 # minio region, us-east-1 by default, useless for minios3_bucket:pgsql # minio bucket name, `pgsql` by defaults3_key:pgbackrest # minio user access key for pgbackrests3_key_secret:S3User.Backup # minio user secret key for pgbackrests3_uri_style:path # use path style uri for minio rather than host stylepath:/pgbackrest # minio backup path, default is `/pgbackrest`storage_port:9000# minio port, 9000 by defaultstorage_ca_file:/pg/cert/ca.crt # minio ca file path, `/pg/cert/ca.crt` by defaultbundle:y# bundle small files into a single filecipher_type:aes-256-cbc # enable AES encryption for remote backup repocipher_pass:pgBackRest # AES encryption password, default is 'pgBackRest'retention_full_type:time # retention full backup by time on minio reporetention_full:14# keep full backup for last 14 days
Note that if you are using a multi-node MinIO cluster and exposing services through a load balancer, you need to modify the s3_endpoint and storage_port parameters accordingly.
14.2 - Configuration
Choose the appropriate MinIO deployment type based on your requirements and provide reliable access.
Before deploying MinIO, you need to define a MinIO cluster in the config inventory. MinIO has three classic deployment modes:
Single-Node Single-Disk: SNSD: Single-node single-disk mode, can use any directory as a data disk, for development, testing, and demo only.
Single-Node Multi-Disk: SNMD: Compromise mode, using multiple disks (>=2) on a single server, only when resources are extremely limited.
Multi-Node Multi-Disk: MNMD: Multi-node multi-disk mode, standard production deployment with the best reliability, but requires multiple servers.
We recommend using SNSD and MNMD modes - the former for development and testing, the latter for production deployment. SNMD should only be used when resources are limited (only one server).
When using a multi-node MinIO cluster, you can access the service from any node, so the best practice is to use load balancing with high availability service access in front of the MinIO cluster.
Core Parameters
In MinIO deployment, MINIO_VOLUMES is a core configuration parameter that specifies the MinIO deployment mode.
Pigsty provides convenient parameters to automatically generate MINIO_VOLUMES and other configuration values based on the config inventory, but you can also specify them directly.
Single-Node Single-Disk: MINIO_VOLUMES points to a regular directory on the local machine, specified by minio_data, defaulting to /data/minio.
Single-Node Multi-Disk: MINIO_VOLUMES points to a series of mount points on the local machine, also specified by minio_data, but requires special syntax to explicitly specify real mount points, e.g., /data{1...4}.
Multi-Node Multi-Disk: MINIO_VOLUMES points to mount points across multiple servers, automatically generated from two parts:
First, use minio_data to specify the disk mount point sequence for each cluster member /data{1...4}
Also use minio_node to specify the node naming pattern ${minio_cluster}-${minio_seq}.pigsty
Multi-Pool: You need to explicitly specify the minio_volumes parameter to allocate nodes for each storage pool
In single-node mode, the only required parameters are minio_seq and minio_cluster, which uniquely identify each MinIO instance.
Single-node single-disk mode is for development purposes only, so you can use a regular directory as the data directory, specified by minio_data, defaulting to /data/minio.
When using MinIO, we strongly recommend accessing it via a statically resolved domain name. For example, if minio_domain uses the default sss.pigsty,
you can add a static resolution on all nodes to facilitate access to this service.
node_etc_hosts:["10.10.10.10 sss.pigsty"]# domain name to access minio from all nodes (required)
SNSD is for Development Only
Single-node single-disk mode should only be used for development, testing, and demo purposes, as it cannot tolerate any hardware failure and does not benefit from multi-disk performance improvements. For production, use Multi-Node Multi-Disk mode.
To use multiple disks on a single node, the operation is similar to Single-Node Single-Disk, but you need to specify minio_data in the format {{ prefix }}{x...y}, which defines a series of disk mount points.
minio:hosts:{10.10.10.10:{minio_seq:1}}vars:minio_cluster:minio # minio cluster name, minio by defaultminio_data:'/data{1...4}'# minio data dir(s), use {x...y} to specify multi drivers
Use Real Disk Mount Points
Note that SNMD mode does not support using regular directories as data directories. If you start MinIO in SNMD mode but the data directory is not a valid disk mount point, MinIO will refuse to start. Ensure you use real disks formatted with XFS.
For example, the Vagrant MinIO sandbox defines a single-node MinIO cluster with 4 disks: /data1, /data2, /data3, and /data4. Before starting MinIO, you need to mount them properly (be sure to format disks with xfs):
mkfs.xfs /dev/vdb; mkdir /data1; mount -t xfs /dev/sdb /data1;# mount disk 1...mkfs.xfs /dev/vdc; mkdir /data2; mount -t xfs /dev/sdb /data2;# mount disk 2...mkfs.xfs /dev/vdd; mkdir /data3; mount -t xfs /dev/sdb /data3;# mount disk 3...mkfs.xfs /dev/vde; mkdir /data4; mount -t xfs /dev/sdb /data4;# mount disk 4...
Disk mounting is part of server provisioning and beyond Pigsty’s scope. Mounted disks should be written to /etc/fstab for auto-mounting after server restart.
SNMD mode can utilize multiple disks on a single machine to provide higher performance and capacity, and tolerate partial disk failures.
However, single-node mode cannot tolerate entire node failure, and you cannot add new nodes at runtime, so we do not recommend using SNMD mode in production unless you have special reasons.
For example, the following configuration defines a MinIO cluster with four nodes, each with four disks:
minio:hosts:10.10.10.10:{minio_seq: 1 } # actual nodename:minio-1.pigsty10.10.10.11:{minio_seq: 2 } # actual nodename:minio-2.pigsty10.10.10.12:{minio_seq: 3 } # actual nodename:minio-3.pigsty10.10.10.13:{minio_seq: 4 } # actual nodename:minio-4.pigstyvars:minio_cluster:miniominio_data:'/data{1...4}'# 4-disk per nodeminio_node:'${minio_cluster}-${minio_seq}.pigsty'# minio node name pattern
The minio_node parameter specifies the MinIO node name pattern, used to generate a unique name for each node.
By default, the node name is ${minio_cluster}-${minio_seq}.pigsty, where ${minio_cluster} is the cluster name and ${minio_seq} is the node sequence number.
The MinIO instance name is crucial and will be automatically written to /etc/hosts on MinIO nodes for static resolution. MinIO relies on these names to identify and access other nodes in the cluster.
In this case, MINIO_VOLUMES will be set to https://minio-{1...4}.pigsty/data{1...4} to identify the four disks on four nodes.
You can directly specify the minio_volumes parameter in the MinIO cluster to override the automatically generated value.
However, this is usually not necessary as Pigsty will automatically generate it based on the config inventory.
Multi-Pool
MinIO’s architecture allows scaling by adding new storage pools. In Pigsty, you can achieve cluster scaling by explicitly specifying the minio_volumes parameter to allocate nodes for each storage pool.
For example, suppose you have already created the MinIO cluster defined in the Multi-Node Multi-Disk example, and now you want to add a new storage pool with four more nodes.
You need to directly override the minio_volumes parameter:
minio:hosts:10.10.10.10:{minio_seq:1}10.10.10.11:{minio_seq:2}10.10.10.12:{minio_seq:3}10.10.10.13:{minio_seq:4}10.10.10.14:{minio_seq:5}10.10.10.15:{minio_seq:6}10.10.10.16:{minio_seq:7}10.10.10.17:{minio_seq:8}vars:minio_cluster:miniominio_data:"/data{1...4}"minio_node:'${minio_cluster}-${minio_seq}.pigsty'# minio node name patternminio_volumes:'https://minio-{1...4}.pigsty:9000/data{1...4} https://minio-{5...8}.pigsty:9000/data{1...4}'
Here, the two space-separated parameters represent two storage pools, each with four nodes and four disks per node. For more information on storage pools, refer to Administration: MinIO Cluster Expansion
Multiple Clusters
You can deploy new MinIO nodes as a completely new MinIO cluster by defining a new group with a different cluster name. The following configuration declares two independent MinIO clusters:
Note that Pigsty defaults to having only one MinIO cluster per deployment. If you need to deploy multiple MinIO clusters, some parameters with default values must be explicitly set and cannot be omitted, otherwise naming conflicts will occur, as shown above.
Expose Service
MinIO serves on port 9000 by default. A multi-node MinIO cluster can be accessed by connecting to any one of its nodes.
Service access falls under the scope of the NODE module, and we’ll provide only a basic introduction here.
High-availability access to a multi-node MinIO cluster can be achieved using L2 VIP or HAProxy. For example, you can use keepalived to bind an L2 VIP to the MinIO cluster,
or use the haproxy component provided by the NODE module to expose MinIO services through a load balancer.
# minio cluster with 4 nodes and 4 drivers per nodeminio:hosts:10.10.10.10:{minio_seq: 1 , nodename:minio-1 }10.10.10.11:{minio_seq: 2 , nodename:minio-2 }10.10.10.12:{minio_seq: 3 , nodename:minio-3 }10.10.10.13:{minio_seq: 4 , nodename:minio-4 }vars:minio_cluster:miniominio_data:'/data{1...4}'minio_buckets:[{name:pgsql }, { name: infra }, { name: redis } ]minio_users:- {access_key: dba , secret_key: S3User.DBA, policy:consoleAdmin }- {access_key: pgbackrest , secret_key: S3User.SomeNewPassWord , policy:readwrite }# bind a node l2 vip (10.10.10.9) to minio cluster (optional)node_cluster:miniovip_enabled:truevip_vrid:128vip_address:10.10.10.9vip_interface:eth1# expose minio service with haproxy on all nodeshaproxy_services:- name:minio # [REQUIRED] service name, uniqueport:9002# [REQUIRED] service port, uniquebalance:leastconn # [OPTIONAL] load balancer algorithmoptions:# [OPTIONAL] minio health check- option httpchk- option http-keep-alive- http-check send meth OPTIONS uri /minio/health/live- http-check expect status 200servers:- {name: minio-1 ,ip: 10.10.10.10 ,port: 9000 ,options:'check-ssl ca-file /etc/pki/ca.crt check port 9000'}- {name: minio-2 ,ip: 10.10.10.11 ,port: 9000 ,options:'check-ssl ca-file /etc/pki/ca.crt check port 9000'}- {name: minio-3 ,ip: 10.10.10.12 ,port: 9000 ,options:'check-ssl ca-file /etc/pki/ca.crt check port 9000'}- {name: minio-4 ,ip: 10.10.10.13 ,port: 9000 ,options:'check-ssl ca-file /etc/pki/ca.crt check port 9000'}
For example, the configuration above enables HAProxy on all nodes of the MinIO cluster, exposing MinIO services on port 9002, and binds a Layer 2 VIP to the cluster.
When in use, users should point the sss.pigsty domain name to the VIP address 10.10.10.9 and access MinIO services using port 9002. This ensures high availability, as the VIP will automatically switch to another node if any node fails.
In this scenario, you may also need to globally modify the domain name resolution destination and the minio_endpoint parameter to change the endpoint address for the MinIO alias on the admin node:
minio_endpoint: https://sss.pigsty:9002 # Override the default:https://sss.pigsty:9000node_etc_hosts:["10.10.10.9 sss.pigsty"]# Other nodes will use sss.pigsty domain to access MinIO
Dedicated Load Balancer
Pigsty allows using a dedicated load balancer server group instead of the cluster itself to run VIP and HAProxy. For example, the prod template uses this approach.
proxy:hosts:10.10.10.18 :{nodename: proxy1 ,node_cluster: proxy ,vip_interface: eth1 ,vip_role:master }10.10.10.19 :{nodename: proxy2 ,node_cluster: proxy ,vip_interface: eth1 ,vip_role:backup }vars:vip_enabled:truevip_address:10.10.10.20vip_vrid:20haproxy_services: # expose minio service :sss.pigsty:9000- name:minio # [REQUIRED] service name, uniqueport:9000# [REQUIRED] service port, uniquebalance:leastconn# Use leastconn algorithm and minio health checkoptions:["option httpchk","option http-keep-alive","http-check send meth OPTIONS uri /minio/health/live","http-check expect status 200"]servers:# reload service with ./node.yml -t haproxy_config,haproxy_reload- {name: minio-1 ,ip: 10.10.10.21 ,port: 9000 ,options:'check-ssl ca-file /etc/pki/ca.crt check port 9000'}- {name: minio-2 ,ip: 10.10.10.22 ,port: 9000 ,options:'check-ssl ca-file /etc/pki/ca.crt check port 9000'}- {name: minio-3 ,ip: 10.10.10.23 ,port: 9000 ,options:'check-ssl ca-file /etc/pki/ca.crt check port 9000'}- {name: minio-4 ,ip: 10.10.10.24 ,port: 9000 ,options:'check-ssl ca-file /etc/pki/ca.crt check port 9000'}- {name: minio-5 ,ip: 10.10.10.25 ,port: 9000 ,options:'check-ssl ca-file /etc/pki/ca.crt check port 9000'}
In this case, you typically need to globally modify the MinIO domain resolution to point sss.pigsty to the load balancer address, and modify the minio_endpoint parameter to change the endpoint address for the MinIO alias on the admin node:
minio_endpoint: https://sss.pigsty:9002 # overwrite the defaults:https://sss.pigsty:9000node_etc_hosts:["10.10.10.20 sss.pigsty"]# domain name to access minio from all nodes (required)
Access Service
To access MinIO exposed via HAProxy, taking PGSQL backup configuration as an example, you can modify the configuration in pgbackrest_repo to add a new backup repository definition:
# This is the newly added HA MinIO Repo definition, USE THIS INSTEAD!minio_ha:type:s3s3_endpoint: minio-1.pigsty # s3_endpoint can be any load balancer:10.10.10.1{0,1,2},or domain names pointing to any of the nodess3_region: us-east-1 # you can use external domain name:sss.pigsty, which resolves to any member (`minio_domain`)s3_bucket: pgsql # instance & nodename can be used:minio-1.pigsty minio-1.pigsty minio-1.pigsty minio-1 minio-2 minio-3s3_key:pgbackrest # Better using a dedicated password for MinIO pgbackrest users3_key_secret:S3User.SomeNewPassWords3_uri_style:pathpath:/pgbackreststorage_port:9002# Use load balancer port 9002 instead of default 9000 (direct access)storage_ca_file:/etc/pki/ca.crtbundle:ycipher_type:aes-256-cbc # Better using a new cipher password for your production environmentcipher_pass:pgBackRest.With.Some.Extra.PassWord.And.Salt.${pg_cluster}retention_full_type:timeretention_full:14
Expose Console
MinIO provides a Web console interface on port 9001 by default (specified by the minio_admin_port parameter).
Exposing the admin interface to external networks may pose security risks. If you want to do this, add MinIO to infra_portal and refresh the Nginx configuration.
Note that the MinIO console requires HTTPS. Please DO NOT expose an unencrypted MinIO console in production.
This means you typically need to add a resolution record for m.pigsty in your DNS server or local /etc/hosts file to access the MinIO console.
Meanwhile, if you are using Pigsty’s self-signed CA rather than a proper public CA, you usually need to manually trust the CA or certificate to skip the “insecure” warning in the browser.
14.3 - Parameters
MinIO module provides 21 configuration parameters for customizing your MinIO cluster.
The MinIO module parameter list contains 21 parameters in two groups:
MINIO: 18 parameters for MinIO cluster deployment and configuration
MINIO_REMOVE: 3 parameters for MinIO cluster removal
Architecture Change: Pigsty v3.6+
Since Pigsty v3.6, the minio.yml playbook no longer includes removal functionality. Removal-related parameters have been migrated to the dedicated minio_remove role and minio-rm.yml playbook.
Parameter Overview
The MINIO parameter group is used for MinIO cluster deployment and configuration, including identity, storage paths, ports, authentication credentials, and provisioning of buckets and users.
#-----------------------------------------------------------------# MINIO#-----------------------------------------------------------------#minio_seq: 1 # minio instance identifier, REQUIREDminio_cluster:minio # minio cluster name, minio by defaultminio_user:minio # minio os user, `minio` by defaultminio_https:true# enable HTTPS for MinIO? true by defaultminio_node:'${minio_cluster}-${minio_seq}.pigsty'# minio node name patternminio_data:'/data/minio'# minio data dir, use `{x...y}` for multiple disks#minio_volumes: # minio core parameter, auto-generated if not specifiedminio_domain:sss.pigsty # minio external domain, `sss.pigsty` by defaultminio_port:9000# minio service port, 9000 by defaultminio_admin_port:9001# minio console port, 9001 by defaultminio_access_key:minioadmin # root access key, `minioadmin` by defaultminio_secret_key:S3User.MinIO # root secret key, `S3User.MinIO` by defaultminio_extra_vars:''# extra environment variables for minio serverminio_provision:true# run minio provisioning tasks?minio_alias:sss # minio client alias for the deployment#minio_endpoint: https://sss.pigsty:9000 # endpoint for alias, auto-generated if not specifiedminio_buckets:# list of minio buckets to be created- {name:pgsql }- {name: meta ,versioning:true}- {name:data }minio_users:# list of minio users to be created- {access_key: pgbackrest ,secret_key: S3User.Backup ,policy:pgsql }- {access_key: s3user_meta ,secret_key: S3User.Meta ,policy:meta }- {access_key: s3user_data ,secret_key: S3User.Data ,policy:data }
#-----------------------------------------------------------------# MINIO_REMOVE#-----------------------------------------------------------------minio_safeguard:false# prevent accidental removal? false by defaultminio_rm_data:true# remove minio data during removal? true by defaultminio_rm_pkg:false# uninstall minio packages during removal? false by default
MINIO
This section contains parameters for the minio role,
used by the minio.yml playbook.
minio_seq
Parameter: minio_seq, Type: int, Level: I
MinIO instance identifier, a required identity parameter. No default value—you must assign it manually.
Best practice is to start from 1, increment by 1, and never reuse previously assigned sequence numbers.
The sequence number, together with the cluster name minio_cluster, uniquely identifies each MinIO instance (e.g., minio-1).
In multi-node deployments, sequence numbers are also used to generate node names, which are written to the /etc/hosts file for static resolution.
minio_cluster
Parameter: minio_cluster, Type: string, Level: C
MinIO cluster name, default is minio. This is useful when deploying multiple MinIO clusters.
The cluster name, together with the sequence number minio_seq, uniquely identifies each MinIO instance.
For example, with cluster name minio and sequence 1, the instance name is minio-1.
Note that Pigsty defaults to a single MinIO cluster per deployment. If you need multiple MinIO clusters,
you must explicitly set minio_alias, minio_domain, minio_endpoint, and other parameters to avoid naming conflicts.
minio_user
Parameter: minio_user, Type: username, Level: C
MinIO operating system user, default is minio.
The MinIO service runs under this user. SSL certificates used by MinIO are stored in this user’s home directory (default /home/minio), under the ~/.minio/certs/ directory.
minio_https
Parameter: minio_https, Type: bool, Level: G/C
Enable HTTPS for MinIO service? Default is true.
Note that pgBackREST requires MinIO to use HTTPS to work properly. If you don’t use MinIO for PostgreSQL backups and don’t need HTTPS, you can set this to false.
When HTTPS is enabled, Pigsty automatically issues SSL certificates for the MinIO server, containing the domain specified in minio_domain and the IP addresses of each node.
minio_node
Parameter: minio_node, Type: string, Level: C
MinIO node name pattern, used for multi-node deployments.
Default value: ${minio_cluster}-${minio_seq}.pigsty, which uses the instance name plus .pigsty suffix as the default node name.
The domain pattern specified here is used to generate node names, which are written to the /etc/hosts file on all MinIO nodes.
minio_data
Parameter: minio_data, Type: path, Level: C
MinIO data directory(s), default value: /data/minio, a common directory for single-node deployments.
In single-node deployment (single or multi-drive), minio_volumes directly uses the minio_data value.
In multi-node deployment, minio_volumes uses minio_node, minio_port, and minio_data to generate multi-node addresses.
In multi-pool deployment, you typically need to explicitly specify and override minio_volumes to define multiple node pool addresses.
When specifying this parameter, ensure the values are consistent with minio_node, minio_port, and minio_data.
minio_domain
Parameter: minio_domain, Type: string, Level: G
MinIO service domain name, default is sss.pigsty.
Clients can access the MinIO S3 service via this domain name. This name is registered in local DNSMASQ and included in SSL certificates’ SAN (Subject Alternative Name) field.
It’s recommended to add a static DNS record in node_etc_hosts pointing this domain to the MinIO server node’s IP (single-node deployment) or load balancer VIP (multi-node deployment).
minio_port
Parameter: minio_port, Type: port, Level: C
MinIO service port, default is 9000.
This is the MinIO S3 API listening port. Clients access the object storage service through this port. In multi-node deployments, this port is also used for inter-node communication.
minio_admin_port
Parameter: minio_admin_port, Type: port, Level: C
MinIO console port, default is 9001.
This is the listening port for MinIO’s built-in web management console. You can access MinIO’s graphical management interface at https://<minio-ip>:9001.
To expose the MinIO console through Nginx, add it to infra_portal. Note that the MinIO console requires HTTPS and WebSocket support.
minio_access_key
Parameter: minio_access_key, Type: username, Level: C
Root access key (username), default is minioadmin.
This is the MinIO super administrator username with full access to all buckets and objects. It’s recommended to change this default value in production environments.
minio_secret_key
Parameter: minio_secret_key, Type: password, Level: C
Root secret key (password), default is S3User.MinIO.
This is the MinIO super administrator’s password, used together with minio_access_key.
Security Warning: Change the default password!
Using default passwords is a high-risk behavior! Make sure to change this password in your production deployment.
Tip: Running ./configure or ./configure -g will automatically replace these default passwords in the configuration template.
minio_extra_vars
Parameter: minio_extra_vars, Type: string, Level: C
Extra environment variables for MinIO server. See the MinIO Server documentation for the complete list.
Default is an empty string. You can use multiline strings to pass multiple environment variables:
When enabled, Pigsty automatically creates the buckets and users defined in minio_buckets and minio_users.
Set this to false if you don’t need automatic provisioning of these resources.
minio_alias
Parameter: minio_alias, Type: string, Level: G
MinIO client alias for the local MinIO cluster, default value: sss.
This alias is written to the MinIO client configuration file (~/.mcli/config.json) for the admin user on the admin node,
allowing you to directly use mcli <alias> commands to access the MinIO cluster, e.g., mcli ls sss/.
If deploying multiple MinIO clusters, specify different aliases for each cluster to avoid conflicts.
minio_endpoint
Parameter: minio_endpoint, Type: string, Level: C
Endpoint for the client alias. If specified, this minio_endpoint (e.g., https://sss.pigsty:9002) will replace the default value as the target endpoint for the MinIO alias written on the admin node.
mcli aliasset{{ minio_alias }}{% if minio_endpoint is defined and minio_endpoint !='' %}{{ minio_endpoint }}{% else %}https://{{ minio_domain }}:{{ minio_port }}{% endif %}{{ minio_access_key }}{{ minio_secret_key }}
This MinIO alias is configured on the admin node as the default admin user.
minio_buckets
Parameter: minio_buckets, Type: bucket[], Level: C
List of MinIO buckets to create by default:
minio_buckets:- {name:pgsql }- {name: meta ,versioning:true}- {name:data }
Three default buckets are created with different purposes and policies:
pgsql bucket: Used by default for PostgreSQL pgBackREST backup storage.
meta bucket: Open bucket with versioning enabled, suitable for storing important metadata requiring version management.
data bucket: Open bucket for other purposes, e.g., Supabase templates may use this bucket for business data.
Each bucket has a corresponding access policy with the same name. For example, the pgsql policy has full access to the pgsql bucket, and so on.
You can also add a lock flag to bucket definitions to enable object locking, preventing accidental deletion of objects in the bucket.
Remove MinIO data during removal? Default value is true.
When enabled, the minio-rm.yml playbook will delete MinIO data directories and configuration files during cluster removal.
minio_rm_pkg
Parameter: minio_rm_pkg, Type: bool, Level: G/C/A
Uninstall MinIO packages during removal? Default value is false.
When enabled, the minio-rm.yml playbook will uninstall MinIO packages during cluster removal. This is disabled by default to preserve the MinIO installation for potential future use.
14.4 - Playbook
Manage MinIO clusters with Ansible playbooks and quick command reference.
The MinIO module provides two built-in playbooks for cluster management:
The playbook automatically skips hosts without minio_seq defined. This means you can safely execute the playbook on mixed host groups - only actual MinIO nodes will be processed.
Architecture Change: Pigsty v3.6+
Since Pigsty v3.6, the minio.yml playbook focuses on cluster installation. All removal operations have been moved to the dedicated minio-rm.yml playbook using the minio_remove role.
To prevent accidental deletion, Pigsty’s MINIO module provides a safeguard mechanism controlled by the minio_safeguard parameter.
By default, minio_safeguard is false, allowing removal operations. If you want to protect the MinIO cluster from accidental deletion, enable this safeguard in the config inventory:
minio_safeguard:true# When enabled, minio-rm.yml will refuse to execute
If you need to remove a protected cluster, override with command-line parameters:
./minio-rm.yml -l minio -e minio_safeguard=false
Demo
14.5 - Administration
MinIO cluster management SOP: create, destroy, expand, shrink, and handle node and disk failures.
Create Cluster
To create a cluster, define it in the config inventory and run the minio.yml playbook.
Starting from Pigsty v3.6, cluster removal has been migrated from minio.yml playbook to the dedicated minio-rm.yml playbook. The old minio_clean task has been deprecated.
The removal playbook automatically performs the following:
Deregisters MinIO targets from Victoria/Prometheus monitoring
Removes records from the DNS service on INFRA nodes
Stops and disables MinIO systemd service
Deletes MinIO data directory and configuration files (optional)
MinIO cannot scale at the node/disk level, but can scale at the storage pool (multiple nodes) level.
Assume you have a four-node MinIO cluster and want to double the capacity by adding a new four-node storage pool.
minio:hosts:10.10.10.10:{minio_seq: 1 , nodename:minio-1 }10.10.10.11:{minio_seq: 2 , nodename:minio-2 }10.10.10.12:{minio_seq: 3 , nodename:minio-3 }10.10.10.13:{minio_seq: 4 , nodename:minio-4 }vars:minio_cluster:miniominio_data:'/data{1...4}'minio_buckets:[{name:pgsql }, { name: infra }, { name: redis } ]minio_users:- {access_key: dba , secret_key: S3User.DBA, policy:consoleAdmin }- {access_key: pgbackrest , secret_key: S3User.SomeNewPassWord , policy:readwrite }# bind a node l2 vip (10.10.10.9) to minio cluster (optional)node_cluster:miniovip_enabled:truevip_vrid:128vip_address:10.10.10.9vip_interface:eth1# expose minio service with haproxy on all nodeshaproxy_services:- name:minio # [REQUIRED] service name, uniqueport:9002# [REQUIRED] service port, uniquebalance:leastconn # [OPTIONAL] load balancer algorithmoptions:# [OPTIONAL] minio health check- option httpchk- option http-keep-alive- http-check send meth OPTIONS uri /minio/health/live- http-check expect status 200servers:- {name: minio-1 ,ip: 10.10.10.10 ,port: 9000 ,options:'check-ssl ca-file /etc/pki/ca.crt check port 9000'}- {name: minio-2 ,ip: 10.10.10.11 ,port: 9000 ,options:'check-ssl ca-file /etc/pki/ca.crt check port 9000'}- {name: minio-3 ,ip: 10.10.10.12 ,port: 9000 ,options:'check-ssl ca-file /etc/pki/ca.crt check port 9000'}- {name: minio-4 ,ip: 10.10.10.13 ,port: 9000 ,options:'check-ssl ca-file /etc/pki/ca.crt check port 9000'}
First, modify the MinIO cluster definition to add four new nodes, assigning sequence numbers 5 to 8.
The key step is to modify the minio_volumes parameter to designate the new four nodes as a new storage pool.
Step 6 (optional): If you are using a load balancer, make sure the load balancer configuration is updated. For example, add the new four nodes to the load balancer configuration:
# expose minio service with haproxy on all nodeshaproxy_services:- name:minio # [REQUIRED] service name, uniqueport:9002# [REQUIRED] service port, uniquebalance:leastconn # [OPTIONAL] load balancer algorithmoptions:# [OPTIONAL] minio health check- option httpchk- option http-keep-alive- http-check send meth OPTIONS uri /minio/health/live- http-check expect status 200servers:- {name: minio-1 ,ip: 10.10.10.10 ,port: 9000 ,options:'check-ssl ca-file /etc/pki/ca.crt check port 9000'}- {name: minio-2 ,ip: 10.10.10.11 ,port: 9000 ,options:'check-ssl ca-file /etc/pki/ca.crt check port 9000'}- {name: minio-3 ,ip: 10.10.10.12 ,port: 9000 ,options:'check-ssl ca-file /etc/pki/ca.crt check port 9000'}- {name: minio-4 ,ip: 10.10.10.13 ,port: 9000 ,options:'check-ssl ca-file /etc/pki/ca.crt check port 9000'}- {name: minio-5 ,ip: 10.10.10.14 ,port: 9000 ,options:'check-ssl ca-file /etc/pki/ca.crt check port 9000'}- {name: minio-6 ,ip: 10.10.10.15 ,port: 9000 ,options:'check-ssl ca-file /etc/pki/ca.crt check port 9000'}- {name: minio-7 ,ip: 10.10.10.16 ,port: 9000 ,options:'check-ssl ca-file /etc/pki/ca.crt check port 9000'}- {name: minio-8 ,ip: 10.10.10.17 ,port: 9000 ,options:'check-ssl ca-file /etc/pki/ca.crt check port 9000'}
Then, run the haproxy subtask of the node.yml playbook to update the load balancer configuration:
MinIO cannot shrink at the node/disk level, but can retire at the storage pool (multiple nodes) level — add a new storage pool, drain the old storage pool to the new one, then retire the old storage pool.
# 1. Remove the failed node from the clusterbin/node-rm <your_old_node_ip>
# 2. Replace the failed node with the same node name (if IP changes, modify the MinIO cluster definition)bin/node-add <your_new_node_ip>
# 3. Install and configure MinIO on the new node./minio.yml -l <your_new_node_ip>
# 4. Instruct MinIO to perform heal actionmc admin heal
# 1. Unmount the failed disk from the clusterumount /dev/<your_disk_device>
# 2. Replace the failed disk, format with xfsmkfs.xfs /dev/sdb -L DRIVE1
# 3. Don't forget to setup fstab for auto-mountvi /etc/fstab
# LABEL=DRIVE1 /mnt/drive1 xfs defaults,noatime 0 2# 4. Remountmount -a
# 5. Instruct MinIO to perform heal actionmc admin heal
14.6 - Monitoring
How to monitor MinIO in Pigsty? How to use MinIO’s built-in console? What alerting rules are worth noting?
Built-in Console
MinIO has a built-in management console. By default, you can access this interface via HTTPS through the admin port (minio_admin_port, default 9001) of any MinIO instance.
In most configuration templates that provide MinIO services, MinIO is exposed as a custom service at m.pigsty. After configuring domain name resolution, you can access the MinIO console at https://m.pigsty.
The MinIO console requires HTTPS access. If you use Pigsty’s self-signed CA, you need to trust the CA certificate in your browser, or manually accept the security warning.
Pigsty Monitoring
Pigsty provides two monitoring dashboards related to the MINIO module:
MinIO Overview: Displays overall monitoring metrics for the MinIO cluster, including cluster status, storage usage, request rates, etc.
MinIO Instance: Displays monitoring metrics details for a single MinIO instance, including CPU, memory, network, disk, etc.
MinIO monitoring metrics are collected through MinIO’s native Prometheus endpoint (/minio/v2/metrics/cluster), and by default are scraped and stored by Victoria Metrics.
Pigsty Alerting
Pigsty provides the following three alerting rules for MinIO:
Complete list of monitoring metrics provided by the Pigsty MINIO module with explanations
The MINIO module contains 79 available monitoring metrics.
Metric Name
Type
Labels
Description
minio_audit_failed_messages
counter
ip, job, target_id, cls, instance, server, ins
Total number of messages that failed to send since start
minio_audit_target_queue_length
gauge
ip, job, target_id, cls, instance, server, ins
Number of unsent messages in queue for target
minio_audit_total_messages
counter
ip, job, target_id, cls, instance, server, ins
Total number of messages sent since start
minio_cluster_bucket_total
gauge
ip, job, cls, instance, server, ins
Total number of buckets in the cluster
minio_cluster_capacity_raw_free_bytes
gauge
ip, job, cls, instance, server, ins
Total free capacity online in the cluster
minio_cluster_capacity_raw_total_bytes
gauge
ip, job, cls, instance, server, ins
Total capacity online in the cluster
minio_cluster_capacity_usable_free_bytes
gauge
ip, job, cls, instance, server, ins
Total free usable capacity online in the cluster
minio_cluster_capacity_usable_total_bytes
gauge
ip, job, cls, instance, server, ins
Total usable capacity online in the cluster
minio_cluster_drive_offline_total
gauge
ip, job, cls, instance, server, ins
Total drives offline in this cluster
minio_cluster_drive_online_total
gauge
ip, job, cls, instance, server, ins
Total drives online in this cluster
minio_cluster_drive_total
gauge
ip, job, cls, instance, server, ins
Total drives in this cluster
minio_cluster_health_erasure_set_healing_drives
gauge
pool, ip, job, cls, set, instance, server, ins
Get the count of healing drives of this erasure set
minio_cluster_health_erasure_set_online_drives
gauge
pool, ip, job, cls, set, instance, server, ins
Get the count of the online drives in this erasure set
minio_cluster_health_erasure_set_read_quorum
gauge
pool, ip, job, cls, set, instance, server, ins
Get the read quorum for this erasure set
minio_cluster_health_erasure_set_status
gauge
pool, ip, job, cls, set, instance, server, ins
Get current health status for this erasure set
minio_cluster_health_erasure_set_write_quorum
gauge
pool, ip, job, cls, set, instance, server, ins
Get the write quorum for this erasure set
minio_cluster_health_status
gauge
ip, job, cls, instance, server, ins
Get current cluster health status
minio_cluster_nodes_offline_total
gauge
ip, job, cls, instance, server, ins
Total number of MinIO nodes offline
minio_cluster_nodes_online_total
gauge
ip, job, cls, instance, server, ins
Total number of MinIO nodes online
minio_cluster_objects_size_distribution
gauge
ip, range, job, cls, instance, server, ins
Distribution of object sizes across a cluster
minio_cluster_objects_version_distribution
gauge
ip, range, job, cls, instance, server, ins
Distribution of object versions across a cluster
minio_cluster_usage_deletemarker_total
gauge
ip, job, cls, instance, server, ins
Total number of delete markers in a cluster
minio_cluster_usage_object_total
gauge
ip, job, cls, instance, server, ins
Total number of objects in a cluster
minio_cluster_usage_total_bytes
gauge
ip, job, cls, instance, server, ins
Total cluster usage in bytes
minio_cluster_usage_version_total
gauge
ip, job, cls, instance, server, ins
Total number of versions (includes delete marker) in a cluster
minio_cluster_webhook_failed_messages
counter
ip, job, cls, instance, server, ins
Number of messages that failed to send
minio_cluster_webhook_online
gauge
ip, job, cls, instance, server, ins
Is the webhook online?
minio_cluster_webhook_queue_length
counter
ip, job, cls, instance, server, ins
Webhook queue length
minio_cluster_webhook_total_messages
counter
ip, job, cls, instance, server, ins
Total number of messages sent to this target
minio_cluster_write_quorum
gauge
ip, job, cls, instance, server, ins
Maximum write quorum across all pools and sets
minio_node_file_descriptor_limit_total
gauge
ip, job, cls, instance, server, ins
Limit on total number of open file descriptors for the MinIO Server process
minio_node_file_descriptor_open_total
gauge
ip, job, cls, instance, server, ins
Total number of open file descriptors by the MinIO Server process
minio_node_go_routine_total
gauge
ip, job, cls, instance, server, ins
Total number of go routines running
minio_node_ilm_expiry_pending_tasks
gauge
ip, job, cls, instance, server, ins
Number of pending ILM expiry tasks in the queue
minio_node_ilm_transition_active_tasks
gauge
ip, job, cls, instance, server, ins
Number of active ILM transition tasks
minio_node_ilm_transition_missed_immediate_tasks
gauge
ip, job, cls, instance, server, ins
Number of missed immediate ILM transition tasks
minio_node_ilm_transition_pending_tasks
gauge
ip, job, cls, instance, server, ins
Number of pending ILM transition tasks in the queue
minio_node_ilm_versions_scanned
counter
ip, job, cls, instance, server, ins
Total number of object versions checked for ilm actions since server start
minio_node_io_rchar_bytes
counter
ip, job, cls, instance, server, ins
Total bytes read by the process from the underlying storage system including cache, /proc/[pid]/io rchar
minio_node_io_read_bytes
counter
ip, job, cls, instance, server, ins
Total bytes read by the process from the underlying storage system, /proc/[pid]/io read_bytes
minio_node_io_wchar_bytes
counter
ip, job, cls, instance, server, ins
Total bytes written by the process to the underlying storage system including page cache, /proc/[pid]/io wchar
minio_node_io_write_bytes
counter
ip, job, cls, instance, server, ins
Total bytes written by the process to the underlying storage system, /proc/[pid]/io write_bytes
minio_node_process_cpu_total_seconds
counter
ip, job, cls, instance, server, ins
Total user and system CPU time spent in seconds
minio_node_process_resident_memory_bytes
gauge
ip, job, cls, instance, server, ins
Resident memory size in bytes
minio_node_process_starttime_seconds
gauge
ip, job, cls, instance, server, ins
Start time for MinIO process per node, time in seconds since Unix epoc
minio_node_process_uptime_seconds
gauge
ip, job, cls, instance, server, ins
Uptime for MinIO process per node in seconds
minio_node_scanner_bucket_scans_finished
counter
ip, job, cls, instance, server, ins
Total number of bucket scans finished since server start
minio_node_scanner_bucket_scans_started
counter
ip, job, cls, instance, server, ins
Total number of bucket scans started since server start
minio_node_scanner_directories_scanned
counter
ip, job, cls, instance, server, ins
Total number of directories scanned since server start
minio_node_scanner_objects_scanned
counter
ip, job, cls, instance, server, ins
Total number of unique objects scanned since server start
minio_node_scanner_versions_scanned
counter
ip, job, cls, instance, server, ins
Total number of object versions scanned since server start
minio_node_syscall_read_total
counter
ip, job, cls, instance, server, ins
Total read SysCalls to the kernel. /proc/[pid]/io syscr
minio_node_syscall_write_total
counter
ip, job, cls, instance, server, ins
Total write SysCalls to the kernel. /proc/[pid]/io syscw
minio_notify_current_send_in_progress
gauge
ip, job, cls, instance, server, ins
Number of concurrent async Send calls active to all targets (deprecated, please use ‘minio_notify_target_current_send_in_progress’ instead)
minio_notify_events_errors_total
counter
ip, job, cls, instance, server, ins
Events that were failed to be sent to the targets (deprecated, please use ‘minio_notify_target_failed_events’ instead)
minio_notify_events_sent_total
counter
ip, job, cls, instance, server, ins
Total number of events sent to the targets (deprecated, please use ‘minio_notify_target_total_events’ instead)
minio_notify_events_skipped_total
counter
ip, job, cls, instance, server, ins
Events that were skipped to be sent to the targets due to the in-memory queue being full
minio_s3_requests_4xx_errors_total
counter
ip, job, cls, instance, server, ins, api
Total number of S3 requests with (4xx) errors
minio_s3_requests_errors_total
counter
ip, job, cls, instance, server, ins, api
Total number of S3 requests with (4xx and 5xx) errors
minio_s3_requests_incoming_total
gauge
ip, job, cls, instance, server, ins
Total number of incoming S3 requests
minio_s3_requests_inflight_total
gauge
ip, job, cls, instance, server, ins, api
Total number of S3 requests currently in flight
minio_s3_requests_rejected_auth_total
counter
ip, job, cls, instance, server, ins
Total number of S3 requests rejected for auth failure
minio_s3_requests_rejected_header_total
counter
ip, job, cls, instance, server, ins
Total number of S3 requests rejected for invalid header
minio_s3_requests_rejected_invalid_total
counter
ip, job, cls, instance, server, ins
Total number of invalid S3 requests
minio_s3_requests_rejected_timestamp_total
counter
ip, job, cls, instance, server, ins
Total number of S3 requests rejected for invalid timestamp
minio_s3_requests_total
counter
ip, job, cls, instance, server, ins, api
Total number of S3 requests
minio_s3_requests_ttfb_seconds_distribution
gauge
ip, job, cls, le, instance, server, ins, api
Distribution of time to first byte across API calls
minio_s3_requests_waiting_total
gauge
ip, job, cls, instance, server, ins
Total number of S3 requests in the waiting queue
minio_s3_traffic_received_bytes
counter
ip, job, cls, instance, server, ins
Total number of s3 bytes received
minio_s3_traffic_sent_bytes
counter
ip, job, cls, instance, server, ins
Total number of s3 bytes sent
minio_software_commit_info
gauge
ip, job, cls, instance, commit, server, ins
Git commit hash for the MinIO release
minio_software_version_info
gauge
ip, job, cls, instance, version, server, ins
MinIO Release tag for the server
minio_up
Unknown
ip, job, cls, instance, ins
N/A
minio_usage_last_activity_nano_seconds
gauge
ip, job, cls, instance, server, ins
Time elapsed (in nano seconds) since last scan activity.
scrape_duration_seconds
Unknown
ip, job, cls, instance, ins
N/A
scrape_samples_post_metric_relabeling
Unknown
ip, job, cls, instance, ins
N/A
scrape_samples_scraped
Unknown
ip, job, cls, instance, ins
N/A
scrape_series_added
Unknown
ip, job, cls, instance, ins
N/A
up
Unknown
ip, job, cls, instance, ins
N/A
14.8 - FAQ
Frequently asked questions about the Pigsty MINIO object storage module
What version of MinIO does Pigsty use?
MinIO announced entering maintenance mode on 2025-12-03, no longer releasing new feature versions, only security patches and maintenance versions, and stopped releasing binary RPM/DEB on 2025-10-15.
So Pigsty forked its own MinIO and used minio/pkger to create the latest 2025-12-03 version.
This version fixes the MinIO CVE-2025-62506 security vulnerability, ensuring Pigsty users’ MinIO deployments are safe and reliable.
You can find the RPM/DEB packages and build scripts in the Pigsty Infra repository.
Why does MinIO require HTTPS?
When pgBackRest uses object storage as a backup repository, HTTPS is mandatory to ensure data transmission security.
If your MinIO is not used for pgBackRest backup, you can still choose to use HTTP protocol.
You can disable HTTPS by modifying the parameter minio_https.
Getting invalid certificate error when accessing MinIO from containers?
Unless you use certificates issued by a real enterprise CA, MinIO uses self-signed certificates by default, which causes client tools inside containers (such as mc / rclone / awscli, etc.) to be unable to verify the identity of the MinIO server, resulting in invalid certificate errors.
For example, for Node.js applications, you can mount the MinIO server’s CA certificate into the container and specify the CA certificate path via the environment variable NODE_EXTRA_CA_CERTS:
Of course, if your MinIO is not used as a pgBackRest backup repository, you can also choose to disable MinIO’s HTTPS support and use HTTP protocol instead.
What if multi-node/multi-disk MinIO cluster fails to start?
In Single-Node Multi-Disk or Multi-Node Multi-Disk mode, if the data directory is not a valid disk mount point, MinIO will refuse to start.
Please use mounted disks as MinIO’s data directory instead of regular directories. You can only use regular directories as MinIO’s data directory in Single-Node Single-Disk mode, which is only suitable for development testing or non-critical scenarios.
How to add new members to an existing MinIO cluster?
Before deployment, you should plan MinIO cluster capacity, as adding new members requires a global restart.
You can scale MinIO by adding new server nodes to the existing cluster to create a new storage pool.
Note that once MinIO is deployed, you cannot modify the number of nodes and disks in the existing cluster! You can only scale by adding new storage pools.
Starting from Pigsty v3.6, removing a MinIO cluster requires using the dedicated minio-rm.yml playbook:
./minio-rm.yml -l minio # Remove MinIO cluster./minio-rm.yml -l minio -e minio_rm_data=false# Remove cluster but keep data
If you have enabled minio_safeguard protection, you need to explicitly override it to perform removal:
./minio-rm.yml -l minio -e minio_safeguard=false
What’s the difference between mcli and mc commands?
mcli is a renamed version of the official MinIO client mc. In Pigsty, we use mcli instead of mc to avoid conflicts with Midnight Commander (a common file manager that also uses the mc command).
Both have identical functionality, just with different command names. You can find the complete command reference in the MinIO Client documentation.
How to monitor MinIO cluster status?
Pigsty provides out-of-the-box monitoring capabilities for MinIO:
Alerting Rules: Including MinIO down, node offline, disk offline alerts
MinIO Built-in Console: Access via https://<minio-ip>:9001
For details, please refer to the Monitoring documentation
15 - Module: REDIS
Pigsty has built-in Redis support, a high-performance in-memory data structure server. Deploy Redis in standalone, cluster, or sentinel mode as a companion to PostgreSQL.
Redis is a widely popular open-source high-performance in-memory data structure server, and a great companion to PostgreSQL.
Redis in Pigsty is a production-ready complete solution supporting master-slave replication, sentinel high availability, and native cluster mode, with integrated monitoring and logging capabilities, along with automated installation, configuration, and operation playbooks.
15.1 - Configuration
Choose the appropriate Redis mode for your use case and express your requirements through the inventory
Concept
The entity model of Redis is almost the same as that of PostgreSQL, which also includes the concepts of Cluster and Instance. Note that the Cluster here does not refer to the native Redis Cluster mode.
The core difference between the REDIS module and the PGSQL module is that Redis uses a single-node multi-instance deployment rather than the 1:1 deployment: multiple Redis instances are typically deployed on a physical/virtual machine node to utilize multi-core CPUs fully. Therefore, the ways to configure and administer Redis instances are slightly different from PGSQL.
In Redis managed by Pigsty, nodes are entirely subordinate to the cluster, which means that currently, it is not allowed to deploy Redis instances of two different clusters on one node. However, this does not affect deploying multiple independent Redis primary-replica instances on one node. Of course, there are some limitations; for example, in this case, you cannot specify different passwords for different instances on the same node.
Identity Parameters
Redis identity parameters are required parameters when defining a Redis cluster.
A Redis node can only belong to one Redis cluster, which means you cannot assign a node to two different Redis clusters simultaneously.
On each Redis node, you need to assign a unique port number to each Redis instance to avoid port conflicts.
Typically, the same Redis cluster will use the same password, but multiple Redis instances on a Redis node cannot have different passwords (because redis_exporter only allows one password).
Redis Cluster has built-in HA, while standalone master-slave HA requires additional manual configuration in Sentinel since we don’t know if you have deployed Sentinel.
For web application session storage with some persistence needs:
redis-session:hosts:10.10.10.10:{redis_node: 1 , redis_instances:{6379:{}, 6380:{replica_of:'10.10.10.10 6379'}}}vars:redis_cluster:redis-sessionredis_password:'session.password'redis_max_memory:1GBredis_mem_policy:volatile-lru # only evict keys with expire setredis_rdb_save:['300 1']# save every 5 minutes if at least 1 changeredis_aof_enabled:false
Message Queue Cluster
For simple message queue scenarios requiring higher data reliability:
redis-queue:hosts:10.10.10.10:{redis_node: 1 , redis_instances:{6379:{}, 6380:{replica_of:'10.10.10.10 6379'}}}vars:redis_cluster:redis-queueredis_password:'queue.password'redis_max_memory:4GBredis_mem_policy:noeviction # reject writes when memory full, don't evictredis_rdb_save:['60 1']# save every minute if at least 1 changeredis_aof_enabled:true# enable AOF for better persistence
High Availability Master-Slave Cluster
Master-slave cluster with Sentinel automatic failover:
For high-volume, high-throughput scenarios using native distributed cluster:
redis-cluster:hosts:10.10.10.10:{redis_node: 1 , redis_instances:{6379:{}, 6380:{}, 6381:{}}}10.10.10.11:{redis_node: 2 , redis_instances:{6379:{}, 6380:{}, 6381:{}}}10.10.10.12:{redis_node: 3 , redis_instances:{6379:{}, 6380:{}, 6381:{}}}10.10.10.13:{redis_node: 4 , redis_instances:{6379:{}, 6380:{}, 6381:{}}}vars:redis_cluster:redis-clusterredis_password:'cluster.password'redis_mode:clusterredis_cluster_replicas:1# 1 replica per primary shardredis_max_memory:16GB # max memory per instanceredis_rdb_save:['900 1']redis_aof_enabled:false# This creates a 6-primary, 6-replica native cluster# Total capacity ~96GB (6 * 16GB)
Security Hardening Configuration
Recommended security configuration for production environments:
redis-secure:hosts:10.10.10.10:{redis_node: 1 , redis_instances:{6379:{}}}vars:redis_cluster:redis-secureredis_password:'StrongP@ssw0rd!'# use strong passwordredis_bind_address:''# bind to internal IP instead of 0.0.0.0redis_max_memory:4GBredis_rename_commands:# rename dangerous commandsFLUSHDB:'DANGEROUS_FLUSHDB'FLUSHALL:'DANGEROUS_FLUSHALL'DEBUG:''# disable commandCONFIG:'ADMIN_CONFIG'
The REDIS parameter group is used for Redis cluster deployment and configuration, including identity, instance definitions, operating mode, memory configuration, persistence, and monitoring.
The Redis module contains 18 deployment parameters and 3 removal parameters.
#redis_cluster: <CLUSTER> # Redis cluster name, required identity parameter#redis_node: 1 <NODE> # Redis node number, unique in cluster#redis_instances: {} <NODE> # Redis instance definitions on this noderedis_fs_main:/data # Redis main data directory, `/data` by defaultredis_exporter_enabled:true# Enable Redis Exporter?redis_exporter_port:9121# Redis Exporter listen portredis_exporter_options:''# Redis Exporter CLI argumentsredis_mode: standalone # Redis mode:standalone, cluster, sentinelredis_conf:redis.conf # Redis config template, except sentinelredis_bind_address:'0.0.0.0'# Redis bind address, empty uses host IPredis_max_memory:1GB # Max memory for each Redis instanceredis_mem_policy:allkeys-lru # Redis memory eviction policyredis_password:''# Redis password, empty disables passwordredis_rdb_save:['1200 1']# Redis RDB save directives, empty disables RDBredis_aof_enabled:false# Enable Redis AOF?redis_rename_commands:{}# Rename dangerous Redis commandsredis_cluster_replicas:1# Replicas per master in Redis native clusterredis_sentinel_monitor:[]# Master list for Sentinel, sentinel mode only# REDIS_REMOVEredis_safeguard:false# Prevent removing running Redis instances?redis_rm_data:true# Remove Redis data directory when removing?redis_rm_pkg:false# Uninstall Redis packages when removing?
redis_cluster
Parameter: redis_cluster, Type: string, Level: C
Redis cluster name, a required identity parameter that must be explicitly configured at the cluster level. It serves as the namespace for resources within the cluster.
Must follow the naming pattern [a-z][a-z0-9-]* to comply with various identity constraints. Using redis- as a cluster name prefix is recommended.
redis_node
Parameter: redis_node, Type: int, Level: I
Redis node sequence number, a required identity parameter that must be explicitly configured at the node (Host) level.
A positive integer that should be unique within the cluster, used to distinguish and identify different nodes. Assign starting from 0 or 1.
redis_instances
Parameter: redis_instances, Type: dict, Level: I
Redis instance definitions on the current node, a required parameter that must be explicitly configured at the node (Host) level.
Format is a JSON key-value object where keys are numeric port numbers and values are instance-specific JSON configuration items.
Each Redis instance listens on a unique port on its node. The replica_of field in instance configuration sets the upstream master address to establish replication:
Main data disk mount point for Redis, default is /data. Pigsty creates a redis directory under this path to store Redis data.
The actual data storage directory is /data/redis, owned by the redis OS user. See FHS: Redis for internal structure details.
redis_exporter_enabled
Parameter: redis_exporter_enabled, Type: bool, Level: C
Enable Redis Exporter monitoring component?
Enabled by default, deploying one exporter per Redis node, listening on redis_exporter_port9121 by default. It scrapes metrics from all Redis instances on the node.
When set to false, roles/redis/tasks/exporter.yml still renders config files but skips starting the redis_exporter systemd service (the redis_exporter_launch task has when: redis_exporter_enabled|bool), allowing manually configured exporters to remain.
redis_exporter_port
Parameter: redis_exporter_port, Type: port, Level: C
Extra CLI arguments for Redis Exporter, rendered to /etc/default/redis_exporter (see roles/redis/tasks/exporter.yml), default is empty string. REDIS_EXPORTER_OPTS is appended to the systemd service’s ExecStart=/bin/redis_exporter $REDIS_EXPORTER_OPTS, useful for configuring extra scrape targets or filtering behavior.
sentinel: Redis high availability component: Sentinel
When using standalone mode, Pigsty sets up Redis replication based on the replica_of parameter.
When using cluster mode, Pigsty creates a native Redis cluster using all defined instances based on the redis_cluster_replicas parameter.
When redis_mode=sentinel, redis.yml executes the redis-ha phase (lines 80-130 of redis.yml) to distribute targets from redis_sentinel_monitor to all sentinels. When redis_mode=cluster, it also executes the redis-join phase (lines 134-180) calling redis-cli --cluster create --cluster-yes ... --cluster-replicas {{ redis_cluster_replicas }}. Both phases are automatically triggered in normal ./redis.yml -l <cluster> runs, or can be run separately with -t redis-ha or -t redis-join.
IP address Redis server binds to. Empty string uses the hostname defined in the inventory.
Default: 0.0.0.0, binding to all available IPv4 addresses on the host.
For security in production environments, bind only to internal IPs by setting this to empty string ''.
When empty, the template roles/redis/templates/redis.conf uses inventory_hostname to render bind <ip>, binding to the management address declared in the inventory.
Redis password. Empty string disables password, which is the default behavior.
Note that due to redis_exporter implementation limitations, you can only set one redis_password per node. This is usually not a problem since Pigsty doesn’t allow deploying two different Redis clusters on the same node.
Pigsty automatically writes this password to /etc/default/redis_exporter (REDIS_PASSWORD=...) and uses it in the redis-ha phase with redis-cli -a <password>, so no need to separately configure exporter or Sentinel authentication.
Use a strong password in production environments
redis_rdb_save
Parameter: redis_rdb_save, Type: string[], Level: C
Redis RDB save directives. Use empty list to disable RDB.
Default is ["1200 1"]: dump dataset to disk every 20 minutes if at least 1 key changed.
Parameter: redis_cluster_replicas, Type: int, Level: C
Number of replicas per master/primary in Redis native cluster. Default: 1, meaning one replica per master.
redis_sentinel_monitor
Parameter: redis_sentinel_monitor, Type: master[], Level: C
List of masters for Redis Sentinel to monitor, used only on sentinel clusters. Each managed master is defined as:
redis_sentinel_monitor:# primary list for redis sentinel, use cls as name, primary ip:port- {name: redis-src, host: 10.10.10.45, port: 6379 ,password: redis.src, quorum:1}- {name: redis-dst, host: 10.10.10.48, port: 6379 ,password: redis.dst, quorum:1}
name and host are required; port, password, and quorum are optional. quorum sets the number of sentinels needed to agree on master failure, typically more than half of sentinel instances (default is 1).
Starting from Pigsty 4.0, you can add remove: true to an entry, causing the redis-ha phase to only execute SENTINEL REMOVE <name>, useful for cleaning up targets no longer needed.
REDIS_REMOVE
The following parameters are used by the redis_remove role, invoked by the redis-rm.yml playbook, controlling Redis instance removal behavior.
Remove Redis data directory when removing Redis instances? Default is true.
The data directory (/data/redis/) contains Redis RDB and AOF files. If not removed, newly deployed Redis instances will load data from these backup files.
Set to false to preserve data directories for later recovery.
redis_rm_pkg
Parameter: redis_rm_pkg, Type: bool, Level: G/C/A
Uninstall Redis and redis_exporter packages when removing Redis instances? Default is false.
Typically not needed to uninstall packages; only enable when completely cleaning up a node.
15.3 - Playbook
Manage Redis clusters with Ansible playbooks and quick command reference.
The REDIS module provides two playbooks for deploying/removing Redis clusters/nodes/instances:
Create redis user and directory structure on all nodes
Start redis_exporter on all nodes
Deploy and start all defined Redis instances
Register all instances to the monitoring system
If sentinel mode, configure sentinel monitoring targets
If cluster mode, form the native cluster
Node-Level Operations
Deploy only all Redis instances on the specified node:
./redis.yml -l 10.10.10.10 # deploy all instances on this node./redis.yml -l 10.10.10.11 # deploy another node
Node-level operations are useful for:
Scaling up by adding new nodes to an existing cluster
Redeploying all instances on a specific node
Reinitializing after node failure recovery
Note: Node-level operations do not execute the redis-ha and redis-join stages. If you need to add a new node to a native cluster, you must manually run redis-cli --cluster add-node
Instance-Level Operations
Use the -e redis_port=<port> parameter to operate on a single instance:
# Deploy only the 6379 port instance on 10.10.10.10./redis.yml -l 10.10.10.10 -e redis_port=6379# Deploy only the 6380 port instance on 10.10.10.11./redis.yml -l 10.10.10.11 -e redis_port=6380
Instance-level operations are useful for:
Adding new instances to an existing node
Redeploying a single failed instance
Updating a single instance’s configuration
When redis_port is specified:
Only renders the config file for that port
Only starts/restarts the systemd service for that port
Only registers that instance to the monitoring system
Does not affect other instances on the same node
Common Tags
Use the -t <tag> parameter to selectively execute certain tasks:
# Install packages only, don't start services./redis.yml -l redis-ms -t redis_node
# Update config and restart instances only./redis.yml -l redis-ms -t redis_config,redis_launch
# Update monitoring registration only./redis.yml -l redis-ms -t redis_register
# Configure sentinel monitoring targets only (sentinel mode)./redis.yml -l redis-sentinel -t redis-ha
# Form native cluster only (cluster mode, auto-runs after first deployment)./redis.yml -l redis-cluster -t redis-join
Idempotency
redis.yml is idempotent and safe to run repeatedly:
Does not check if instances already exist; directly renders config and restarts
Suitable for batch updates after configuration changes
Tip: If you only want to update configs without restarting all instances, use -t redis_config to render configs only, then manually restart the instances you need.
redis-rm.yml
The redis-rm.yml playbook for removing Redis contains the following subtasks:
redis_safeguard : Safety check, abort ifredis_safeguard=trueredis_deregister : Remove registration from monitoring system
- rm_metrics : Delete /infra/targets/redis/*.yml
- rm_logs : Revoke /etc/vector/redis.yaml
redis_exporter : Stop and disable redis_exporter
redis : Stop and disable redis instances
redis_data : Delete data directories (when redis_rm_data=true)redis_pkg : Uninstall packages (when redis_rm_pkg=true)
Operation Levels
redis-rm.yml also supports three operation levels:
Level
Parameters
Description
Cluster
-l <cluster>
Remove all nodes and instances of the entire Redis cluster
Node
-l <ip>
Remove all Redis instances on the specified node
Instance
-l <ip> -e redis_port=<port>
Remove only a single instance on the specified node
Deregister all instances on all nodes from the monitoring system
Stop redis_exporter on all nodes
Stop and disable all Redis instances
Delete all data directories (if redis_rm_data=true)
Uninstall packages (if redis_rm_pkg=true)
Node-Level Removal
Remove only all Redis instances on the specified node:
./redis-rm.yml -l 10.10.10.10 # remove all instances on this node./redis-rm.yml -l 10.10.10.11 # remove another node
Node-level removal is useful for:
Scaling down by removing an entire node
Cleanup before node decommission
Preparation before node migration
Node-level removal will:
Deregister all instances on that node from the monitoring system
Stop redis_exporter on that node
Stop all Redis instances on that node
Delete all data directories on that node
Delete Vector logging config on that node
Instance-Level Removal
Use the -e redis_port=<port> parameter to remove a single instance:
# Remove only the 6379 port instance on 10.10.10.10./redis-rm.yml -l 10.10.10.10 -e redis_port=6379# Remove only the 6380 port instance on 10.10.10.11./redis-rm.yml -l 10.10.10.11 -e redis_port=6380
Instance-level removal is useful for:
Removing a single replica from a node
Removing instances no longer needed
Removing the original primary after failover
Behavioral differences when redis_port is specified:
Component
Node-Level (no redis_port)
Instance-Level (with redis_port)
Monitoring registration
Delete entire node’s registration file
Only remove that instance from registration file
redis_exporter
Stop and disable
No operation (other instances still need it)
Redis instances
Stop all instances
Only stop the specified port’s instance
Data directory
Delete entire /data/redis/ directory
Only delete /data/redis/<cluster>-<node>-<port>/
Vector config
Delete /etc/vector/redis.yaml
No operation (other instances still need it)
Packages
Optionally uninstall
No operation
Control Parameters
redis-rm.yml provides the following control parameters:
Parameter
Default
Description
redis_safeguard
false
Safety guard; when true, refuses to execute removal
redis_rm_data
true
Whether to delete data directories (RDB/AOF files)
redis_rm_pkg
false
Whether to uninstall Redis packages
Usage examples:
# Remove cluster but keep data directories./redis-rm.yml -l redis-ms -e redis_rm_data=false# Remove cluster and uninstall packages./redis-rm.yml -l redis-ms -e redis_rm_pkg=true# Bypass safeguard to force removal./redis-rm.yml -l redis-ms -e redis_safeguard=false
Safeguard Mechanism
When a cluster has redis_safeguard: true configured, redis-rm.yml will refuse to execute:
redis-production:vars:redis_safeguard:true# enable protection for production
$ ./redis-rm.yml -l redis-production
TASK [ABORT due to redis_safeguard enabled] ***
fatal: [10.10.10.10]: FAILED! => {"msg": "Abort due to redis_safeguard..."}
You can use the redis.yml playbook to initialize Redis clusters, nodes, or instances:
# Initialize all Redis instances in the cluster./redis.yml -l <cluster> # init redis cluster# Initialize all Redis instances on a specific node./redis.yml -l 10.10.10.10 # init redis node# Initialize a specific Redis instance: 10.10.10.11:6379./redis.yml -l 10.10.10.11 -e redis_port=6379 -t redis
Note that Redis cannot reload configuration online. You must restart Redis using the launch task to make configuration changes take effect.
Using Redis Client
Access Redis instances with redis-cli:
$ redis-cli -h 10.10.10.10 -p 6379# <--- connect with host and port10.10.10.10:6379> auth redis.ms # <--- authenticate with passwordOK
10.10.10.10:6379> set a 10# <--- set a keyOK
10.10.10.10:6379> get a # <--- get the key value"10"
Redis provides the redis-benchmark tool, which can be used for Redis performance evaluation or to generate load for testing.
# Promote a Redis instance to primary> REPLICAOF NO ONE
"OK"# Make a Redis instance a replica of another instance> REPLICAOF 127.0.0.1 6799"OK"
Configure HA with Sentinel
Redis standalone master-slave clusters can be configured for automatic high availability through Redis Sentinel. For detailed information, please refer to the Sentinel official documentation.
Using the four-node sandbox environment as an example, a Redis Sentinel cluster redis-meta can be used to manage multiple standalone Redis master-slave clusters.
Taking the one-master-one-slave Redis standalone cluster redis-ms as an example, you need to add the target on each Sentinel instance using SENTINEL MONITOR and provide the password using SENTINEL SET, and the high availability is configured.
# For each sentinel, add the redis master to sentinel management: (26379,26380,26381)$ redis-cli -h 10.10.10.11 -p 26379 -a redis.meta
10.10.10.11:26379> SENTINEL MONITOR redis-ms 10.10.10.10 6379110.10.10.11:26379> SENTINEL SET redis-ms auth-pass redis.ms # if auth enabled, password needs to be configured
If you want to remove a Redis master-slave cluster managed by Sentinel, use SENTINEL REMOVE <name>.
You can use the redis_sentinel_monitor parameter defined on the Sentinel cluster to automatically configure the list of masters managed by Sentinel.
redis_sentinel_monitor:# list of masters to be monitored, port, password, quorum (should be more than 1/2 of sentinels) are optional- {name: redis-src, host: 10.10.10.45, port: 6379 ,password: redis.src, quorum:1}- {name: redis-dst, host: 10.10.10.48, port: 6379 ,password: redis.dst, quorum:1}
The redis-ha stage in redis.yml will render /tmp/<cluster>.monitor on each sentinel instance based on this list and execute SENTINEL REMOVE and SENTINEL MONITOR commands sequentially, ensuring the sentinel management state remains consistent with the inventory. If you only want to remove a target without re-adding it, set remove: true on the monitor object, and the playbook will skip re-registration after SENTINEL REMOVE.
Use the following command to refresh the managed master list on the Redis Sentinel cluster:
./redis.yml -l redis-meta -t redis-ha # replace redis-meta if your Sentinel cluster has a different name
Initialize Redis Native Cluster
When redis_mode is set to cluster, redis.yml will additionally execute the redis-join stage: it uses redis-cli --cluster create --cluster-yes ... --cluster-replicas {{ redis_cluster_replicas }} in /tmp/<cluster>-join.sh to join all instances into a native cluster.
This step runs automatically during the first deployment. Subsequently re-running ./redis.yml -l <cluster> -t redis-join will regenerate and execute the same command. Since --cluster create is not idempotent, you should only trigger this stage separately when you are sure you need to rebuild the entire native cluster.
Scale Up Redis Nodes
Scale Up Standalone Cluster
When adding new nodes/instances to an existing Redis master-slave cluster, first add the new definition in the inventory:
./redis.yml -l 10.10.10.11 # deploy only the new node
Scale Up Native Cluster
Adding new nodes to a Redis native cluster requires additional steps:
# 1. Add the new node definition in the inventory# 2. Deploy the new node./redis.yml -l 10.10.10.14
# 3. Add the new node to the cluster (manual execution)redis-cli --cluster add-node 10.10.10.14:6379 10.10.10.12:6379
# 4. Reshard slots if neededredis-cli --cluster reshard 10.10.10.12:6379
Scale Up Sentinel Cluster
To add new instances to a Sentinel cluster:
# Add new sentinel instances in the inventory, then execute:./redis.yml -l <sentinel-cluster> -t redis_instance
Scale Down Redis Nodes
Scale Down Standalone Cluster
# 1. If removing a replica, just remove it directly./redis-rm.yml -l 10.10.10.11 -e redis_port=6379# 2. If removing the primary, first perform a failoverredis-cli -h 10.10.10.10 -p 6380 REPLICAOF NO ONE # promote replicaredis-cli -h 10.10.10.10 -p 6379 REPLICAOF 10.10.10.10 6380# demote original primary# 3. Then remove the original primary./redis-rm.yml -l 10.10.10.10 -e redis_port=6379# 4. Update the inventory to remove the definition
Scale Down Native Cluster
# 1. First migrate data slotsredis-cli --cluster reshard 10.10.10.12:6379 \
--cluster-from <node-id> --cluster-to <target-node-id> --cluster-slots <count>
# 2. Remove node from clusterredis-cli --cluster del-node 10.10.10.12:6379 <node-id>
# 3. Remove the instance./redis-rm.yml -l 10.10.10.14
# 4. Update the inventory
# Check replication statusredis-cli -h 10.10.10.10 -p 6379 INFO replication
# Check replication lagredis-cli -h 10.10.10.10 -p 6380 INFO replication | grep lag
Performance Tuning
Memory Optimization
redis-cache:vars:redis_max_memory:4GB # set based on available memoryredis_mem_policy:allkeys-lru # LRU recommended for cache scenariosredis_conf:redis.conf
Persistence Optimization
# Pure cache scenario: disable persistenceredis-cache:vars:redis_rdb_save:[]# disable RDBredis_aof_enabled:false# disable AOF# Data safety scenario: enable both RDB and AOFredis-data:vars:redis_rdb_save:['900 1','300 10','60 10000']redis_aof_enabled:true
Connection Pool Recommendations
When connecting to Redis from client applications:
Use connection pooling to avoid frequent connection creation
Set reasonable timeout values (recommended 1-3 seconds)
Enable TCP keepalive
For high-concurrency scenarios, consider using Pipeline for batch operations
Key Monitoring Metrics
Monitor these metrics through Grafana dashboards:
Memory usage: Pay attention when redis:ins:mem_usage > 80%
CPU usage: Pay attention when redis:ins:cpu_usage > 70%
QPS: Watch for spikes and abnormal fluctuations
Response time: Investigate when redis:ins:rt > 1ms
Start time of the Redis instance since unix epoch in seconds.
redis_target_scrape_request_errors_total
counter
cls, ip, instance, ins, job
Errors in requests to the exporter
redis_total_error_replies
counter
cls, ip, instance, ins, job
total_error_replies metric
redis_total_reads_processed
counter
cls, ip, instance, ins, job
total_reads_processed metric
redis_total_system_memory_bytes
gauge
cls, ip, instance, ins, job
total_system_memory_bytes metric
redis_total_writes_processed
counter
cls, ip, instance, ins, job
total_writes_processed metric
redis_tracking_clients
gauge
cls, ip, instance, ins, job
tracking_clients metric
redis_tracking_total_items
gauge
cls, ip, instance, ins, job
tracking_total_items metric
redis_tracking_total_keys
gauge
cls, ip, instance, ins, job
tracking_total_keys metric
redis_tracking_total_prefixes
gauge
cls, ip, instance, ins, job
tracking_total_prefixes metric
redis_unexpected_error_replies
counter
cls, ip, instance, ins, job
unexpected_error_replies metric
redis_up
gauge
cls, ip, instance, ins, job
Information about the Redis instance
redis_uptime_in_seconds
gauge
cls, ip, instance, ins, job
uptime_in_seconds metric
scrape_duration_seconds
Unknown
cls, ip, instance, ins, job
N/A
scrape_samples_post_metric_relabeling
Unknown
cls, ip, instance, ins, job
N/A
scrape_samples_scraped
Unknown
cls, ip, instance, ins, job
N/A
scrape_series_added
Unknown
cls, ip, instance, ins, job
N/A
up
Unknown
cls, ip, instance, ins, job
N/A
15.7 - FAQ
Frequently asked questions about the Pigsty REDIS module
ABORT due to redis_safeguard enabled
This means the Redis instance you are trying to remove has the safeguard enabled: this happens when attempting to remove a Redis instance with redis_safeguard set to true. The redis-rm.yml playbook refuses to execute to prevent accidental deletion of running Redis instances.
You can override this protection with the CLI argument -e redis_safeguard=false to force removal of the Redis instance. This is what redis_safeguard is designed for.
How to add a new Redis instance on a node?
Use bin/redis-add <ip> <port> to deploy a new Redis instance on the node.
How to remove a specific instance from a node?
Use bin/redis-rm <ip> <port> to remove a single Redis instance from the node.
Are there plans to upgrade to Valkey or the latest version?
Since Redis is not a core component of this project, there are currently no plans to update to the latest Redis RSAL / AGPLv3 version or Valkey.
The Redis version in Pigsty is locked to 7.2.6, the last version using the BSD license.
This version has been validated in large-scale production environments, and Pigsty no longer has such scenarios to re-validate the stability and reliability of newer versions.
16 - Module: FERRET
Add MongoDB-compatible protocol support to PostgreSQL using FerretDB
FERRET is an optional module in Pigsty for deploying FerretDB —
a protocol translation middleware built on the PostgreSQL kernel and the DocumentDB extension.
It enables applications using MongoDB drivers to connect and translates those requests into PostgreSQL operations.
Pigsty is a community partner of FerretDB. We have built binary packages for FerretDB and DocumentDB (FerretDB-specific fork),
and provide a ready-to-use configuration template mongo.yml to help you easily deploy enterprise-grade FerretDB clusters.
16.1 - Usage
Install client tools, connect to and use FerretDB
This document describes how to install MongoDB client tools and connect to FerretDB.
Installing Client Tools
You can use MongoDB’s command-line tool MongoSH to access FerretDB.
Use the pig command to add the MongoDB repository, then install mongosh using yum or apt:
pig repo add mongo -u # Add the official MongoDB repositoryyum install mongodb-mongosh # RHEL/CentOS/Rocky/Almaapt install mongodb-mongosh # Debian/Ubuntu
After installation, you can use the mongosh command to connect to FerretDB.
Connecting to FerretDB
You can access FerretDB using any language’s MongoDB driver via a MongoDB connection string. Here’s an example using the mongosh CLI tool:
$ mongosh
Current Mongosh Log ID: 67ba8c1fe551f042bf51e943
Connecting to: mongodb://127.0.0.1:27017/?directConnection=true&serverSelectionTimeoutMS=2000&appName=mongosh+2.4.0
Using MongoDB: 7.0.77
Using Mongosh: 2.4.0
For mongosh info see: https://www.mongodb.com/docs/mongodb-shell/
test>
Using Connection Strings
FerretDB authentication is entirely based on PostgreSQL. Since Pigsty-managed PostgreSQL clusters use scram-sha-256 authentication by default, you must specify the PLAIN authentication mechanism in the connection string:
You can connect to FerretDB using any user that has been created in PostgreSQL:
# Using dbuser_dba usermongosh 'mongodb://dbuser_dba:[email protected]:27017?authMechanism=PLAIN'# Using mongod superusermongosh 'mongodb://mongod:[email protected]:27017?authMechanism=PLAIN'# Connecting to a specific databasemongosh 'mongodb://test:[email protected]:27017/test?authMechanism=PLAIN'
Basic Operations
After connecting to FerretDB, you can operate it just like MongoDB. Here are some basic operation examples:
Database Operations
// Switch to / create database
usemydb// Show all databases
showdbs// Drop current database
db.dropDatabase()
Collection Operations
// Create collection
db.createCollection('users')// Show all collections
showcollections// Drop collection
db.users.drop()
Document Operations
// Insert a single document
db.users.insertOne({name:'Alice',age:30,email:'[email protected]'})// Insert multiple documents
db.users.insertMany([{name:'Bob',age:25},{name:'Charlie',age:35}])// Query documents
db.users.find()db.users.find({age:{$gt:25}})db.users.findOne({name:'Alice'})// Update documents
db.users.updateOne({name:'Alice'},{$set:{age:31}})// Delete documents
db.users.deleteOne({name:'Bob'})db.users.deleteMany({age:{$lt:30}})
Index Operations
// Create indexes
db.users.createIndex({name:1})db.users.createIndex({age:-1})// View indexes
db.users.getIndexes()// Drop index
db.users.dropIndex('name_1')
Differences from MongoDB
FerretDB implements MongoDB’s wire protocol but uses PostgreSQL for underlying storage. This means:
MongoDB commands are translated to SQL statements for execution
Most basic operations are compatible with MongoDB
Some advanced features may differ or not be supported
You can consult the following resources for detailed information:
Key point: All drivers require the authMechanism=PLAIN parameter in the connection string.
16.2 - Configuration
Configure the FerretDB module and define cluster topology
Before deploying a FerretDB cluster, you need to define it in the configuration inventory using the relevant parameters.
FerretDB Cluster
The following example uses the default single-node pg-meta cluster’s meta database as FerretDB’s underlying storage:
all:children:#----------------------------------## ferretdb for mongodb on postgresql#----------------------------------## ./mongo.yml -l ferretferret:hosts:10.10.10.10:{mongo_seq:1}vars:mongo_cluster:ferretmongo_pgurl:'postgres://mongod:[email protected]:5432/meta'
Here, mongo_cluster and mongo_seq are essential identity parameters. For FerretDB, mongo_pgurl is also required to specify the underlying PostgreSQL location.
Note that the mongo_pgurl parameter requires a PostgreSQL superuser. In this example, a dedicated mongod superuser is defined for FerretDB.
Note that FerretDB’s authentication is entirely based on PostgreSQL. You can create other regular users using either FerretDB or PostgreSQL.
PostgreSQL Cluster
FerretDB 2.0+ requires an extension: DocumentDB, which depends on several other extensions. Here’s a template for creating a PostgreSQL cluster for FerretDB:
all:children:#----------------------------------## pgsql (singleton on current node)#----------------------------------## postgres cluster: pg-metapg-meta:hosts:{10.10.10.10:{pg_seq: 1, pg_role:primary } }vars:pg_cluster:pg-metapg_users:- {name: mongod ,password: DBUser.Mongo ,pgbouncer: true ,roles: [dbrole_admin ] ,superuser: true ,comment:ferretdb super user }- {name: dbuser_meta ,password: DBUser.Meta ,pgbouncer: true ,roles: [dbrole_admin] ,comment:pigsty admin user }- {name: dbuser_view ,password: DBUser.Viewer ,pgbouncer: true ,roles: [dbrole_readonly] ,comment:read-only viewer for meta database }pg_databases:- {name: meta, owner: mongod ,baseline: cmdb.sql ,comment: pigsty meta database ,schemas: [pigsty] ,extensions:[documentdb, postgis, vector, pg_cron, rum ]}pg_hba_rules:- {user: dbuser_view , db: all ,addr: infra ,auth: pwd ,title:'allow grafana dashboard access cmdb from infra nodes'}- {user: mongod , db: all ,addr: world ,auth: pwd ,title:'mongodb password access from everywhere'}pg_extensions:- documentdb, citus, postgis, pgvector, pg_cron, rumpg_parameters:cron.database_name:metapg_libs:'pg_documentdb, pg_documentdb_core, pg_cron, pg_stat_statements, auto_explain'
Key configuration points:
User configuration: You need to create a mongod user with superuser privileges for FerretDB to use
Database configuration: The database needs to have the documentdb extension and its dependencies installed
HBA rules: Allow the mongod user to connect from any address with password authentication
Shared libraries: pg_documentdb and pg_documentdb_core need to be preloaded in pg_libs
High Availability
You can use Services to connect to a highly available PostgreSQL cluster, deploy multiple FerretDB instance replicas, and bind an L2 VIP for the FerretDB layer to achieve high availability.
Multi-instance deployment: Deploy FerretDB instances on three nodes, with all instances connecting to the same PostgreSQL backend
VIP configuration: Use Keepalived to bind the virtual IP 10.10.10.99, enabling failover at the FerretDB layer
Service address: Use PostgreSQL’s service address (port 5436 is typically the primary service), ensuring connections go to the correct primary
With this configuration, clients can connect to FerretDB through the VIP address. Even if one FerretDB instance fails, the VIP will automatically float to another available instance.
16.3 - Parameters
Customize FerretDB with 9 parameters
Parameter Overview
The FERRET parameter group is used for FerretDB deployment and configuration, including identity, underlying PostgreSQL connection, listen ports, and SSL settings.
Default is empty string '', meaning listen on all available addresses (0.0.0.0). You can specify a specific IP address to bind to.
mongo_port
Parameter: mongo_port, Type: port, Level: C
Service port for mongo client connections.
Default is 27017, which is the standard MongoDB port. Change this port if you need to avoid port conflicts or have security considerations.
mongo_ssl_port
Parameter: mongo_ssl_port, Type: port, Level: C
TLS listen port for mongo encrypted connections.
Default is 27018. When SSL/TLS is enabled via mongo_ssl_enabled, FerretDB will accept encrypted connections on this port.
mongo_exporter_port
Parameter: mongo_exporter_port, Type: port, Level: C
Exporter port for mongo metrics collection.
Default is 9216. This port is used by FerretDB’s built-in metrics exporter to expose monitoring metrics to Prometheus.
mongo_extra_vars
Parameter: mongo_extra_vars, Type: string, Level: C
Extra environment variables for FerretDB server.
Default is empty string ''. You can specify additional environment variables to pass to the FerretDB process in KEY=VALUE format, with multiple variables separated by spaces.
./mongo.yml -l ferret # Install FerretDB on the ferret group
Since FerretDB uses PostgreSQL as its underlying storage, running this playbook multiple times is generally safe (idempotent).
The FerretDB service is configured to automatically restart on failure (Restart=on-failure), providing basic resilience for this stateless proxy layer.
Remove FerretDB Cluster
To remove a FerretDB cluster, run the mongo_purge subtask of the mongo.yml playbook with the mongo_purge parameter:
Pigsty-managed PostgreSQL clusters use scram-sha-256 as the default authentication method, so you must use PLAIN authentication when connecting to FerretDB. See FerretDB: Authentication for details.
You can also use other PostgreSQL users to access FerretDB by specifying them in the connection string:
MongoDB commands are translated to SQL commands and executed in the underlying PostgreSQL:
usetest// CREATE SCHEMA test;
db.dropDatabase()// DROP SCHEMA test;
db.createCollection('posts')// CREATE TABLE posts(_data JSONB,...)
db.posts.insert({// INSERT INTO posts VALUES(...);
title:'Post One',body:'Body of post one',category:'News',tags:['news','events'],user:{name:'John Doe',status:'author'},date:Date()})db.posts.find().limit(2).pretty()// SELECT * FROM posts LIMIT 2;
db.posts.createIndex({title:1})// CREATE INDEX ON posts(_data->>'title');
If you want to generate some sample load, you can use mongosh to execute the following simple test script:
cat > benchmark.js <<'EOF'
const coll = "testColl";
const numDocs = 10000;
for (let i = 0; i < numDocs; i++) { // insert
db.getCollection(coll).insert({ num: i, name: "MongoDB Benchmark Test" });
}
for (let i = 0; i < numDocs; i++) { // select
db.getCollection(coll).find({ num: i });
}
for (let i = 0; i < numDocs; i++) { // update
db.getCollection(coll).update({ num: i }, { $set: { name: "Updated" } });
}
for (let i = 0; i < numDocs; i++) { // delete
db.getCollection(coll).deleteOne({ num: i });
}
EOFmongosh 'mongodb://dbuser_meta:[email protected]:27017?authMechanism=PLAIN' benchmark.js
You can check the MongoDB commands supported by FerretDB, as well as some known differences. For basic usage, these differences usually aren’t a significant problem.
16.5 - Playbook
Ansible playbooks available for the FERRET module
Pigsty provides a built-in playbook mongo.yml for installing FerretDB on nodes.
Important: This playbook only executes on hosts where mongo_seq is defined.
Running the playbook against hosts without mongo_seq will skip all tasks safely, making it safe to run against mixed host groups.
Wait for service to be available on specified port (default 27017)
The FerretDB service is configured with Restart=on-failure, so it will automatically restart if the process crashes unexpectedly. This provides basic resilience for this stateless proxy service.
mongo_register
Register FerretDB instance to Prometheus monitoring system:
The FerretDB module currently uses basic instance liveness alerts:
- alert:FerretDBDownexpr:ferretdb_up == 0for:1mlabels:severity:criticalannotations:summary:"FerretDB instance {{ $labels.ins }} is down"description:"FerretDB instance {{ $labels.ins }} on {{ $labels.ip }} has been down for more than 1 minute."
Since FerretDB is a stateless proxy layer, the primary monitoring and alerting should focus on the underlying PostgreSQL cluster.
16.7 - Metrics
Complete list of monitoring metrics provided by the FerretDB module
The MONGO module contains 54 available monitoring metrics.
A summary of the pause duration of garbage collection cycles.
go_gc_duration_seconds_count
Unknown
cls, ip, ins, instance, job
N/A
go_gc_duration_seconds_sum
Unknown
cls, ip, ins, instance, job
N/A
go_goroutines
gauge
cls, ip, ins, instance, job
Number of goroutines that currently exist.
go_info
gauge
cls, version, ip, ins, instance, job
Information about the Go environment.
go_memstats_alloc_bytes
gauge
cls, ip, ins, instance, job
Number of bytes allocated and still in use.
go_memstats_alloc_bytes_total
counter
cls, ip, ins, instance, job
Total number of bytes allocated, even if freed.
go_memstats_buck_hash_sys_bytes
gauge
cls, ip, ins, instance, job
Number of bytes used by the profiling bucket hash table.
go_memstats_frees_total
counter
cls, ip, ins, instance, job
Total number of frees.
go_memstats_gc_sys_bytes
gauge
cls, ip, ins, instance, job
Number of bytes used for garbage collection system metadata.
go_memstats_heap_alloc_bytes
gauge
cls, ip, ins, instance, job
Number of heap bytes allocated and still in use.
go_memstats_heap_idle_bytes
gauge
cls, ip, ins, instance, job
Number of heap bytes waiting to be used.
go_memstats_heap_inuse_bytes
gauge
cls, ip, ins, instance, job
Number of heap bytes that are in use.
go_memstats_heap_objects
gauge
cls, ip, ins, instance, job
Number of allocated objects.
go_memstats_heap_released_bytes
gauge
cls, ip, ins, instance, job
Number of heap bytes released to OS.
go_memstats_heap_sys_bytes
gauge
cls, ip, ins, instance, job
Number of heap bytes obtained from system.
go_memstats_last_gc_time_seconds
gauge
cls, ip, ins, instance, job
Number of seconds since 1970 of last garbage collection.
go_memstats_lookups_total
counter
cls, ip, ins, instance, job
Total number of pointer lookups.
go_memstats_mallocs_total
counter
cls, ip, ins, instance, job
Total number of mallocs.
go_memstats_mcache_inuse_bytes
gauge
cls, ip, ins, instance, job
Number of bytes in use by mcache structures.
go_memstats_mcache_sys_bytes
gauge
cls, ip, ins, instance, job
Number of bytes used for mcache structures obtained from system.
go_memstats_mspan_inuse_bytes
gauge
cls, ip, ins, instance, job
Number of bytes in use by mspan structures.
go_memstats_mspan_sys_bytes
gauge
cls, ip, ins, instance, job
Number of bytes used for mspan structures obtained from system.
go_memstats_next_gc_bytes
gauge
cls, ip, ins, instance, job
Number of heap bytes when next garbage collection will take place.
go_memstats_other_sys_bytes
gauge
cls, ip, ins, instance, job
Number of bytes used for other system allocations.
go_memstats_stack_inuse_bytes
gauge
cls, ip, ins, instance, job
Number of bytes in use by the stack allocator.
go_memstats_stack_sys_bytes
gauge
cls, ip, ins, instance, job
Number of bytes obtained from system for stack allocator.
go_memstats_sys_bytes
gauge
cls, ip, ins, instance, job
Number of bytes obtained from system.
go_threads
gauge
cls, ip, ins, instance, job
Number of OS threads created.
mongo_up
Unknown
cls, ip, ins, instance, job
N/A
process_cpu_seconds_total
counter
cls, ip, ins, instance, job
Total user and system CPU time spent in seconds.
process_max_fds
gauge
cls, ip, ins, instance, job
Maximum number of open file descriptors.
process_open_fds
gauge
cls, ip, ins, instance, job
Number of open file descriptors.
process_resident_memory_bytes
gauge
cls, ip, ins, instance, job
Resident memory size in bytes.
process_start_time_seconds
gauge
cls, ip, ins, instance, job
Start time of the process since unix epoch in seconds.
process_virtual_memory_bytes
gauge
cls, ip, ins, instance, job
Virtual memory size in bytes.
process_virtual_memory_max_bytes
gauge
cls, ip, ins, instance, job
Maximum amount of virtual memory available in bytes.
promhttp_metric_handler_errors_total
counter
job, cls, ip, ins, instance, cause
Total number of internal errors encountered by the promhttp metric handler.
promhttp_metric_handler_requests_in_flight
gauge
cls, ip, ins, instance, job
Current number of scrapes being served.
promhttp_metric_handler_requests_total
counter
job, cls, ip, ins, instance, code
Total number of scrapes by HTTP status code.
scrape_duration_seconds
Unknown
cls, ip, ins, instance, job
N/A
scrape_samples_post_metric_relabeling
Unknown
cls, ip, ins, instance, job
N/A
scrape_samples_scraped
Unknown
cls, ip, ins, instance, job
N/A
scrape_series_added
Unknown
cls, ip, ins, instance, job
N/A
up
Unknown
cls, ip, ins, instance, job
N/A
16.8 - FAQ
Frequently asked questions about FerretDB and DocumentDB modules
Why Use FerretDB?
MongoDBwas an amazing technology that allowed developers to escape the “schema constraints” of relational databases and rapidly build applications.
However, over time, MongoDB abandoned its open-source roots and changed its license to SSPL, making it unusable for many open-source projects and early-stage commercial ventures.
Most MongoDB users don’t actually need the advanced features MongoDB offers, but they do need an easy-to-use open-source document database solution. To fill this gap, FerretDB was born.
PostgreSQL’s JSON support is already quite comprehensive: binary JSONB storage, GIN indexes for arbitrary fields, various JSON processing functions, JSON PATH and JSON Schema—it has long been a fully-featured, high-performance document database.
But providing alternative functionality is not the same as direct emulation. FerretDB can provide a smooth migration path to PostgreSQL for applications using MongoDB drivers.
Pigsty’s FerretDB Support History
Pigsty has provided Docker-based FerretDB templates since 1.x and added native deployment support in v2.3.
As an optional component, it greatly enriches the PostgreSQL ecosystem. The Pigsty community has become a partner of the FerretDB community, and deeper collaboration and integration support will follow.
FERRET is an optional module in Pigsty. Since v2.0, it requires the documentdb extension to work.
Pigsty has packaged this extension and provides a mongo.yml template to help you easily deploy FerretDB clusters.
Installing MongoSH
You can use MongoSH as a client tool to access FerretDB clusters.
The recommended approach is to use the pig command to add the MongoDB repository and install:
pig repo add mongo -u # Add the official MongoDB repositoryyum install mongodb-mongosh # RHEL/CentOS/Rocky/Almaapt install mongodb-mongosh # Debian/Ubuntu
FerretDB authentication is entirely based on the underlying PostgreSQL. Since Pigsty-managed PostgreSQL clusters use scram-sha-256 authentication by default, you must specify the PLAIN authentication mechanism in the connection string:
FerretDB 2.0+ uses the documentdb extension, which requires superuser privileges to create and manage internal structures. Therefore, the user specified in mongo_pgurl must be a PostgreSQL superuser.
It’s recommended to create a dedicated mongod superuser for FerretDB to use, rather than using the default postgres user.
How to Achieve High Availability
FerretDB itself is stateless—all data is stored in the underlying PostgreSQL. To achieve high availability:
PostgreSQL layer: Use Pigsty’s PGSQL module to deploy a highly available PostgreSQL cluster
FerretDB layer: Deploy multiple FerretDB instances with a VIP or load balancer
FerretDB’s performance depends on the underlying PostgreSQL cluster. Since MongoDB commands need to be translated to SQL, there is some performance overhead. For most OLTP scenarios, the performance is acceptable.
If you need higher performance, you can:
Use faster storage (NVMe SSD)
Increase PostgreSQL resource allocation
Optimize PostgreSQL parameters
Use connection pooling to reduce connection overhead
17 - Module: DOCKER
Docker daemon service that enables one-click deployment of containerized stateless software templates and additional functionality.
Docker is the most popular containerization platform, providing standardized software delivery capabilities.
Pigsty does not rely on Docker to deploy any of its components; instead, it provides the ability to deploy and install Docker — this is an optional module.
Pigsty offers a series of Docker software/tool/application templates for you to choose from as needed.
This allows users to quickly spin up various containerized stateless software templates, adding extra functionality.
You can use external, Pigsty-managed highly available database clusters while placing stateless applications inside containers.
Pigsty’s Docker module automatically configures accessible registry mirrors for users in mainland China to improve image pulling speed (and availability).
You can easily configure Registry and Proxy settings to flexibly access different image sources.
Pigsty has built-in Docker support, which you can use to quickly deploy containerized applications.
Getting Started
Docker is an optional module, and in most of Pigsty’s configuration templates, Docker is not enabled by default. Therefore, users need to explicitly download and configure it to use Docker in Pigsty.
For example, in the default meta template, Docker is not downloaded or installed by default. However, in the rich single-node template, Docker is downloaded and installed.
The key difference between these two configurations lies in these two parameters: repo_modules and repo_packages.
After Docker is downloaded, you need to set the docker_enabled: true flag on the nodes where you want to install Docker, and configure other parameters as needed.
infra:hosts:10.10.10.10:{infra_seq: 1 ,nodename:infra-1 }10.10.10.11:{infra_seq: 2 ,nodename:infra-2 }vars:docker_enabled:true# Install Docker on this group!
Finally, use the docker.yml playbook to install it on the nodes:
./docker.yml -l infra # Install Docker on the infra group
Installation
If you want to temporarily install Docker directly from the internet on certain nodes, you can use the following command:
This command will first enable the upstream software sources for the node,docker modules on the target nodes, then install the docker-ce and docker-compose-plugin packages (same package names for EL/Debian).
If you want Docker-related packages to be automatically downloaded during Pigsty initialization, refer to the instructions below.
Removal
Because it’s so simple, Pigsty doesn’t provide an uninstall playbook for the Docker module. You can directly remove Docker using an Ansible command:
ansible minio -m package -b -a 'name=docker-ce state=absent'# Remove docker
This command will uninstall the docker-ce package using the OS package manager.
repo_modules:infra,node,pgsql,docker # <--- Enable Docker repositoryrepo_packages:- node-bootstrap, infra-package, infra-addons, node-package1, node-package2, pgsql-common, docker # <--- Download Dockerrepo_extra_packages:- pgsql-main docker# <--- Can also be specified here
The docker specified here (which actually corresponds to the docker-ce and docker-compose-plugin packages) will be automatically downloaded to the local repository during the default install.yml process.
After downloading, the Docker packages will be available to all nodes via the local repository.
If you’ve already completed Pigsty installation and the local repository is initialized, you can run ./infra.yml -t repo_build after modifying the configuration to re-download and rebuild the offline repository.
Installing Docker requires the Docker YUM/APT repository, which is included by default in Pigsty but not enabled. You need to add docker to repo_modules to enable it before installation.
Repository
Downloading Docker requires upstream internet software repositories, which are defined in the default repo_upstream with module name docker:
You can reference this repository using the docker module name in the repo_modules and node_repo_modules parameters.
Note that Docker’s official software repository is blocked by default in mainland China. You need to use mirror sites in China to complete the download.
If you’re in mainland China and encounter Docker download failures, check whether region is set to default in your configuration inventory. The automatically configured region: china can resolve this issue.
Proxy
If your network environment requires a proxy server to access the internet, you can configure the proxy_env parameter in Pigsty’s configuration inventory. This parameter will be written to the proxy related configuration in Docker’s configuration file.
When running configure with the -x parameter, the proxy server configuration from your current environment will be automatically generated into Pigsty’s configuration file under proxy_env.
In addition to using a proxy server, you can also configure Docker Registry Mirrors to bypass blocks.
For users outside the firewall, in addition to the official DockerHub site, you can also consider using the quay.io mirror site. If your internal network environment already has mature image infrastructure, you can use your internal Docker registry mirrors to avoid being affected by external mirror sites and improve download speeds.
Users of public cloud providers can consider using free internal Docker mirrors. For example, if you’re using Alibaba Cloud, you can use Alibaba Cloud’s internal Docker mirror site (requires login):
If you’re using Tencent Cloud, you can use Tencent Cloud’s internal Docker mirror site (requires internal network):
["https://ccr.ccs.tencentyun.com"]# Tencent Cloud mirror, internal network only
Additionally, you can use CF-Workers-docker.io to quickly set up your own Docker image proxy.
You can also consider using free Docker proxy mirrors (use at your own risk!)
Pulling Images
The docker_image and docker_image_cache parameters can be used to directly specify a list of images to pull during Docker installation.
Using this feature, Docker will come with the specified images after installation (provided they can be successfully pulled; this task will be automatically ignored and skipped on failure).
For example, you can specify images to pull in the configuration inventory:
infra:hosts:10.10.10.10:{infra_seq:1}vars:docker_enabled:true# Install Docker on this group!docker_image:- redis:latest # Pull the latest Redis image
Another way to preload images is to use locally saved tgz archives: if you’ve previously exported Docker images using docker save xxx | gzip -c > /tmp/docker/xxx.tgz.
These exported image files can be automatically loaded via the glob specified by the docker_image_cache parameter. The default location is: /tmp/docker/*.tgz.
This means you can place images in the /tmp/docker directory beforehand, and after running docker.yml to install Docker, these image packages will be automatically loaded.
For example, in the self-hosted Supabase tutorial, this technique is used. Before spinning up Supabase and installing Docker, the *.tgz image archives from the local /tmp/supabase directory are copied to the target node’s /tmp/docker directory.
- name:copy local docker imagescopy:src="{{ item }}" dest="/tmp/docker/"with_fileglob:"{{ supa_images }}"vars:# you can override this with -e cli argssupa_images:/tmp/supabase/*.tgz
Applications
Pigsty provides a series of ready-to-use, Docker Compose-based software templates, which you can use to spin up business software that uses external Pigsty-managed database clusters.
17.2 - Parameters
DOCKER module provides 8 configuration parameters
The DOCKER module provides 8 configuration parameters.
Parameter Overview
The DOCKER parameter group is used for Docker container engine deployment and configuration, including enable switch, data directory, storage driver, registry mirrors, and monitoring.
Enable Docker on current node? Default: false, meaning Docker is not enabled.
docker_data
Parameter: docker_data, Type: path, Level: G/C/I
Docker data directory, default is /data/docker.
This directory stores Docker images, containers, volumes, and other data. If you have a dedicated data disk, it’s recommended to point this directory to that disk’s mount point.
Running this playbook will install docker-ce and docker-compose-plugin on target nodes with the docker_enabled: true flag, and enable the dockerd service.
The following are the available task subsets in the docker.yml playbook:
docker_install : Install Docker and Docker Compose packages on the node
docker_admin : Add specified users to the Docker admin user group
docker_alias : Generate Docker command completion and alias scripts
docker_dir : Create Docker related directories
docker_config : Generate Docker daemon service configuration file
docker_launch : Start the Docker daemon service
docker_register : Register Docker daemon as a Prometheus monitoring target
docker_image : Attempt to load pre-cached image tarballs from /tmp/docker/*.tgz (if they exist)
The Docker module does not provide a dedicated uninstall playbook. If you need to uninstall Docker, you can manually stop Docker and then remove it:
systemctl stop docker # Stop Docker daemon serviceyum remove docker-ce docker-compose-plugin # Uninstall Docker on EL systemsapt remove docker-ce docker-compose-plugin # Uninstall Docker on Debian systems
17.4 - Metrics
Complete list of monitoring metrics provided by the Pigsty Docker module
The DOCKER module contains 123 available monitoring metrics.
Metric Name
Type
Labels
Description
builder_builds_failed_total
counter
ip, cls, reason, ins, job, instance
Number of failed image builds
builder_builds_triggered_total
counter
ip, cls, ins, job, instance
Number of triggered image builds
docker_up
Unknown
ip, cls, ins, job, instance
N/A
engine_daemon_container_actions_seconds_bucket
Unknown
ip, cls, ins, job, instance, le, action
N/A
engine_daemon_container_actions_seconds_count
Unknown
ip, cls, ins, job, instance, action
N/A
engine_daemon_container_actions_seconds_sum
Unknown
ip, cls, ins, job, instance, action
N/A
engine_daemon_container_states_containers
gauge
ip, cls, ins, job, instance, state
The count of containers in various states
engine_daemon_engine_cpus_cpus
gauge
ip, cls, ins, job, instance
The number of cpus that the host system of the engine has
Frequently asked questions about the Pigsty Docker module
Who Can Run Docker Commands?
By default, Pigsty adds both the management user running the playbook on the remote node (i.e., the SSH login user on the target node) and the admin user specified in the node_admin_username parameter to the Docker operating system group.
All users in this group (docker) can manage Docker using the docker CLI command.
If you want other users to be able to run Docker commands, add that OS user to the docker group:
usermod -aG docker <username>
Working Through a Proxy
During Docker installation, if the proxy_env parameter exists,
the HTTP proxy server configuration will be written to the /etc/docker/daemon.json configuration file.
Docker will use this proxy server when pulling images from upstream registries.
Tip: Running configure with the -x flag will write the proxy server configuration from your current environment into proxy_env.
Using Mirror Registries
If you’re in mainland China and affected by the Great Firewall, you can consider using Docker mirror sites available within China, such as quay.io:
docker login quay.io # Enter username and password to log in
Update (June 2024): All previously accessible Docker mirror sites in China have been blocked. Please use a proxy server to access and pull images.
Adding Docker to Monitoring
During Docker module installation, you can register Docker as a monitoring target by running the docker_register or register_prometheus subtask for specific nodes:
Here are some basic MySQL cluster management operations:
Create MySQL cluster with mysql.yml:
./mysql.yml -l my-test
Playbook
Pigsty has the following playbooks related to the MYSQL module:
mysql.yml: Deploy MySQL according to the inventory
mysql.yml
The playbook mysql.yml contains the following subtasks:
mysql-id : generate mysql instance identity
mysql_clean : remove existing mysql instance (DANGEROUS)mysql_dbsu : create os user mysql
mysql_install : install mysql rpm/deb packages
mysql_dir : create mysql data & conf dir
mysql_config : generate mysql config file
mysql_boot : bootstrap mysql cluster
mysql_launch : launch mysql service
mysql_pass : write mysql password
mysql_db : create mysql biz database
mysql_user : create mysql biz user
mysql_exporter : launch mysql exporter
mysql_register : register mysql service to prometheus
#-----------------------------------------------------------------# MYSQL_IDENTITY#-----------------------------------------------------------------# mysql_cluster: #CLUSTER # mysql cluster name, required identity parameter# mysql_role: replica #INSTANCE # mysql role, required, could be primary,replica# mysql_seq: 0 #INSTANCE # mysql instance seq number, required identity parameter#-----------------------------------------------------------------# MYSQL_BUSINESS#-----------------------------------------------------------------# mysql business object definition, overwrite in group varsmysql_users:[]# mysql business usersmysql_databases:[]# mysql business databasesmysql_services:[]# mysql business services# global credentials, overwrite in global varsmysql_root_username:rootmysql_root_password:DBUser.Rootmysql_replication_username:replicatormysql_replication_password:DBUser.Replicatormysql_admin_username:dbuser_dbamysql_admin_password:DBUser.DBAmysql_monitor_username:dbuser_monitormysql_monitor_password:DBUser.Monitor#-----------------------------------------------------------------# MYSQL_INSTALL#-----------------------------------------------------------------# - install - #mysql_dbsu:mysql # os dbsu name, mysql by default, better not change itmysql_dbsu_uid:27# os dbsu uid and gid, 306 for default mysql users and groupsmysql_dbsu_home:/var/lib/mysql # mysql home directory, `/var/lib/mysql` by defaultmysql_dbsu_ssh_exchange:true# exchange mysql dbsu ssh key among same mysql clustermysql_packages:# mysql packages to be installed, `mysql-community*` by default- mysql-community*- mysqld_exporter# - bootstrap - #mysql_data:/data/mysql # mysql data directory, `/data/mysql` by defaultmysql_listen:'0.0.0.0'# mysql listen addresses, comma separated IP listmysql_port:3306# mysql listen port, 3306 by defaultmysql_sock:/var/lib/mysql/mysql.sock# mysql socket dir, `/var/lib/mysql/mysql.sock` by defaultmysql_pid:/var/run/mysqld/mysqld.pid# mysql pid file, `/var/run/mysqld/mysqld.pid` by defaultmysql_conf:/etc/my.cnf # mysql config file, `/etc/my.cnf` by defaultmysql_log_dir:/var/log # mysql log dir, `/var/log/mysql` by defaultmysql_exporter_port:9104# mysqld_exporter listen port, 9104 by defaultmysql_parameters:{}# extra parameters for mysqldmysql_default_parameters:# default parameters for mysqld
Kafka requires a Java runtime environment, so you need to install an available JDK when installing Kafka (OpenJDK 17 is used by default, but other JDKs and versions, such as 8 and 11, can also be used).
Single node Kafka configuration example. Please note that in Pigsty single machine deployment mode, the 9093 port on the admin node is already occupied by AlertManager.
It is recommended to use other ports when installing Kafka on the admin node, such as (9095).
kf-main:hosts:10.10.10.10:{kafka_seq: 1, kafka_role:controller }vars:kafka_cluster:kf-mainkafka_data:/data/kafkakafka_peer_port:9095# 9093 is already hold by alertmanager
DuckDB is an embedded database, so it does not require deployment or service management. You only need to install the DuckDB package on the node to use it.
Installation
Pigsty already provides DuckDB software package (RPM / DEB) in the Infra software repository, you can install it with the following command:
TigerBeetle Requires Linux Kernel Version 5.5 or Higher!
Please note that TigerBeetle supports only Linux kernel version 5.5 or higher, making it incompatible by default with EL7 (3.10) and EL8 (4.18) systems.
To install TigerBeetle, please use EL9 (5.14), Ubuntu 22.04 (5.15), Debian 12 (6.1), Debian 11 (5.10), or another supported system.
18.5 - Module: Kubernetes
Deploy Kubernetes, the Production-Grade Container Orchestration Platform.
Kubernetes is a production-grade, open-source container orchestration platform. It helps you automate, deploy, scale, and manage containerized applications.
Pigsty has native support for ETCD clusters, which can be used by Kubernetes. Therefore, the pro version also provides the KUBE module for deploying production-grade Kubernetes clusters.
The KUBE module is currently in Beta status and only available for Pro edition customers.
However, you can directly specify node repositories in Pigsty, install Kubernetes packages, and use Pigsty to adjust environment configurations and provision nodes for K8S deployment, solving the last mile delivery problem.
SealOS
SealOS is a lightweight, high-performance, and easy-to-use Kubernetes distribution. It is designed to simplify the deployment and management of Kubernetes clusters.
Pigsty provides SealOS 5.0 RPM and DEB packages in the Infra repository, which can be downloaded and installed directly, and use SealOS to manage clusters.
Kubernetes supports multiple container runtimes. If you want to use Containerd as the container runtime, please make sure Containerd is installed on the node.
If you want to use Docker as the container runtime, you need to install Docker and bridge with the cri-dockerd project (not available on EL9/D11/U20 yet):
#kube_cluster: #IDENTITY# # define kubernetes cluster namekube_role:node # default kubernetes role (master|node)kube_version:1.31.0# kubernetes versionkube_registry:registry.aliyuncs.com/google_containers # kubernetes version aliyun k8s miiror repositorykube_pod_cidr:"10.11.0.0/16"# kubernetes pod network cidrkube_service_cidr:"10.12.0.0/16"# kubernetes service network cidrkube_dashboard_admin_user:dashboard-admin-sa # kubernetes dashboard admin user name
18.6 - Module: Consul
Deploy Consul, the alternative to Etcd, with Pigsty.
Consul is a distributed DCS + KV + DNS + service registry/discovery component.
In the old version (1.x) of Pigsty, Consul was used as the default high-availability DCS. Now this support has been removed, but it will be provided as a separate module in the future.
For production deployments, we recommend using an odd number of Consul Servers, preferably three.
Parameters
#-----------------------------------------------------------------# CONSUL#-----------------------------------------------------------------consul_role:node # consul role, node or server, node by defaultconsul_dc:pigsty # consul data center name, `pigsty` by defaultconsul_data:/data/consul # consul data dir, `/data/consul`consul_clean:true# consul purge flag, if true, clean consul during initconsul_ui:false# enable consul ui, the default value for consul server is true
18.7 - Module: Victoria
Deploy VictoriaMetrics & VictoriaLogs, the in-place replacement for Prometheus & Loki.
VictoriaMetrics is the in-place replacement for Prometheus, offering better performance and compression ratio.
Overview
Victoria is currently only available in the Pigsty Professional Edition Beta preview.
It includes the deployment and management of VictoriaMetrics and VictoriaLogs components.
Installation
Pigsty Infra Repo has the RPM / DEB packages for VictoriaMetrics, use the following command to install:
For common users, installing the standalone version of VictoriaMetrics is sufficient.
If you need to deploy a cluster, you can install the victoria-metrics-cluster package.
18.8 - Module: Jupyter
Launch Jupyter notebook server with Pigsty, a web-based interactive scientific notebook.
Run Jupyter notebook with Docker, you have to:
Change the default password in .env: JUPYTER_TOKEN
Create data dir with proper permission: make dir, owned by 1000:100
make up to pull up Jupyter with docker compose
cd ~/pigsty/app/jupyter ; make dir up
Visit http://lab.pigsty or http://10.10.10.10:8888, the default password is pigsty
importpsycopg2conn=psycopg2.connect('postgres://dbuser_dba:[email protected]:5432/meta')cursor=conn.cursor()cursor.execute('SELECT * FROM pg_stat_activity')foriincursor.fetchall():print(i)
Alias
make up # pull up jupyter with docker composemake dir # create required /data/jupyter and set ownermake run # launch jupyter with dockermake view # print jupyter access pointmake log # tail -f jupyter logsmake info # introspect jupyter with jqmake stop # stop jupyter containermake clean # remove jupyter containermake pull # pull latest jupyter imagemake rmi # remove jupyter imagemake save # save jupyter image to /tmp/docker/jupyter.tgzmake load # load jupyter image from /tmp/docker/jupyter.tgz
19 - Miscellaneous
20 - PIG the PGPM
PostgreSQL Extension Ecosystem Package Manager
— Postgres Install Genius, the missing extension package manager for the PostgreSQL ecosystem
PIG is a command-line tool specifically designed for installing, managing, and building PostgreSQL and its extensions. Developed in Go, it’s ready to use out of the box, simple, and lightweight (4MB).
PIG is not a reinvented wheel, but rather a PiggyBack — a high-level abstraction layer that leverages existing Linux distribution package managers (apt/dnf).
It abstracts away the differences between operating systems, chip architectures, and PG major versions, allowing you to install and manage PG kernels and 431+ extensions with just a few simple commands.
Note: For extension installation, pig is not a mandatory component — you can still use apt/dnf package managers to directly access the Pigsty PGSQL repository.
Introduction: Why do we need a dedicated PG package manager?
PIG is a Go-written binary program, installed by default at /usr/bin/pig. pig version prints version information:
$ pig version
pig version 0.7.2 linux/amd64
build: HEAD 9cdb57a 2025-11-10T11:14:17Z
Use the pig status command to print the current environment status, OS code, PG installation status, and repository accessibility with latency.
$ pig status
# [Configuration] ================================Pig Version : 0.7.2
Pig Config : /root/.pig/config.yml
Log Level : info
Log Path : stderr
# [OS Environment] ===============================OS Distro Code : el10
OS OSArch : amd64
OS Package Type : rpm
OS Vendor ID : rocky
OS Version : 10OS Version Full : 10.0
OS Version Code : el10
# [PG Environment] ===============================No PostgreSQL installation found
No active PostgreSQL found in PATH:
- /root/.local/bin
- /root/bin
- /usr/local/sbin
- /usr/local/bin
- /usr/sbin
- /usr/bin
# [Pigsty Environment] ===========================Inventory Path : Not Found
Pigsty Home : Not Found
# [Network Conditions] ===========================pigsty.cc ping ok: 612 ms
pigsty.io ping ok: 1222 ms
google.com request error
Internet Access : truePigsty Repo : pigsty.io
Inferred Region : china
Latest Pigsty Ver : v3.6.1
List Extensions
Use the pig ext list command to print the built-in PG extension data catalog.
[root@pg-meta ~]# pig ext listName Version Cate Flags License RPM DEB PG Ver Description
---- ------- ---- ------ ------- ------ ------ ------ ---------------------
timescaledb 2.23.0 TIME -dsl-- Timescale PIGSTY PIGSTY 15-18 Enables scalable inserts and complex queries for time-series dat...
timescaledb_toolkit 1.22.0 TIME -ds-t- Timescale PIGSTY PIGSTY 15-18 Library of analytical hyperfunctions, time-series pipelining, an...
timeseries 0.1.7 TIME -d---- PostgreSQL PIGSTY PIGSTY 13-18 Convenience API fortime series stack
periods 1.2.3 TIME -ds--- PostgreSQL PGDG PGDG 13-18 Provide Standard SQL functionality for PERIODs and SYSTEM VERSIO...
temporal_tables 1.2.2 TIME -ds--r BSD 2-Clause PIGSTY PIGSTY 13-18 temporal tables
.........
pg_fact_loader 2.0.1 ETL -ds--x MIT PGDG PGDG 13-18 build fact tables with Postgres
pg_bulkload 3.1.22 ETL bds--- BSD 3-Clause PGDG PIGSTY 13-17 pg_bulkload is a high speed data loading utility for PostgreSQL
test_decoding - ETL --s--x PostgreSQL CONTRIB CONTRIB 13-18 SQL-based test/example module for WAL logical decoding
pgoutput - ETL --s--- PostgreSQL CONTRIB CONTRIB 13-18 Logical Replication output plugin
(431 Rows)(Flags: b= HasBin, d= HasDDL, s= HasLib, l= NeedLoad, t= Trusted, r= Relocatable, x= Unknown)
All extension metadata is defined in a data file named extension.csv.
This file is updated with each pig version release. You can update it directly using the pig ext reload command.
The updated file is placed in ~/.pig/extension.csv by default, which you can view and modify — you can also find the authoritative version of this data file in the project.
Add Repositories
To install extensions, you first need to add upstream repositories. pig repo can be used to manage Linux APT/YUM/DNF software repository configuration.
You can use the straightforward pig repo set to overwrite existing repository configuration, ensuring only necessary repositories exist in the system:
pig repo set# One-time setup for all repos including Linux system, PGDG, PIGSTY (PGSQL+INFRA)
Warning: pig repo set will backup and clear existing repository configuration, then add required repositories, implementing Overwrite semantics — please be aware!
Or choose the gentler pig repo add to add needed repositories:
pig repo add pgdg pigsty # Add PGDG official repo and PIGSTY supplementary repopig repo add pgsql # [Optional] You can also add PGDG and PIGSTY together as one "pgsql" modulepig repo update # Update cache: apt update / yum makecache
PIG will detect your network environment and choose to use Cloudflare global CDN or China cloud CDN, but you can force a specific region with the --region parameter.
pig repo set --region=china # Use China region mirror repos for faster downloadspig repo add pgdg --region=default --update # Force using PGDG upstream repo
PIG itself doesn’t support offline installation. You can download RPM/DEB packages yourself and copy them to network-isolated production servers for installation.
The related PIGSTY project provides local software repositories that can use pig to install already-downloaded extensions from local repos.
Install PG
After adding repositories, you can use the pig ext add subcommand to install extensions (and related packages)
This uses an “alias translation” mechanism to translate clean PG kernel/extension logical package names into actual RPM/DEB lists. If you don’t need alias translation, you can use apt/dnf directly,
or use the -n|--no-translation parameter with the variant pig install:
pig install vector # With translation, installs pgvector_18 or postgresql-18-pgvector for current PG 18pig install vector -n # Without translation, installs the package literally named 'vector' (a log collector from pigsty-infra repo)
Alias Translation
PostgreSQL kernels and extensions correspond to a series of RPM/DEB packages. Remembering these packages is tedious, so pig provides many common aliases to simplify the installation process:
For example, on EL systems, the following aliases will be translated to the corresponding RPM package list on the right:
Note that the $v placeholder is replaced with the PG major version number, so when you use the pgsql alias, $v is actually replaced with 18, 17, etc.
Therefore, when you install the pg17-server alias, on EL it actually installs postgresql17-server, postgresql17-libs, postgresql17-contrib, and on Debian/Ubuntu it installs postgresql-17 — pig handles all the details.
These aliases can be used directly and instantiated with major version numbers via parameters, or you can use alias variants with major version numbers: replacing pgsql with pg18, pg17, pgxx, etc.
For example, for PostgreSQL 18, you can directly use these aliases:
pgsql
pg18
pg17
pg16
pg15
pg14
pg13
pgsql
pg18
pg17
pg16
pg15
pg14
pg13
pgsql-mini
pg18-mini
pg17-mini
pg16-mini
pg15-mini
pg14-mini
pg13-mini
pgsql-core
pg18-core
pg17-core
pg16-core
pg15-core
pg14-core
pg13-core
pgsql-full
pg18-full
pg17-full
pg16-full
pg15-full
pg14-full
pg13-full
pgsql-main
pg18-main
pg17-main
pg16-main
pg15-main
pg14-main
pg13-main
pgsql-client
pg18-client
pg17-client
pg16-client
pg15-client
pg14-client
pg13-client
pgsql-server
pg18-server
pg17-server
pg16-server
pg15-server
pg14-server
pg13-server
pgsql-devel
pg18-devel
pg17-devel
pg16-devel
pg15-devel
pg14-devel
pg13-devel
pgsql-basic
pg18-basic
pg17-basic
pg16-basic
pg15-basic
pg14-basic
pg13-basic
Install Extensions
pig detects the PostgreSQL installation in the current system environment. If it detects an active PG installation (based on pg_config in PATH), pig will automatically install extensions for that PG major version without you explicitly specifying it.
pig install pg_smtp_client # Simplerpig install pg_smtp_client -v 18# Explicitly specify major version, more stable and reliablepig install pg_smtp_client -p /usr/lib/postgresql/16/bin/pg_config # Another way to specify PG versiondnf install pg_smtp_client_18 # Most direct... but not all extensions are this simple...
Tip: To add a specific major version of PostgreSQL kernel binaries to PATH, use the pig ext link command:
pig ext link pg17 # Create /usr/pgsql symlink and write to /etc/profile.d/pgsql.sh. /etc/profile.d/pgsql.sh # Take effect immediately, update PATH environment variable
If you want to install a specific version of software, you can use the name=ver syntax:
pig ext add -v 17pgvector=0.7.2 # install pgvector 0.7.2 for PG 17pig ext add pg16=16.5 # install PostgreSQL 16 with a specific minor version
Warning: Note that currently only PGDG YUM repository provides historical extension versions. PIGSTY repository and PGDG APT repository only provide the latest version of extensions.
Show Extensions
The pig ext status command can be used to show currently installed extensions.
$ pig ext status -v 18Installed:
- PostgreSQL 18.0 80 Extensions
No active PostgreSQL found in PATH:
- /root/.local/bin
- /root/bin
- /usr/local/sbin
- /usr/local/bin
- /usr/sbin
- /usr/bin
Extension Stat : 11 Installed (PIGSTY 3, PGDG 8) + 69CONTRIB=80 Total
Name Version Cate Flags License Repo Package Description
---- ------- ---- ------ ------- ------ ------------ ---------------------
timescaledb 2.23.0 TIME -dsl-- Timescale PIGSTY timescaledb-tsl_18* Enables scalable inserts and complex queries for time-series dat
postgis 3.6.0 GIS -ds--- GPL-2.0 PGDG postgis36_18* PostGIS geometry and geography spatial types and functions
postgis_topology 3.6.0 GIS -ds--- GPL-2.0 PGDG postgis36_18* PostGIS topology spatial types and functions
postgis_raster 3.6.0 GIS -ds--- GPL-2.0 PGDG postgis36_18* PostGIS raster types and functions
postgis_sfcgal 3.6.0 GIS -ds--r GPL-2.0 PGDG postgis36_18* PostGIS SFCGAL functions
postgis_tiger_geocoder 3.6.0 GIS -ds-t- GPL-2.0 PGDG postgis36_18* PostGIS tiger geocoder and reverse geocoder
address_standardizer 3.6.0 GIS -ds--r GPL-2.0 PGDG postgis36_18* Used to parse an address into constituent elements. Generally us
address_standardizer_data_us 3.6.0 GIS -ds--r GPL-2.0 PGDG postgis36_18* Address Standardizer US dataset example
vector 0.8.1 RAG -ds--r PostgreSQL PGDG pgvector_18* vector data type and ivfflat and hnsw access methods
pg_duckdb 1.1.0 OLAP -dsl-- MIT PIGSTY pg_duckdb_18* DuckDB Embedded in Postgres
pg_mooncake 0.2.0 OLAP -d---- MIT PIGSTY pg_mooncake_18* Columnstore Table in Postgres
If PostgreSQL cannot be found in your current system path (based on pg_config in PATH), please make sure to specify the PG major version number or pg_config path via -v|-p.
Scan Extensions
pig ext scan provides lower-level extension scanning functionality, scanning shared libraries in the specified PostgreSQL directory to discover installed extensions:
docker build -t d13:latest .
docker run -it d13:latest /bin/bash
pig repo set --region=china # Add China region repositoriespig install -y pg18 # Install PGDG 18 kernel packagespig install -y postgis timescaledb pgvector pg_duckdb
20.2 - Introduction
Why do we need yet another package manager? Especially for Postgres extensions?
Have you ever struggled with installing or upgrading PostgreSQL extensions? Digging through outdated documentation, cryptic configuration scripts, or searching GitHub for forks and patches?
Postgres’s rich extension ecosystem also means complex deployment processes — especially tricky across multiple distributions and architectures. PIG can solve these headaches for you.
This is exactly why Pig was created. Developed in Go, Pig is dedicated to one-stop management of Postgres and its 430+ extensions.
Whether it’s TimescaleDB, Citus, PGVector, 30+ Rust extensions, or all the components needed to self-host Supabase — Pig’s unified CLI makes everything accessible.
It completely eliminates source compilation and messy repositories, directly providing version-aligned RPM/DEB packages that perfectly support Debian, Ubuntu, RedHat, and other mainstream distributions on both x86 and Arm architectures — no guessing, no hassle.
Pig isn’t reinventing the wheel; it fully leverages native system package managers (APT, YUM, DNF) and strictly follows PGDG official packaging standards for seamless integration.
You don’t need to choose between “the standard way” and “shortcuts”; Pig respects existing repositories, follows OS best practices, and coexists harmoniously with existing repositories and packages.
If your Linux system and PostgreSQL major version aren’t in the supported list, you can use pig build to compile extensions for your specific combination.
Want to supercharge your Postgres and escape the hassle? Visit the PIG official documentation for guides and check out the extensive extension list,
turning your local Postgres database into an all-capable multi-modal data platform with one click.
If Postgres’s future is unmatched extensibility, then Pig is the magic lamp that helps you unlock it. After all, no one ever complains about “too many extensions.”
After extracting, place the binary file in your system PATH.
Repository Installation
The pig software is located in the pigsty-infra repository. You can add this repository to your operating system and then install using the OS package manager:
YUM
For RHEL, RockyLinux, CentOS, Alma Linux, OracleLinux, and other EL distributions:
sudo tee /etc/yum.repos.d/pigsty-infra.repo > /dev/null <<-'EOF'
[pigsty-infra]
name=Pigsty Infra for $basearch
baseurl=https://repo.pigsty.io/yum/infra/$basearch
enabled = 1
gpgcheck = 0
module_hotfixes=1
EOFsudo yum makecache;sudo yum install -y pig
APT
For Debian, Ubuntu, and other DEB distributions:
sudo tee /etc/apt/sources.list.d/pigsty-infra.list > /dev/null <<EOF
deb [trusted=yes] https://repo.pigsty.io/apt/infra generic main
EOFsudo apt update;sudo apt install -y pig
Update
To upgrade an existing pig version to the latest available version, use the following command:
pig update # Upgrade pig itself to the latest version
To update the extension data of an existing pig to the latest available version, use the following command:
pig ext reload # Update pig extension data to the latest version
Uninstall
apt remove -y pig # Debian / Ubuntu and other Debian-based systemsyum remove -y pig # RHEL / CentOS / RockyLinux and other EL distributionsrm -rf /usr/bin/pig # If installed directly from binary, just delete the binary file
Build from Source
You can also build pig yourself. pig is developed in Go and is very easy to build. The source code is hosted at github.com/pgsty/pig
git clone https://github.com/pgsty/pig.git;cd pig
go get -u; go build
All RPM/DEB packages are automatically built through GitHub CI/CD workflow using goreleaser.
The pig CLI provides comprehensive tools for managing PostgreSQL installations, extensions, repositories, and building extensions from source. Check command documentation with pig help <command>.
Manage PostgreSQL extensions with pig ext subcommand
The pig ext command is a comprehensive tool for managing PostgreSQL extensions.
It allows users to search, install, remove, update, and manage PostgreSQL extensions and even kernel packages.
Command
Description
Notes
ext list
Search extensions
ext info
Show extension details
ext status
Show installed extensions
ext add
Install extensions
Requires sudo or root
ext rm
Remove extensions
Requires sudo or root
ext update
Update extensions
Requires sudo or root
ext scan
Scan installed extensions
ext import
Download for offline use
Requires sudo or root
ext link
Link PG version to PATH
Requires sudo or root
ext reload
Refresh extension catalog
Quick Start
pig ext list # List all extensionspig ext list duck # Search for "duck" extensionspig ext info pg_duckdb # Show pg_duckdb extension infopig install pg_duckdb # Install pg_duckdb extensionpig install pg_duckdb -v 17# Install pg_duckdb for PG 17pig ext status # Show installed extensions
ext list
List or search extensions.
pig ext list # List all extensionspig ext list duck # Search for "duck" extensionspig ext list vector ai # Search multiple keywordspig ext list -c RAG # Filter by categorypig ext list -v 17# Filter by PG version
Check extension list for available extensions and their names.
Notes:
When no PostgreSQL version is specified, the tool will try to detect the active PostgreSQL installation from pg_config in your PATH
PostgreSQL can be specified either by major version number (-v) or by pg_config path (-p). If -v is given, pig will use the well-known default path of PGDG kernel packages for the given version.
On EL distros, it’s /usr/pgsql-$v/bin/pg_config for PG$v
On DEB distros, it’s /usr/lib/postgresql/$v/bin/pg_config for PG$v
If -p is given, pig will use the pg_config path to find the PostgreSQL installation
The extension manager supports different package formats based on the underlying operating system:
RPM packages for RHEL/CentOS/Rocky Linux/AlmaLinux
DEB packages for Debian/Ubuntu
Some extensions may have dependencies that will be automatically resolved during installation
Use the -y flag with caution as it will automatically confirm all prompts
Pigsty assumes you already have installed the official PGDG kernel packages. If not, you can install them with:
Manage software repositories with pig repo subcommand
The pig repo command is a comprehensive tool for managing package repositories on Linux systems. It provides functionality to add, remove, create, and manage software repositories for both RPM-based (RHEL/CentOS/Rocky/Alma) and Debian-based (Debian/Ubuntu) distributions.
Command
Description
Notes
repo list
Print available repo and module list
repo info
Get repo detailed information
repo status
Show current repo status
repo add
Add new repository
Requires sudo or root
repo set
Wipe, overwrite, and update repository
Requires sudo or root
repo rm
Remove repository
Requires sudo or root
repo update
Update repo cache
Requires sudo or root
repo create
Create local YUM/APT repository
Requires sudo or root
repo cache
Create offline package from local repo
Requires sudo or root
repo boot
Bootstrap repo from offline package
Requires sudo or root
Quick Start
# Method 1: Clean existing repos, add all necessary repos and update cache (recommended)pig repo add all --remove --update # Remove old repos, add all essentials, update cache# Method 1 variant: One-steppig repo set# = pig repo add all --remove --update# Method 2: Gentle approach - only add required repos, keep existing configpig repo add pgsql # Add PGDG and Pigsty repos with cache updatepig repo add pigsty --region=china # Add Pigsty repo, specify China regionpig repo add pgdg --region=default # Add PGDG, specify default regionpig repo add infra --region=europe # Add INFRA repo, specify Europe region# If no -u|--update option above, run this command additionallypig repo update # Update system package cache
Modules
In pig, APT/YUM repositories are organized into modules — groups of repositories serving a specific purpose.
Module
Description
Repository List
all
All core modules needed to install PG
node + infra + pgsql
pgsql
PGDG + Pigsty PG extensions
pigsty-pgsql + pgdg
pigsty
Pigsty Infra + PGSQL repos
pigsty-infra, pigsty-pgsql
pgdg
PGDG official repository
pgdg-common, pgdg13-18
node
Linux system repositories
base, updates, extras, epel…
infra
Infrastructure component repos
pigsty-infra, nginx, docker-ce
repo add
Add repository configuration files to the system. Requires root/sudo privileges.
pig repo add pgdg # Add PGDG repositorypig repo add pgdg pigsty # Add multiple repositoriespig repo add all # Add all essential repos (pgdg + pigsty + node)pig repo add pigsty -u # Add and update cachepig repo add all -r # Remove existing repos before addingpig repo add all -ru # Remove, add, and update (complete reset)pig repo add pgdg --region=china # Use China mirrors
Options:
-r|--remove: Remove existing repos before adding new ones
-u|--update: Run package cache update after adding repos
--region <region>: Use regional mirror repositories (default / china / europe)
repo set
Equivalent to repo add --remove --update. Wipes existing repositories and sets up new ones, then updates cache.
pig repo set# Replace with default repospig repo set pgdg pigsty # Replace with specific repos and updatepig repo set all --region=china # Use China mirrors
repo rm
Remove repository configuration files and back them up.
pig repo rm # Remove all repospig repo rm pgdg # Remove specific repopig repo rm pgdg pigsty -u # Remove and update cache
repo update
Update package manager cache to reflect repository changes.
pig repo update # Update package cache
Platform
Equivalent Command
EL
dnf makecache
Debian
apt update
repo create
Create local package repository for offline installations.
pig repo create # Create at default location (/www/pigsty)pig repo create /srv/repo # Create at custom location
repo cache
Create compressed tarball of repository contents for offline distribution.
# For users in Chinasudo pig repo add all --region=china -u
# Check mirror URLspig repo info pgdg
20.9 - CMD: pig sty
Manage Pigsty installation with pig sty subcommand
The pig can also be used as a CLI tool for Pigsty — the battery-included free PostgreSQL RDS.
Which brings HA, PITR, Monitoring, IaC, and all the extensions to your PostgreSQL cluster.
Download and install Pigsty distribution to ~/pigsty directory.
pig sty init # Install latest Pigstypig sty init -v 3.5.0 # Install specific versionpig sty init -d /opt/pigsty # Install to specific directory
Options:
-v|--version: Specify Pigsty version
-d|--dir: Specify installation directory
-f|--force: Overwrite existing pigsty directory
sty boot
Install Ansible and its dependencies.
pig sty boot # Install Ansiblepig sty boot -y # Auto-confirmpig sty boot -r china # Use China region mirrors
Options:
-r|--region: Upstream repo region (default, china, europe)
-k|--keep: Keep existing upstream repo during bootstrap
sty conf
Generate Pigsty configuration file.
pig sty conf # Generate default configurationpig sty conf -c rich # Use conf/rich.yml template (more extensions)pig sty conf -c slim # Use conf/slim.yml template (minimal install)pig sty conf -c supabase # Use conf/supabase.yml template (self-hosting)pig sty conf -g # Generate with random passwords (recommended!)pig sty conf -v 17# Use PostgreSQL 17pig sty conf -r china # Use China region mirrorspig sty conf --ip 10.10.10.10 # Specify IP address
Options:
-c|--conf: Config template name
-v|--version: PostgreSQL major version
-r|--region: Upstream repo region
--ip: Primary IP address
-g|--generate: Generate random passwords
-s|--skip: Skip IP address probing
-o|--output: Output config file path
sty deploy
Run Pigsty deployment playbook.
pig sty deploy # Run full deployment
This command runs the deploy.yml playbook from your Pigsty installation.
Warning: This operation makes changes to your system. Use with caution!
Complete Workflow
Here’s the complete workflow to set up Pigsty:
# 1. Download and install Pigstypig sty init
# 2. Install Ansible and dependenciescd ~/pigsty
pig sty boot
# 3. Generate configurationpig sty conf -g # Generate with random passwords# 4. Deploy Pigstypig sty deploy
For detailed setup instructions, check Get Started.
Configuration Templates
Available configuration templates (-c option):
Template
Description
meta
Default single-node meta configuration
rich
Configuration with more extensions enabled
slim
Minimal installation
full
Full 4-node HA template
supabase
Self-hosting Supabase template
Example:
pig sty conf -c rich -g -v 17 -r china
This generates a configuration using the rich template with PostgreSQL 17, random passwords, and China region mirrors.
20.10 - CMD: pig build
Build PostgreSQL extensions from source with pig build subcommand
The pig build command is a powerful tool that simplifies the entire workflow of building PostgreSQL extensions from source. It provides a complete build infrastructure setup, dependency management, and compilation environment for both standard and custom PostgreSQL extensions across different operating systems.
# Build extension for multiple PostgreSQL versionspig build pkg citus --pg 15,16,17
# Results in packages for each version:# citus_15-*.rpm# citus_16-*.rpm# citus_17-*.rpm
Troubleshooting
Build Tools Not Found
# Install build toolspig build tool
# For specific compilersudo dnf groupinstall "Development Tools"# ELsudo apt install build-essential # Debian
Missing Dependencies
# Install extension dependenciespig build dep <extension>
# Check error messages for specific packages# Install manually if neededsudo dnf install <package> # ELsudo apt install <package> # Debian
PostgreSQL Headers Not Found
# Install PostgreSQL development packagesudo pig ext install pg17-devel
# Or specify pg_config pathexportPG_CONFIG=/usr/pgsql-17/bin/pg_config
The infrastructure to deliver PostgreSQL Extensions
Pigsty has a repository that provides 340+ extra PostgreSQL extensions on mainstream Linux Distros.
It is designed to work together with the official PostgreSQL Global Development Group (PGDG) repo.
Together, they can provide up to 400+ PostgreSQL Extensions out-of-the-box.
You can also add these repos to your system manually with the default apt, dnf, yum approach.
# Add Pigsty's GPG public key to your system keychain to verify package signaturescurl -fsSL https://repo.pigsty.io/key | sudo gpg --dearmor -o /etc/apt/keyrings/pigsty.gpg
# Get Debian distribution codename (distro_codename=jammy, focal, bullseye, bookworm), and write the corresponding upstream repository address to the APT List filedistro_codename=$(lsb_release -cs)sudo tee /etc/apt/sources.list.d/pigsty-io.list > /dev/null <<EOF
deb [signed-by=/etc/apt/keyrings/pigsty.gpg] https://repo.pigsty.io/apt/infra generic main
deb [signed-by=/etc/apt/keyrings/pigsty.gpg] https://repo.pigsty.io/apt/pgsql/${distro_codename} ${distro_codename} main
EOF# Refresh APT repository cachesudo apt update
# Add Pigsty's GPG public key to your system keychain to verify package signaturescurl -fsSL https://repo.pigsty.io/key | sudo tee /etc/pki/rpm-gpg/RPM-GPG-KEY-pigsty >/dev/null
# Add Pigsty Repo definition files to /etc/yum.repos.d/ directory, including two repositoriessudo tee /etc/yum.repos.d/pigsty-io.repo > /dev/null <<-'EOF'
[pigsty-infra]
name=Pigsty Infra for $basearch
baseurl=https://repo.pigsty.io/yum/infra/$basearch
skip_if_unavailable = 1
enabled = 1
priority = 1
gpgcheck = 1
gpgkey=file:///etc/pki/rpm-gpg/RPM-GPG-KEY-pigsty
module_hotfixes=1
[pigsty-pgsql]
name=Pigsty PGSQL For el$releasever.$basearch
baseurl=https://repo.pigsty.io/yum/pgsql/el$releasever.$basearch
skip_if_unavailable = 1
enabled = 1
priority = 1
gpgcheck = 1
gpgkey=file:///etc/pki/rpm-gpg/RPM-GPG-KEY-pigsty
module_hotfixes=1
EOF# Refresh YUM/DNF repository cachesudo yum makecache;
All the RPM / DEB packages are signed with GPG Key fingerprint (B9BD8B20) in Pigsty repository.
Repository Components
Pigsty has two major repos: INFRA and PGSQL,
providing DEB / RPM packages for x86_64 and aarch64 architecture.
The INFRA repo contains packages that are generic to any PostgreSQL version and Linux major version,
including Prometheus & Grafana stack, admin tools for Postgres, and many utilities written in Go.
Linux
Package
x86_64
aarch64
EL
rpm
✓
✓
Debian
deb
✓
✓
The PGSQL repo contains packages that are ad hoc to specific PostgreSQL Major Versions
(often ad hoc to a specific Linux distro major version, too). Including extensions and some kernel forks.
Compatibility Details
OS Code
Vendor
Major
Minor
Fullname
PG Major Version
Comment
el7.x86_64
EL
7
7.9
CentOS 7 x86
15 14 13
EOL
el8.x86_64
EL
8
8.10
RockyLinux 8 x86
181716151413
Near EOL
el8.aarch64
EL
8
8.10
RockyLinux 8 ARM
181716151413
Near EOL
el9.x86_64
EL
9
9.6
RockyLinux 9 x86
181716151413
OK
el9.aarch64
EL
9
9.6
RockyLinux 9 ARM
181716151413
OK
el10.x86_64
EL
10
10.0
RockyLinux 10 x86
181716151413
OK
el10.aarch64
EL
10
10.0
RockyLinux 10 ARM
181716151413
OK
d11.x86_64
Debian
11
11.11
Debian 11 x86
17 16 15 14 13
EOL
d11.aarch64
Debian
11
11.11
Debian 11 ARM
17 16 15 14 13
EOL
d12.x86_64
Debian
12
12.12
Debian 12 x86
181716151413
OK
d12.aarch64
Debian
12
12.12
Debian 12 ARM
181716151413
OK
d13.x86_64
Debian
13
13.1
Debian 13 x86
181716151413
OK
d13.aarch64
Debian
13
13.1
Debian 13 ARM
181716151413
OK
u20.x86_64
Ubuntu
20
20.04.6
Ubuntu 20.04 x86
17 16 15 14 13
EOL
u20.aarch64
Ubuntu
20
20.04.6
Ubuntu 20.04 ARM
17 16 15 14 13
EOL
u22.x86_64
Ubuntu
22
22.04.5
Ubuntu 22.04 x86
181716151413
OK
u22.aarch64
Ubuntu
22
22.04.5
Ubuntu 22.04 ARM
181716151413
OK
u24.x86_64
Ubuntu
24
24.04.3
Ubuntu 24.04 x86
181716151413
OK
u24.aarch64
Ubuntu
24
24.04.3
Ubuntu 24.04 ARM
181716151413
OK
Source
Building specs of these repos and packages are open-sourced on GitHub:
The Pigsty PGSQL Repo is designed to work together with the official PostgreSQL Global Development Group (PGDG) repo.
Together, they can provide up to 400+ PostgreSQL Extensions out-of-the-box.
Mirror synced at 2025-12-29 12:00:00
Quick Start
You can install pig - the CLI tool, and add pgdg repo with it (recommended):
pig repo add pgdg # add pgdg repo filepig repo add pgdg -u # add pgdg repo and update cachepig repo add pgdg -u --region=default # add pgdg repo, enforce using the default repo (postgresql.org)pig repo add pgdg -u --region=china # add pgdg repo, always use the china mirror (repo.pigsty.cc)pig repo add pgsql -u # pgsql = pgdg + pigsty-pgsql (add pigsty + official PGDG)pig repo add -u # all = node + pgsql (pgdg + pigsty) + infra
Mirror
Since 2025-05, PGDG has closed the rsync/ftp sync channel, which makes almost all mirror sites out-of-sync.
Currently, Pigsty, Yandex, and Xtom are providing regular synced mirror service.
The Pigsty PGDG mirror is a subset of the official PGDG repo, covering EL 7-10, Debian 11-13, Ubuntu 20.04 - 24.04, with x86_64 & arm64 and PG 13 - 19alpha.
PGDG YUM repo is signed with a series of keys from https://ftp.postgresql.org/pub/repos/yum/keys/. Please choose and use as needed.
21.2 - GPG Key
Import the GPG key for Pigsty repository
You can verify the integrity of the packages you download from Pigsty repository by checking the GPG signature.
This document describes how to import the GPG key used to sign the packages.
Summary
All the RPM / DEB packages are signed with GPG key fingerprint (B9BD8B20) in Pigsty repository.
To sign your DEB packages, add the key id to reprepro configuration:
Origin:PigstyLabel:Pigsty INFRACodename:genericArchitectures:amd64 arm64Components:mainDescription:pigsty apt repository for infra componentsSignWith:9592A7BC7A682E7333376E09E7935D8DB9BD8B20
21.3 - INFRA Repo
Packages that are generic to any PostgreSQL version and Linux major version.
The pigsty-infra repo contains packages that are generic to any PostgreSQL version and Linux major version,
including Prometheus & Grafana stack, admin tools for Postgres, and many utilities written in Go.
This repo is maintained by Ruohang Feng (Vonng) @ Pigsty,
you can find all the build specs on https://github.com/pgsty/infra-pkg.
Prebuilt RPM / DEB packages for RHEL / Debian / Ubuntu distros available for x86_64 and aarch64 arch.
Hosted on Cloudflare CDN for free global access.
You can add the pigsty-infra repo with the pig CLI tool, it will automatically choose from apt/yum/dnf.
curl https://repo.pigsty.io/pig | bash # download and install the pig CLI toolpig repo add infra # add pigsty-infra repo file to your systempig repo update # update local repo cache with apt / dnf
# use when in mainland China or Cloudflare is downcurl https://repo.pigsty.cc/pig | bash # install pig from China CDN mirrorpig repo add infra # add pigsty-infra repo file to your systempig repo update # update local repo cache with apt / dnf
# you can manage infra repo with these commands:pig repo add infra -u # add repo file, and update cachepig repo add infra -ru # remove all existing repo, add repo and make cachepig repo set infra # = pigsty repo add infra -rupig repo add all # add infra, node, pgsql repo to your systempig repo set all # remove existing repo, add above repos and update cache
Manual Setup
You can also use this repo directly without the pig CLI tool, by adding them to your Linux OS repo list manually:
APT Repo
On Debian / Ubuntu compatible Linux distros, you can add the GPG Key and APT repo file manually with:
# Add Pigsty's GPG public key to your system keychain to verify package signatures, or just trustcurl -fsSL https://repo.pigsty.io/key | sudo gpg --dearmor -o /etc/apt/keyrings/pigsty.gpg
# Get Debian distribution codename (distro_codename=jammy, focal, bullseye, bookworm)# and write the corresponding upstream repository address to the APT List filedistro_codename=$(lsb_release -cs)sudo tee /etc/apt/sources.list.d/pigsty-infra.list > /dev/null <<EOF
deb [signed-by=/etc/apt/keyrings/pigsty.gpg] https://repo.pigsty.io/apt/infra generic main
EOF# Refresh APT repository cachesudo apt update
# use when in mainland China or Cloudflare is down# Add Pigsty's GPG public key to your system keychain to verify package signatures, or just trustcurl -fsSL https://repo.pigsty.cc/key | sudo gpg --dearmor -o /etc/apt/keyrings/pigsty.gpg
# Get Debian distribution codename (distro_codename=jammy, focal, bullseye, bookworm)# and write the corresponding upstream repository address to the APT List filedistro_codename=$(lsb_release -cs)sudo tee /etc/apt/sources.list.d/pigsty-infra.list > /dev/null <<EOF
deb [signed-by=/etc/apt/keyrings/pigsty.gpg] https://repo.pigsty.cc/apt/infra generic main
EOF# Refresh APT repository cachesudo apt update
# If you don't want to trust any GPG key, just trust the repo directlydistro_codename=$(lsb_release -cs)sudo tee /etc/apt/sources.list.d/pigsty-infra.list > /dev/null <<EOF
deb [trust=yes] https://repo.pigsty.io/apt/infra generic main
EOFsudo apt update
YUM Repo
On RHEL compatible Linux distros, you can add the GPG Key and YUM repo file manually with:
# Add Pigsty's GPG public key to your system keychain to verify package signaturescurl -fsSL https://repo.pigsty.io/key | sudo tee /etc/pki/rpm-gpg/RPM-GPG-KEY-pigsty >/dev/null
# Add Pigsty Repo definition files to /etc/yum.repos.d/ directorysudo tee /etc/yum.repos.d/pigsty-infra.repo > /dev/null <<-'EOF'
[pigsty-infra]
name=Pigsty Infra for $basearch
baseurl=https://repo.pigsty.io/yum/infra/$basearch
skip_if_unavailable = 1
enabled = 1
priority = 1
gpgcheck = 1
gpgkey=file:///etc/pki/rpm-gpg/RPM-GPG-KEY-pigsty
module_hotfixes=1
EOF# Refresh YUM/DNF repository cachesudo yum makecache;
# use when in mainland China or Cloudflare is down# Add Pigsty's GPG public key to your system keychain to verify package signaturescurl -fsSL https://repo.pigsty.cc/key | sudo tee /etc/pki/rpm-gpg/RPM-GPG-KEY-pigsty >/dev/null
# Add Pigsty Repo definition files to /etc/yum.repos.d/ directorysudo tee /etc/yum.repos.d/pigsty-infra.repo > /dev/null <<-'EOF'
[pigsty-infra]
name=Pigsty Infra for $basearch
baseurl=https://repo.pigsty.cc/yum/infra/$basearch
skip_if_unavailable = 1
enabled = 1
priority = 1
gpgcheck = 1
gpgkey=file:///etc/pki/rpm-gpg/RPM-GPG-KEY-pigsty
module_hotfixes=1
EOF# Refresh YUM/DNF repository cachesudo yum makecache;
# If you don't want to trust any GPG key, just trust the repo directlysudo tee /etc/yum.repos.d/pigsty-infra.repo > /dev/null <<-'EOF'
[pigsty-infra]
name=Pigsty Infra for $basearch
baseurl=https://repo.pigsty.io/yum/infra/$basearch
skip_if_unavailable = 1
enabled = 1
priority = 1
gpgcheck = 0
module_hotfixes=1
EOFsudo yum makecache;
Content
For a detailed list of all packages available in the Infra repository, see the Package List.
For the changelog and release history, see the Release Log.
Source
Building specs of this repo is open-sourced on GitHub:
Pigsty splits the Victoria datasource extensions into architecture-specific sub-packages.
If you choose to install these plugins to your own Grafana instance,
please configure the following parameter in /etc/grafana/grafana.ini to allow loading unsigned plugins.
pigsty-infra repository changelog and observability package release notes
2026-01-08
Name
Old Ver
New Ver
Note
pg_exporter
1.1.0
1.1.1
new pg_timeline collector
npgsqlrest
-
3.3.3
new
postgrest
-
14.3
new
opencode
1.0.223
new
code-server
4.107.0
new
claude
2.0.76
2.1.1
update
genai-toolbox
0.23.0
0.24.0
remove broken oracle driver
golang
-
1.25.5
new
nodejs
-
24.12.0
new
2025-12-25
Name
Old Ver
New Ver
Note
pig
0.8.0
0.9.0
routine update
etcd
3.6.6
3.6.7
routine update
uv
-
0.9.18
new python package manager
ccm
-
2.0.76
new claude code
asciinema
-
3.0.1
new terminal recorder
ivorysql
5.0
5.1
grafana
12.3.0
12.3.1
vector
0.51.1
0.52.0
prometheus
3.8.0
3.8.1
alertmanager
0.29.0
0.30.0
victoria-logs
1.41.0
1.43.1
pgbackrest_exporter
0.21.0
0.22.0
grafana-victorialogs-ds
0.22.4
0.23.2
2025-12-16
Name
Old Ver
New Ver
Note
victoria-metrics
1.131.0
1.132.0
victoria-logs
1.40.0
1.41.0
blackbox_exporter
0.27.0
0.28.0
duckdb
1.4.2
1.4.3
rclone
1.72.0
1.72.1
pev2
1.17.0
1.19.0
pg_exporter
1.0.3
1.1.0
pig
0.7.4
0.8.0
genai-toolbox
0.22.0
0.23.0
minio
20250907161309
20251203120000
by pgsty
2025-12-04
Name
Old Ver
New Ver
Note
rustfs
-
1.0.0-a71
new
seaweedfs
-
4.1.0
new
garage
-
2.1.0
new
rclone
1.71.2
1.72.0
vector
0.51.0
0.51.1
prometheus
3.7.3
3.8.0
victoria-metrics
0.130.0
0.131.0
victoria-logs
0.38.0
0.40.0
victoria-traces
-
0.5.1
new
grafana-victorialogs-ds
0.22.1
0.22.4
redis_exporter
1.80.0
1.80.1
mongodb_exporter
0.47.1
0.47.2
genai-toolbox
0.21.0
0.22.0
2025-11-23
Name
Old Ver
New Ver
Note
pgschema
-
1.4.2
new
pgflo
-
0.0.15
new
vector
0.51.0
0.51.1
bug fix
sealos
5.0.1
5.1.1
etcd
3.6.5
3.6.6
duckdb
1.4.1
1.4.2
pg_exporter
1.0.2
1.0.3
pig
0.7.1
0.7.2
grafana
12.1.0
12.3.0
pg_timetable
6.1.0
6.2.0
genai-toolbox
0.16.0
0.21.0
timescaledb-tools
0.18.0
0.18.1
moved from PGSQL to INFRA
timescaledb-event-streamer
0.12.0
0.20.0
tigerbeetle
0.16.60
0.16.65
victoria-metrics
1.129.1
1.130.0
victoria-logs
1.37.2
1.38.0
grafana-victorialogs-ds
0.21.4
0.22.1
grafana-victoriametrics-ds
0.19.6
0.19.7
grafana-plugins
12.0.0
12.3.0
2025-11-11
Name
Old Ver
New Ver
Note
grafana
12.1.0
12.2.1
download url change
prometheus
3.6.0
3.7.3
pushgateway
1.11.1
1.11.2
alertmanager
0.28.1
0.29.0
nginx_exporter
1.5.0
1.5.1
node_exporter
1.9.1
1.10.2
pgbackrest_exporter
0.20.0
0.21.0
redis_exporter
1.77.0
1.80.0
duckdb
1.4.0
1.4.1
dblab
0.33.0
0.34.2
pg_timetable
5.13.0
6.1.0
vector
0.50.0
0.51.0
rclone
1.71.1
1.71.2
victoria-metrics
1.126.0
1.129.1
victoria-logs
1.35.0
1.37.2
grafana-victorialogs-ds
0.21.0
0.21.4
grafana-victoriametrics-ds
0.19.4
0.19.6
grafana-infinity-ds
3.5.0
3.6.0
genai-toolbox
0.16.0
0.18.0
pev2
1.16.0
1.17.0
pig
0.6.2
0.7.1
2025-10-18
Name
Old Ver
New Ver
Note
prometheus
3.5.0
3.6.0
nginx_exporter
1.4.2
1.5.0
mysqld_exporter
0.17.2
0.18.0
redis_exporter
1.75.0
1.77.0
mongodb_exporter
0.47.0
0.47.1
victoria-metrics
1.121.0
1.126.0
victoria-logs
1.25.1
1.35.0
duckdb
1.3.2
1.4.0
etcd
3.6.4
3.6.5
restic
0.18.0
0.18.1
tigerbeetle
0.16.54
0.16.60
grafana-victorialogs-ds
0.19.3
0.21.0
grafana-victoriametrics-ds
0.18.3
0.19.4
grafana-infinity-ds
3.3.0
3.5.0
genai-toolbox
0.9.0
0.16.0
grafana
12.1.0
12.2.0
vector
0.49.0
0.50.0
rclone
1.70.3
1.71.1
minio
20250723155402
20250907161309
mcli
20250721052808
20250813083541
2025-08-15
Name
Old Ver
New Ver
Note
grafana
12.0.0
12.1.0
pg_exporter
1.0.1
1.0.2
pig
0.6.0
0.6.1
vector
0.48.0
0.49.0
redis_exporter
1.74.0
1.75.0
mongodb_exporter
0.46.0
0.47.0
victoria-metrics
1.121.0
1.123.0
victoria-logs
1.25.0
1.28.0
grafana-victoriametrics-ds
0.17.0
0.18.3
grafana-victorialogs-ds
0.18.3
0.19.3
grafana-infinity-ds
3.3.0
3.4.1
etcd
3.6.1
3.6.4
ferretdb
2.3.1
2.5.0
tigerbeetle
0.16.50
0.16.54
genai-toolbox
0.9.0
0.12.0
2025-07-24
Name
Old Ver
New Ver
Note
ferretdb
-
2.4.0
pair with documentdb 1.105
etcd
-
3.6.3
minio
-
20250723155402
mcli
-
20250721052808
ivorysql
-
4.5-0ffca11-20250709
fix libxcrypt dep issue
2025-07-16
Name
Old Ver
New Ver
Note
genai-toolbox
0.8.0
0.9.0
MCP toolbox for various DBMS
victoria-metrics
1.120.0
1.121.0
split into various packages
victoria-logs
1.24.0
1.25.0
split into various packages
prometheus
3.4.2
3.5.0
duckdb
1.3.1
1.3.2
etcd
3.6.1
3.6.2
tigerbeetle
0.16.48
0.16.50
grafana-victoriametrics-ds
0.16.0
0.17.0
rclone
1.69.3
1.70.3
pig
0.5.0
0.6.0
pev2
1.15.0
1.16.0
pg_exporter
1.0.0
1.0.1
2025-07-04
Name
Old Ver
New Ver
Note
prometheus
3.4.1
3.4.2
grafana
12.0.1
12.0.2
vector
0.47.0
0.48.0
rclone
1.69.0
1.70.2
vip-manager
3.0.0
4.0.0
blackbox_exporter
0.26.0
0.27.0
redis_exporter
1.72.1
1.74.0
duckdb
1.3.0
1.3.1
etcd
3.6.0
3.6.1
ferretdb
2.2.0
2.3.1
dblab
0.32.0
0.33.0
tigerbeetle
0.16.41
0.16.48
grafana-victorialogs-ds
0.16.3
0.18.1
grafana-victoriametrics-ds
0.15.1
0.16.0
grafana-infinity-ds
3.2.1
3.3.0
victoria-logs
1.22.2
1.24.0
victoria-metrics
1.117.1
1.120.0
2025-06-01
Name
Old Ver
New Ver
Note
grafana
-
12.0.1
prometheus
-
3.4.1
keepalived_exporter
-
1.7.0
redis_exporter
-
1.73.0
victoria-metrics
-
1.118.0
victoria-logs
-
1.23.1
tigerbeetle
-
0.16.42
grafana-victorialogs-ds
-
0.17.0
grafana-infinity-ds
-
3.2.2
2025-05-22
Name
Old Ver
New Ver
Note
dblab
-
0.32.0
prometheus
-
3.4.0
duckdb
-
1.3.0
etcd
-
3.6.0
pg_exporter
-
1.0.0
ferretdb
-
2.2.0
rclone
-
1.69.3
minio
-
20250422221226
last version with admin GUI
mcli
-
20250416181326
nginx_exporter
-
1.4.2
keepalived_exporter
-
1.6.2
pgbackrest_exporter
-
0.20.0
redis_exporter
-
1.27.1
victoria-metrics
-
1.117.1
victoria-logs
-
1.22.2
pg_timetable
-
5.13.0
tigerbeetle
-
0.16.41
pev2
-
1.15.0
grafana
-
12.0.0
grafana-victorialogs-ds
-
0.16.3
grafana-victoriametrics-ds
-
0.15.1
grafana-infinity-ds
-
3.2.1
grafana-plugins
-
12.0.0
2025-04-23
Name
Old Ver
New Ver
Note
mtail
-
3.0.8
new
pig
-
0.4.0
pg_exporter
-
0.9.0
prometheus
-
3.3.0
pushgateway
-
1.11.1
keepalived_exporter
-
1.6.0
redis_exporter
-
1.70.0
victoria-metrics
-
1.115.0
victoria-logs
-
1.20.0
duckdb
-
1.2.2
pg_timetable
-
5.12.0
vector
-
0.46.1
minio
-
20250422221226
mcli
-
20250416181326
2025-04-05
Name
Old Ver
New Ver
Note
pig
-
0.3.4
etcd
-
3.5.21
restic
-
0.18.0
ferretdb
-
2.1.0
tigerbeetle
-
0.16.34
pg_exporter
-
0.8.1
node_exporter
-
1.9.1
grafana
-
11.6.0
zfs_exporter
-
3.8.1
mongodb_exporter
-
0.44.0
victoria-metrics
-
1.114.0
minio
-
20250403145628
mcli
-
20250403170756
2025-03-23
Name
Old Ver
New Ver
Note
etcd
-
3.5.20
pgbackrest_exporter
-
0.19.0
rebuilt
victoria-logs
-
1.17.0
vlogscli
-
1.17.0
2025-03-17
Name
Old Ver
New Ver
Note
kafka
-
4.0.0
prometheus
-
3.2.1
alertmanager
-
0.28.1
blackbox_exporter
-
0.26.0
node_exporter
-
1.9.0
mysqld_exporter
-
0.17.2
kafka_exporter
-
1.9.0
redis_exporter
-
1.69.0
duckdb
-
1.2.1
etcd
-
3.5.19
ferretdb
-
2.0.0
tigerbeetle
-
0.16.31
vector
-
0.45.0
victoria-metrics
-
1.114.0
victoria-logs
-
1.16.0
rclone
-
1.69.1
pev2
-
1.14.0
grafana-victorialogs-ds
-
0.16.0
grafana-victoriametrics-ds
-
0.14.0
grafana-infinity-ds
-
3.0.0
timescaledb-event-streamer
-
0.12.0
new
restic
-
0.17.3
new
juicefs
-
1.2.3
new
2025-02-12
Name
Old Ver
New Ver
Note
pushgateway
1.10.0
1.11.0
alertmanager
0.27.0
0.28.0
nginx_exporter
1.4.0
1.4.1
pgbackrest_exporter
0.18.0
0.19.0
redis_exporter
1.66.0
1.67.0
mongodb_exporter
0.43.0
0.43.1
victoria-metrics
1.107.0
1.111.0
victoria-logs
1.3.2
1.9.1
duckdb
1.1.3
1.2.0
etcd
3.5.17
3.5.18
pg_timetable
5.10.0
5.11.0
ferretdb
1.24.0
2.0.0
tigerbeetle
0.16.13
0.16.27
grafana
11.4.0
11.5.1
vector
0.43.1
0.44.0
minio
20241218131544
20250207232109
mcli
20241121172154
20250208191421
rclone
1.68.2
1.69.0
2024-11-19
Name
Old Ver
New Ver
Note
prometheus
2.54.0
3.0.0
victoria-metrics
1.102.1
1.106.1
victoria-logs
0.28.0
1.0.0
mysqld_exporter
0.15.1
0.16.0
redis_exporter
1.62.0
1.66.0
mongodb_exporter
0.41.2
0.42.0
keepalived_exporter
1.3.3
1.4.0
duckdb
1.1.2
1.1.3
etcd
3.5.16
3.5.17
tigerbeetle
16.8
0.16.13
grafana
-
11.3.0
vector
-
0.42.0
21.4 - PGSQL Repo
The repo for PostgreSQL Extensions & Kernel Forks
The pigsty-pgsql repo contains packages that are ad hoc to specific PostgreSQL Major Versions
(often ad hoc to a specific Linux distro major version, too). Including extensions and some kernel forks.
You can install pig - the CLI tool, and add pgdg / pigsty repo with it (recommended):
pig repo add pigsty # add pigsty-pgsql repopig repo add pigsty -u # add pigsty-pgsql repo, and update cachepig repo add pigsty -u --region=default # add pigsty-pgsql repo and enforce default region (pigsty.io)pig repo add pigsty -u --region=china # add pigsty-pgsql repo with china region (pigsty.cc)pig repo add pgsql -u # pgsql = pgdg + pigsty-pgsql (add pigsty + official PGDG)pig repo add -u # all = node + pgsql (pgdg + pigsty) + infra
Hint: If you are in mainland China, consider using the China CDN mirror (replace pigsty.io with pigsty.cc)
APT
You can also enable this repo with apt directly on Debian / Ubuntu:
# Add Pigsty's GPG public key to your system keychain to verify package signaturescurl -fsSL https://repo.pigsty.io/key | sudo gpg --dearmor -o /etc/apt/keyrings/pigsty.gpg
# Get Debian distribution codename (distro_codename=jammy, focal, bullseye, bookworm), and write the corresponding upstream repository address to the APT List filedistro_codename=$(lsb_release -cs)sudo tee /etc/apt/sources.list.d/pigsty-io.list > /dev/null <<EOF
deb [signed-by=/etc/apt/keyrings/pigsty.gpg] https://repo.pigsty.io/apt/pgsql/${distro_codename} ${distro_codename} main
EOF# Refresh APT repository cachesudo apt update
# Use when in mainland China or Cloudflare is unavailable# Add Pigsty's GPG public key to your system keychain to verify package signaturescurl -fsSL https://repo.pigsty.cc/key | sudo gpg --dearmor -o /etc/apt/keyrings/pigsty.gpg
# Get Debian distribution codename, and write the corresponding upstream repository address to the APT List filedistro_codename=$(lsb_release -cs)sudo tee /etc/apt/sources.list.d/pigsty-io.list > /dev/null <<EOF
deb [signed-by=/etc/apt/keyrings/pigsty.gpg] https://repo.pigsty.cc/apt/pgsql/${distro_codename} ${distro_codename} main
EOF# Refresh APT repository cachesudo apt update
DNF
You can also enable this repo with dnf/yum directly on EL-compatible systems:
# Add Pigsty's GPG public key to your system keychain to verify package signaturescurl -fsSL https://repo.pigsty.io/key | sudo tee /etc/pki/rpm-gpg/RPM-GPG-KEY-pigsty >/dev/null
# Add Pigsty Repo definition files to /etc/yum.repos.d/ directory, including two repositoriessudo tee /etc/yum.repos.d/pigsty-pgsql.repo > /dev/null <<-'EOF'
[pigsty-pgsql]
name=Pigsty PGSQL For el$releasever.$basearch
baseurl=https://repo.pigsty.io/yum/pgsql/el$releasever.$basearch
skip_if_unavailable = 1
enabled = 1
priority = 1
gpgcheck = 1
gpgkey=file:///etc/pki/rpm-gpg/RPM-GPG-KEY-pigsty
module_hotfixes=1
EOF# Refresh YUM/DNF repository cachesudo dnf makecache;
# Use when in mainland China or Cloudflare is unavailable# Add Pigsty's GPG public key to your system keychain to verify package signaturescurl -fsSL https://repo.pigsty.cc/key | sudo tee /etc/pki/rpm-gpg/RPM-GPG-KEY-pigsty >/dev/null
# Add Pigsty Repo definition files to /etc/yum.repos.d/ directorysudo tee /etc/yum.repos.d/pigsty-pgsql.repo > /dev/null <<-'EOF'
[pigsty-pgsql]
name=Pigsty PGSQL For el$releasever.$basearch
baseurl=https://repo.pigsty.cc/yum/pgsql/el$releasever.$basearch
skip_if_unavailable = 1
enabled = 1
priority = 1
gpgcheck = 1
gpgkey=file:///etc/pki/rpm-gpg/RPM-GPG-KEY-pigsty
module_hotfixes=1
EOF# Refresh YUM/DNF repository cachesudo dnf makecache;
Source
Building specs of this repo is open-sourced on GitHub:
PG Exporter provides 4 core built-in metrics out of the box:
Metric
Type
Description
pg_up
Gauge
1 if exporter can connect to PostgreSQL, 0 otherwise
pg_version
Gauge
PostgreSQL server version number
pg_in_recovery
Gauge
1 if server is in recovery mode (replica), 0 if primary
pg_exporter_build_info
Gauge
Exporter version and build information
Configuration File
All other metrics (600+) are defined in the pg_exporter.yml configuration file. By default, PG Exporter looks for this file in:
Path specified by --config flag
Path in PG_EXPORTER_CONFIG environment variable
Current directory (./pg_exporter.yml)
System config (/etc/pg_exporter.yml or /etc/pg_exporter/)
Your First Monitoring Setup
Step 1: Create a Monitoring User
Create a dedicated PostgreSQL user for monitoring:
-- Create monitoring user
CREATEUSERpg_monitorWITHPASSWORD'secure_password';-- Grant necessary permissions
GRANTpg_monitorTOpg_monitor;GRANTCONNECTONDATABASEpostgresTOpg_monitor;-- For PostgreSQL 10+, pg_monitor role provides read access to monitoring views
-- For older versions, you may need additional grants
Step 2: Test Connection
Verify the exporter can connect to your database:
# Set connection URLexportPG_EXPORTER_URL='postgres://pg_monitor:secure_password@localhost:5432/postgres'# Run in dry-run mode to test configurationpg_exporter --dry-run
Step 3: Run the Exporter
Start PG Exporter:
# Run with default settingspg_exporter
# Or with custom flagspg_exporter \
--url='postgres://pg_monitor:secure_password@localhost:5432/postgres'\
--web.listen-address=':9630'\
--log.level=info
Step 4: Configure Prometheus
Add PG Exporter as a target in your prometheus.yml:
# View raw metricscurl http://localhost:9630/metrics | grep pg_
# Check exporter statisticscurl http://localhost:9630/stat
# Verify server detectioncurl http://localhost:9630/explain
Auto-Discovery Mode
PG Exporter can automatically discover and monitor all databases in a PostgreSQL instance:
# Enable auto-discovery (default behavior)pg_exporter --auto-discovery
# Exclude specific databasespg_exporter --auto-discovery \
--exclude-database="template0,template1,postgres"# Include only specific databasespg_exporter --auto-discovery \
--include-database="app_db,analytics_db"
When auto-discovery is enabled:
Cluster-level metrics (1xx-5xx) are collected once per instance
Database-level metrics (6xx-8xx) are collected for each discovered database
Metrics are labeled with datname to distinguish between databases
Monitoring pgBouncer
To monitor pgBouncer instead of PostgreSQL:
# Connect to pgBouncer admin databasePG_EXPORTER_URL='postgres://pgbouncer:password@localhost:6432/pgbouncer'\
pg_exporter --config=/etc/pg_exporter.yml
PG Exporter provides health check endpoints for load balancers and orchestrators:
# Basic health checkcurl http://localhost:9630/up
# Returns: 200 if connected, 503 if not# Primary detectioncurl http://localhost:9630/primary
# Returns: 200 if primary, 404 if replica, 503 if unknown# Replica detectioncurl http://localhost:9630/replica
# Returns: 200 if replica, 404 if primary, 503 if unknown
Troubleshooting
Connection Issues
# Test with detailed loggingpg_exporter --log.level=debug --dry-run
# Check server planningpg_exporter --explain
Permission Errors
Ensure the monitoring user has necessary permissions:
-- Check current permissions
SELECT*FROMpg_rolesWHERErolname='pg_monitor';-- Grant additional permissions if needed
GRANTUSAGEONSCHEMApg_catalogTOpg_monitor;GRANTSELECTONALLTABLESINSCHEMApg_catalogTOpg_monitor;
PG Exporter provides multiple installation methods to suit different deployment scenarios.
This guide covers all available installation options with detailed instructions for each platform.
Pigsty
The easiest way to get started with pg_exporter is to use Pigsty,
which is a complete PostgreSQL distribution with built-in Observability best practices based on pg_exporter, Prometheus, and Grafana.
You don’t even need to know any details about pg_exporter, it just gives you all the metrics and dashboard panels
The pg_exporter can be installed as a standalone binary.
Compatibility
The current pg_exporter support PostgreSQL version 10 and above.
While it is designed to work with any PostgreSQL major version (back to 9.x).
The only problem to use with legacy version (9.6 and below) is that
we removed older metrics collector branches definition due to EOL.
You can always retrieve these legacy version of config files and use against historic versions of PostgreSQL
PostgreSQL Version
Support Status
10 ~ 17
✅ Full Support
9.6-
⚠️ Legacy Conf
pg_exporter works with pgbouncer 1.8+, Since v1.8 is the first version with SHOW command support.
pgBouncer Version
Support Status
1.8.x ~ 1.24.x
✅ Full Support
before 1.8.x
⚠️ No Metrics
22.3 - Configuration
PG Exporter uses a powerful and flexible configuration system that allows you to define custom metrics, control collection behavior, and optimize performance.
This guide covers all aspects of configuration from basic setup to advanced customization.
Metrics Collectors
PG Exporter uses a declarative YAML configuration system that provides incredible flexibility and control over metric collection. This guide covers all aspects of configuring PG Exporter for your specific monitoring needs.
Configuration Overview
PG Exporter’s configuration is centered around collectors - individual metric queries with associated metadata. The configuration can be:
A single monolithic YAML file (pg_exporter.yml)
A directory containing multiple YAML files (merged alphabetically)
Custom path specified via command-line or environment variable
Configuration Loading
PG Exporter searches for configuration in the following order:
Each collector is a top-level object in the YAML configuration with a unique name and various properties:
collector_branch_name:# Unique identifier for this collectorname:metric_namespace # Metric prefix (defaults to branch name)desc:"Collector description"# Human-readable descriptionquery:| # SQL query to executeSELECT column1, column2FROM table# Execution Controlttl:10# Cache time-to-live in secondstimeout:0.1# Query timeout in secondsfatal:false# If true, failure fails entire scrapeskip:false# If true, collector is disabled# Version Compatibilitymin_version:100000# Minimum PostgreSQL version (inclusive)max_version:999999# Maximum PostgreSQL version (exclusive)# Execution Tagstags:[cluster, primary] # Conditions for execution# Predicate Queries (optional)predicate_queries:- name:"check_function"predicate_query:| SELECT EXISTS (...)# Metric Definitionsmetrics:- column_name:usage:GAUGE # GAUGE, COUNTER, LABEL, or DISCARDrename: metric_name # Optional:rename the metricdescription:"Help text"# Metric descriptiondefault:0# Default value if NULLscale:1000# Scale factor for the value
Core Configuration Elements
Collector Branch Name
The top-level key uniquely identifies a collector across the entire configuration:
pg_stat_database:# Must be uniquename:pg_db # Actual metric namespace
Query Definition
The SQL query that retrieves metrics:
query:| SELECT
datname,
numbackends,
xact_commit,
xact_rollback,
blks_read,
blks_hit
FROM pg_stat_database
WHERE datname NOT IN ('template0', 'template1')
Metric Types
Each column in the query result must be mapped to a metric type:
Usage
Description
Example
GAUGE
Instantaneous value that can go up or down
Current connections
COUNTER
Cumulative value that only increases
Total transactions
LABEL
Use as a Prometheus label
Database name
DISCARD
Ignore this column
Internal values
Cache Control (TTL)
The ttl parameter controls result caching:
# Fast queries - minimal cachingpg_stat_activity:ttl:1# Cache for 1 second# Expensive queries - longer cachingpg_table_bloat:ttl:3600# Cache for 1 hour
Best practices:
Set TTL less than your scrape interval
Use longer TTL for expensive queries
TTL of 0 disables caching
Timeout Control
Prevent queries from running too long:
timeout:0.1# 100ms defaulttimeout:1.0# 1 second for complex queriestimeout:-1# Disable timeout (not recommended)
Version Compatibility
Control which PostgreSQL versions can run this collector:
expensive_metrics:tags:[critical] # Only runs with 'critical' tag
Predicate Queries
Execute conditional checks before main query:
predicate_queries:- name:"Check pg_stat_statements"predicate_query:| SELECT EXISTS (
SELECT 1 FROM pg_extension
WHERE extname = 'pg_stat_statements'
)
The main query only executes if all predicates return true.
Metric Definition
Basic Definition
metrics:- numbackends:usage:GAUGEdescription:"Number of backends connected"
Advanced Options
metrics:- checkpoint_write_time:usage:COUNTERrename:write_time # Rename metricscale:0.001# Convert ms to secondsdefault:0# Use 0 if NULLdescription:"Checkpoint write time in seconds"
Collector Organization
PG Exporter ships with pre-organized collectors:
Range
Category
Description
0xx
Documentation
Examples and documentation
1xx
Basic
Server info, settings, metadata
2xx
Replication
Replication, slots, receivers
3xx
Persistence
I/O, checkpoints, WAL
4xx
Activity
Connections, locks, queries
5xx
Progress
Vacuum, index creation progress
6xx
Database
Per-database statistics
7xx
Objects
Tables, indexes, functions
8xx
Optional
Expensive/optional metrics
9xx
pgBouncer
Connection pooler metrics
10xx+
Extensions
Extension-specific metrics
Real-World Examples
Simple Gauge Collector
pg_connections:desc:"Current database connections"query:| SELECT
count(*) as total,
count(*) FILTER (WHERE state = 'active') as active,
count(*) FILTER (WHERE state = 'idle') as idle,
count(*) FILTER (WHERE state = 'idle in transaction') as idle_in_transaction
FROM pg_stat_activity
WHERE pid != pg_backend_pid()ttl:1metrics:- total:{usage: GAUGE, description:"Total connections"}- active:{usage: GAUGE, description:"Active connections"}- idle:{usage: GAUGE, description:"Idle connections"}- idle_in_transaction:{usage: GAUGE, description:"Idle in transaction"}
pg_stat_statements_metrics:desc:"Query performance statistics"tags:[extension:pg_stat_statements]query:| SELECT
sum(calls) as total_calls,
sum(total_exec_time) as total_time,
sum(mean_exec_time * calls) / sum(calls) as mean_time
FROM pg_stat_statementsttl:60metrics:- total_calls:{usage:COUNTER}- total_time:{usage: COUNTER, scale:0.001}- mean_time:{usage: GAUGE, scale:0.001}
Custom Collectors
Creating Your Own Metrics
Create a new YAML file in your config directory:
# /etc/pg_exporter/custom_metrics.ymlapp_metrics:desc:"Application-specific metrics"query:| SELECT
(SELECT count(*) FROM users WHERE active = true) as active_users,
(SELECT count(*) FROM orders WHERE created_at > NOW() - '1 hour'::interval) as recent_orders,
(SELECT avg(processing_time) FROM jobs WHERE completed_at > NOW() - '5 minutes'::interval) as avg_job_timettl:30metrics:- active_users:{usage: GAUGE, description:"Currently active users"}- recent_orders:{usage: GAUGE, description:"Orders in last hour"}- avg_job_time:{usage: GAUGE, description:"Average job processing time"}
Test your collector:
pg_exporter --explain --config=/etc/pg_exporter/
Conditional Metrics
Use predicate queries for conditional metrics:
partition_metrics:desc:"Partitioned table metrics"predicate_queries:- name:"Check if partitioning is used"predicate_query:| SELECT EXISTS (
SELECT 1 FROM pg_class
WHERE relkind = 'p' LIMIT 1
)query:| SELECT
parent.relname as parent_table,
count(*) as partition_count,
sum(pg_relation_size(child.oid)) as total_size
FROM pg_inherits
JOIN pg_class parent ON parent.oid = pg_inherits.inhparent
JOIN pg_class child ON child.oid = pg_inherits.inhrelid
WHERE parent.relkind = 'p'
GROUP BY parent.relnamettl:300metrics:- parent_table:{usage:LABEL}- partition_count:{usage:GAUGE}- total_size:{usage:GAUGE}
Performance Optimization
Query Optimization Tips
Use appropriate TTL values:
Fast queries: 1-10 seconds
Medium queries: 10-60 seconds
Expensive queries: 300-3600 seconds
Set realistic timeouts:
Default: 100ms
Complex queries: 500ms-1s
Never disable timeout in production
Use cluster-level tags:
tags:[cluster] # Run once per cluster, not per database
Disable expensive collectors:
pg_table_bloat:skip:true# Disable if not needed
Monitoring Collector Performance
Check collector execution statistics:
# View collector statisticscurl http://localhost:9630/stat
# Check which collectors are slowcurl http://localhost:9630/metrics | grep pg_exporter_collector_duration
PG Exporter provides a comprehensive REST API for metrics collection, health checking, traffic routing, and operational control. All endpoints are exposed via HTTP on the configured port (default: 9630).
The primary endpoint that exposes all collected metrics in Prometheus format.
Request
curl http://localhost:9630/metrics
Response
# HELP pg_up PostgreSQL server is up and accepting connections
# TYPE pg_up gauge
pg_up 1
# HELP pg_version PostgreSQL server version number
# TYPE pg_version gauge
pg_version 140000
# HELP pg_in_recovery PostgreSQL server is in recovery mode
# TYPE pg_in_recovery gauge
pg_in_recovery 0
# HELP pg_exporter_build_info PG Exporter build information
# TYPE pg_exporter_build_info gauge
pg_exporter_build_info{version="1.1.1",branch="main",revision="abc123"} 1
# ... additional metrics
Response Format
Metrics follow the Prometheus exposition format:
# HELP <metric_name> <description>
# TYPE <metric_name> <type>
<metric_name>{<label_name>="<label_value>",...} <value> <timestamp>
Health Check Endpoints
Health check endpoints provide various ways to monitor PG Exporter and the target database status.
GET /up
Simple binary health check.
Response Codes
Code
Status
Description
200
OK
Exporter and database are up
503
Service Unavailable
Database is down or unreachable
Example
# Check if service is upcurl -I http://localhost:9630/up
HTTP/1.1 200 OK
Content-Type: text/plain;charset=utf-8
These endpoints are designed for load balancers and proxies to route traffic based on server role.
GET /primary
Check if the server is a primary (master) instance.
Response Codes
Code
Status
Description
200
OK
Server is primary and accepting writes
404
Not Found
Server is not primary (is replica)
503
Service Unavailable
Server is down
Aliases
/leader
/master
/read-write
/rw
Example
# Check if server is primarycurl -I http://localhost:9630/primary
# Use in HAProxy configurationbackend pg_primary
option httpchk GET /primary
server pg1 10.0.0.1:5432 check port 9630 server pg2 10.0.0.2:5432 check port 9630
GET /replica
Check if the server is a replica (standby) instance.
Response Codes
Code
Status
Description
200
OK
Server is replica and in recovery
404
Not Found
Server is not replica (is primary)
503
Service Unavailable
Server is down
Aliases
/standby
/slave
/read-only
/ro
Example
# Check if server is replicacurl -I http://localhost:9630/replica
# Use in load balancer configurationbackend pg_replicas
option httpchk GET /replica
server pg2 10.0.0.2:5432 check port 9630 server pg3 10.0.0.3:5432 check port 9630
GET /read
Check if the server can handle read traffic (both primary and replica).
Response Codes
Code
Status
Description
200
OK
Server is up and can handle reads
503
Service Unavailable
Server is down
Example
# Check if server can handle readscurl -I http://localhost:9630/read
# Route read traffic to any available serverbackend pg_read
option httpchk GET /read
server pg1 10.0.0.1:5432 check port 9630 server pg2 10.0.0.2:5432 check port 9630 server pg3 10.0.0.3:5432 check port 9630
Operational Endpoints
POST /reload
Reload configuration without restarting the exporter.
Run pg_exporter --help for a complete list of available flags:
Flags:
-h, --[no-]help Show context-sensitive help(also try --help-long and --help-man).
-u, --url=URL postgres target url
-c, --config=CONFIG path to config dir or file
--[no-]web.systemd-socket Use systemd socket activation listeners instead of port listeners (Linux only).
--web.listen-address=:9630 ...
Addresses on which to expose metrics and web interface. Repeatable for multiple addresses. Examples: `:9100` or `[::1]:9100`for http, `vsock://:9100`for vsock
--web.config.file="" Path to configuration file that can enable TLS or authentication. See: https://github.com/prometheus/exporter-toolkit/blob/master/docs/web-configuration.md
-l, --label="" constant lables:comma separated list of label=value pair ($PG_EXPORTER_LABEL) -t, --tag="" tags,comma separated list of server tag ($PG_EXPORTER_TAG) -C, --[no-]disable-cache force not using cache ($PG_EXPORTER_DISABLE_CACHE) -m, --[no-]disable-intro disable collector level introspection metrics ($PG_EXPORTER_DISABLE_INTRO) -a, --[no-]auto-discovery automatically scrape all database for given server ($PG_EXPORTER_AUTO_DISCOVERY) -x, --exclude-database="template0,template1,postgres" excluded databases when enabling auto-discovery ($PG_EXPORTER_EXCLUDE_DATABASE) -i, --include-database="" included databases when enabling auto-discovery ($PG_EXPORTER_INCLUDE_DATABASE) -n, --namespace="" prefix of built-in metrics, (pg|pgbouncer) by default ($PG_EXPORTER_NAMESPACE) -f, --[no-]fail-fast fail fast instead of waiting during start-up ($PG_EXPORTER_FAIL_FAST) -T, --connect-timeout=100 connect timeout in ms, 100 by default ($PG_EXPORTER_CONNECT_TIMEOUT) -P, --web.telemetry-path="/metrics" URL path under which to expose metrics. ($PG_EXPORTER_TELEMETRY_PATH) -D, --[no-]dry-run dry run and print raw configs
-E, --[no-]explain explain server planned queries
--log.level="info" log level: debug|info|warn|error] --log.format="logfmt" log format: logfmt|json
--[no-]version Show application version.
Environment Variables
All command-line arguments have corresponding environment variables:
Create a dedicated monitoring user with minimal required permissions:
-- Create monitoring role
CREATEROLEpg_monitorWITHLOGINPASSWORD'strong_password'CONNECTIONLIMIT5;-- Grant necessary permissions
GRANTpg_monitorTOpg_monitor;-- PostgreSQL 10+ built-in role
GRANTCONNECTONDATABASEpostgresTOpg_monitor;-- For specific databases
GRANTCONNECTONDATABASEapp_dbTOpg_monitor;GRANTUSAGEONSCHEMApublicTOpg_monitor;-- Additional permissions for extended monitoring
GRANTSELECTONALLTABLESINSCHEMApg_catalogTOpg_monitor;GRANTSELECTONALLSEQUENCESINSCHEMApg_catalogTOpg_monitor;
Connection Security
Using SSL/TLS
# Connection string with SSLPG_EXPORTER_URL='postgres://pg_monitor:[email protected]:5432/postgres?sslmode=require&sslcert=/path/to/client.crt&sslkey=/path/to/client.key&sslrootcert=/path/to/ca.crt'
Using .pgpass File
# Create .pgpass fileecho"db.example.com:5432:*:pg_monitor:password" > ~/.pgpass
chmod 600 ~/.pgpass
# Use without password in URLPG_EXPORTER_URL='postgres://[email protected]:5432/postgres'
Systemd Service Configuration
Complete production systemd setup:
[Unit]Description=Prometheus exporter for PostgreSQL/Pgbouncer server metricsDocumentation=https://github.com/pgsty/pg_exporterAfter=network.target[Service]EnvironmentFile=-/etc/default/pg_exporterUser=prometheusExecStart=/usr/bin/pg_exporter $PG_EXPORTER_OPTSRestart=on-failure[Install]WantedBy=multi-user.target
Change min_version from 9.6 to 10, explicit ::int type casting
pg_size: Fix log directory size detection, use logging_collector check instead of path pattern matching
pg_table: Performance optimization, replace LATERAL subqueries with JOIN for better query performance; fix tuples and frozenxid metric type from COUNTER to GAUGE; increase timeout from 1s to 2s
pg_vacuuming: Add PG17 collector branch with new metrics indexes_total, indexes_processed, dead_tuple_bytes for index vacuum progress tracking
pg_query: Increase timeout from 1s to 2s for high-load scenarios
Remove the monitor schema requirement for pg_query collectors (you have to ensure it with search_path or just
install pg_stat_statements in the default public schema)
Fix pgbouncer version parsing message level from info to debug
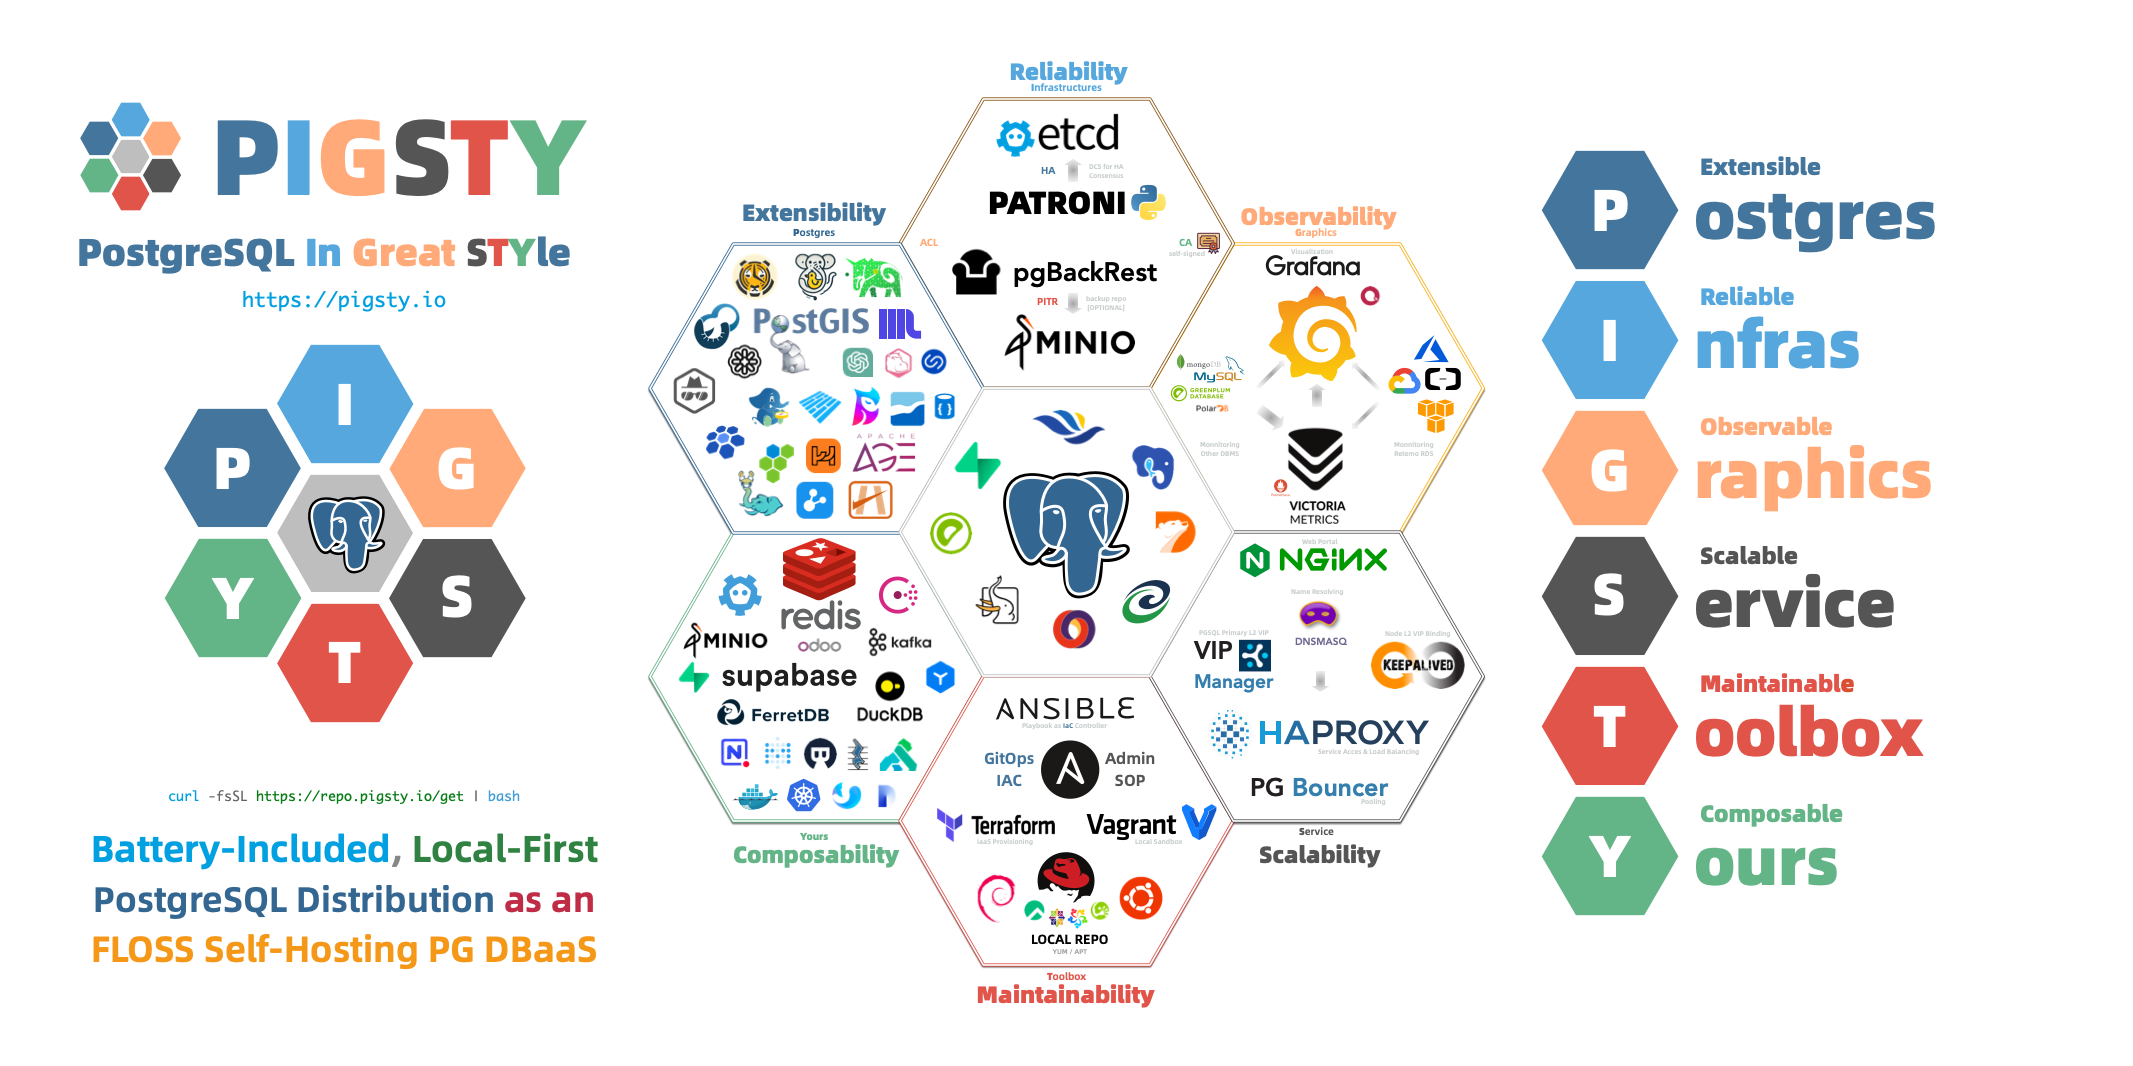


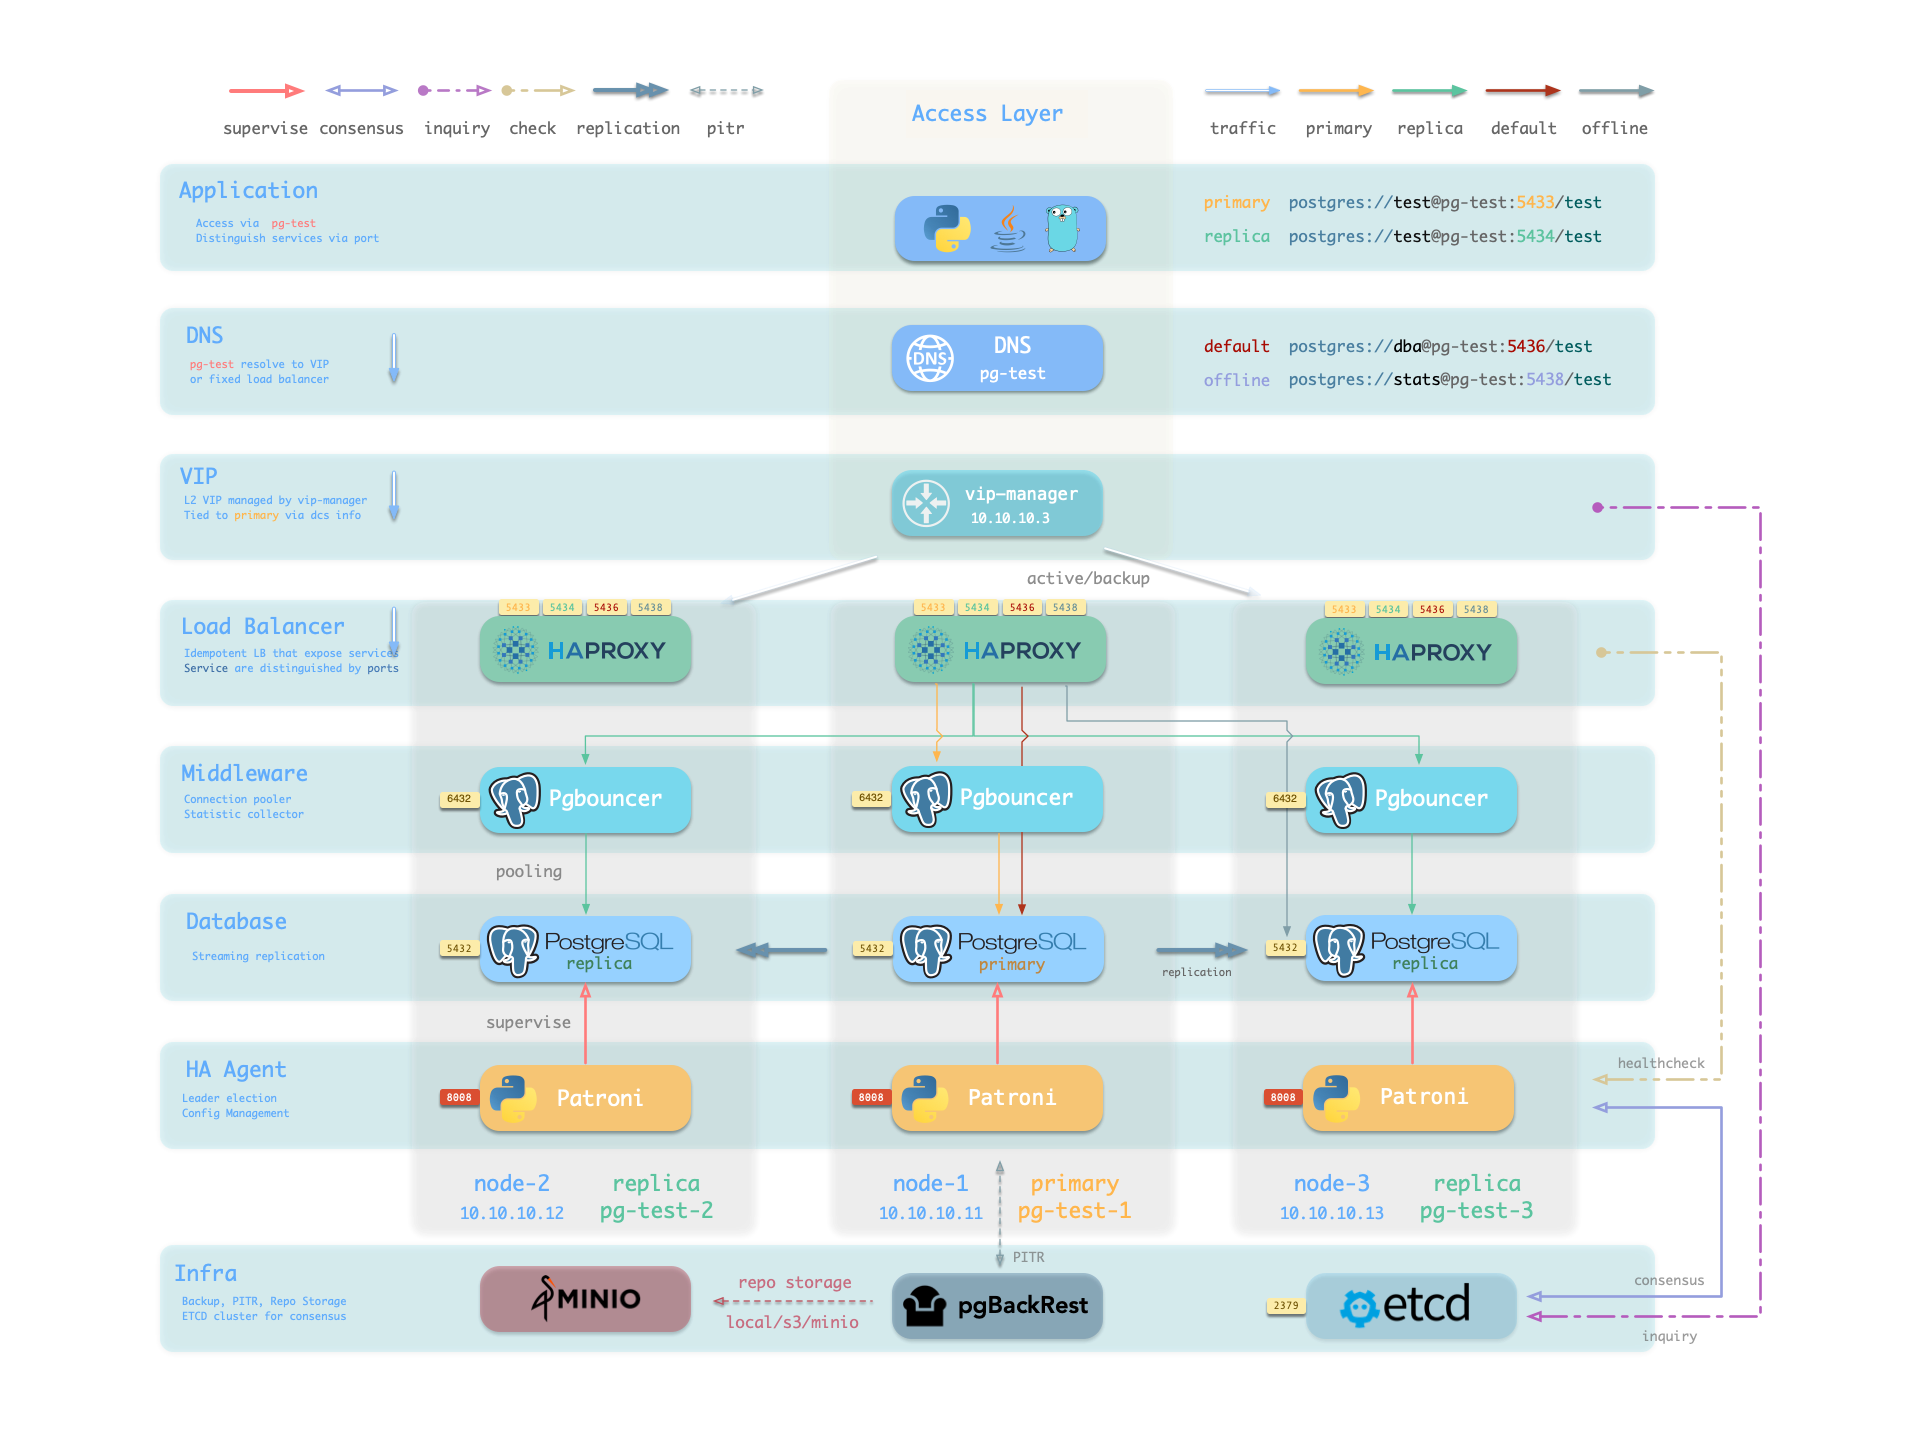
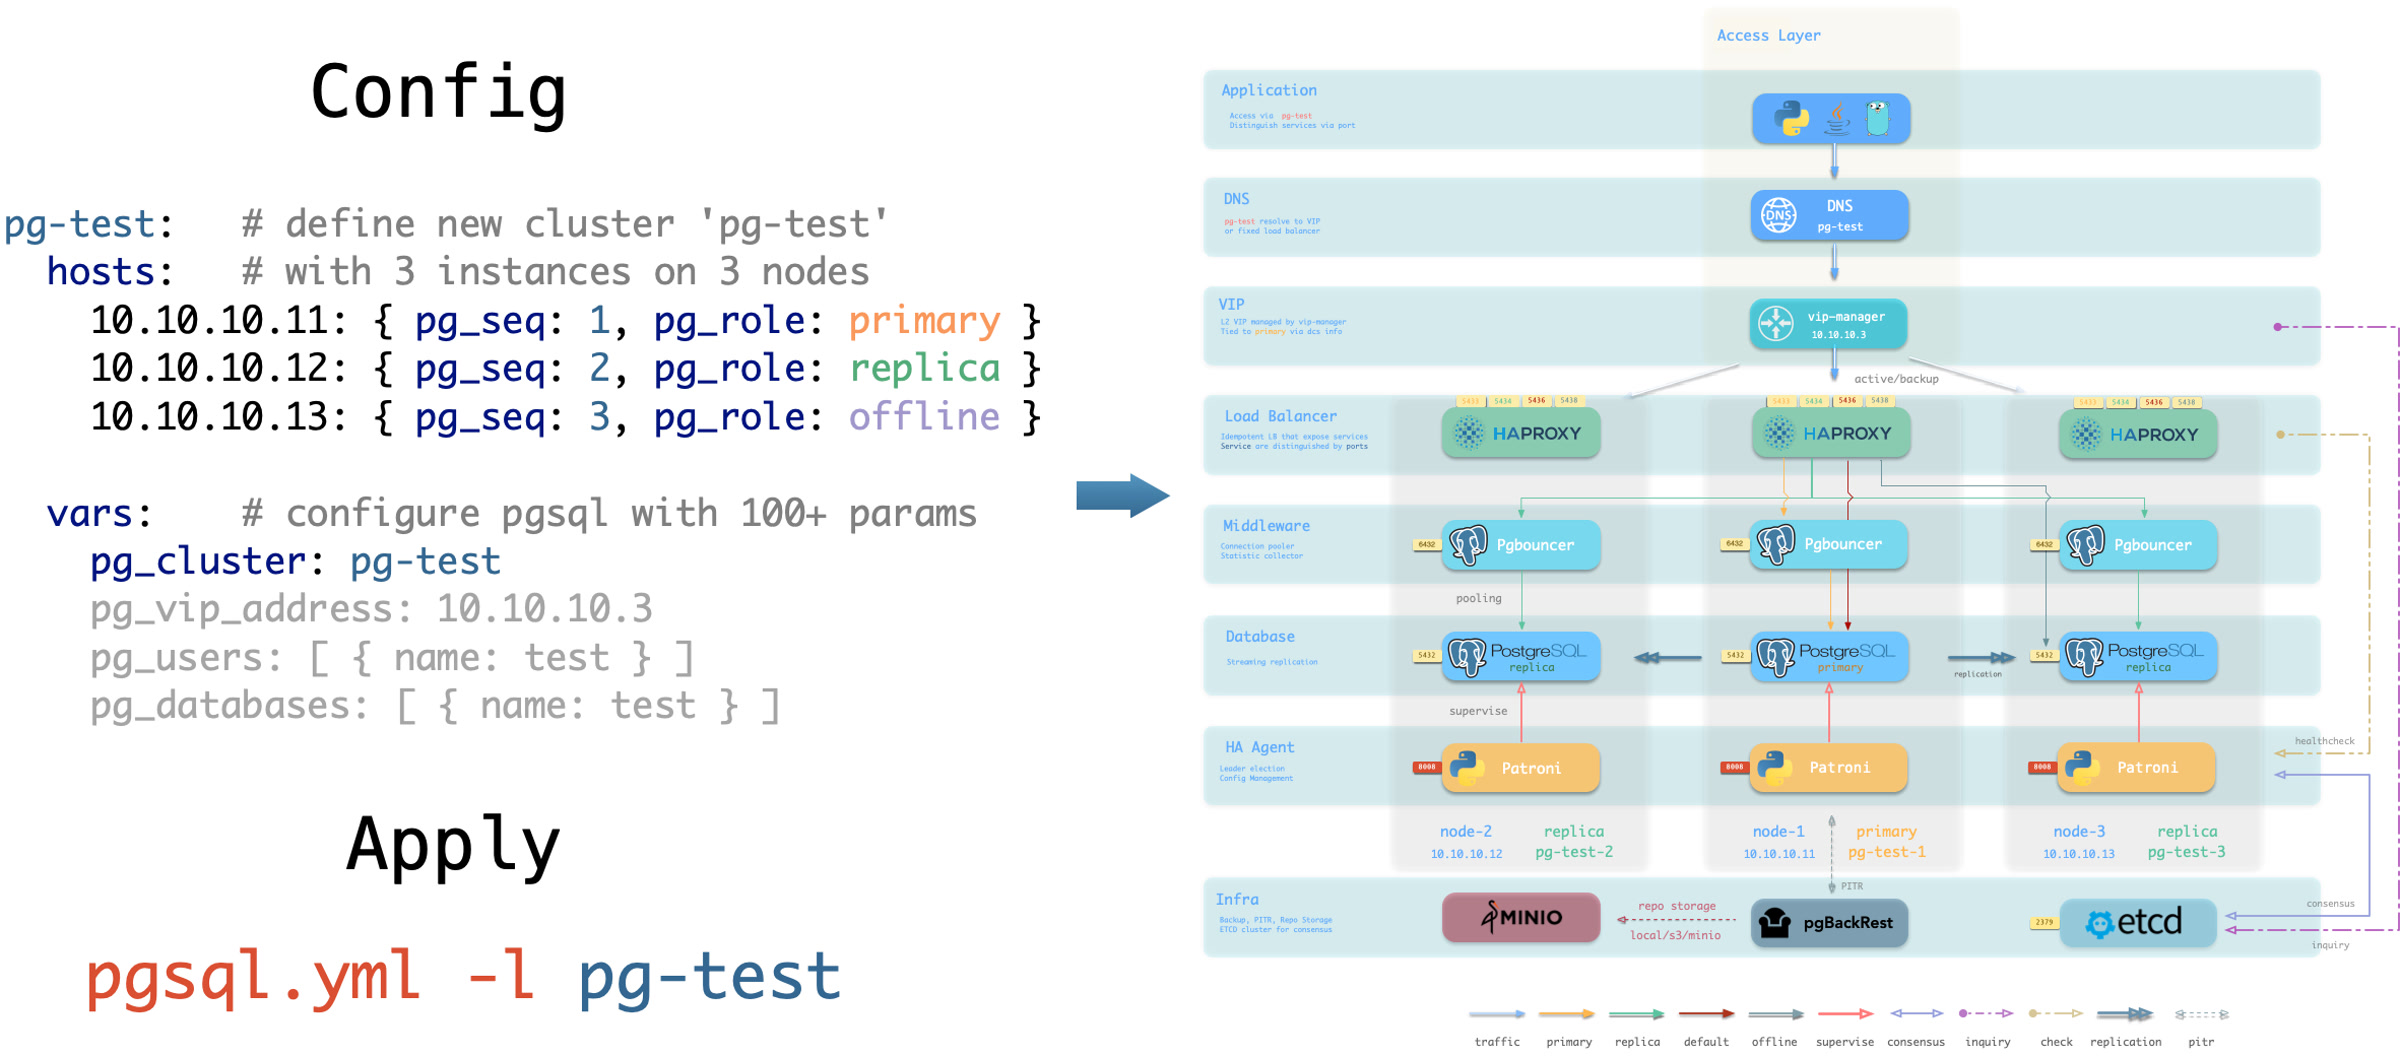
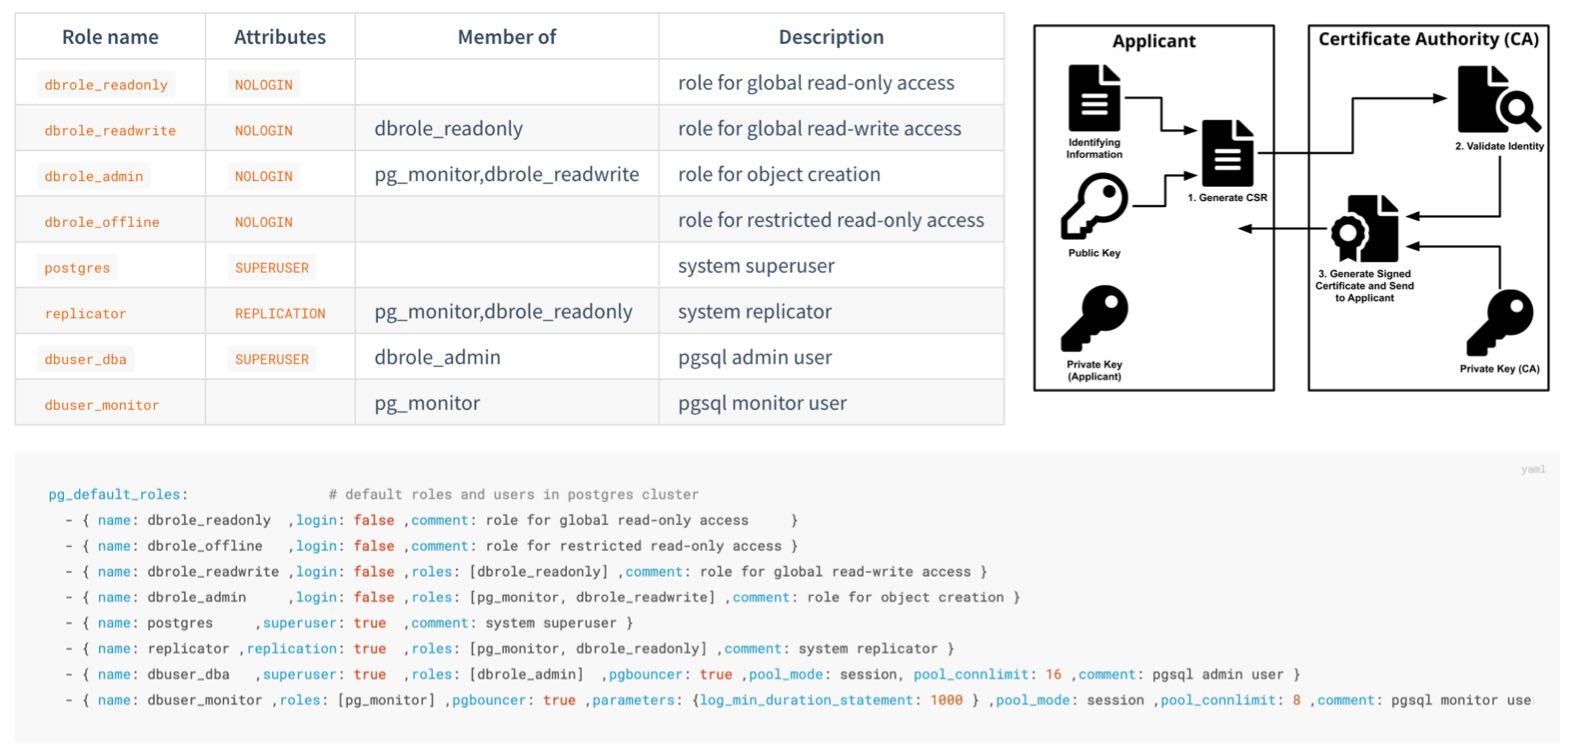

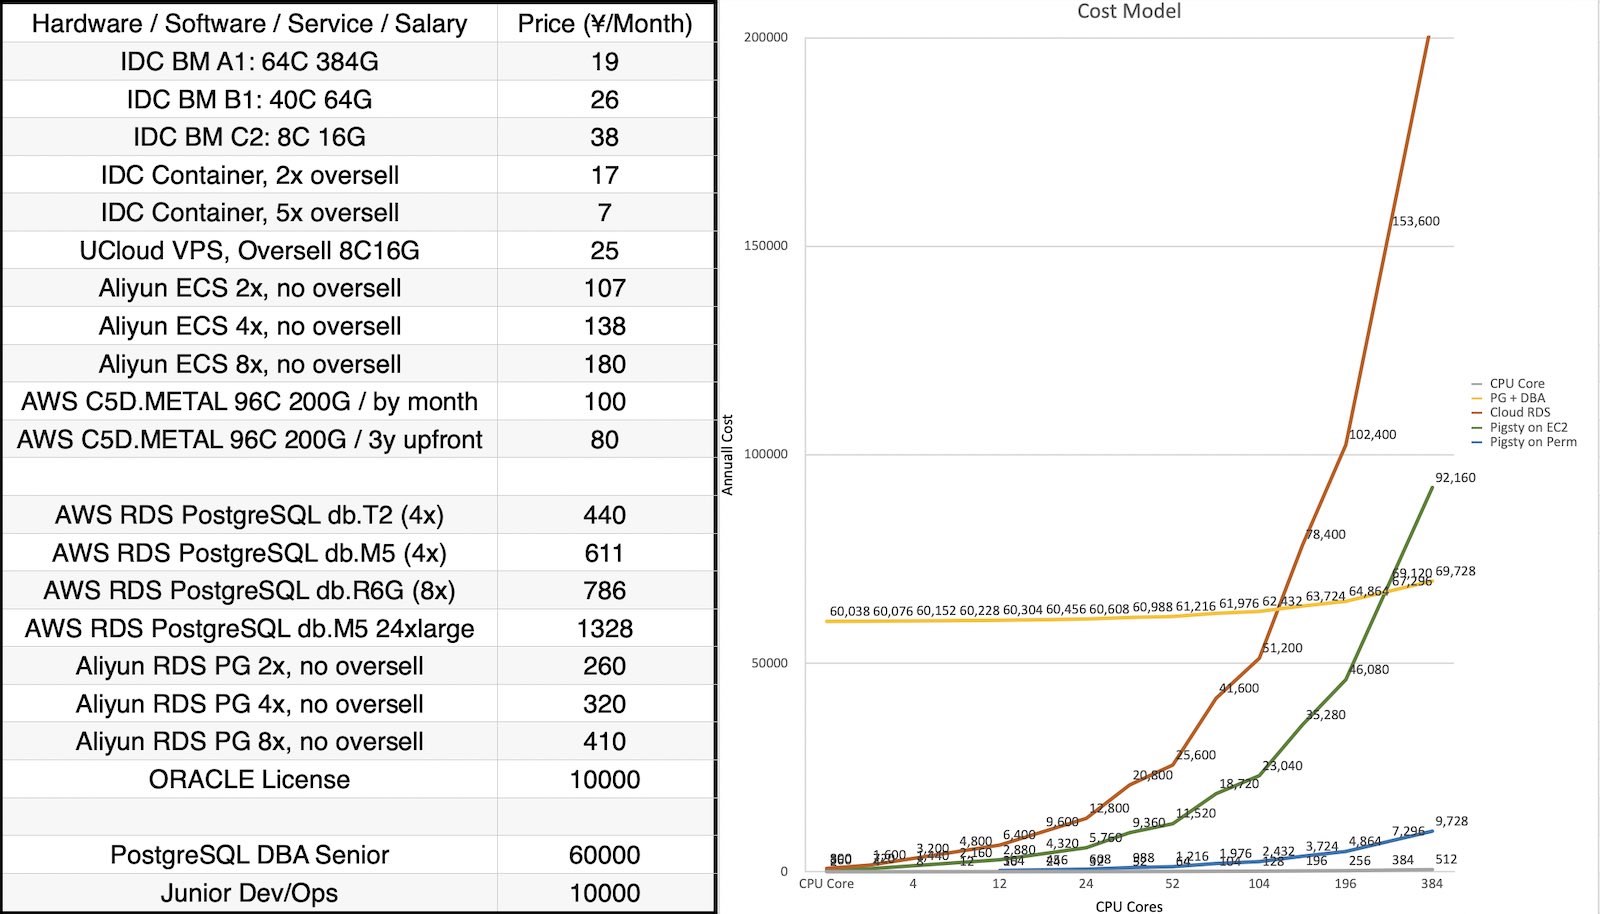

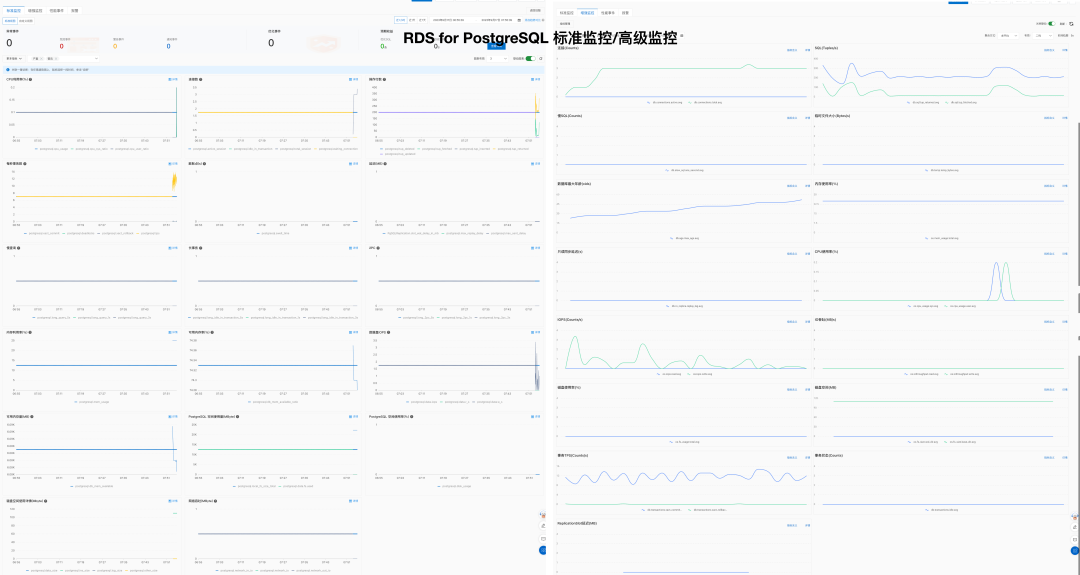
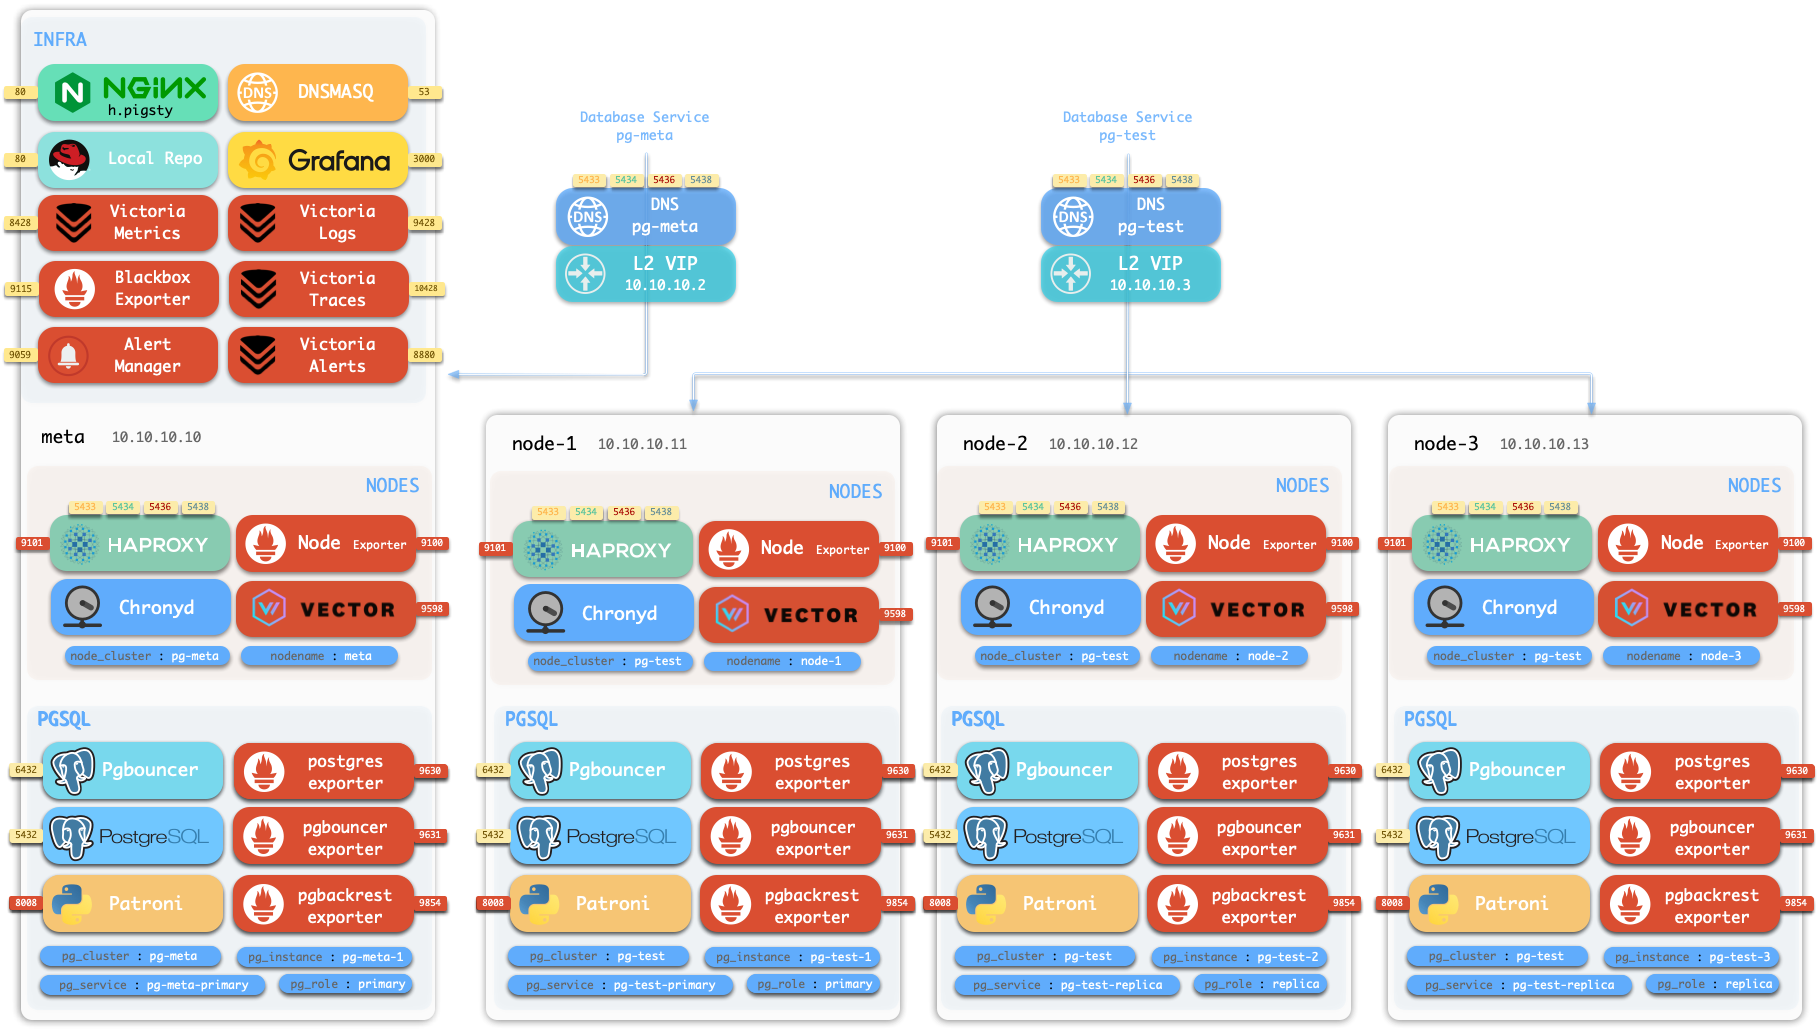
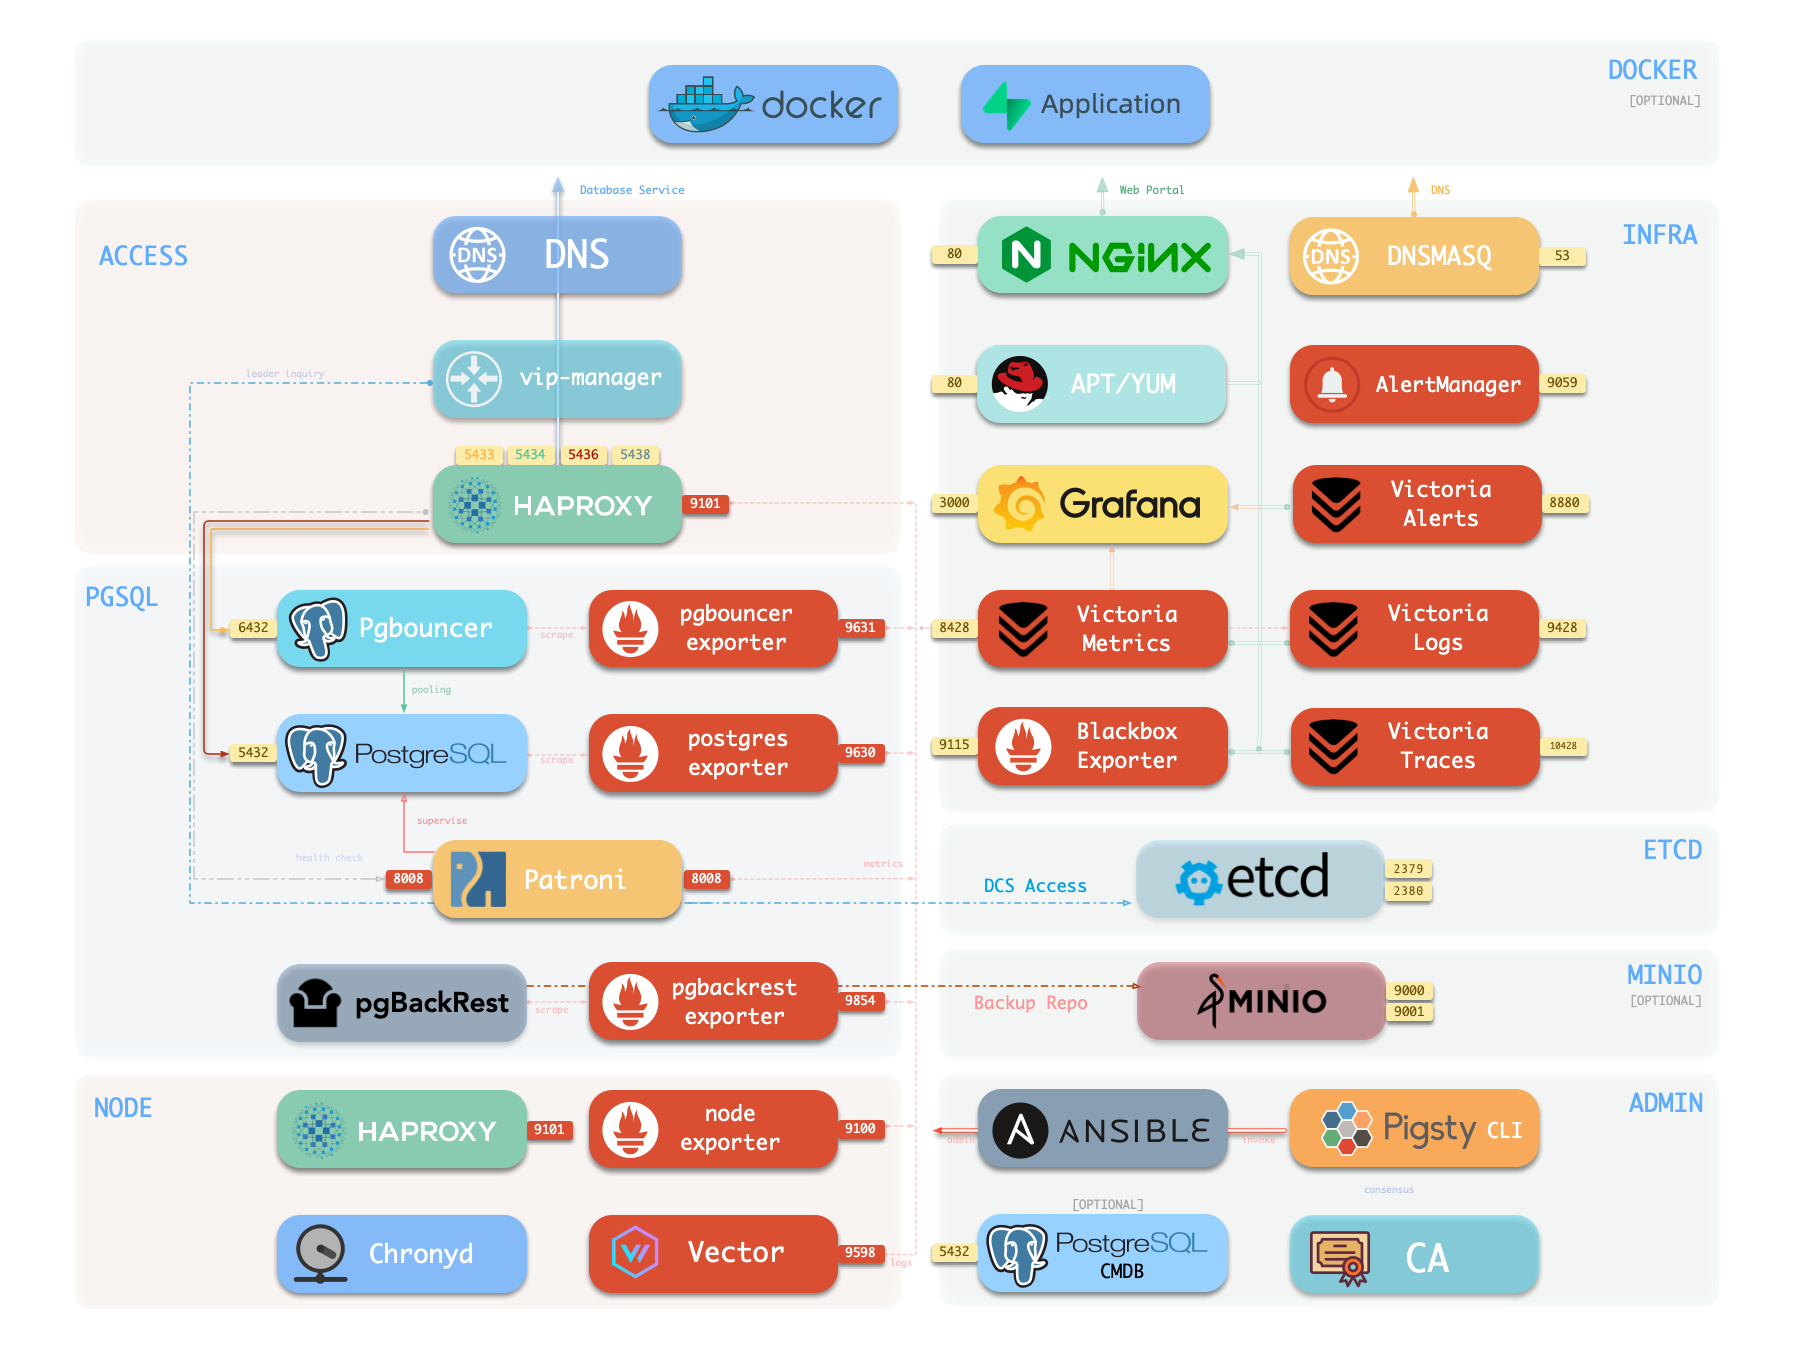
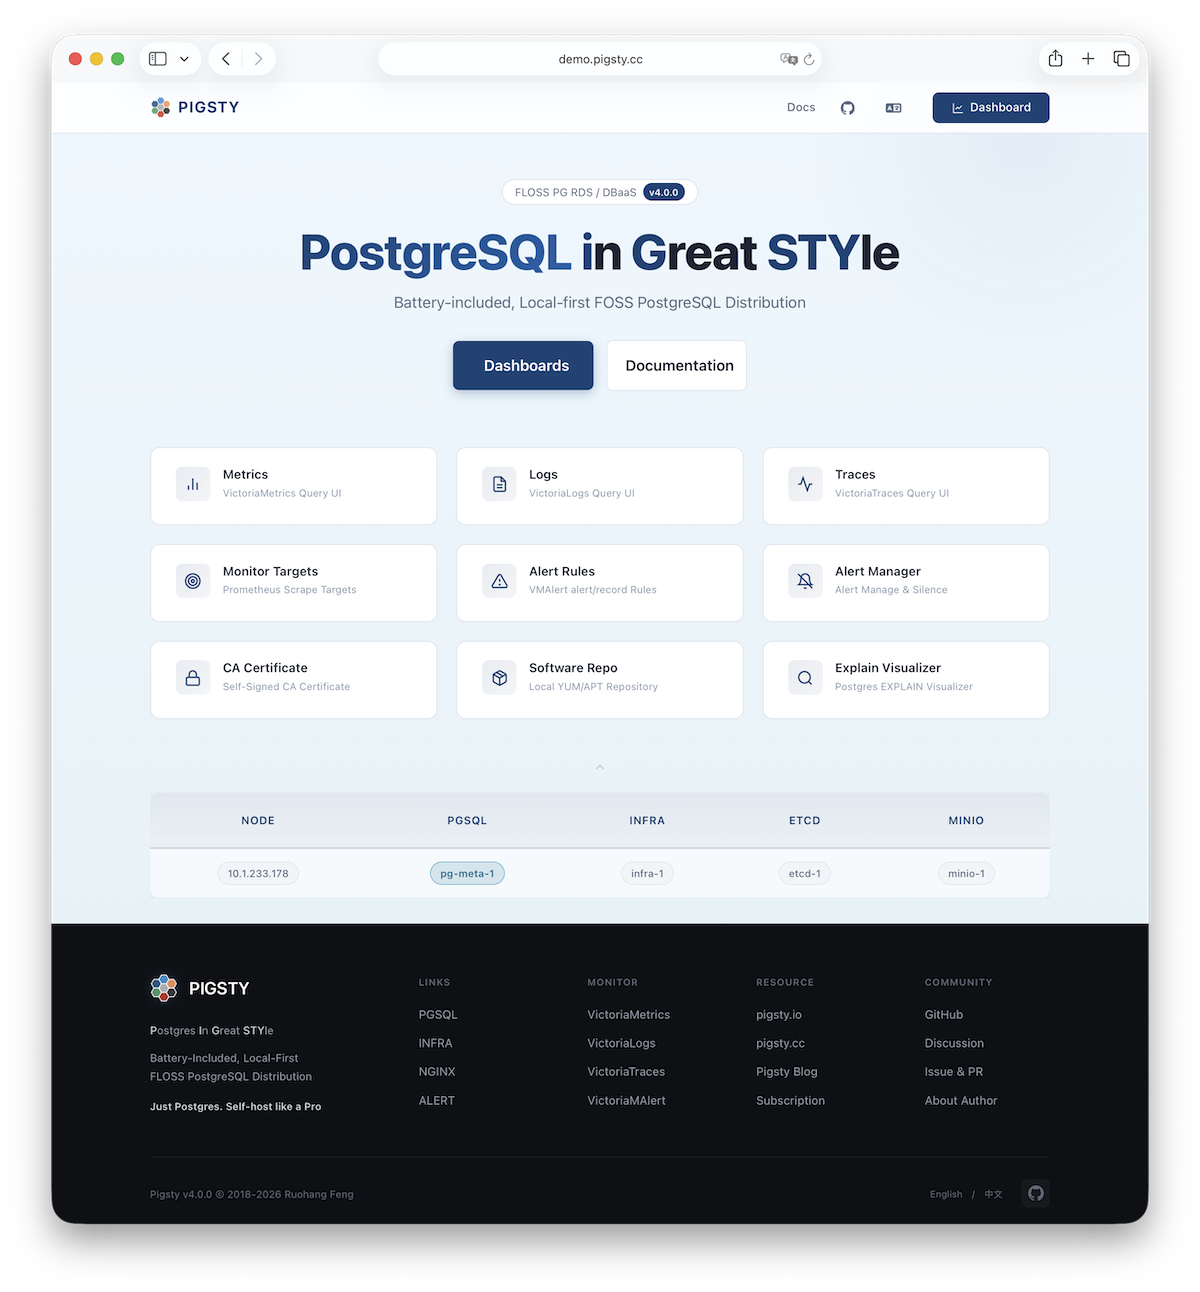
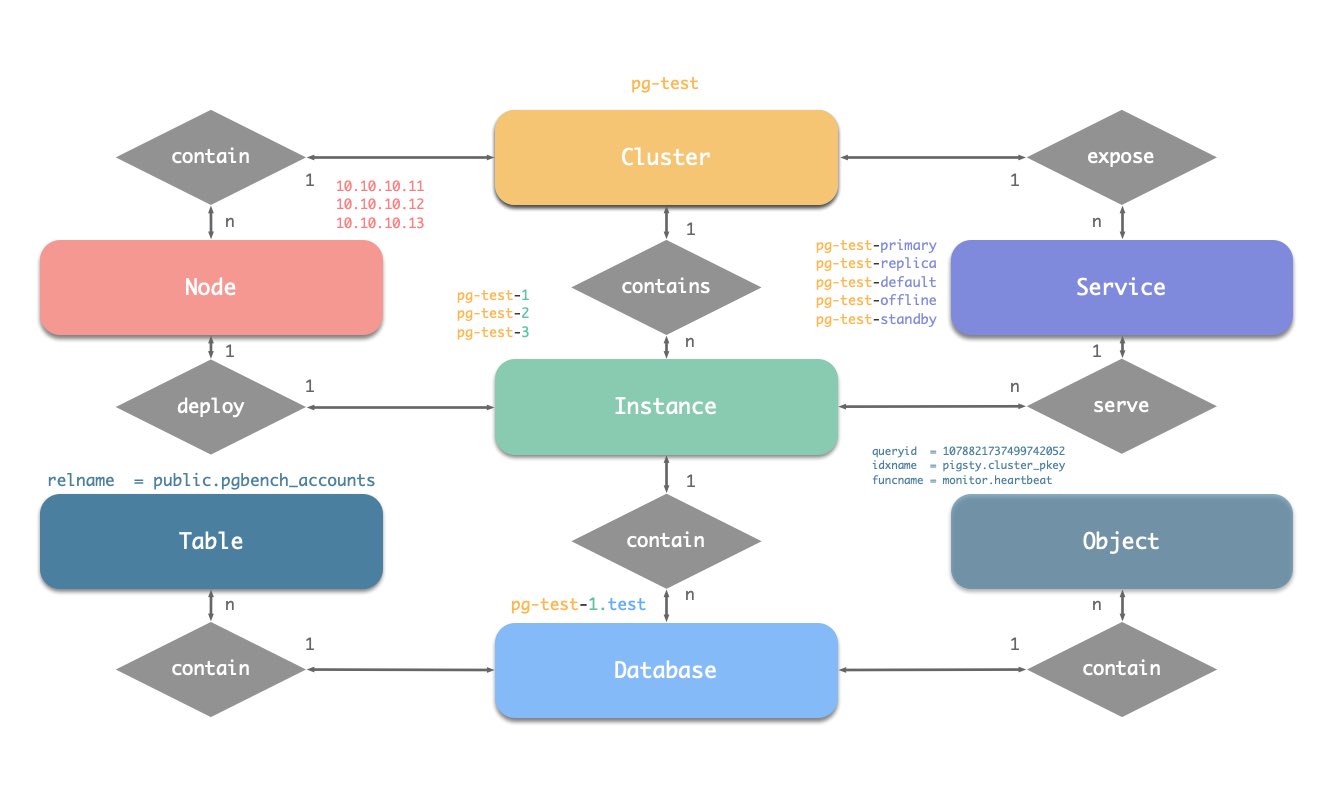
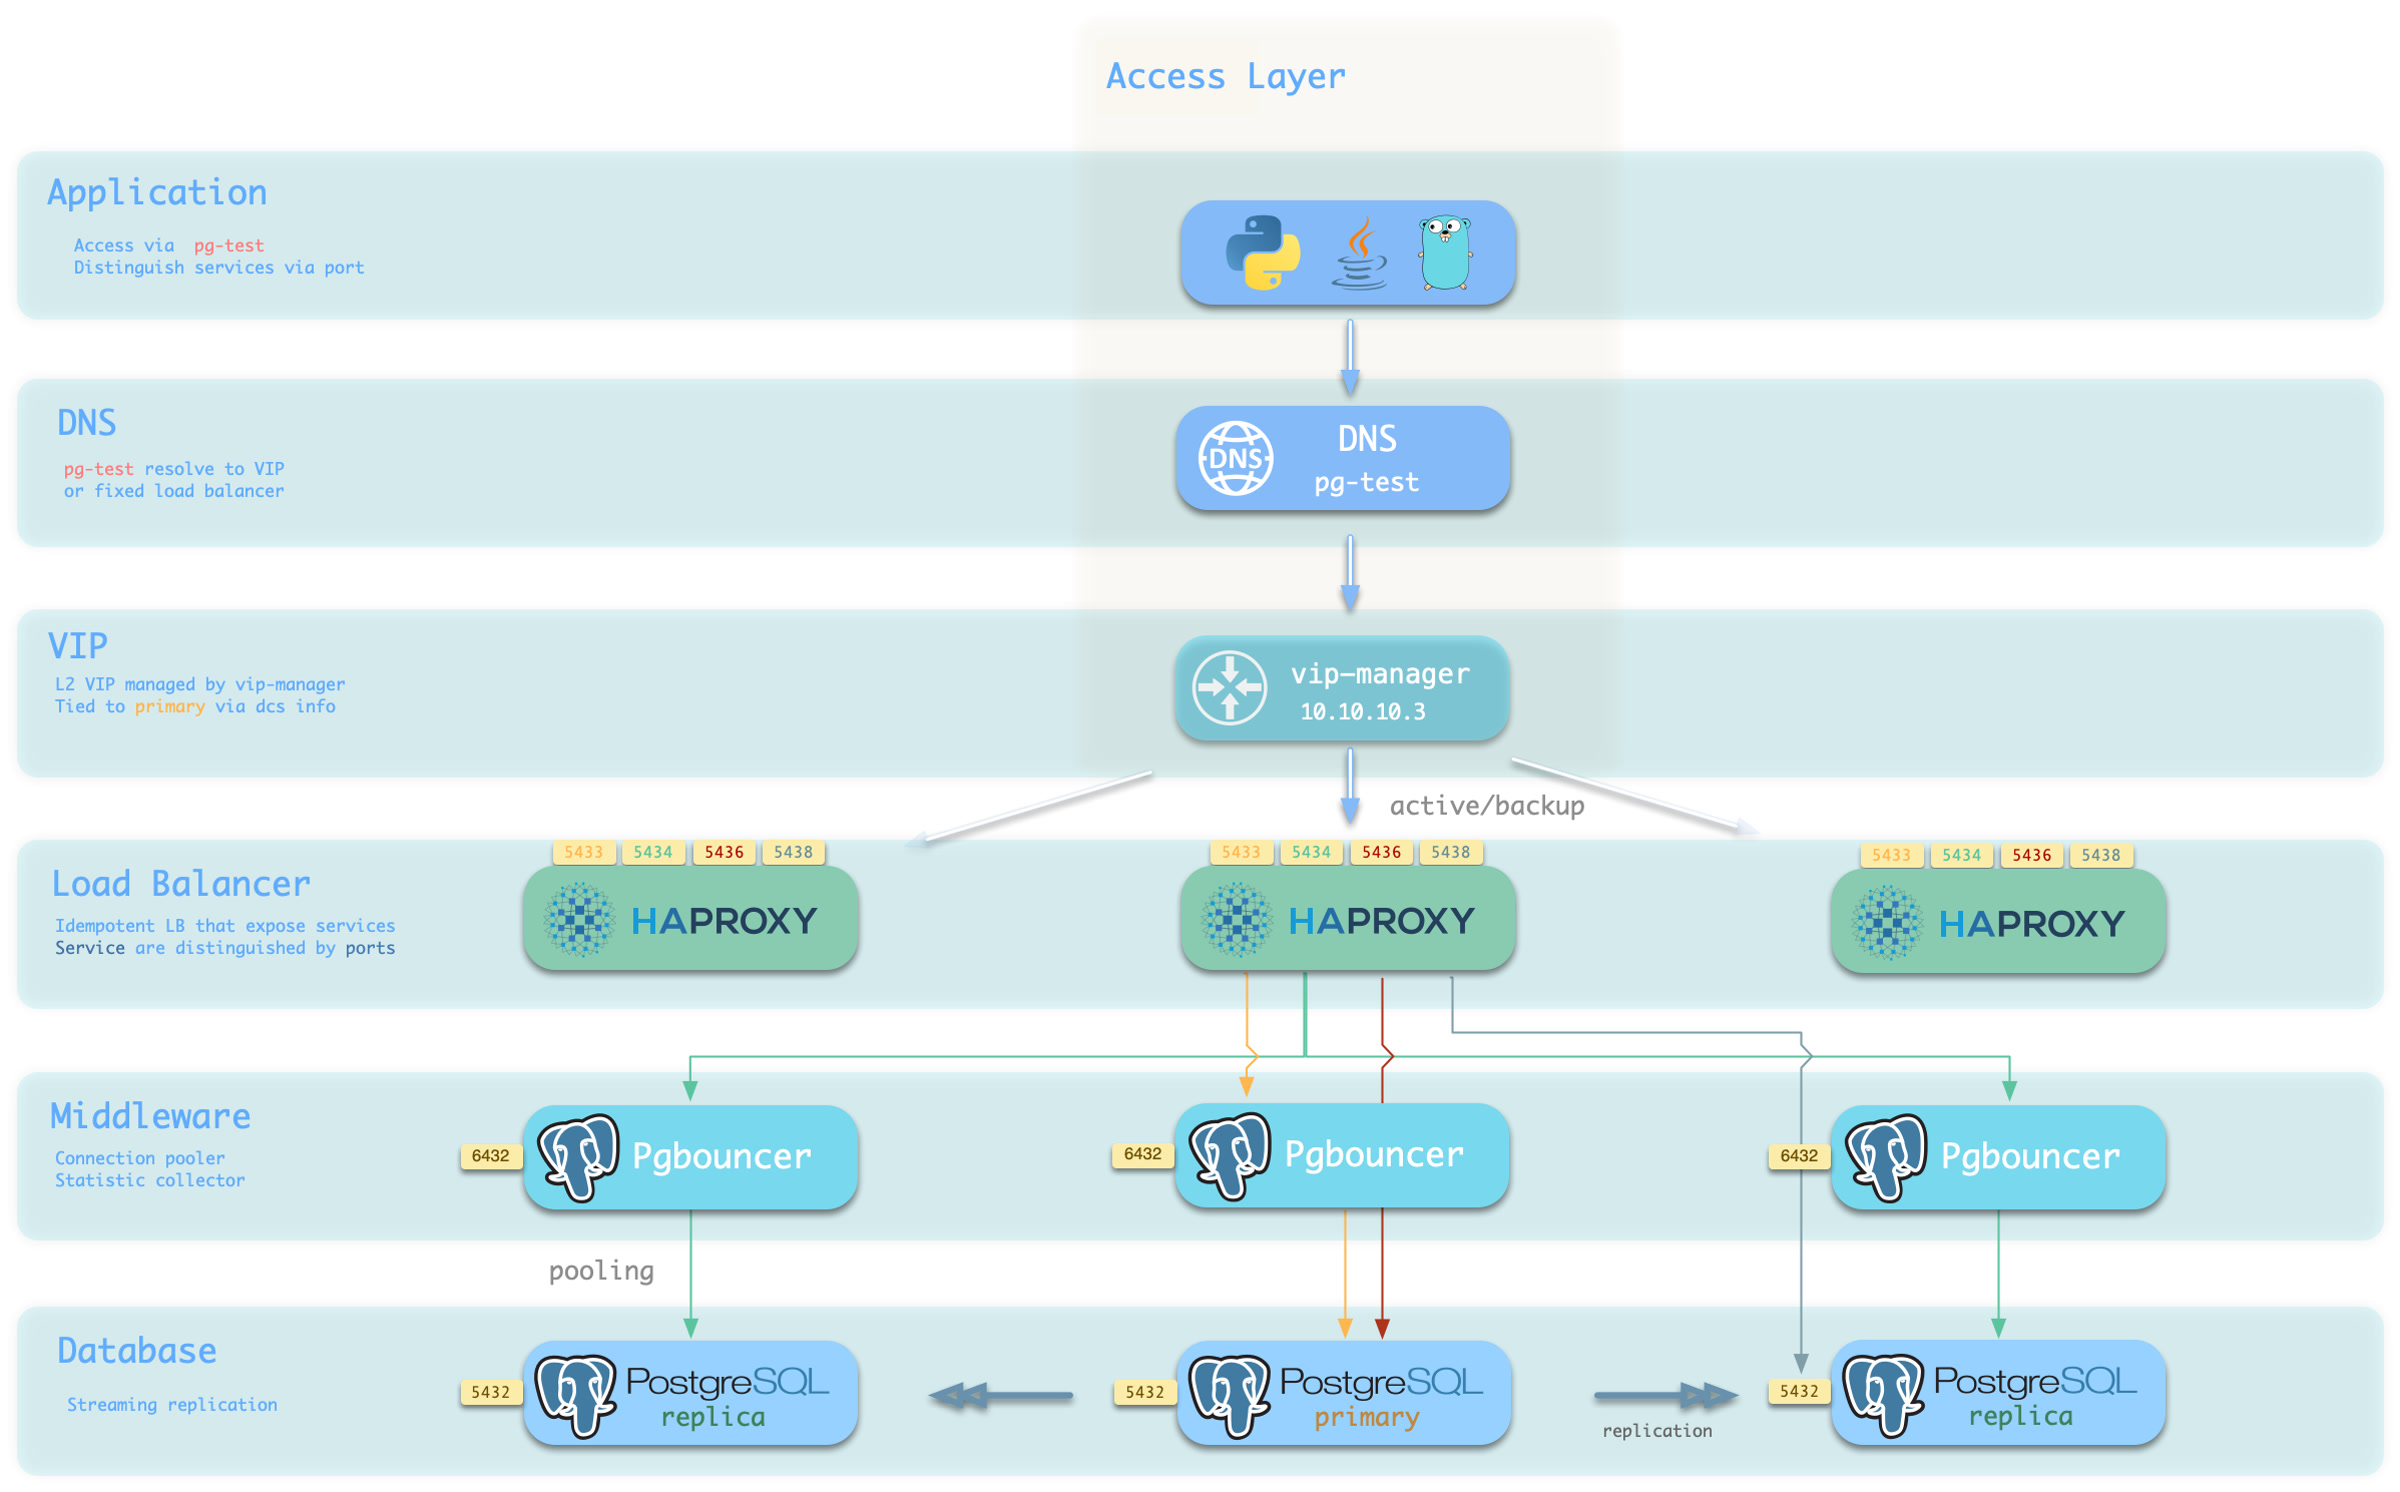

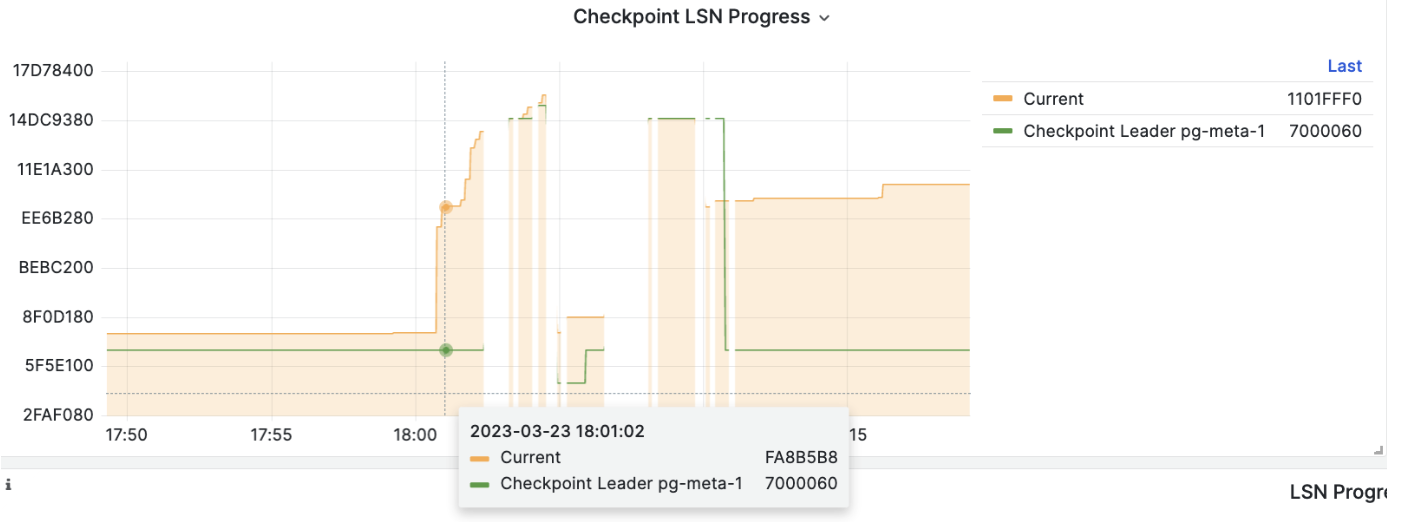


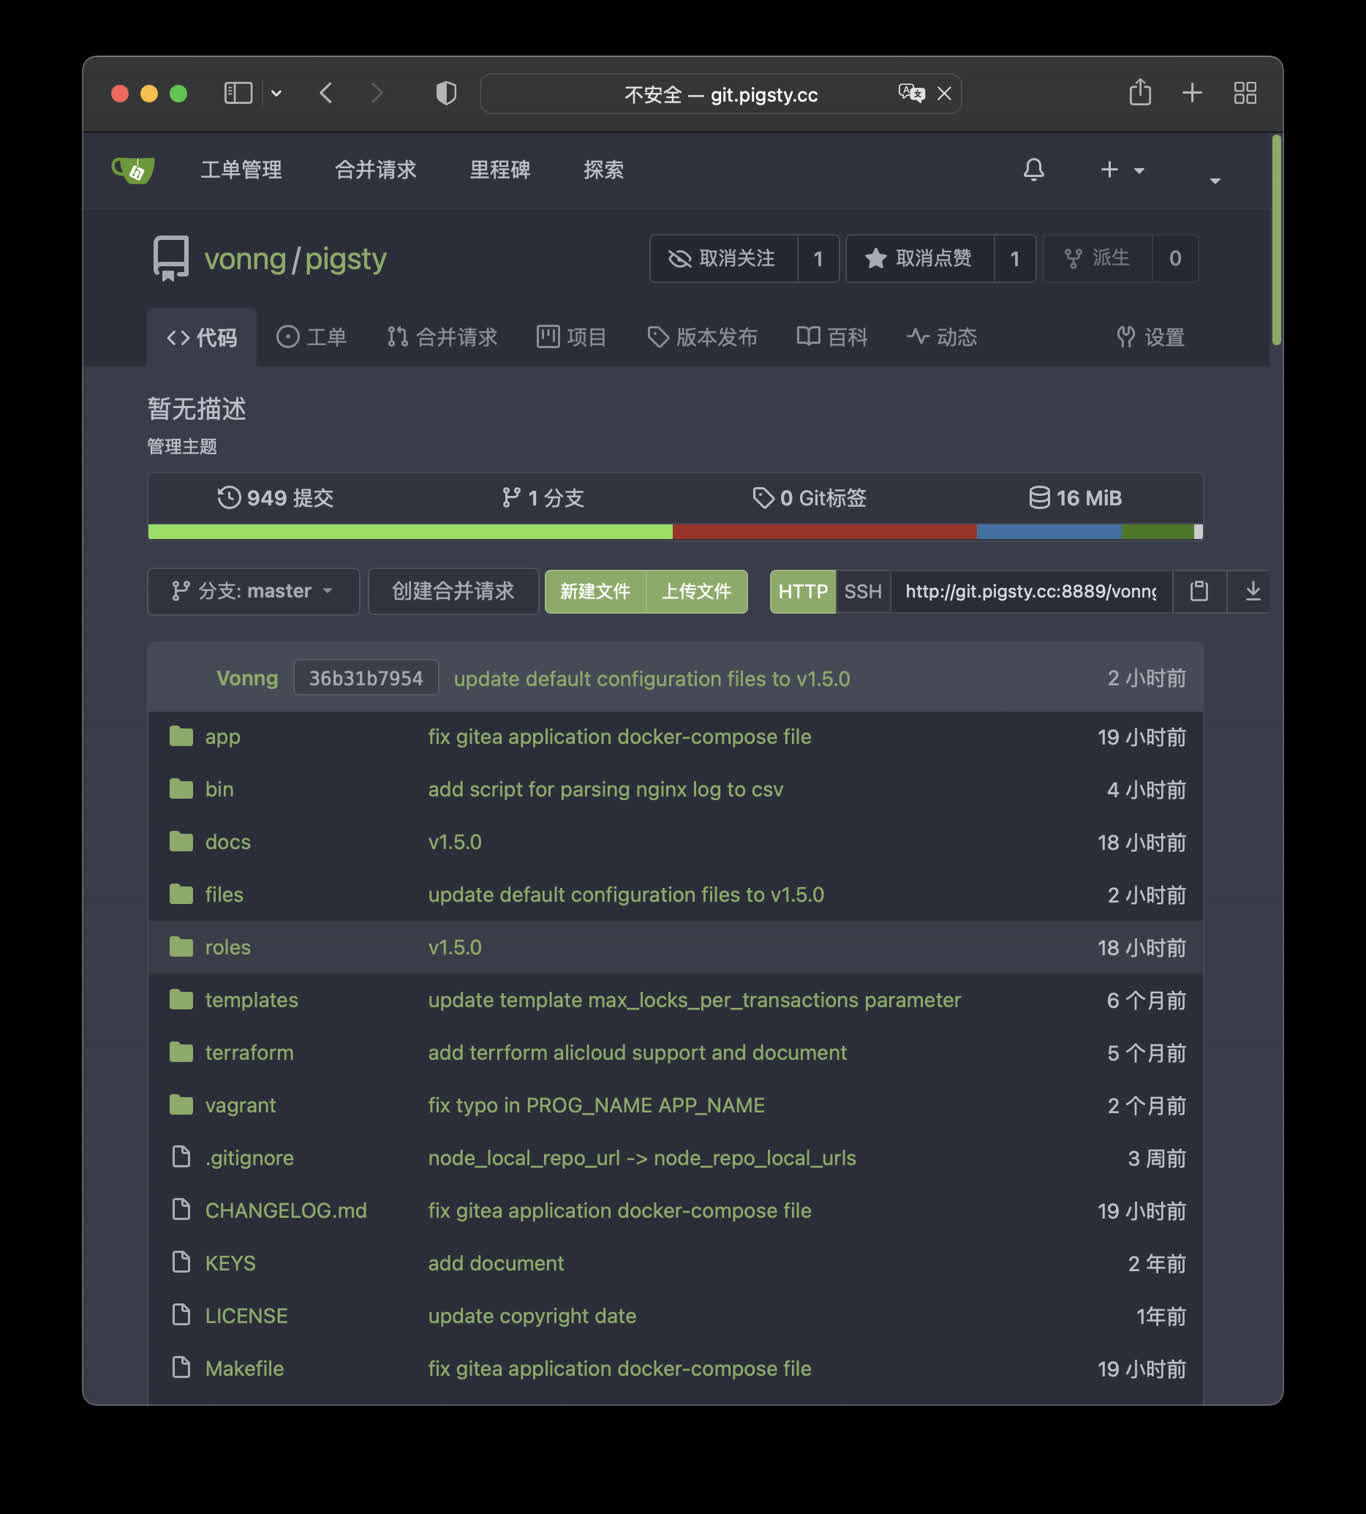
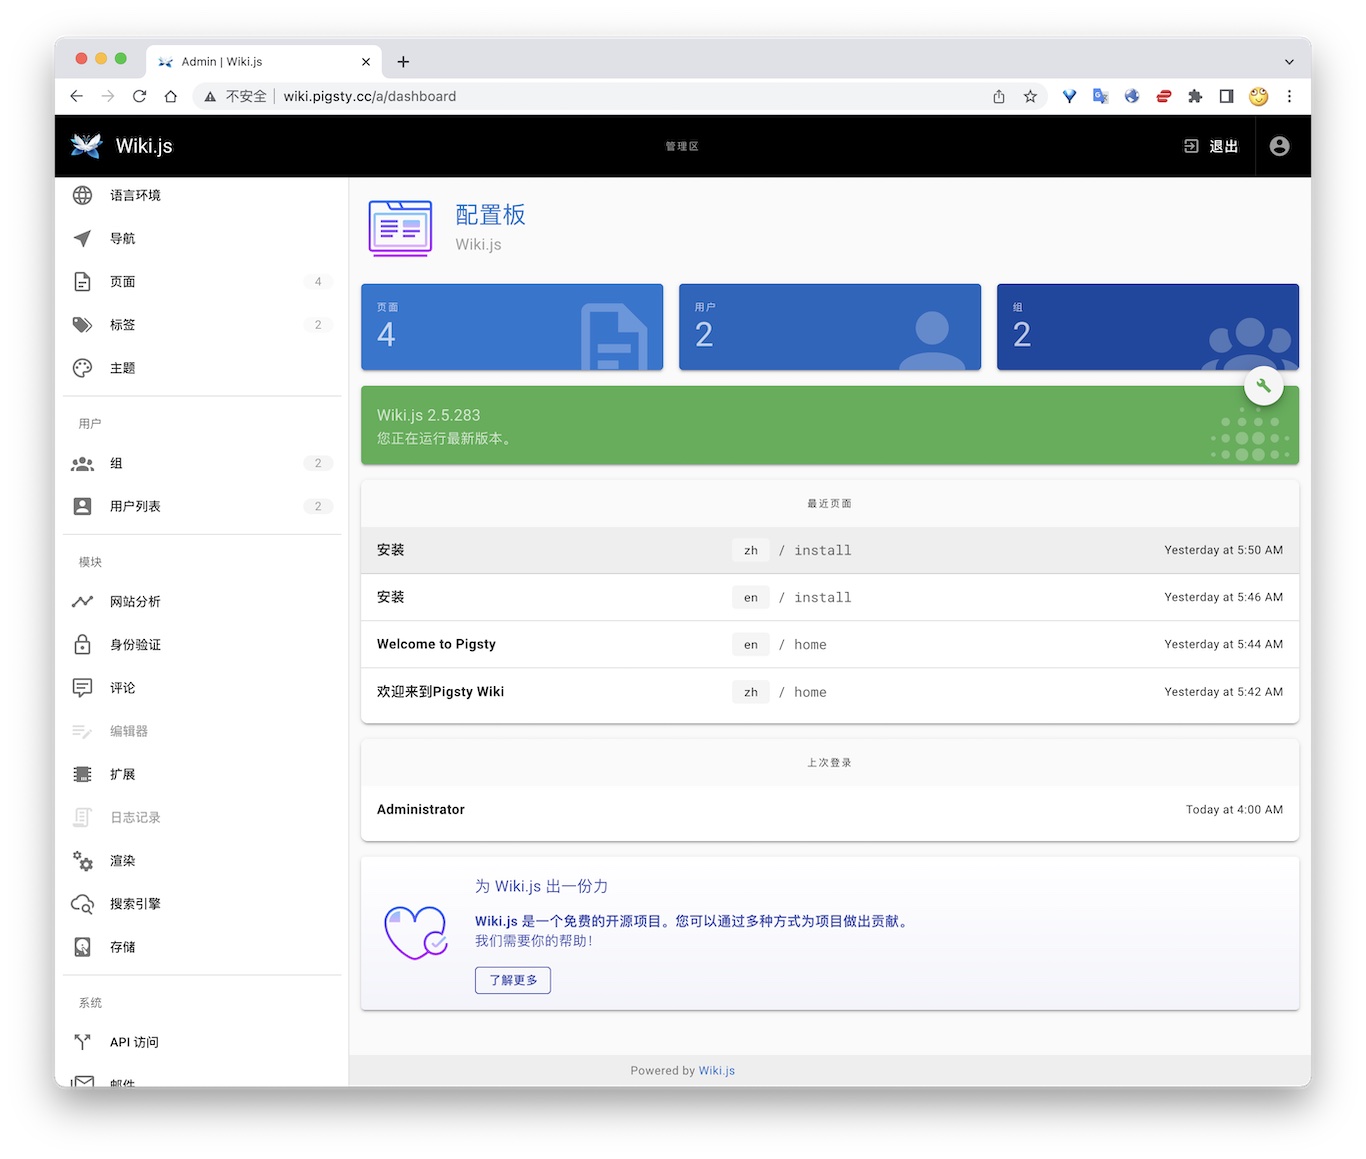
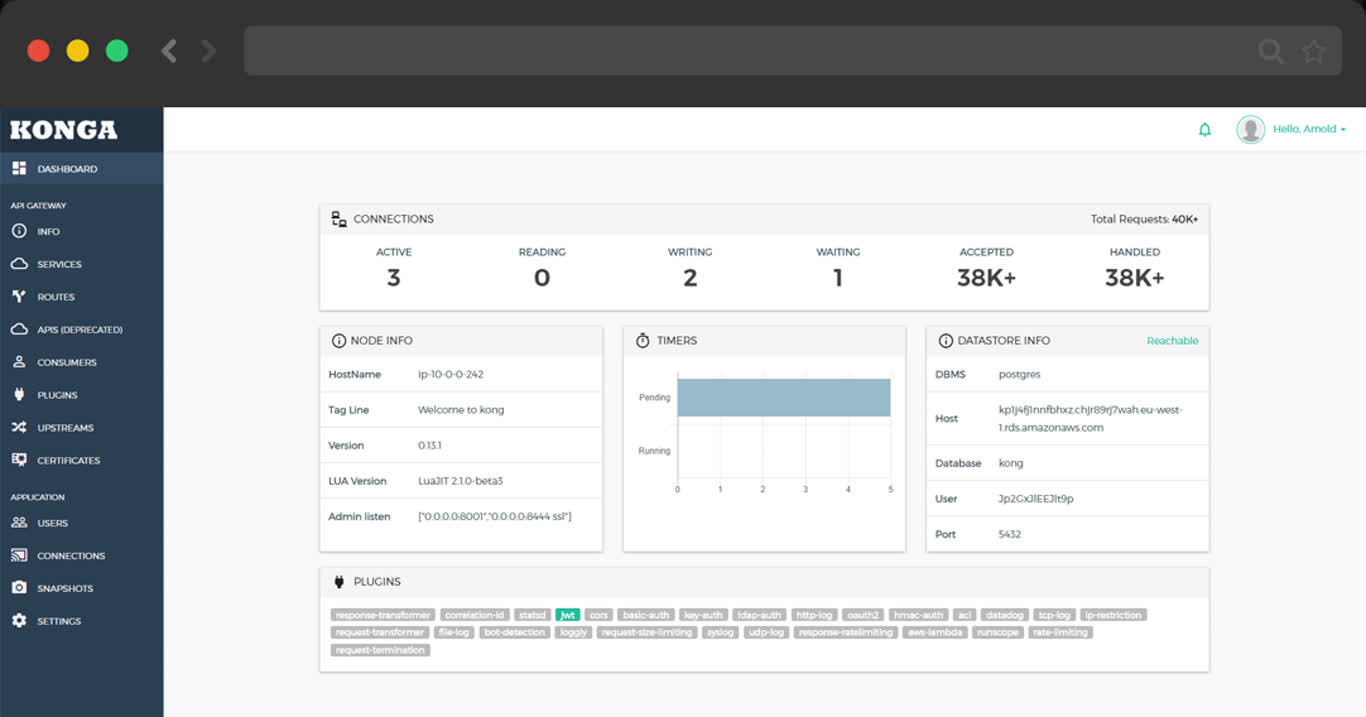
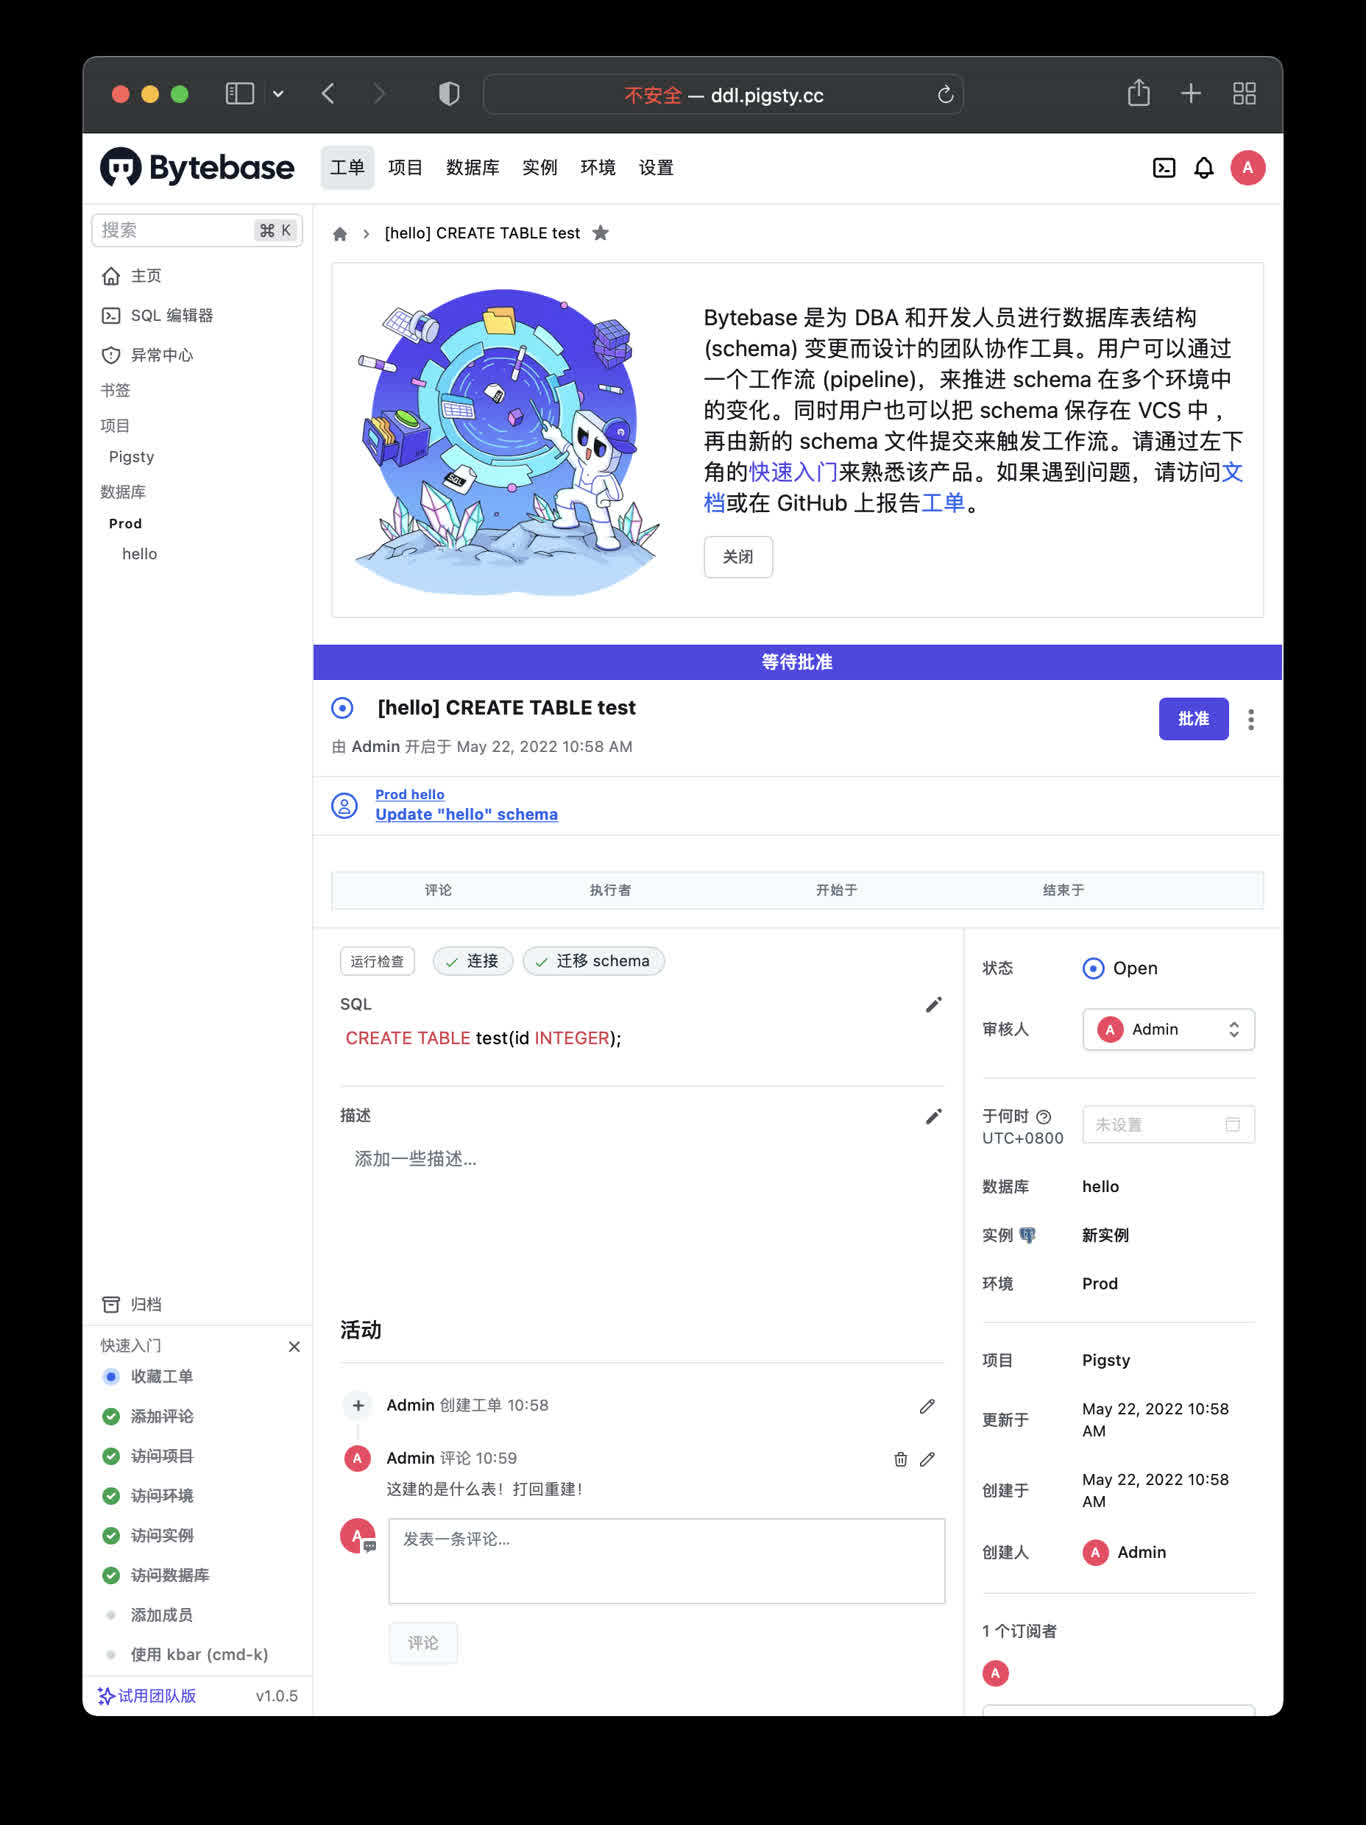
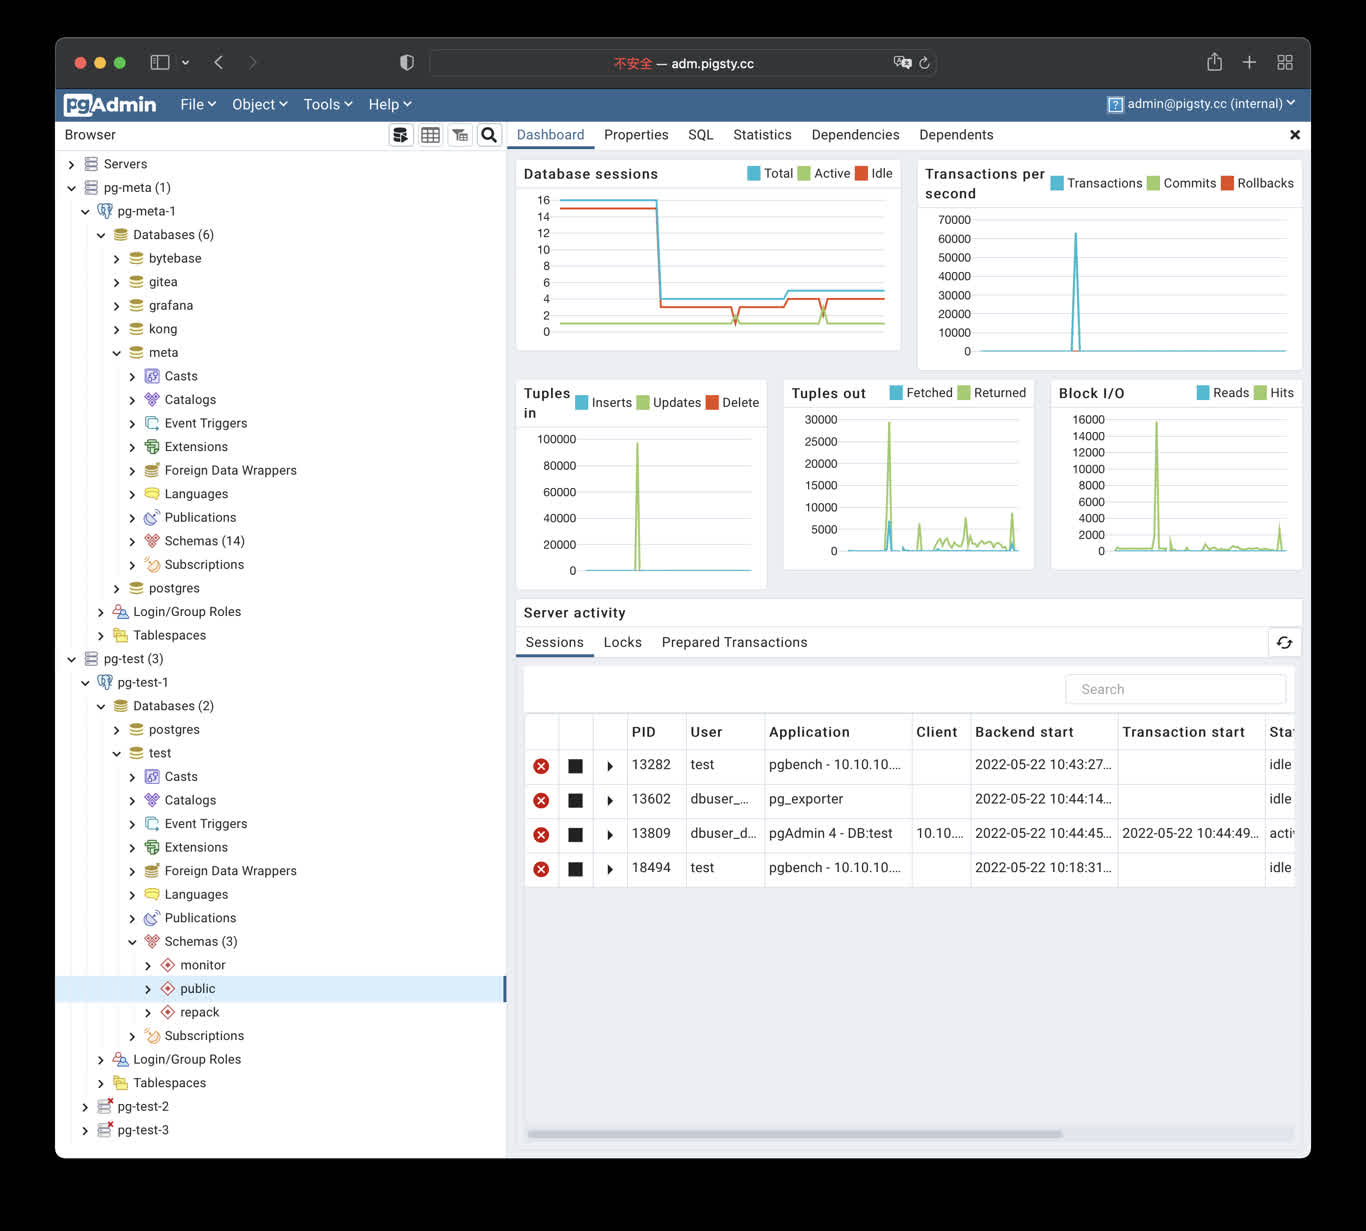

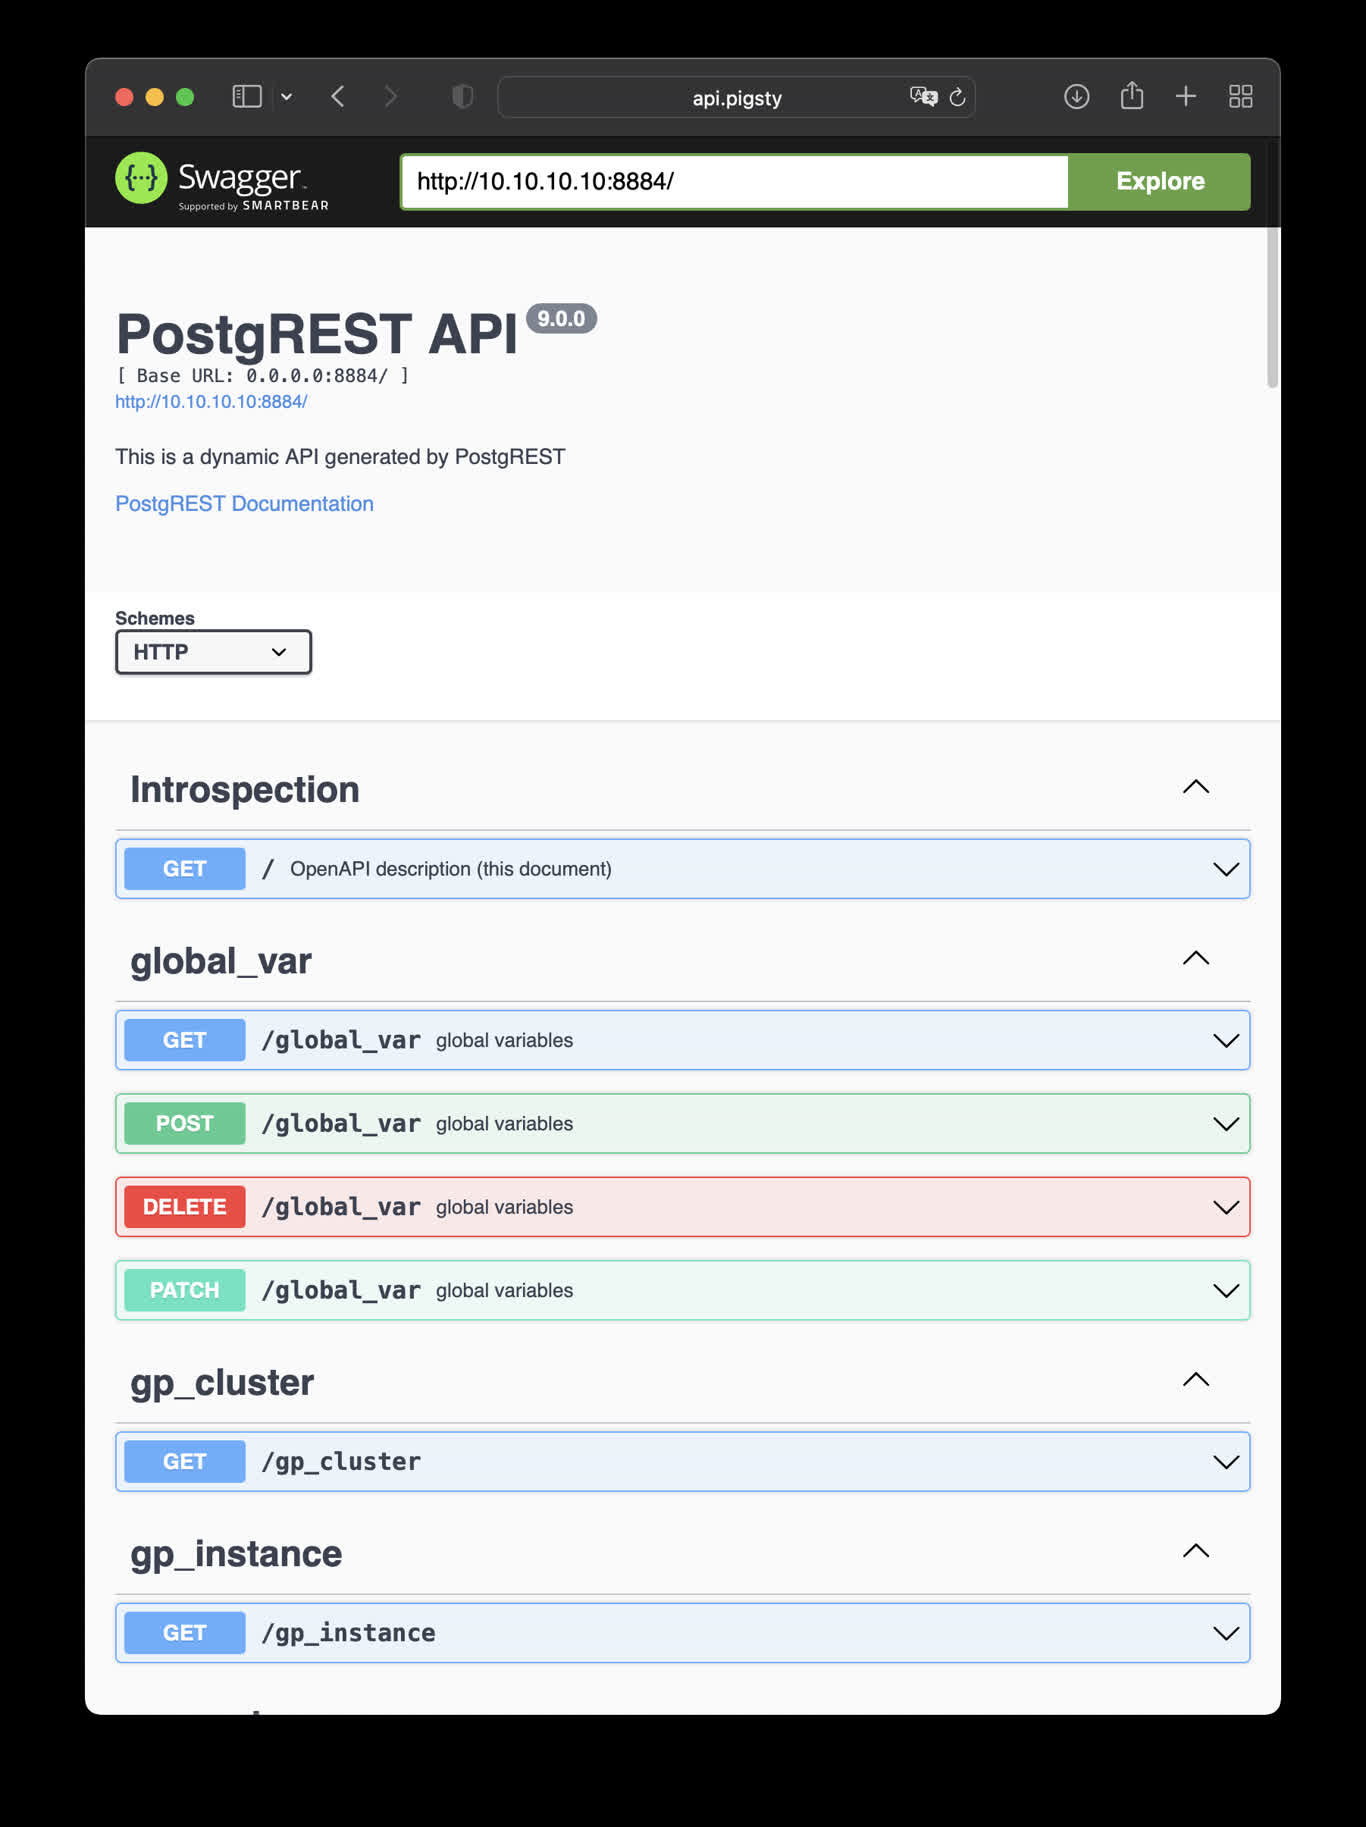
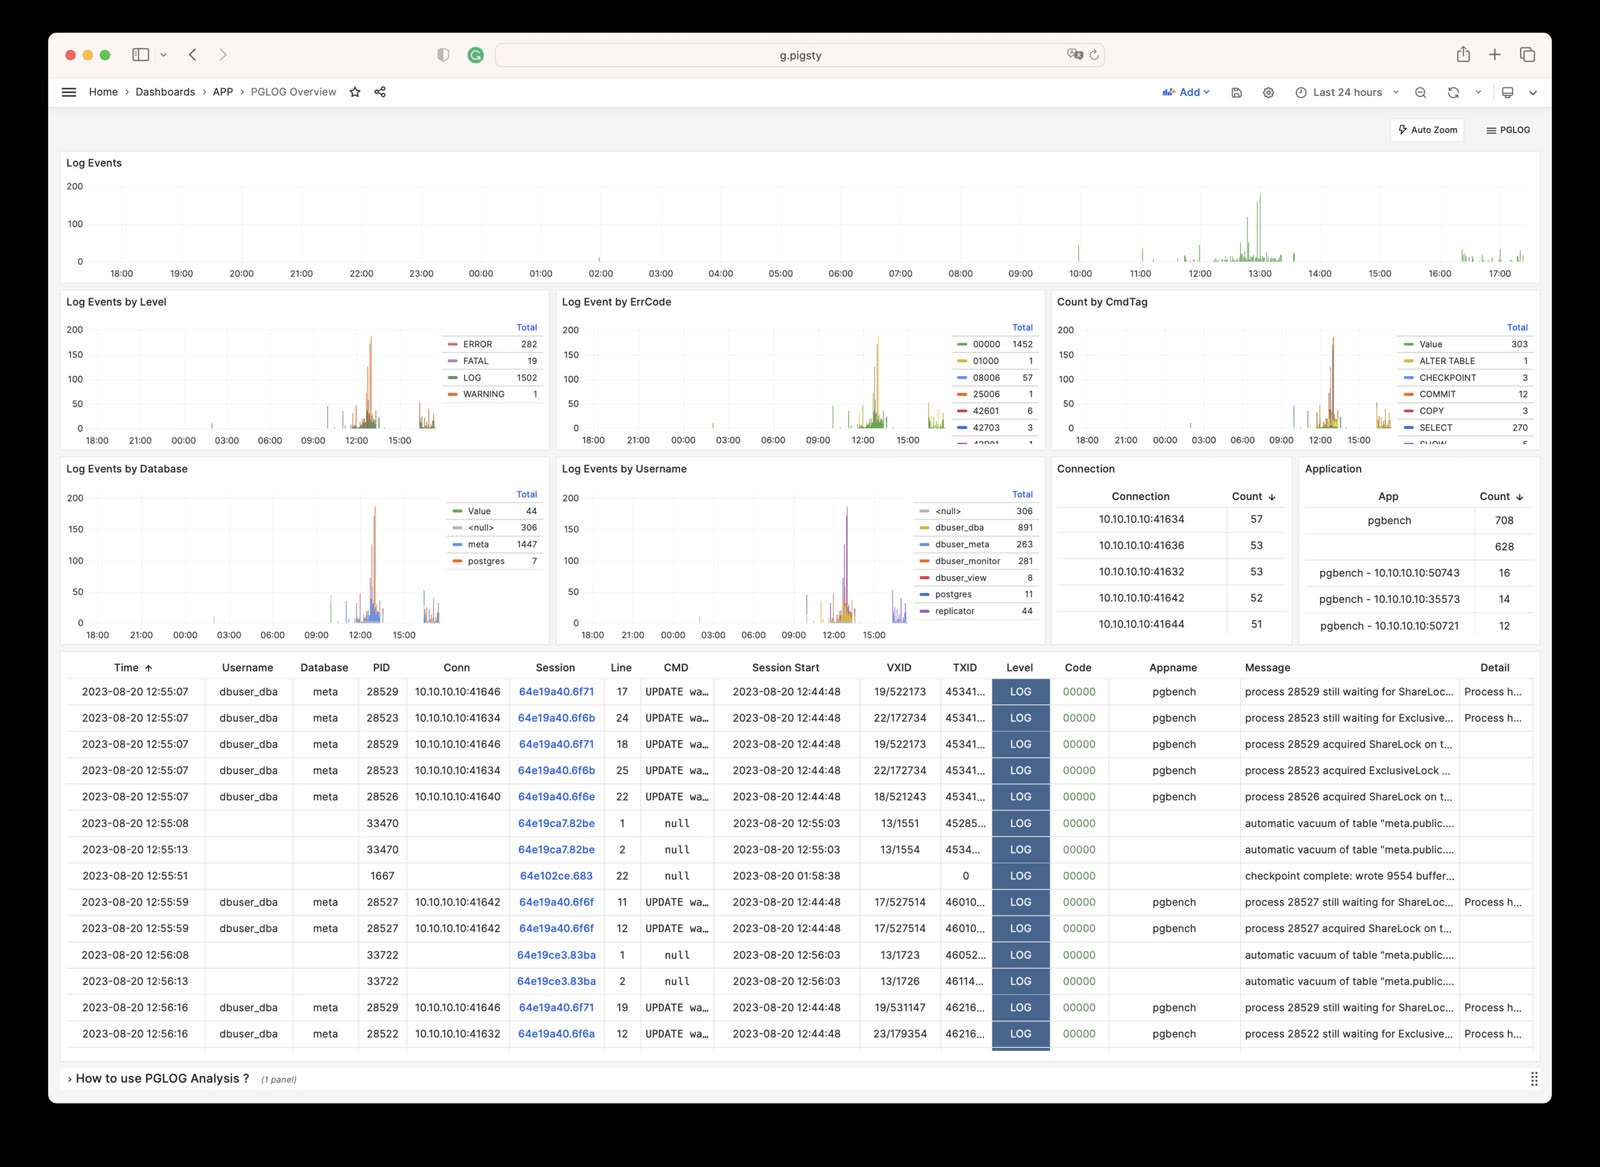
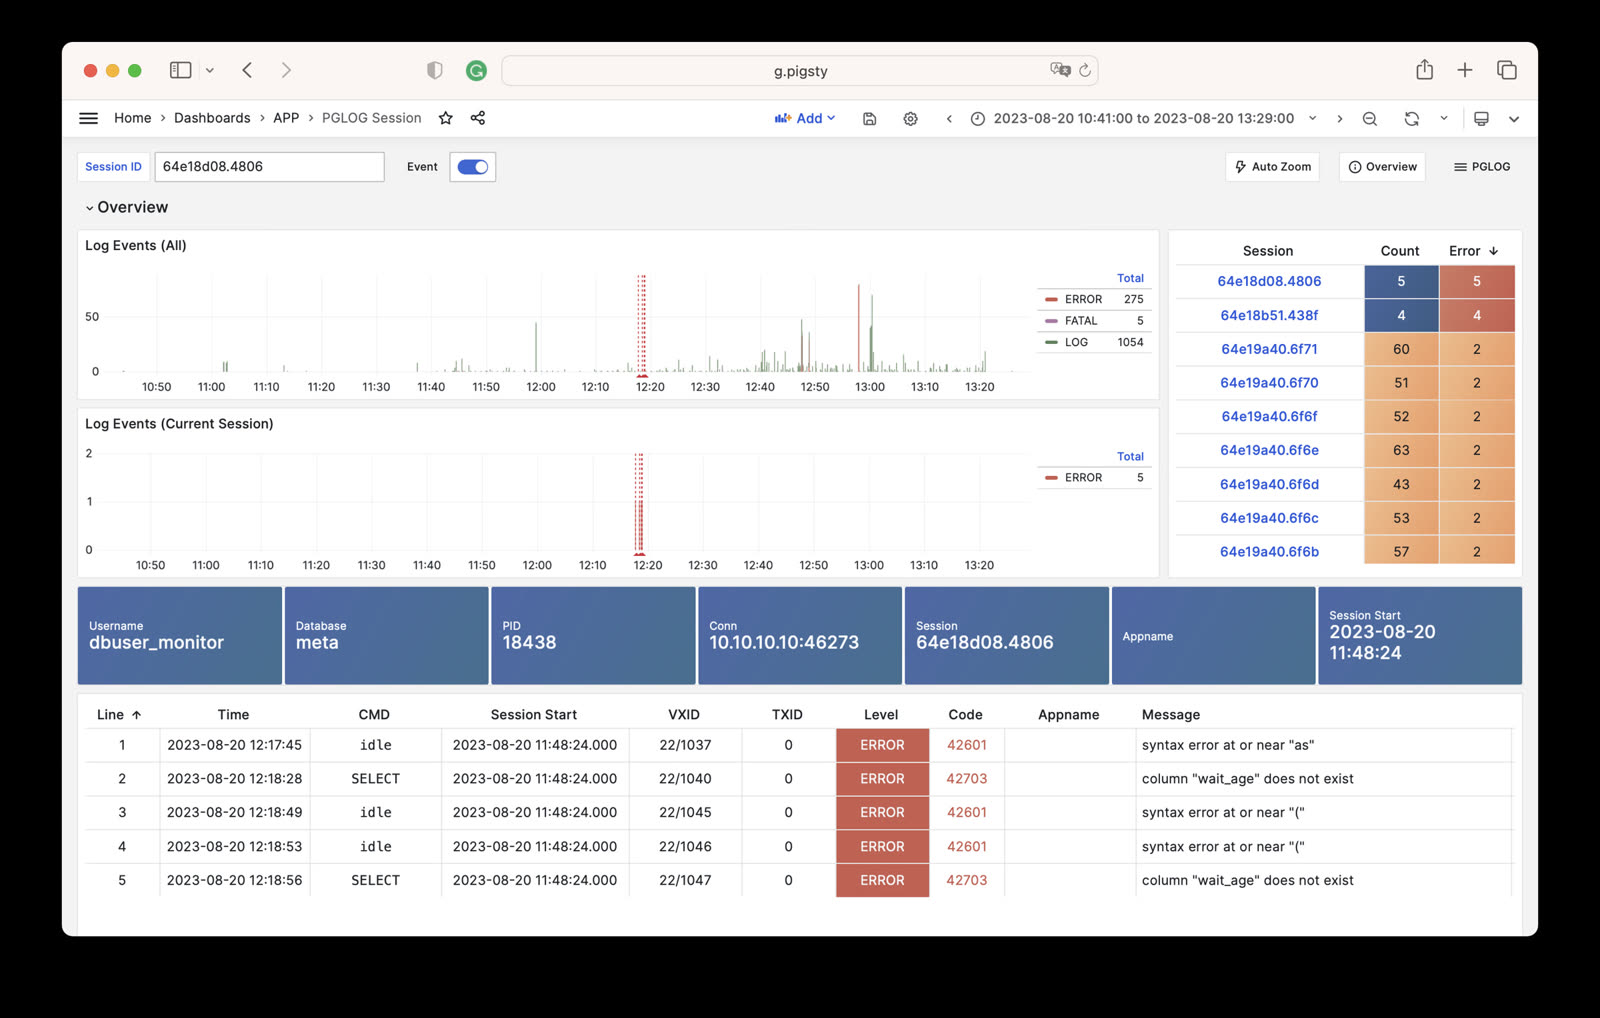
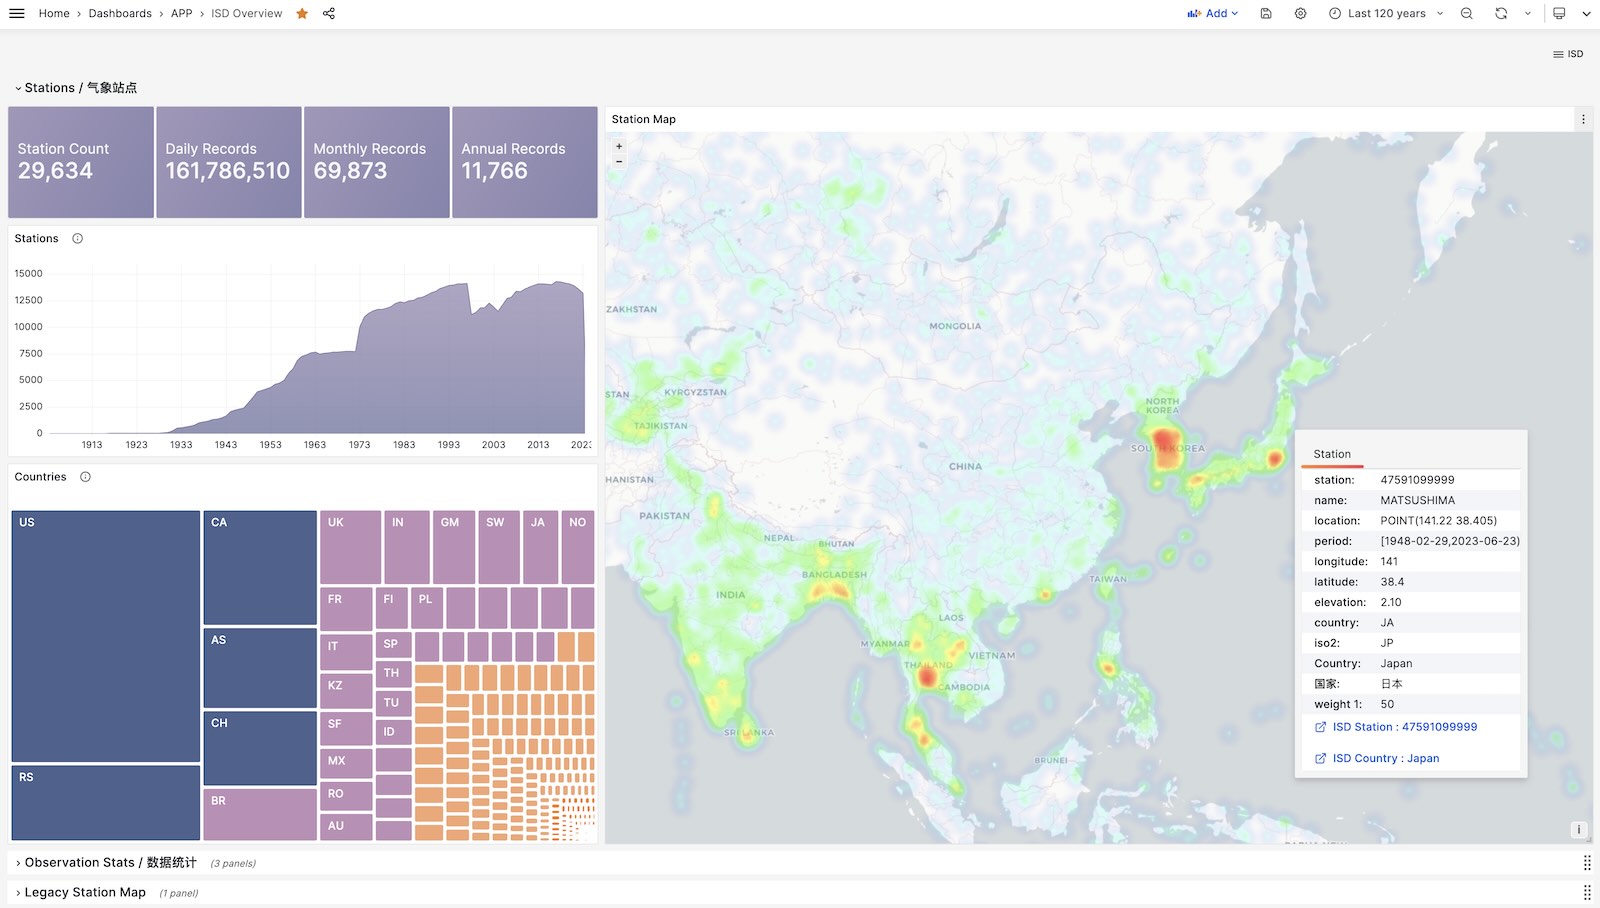
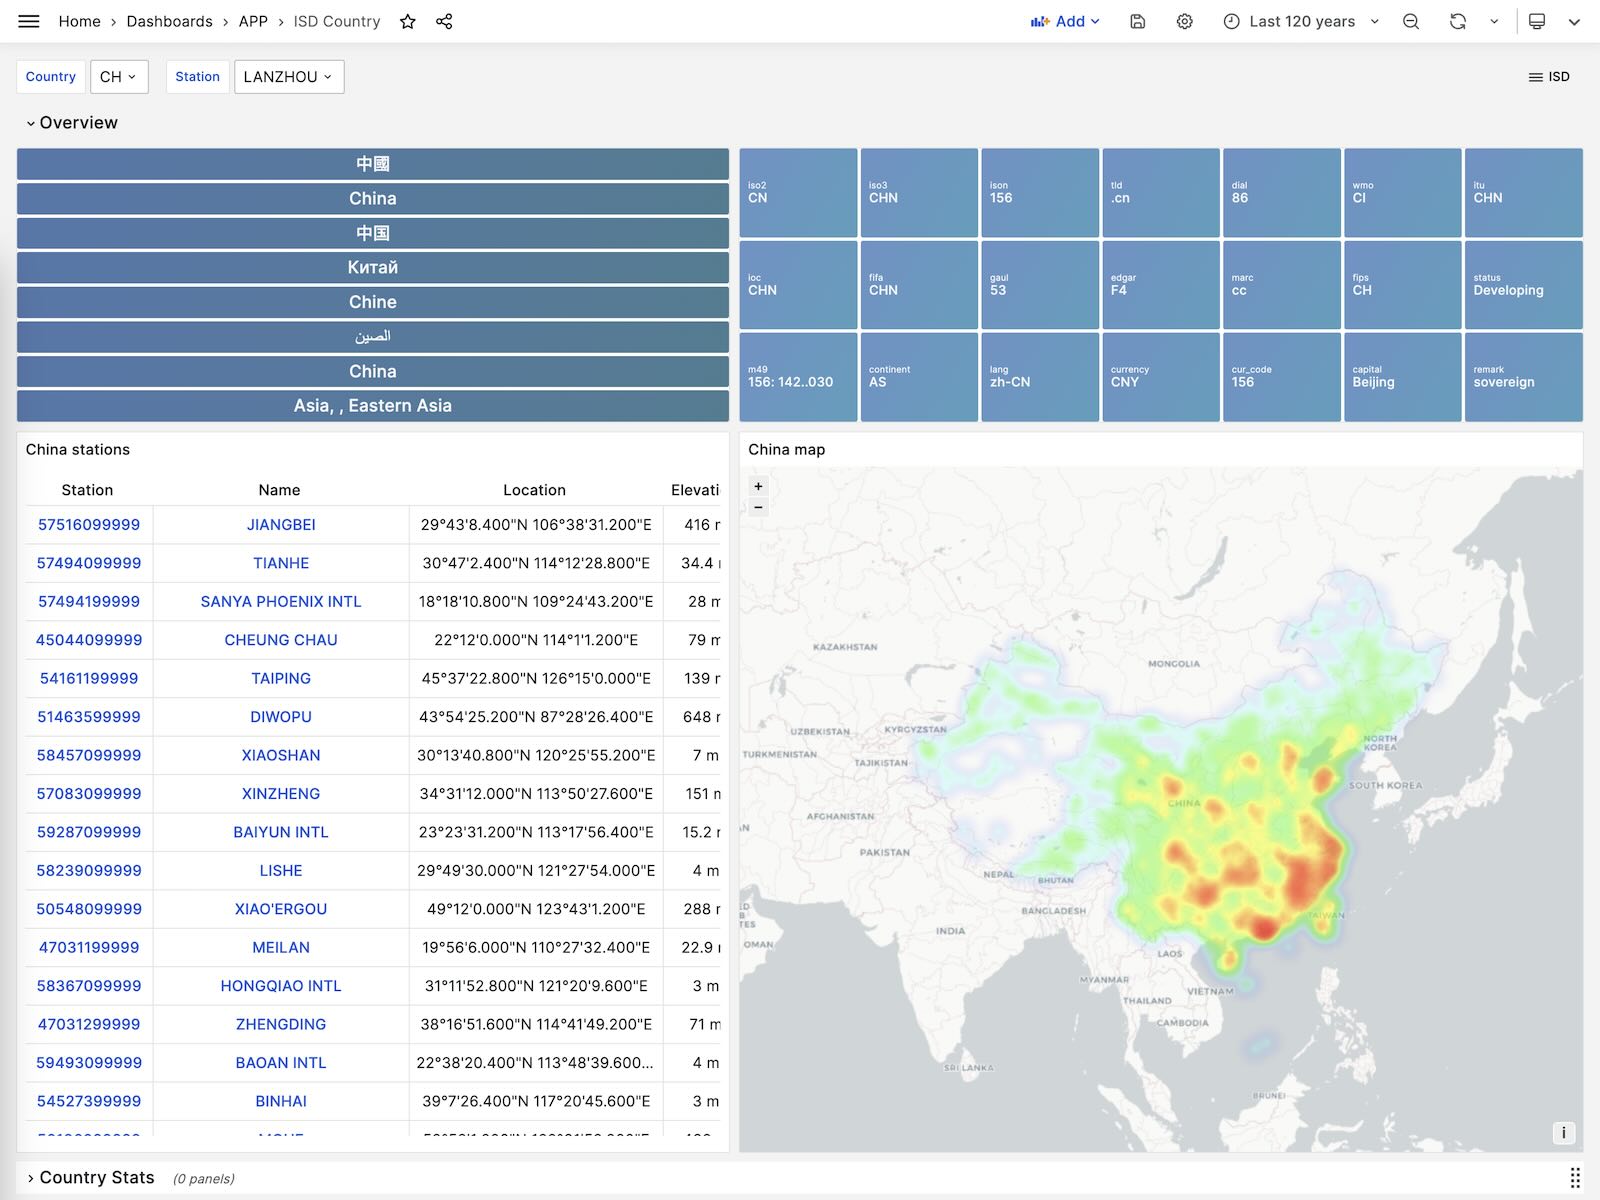
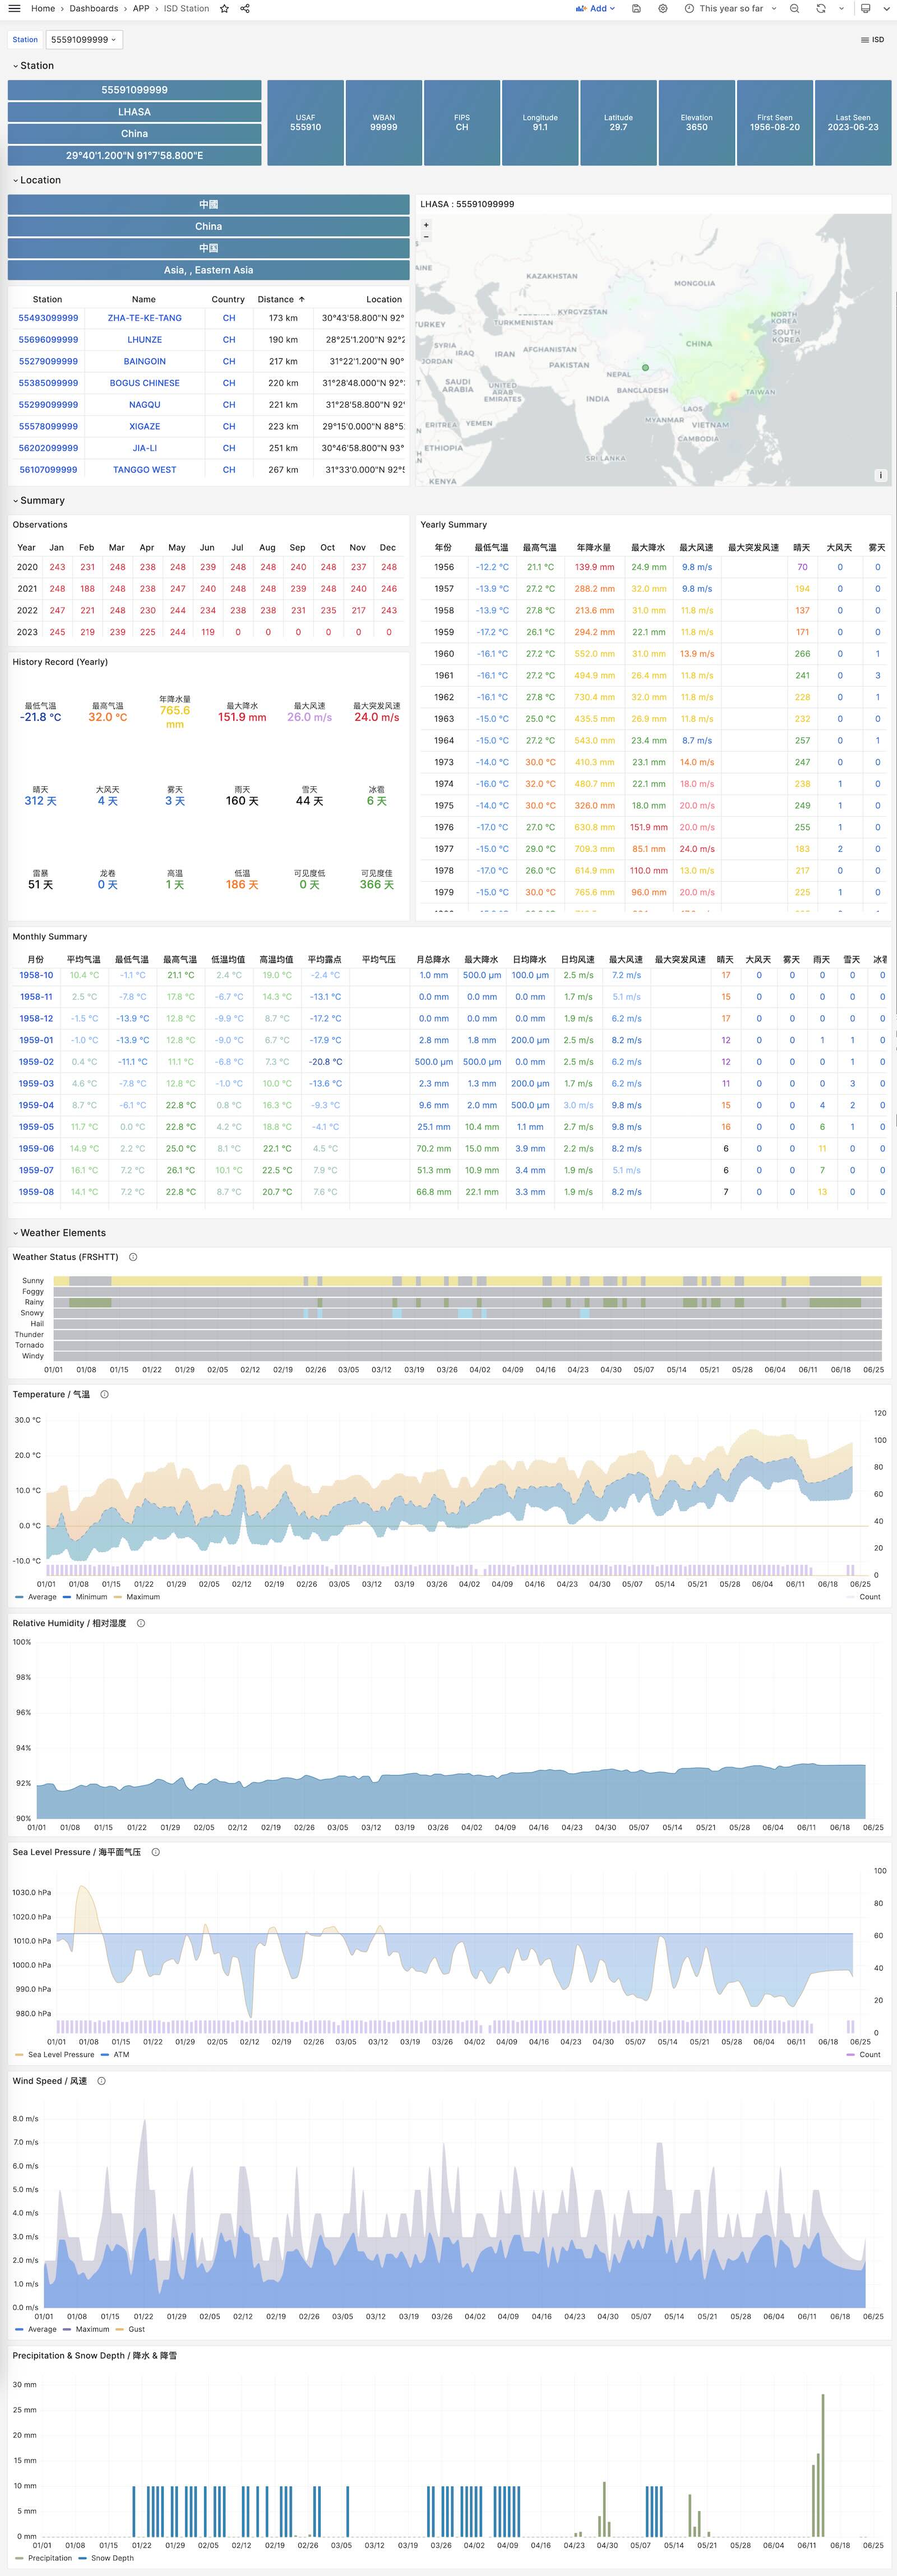
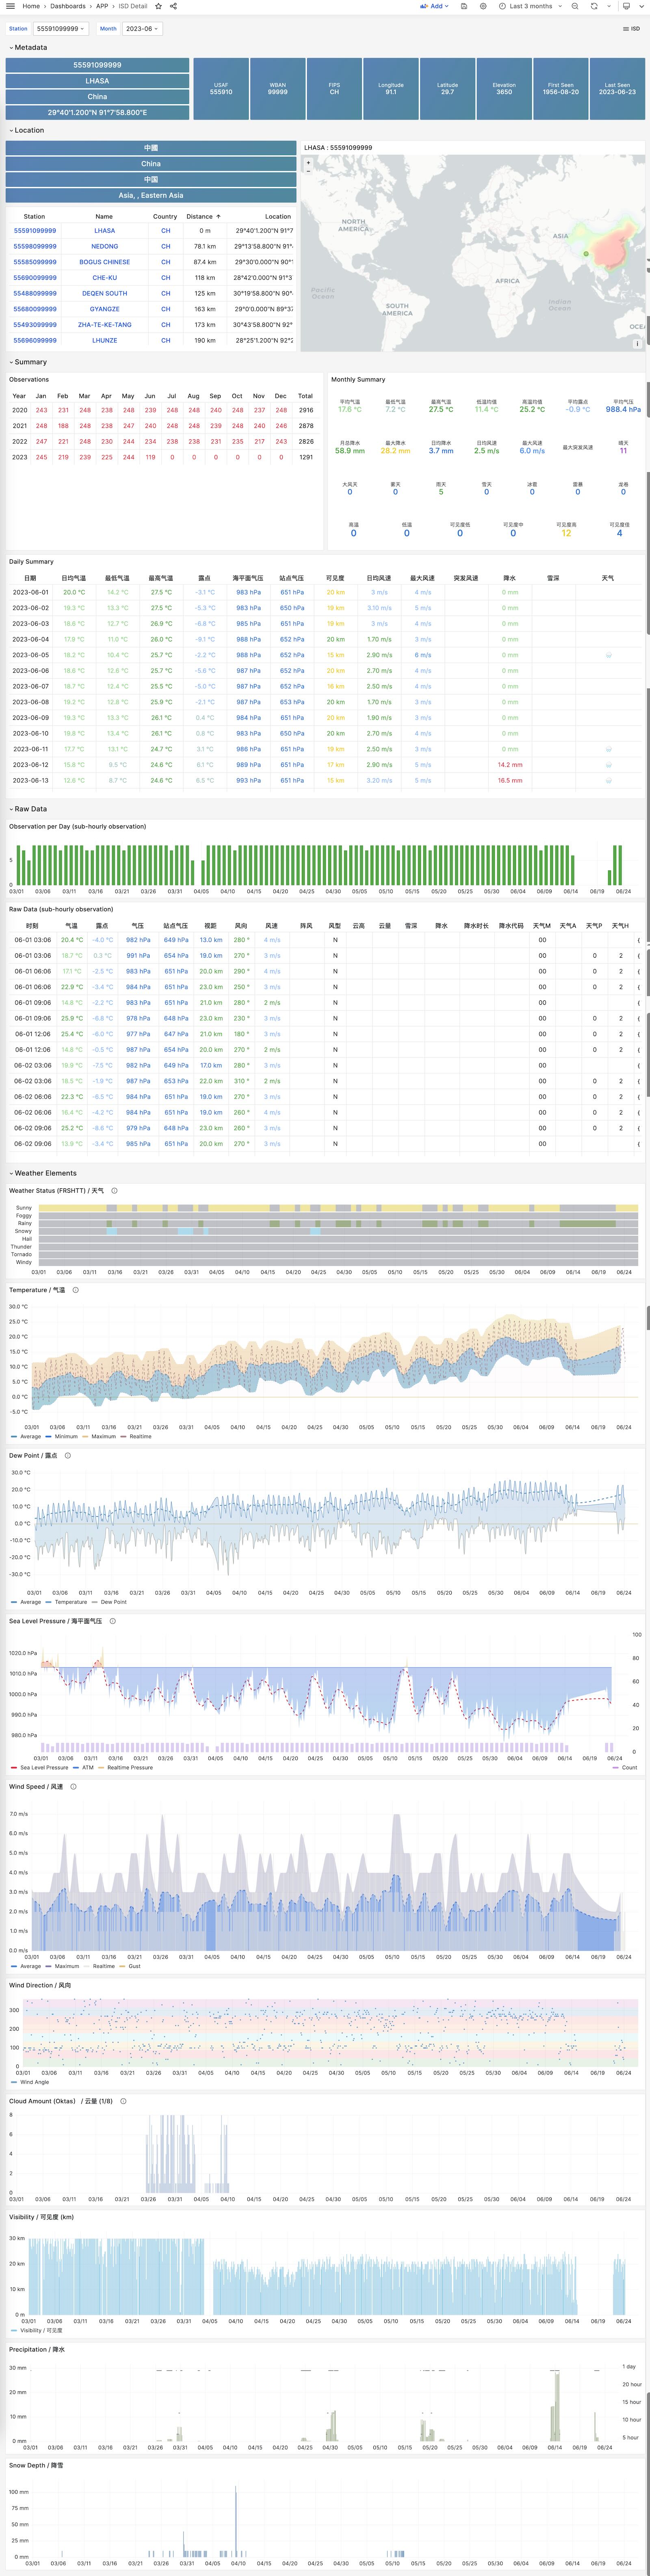

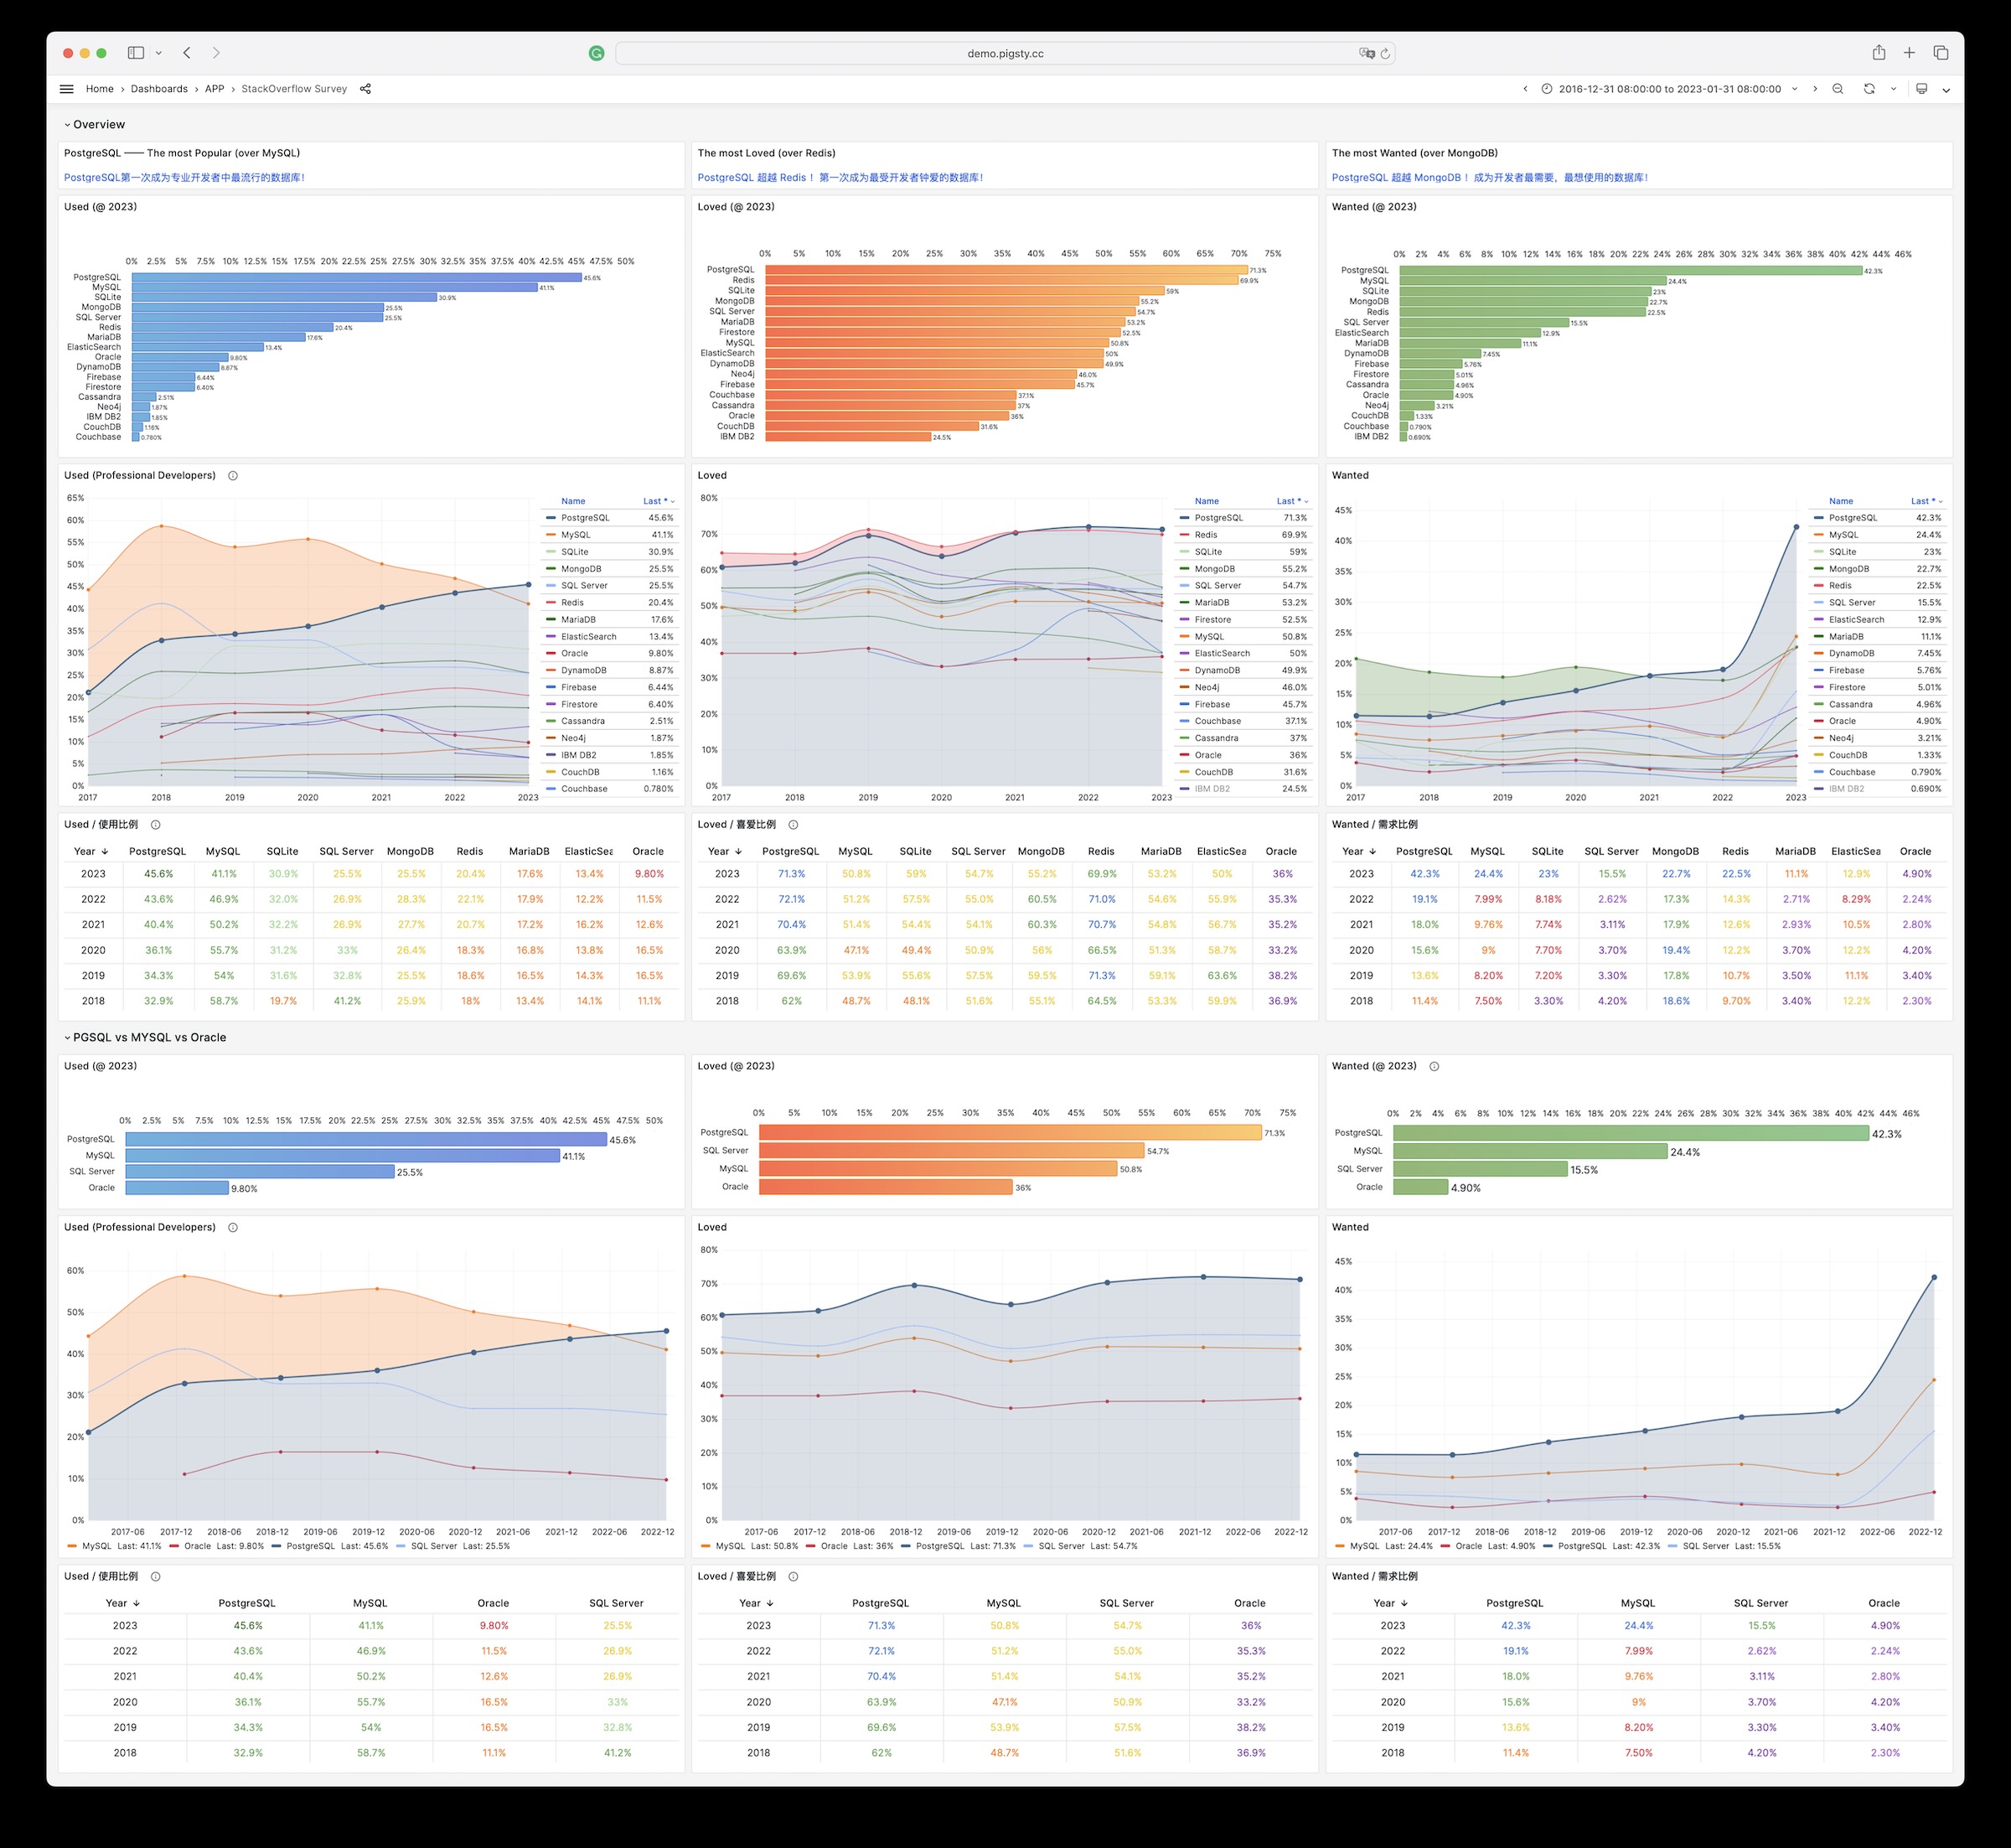
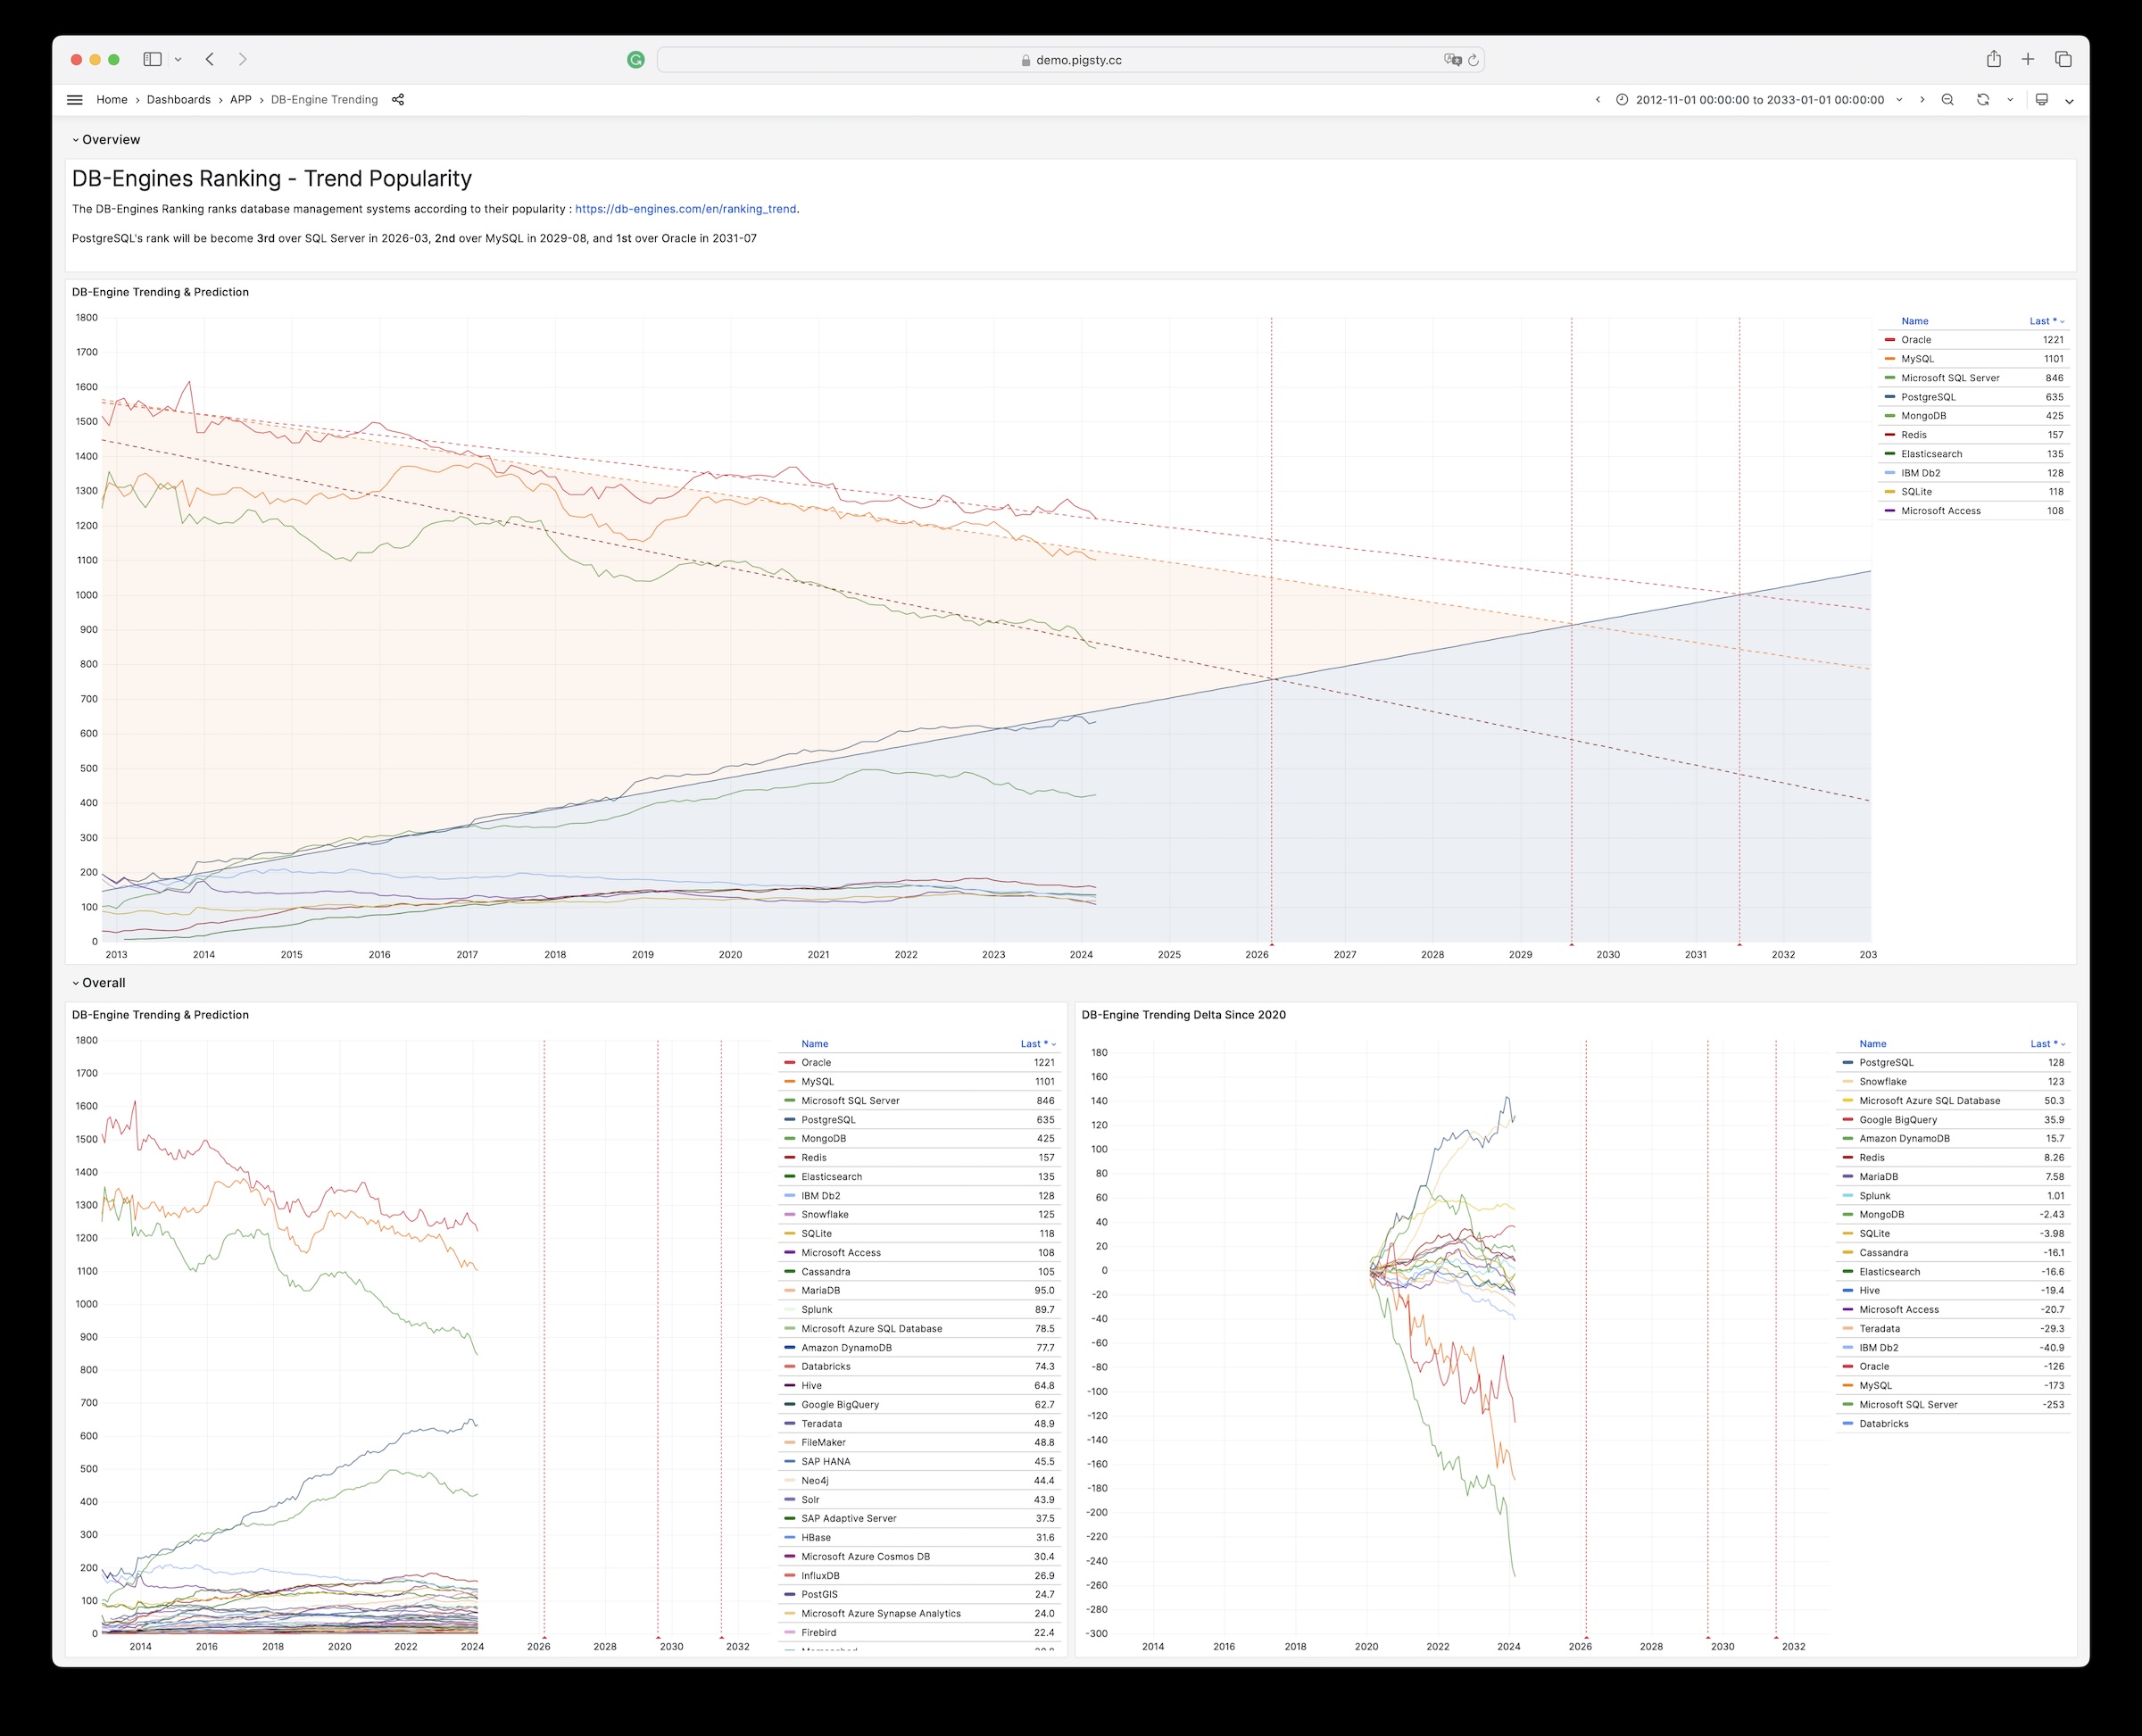


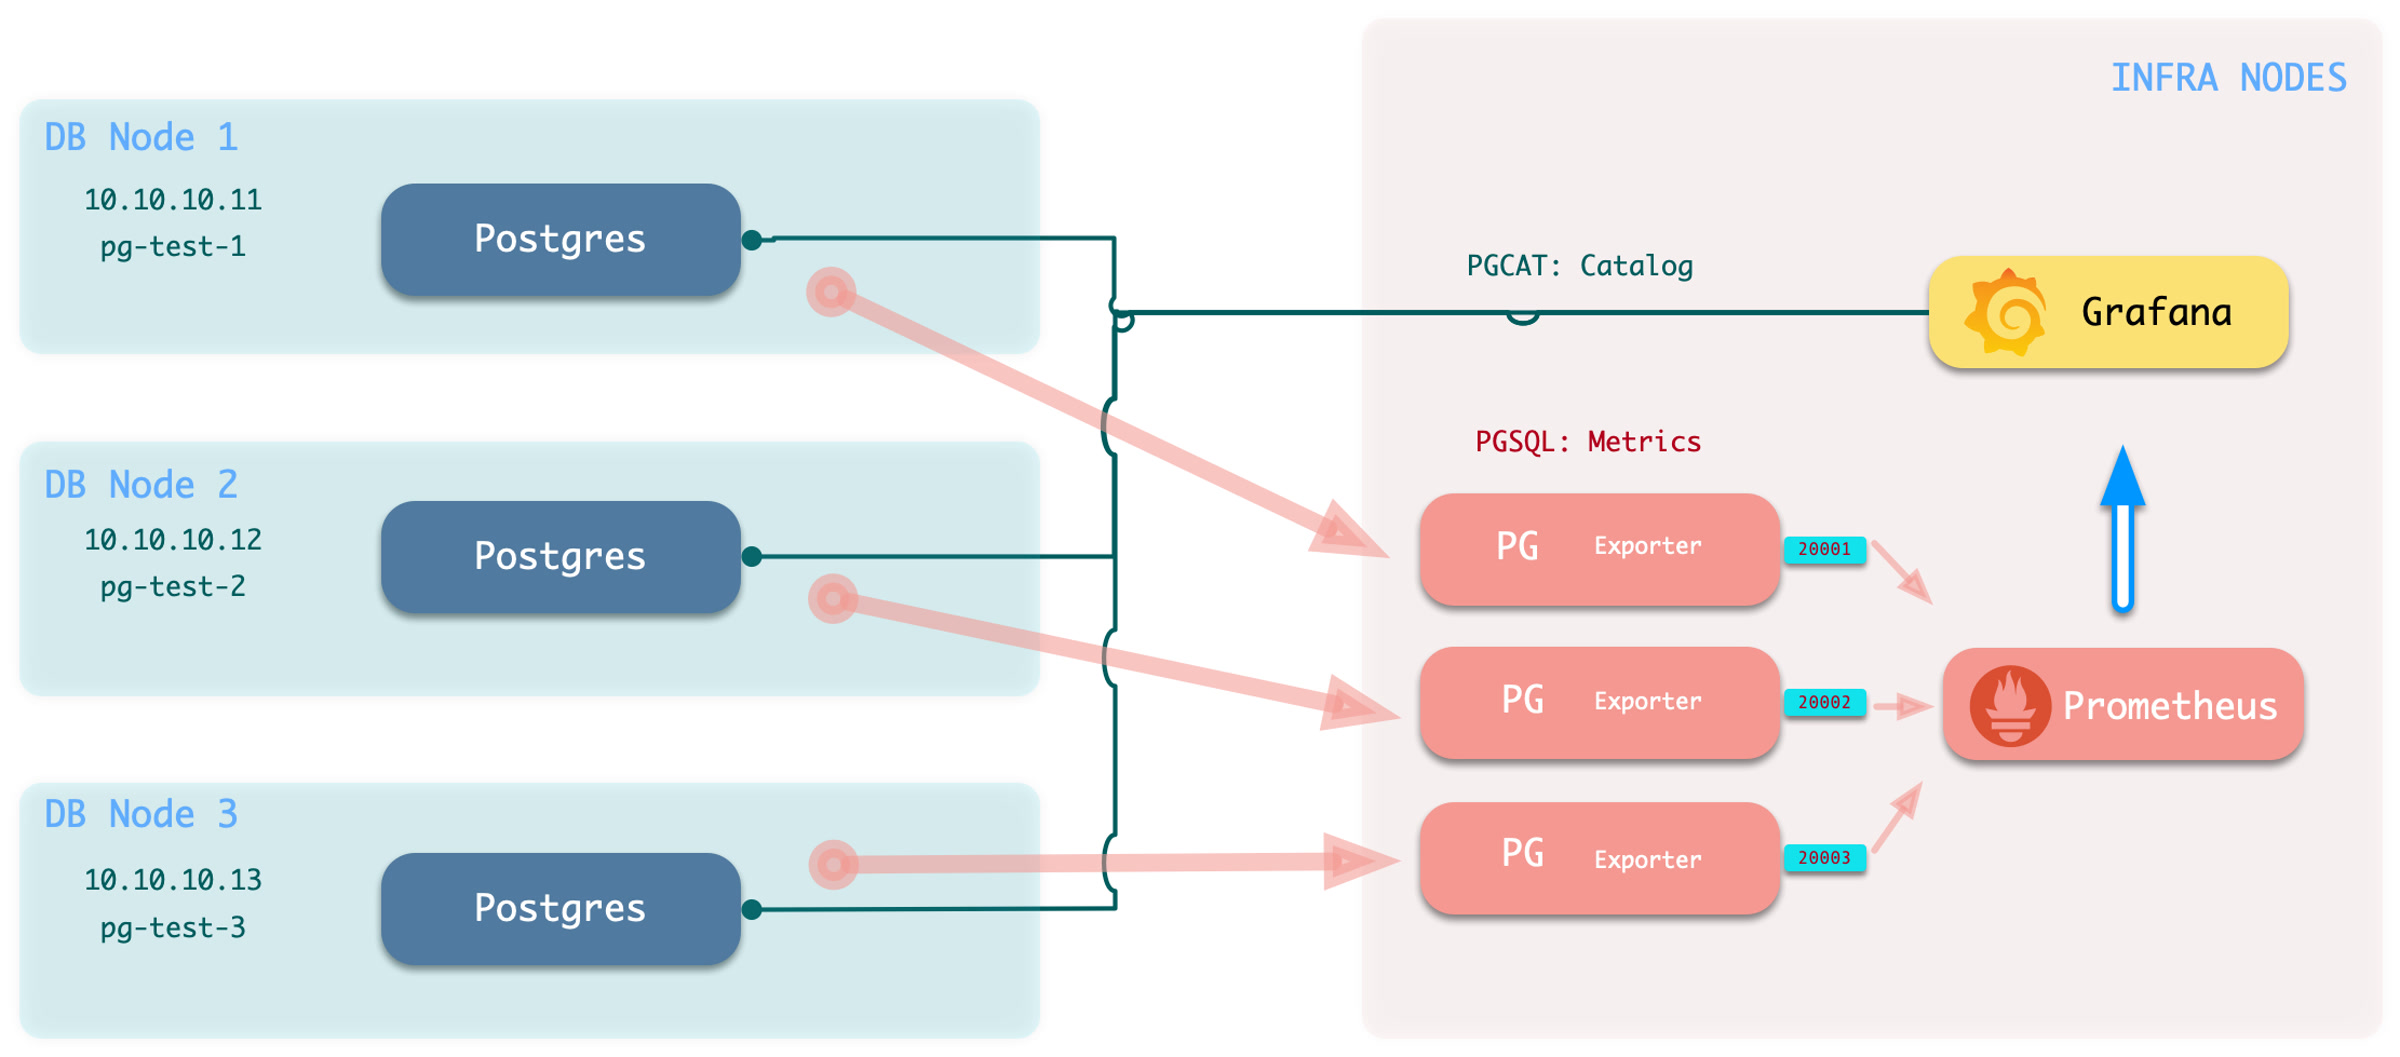
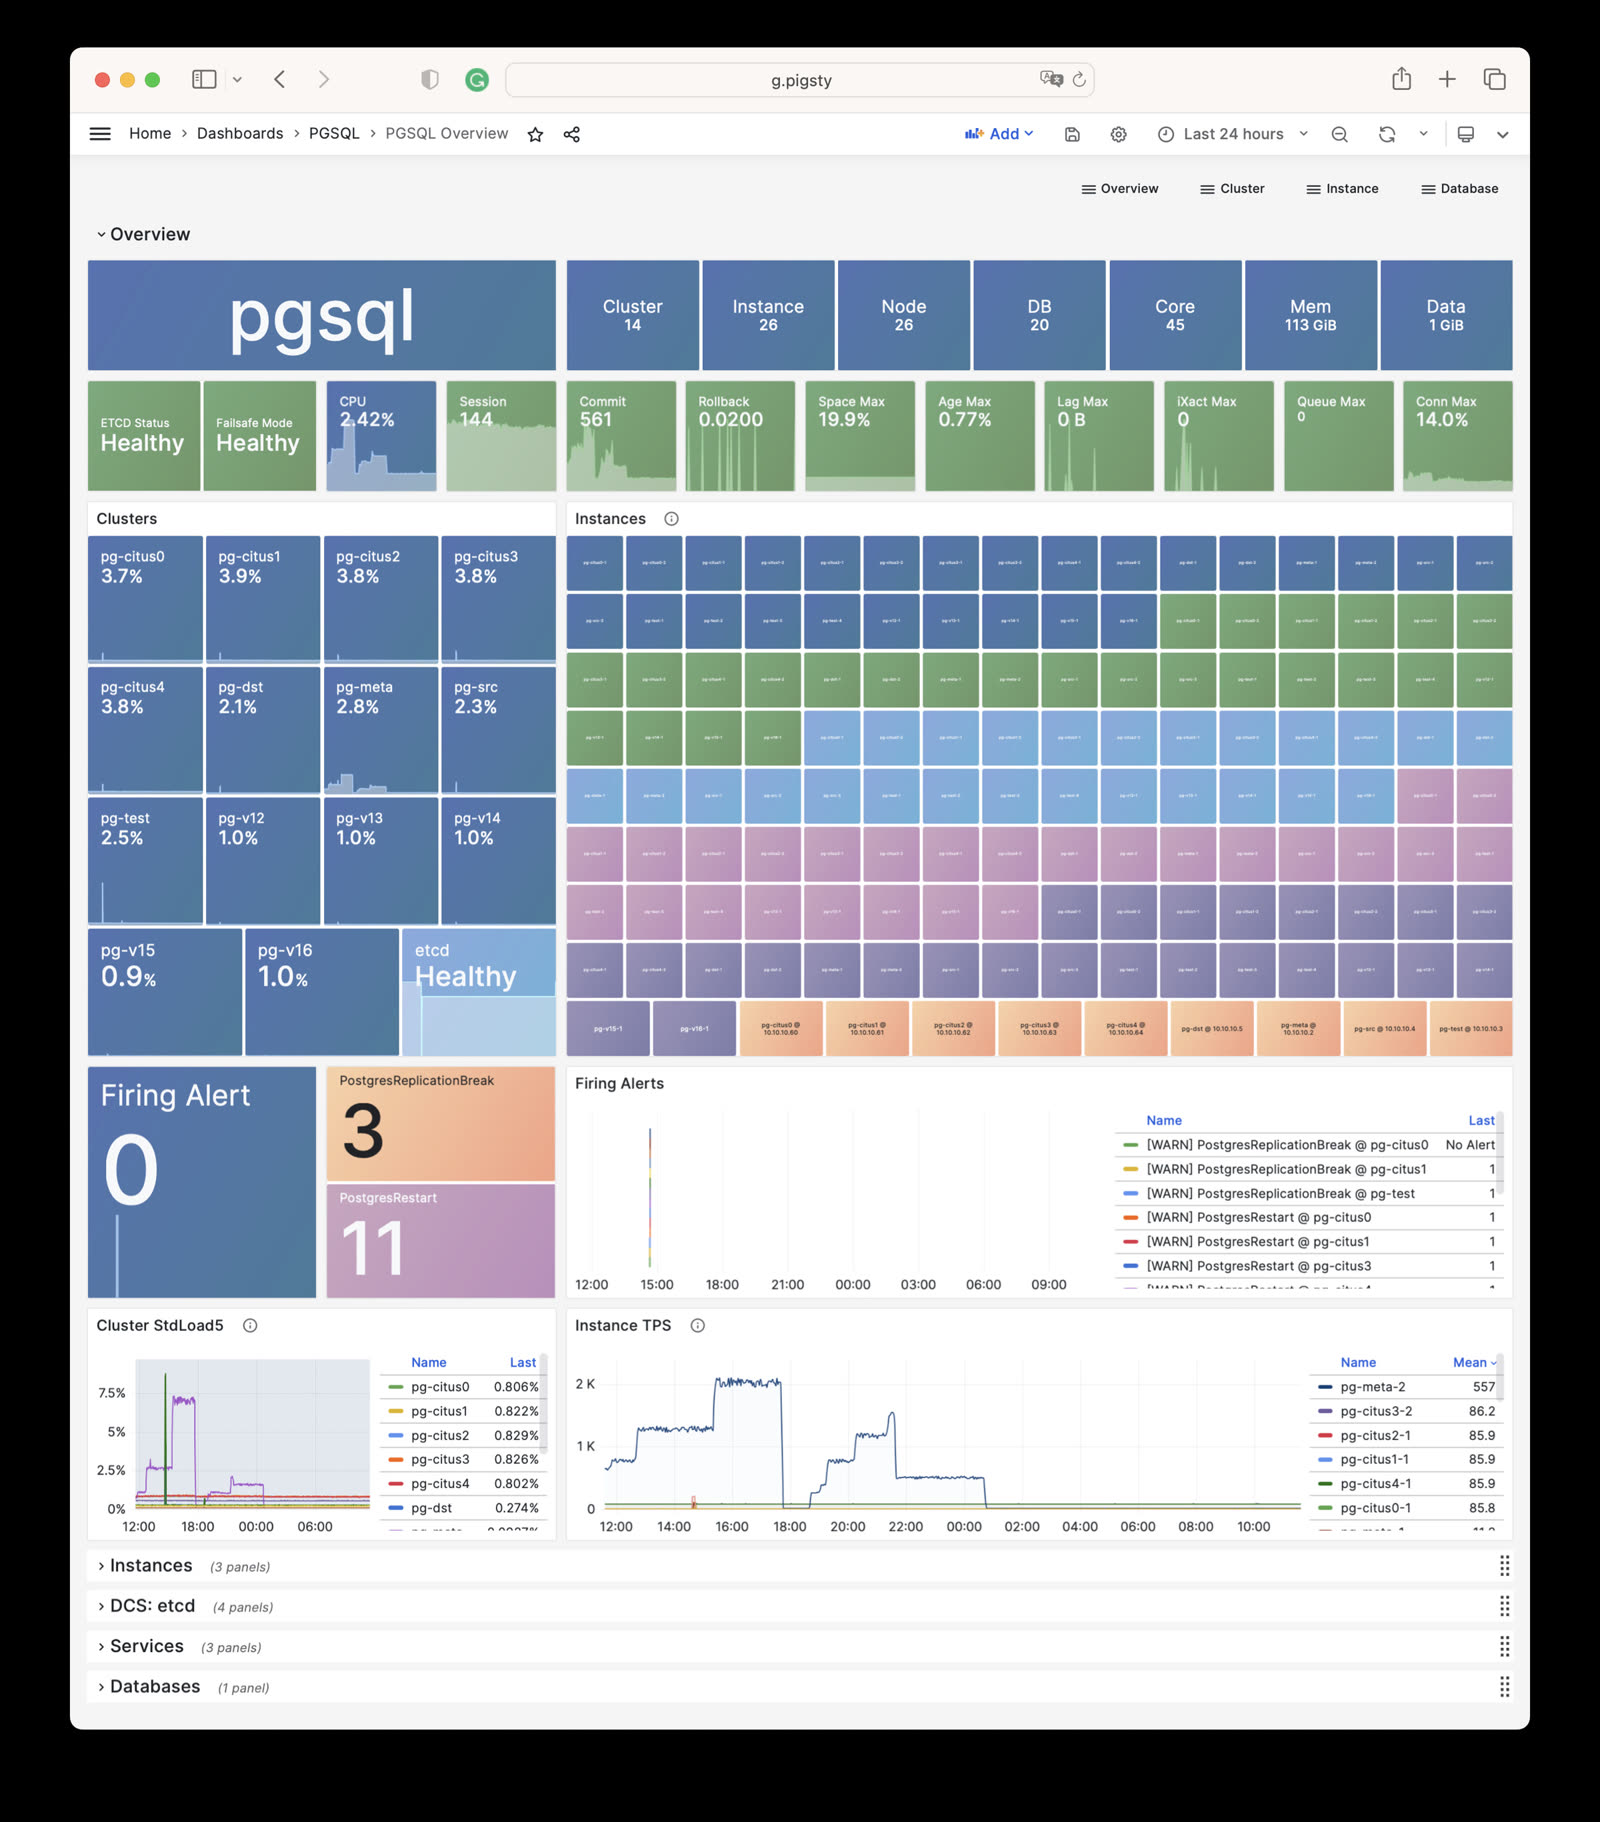
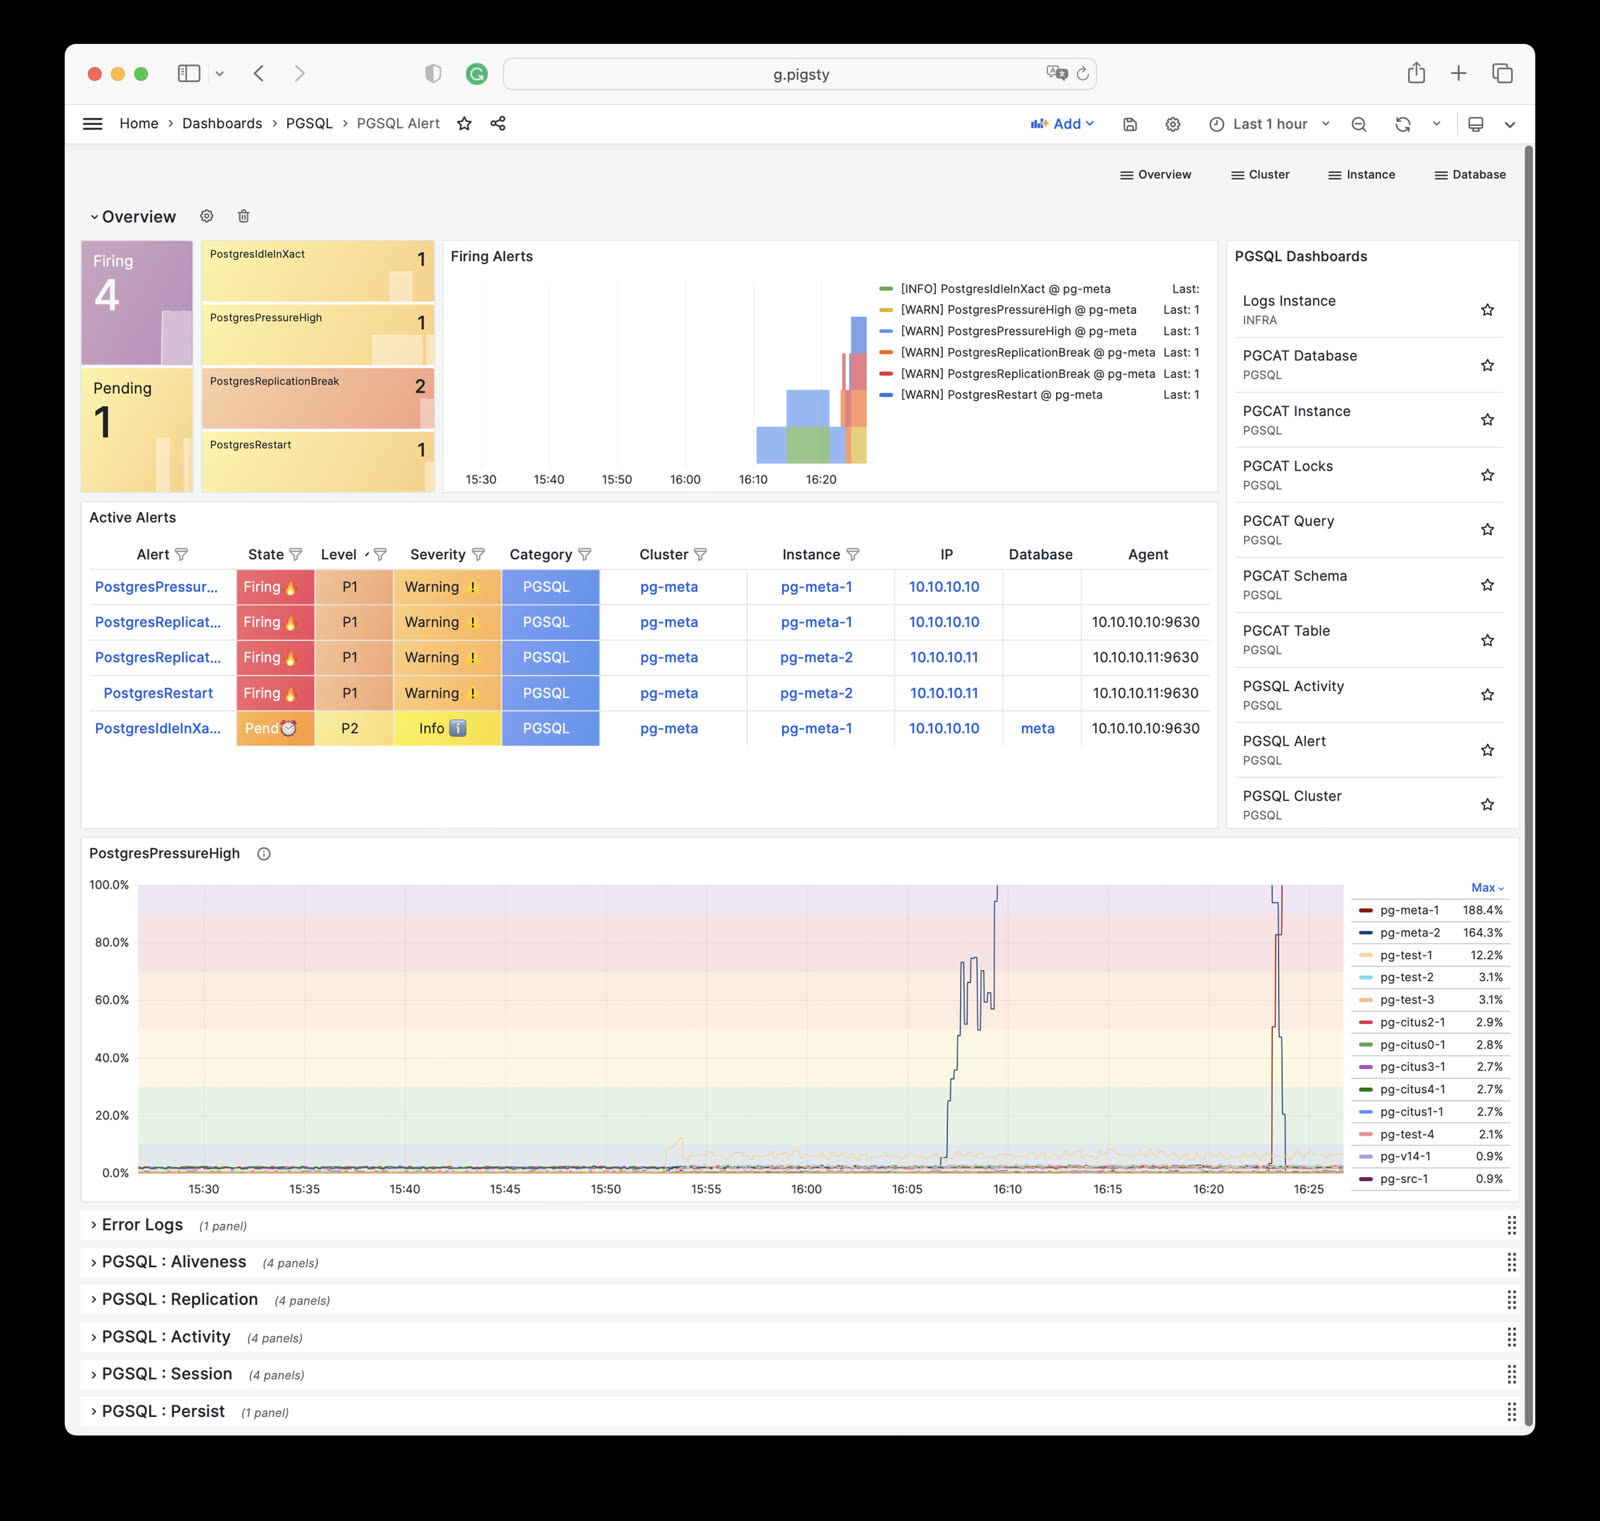
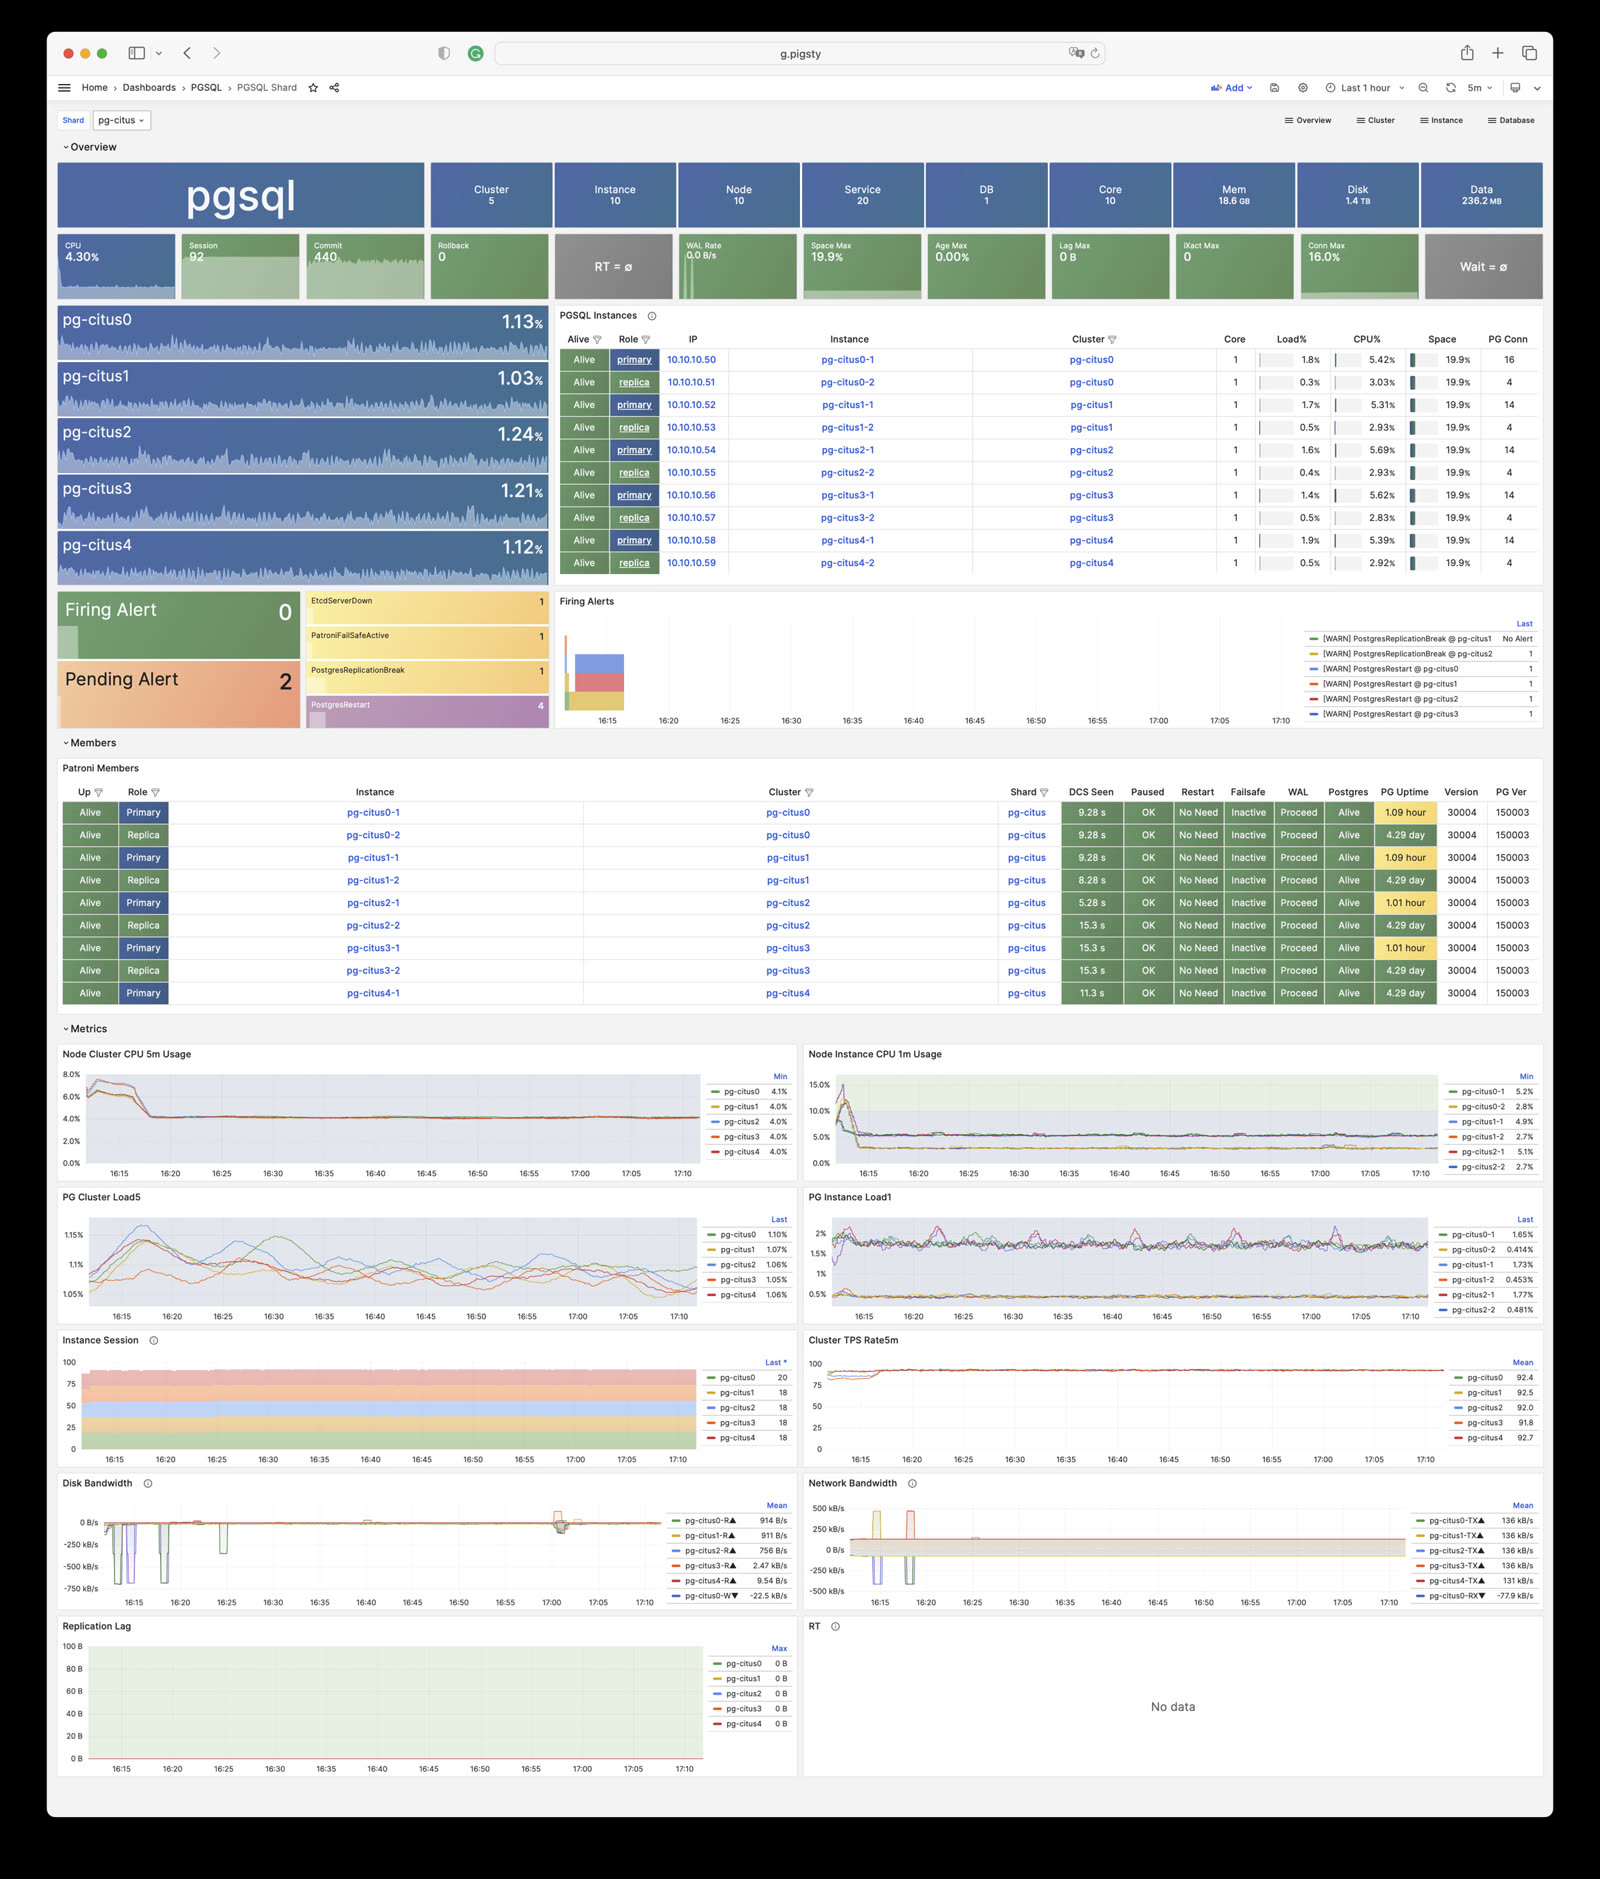
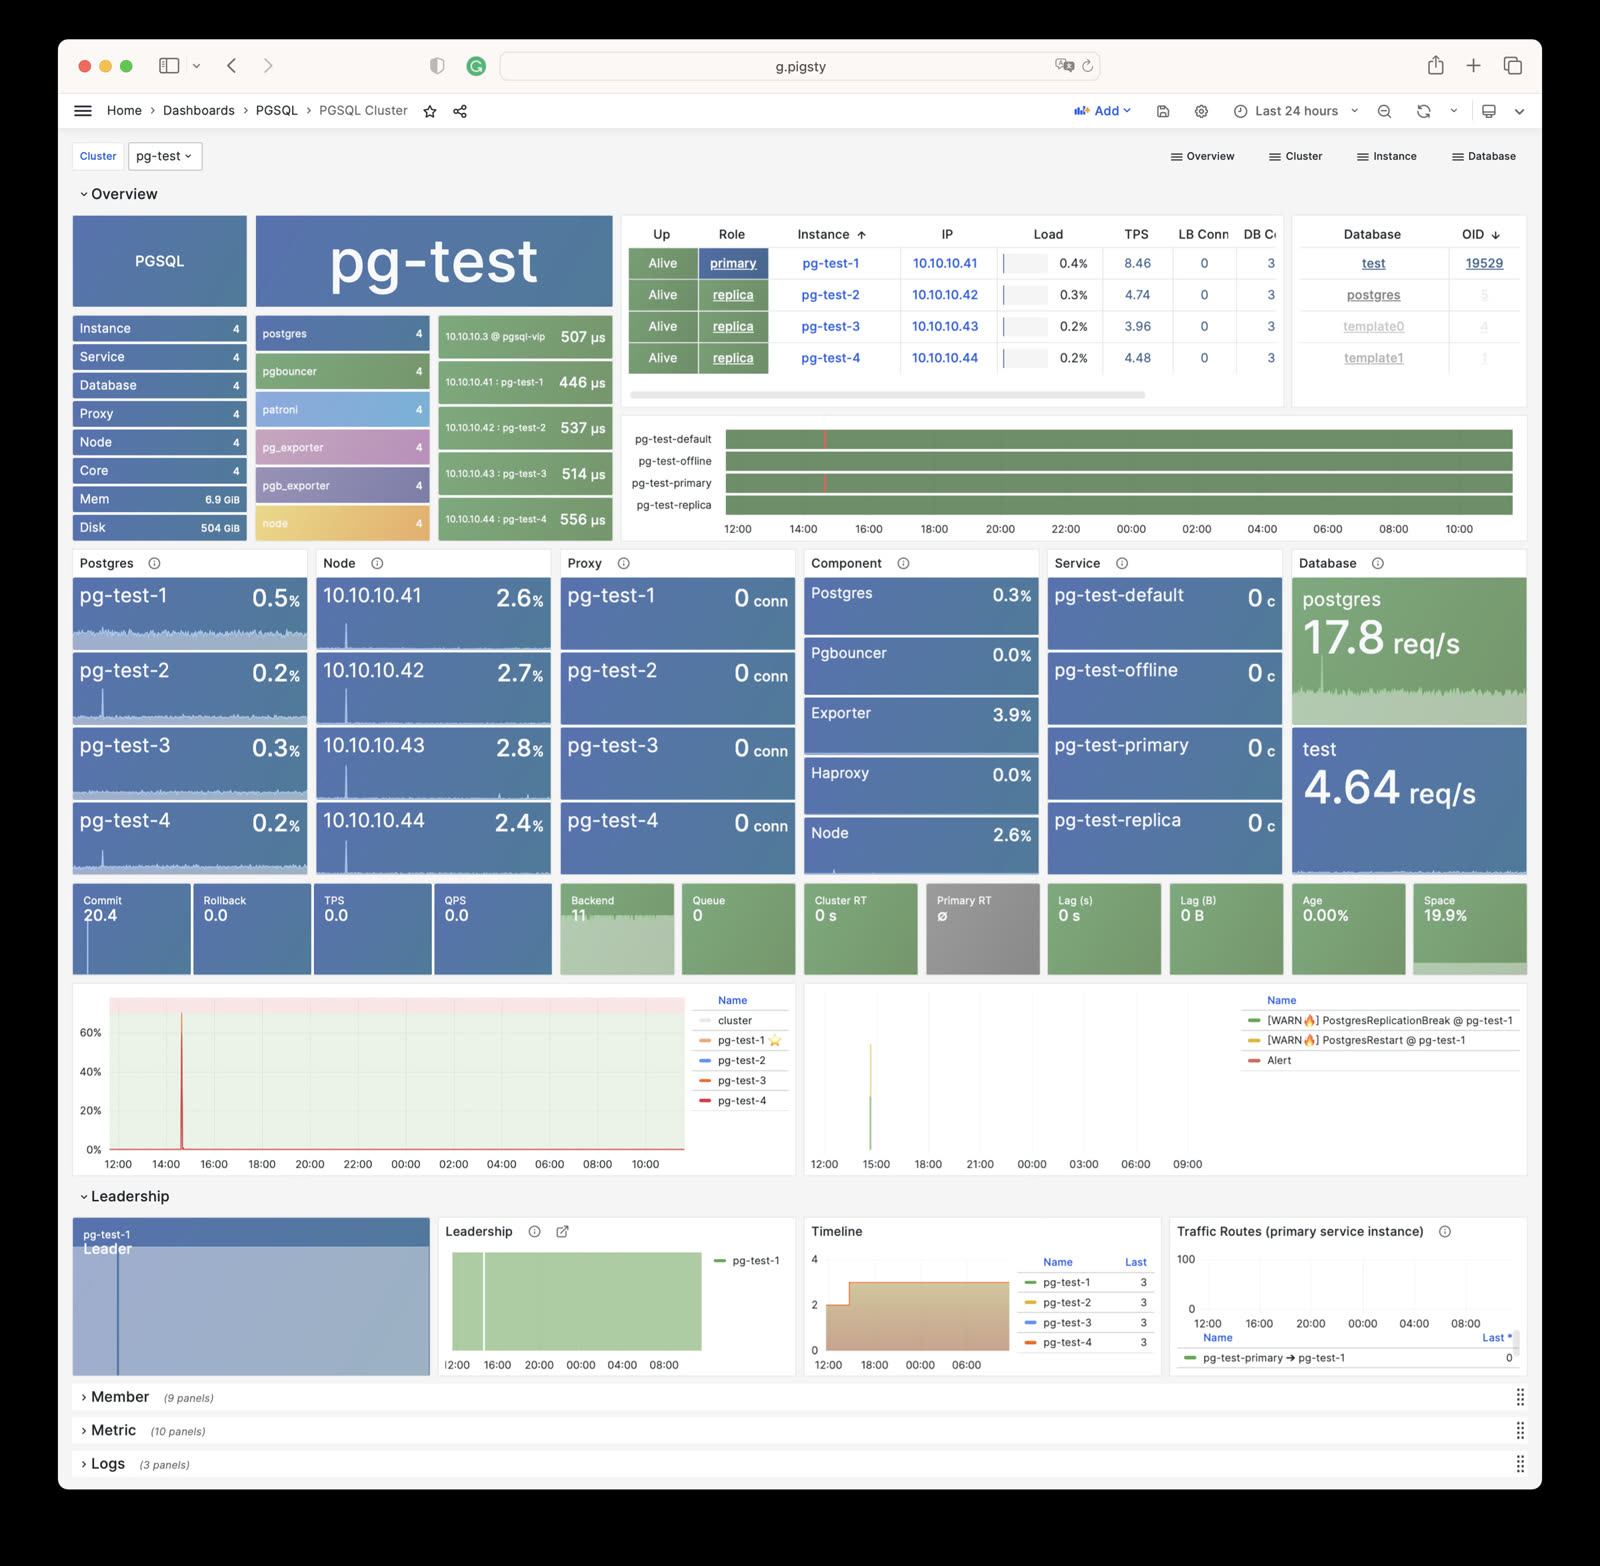
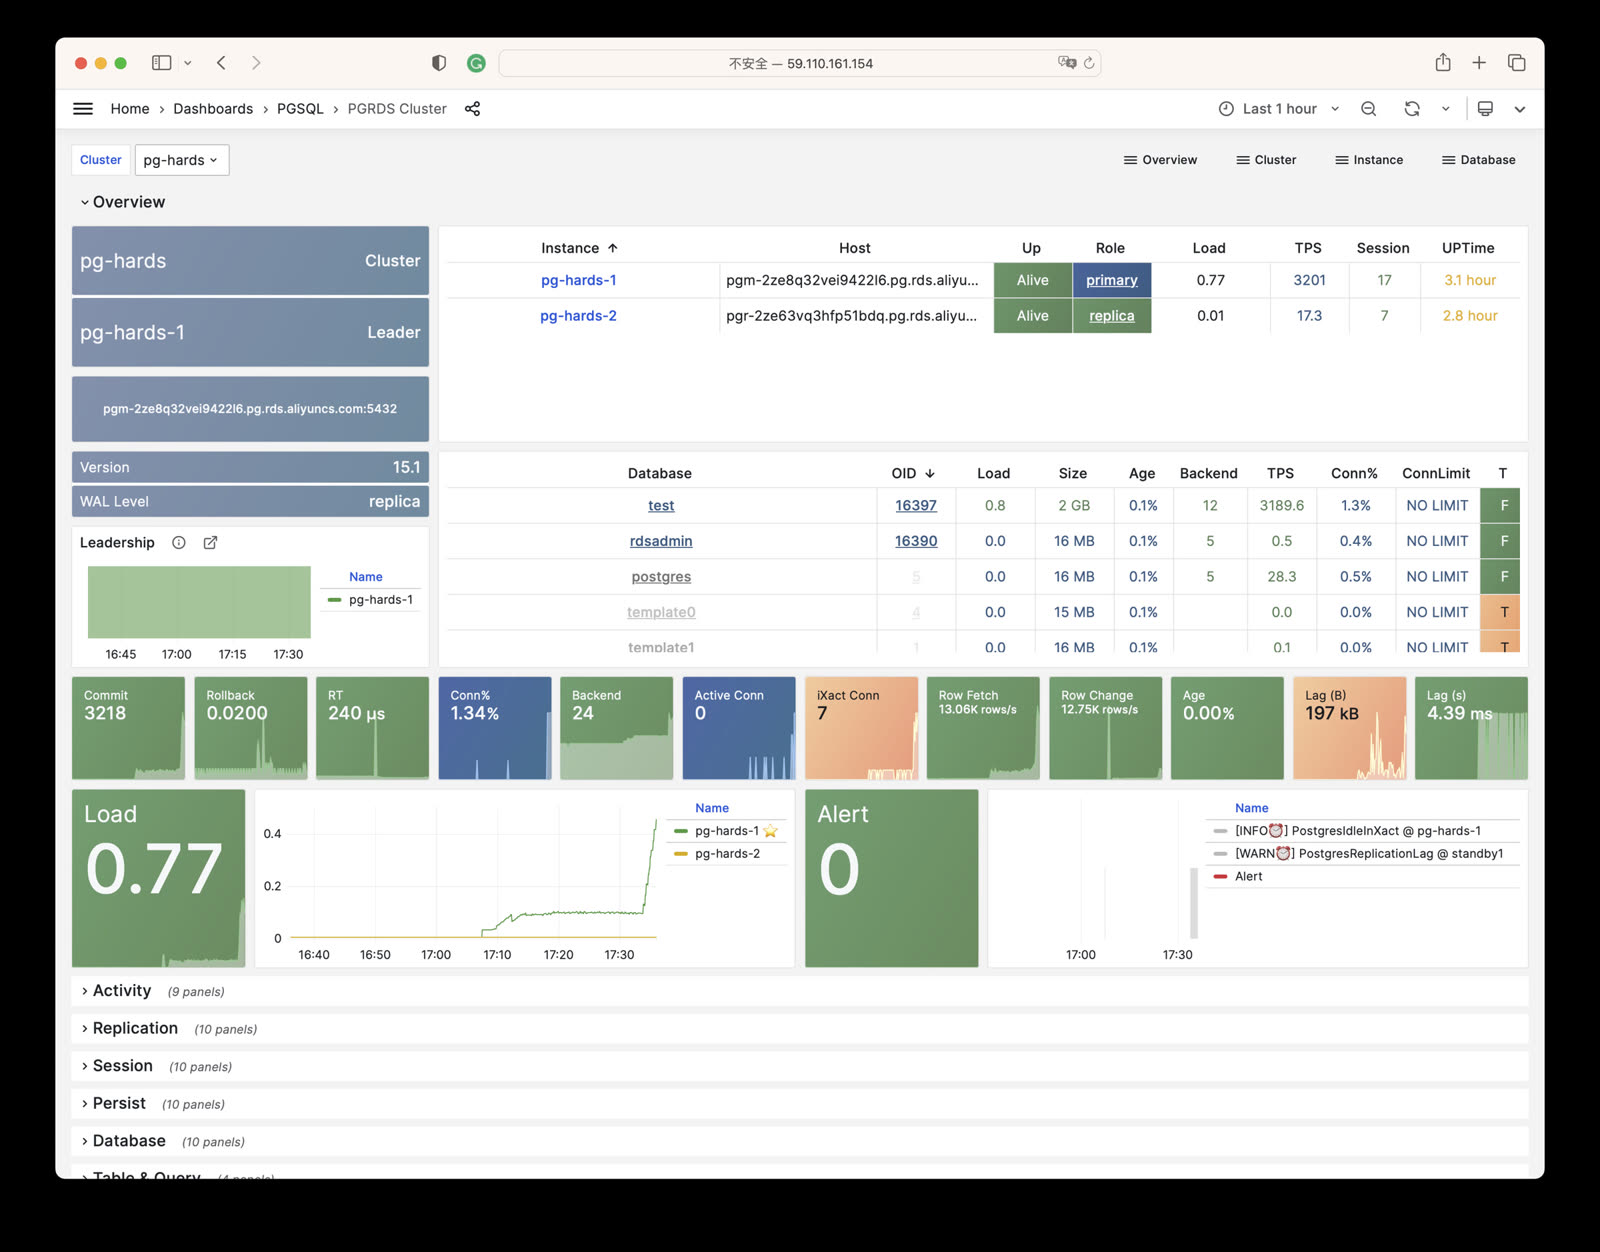
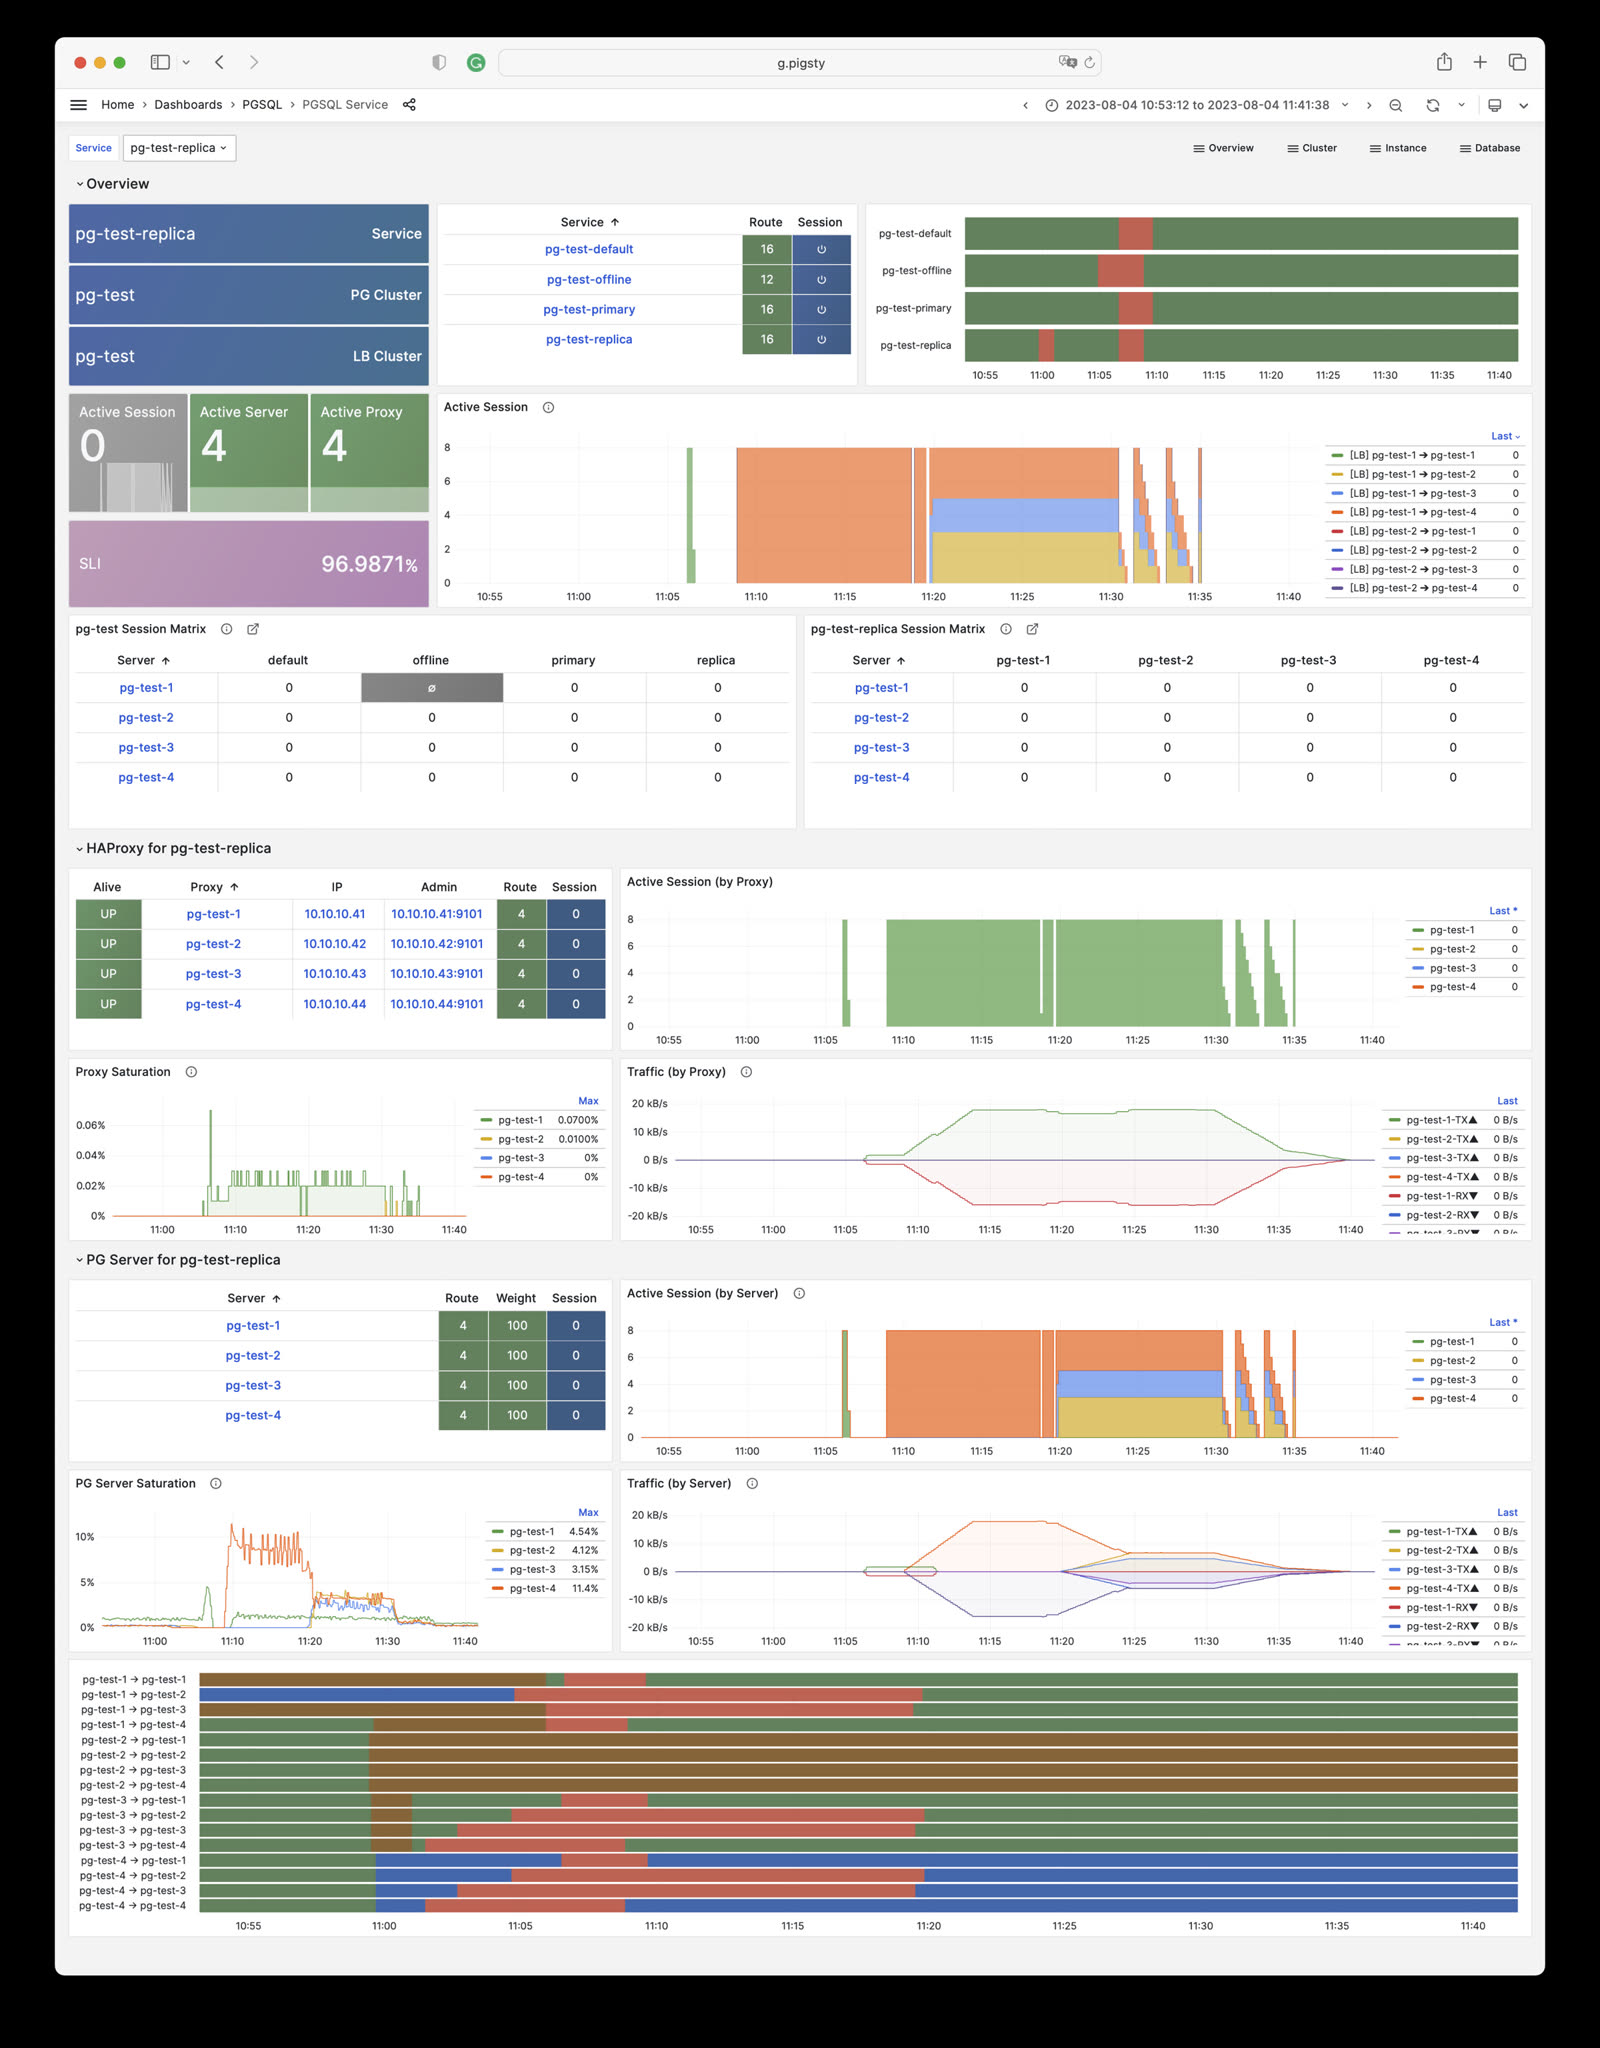
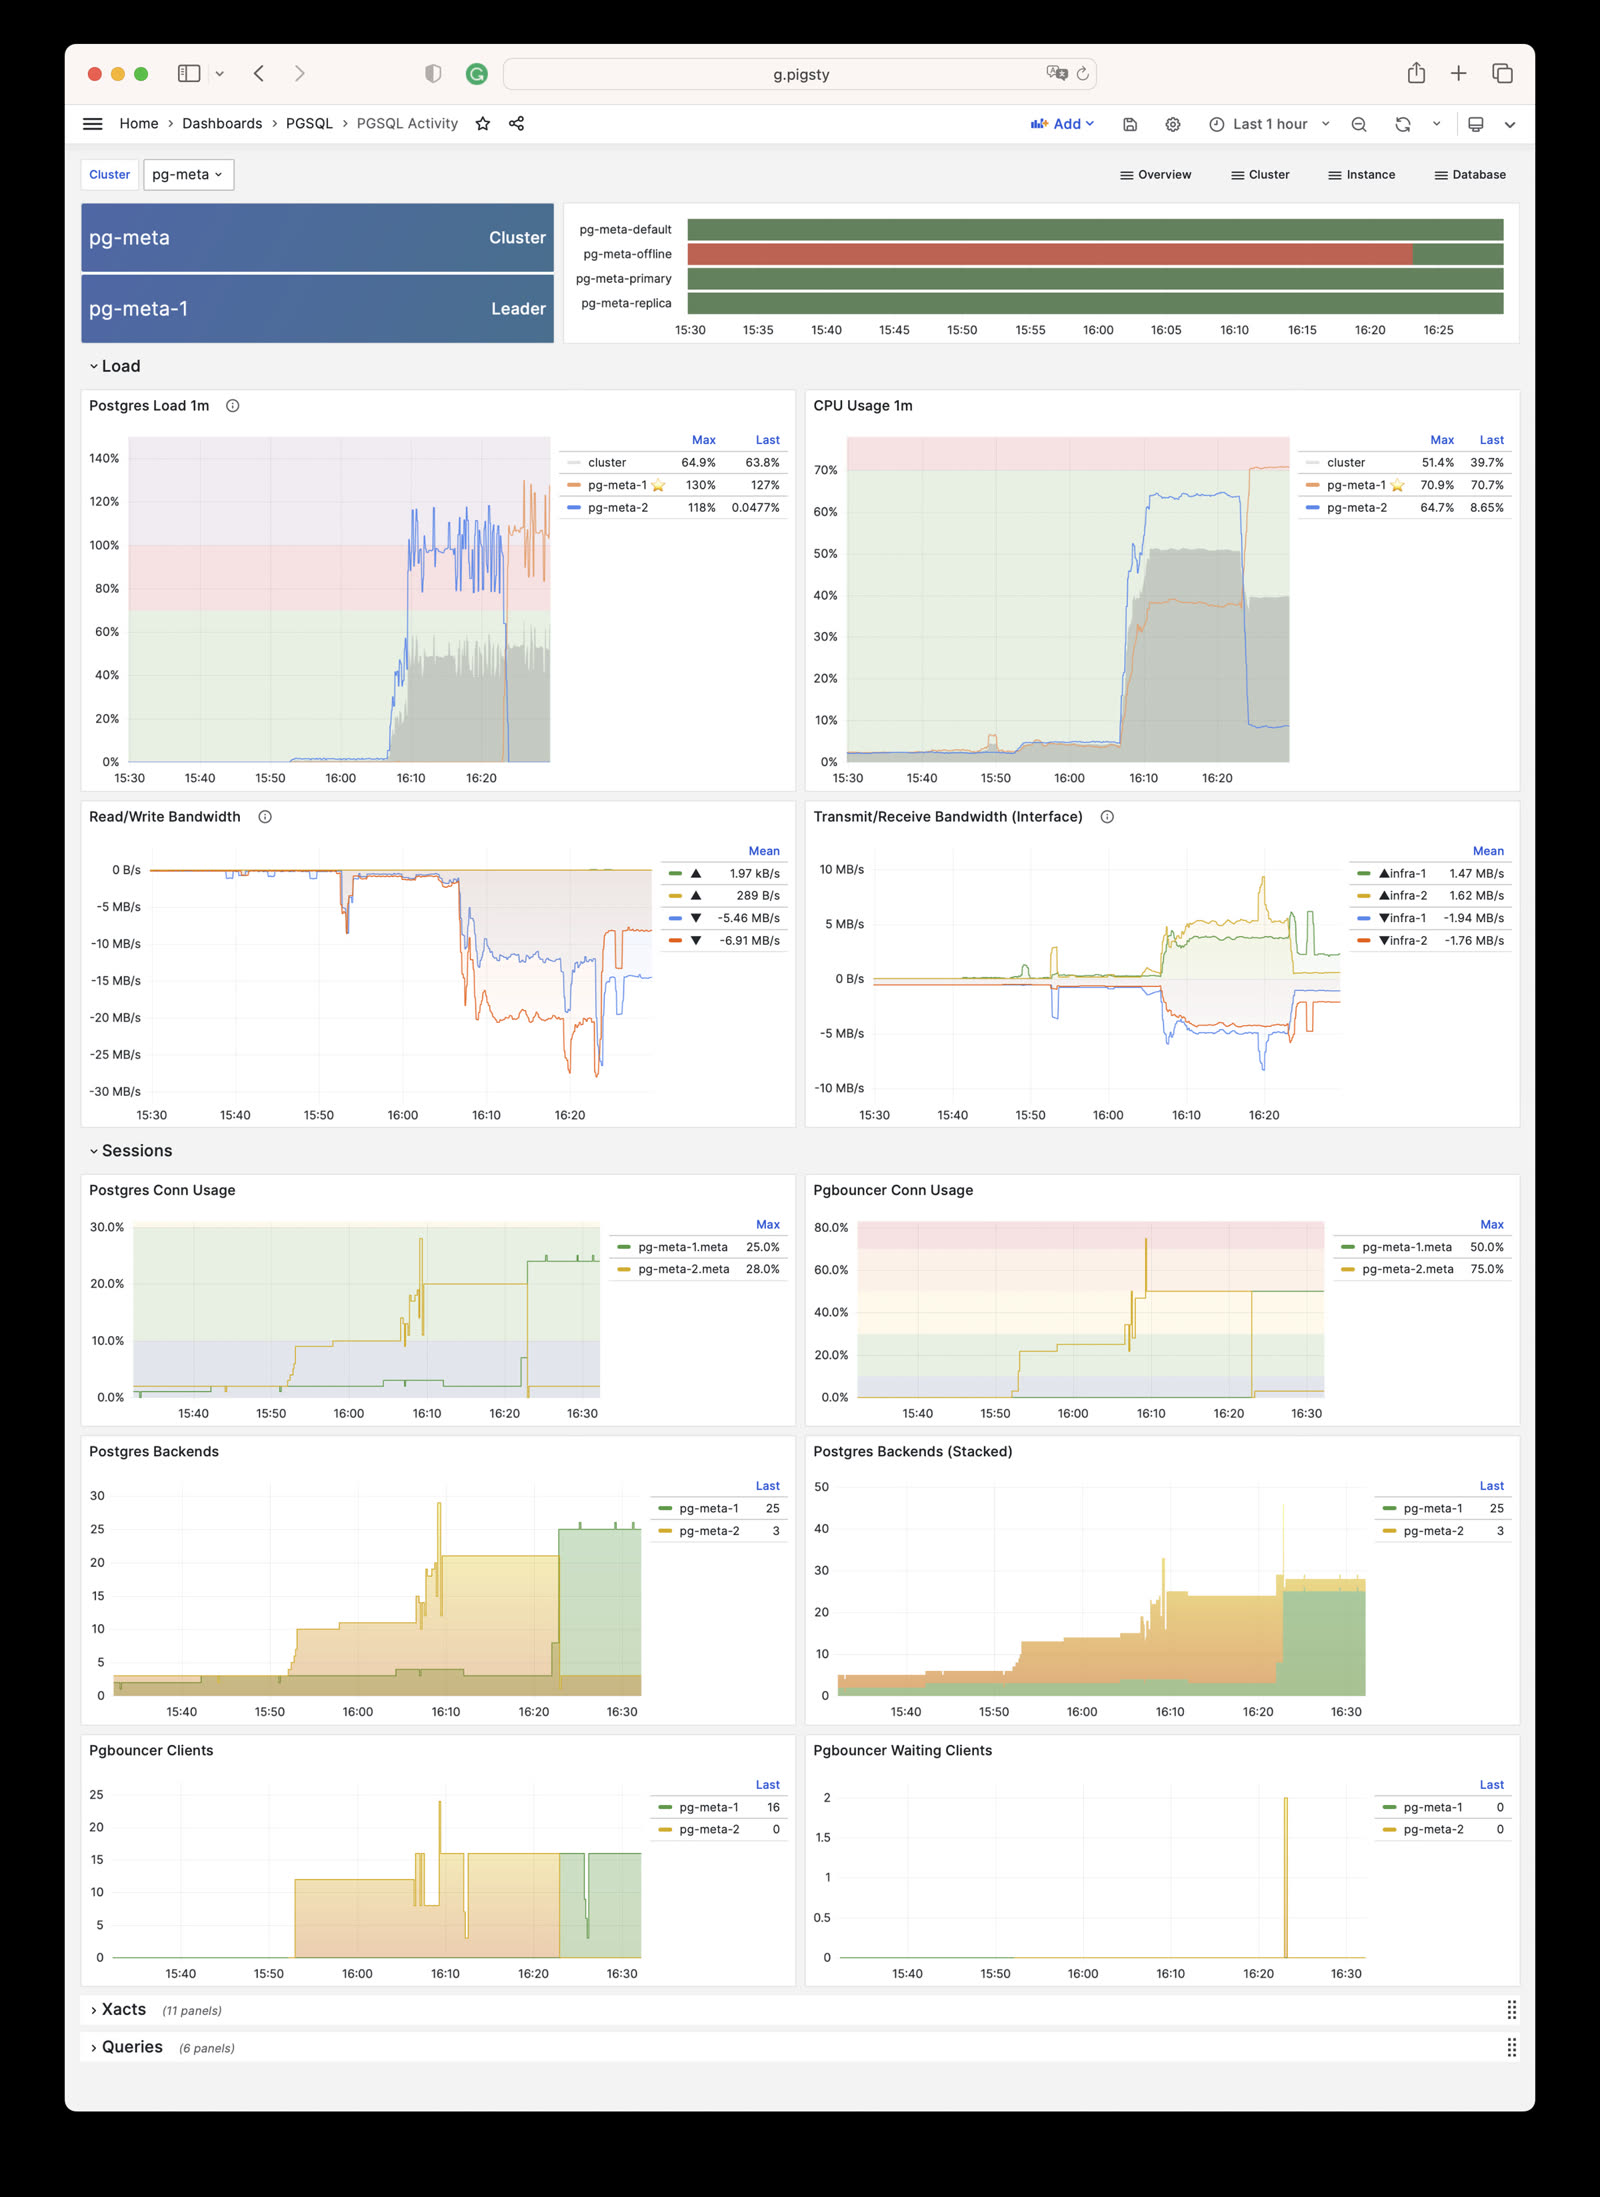
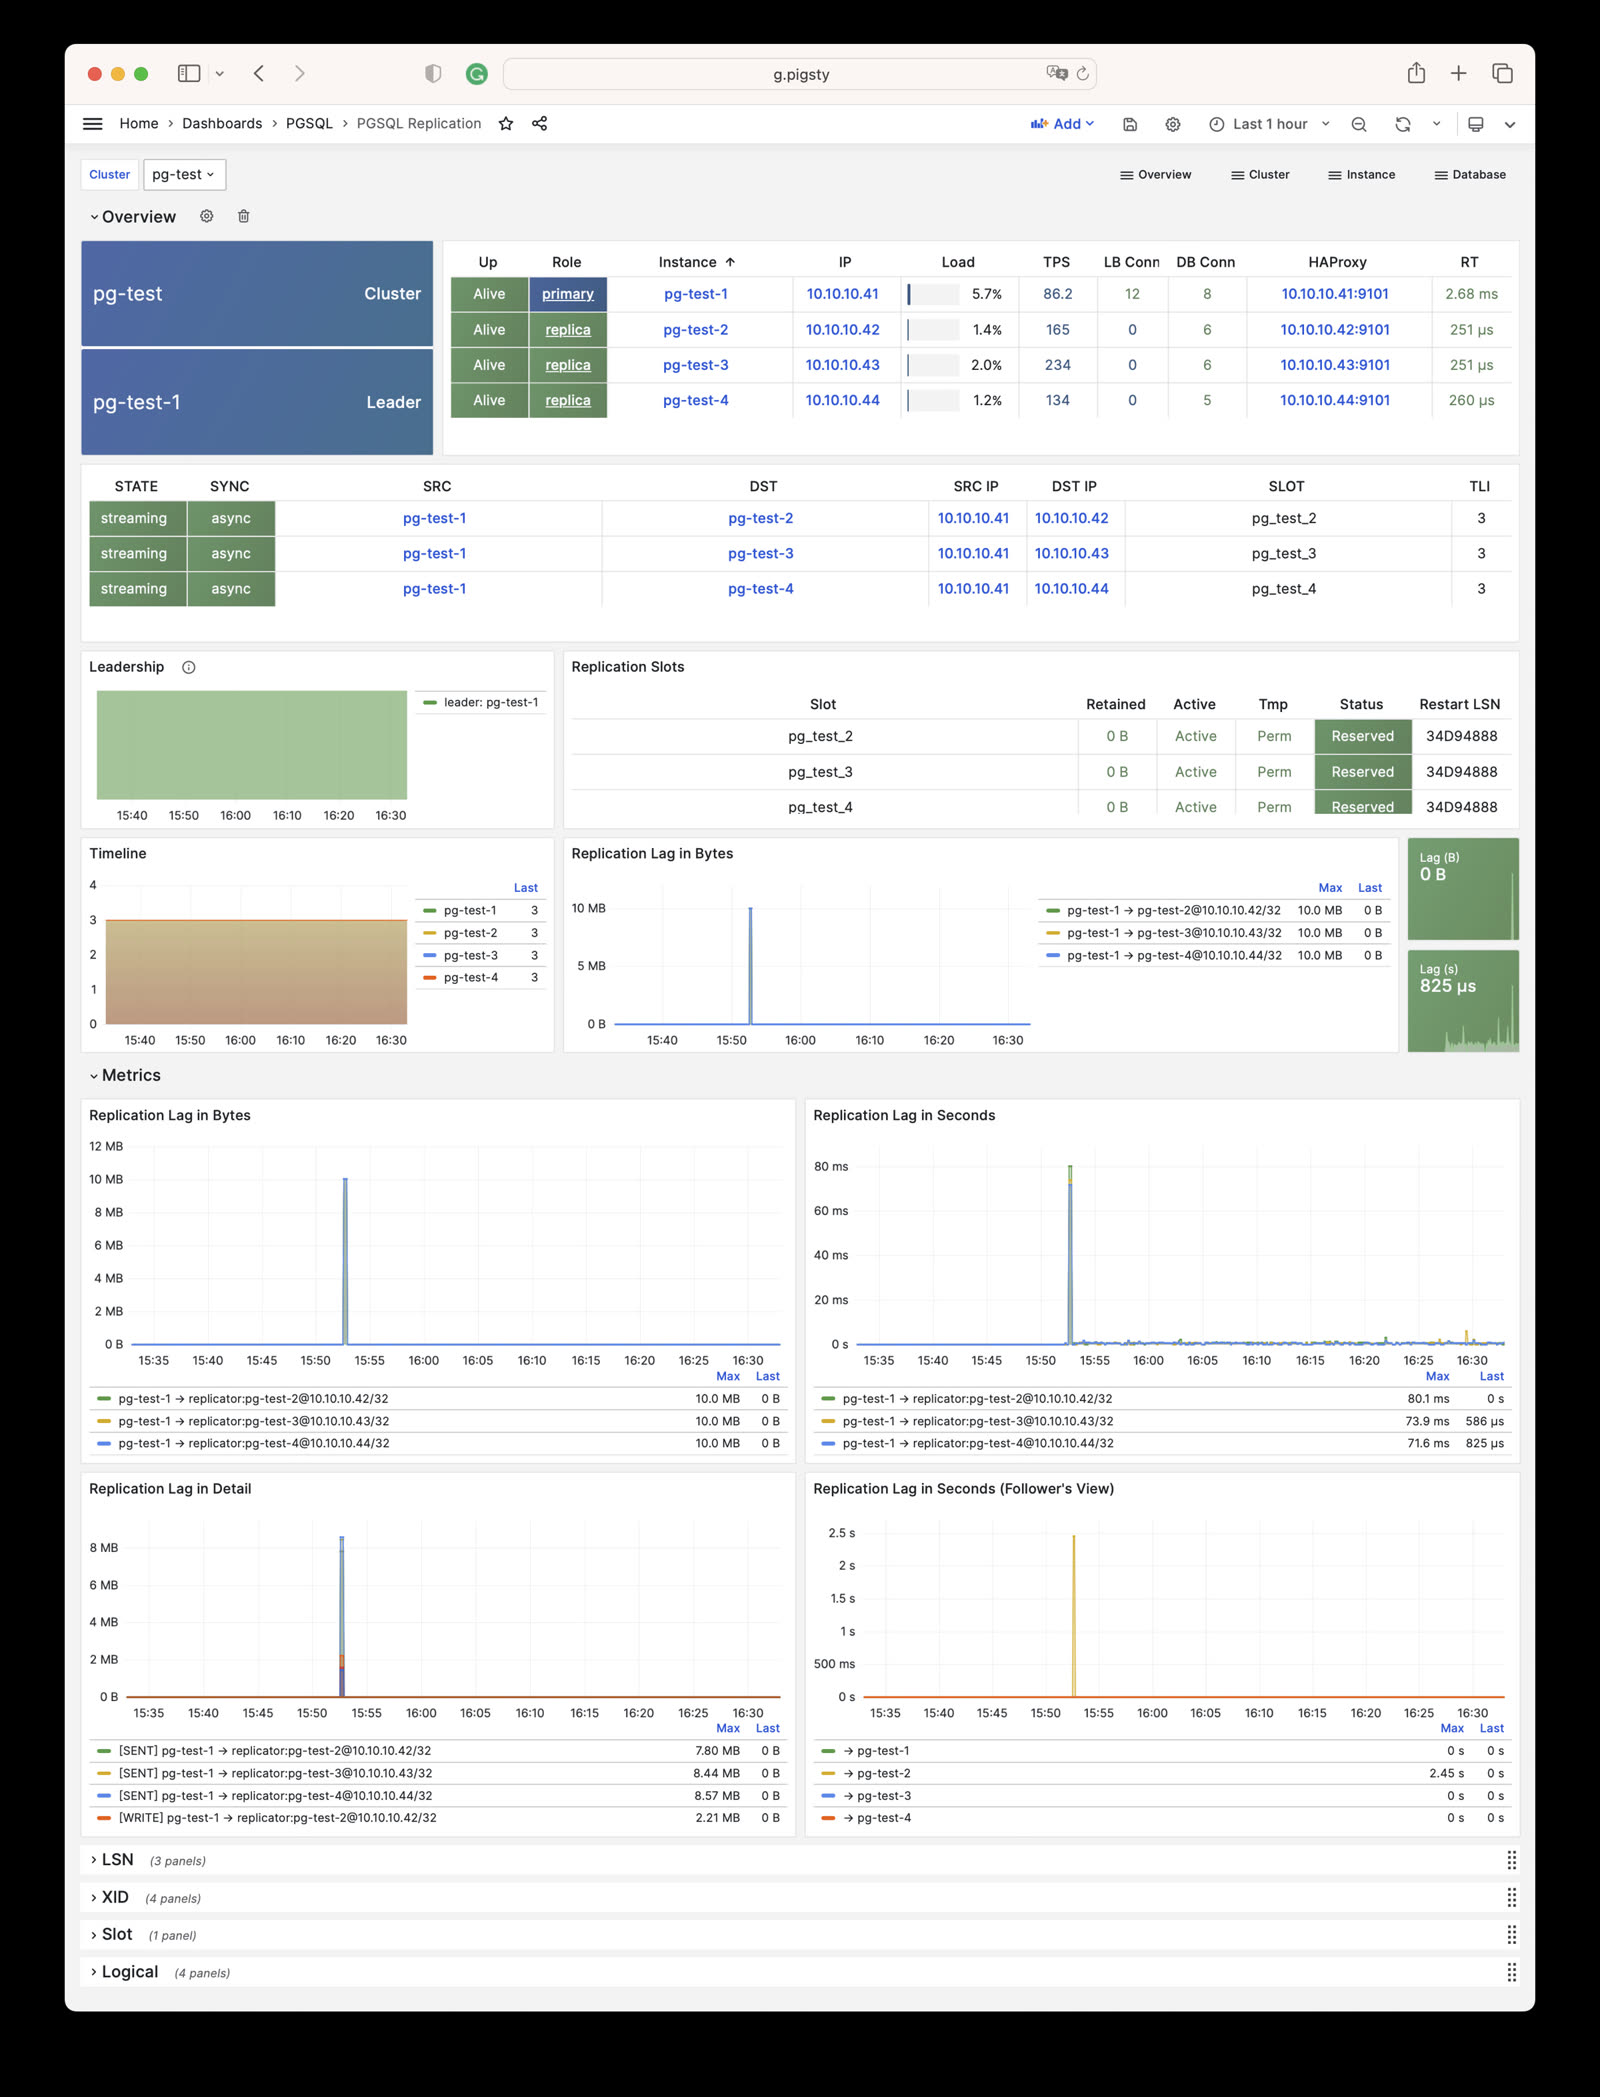
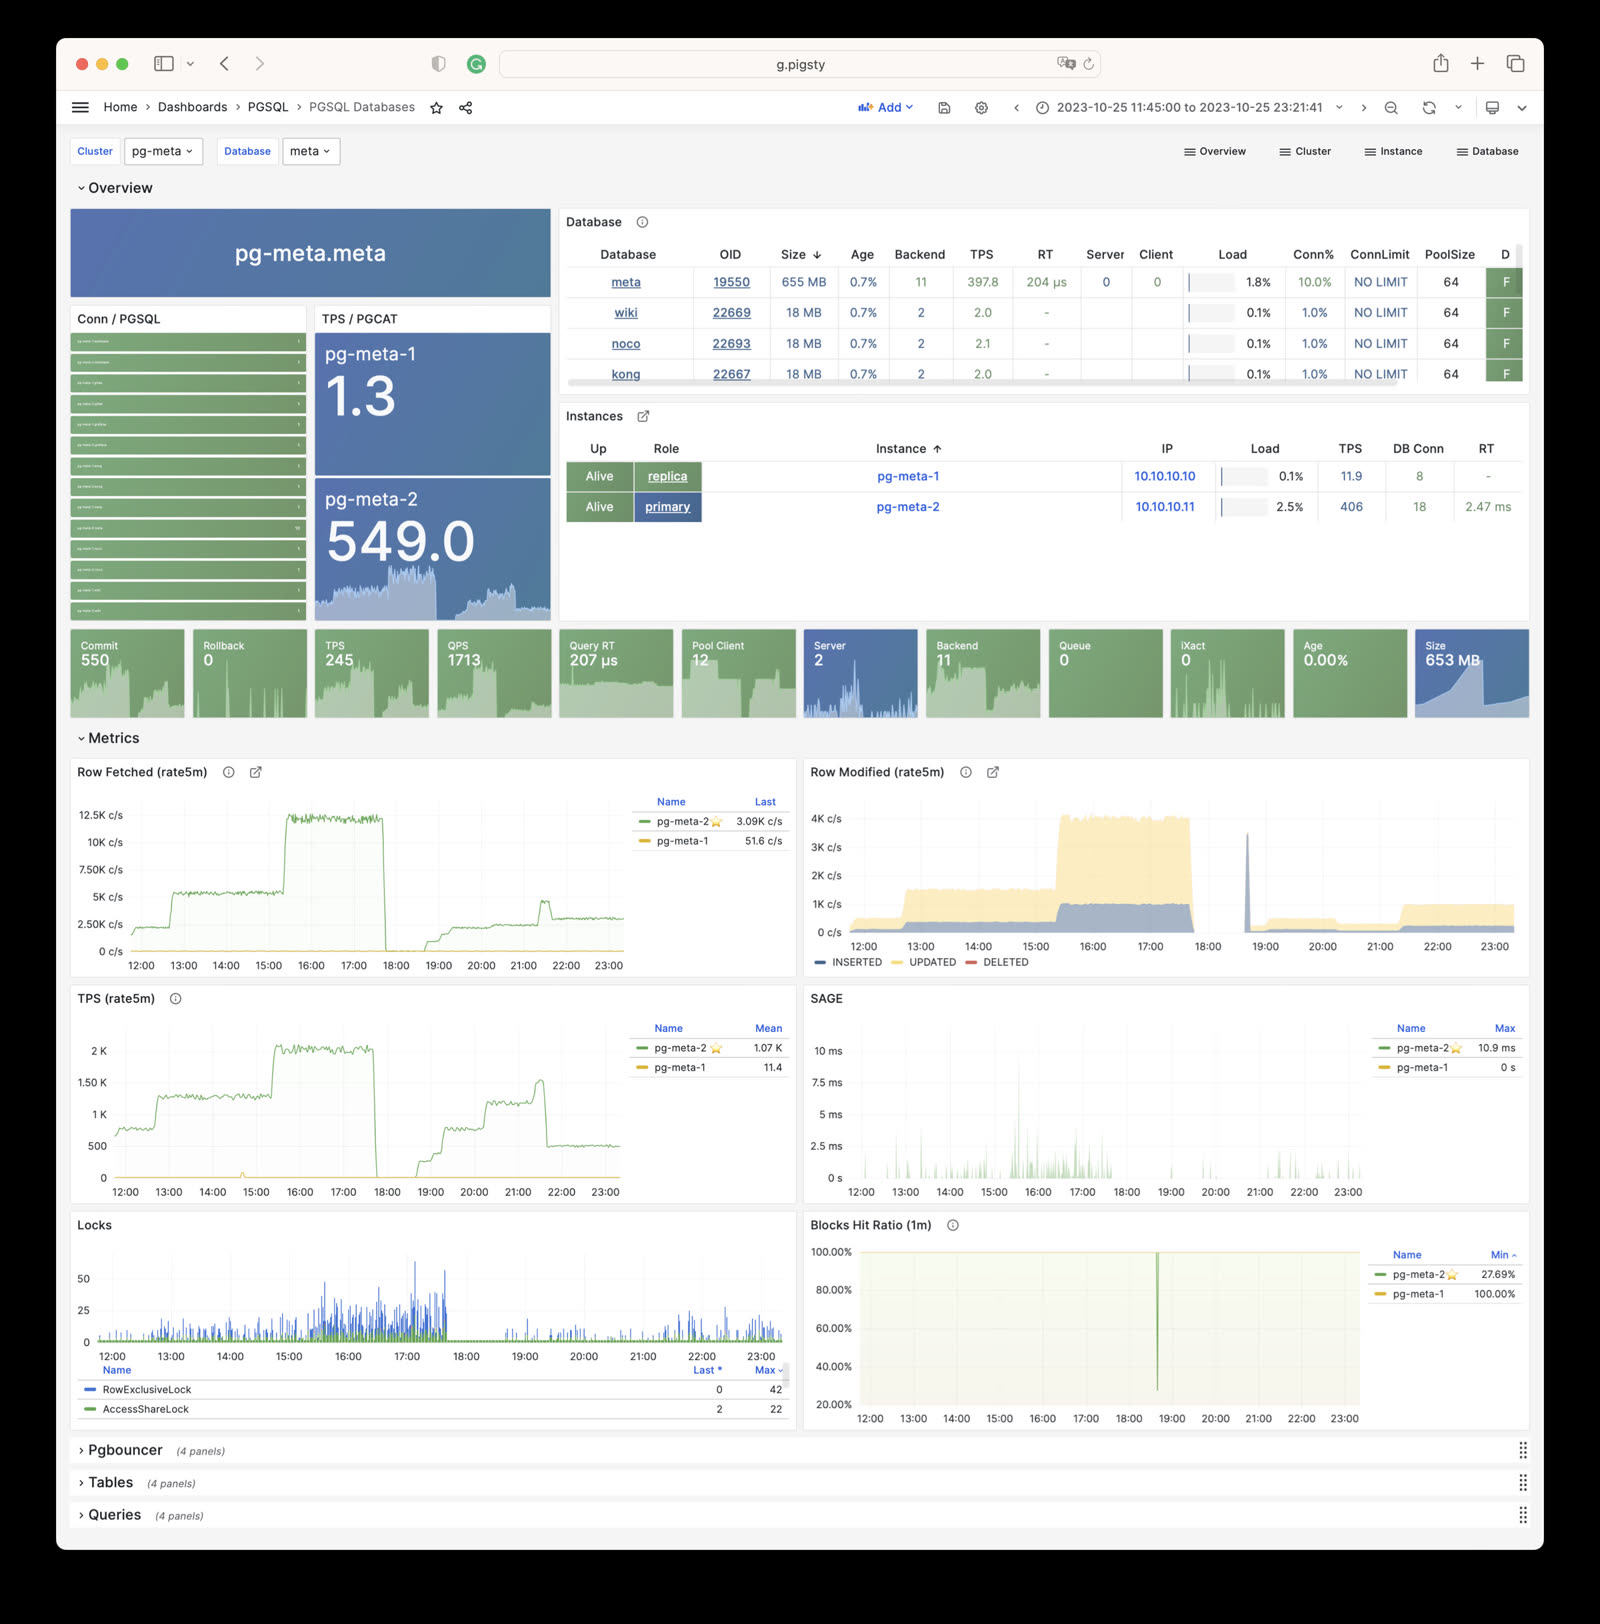

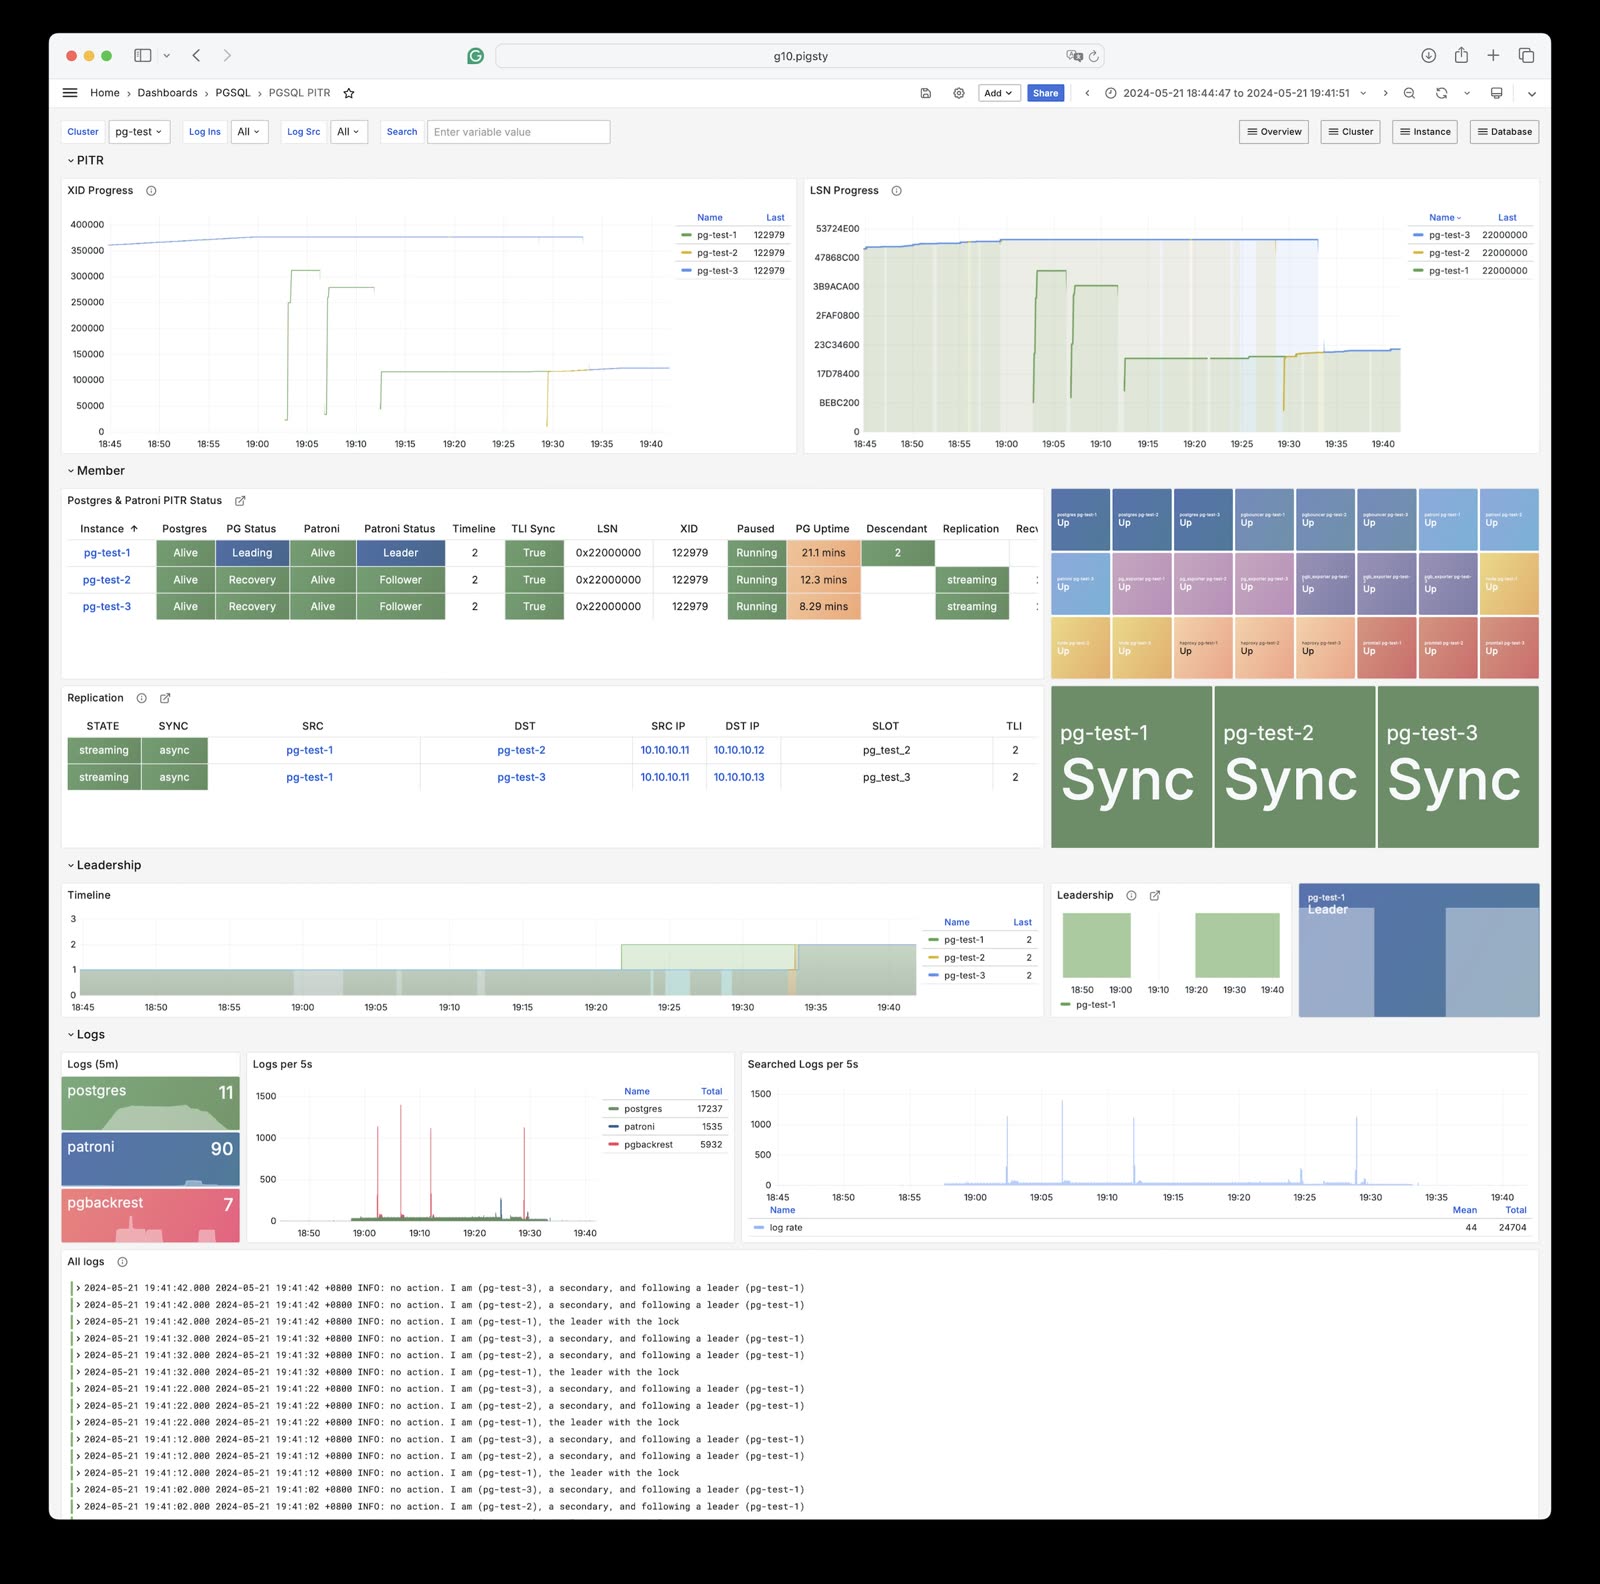
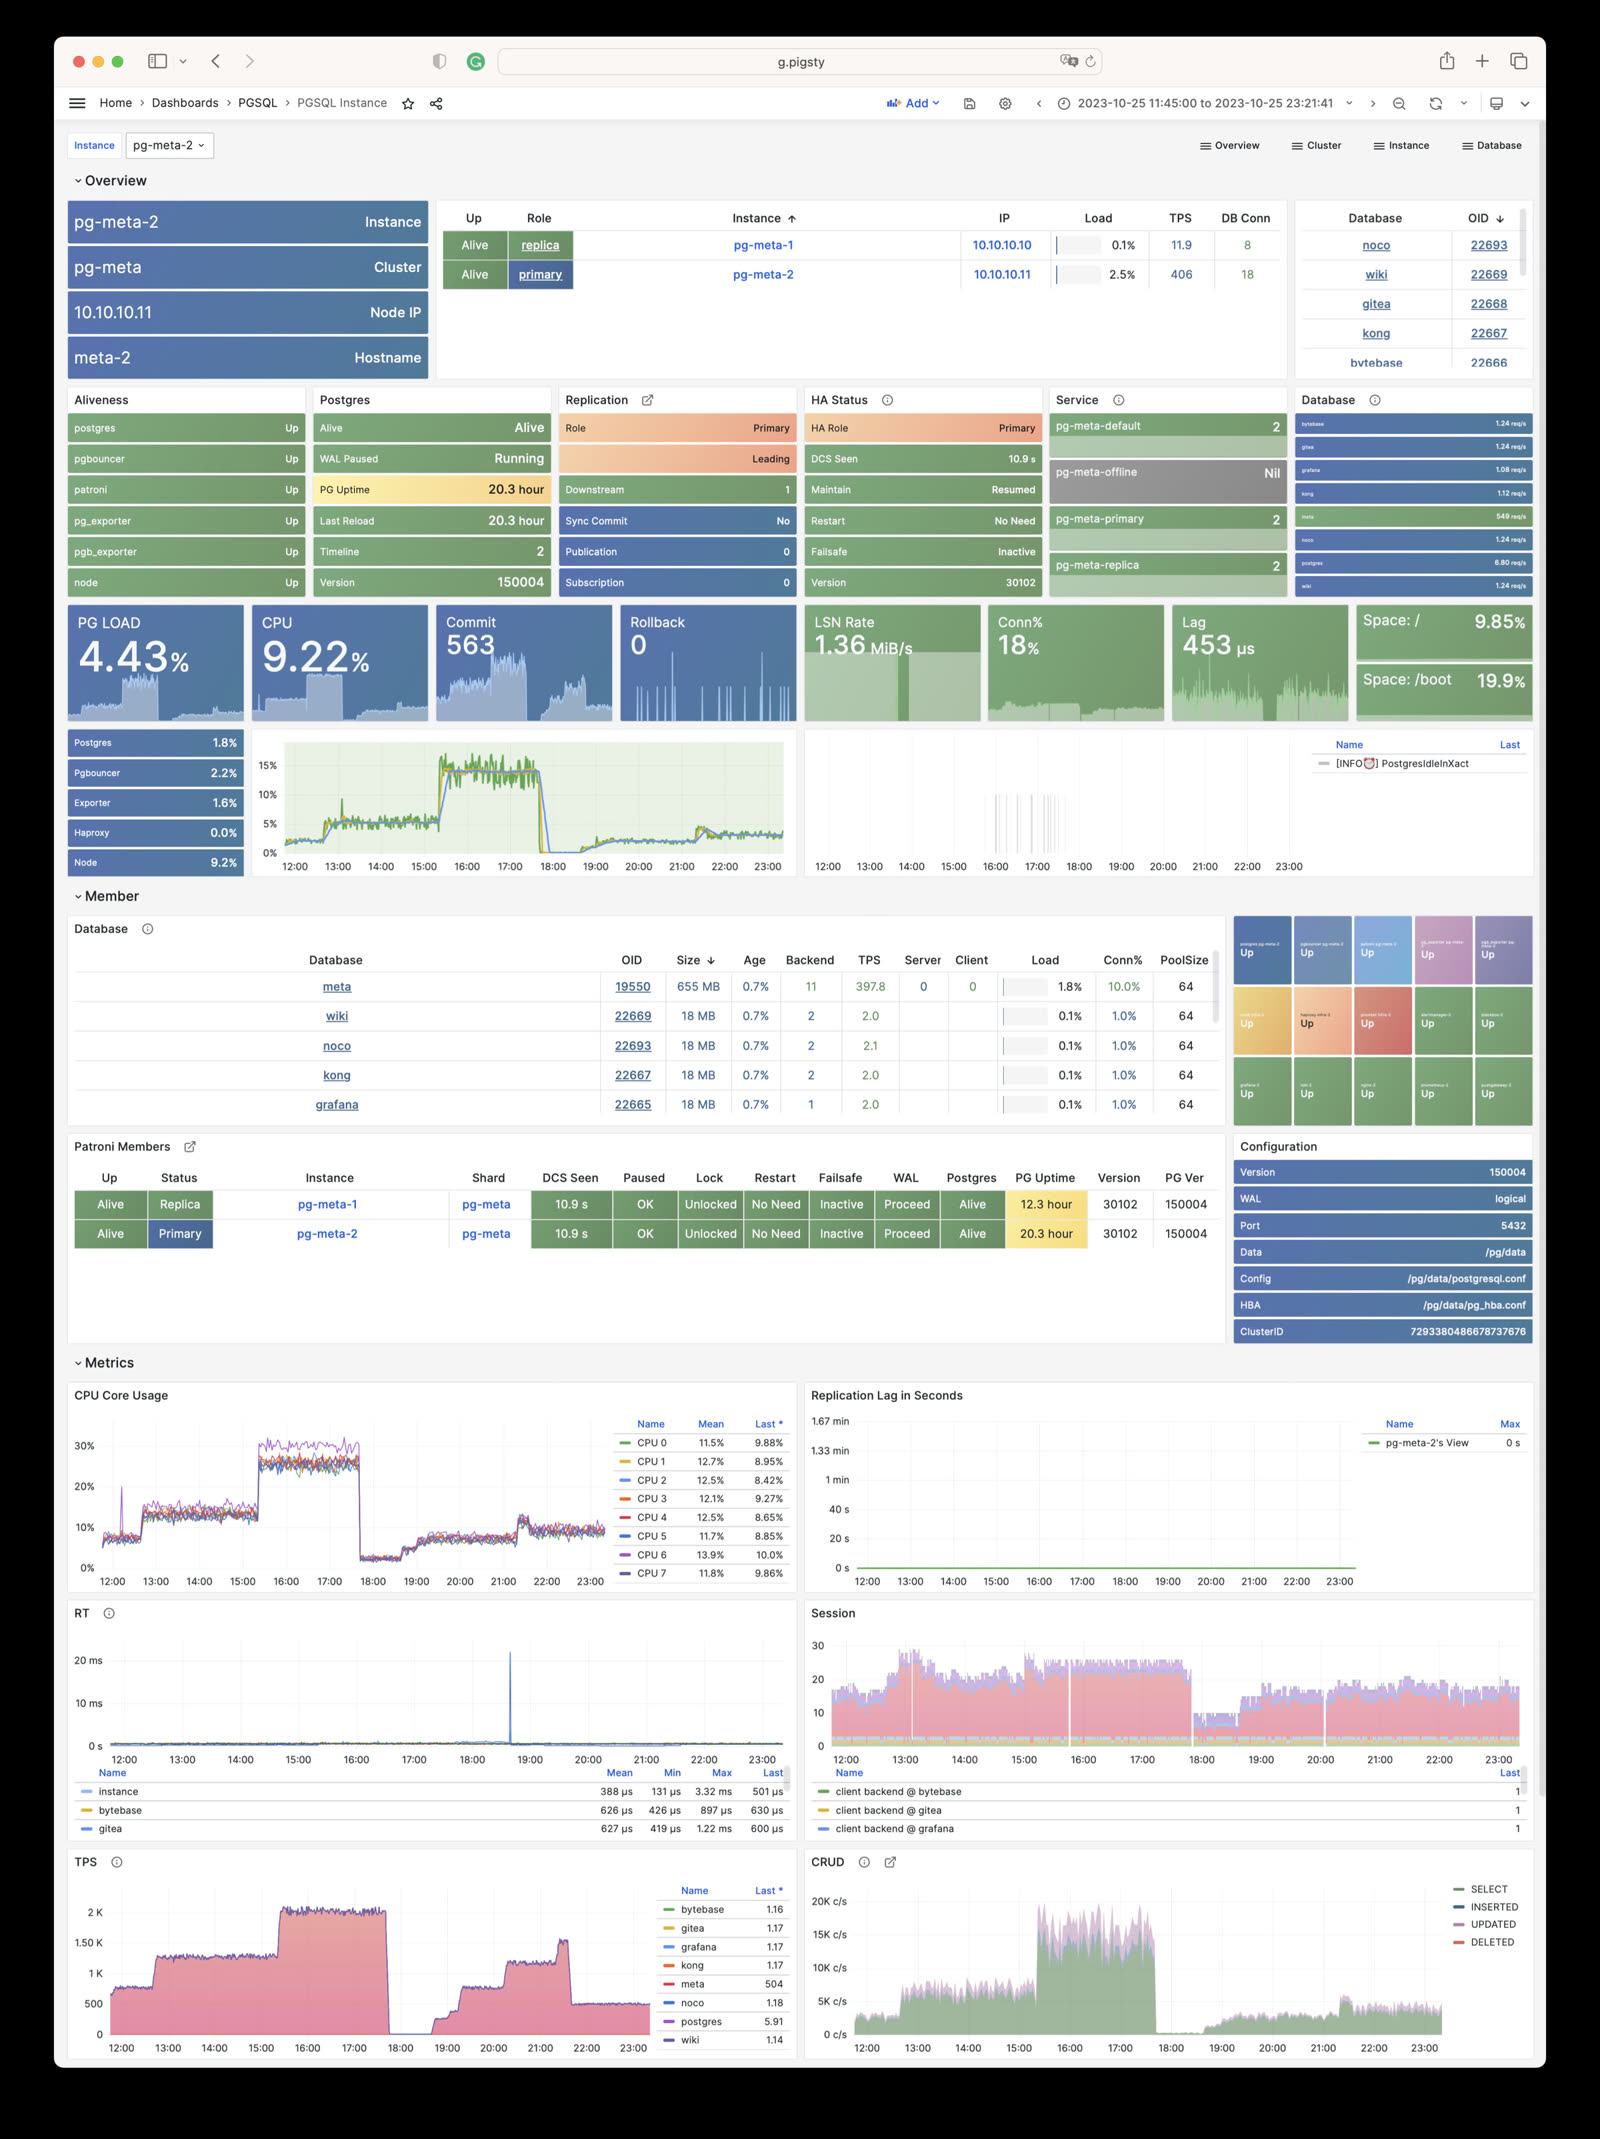

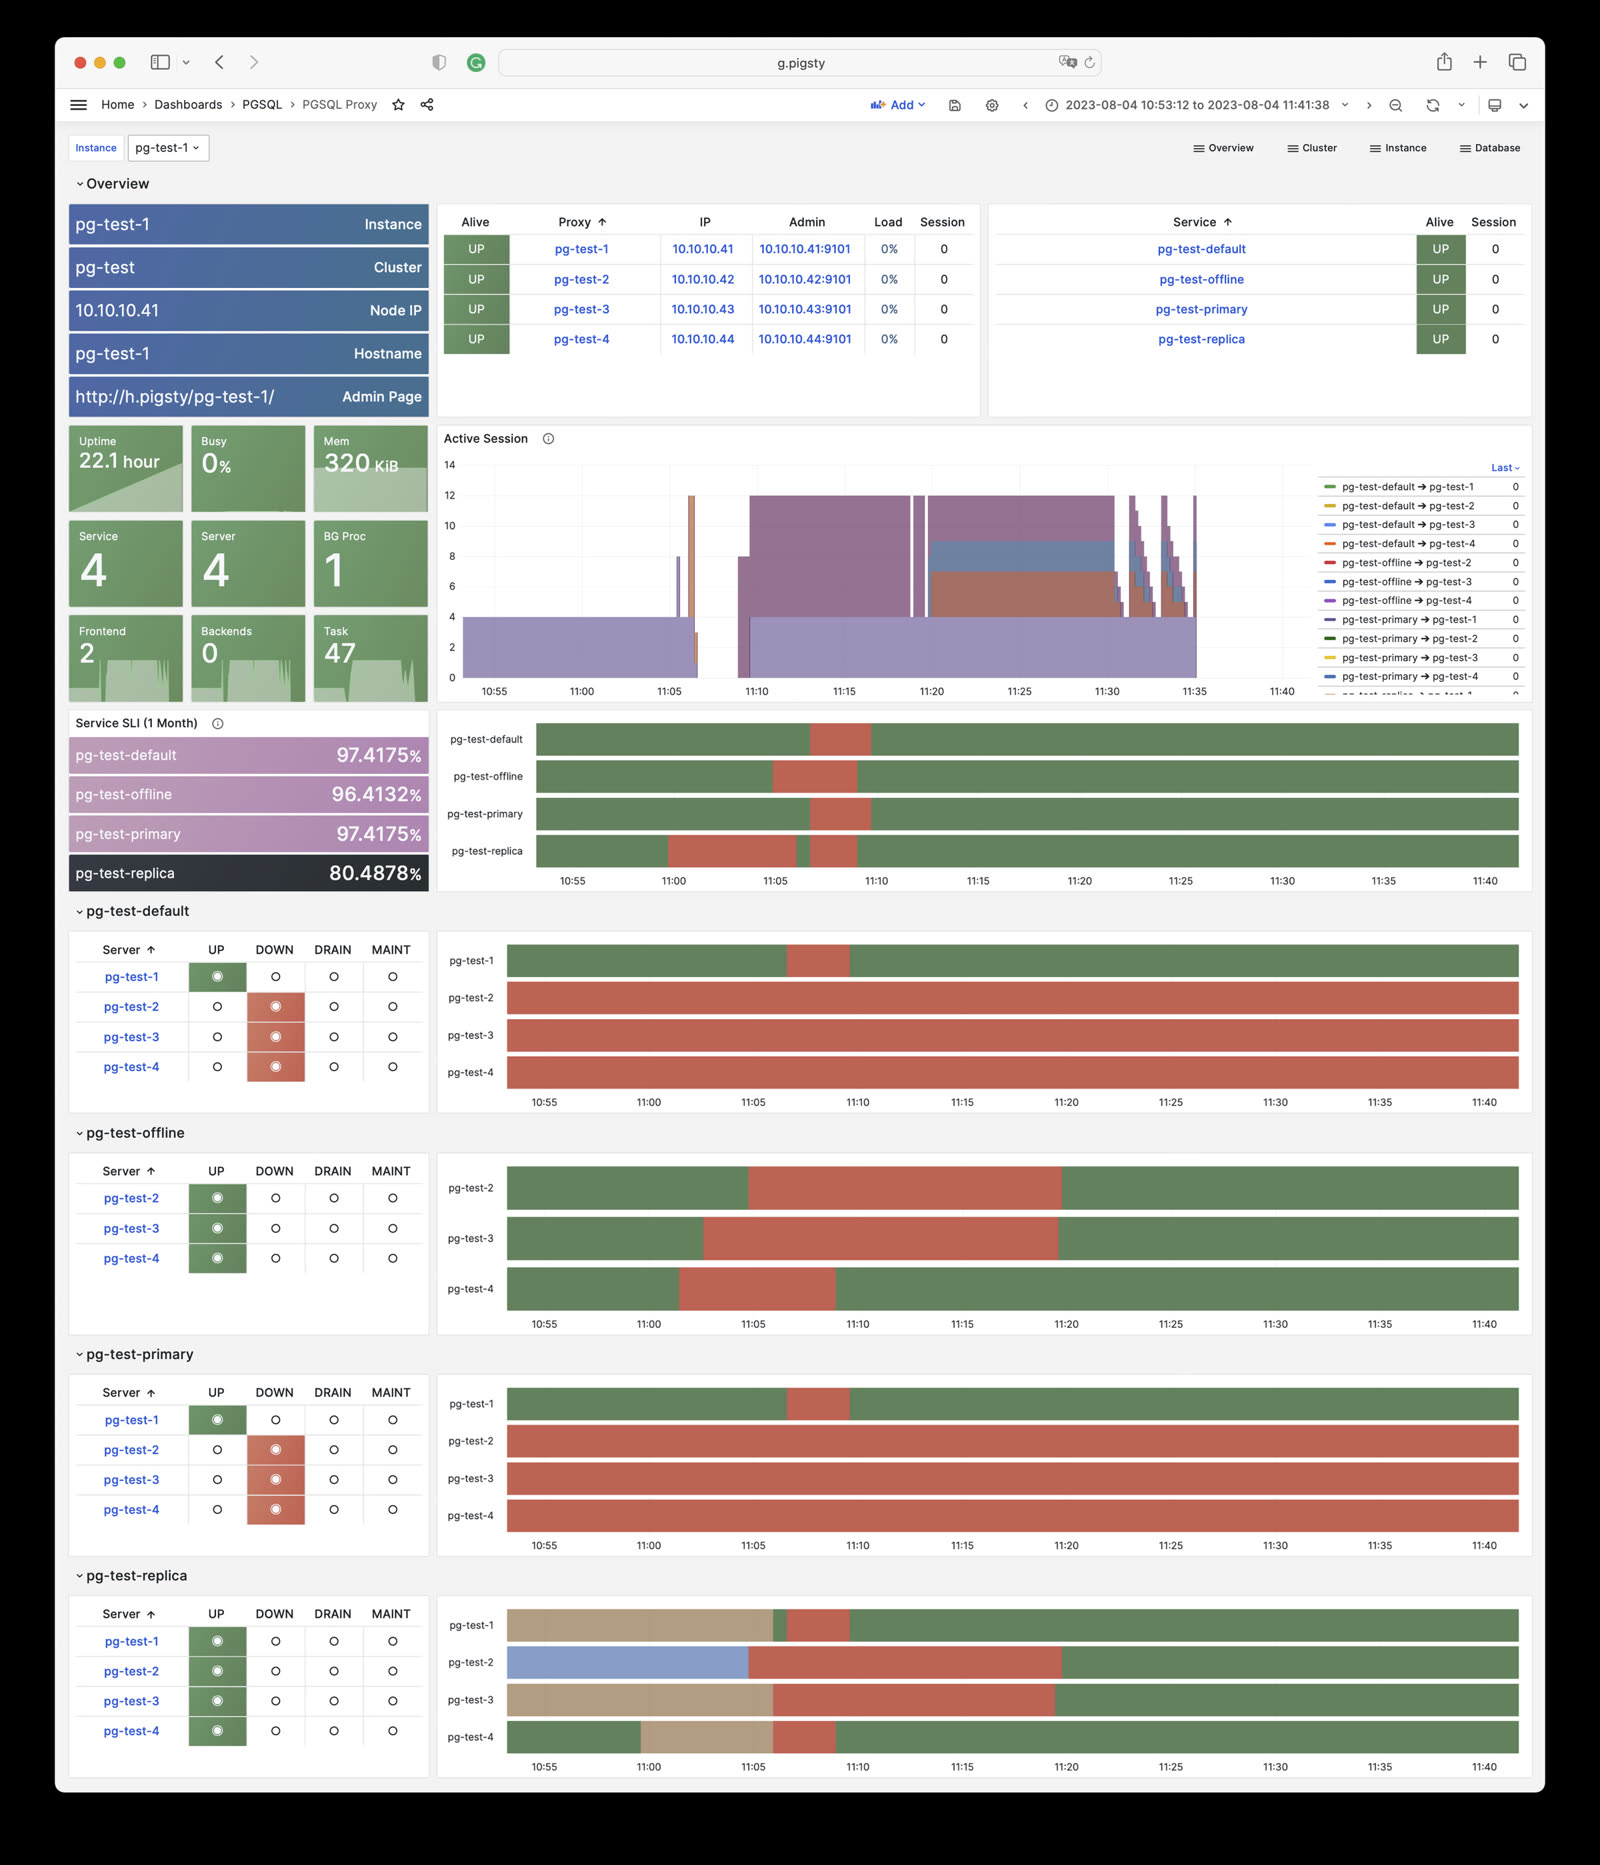
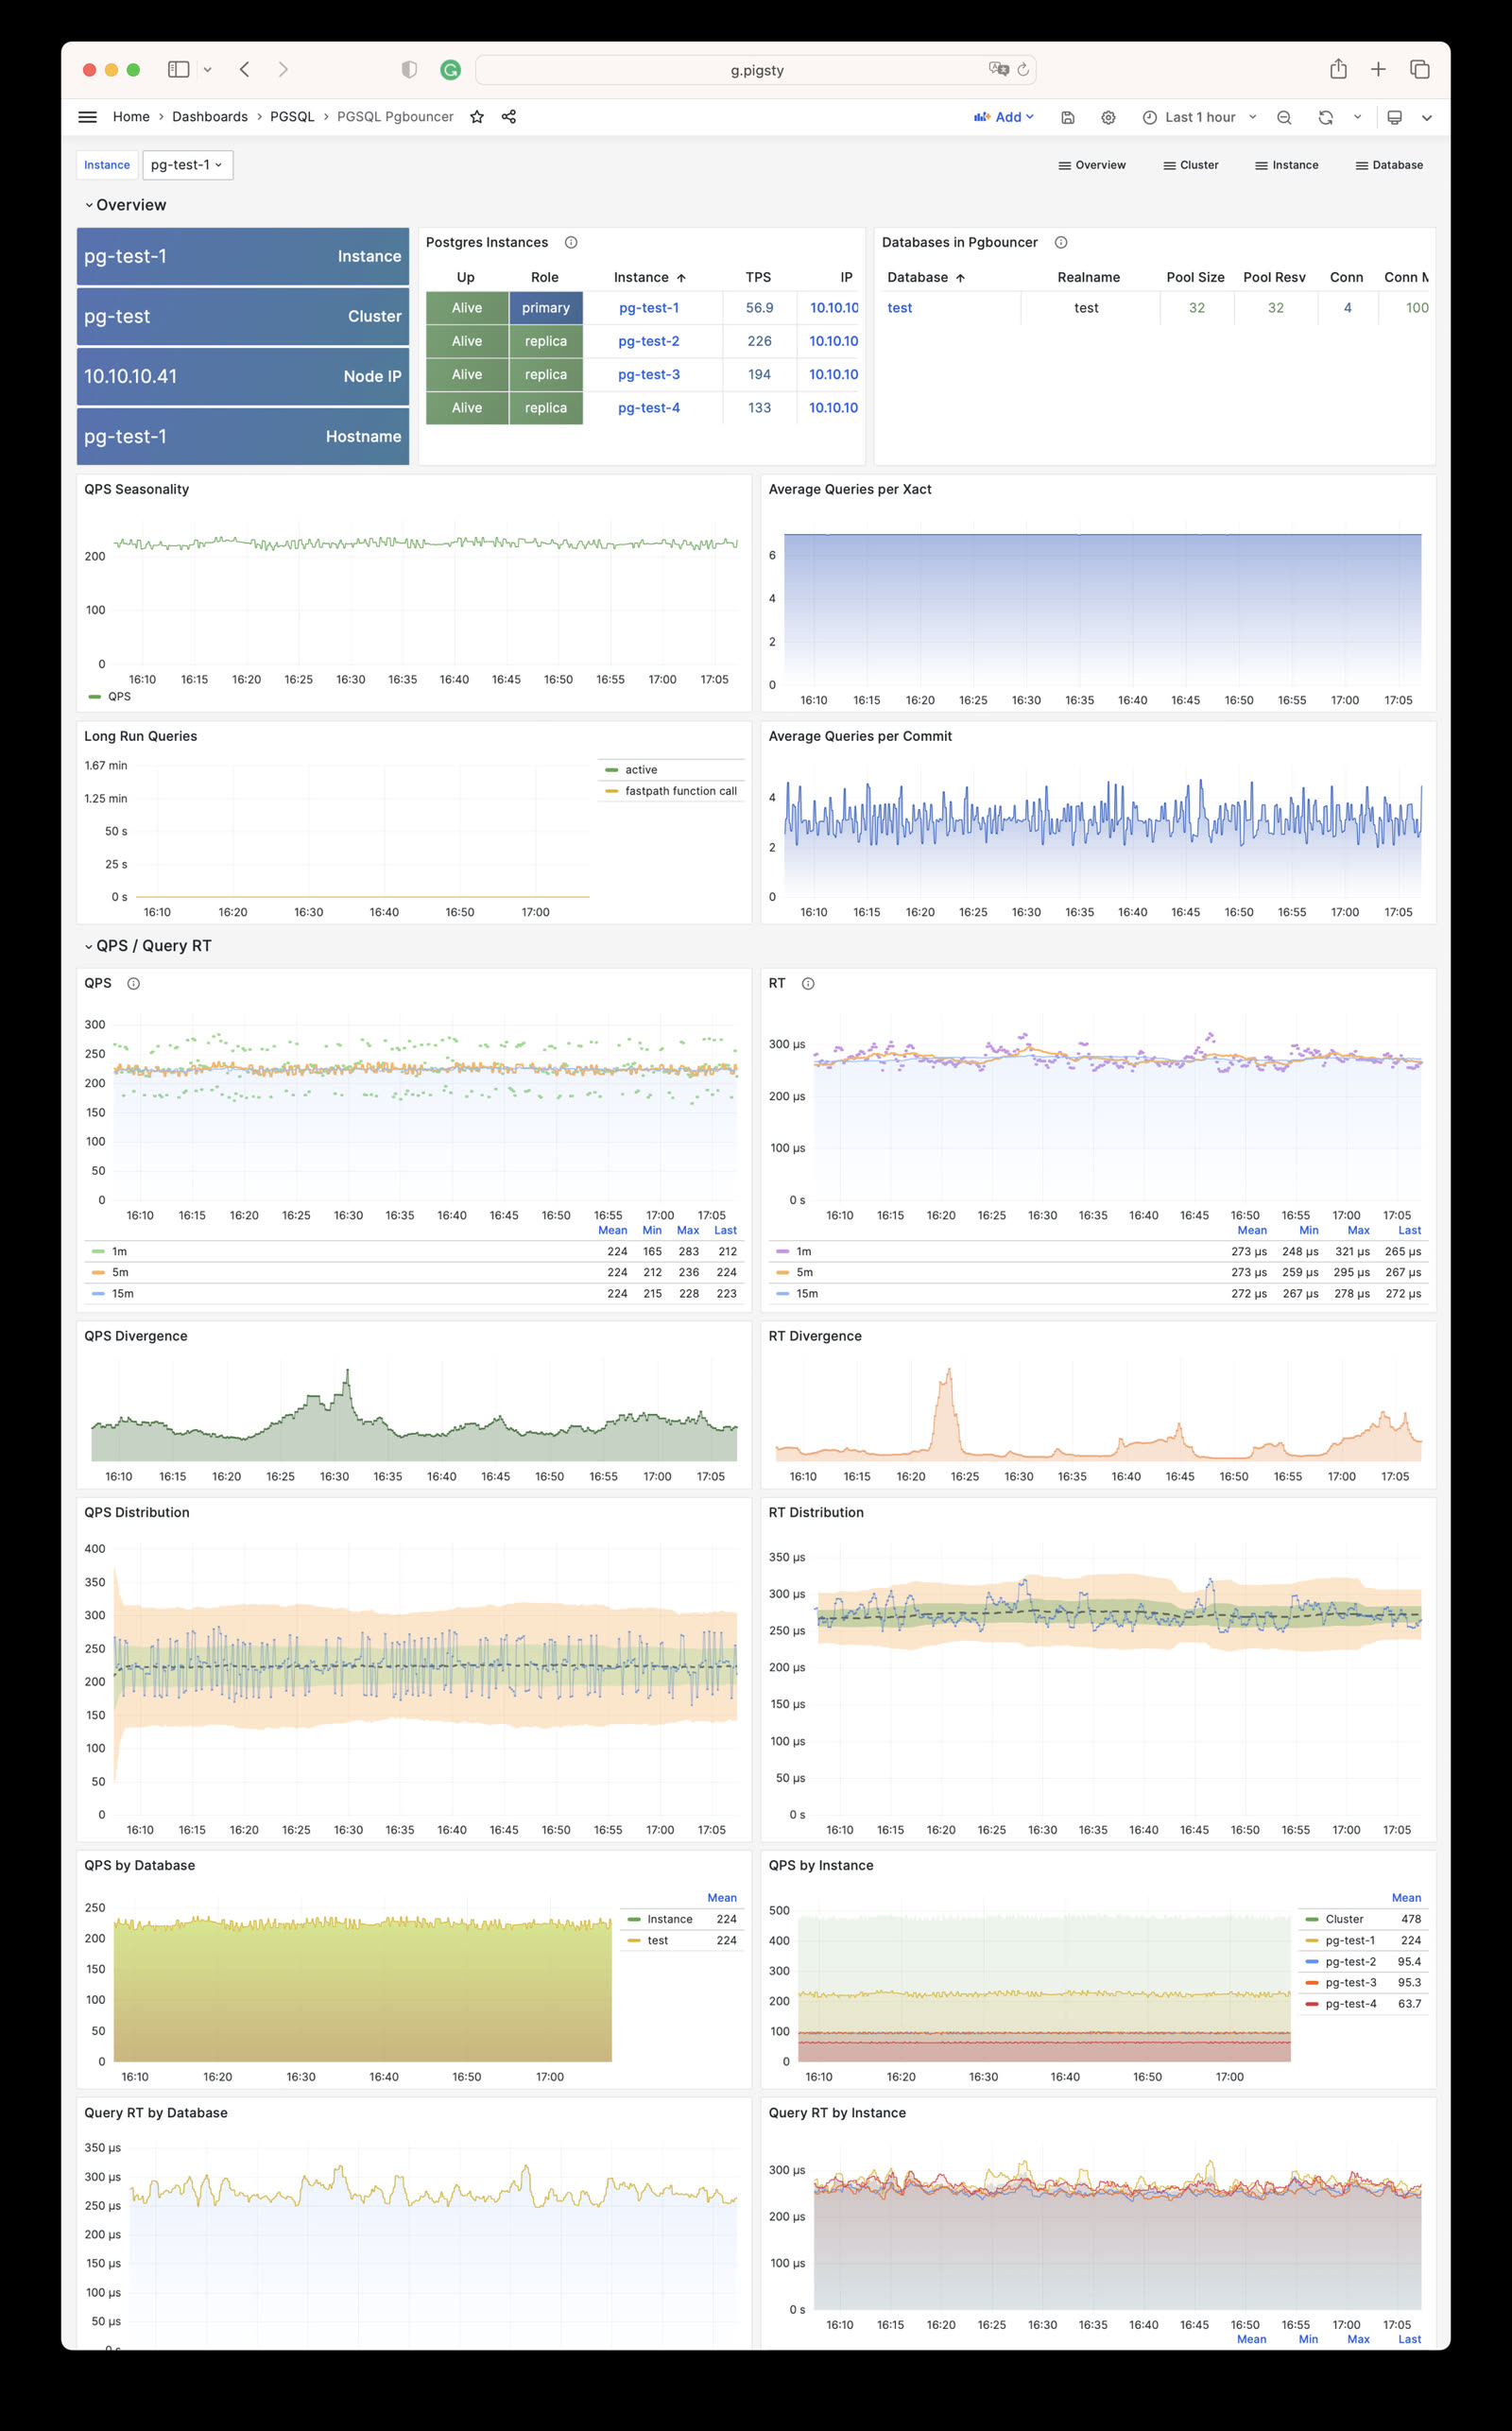
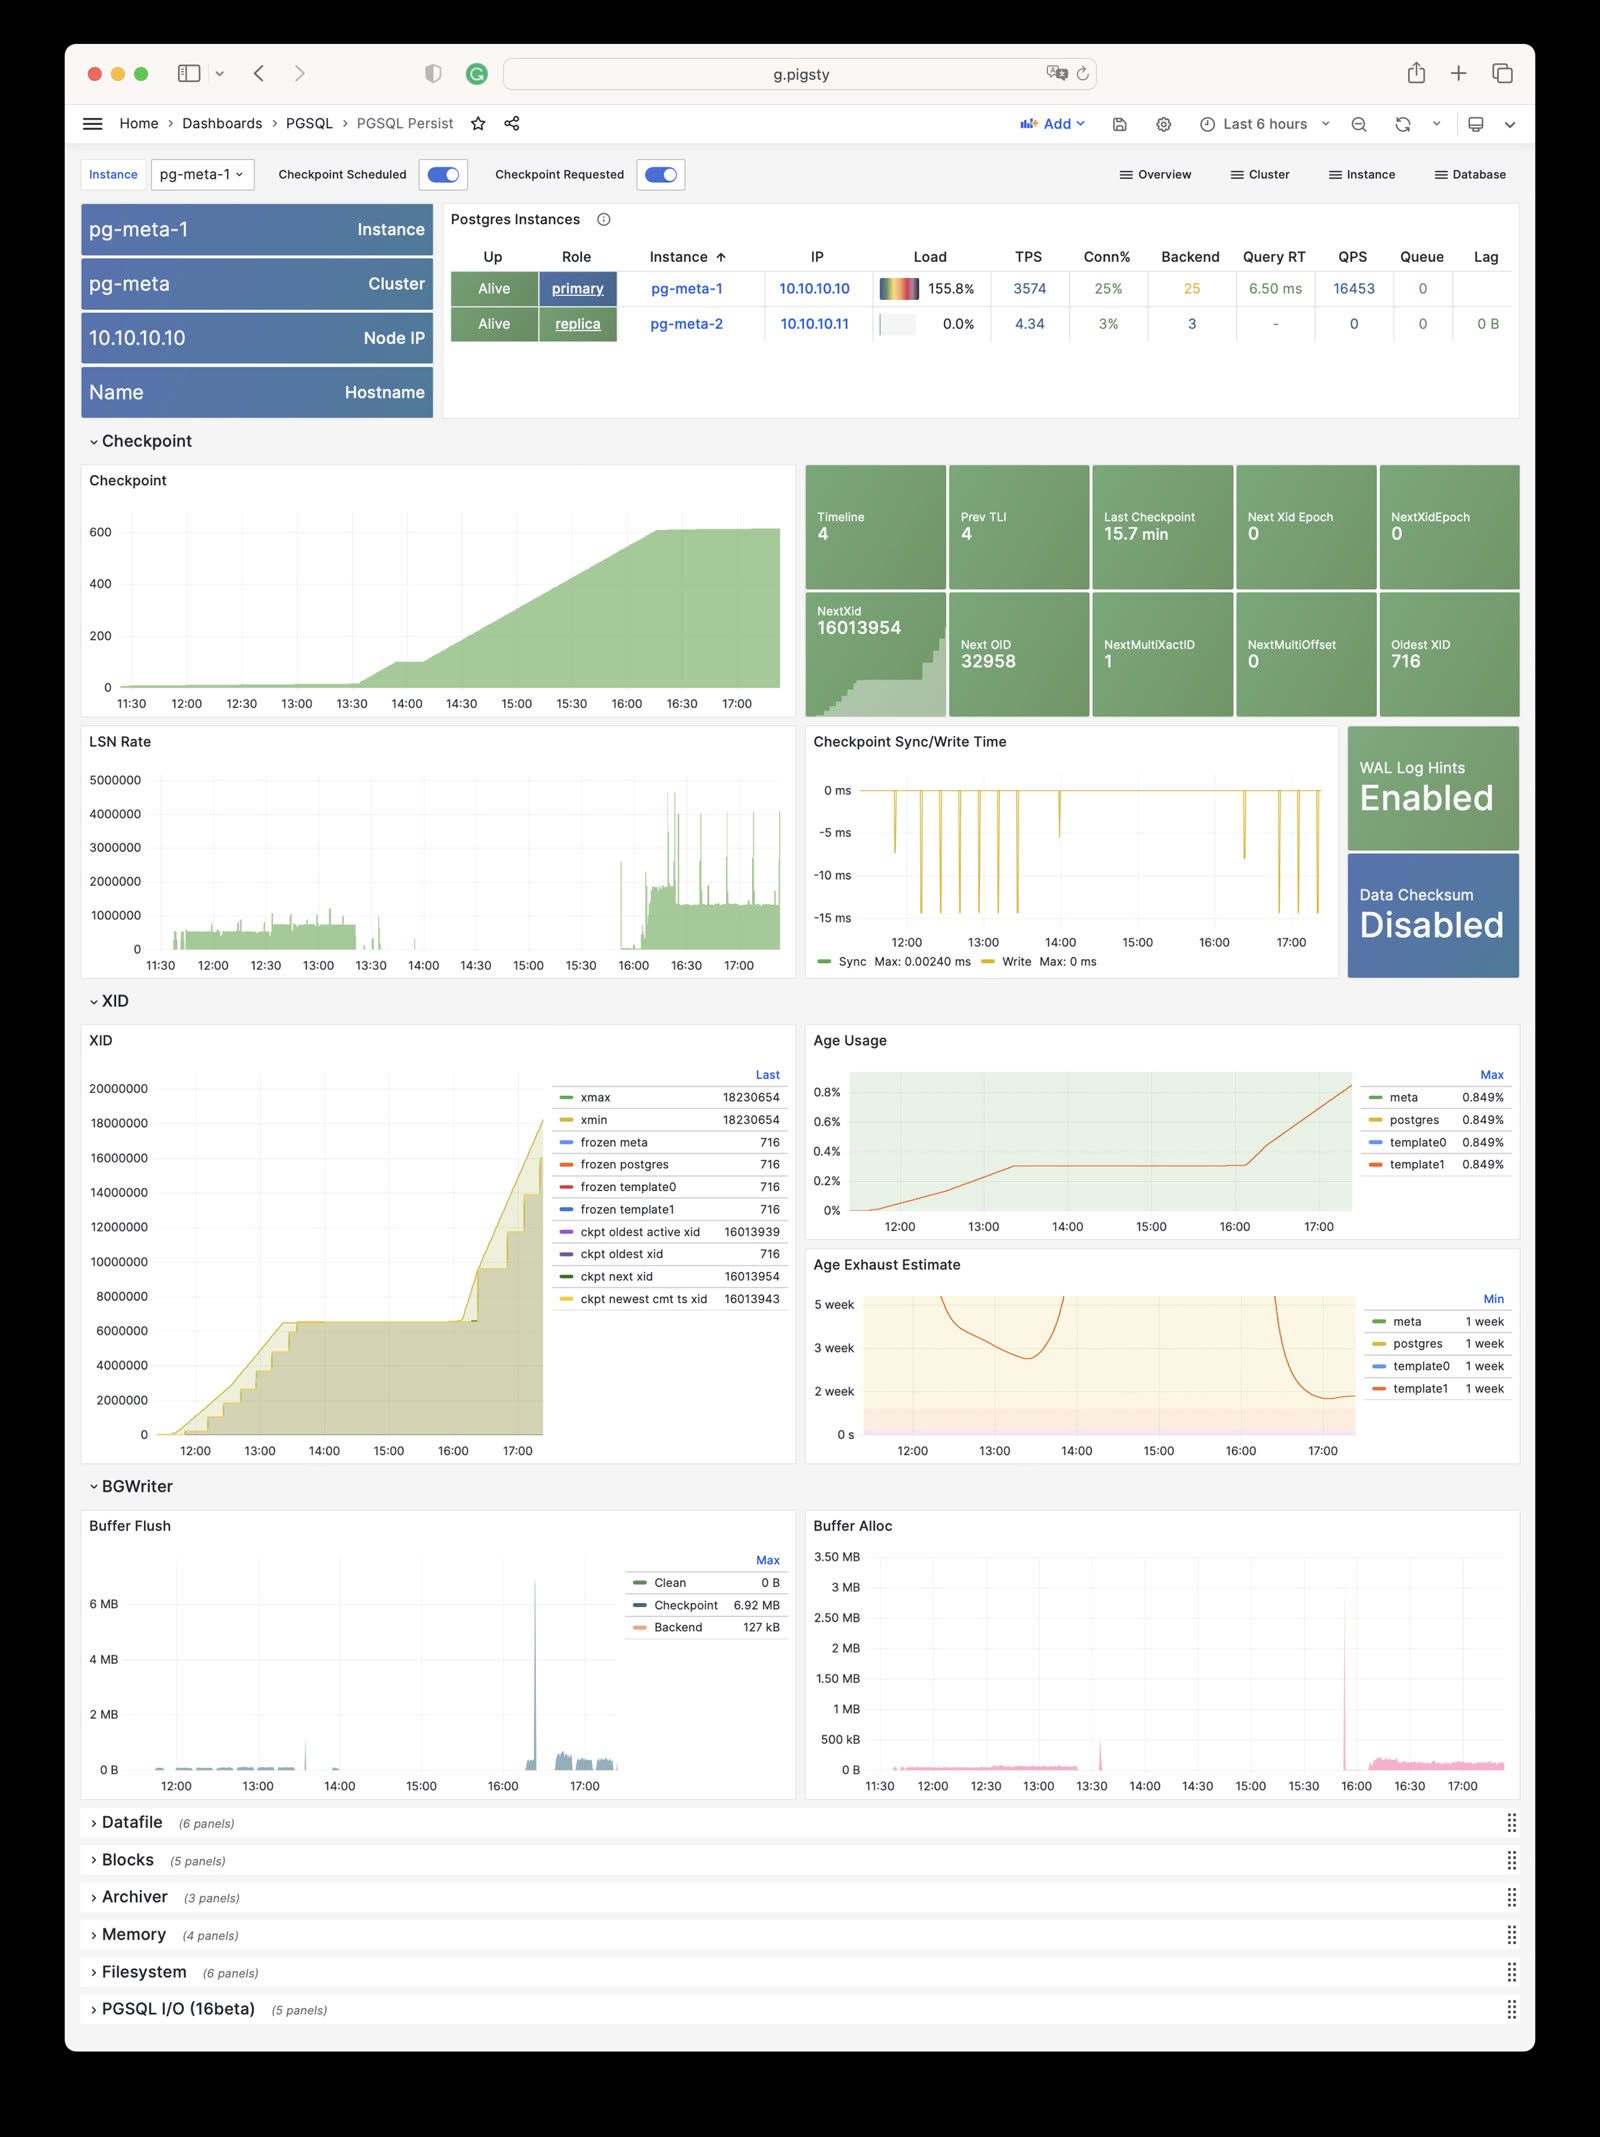
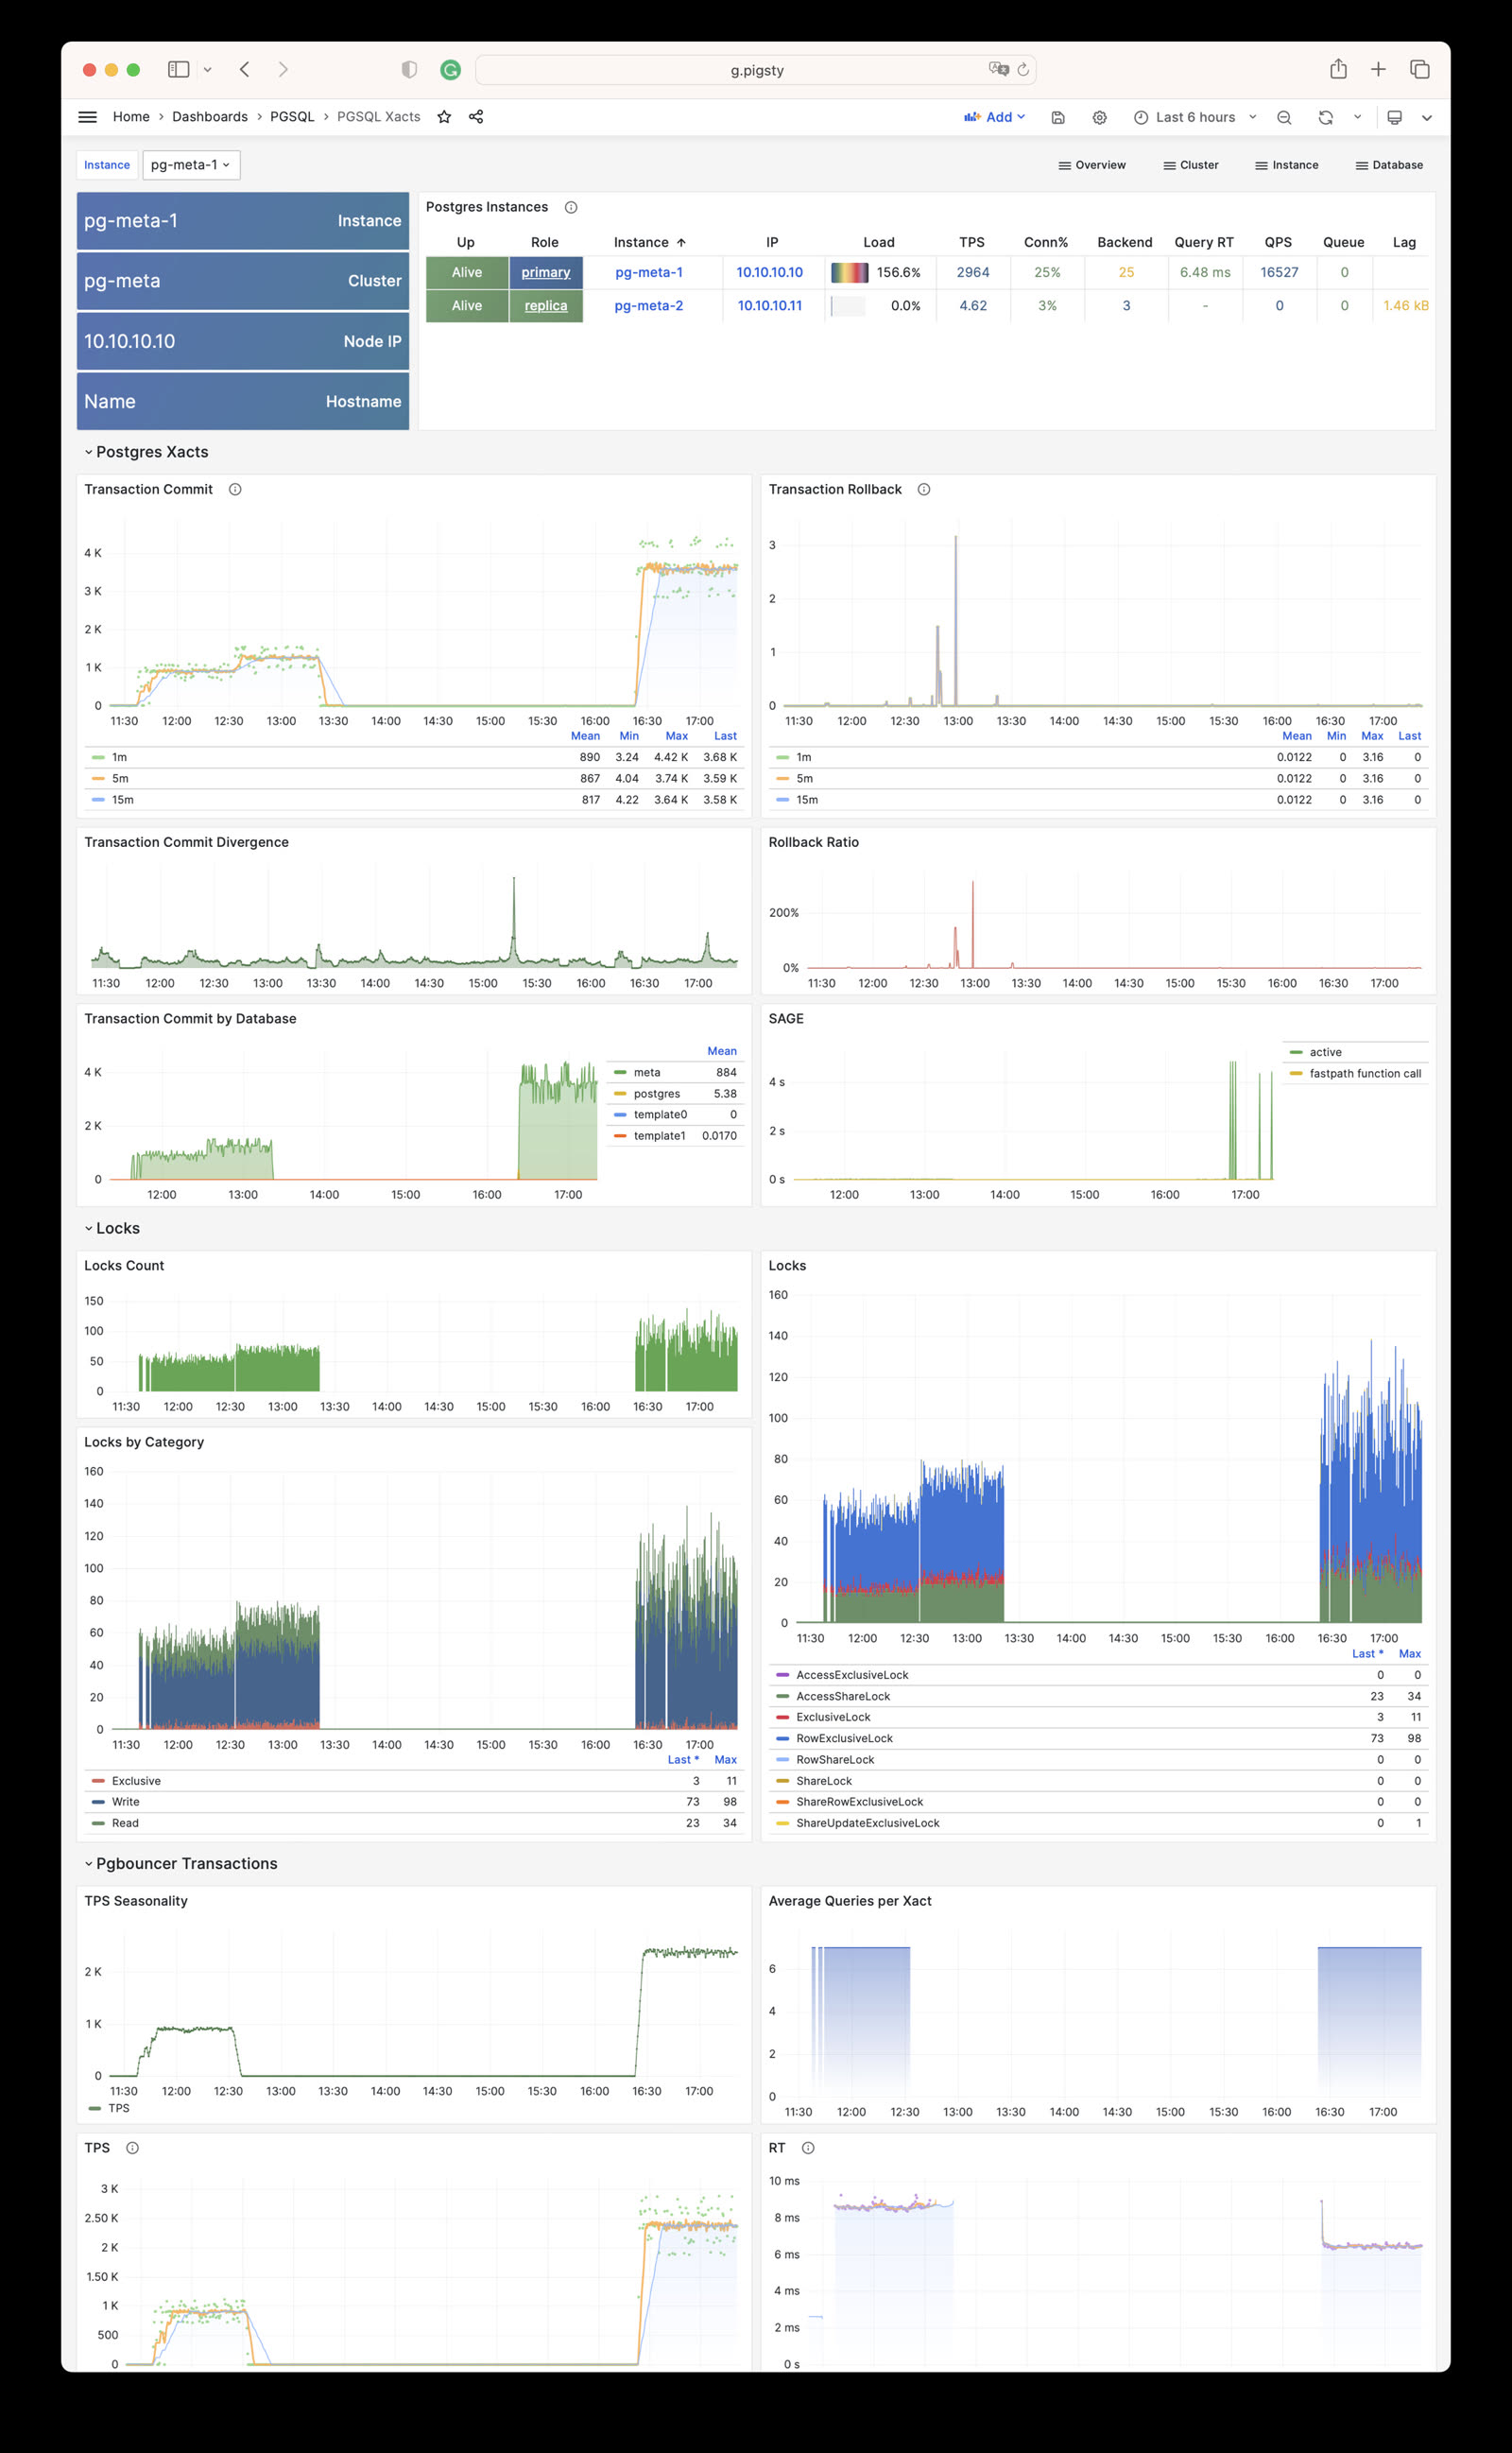
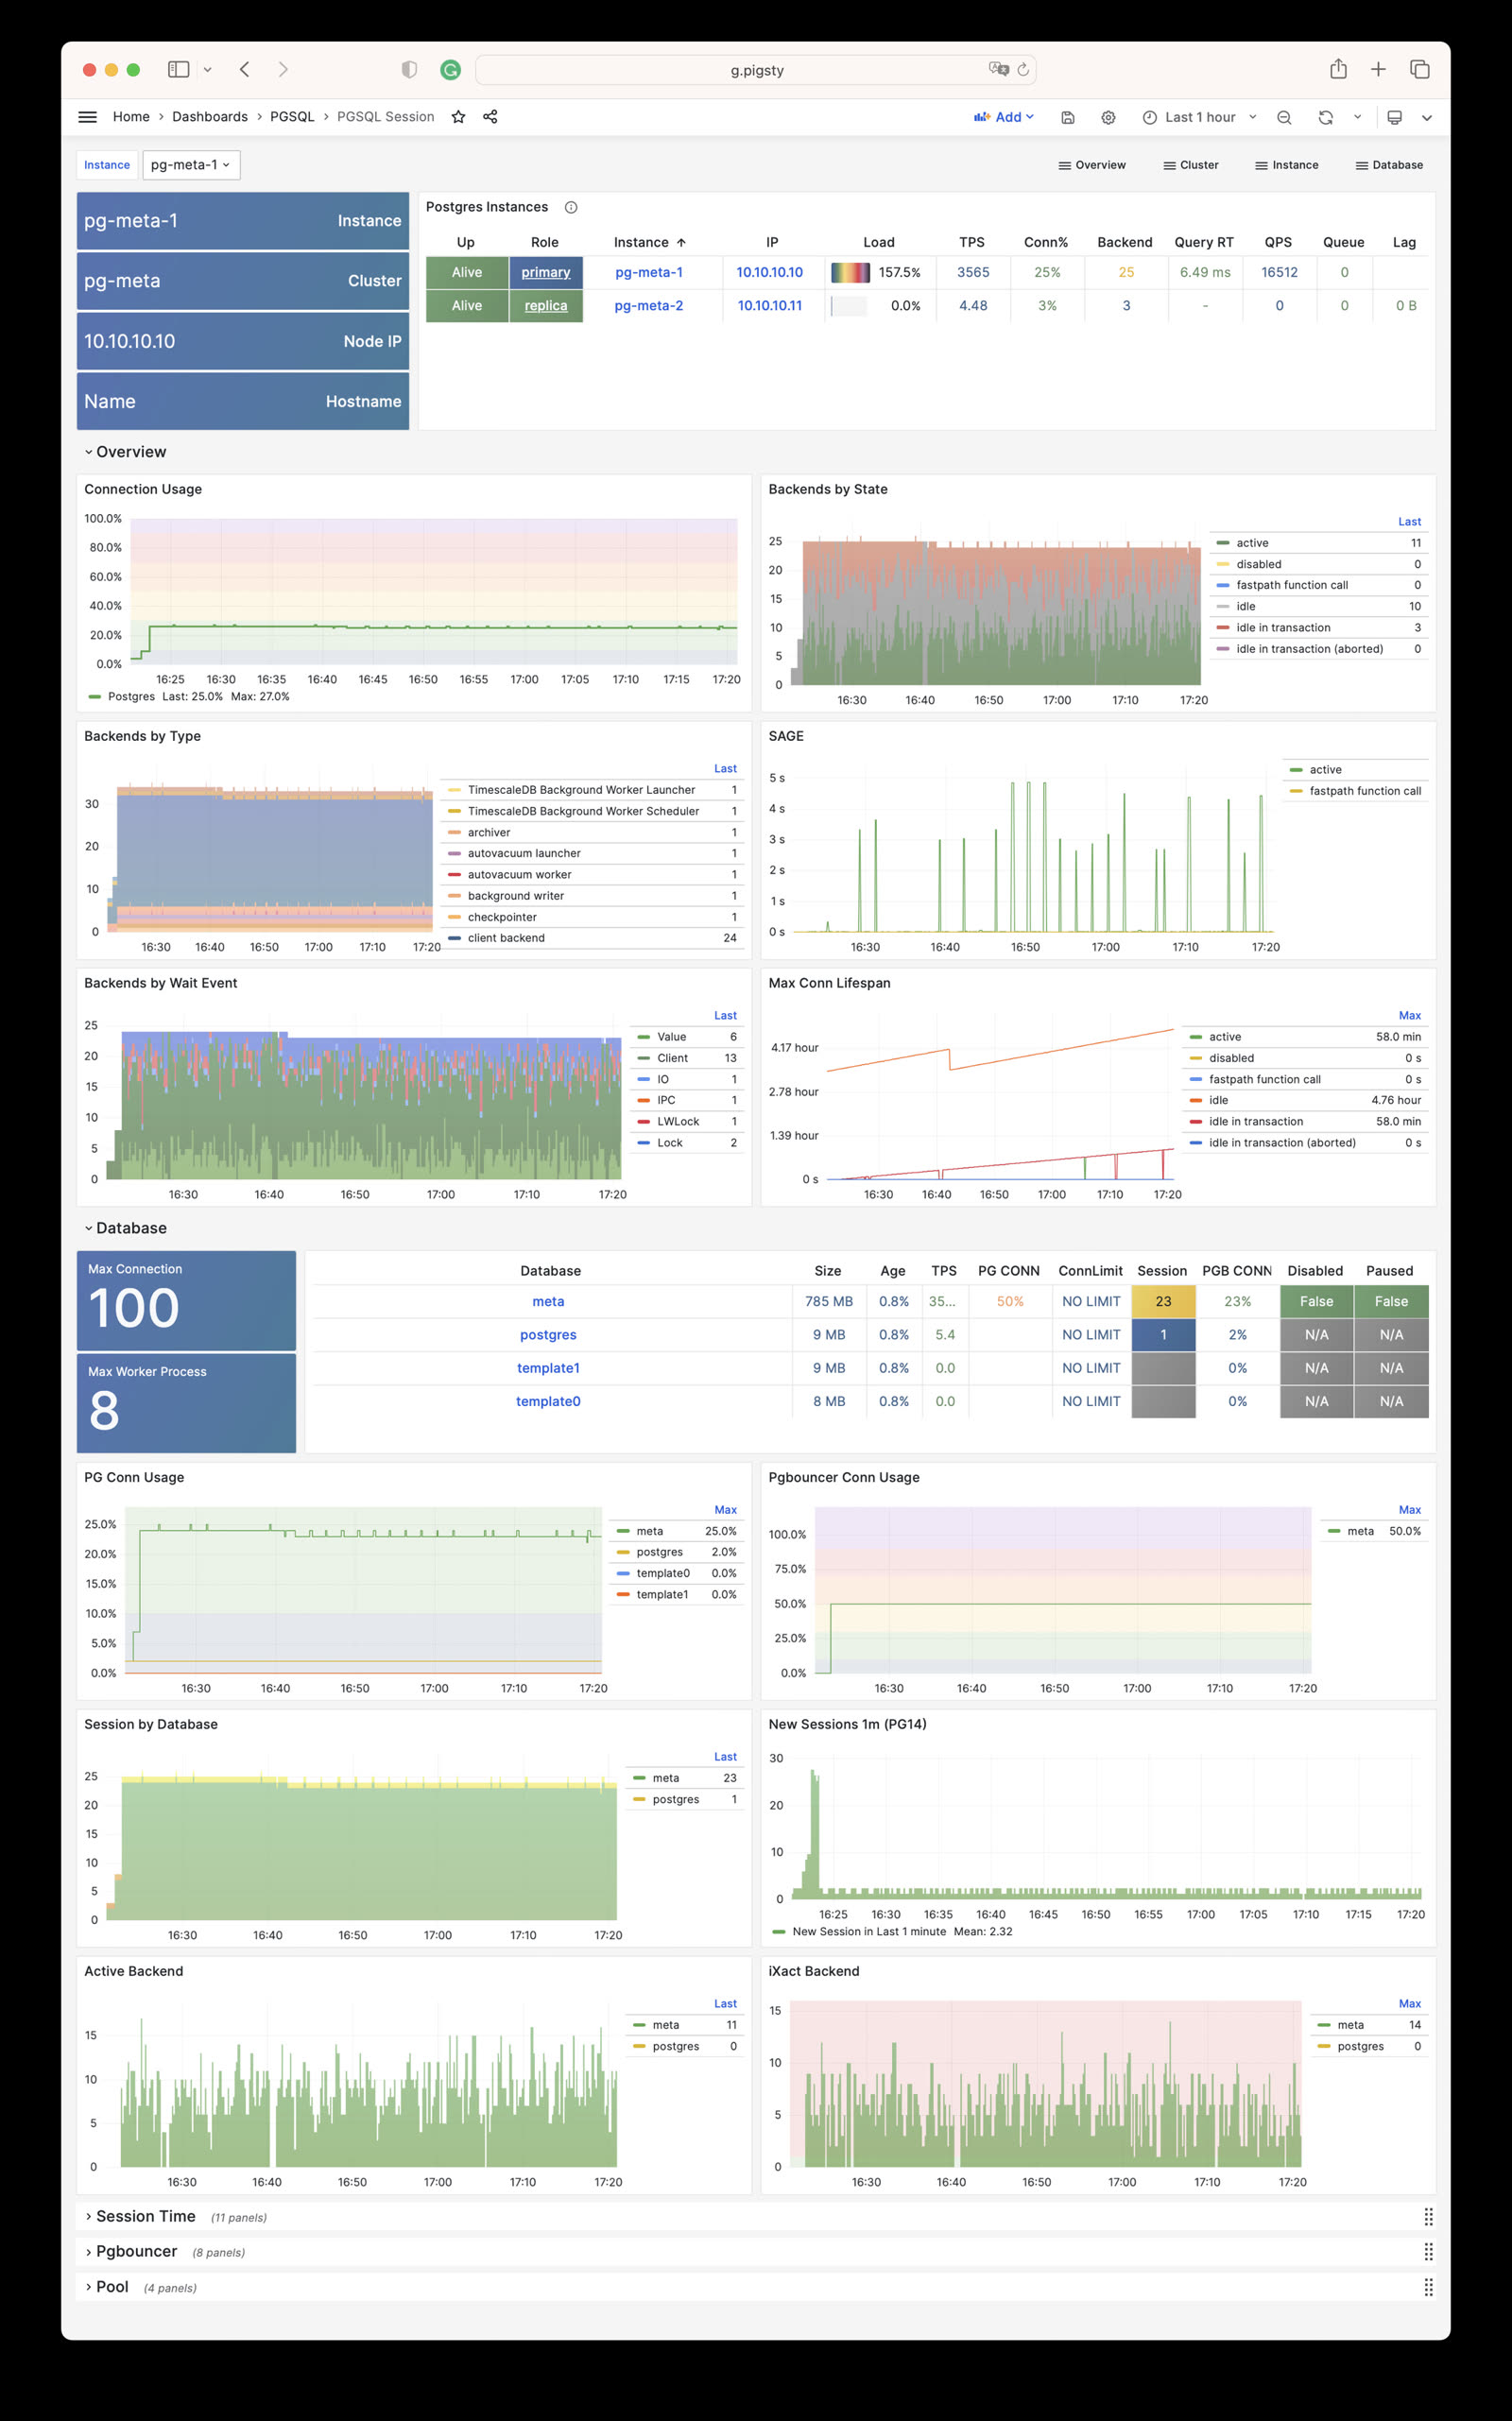
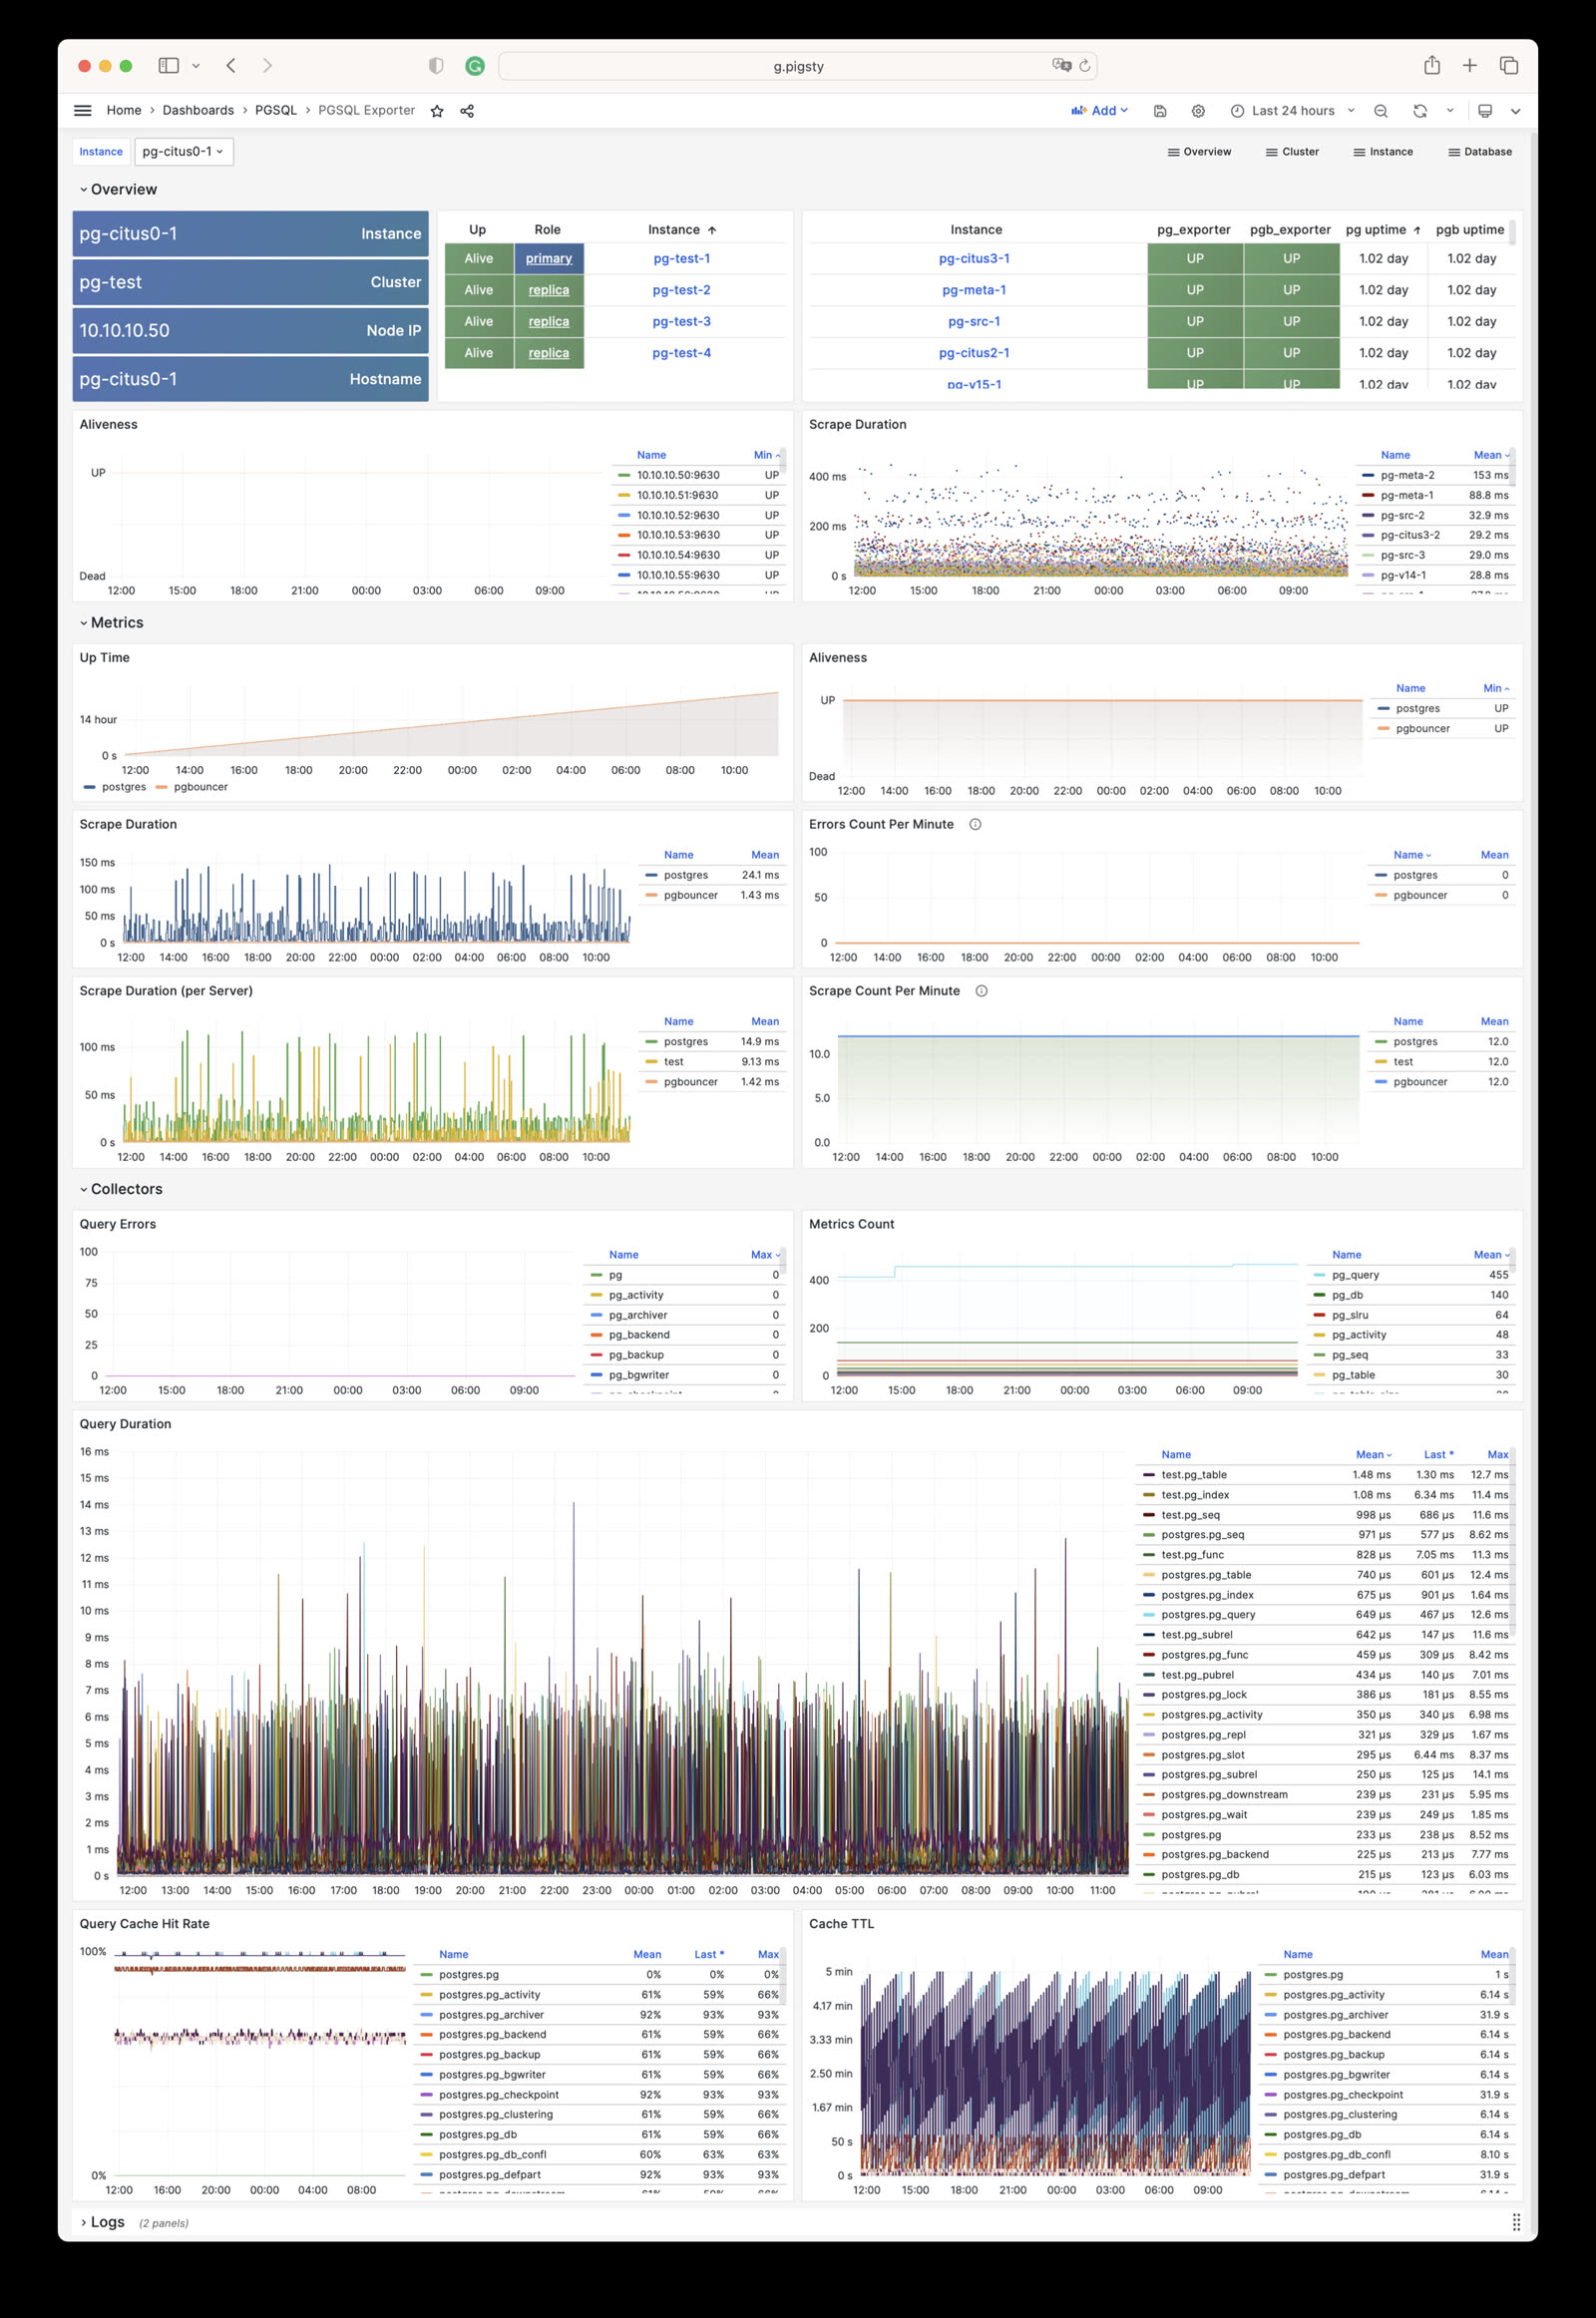
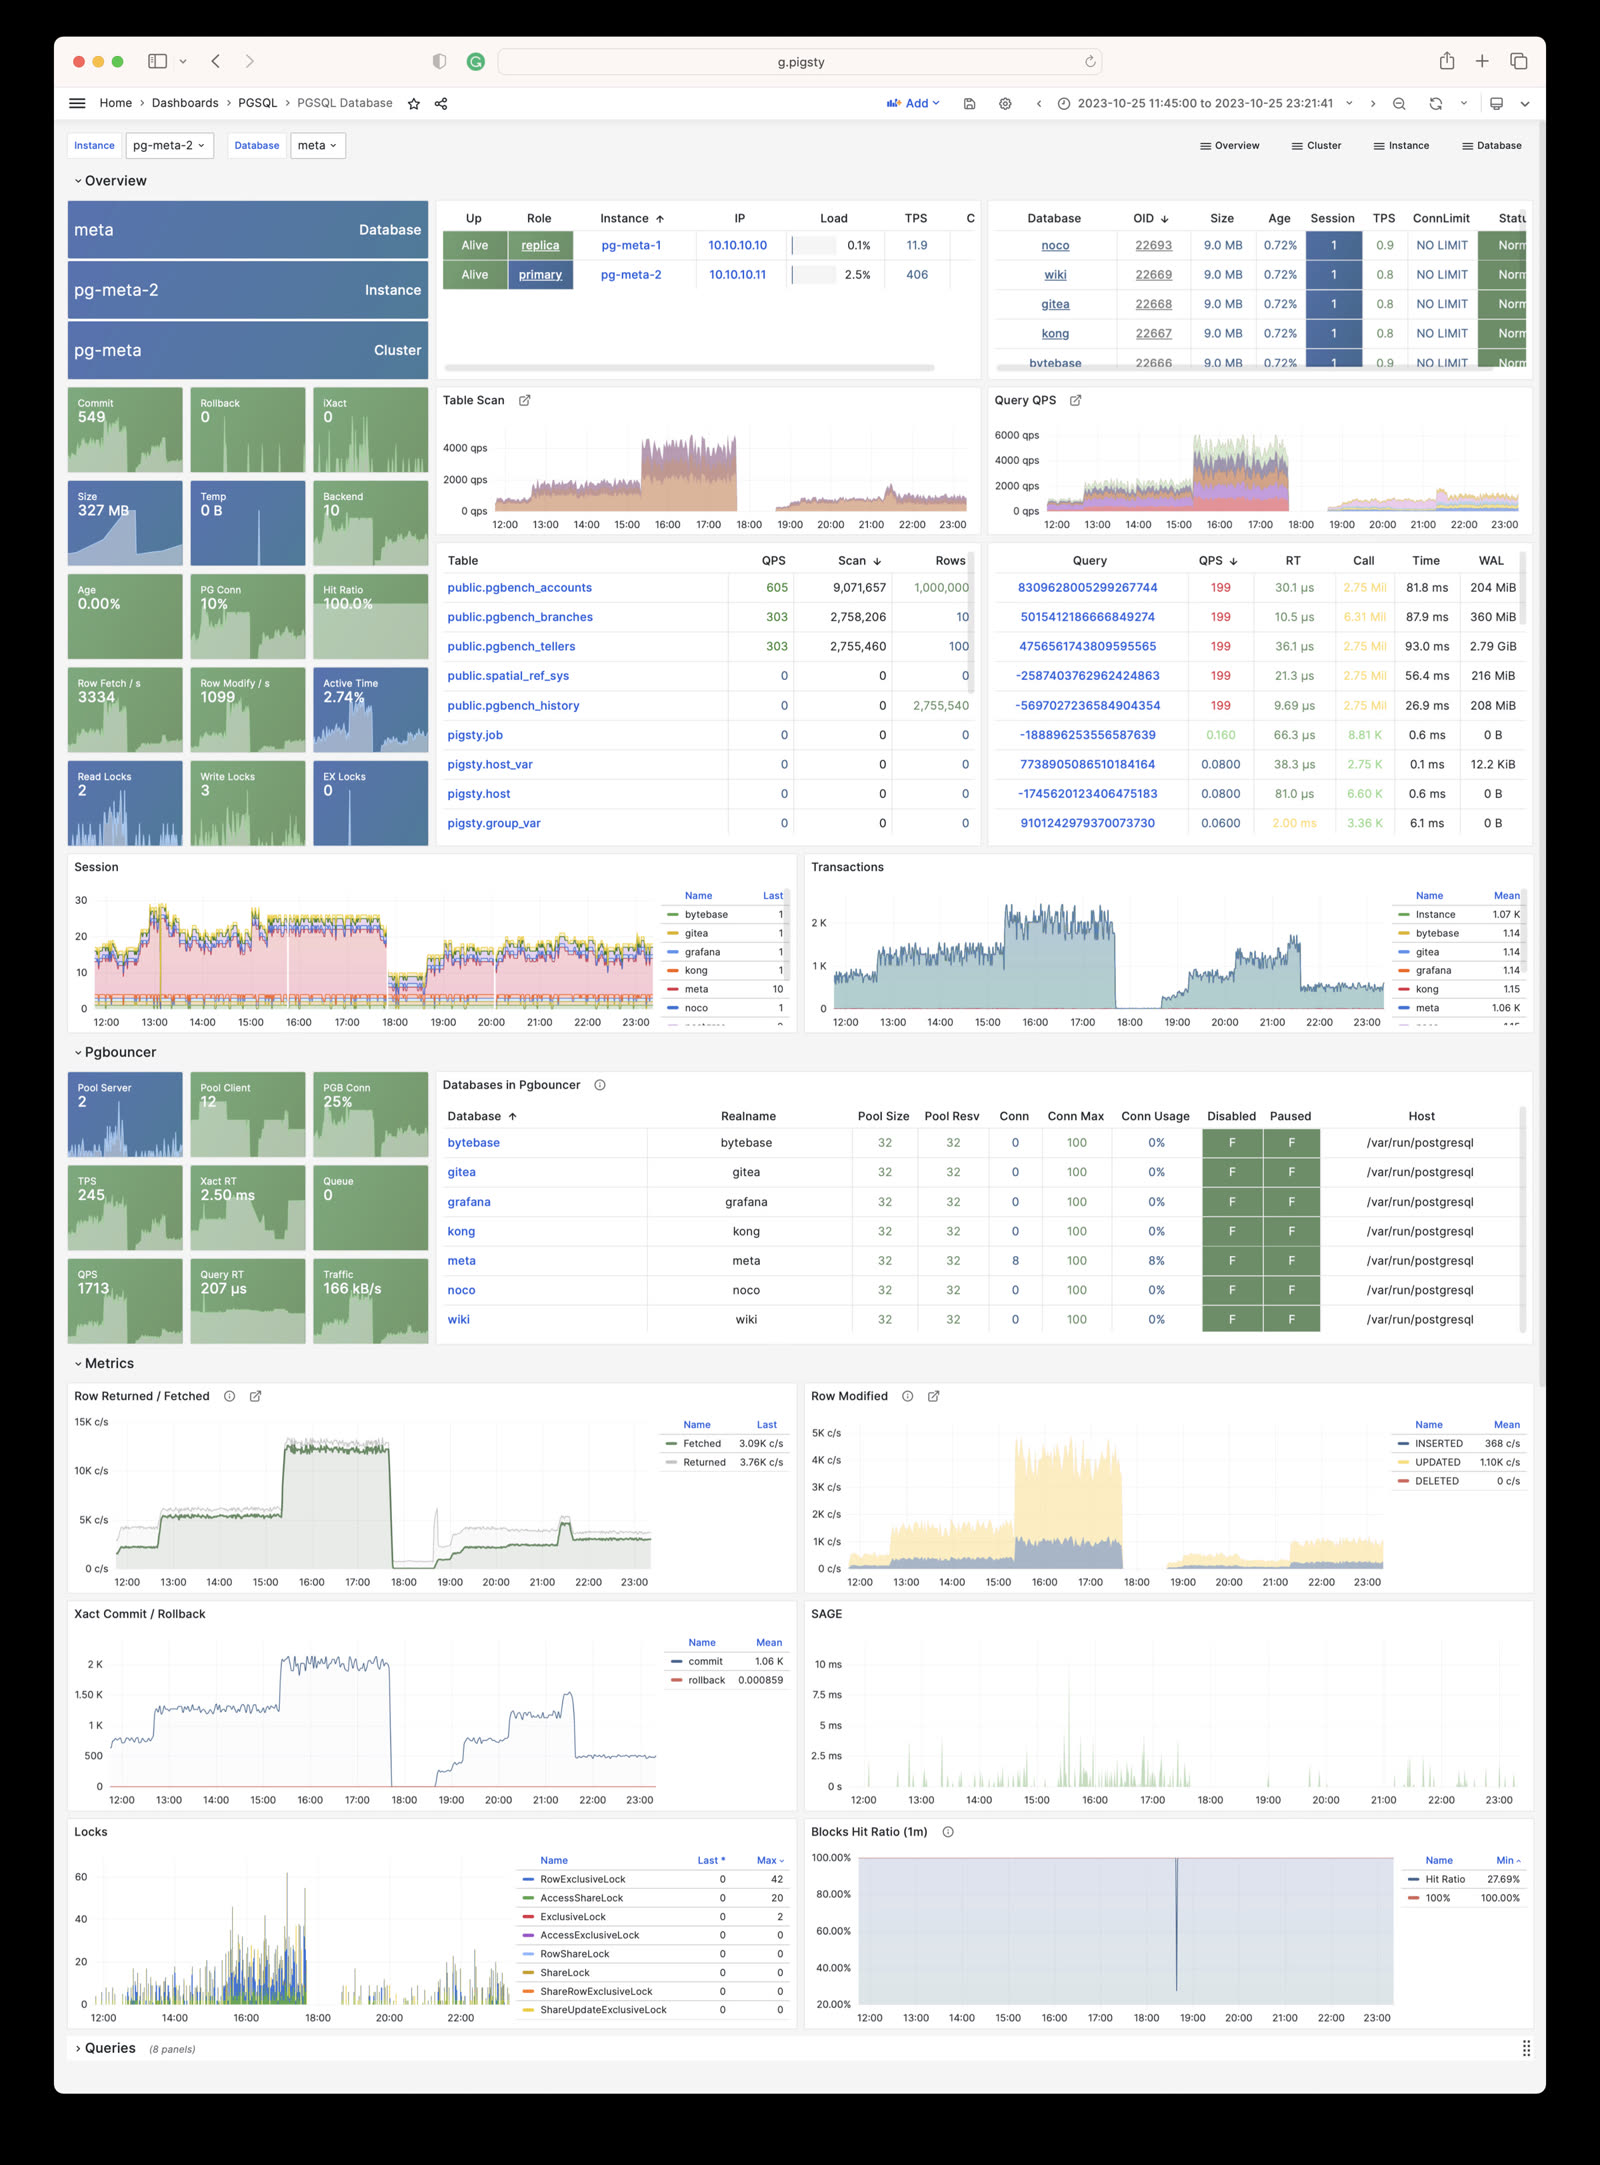
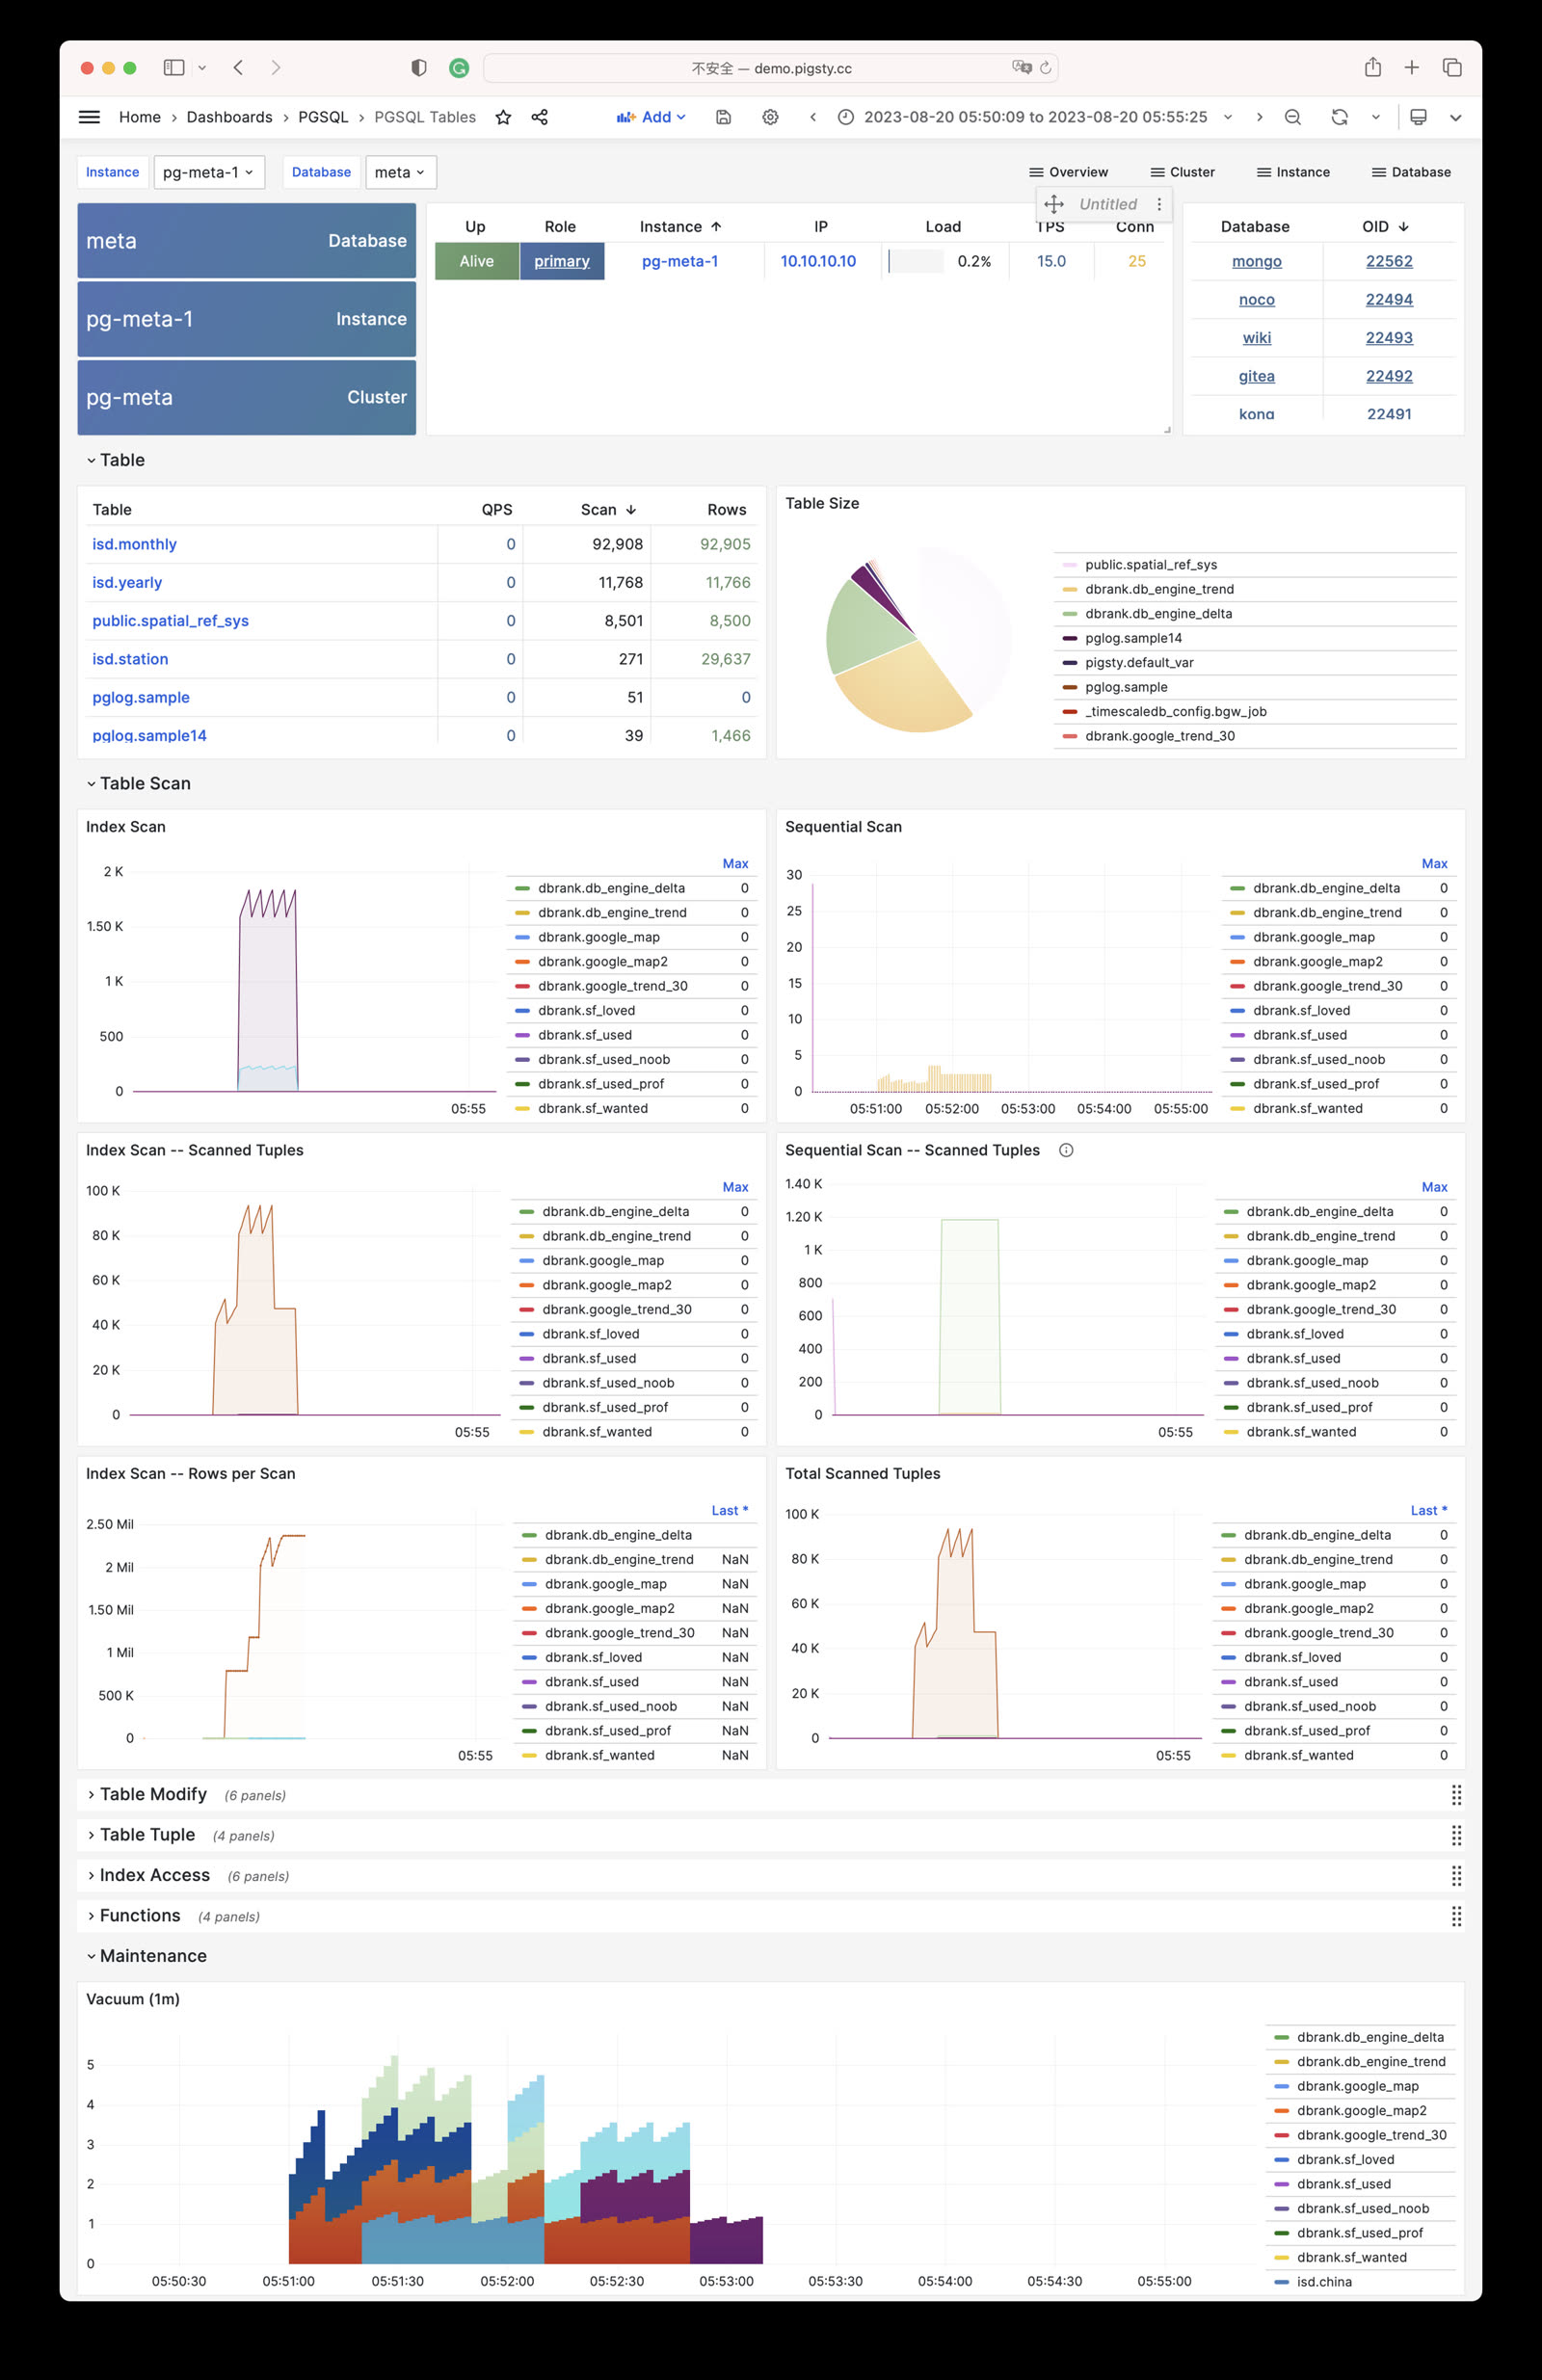
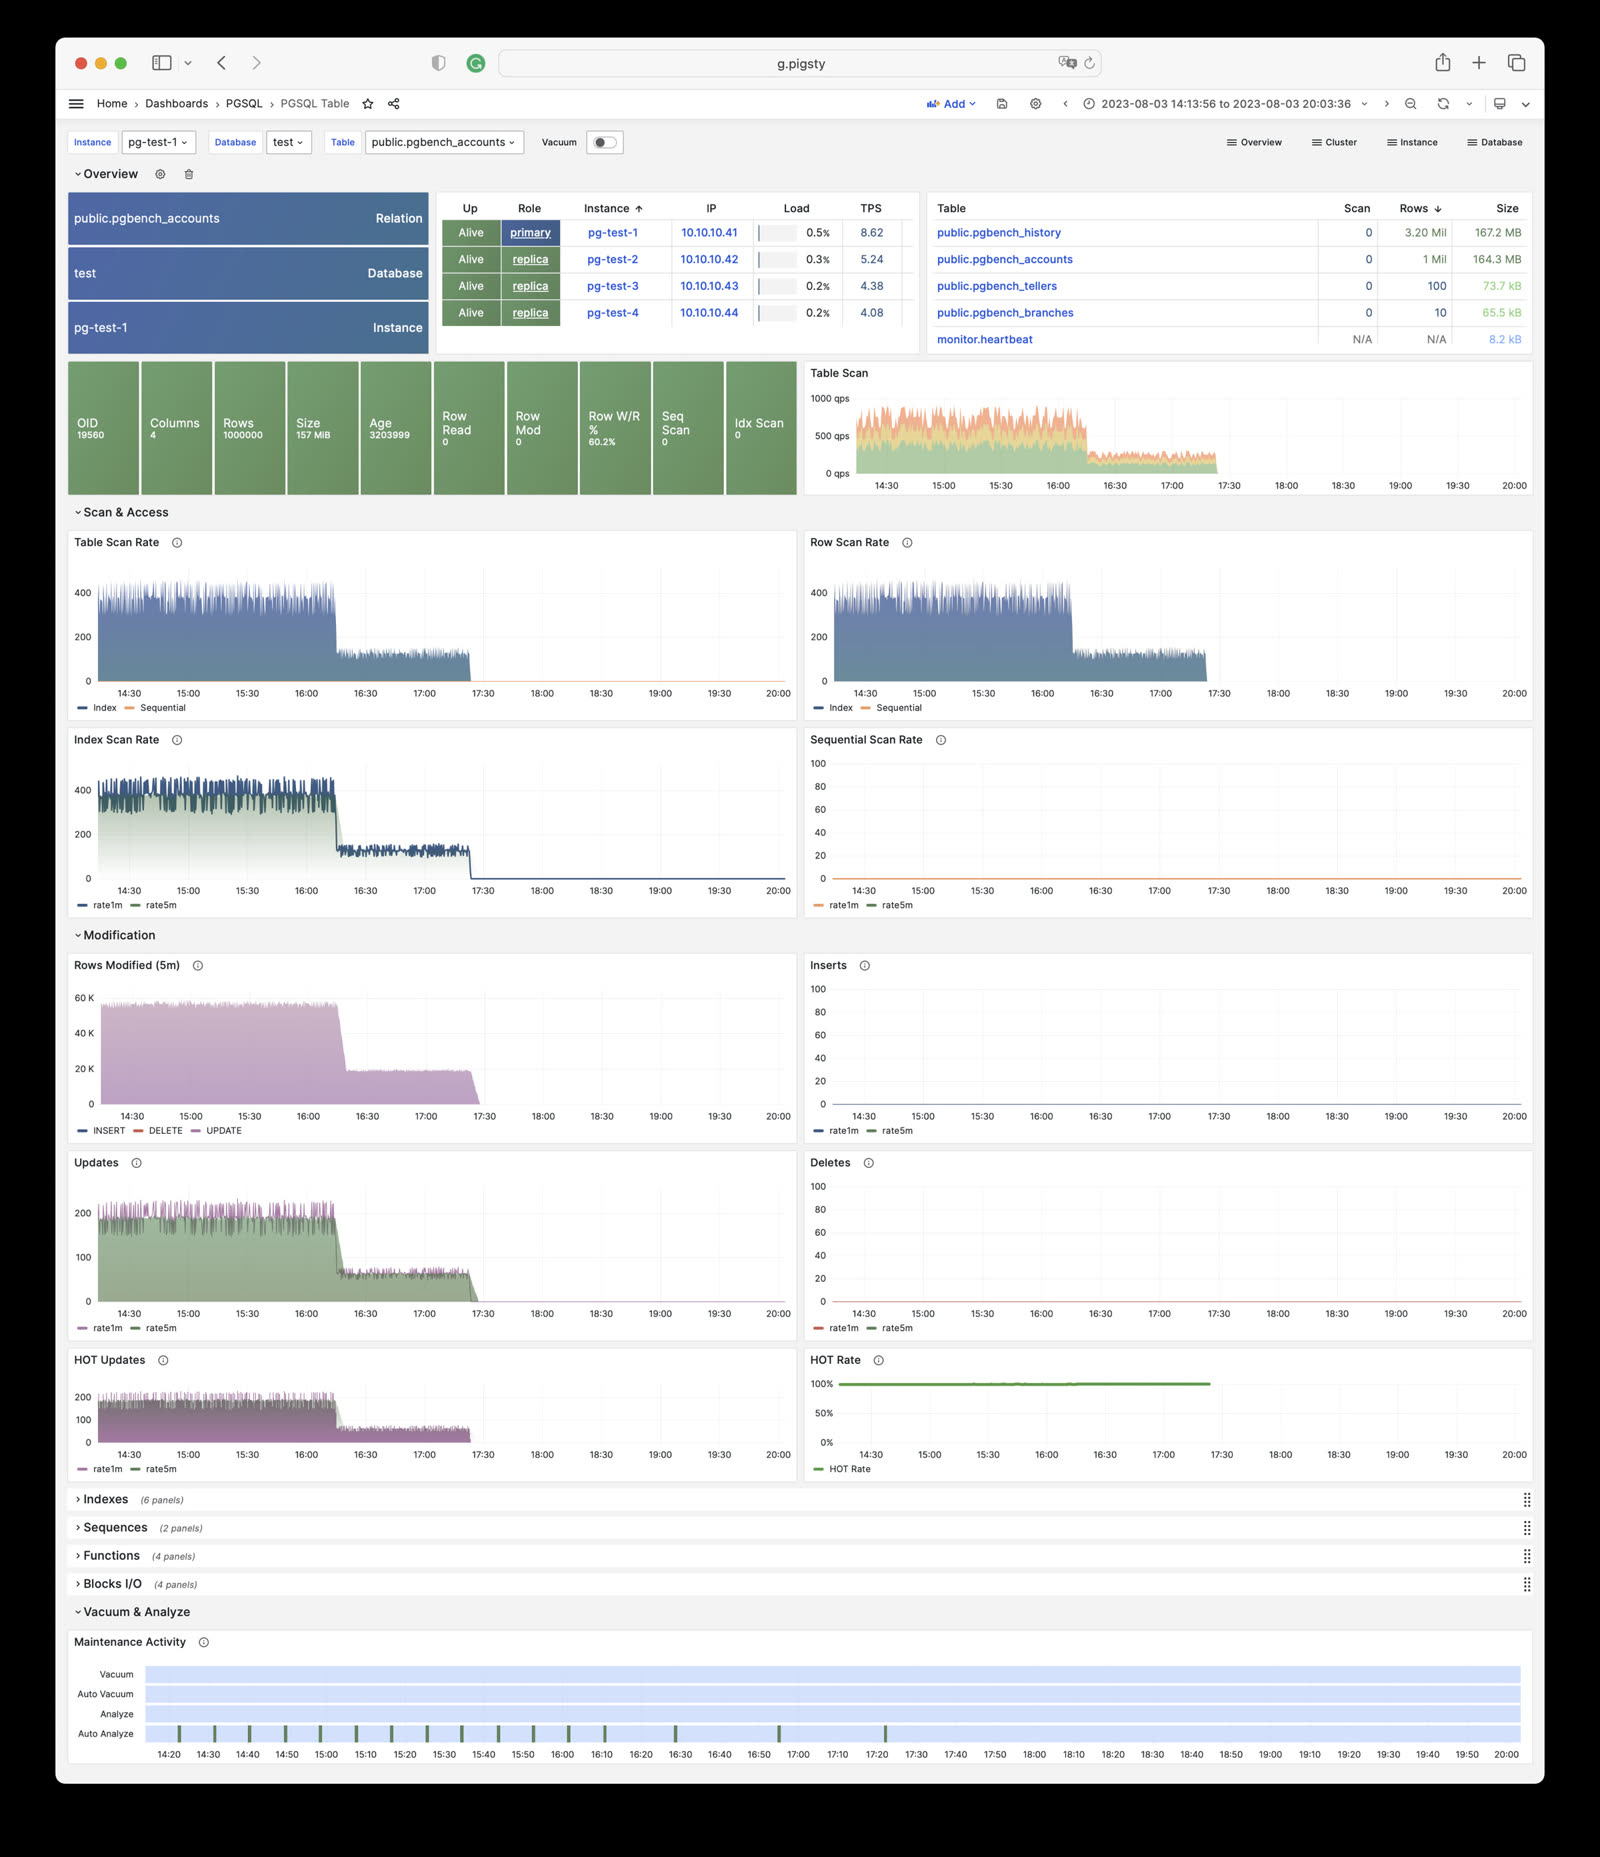
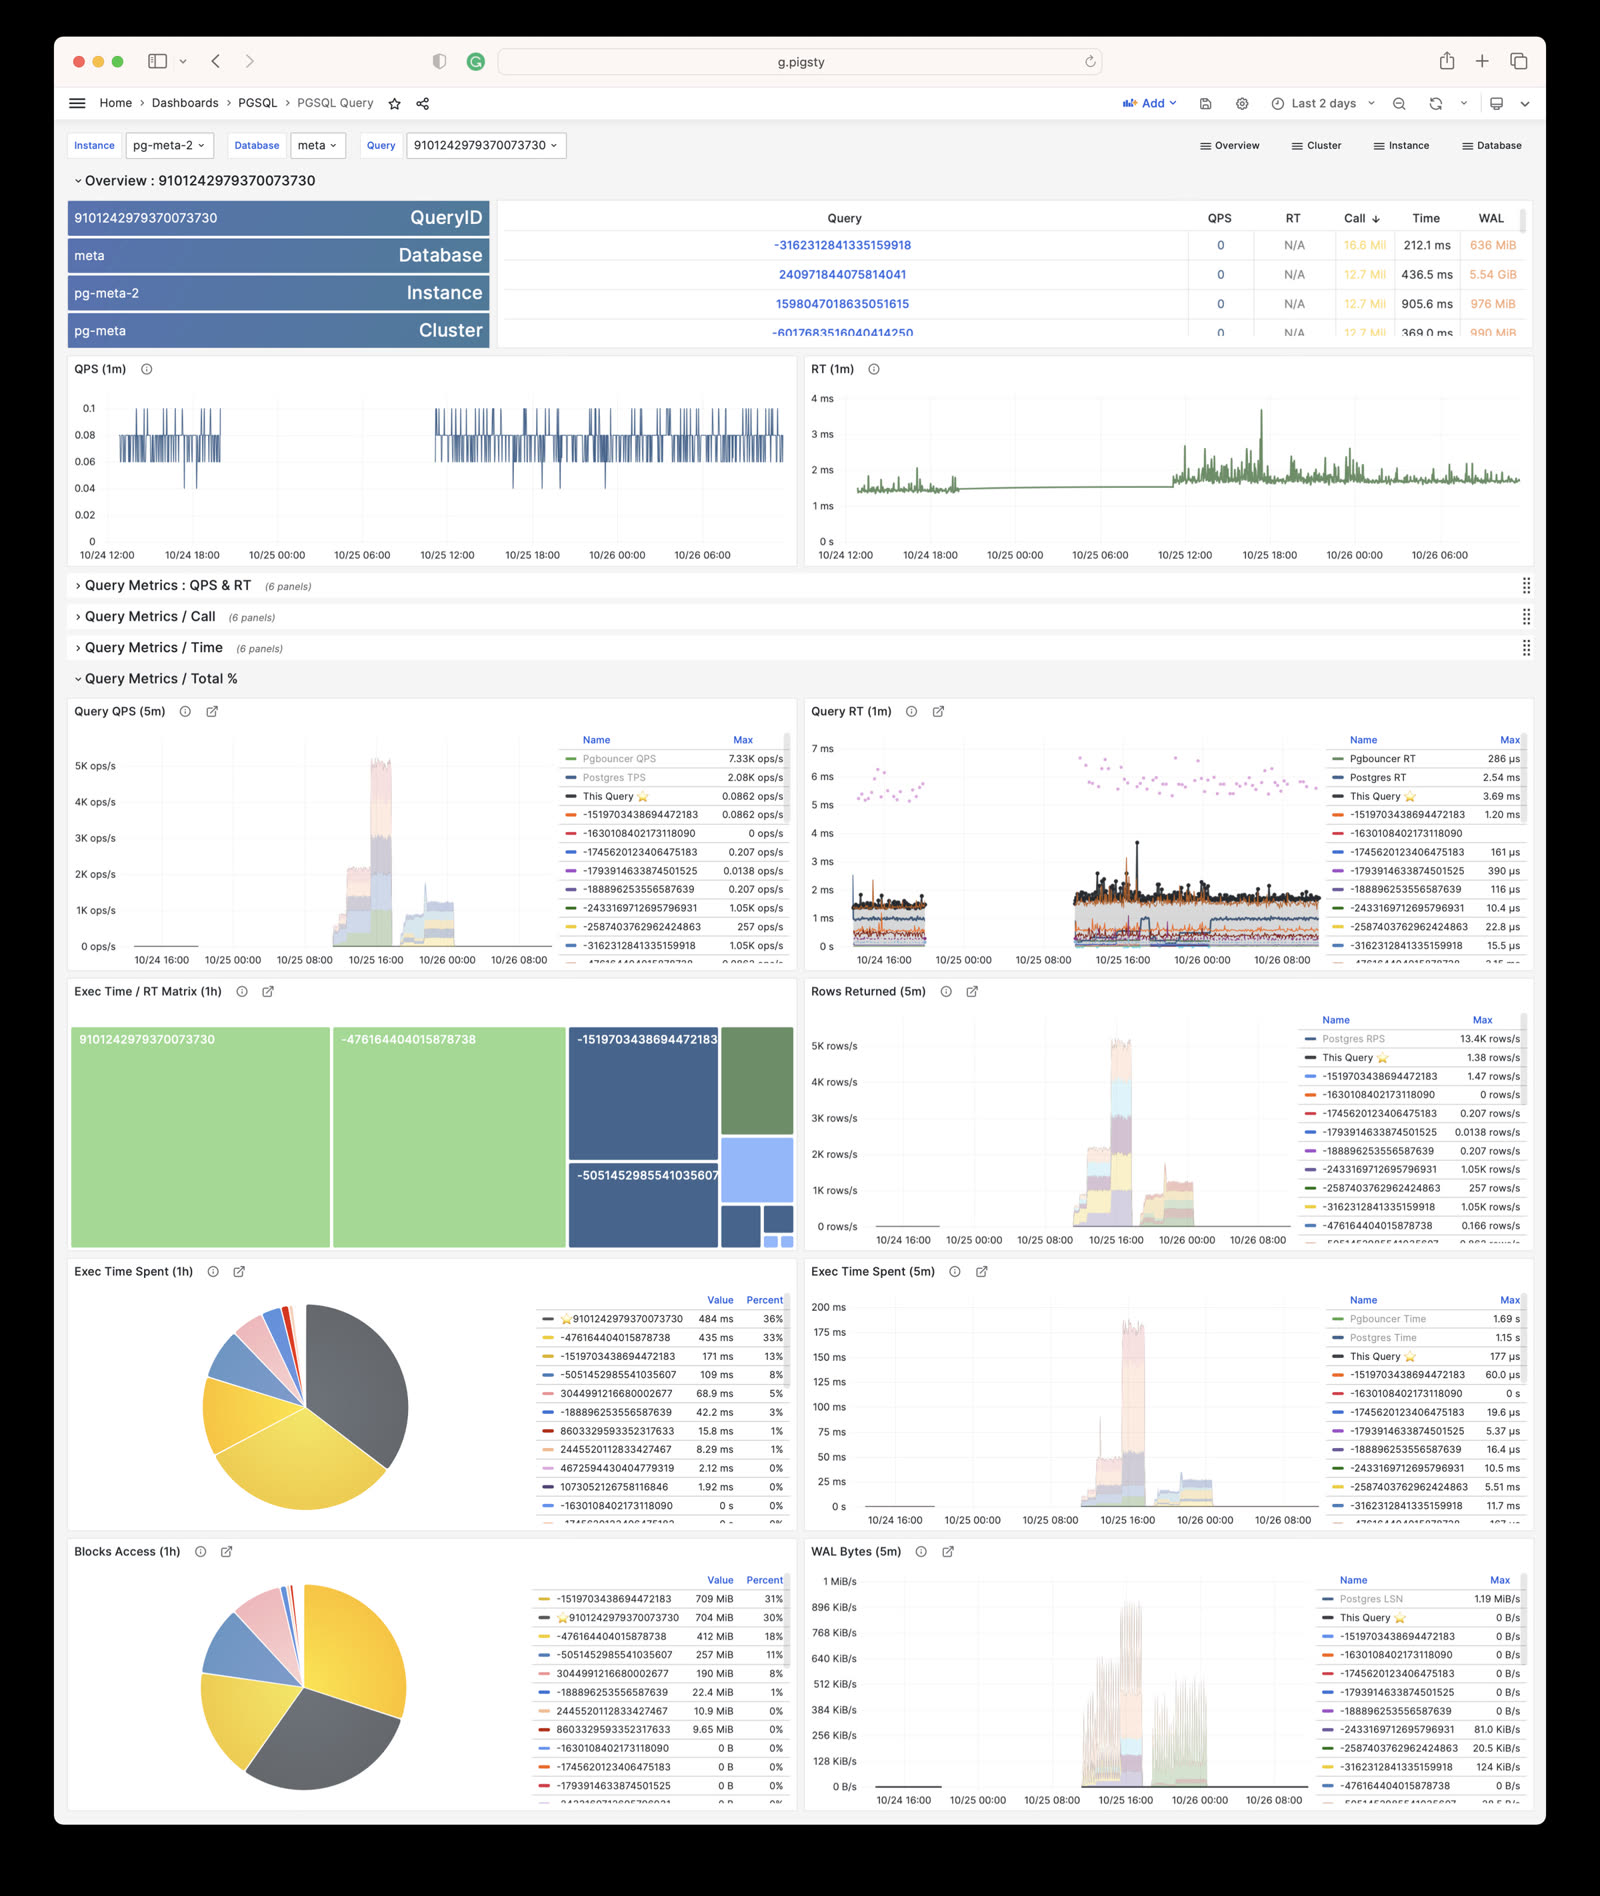
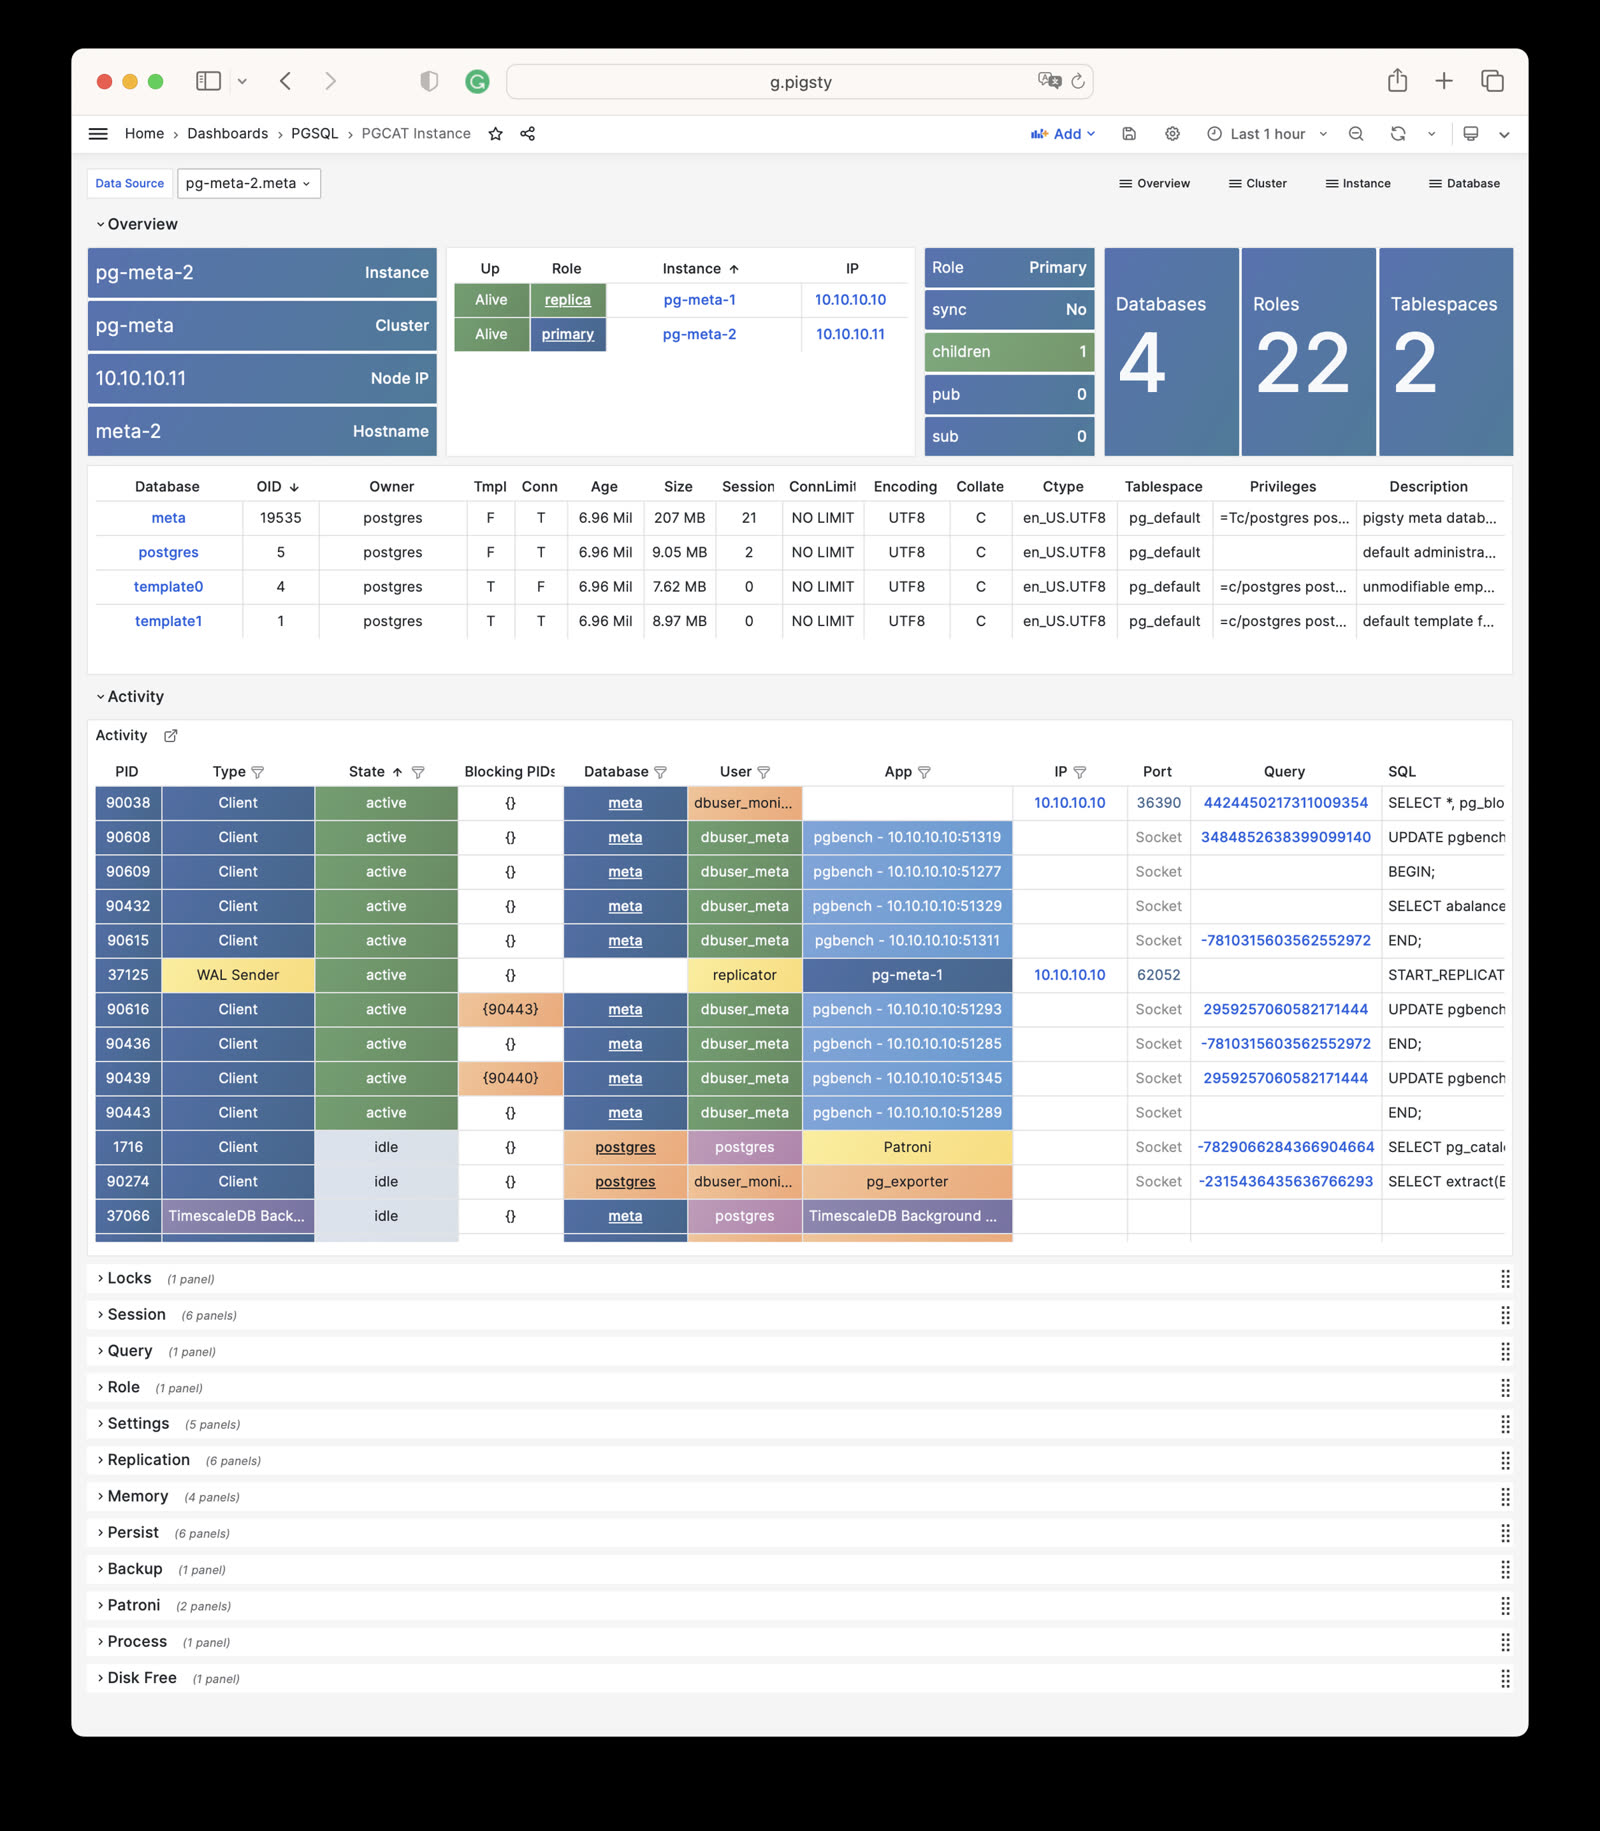
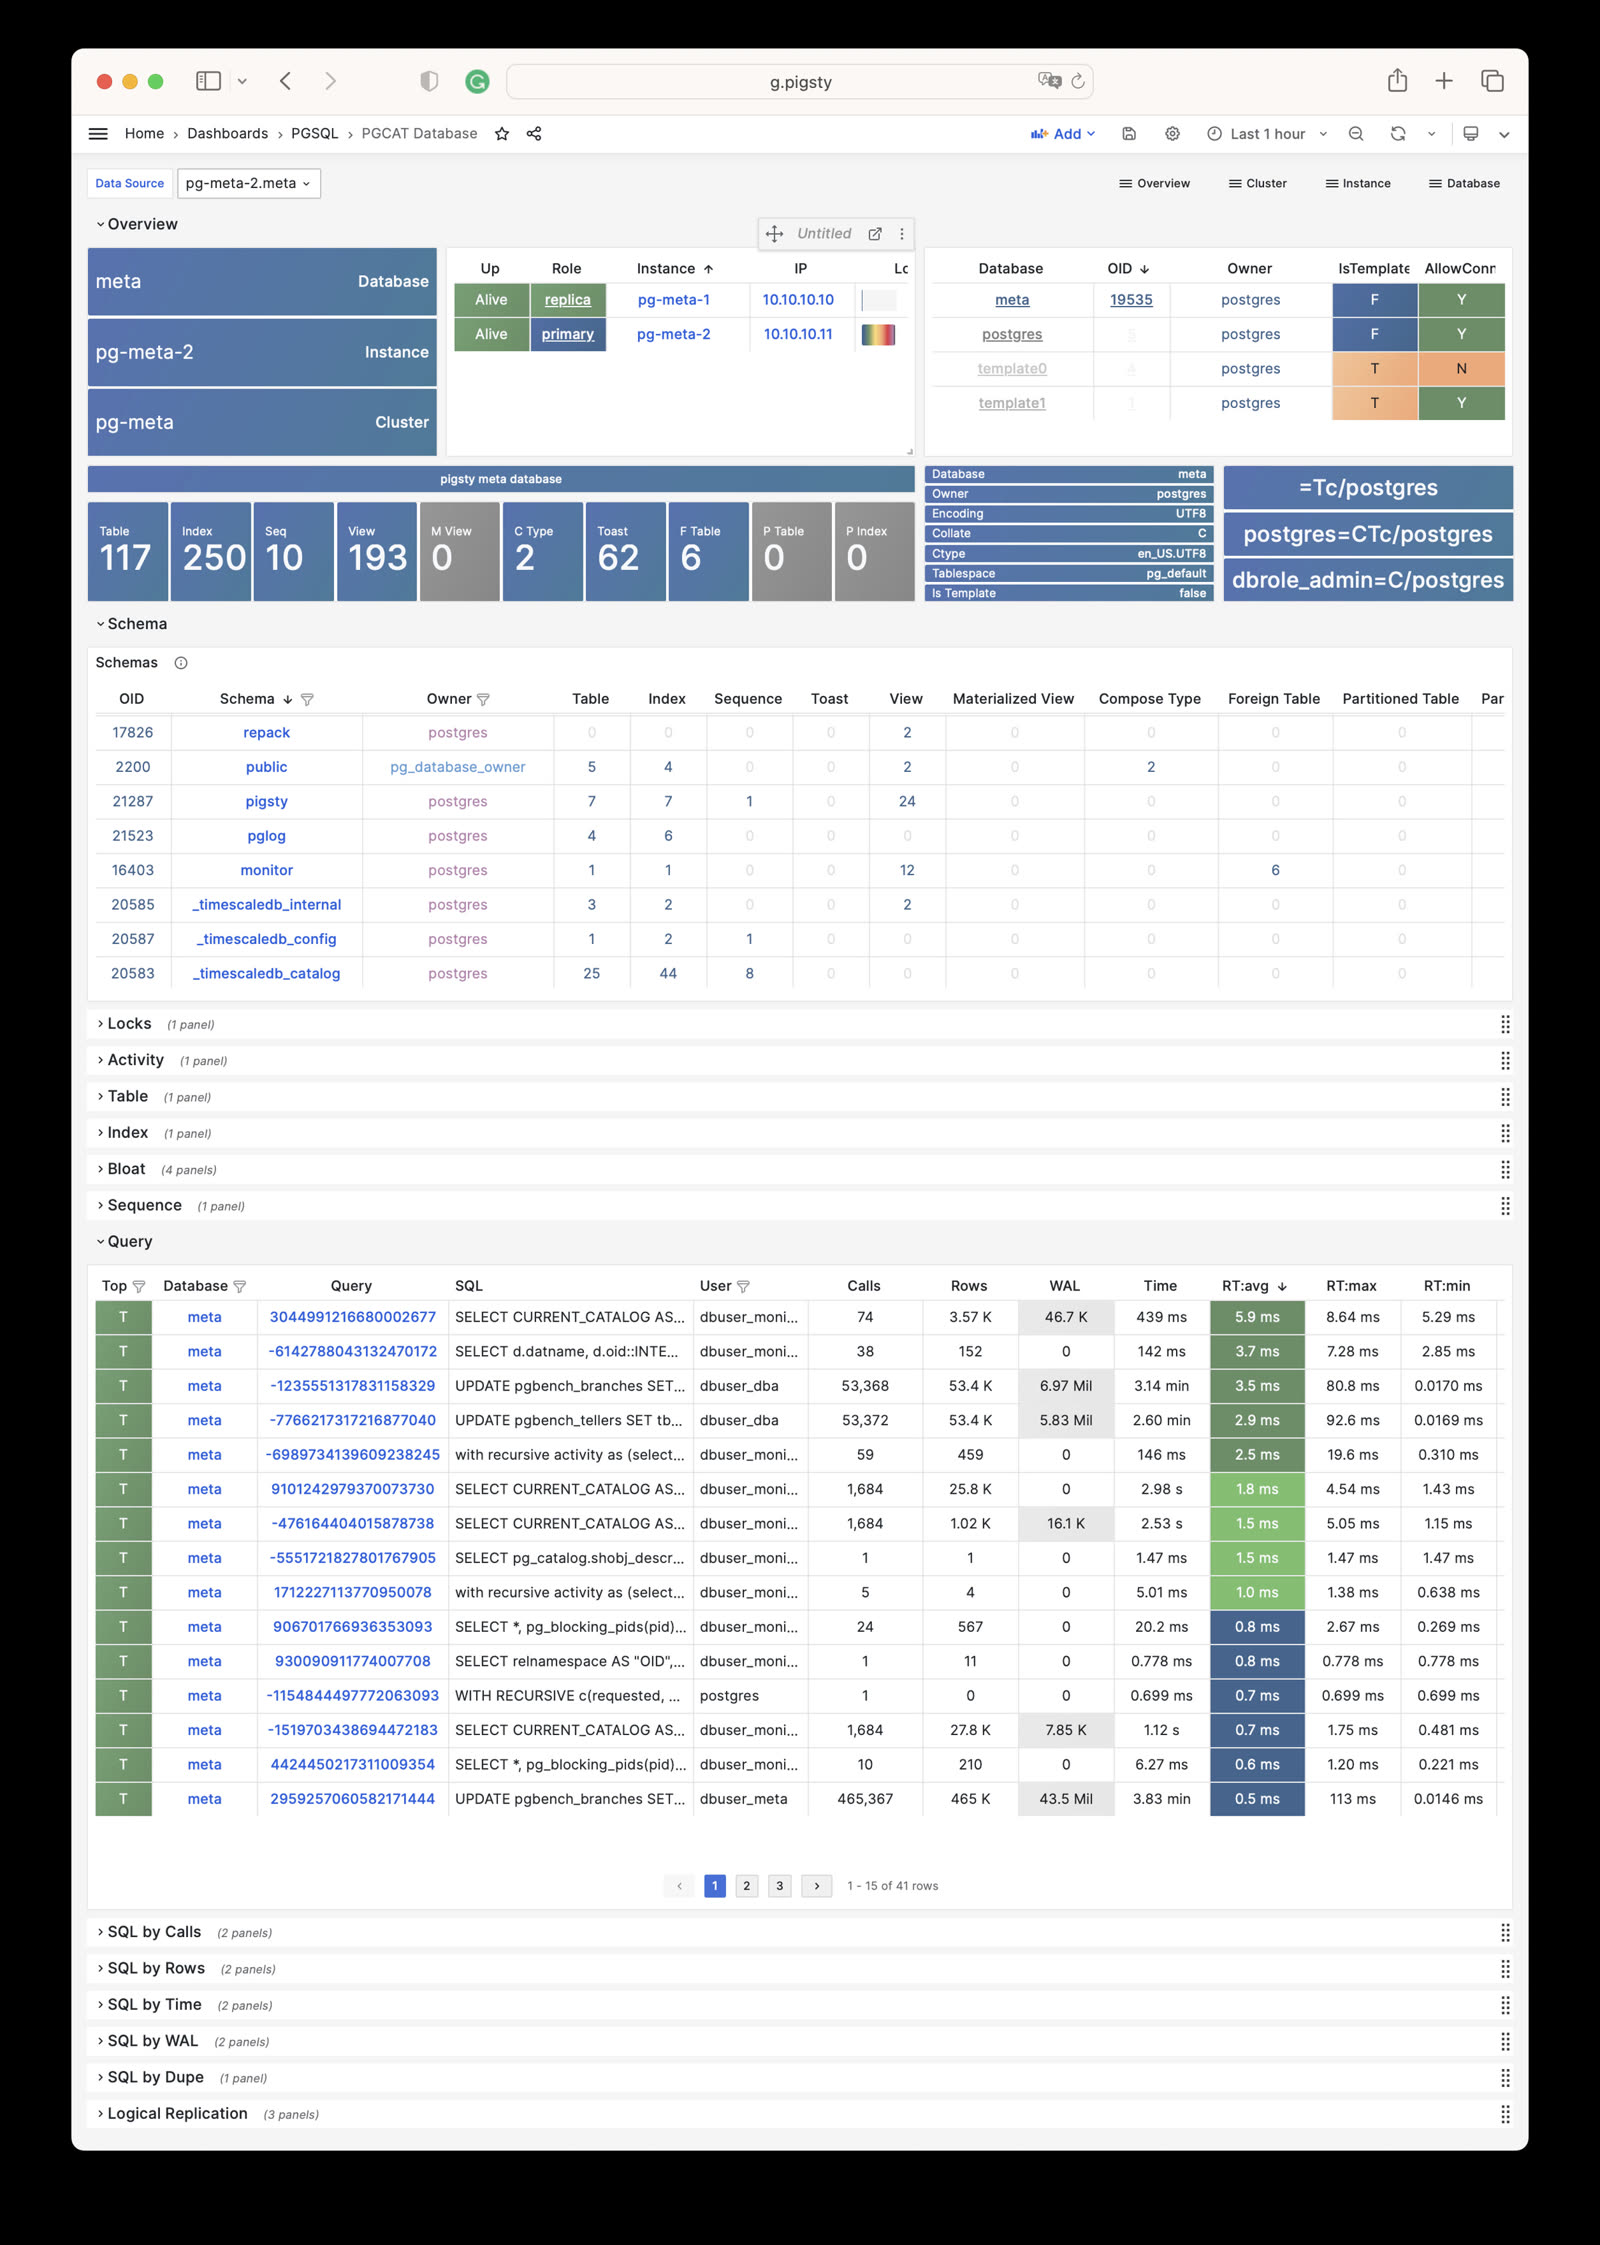
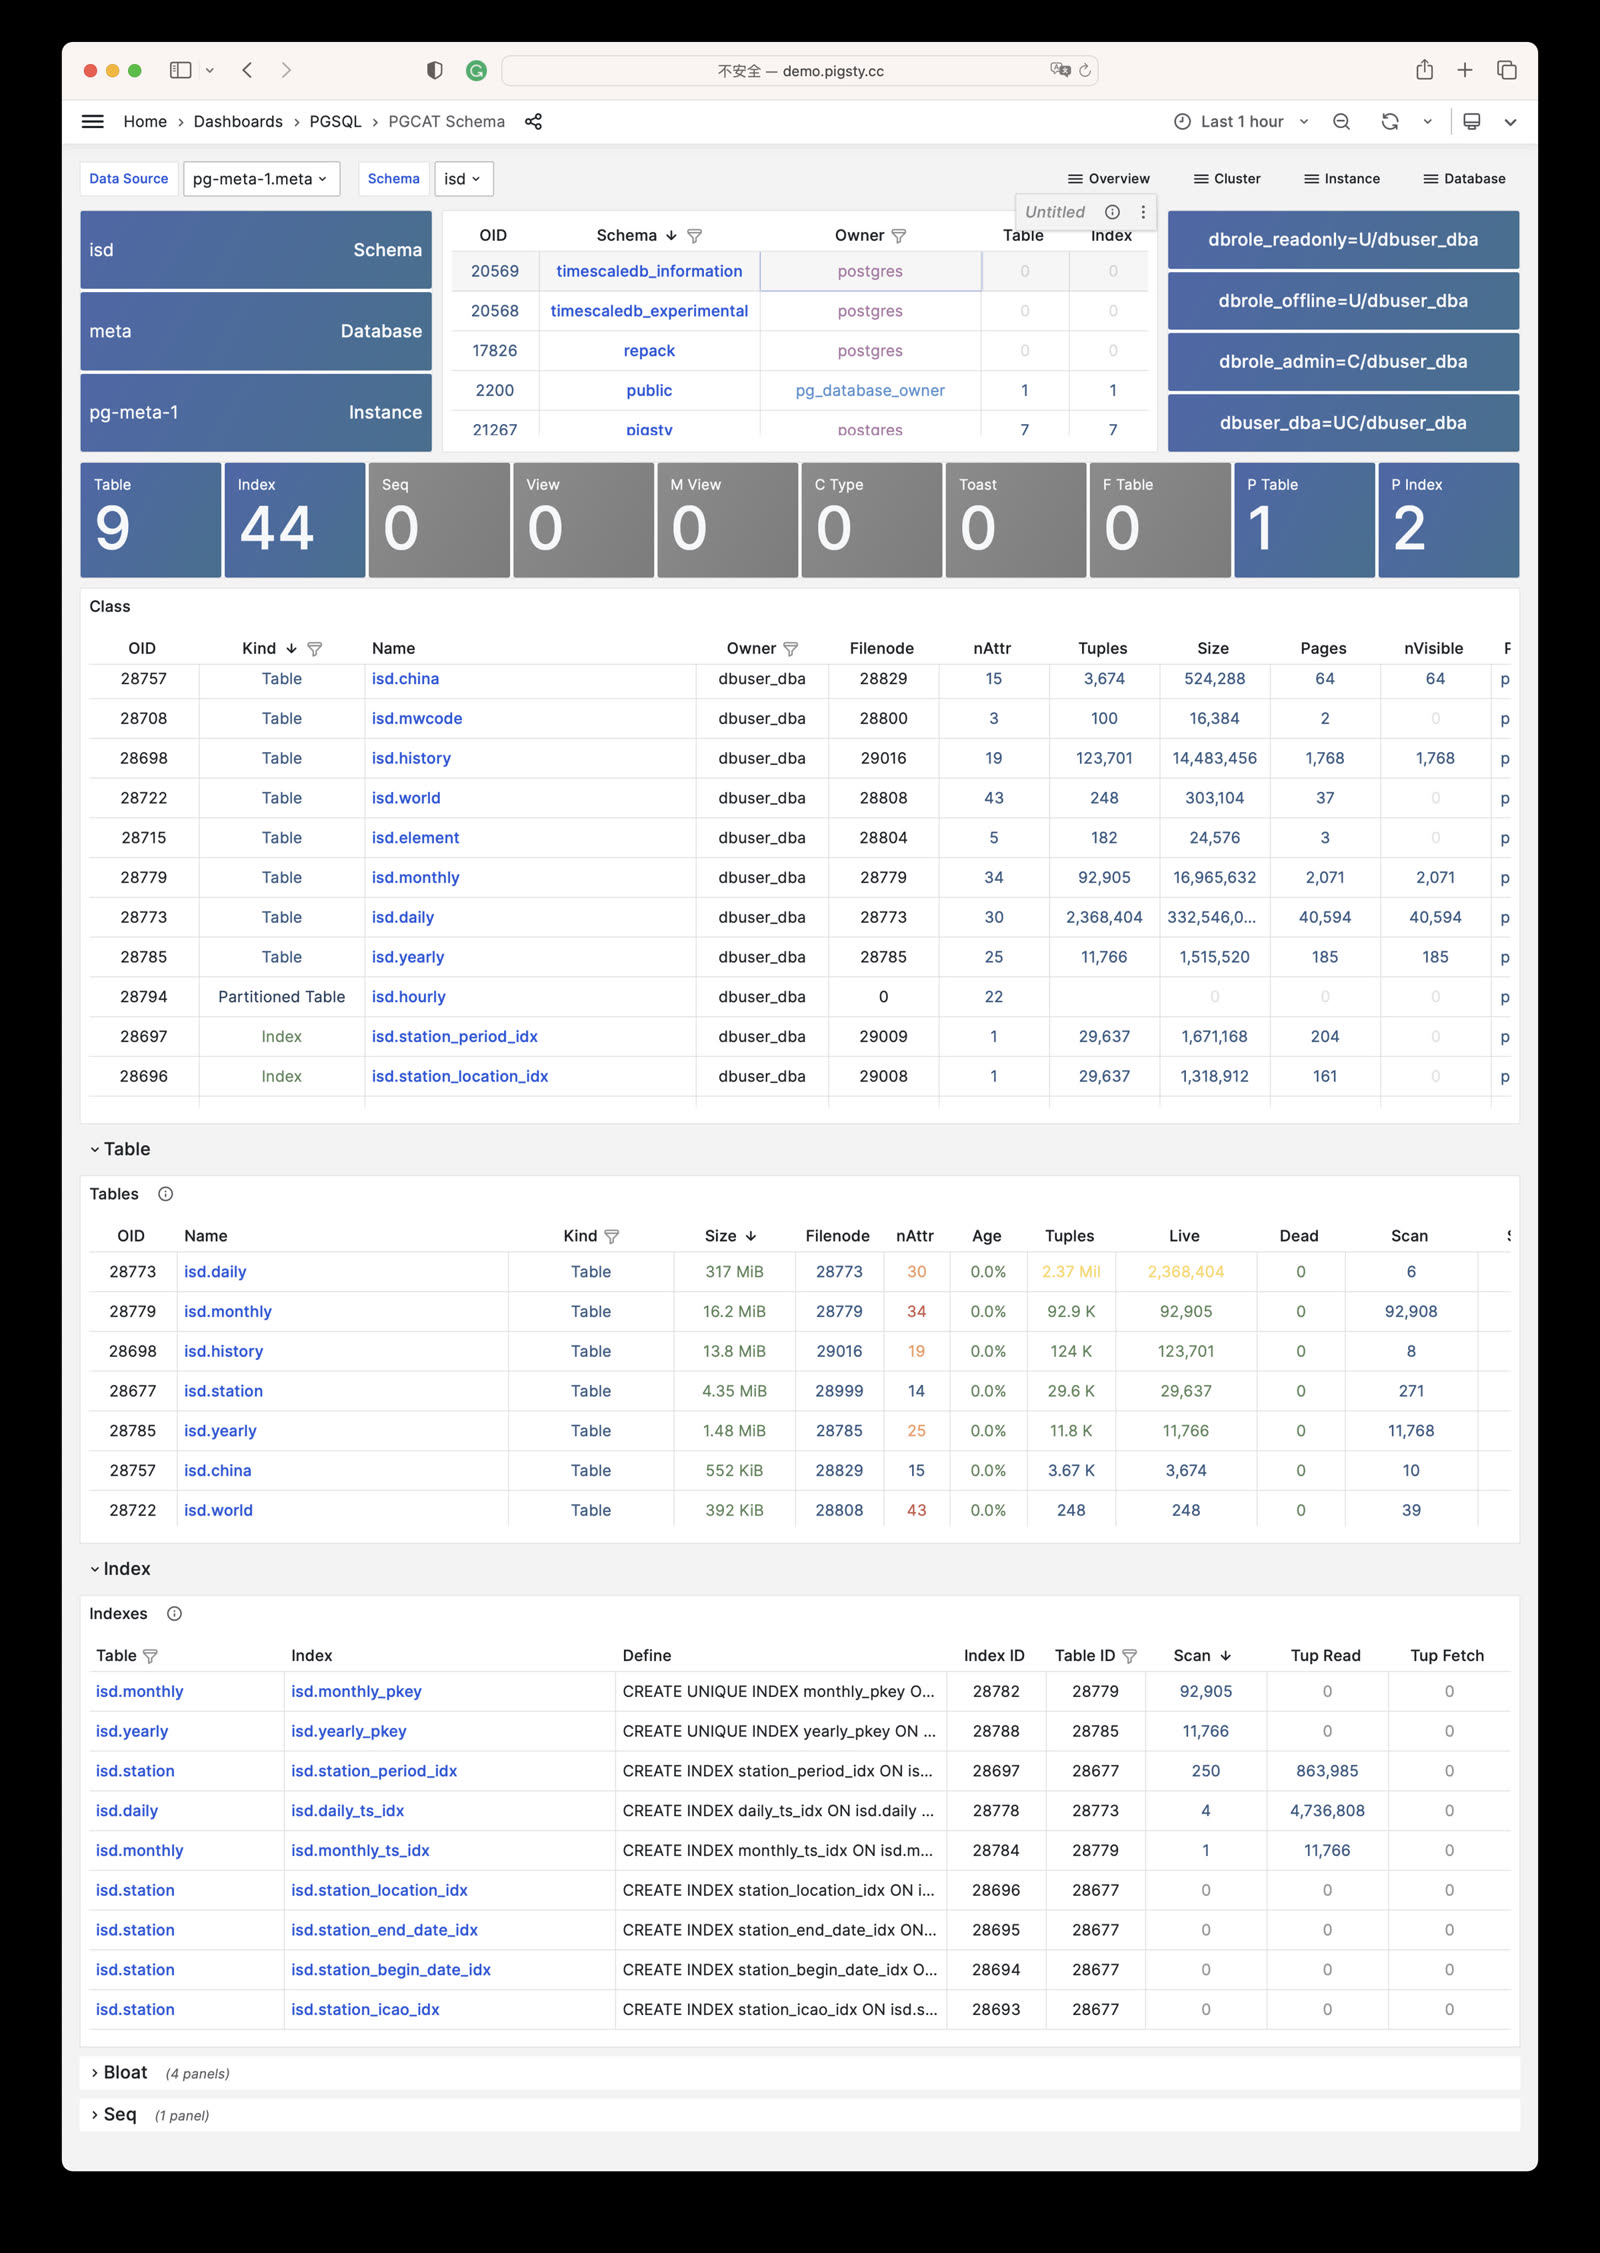

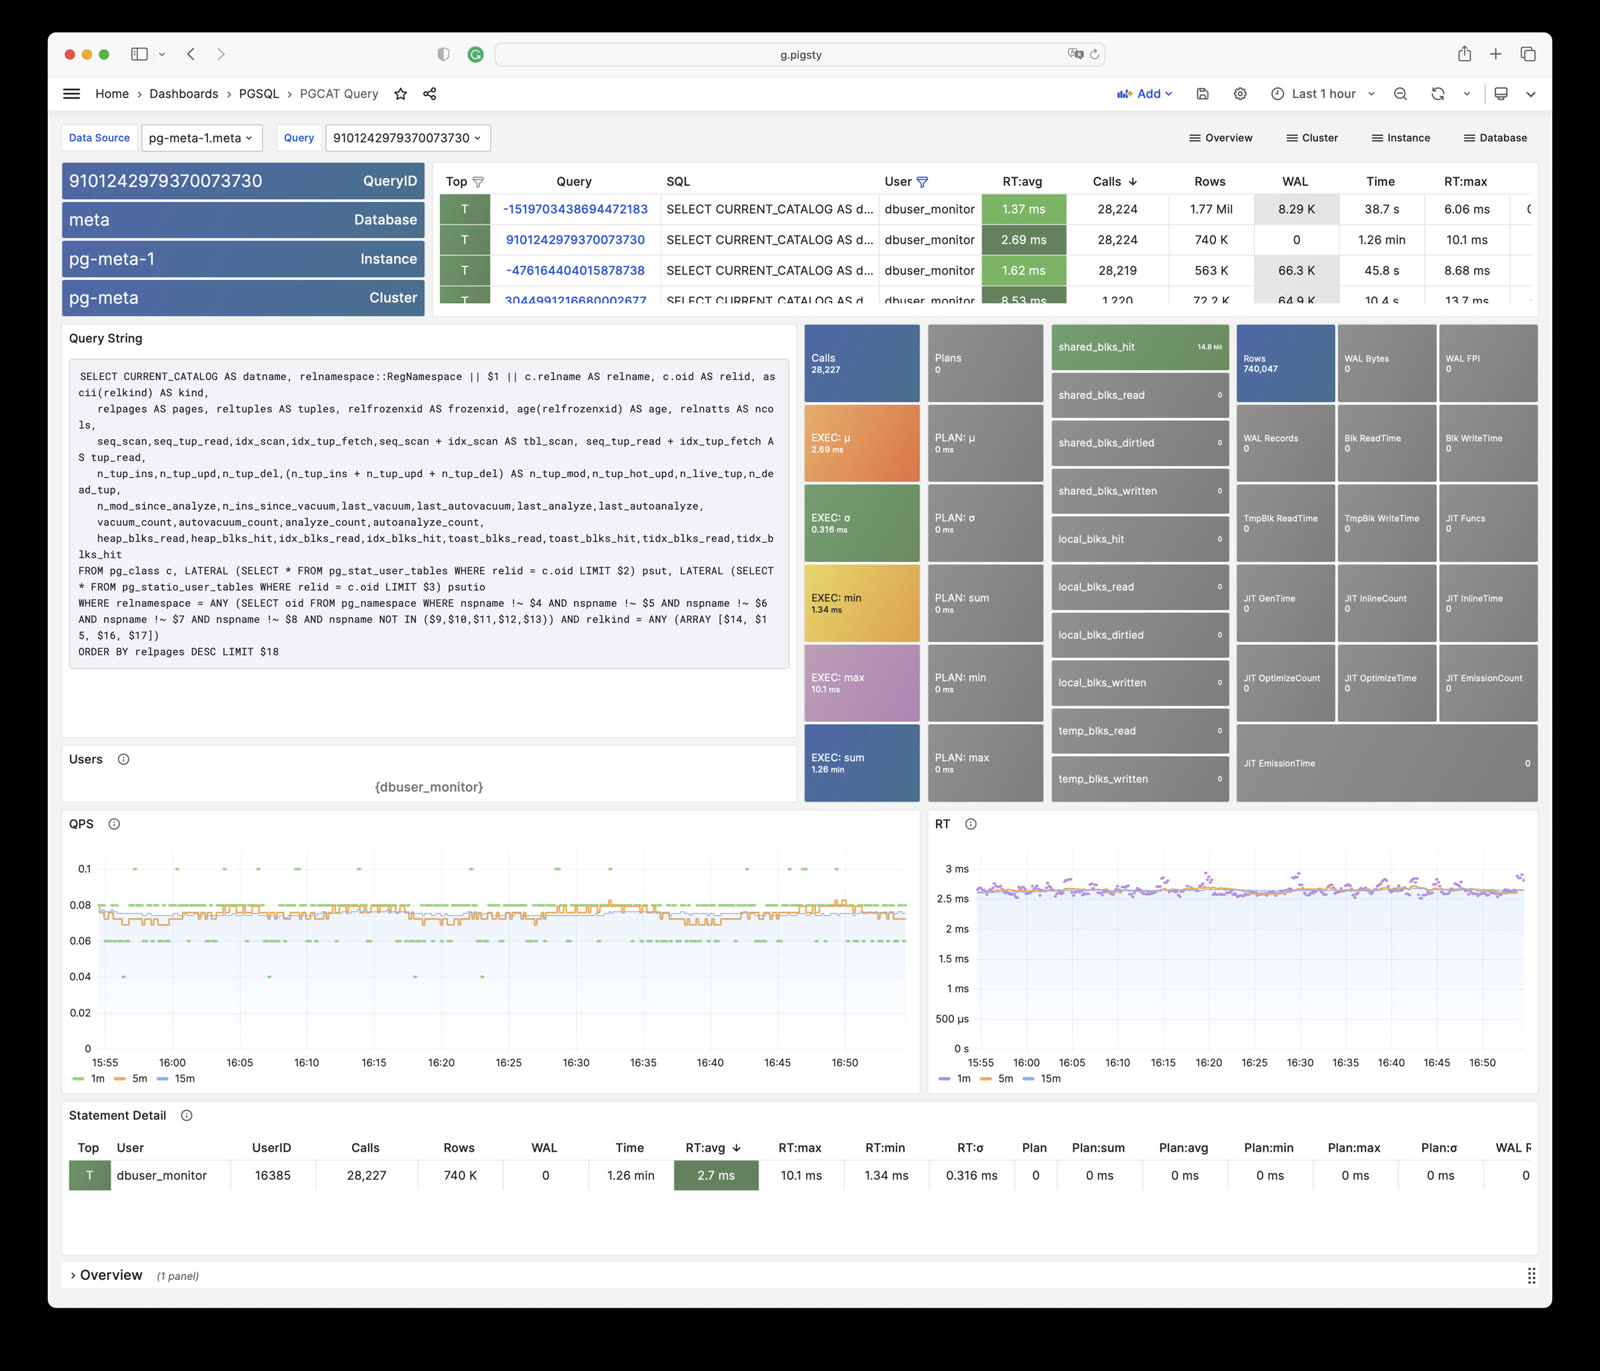
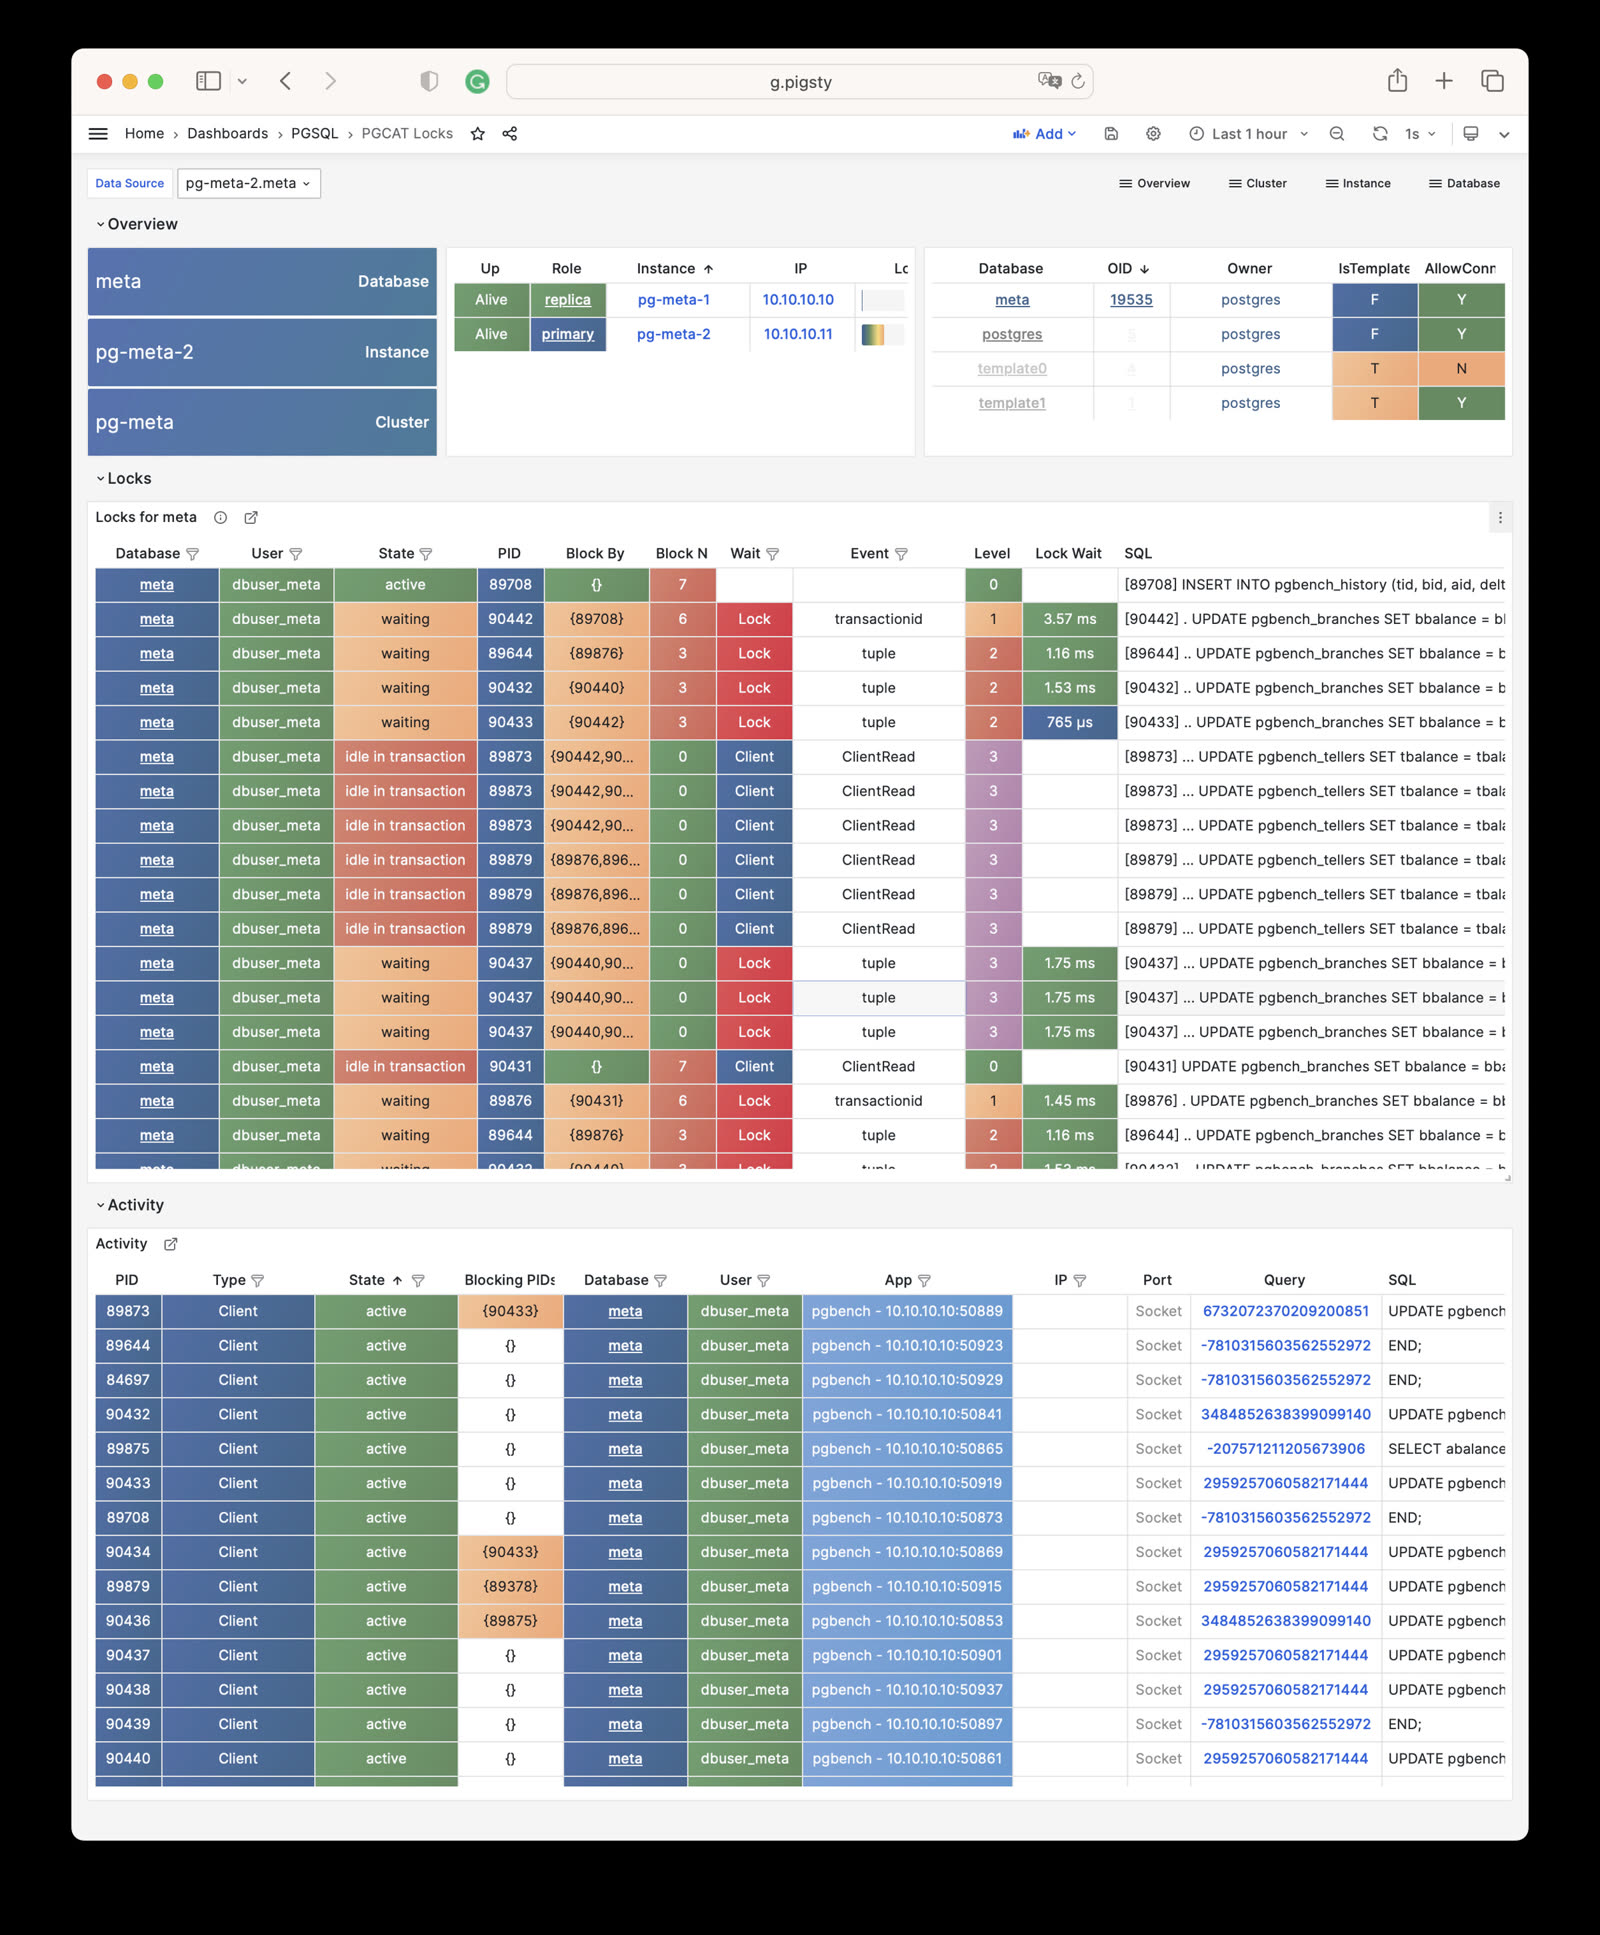


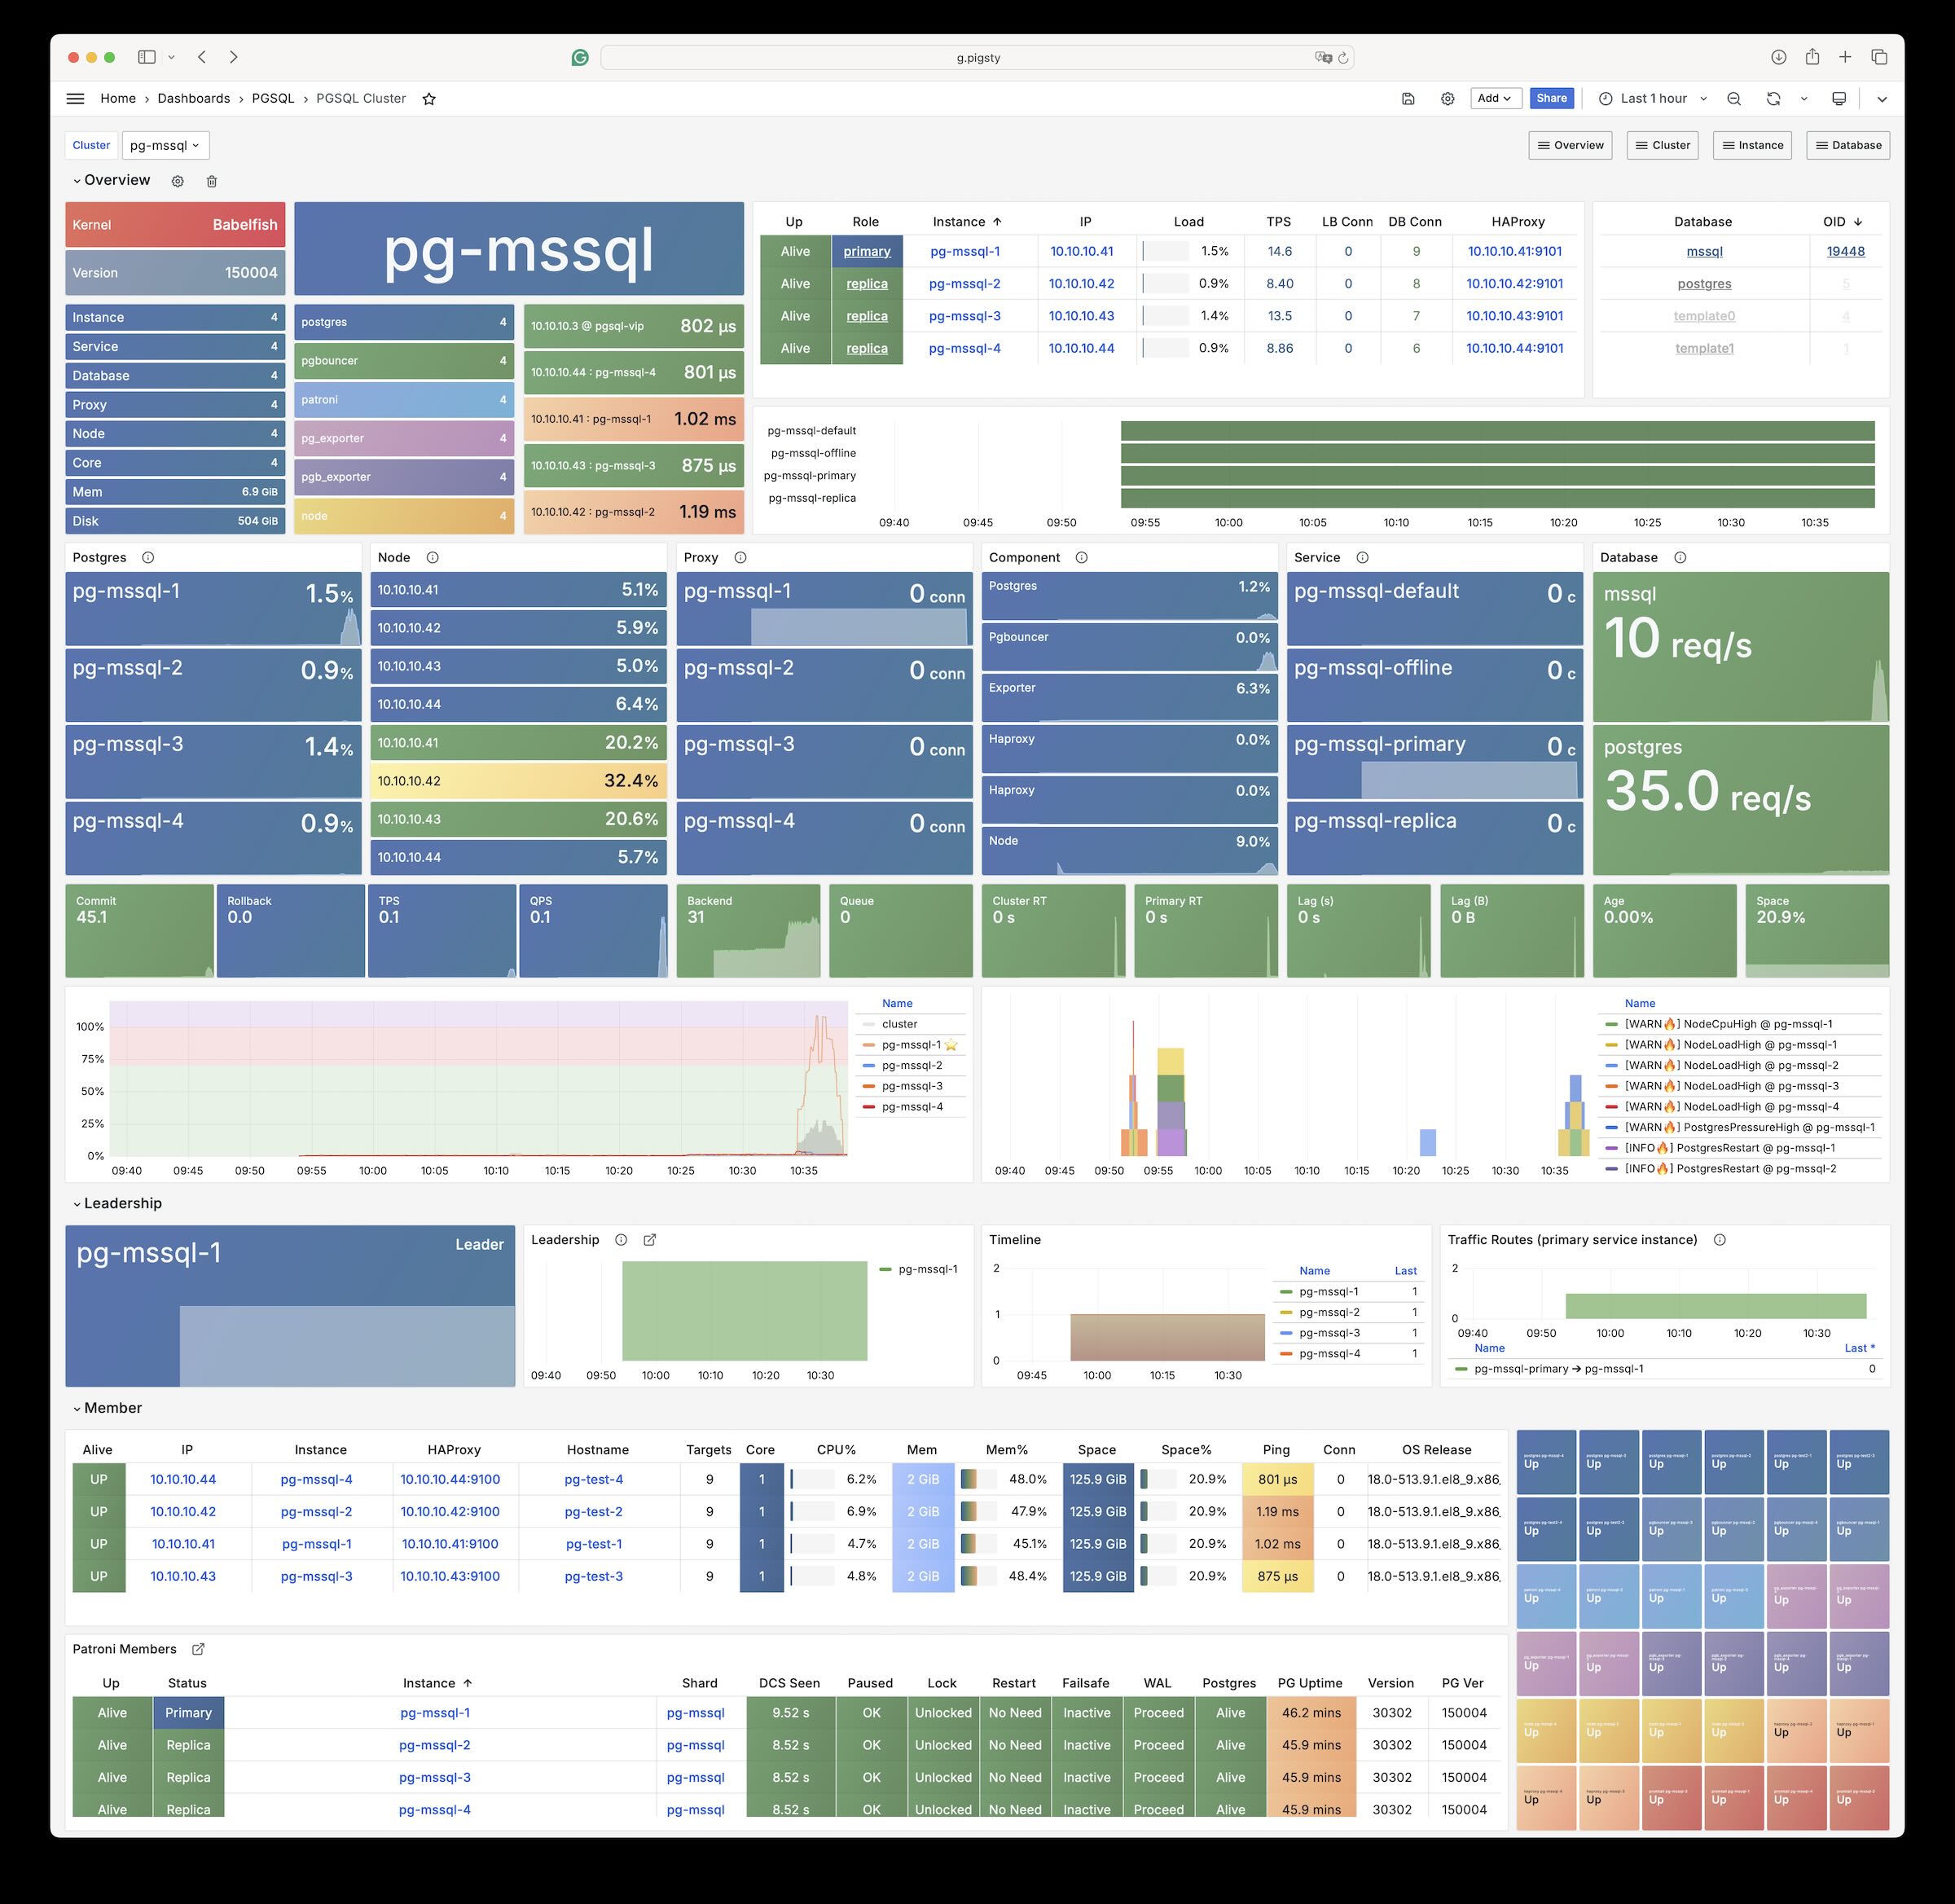


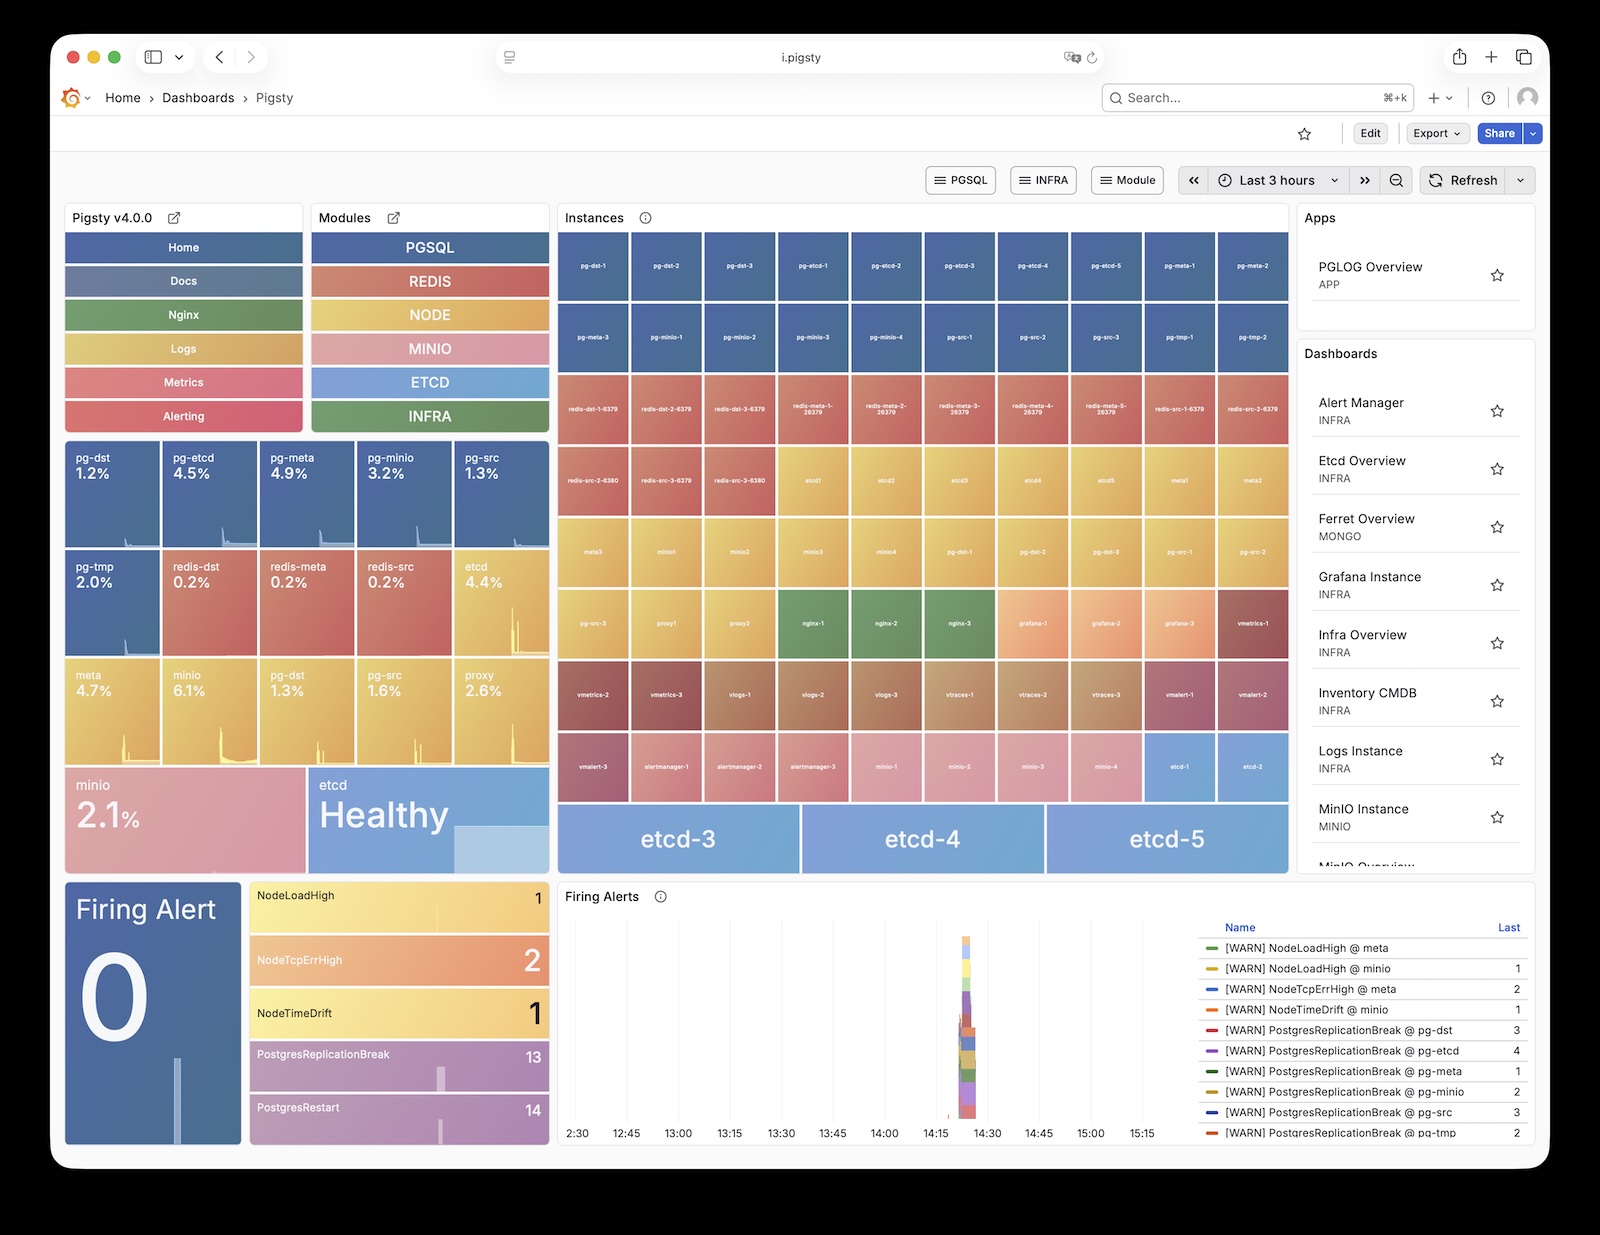

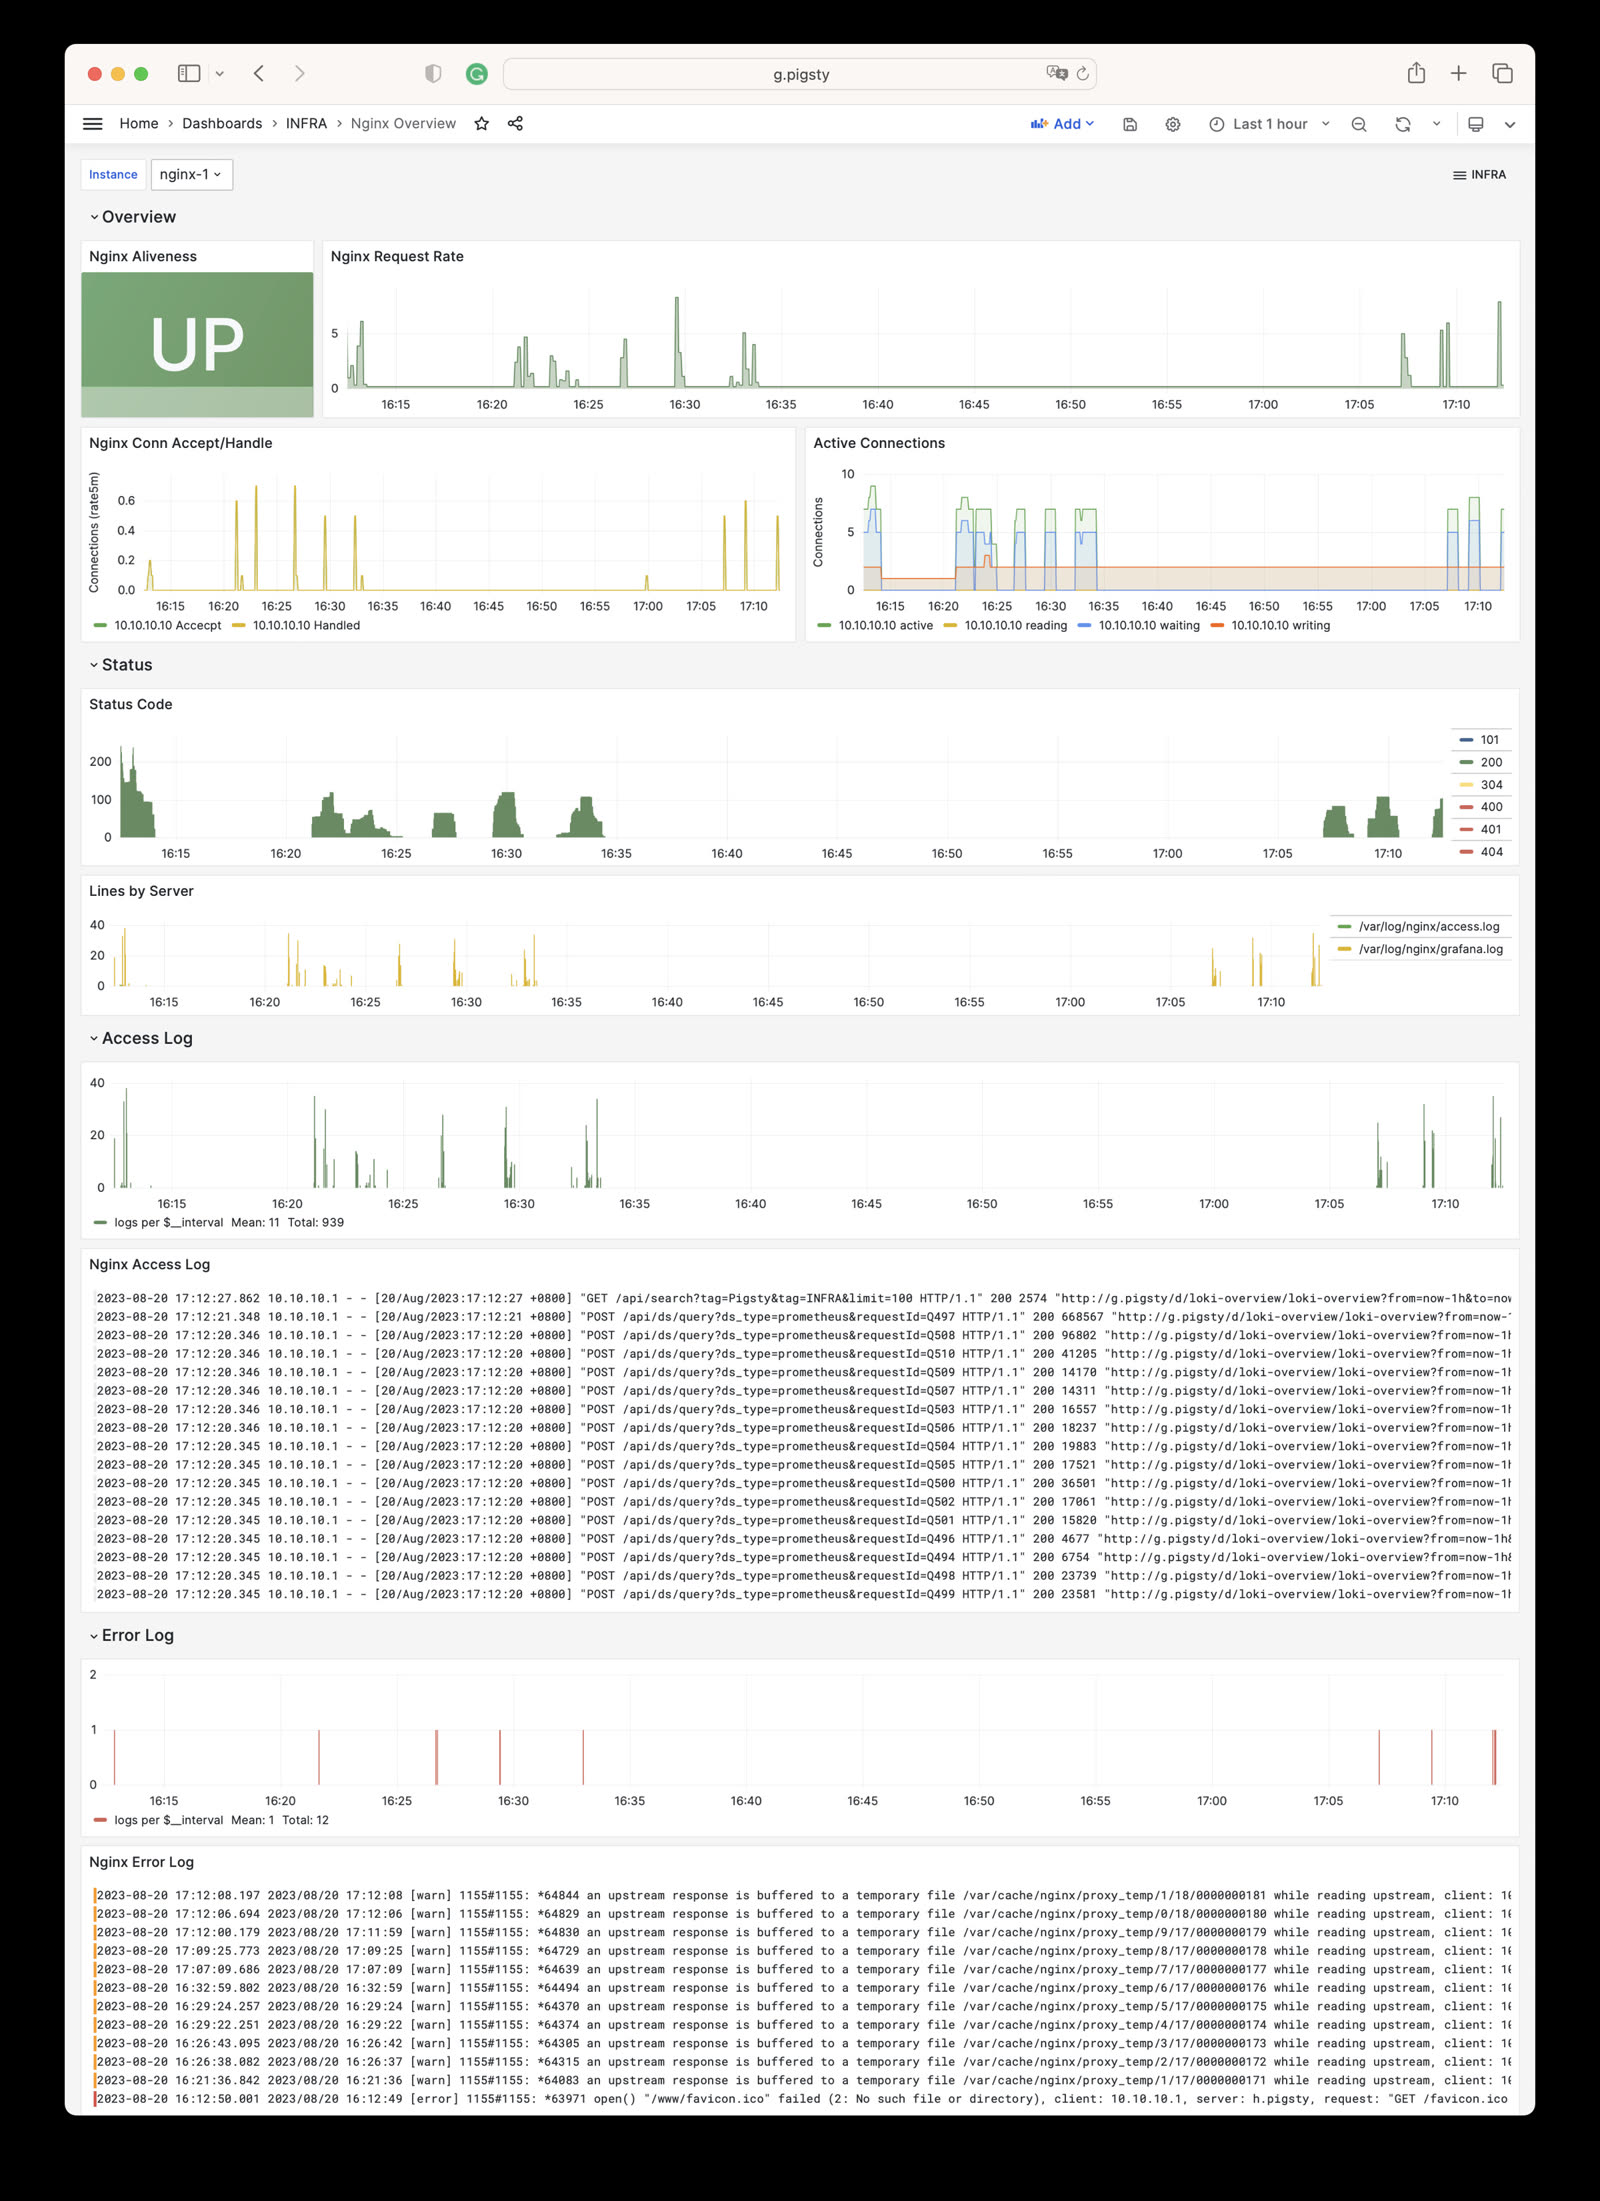
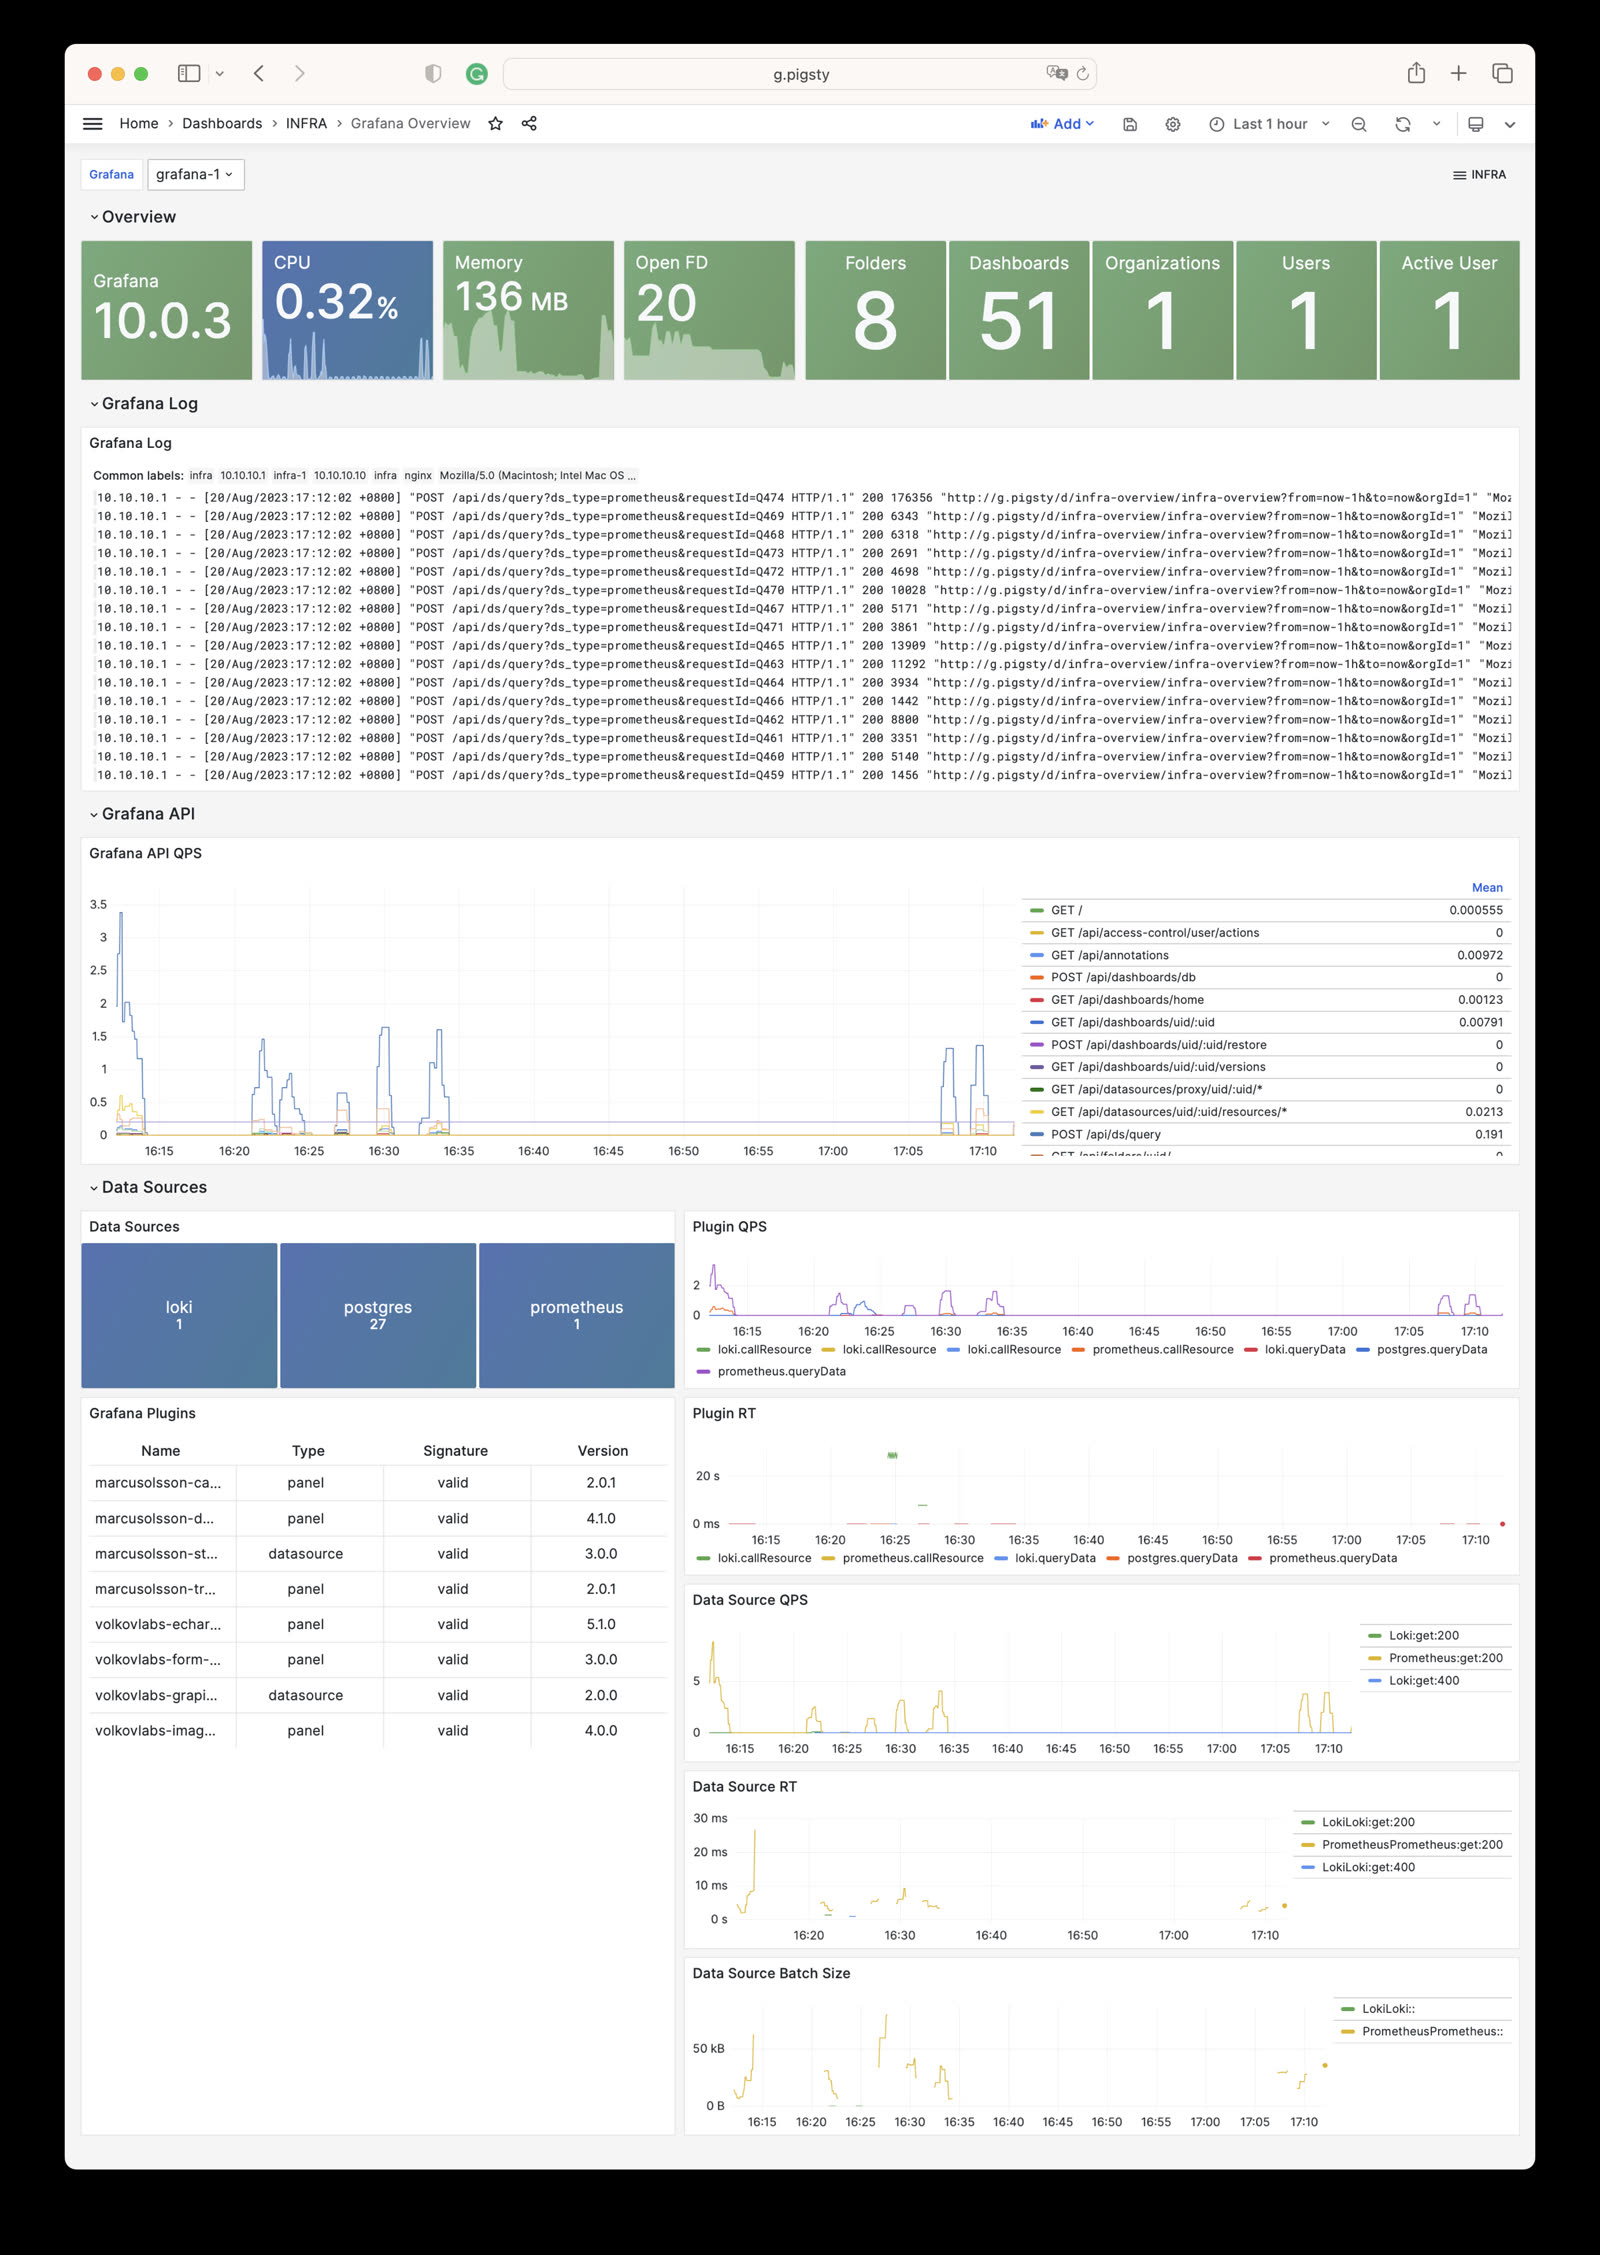

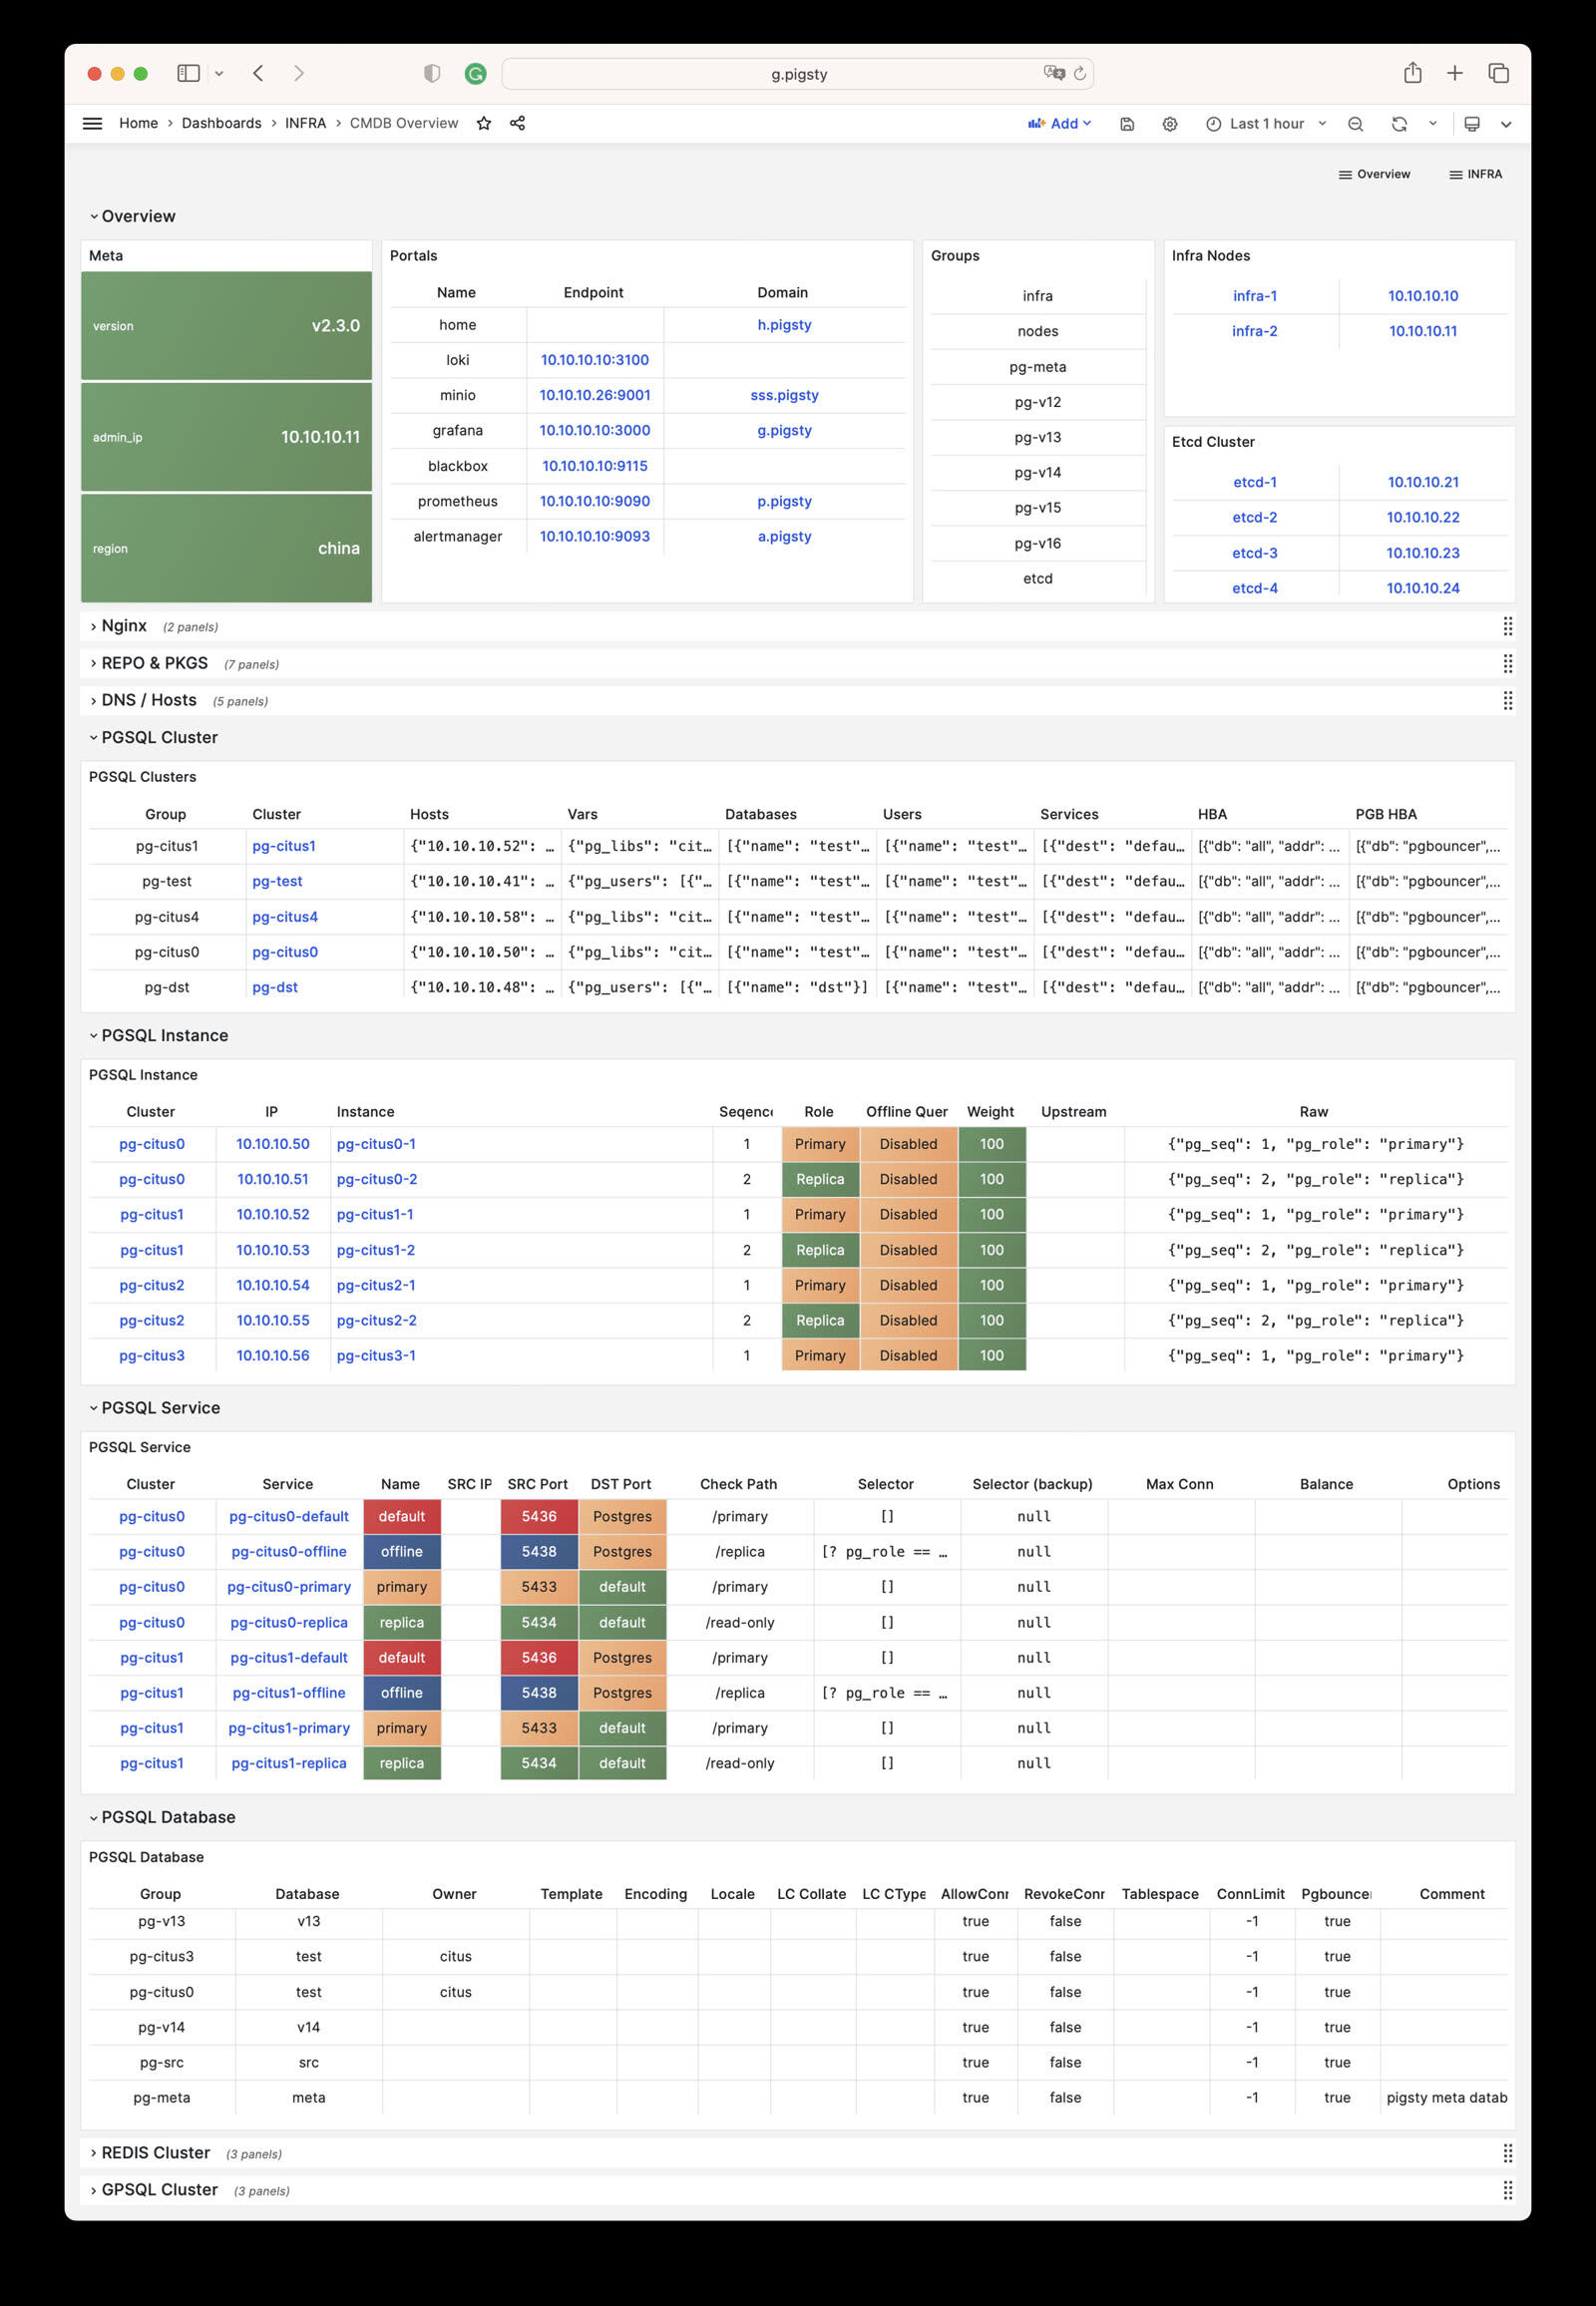
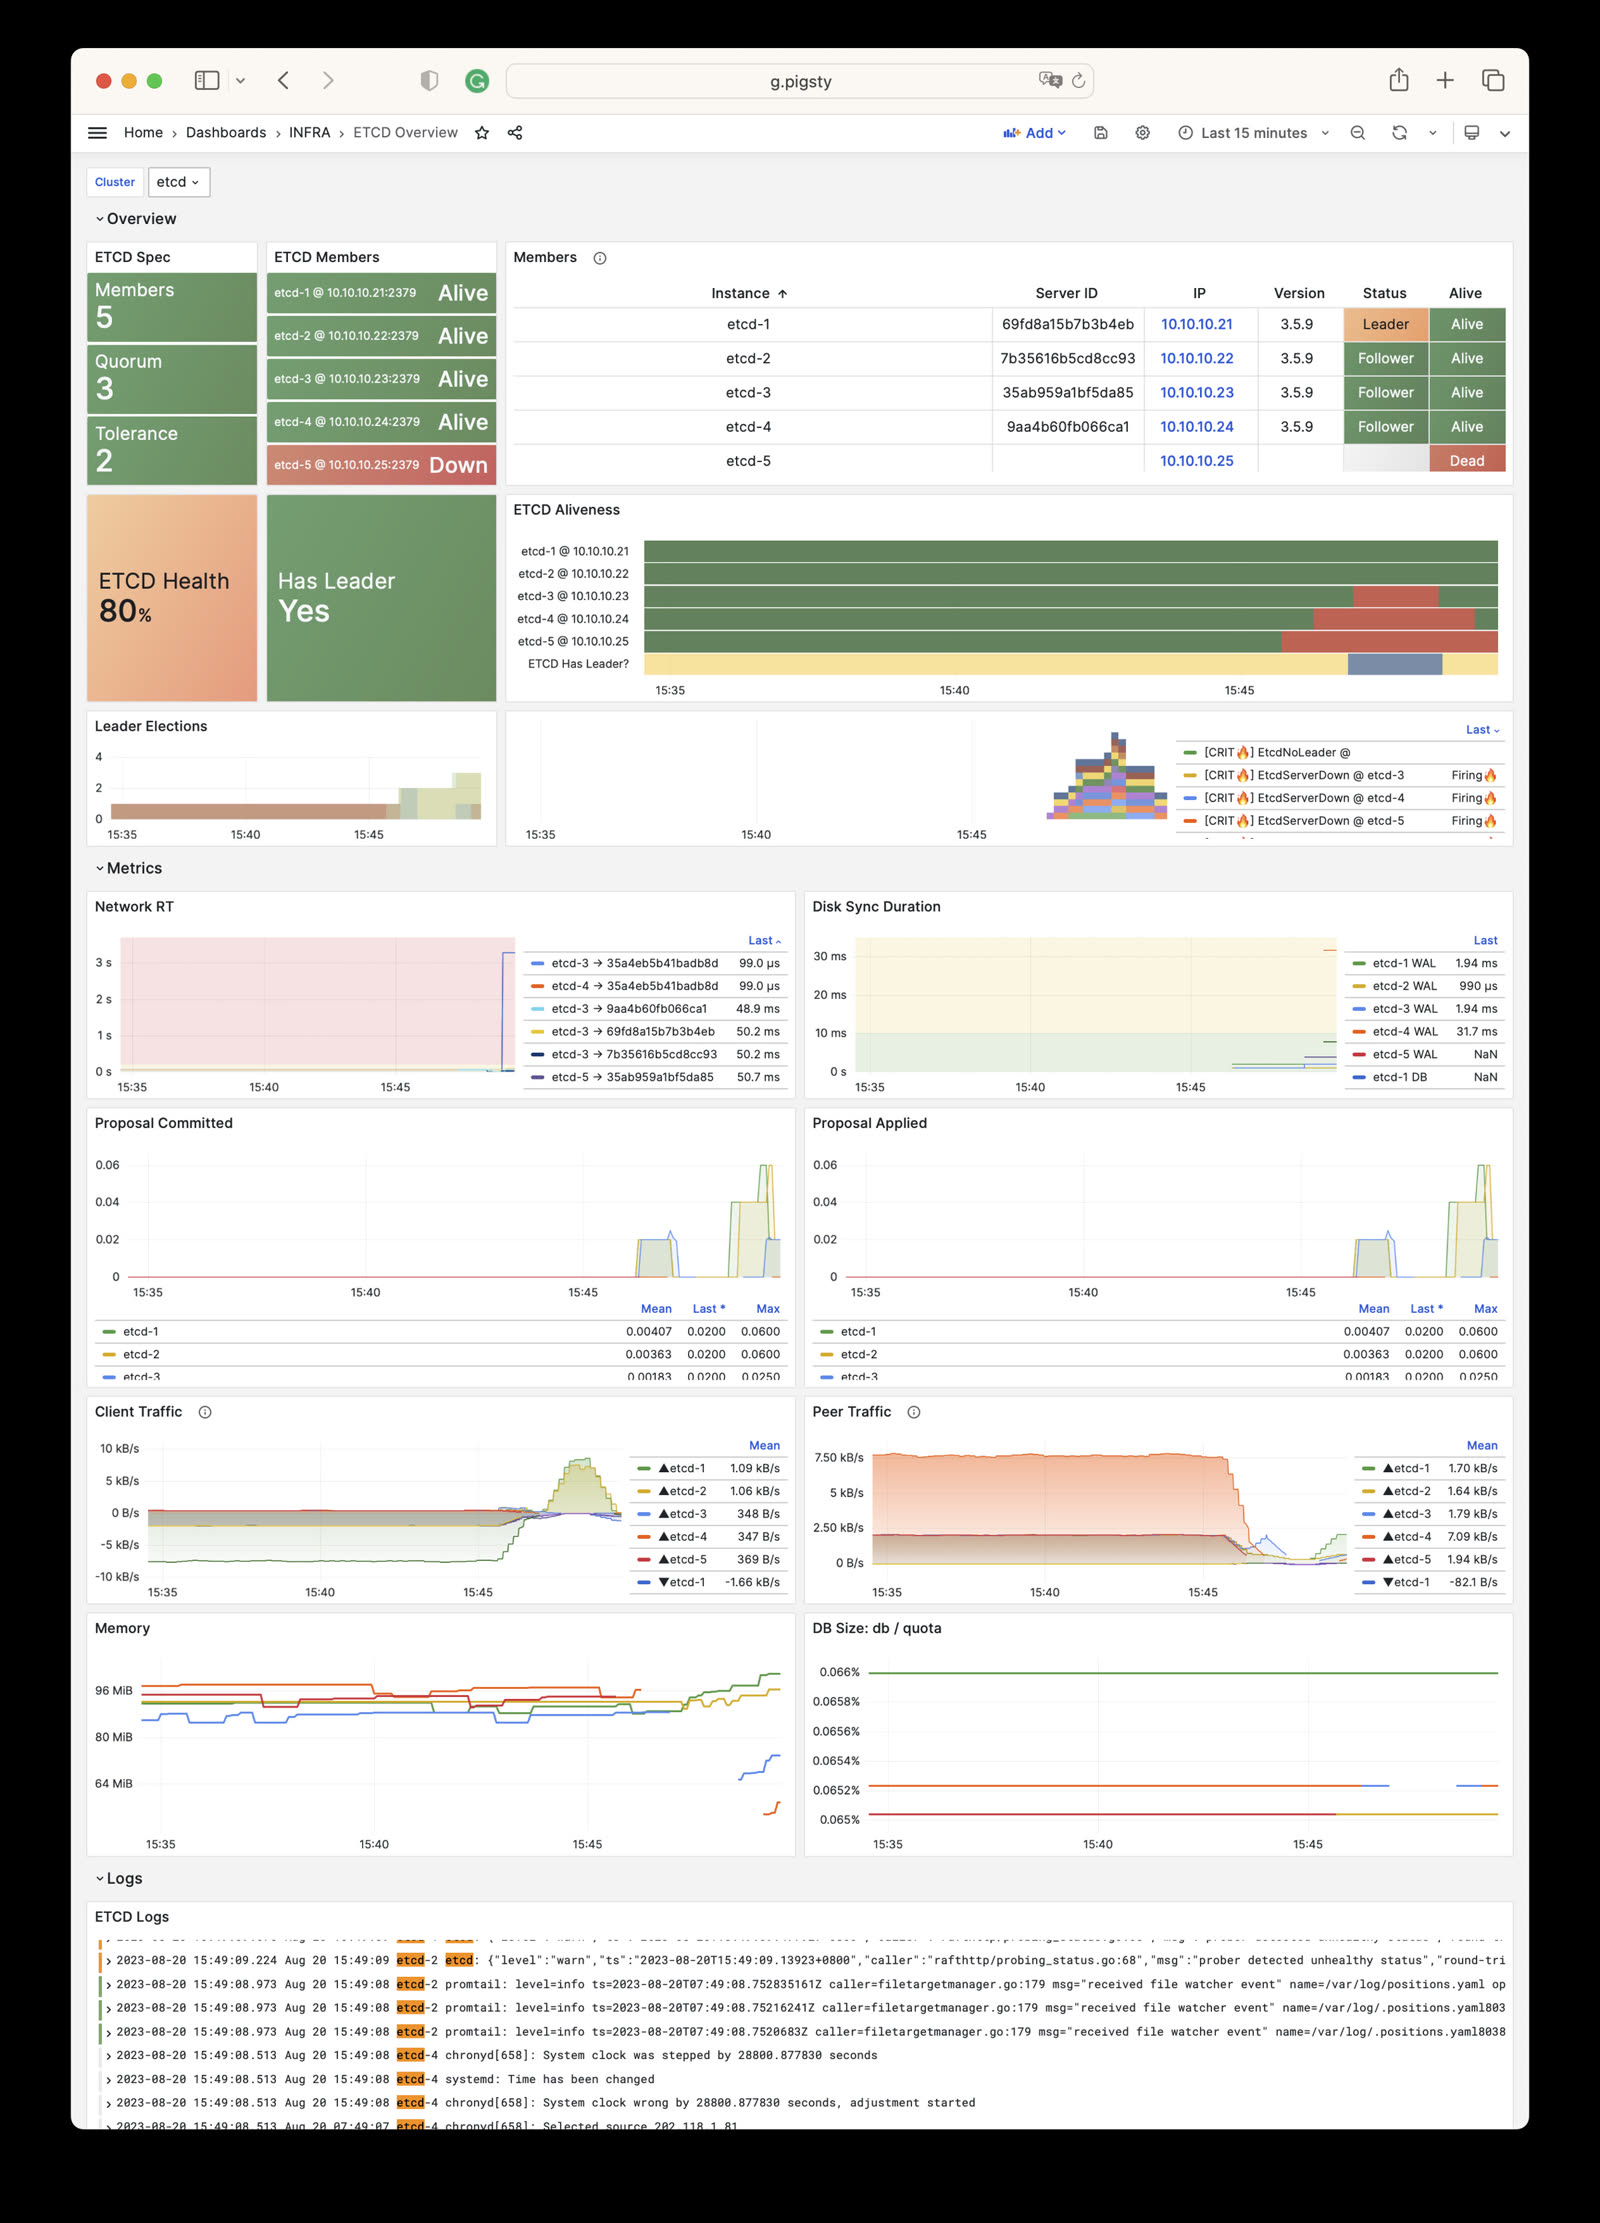
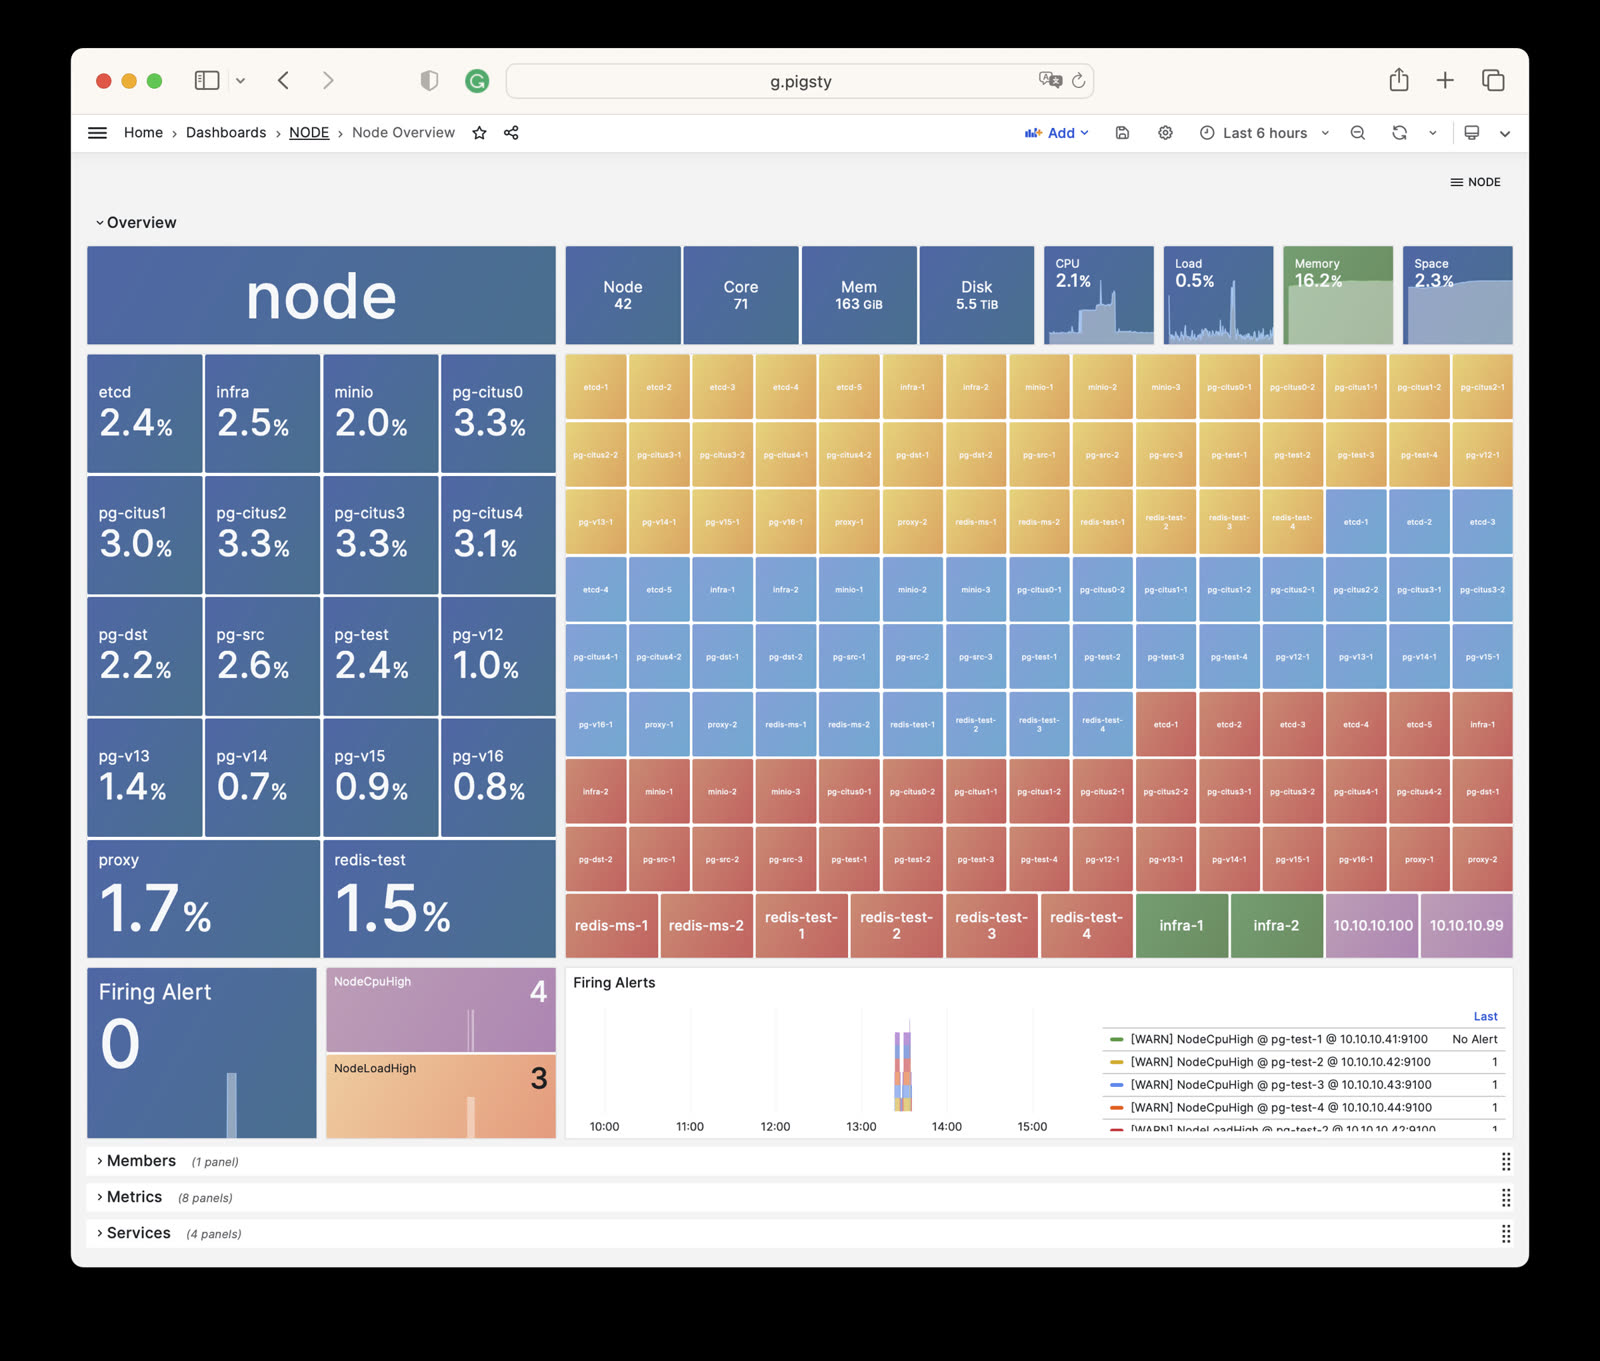
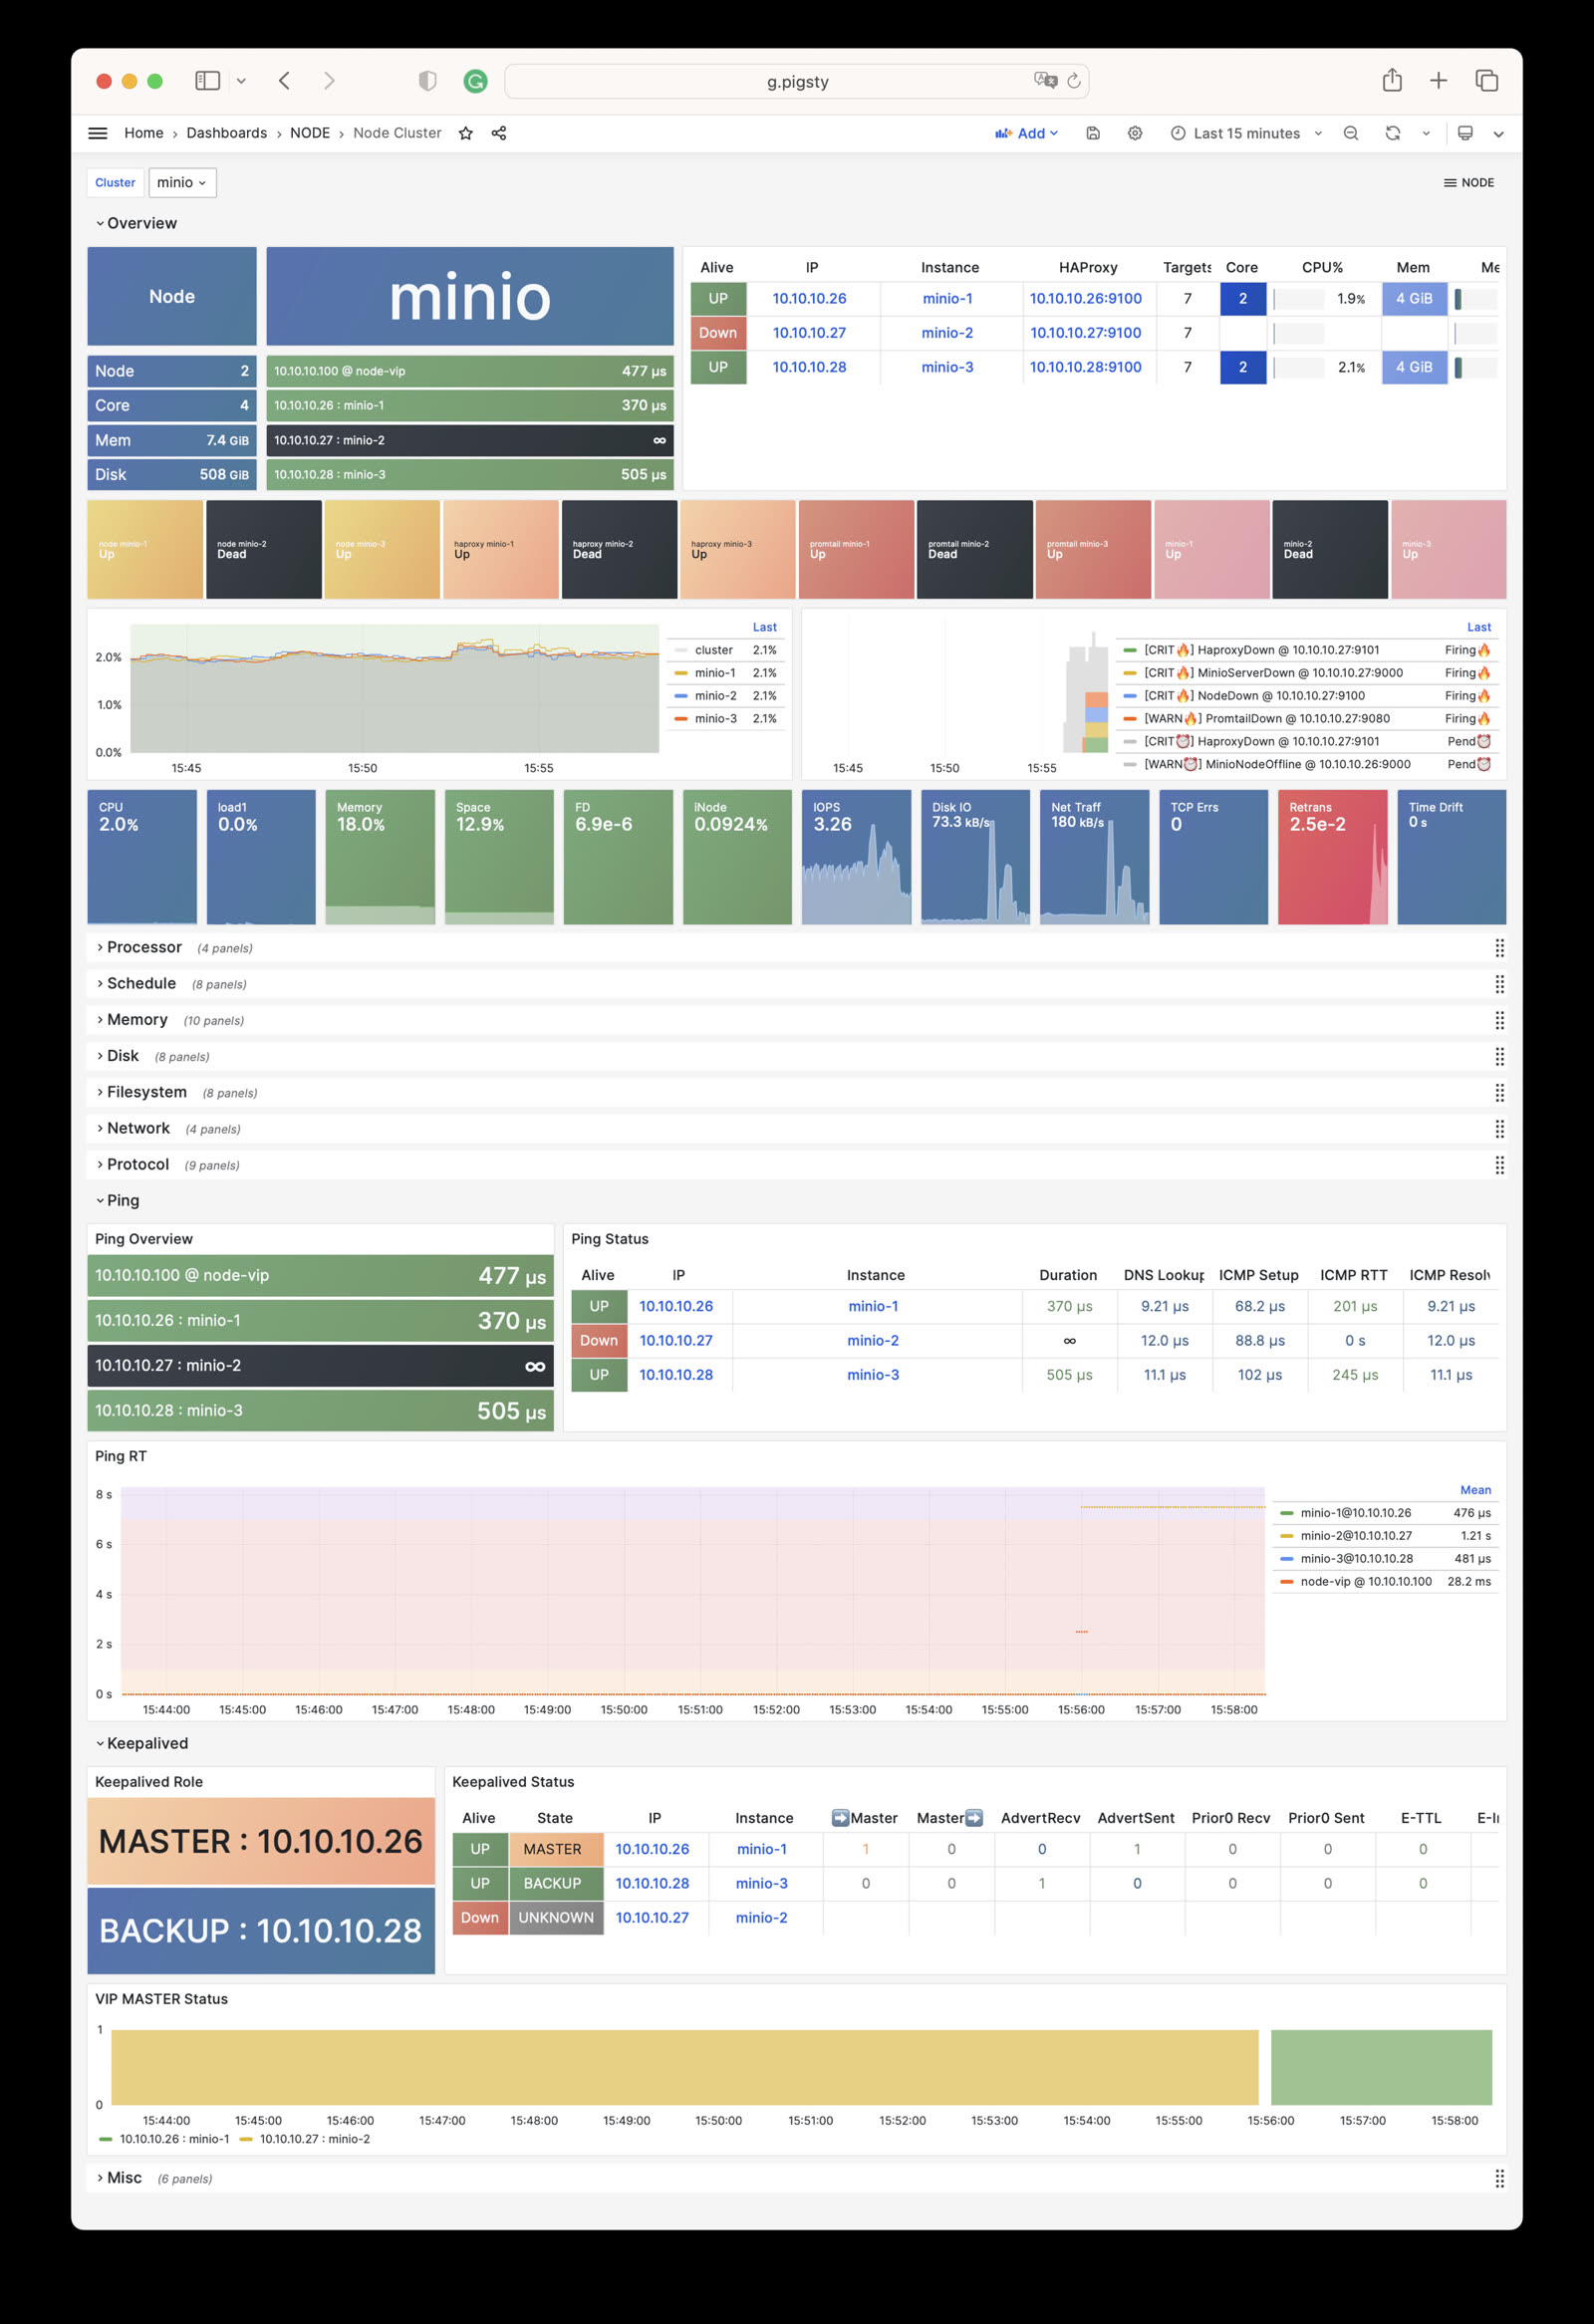
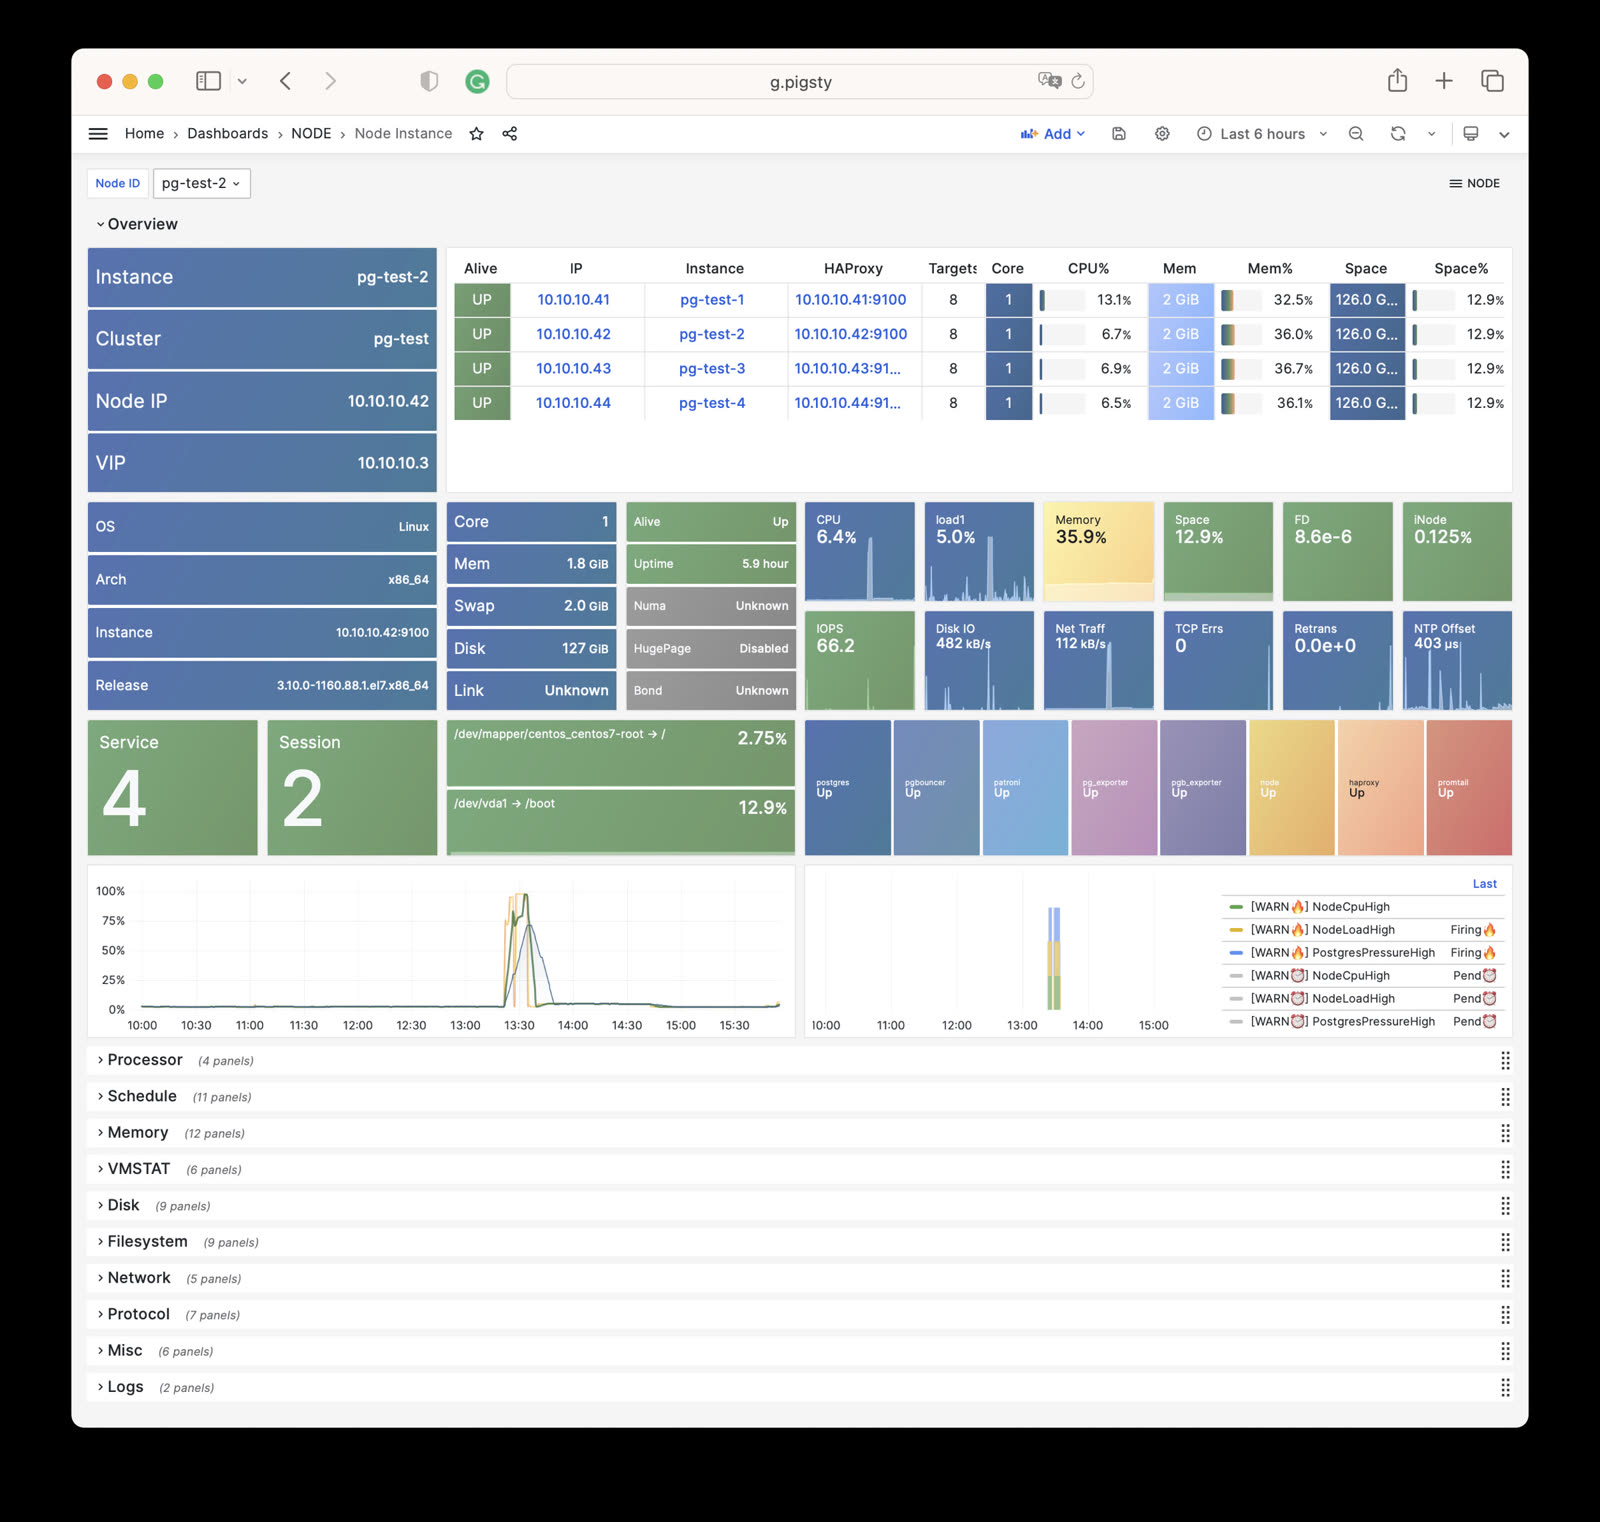
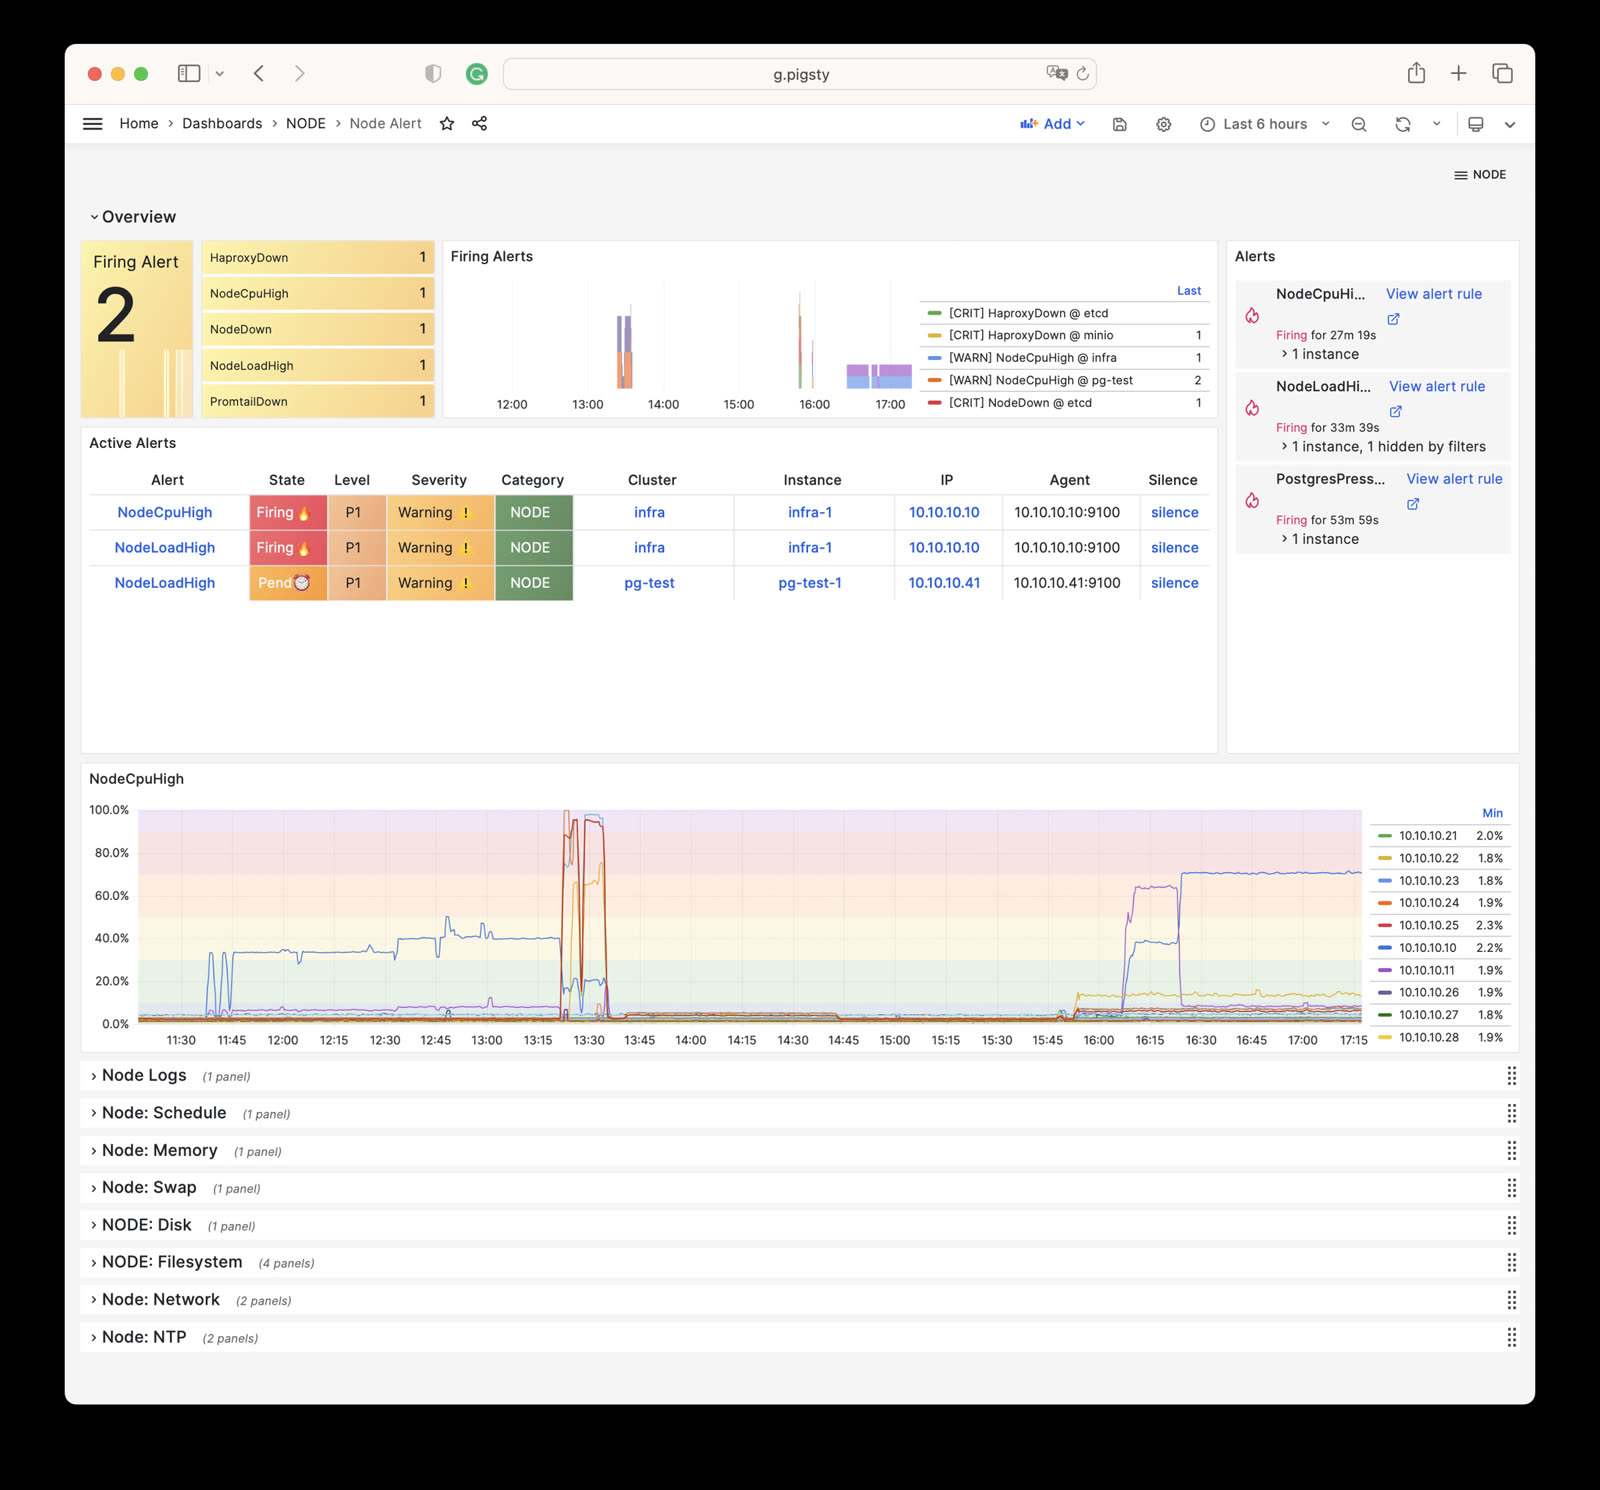
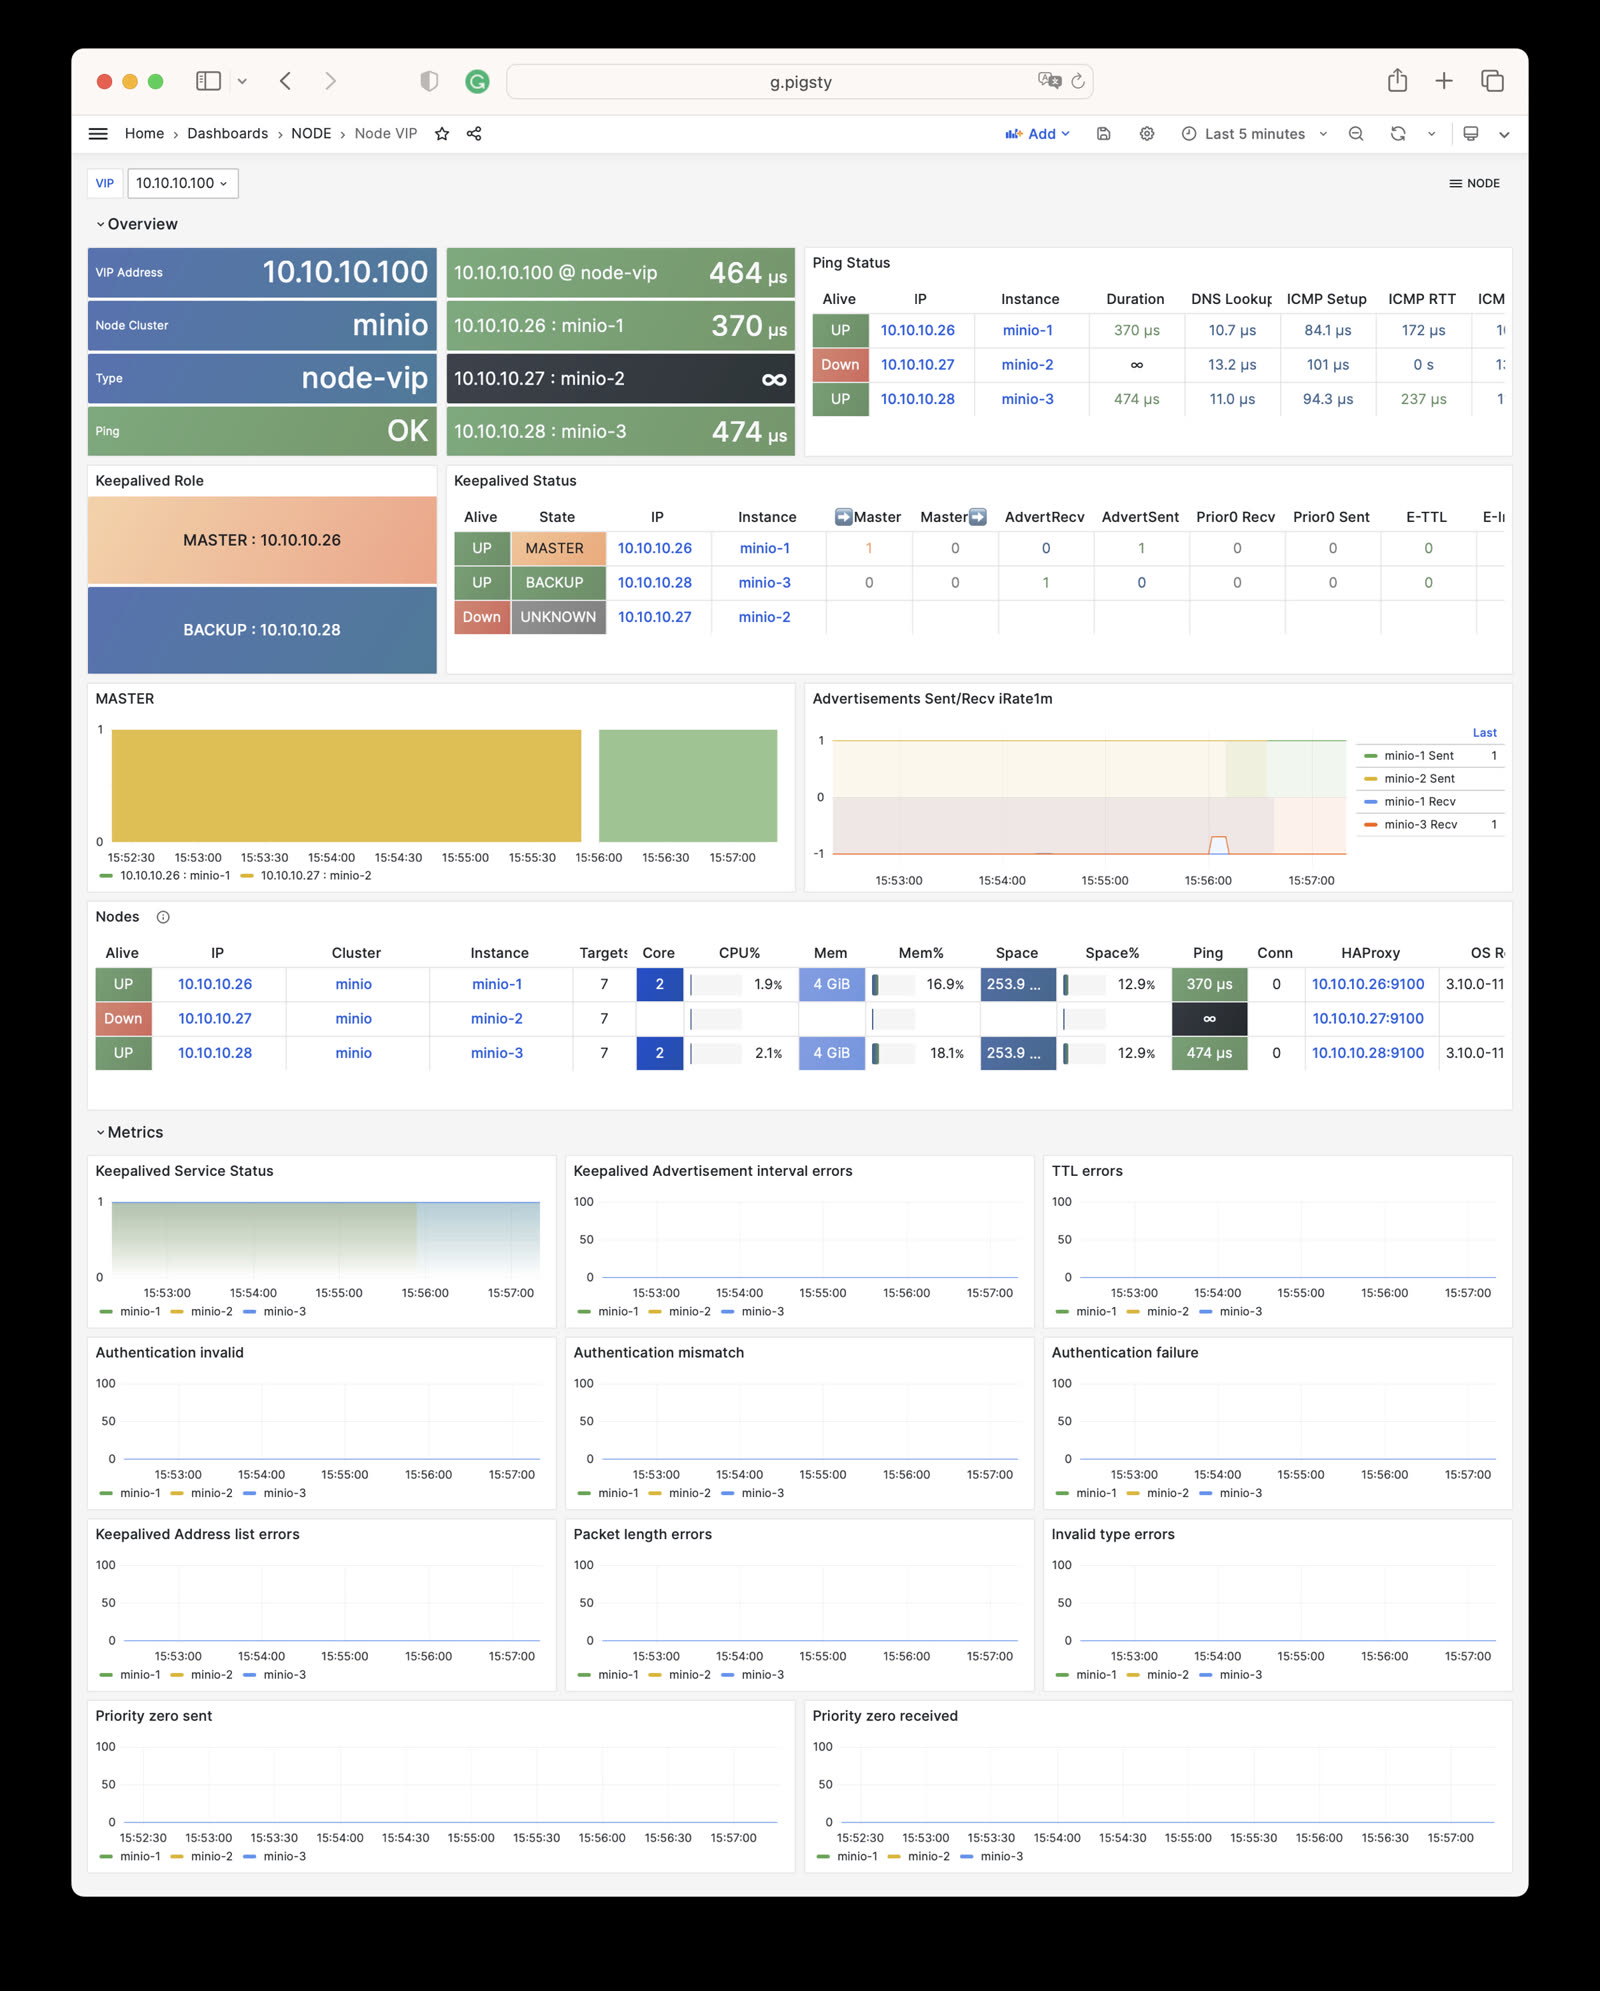
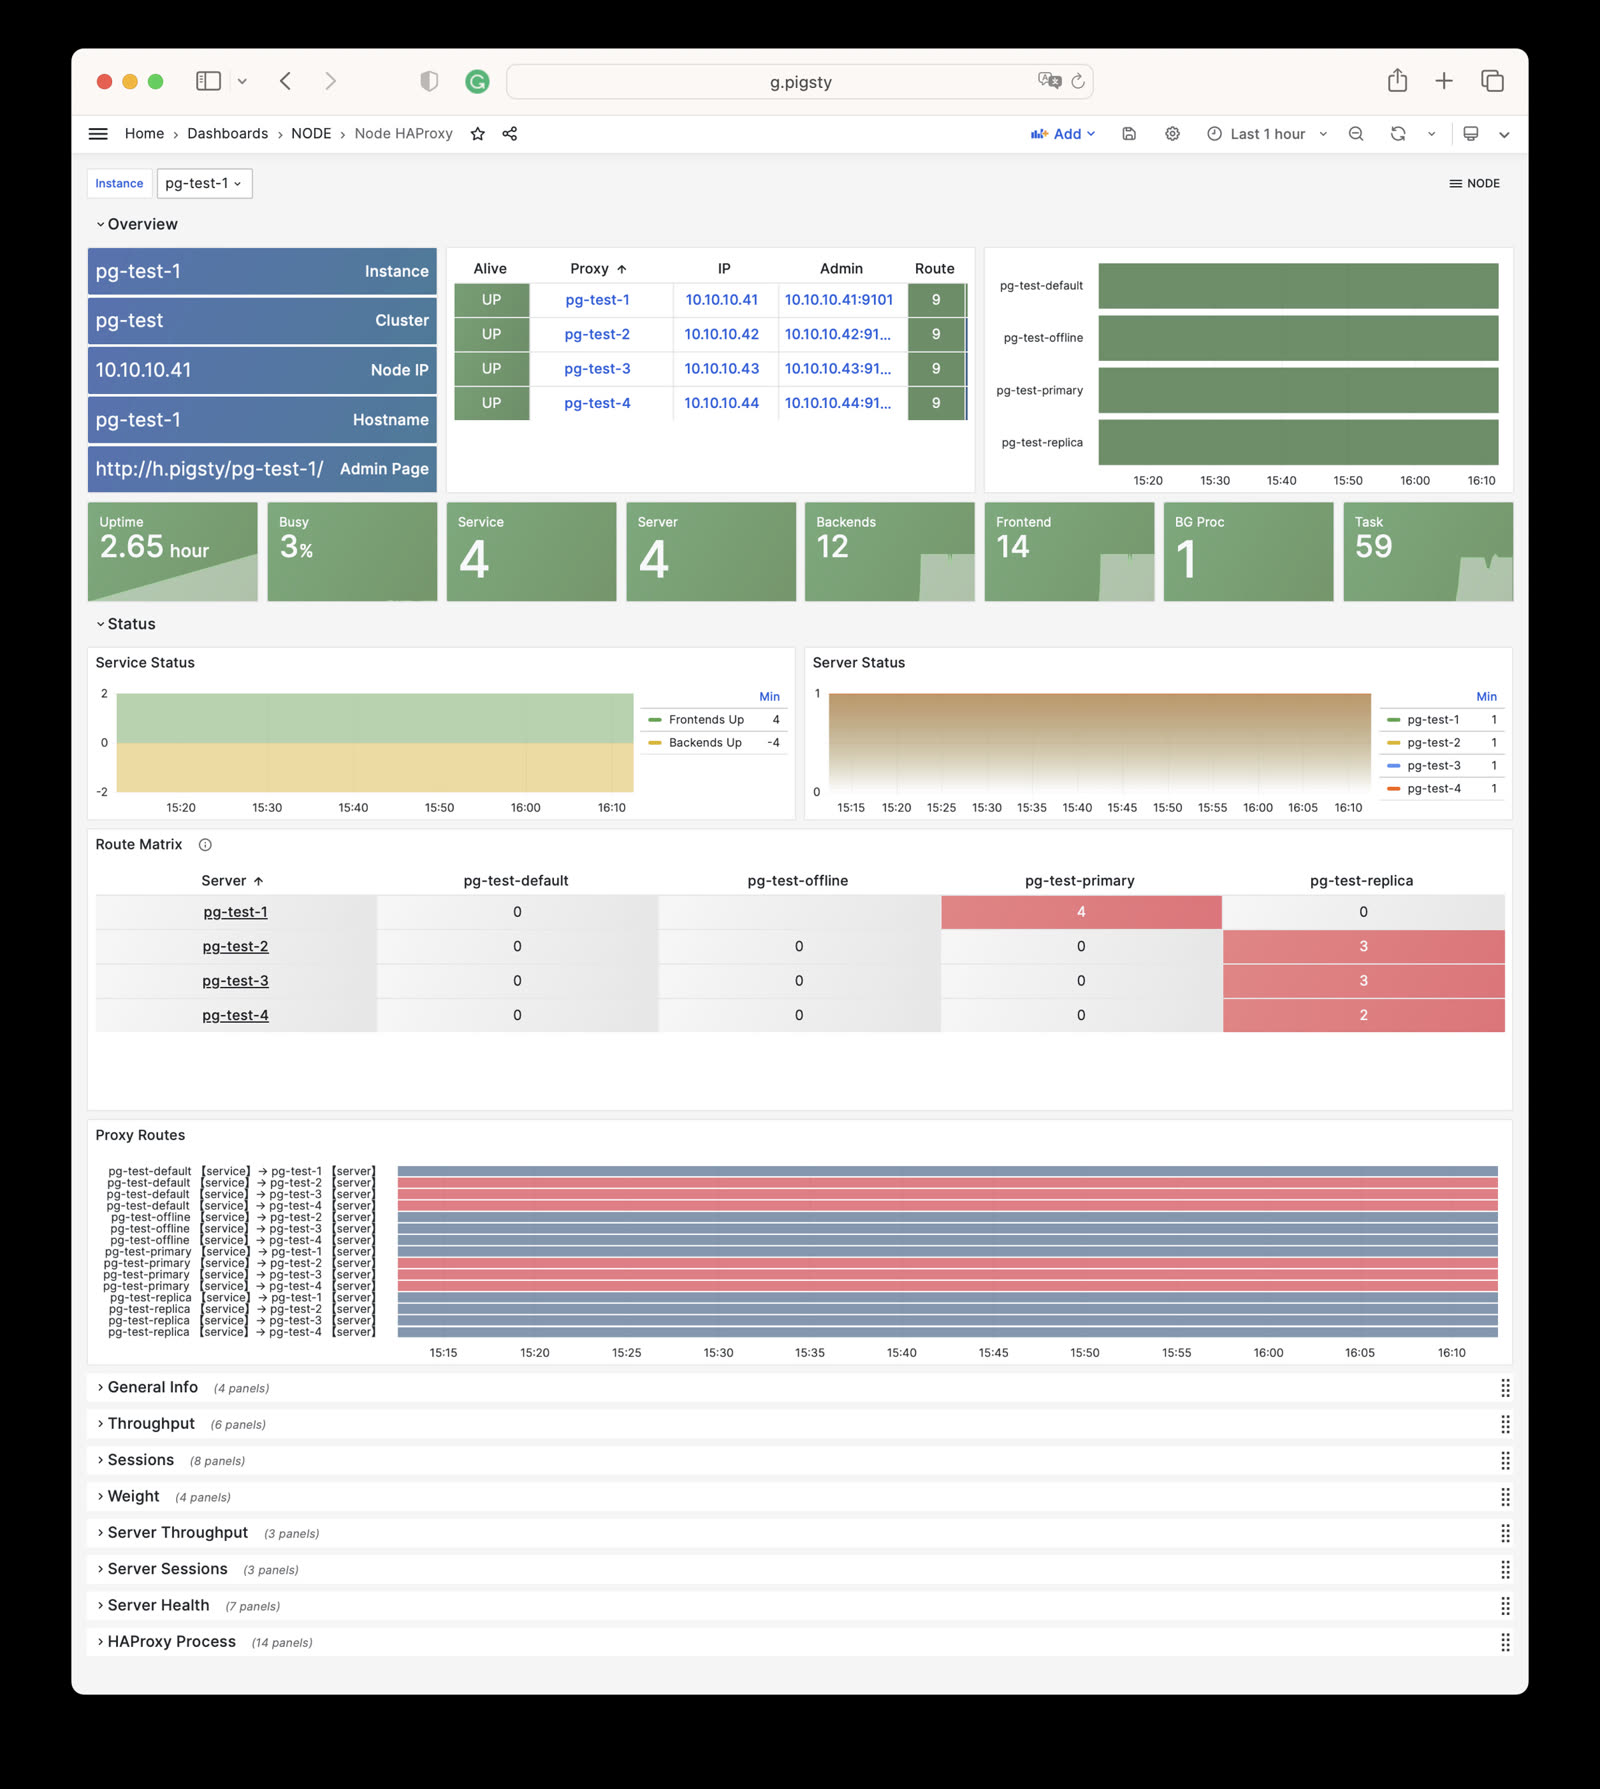


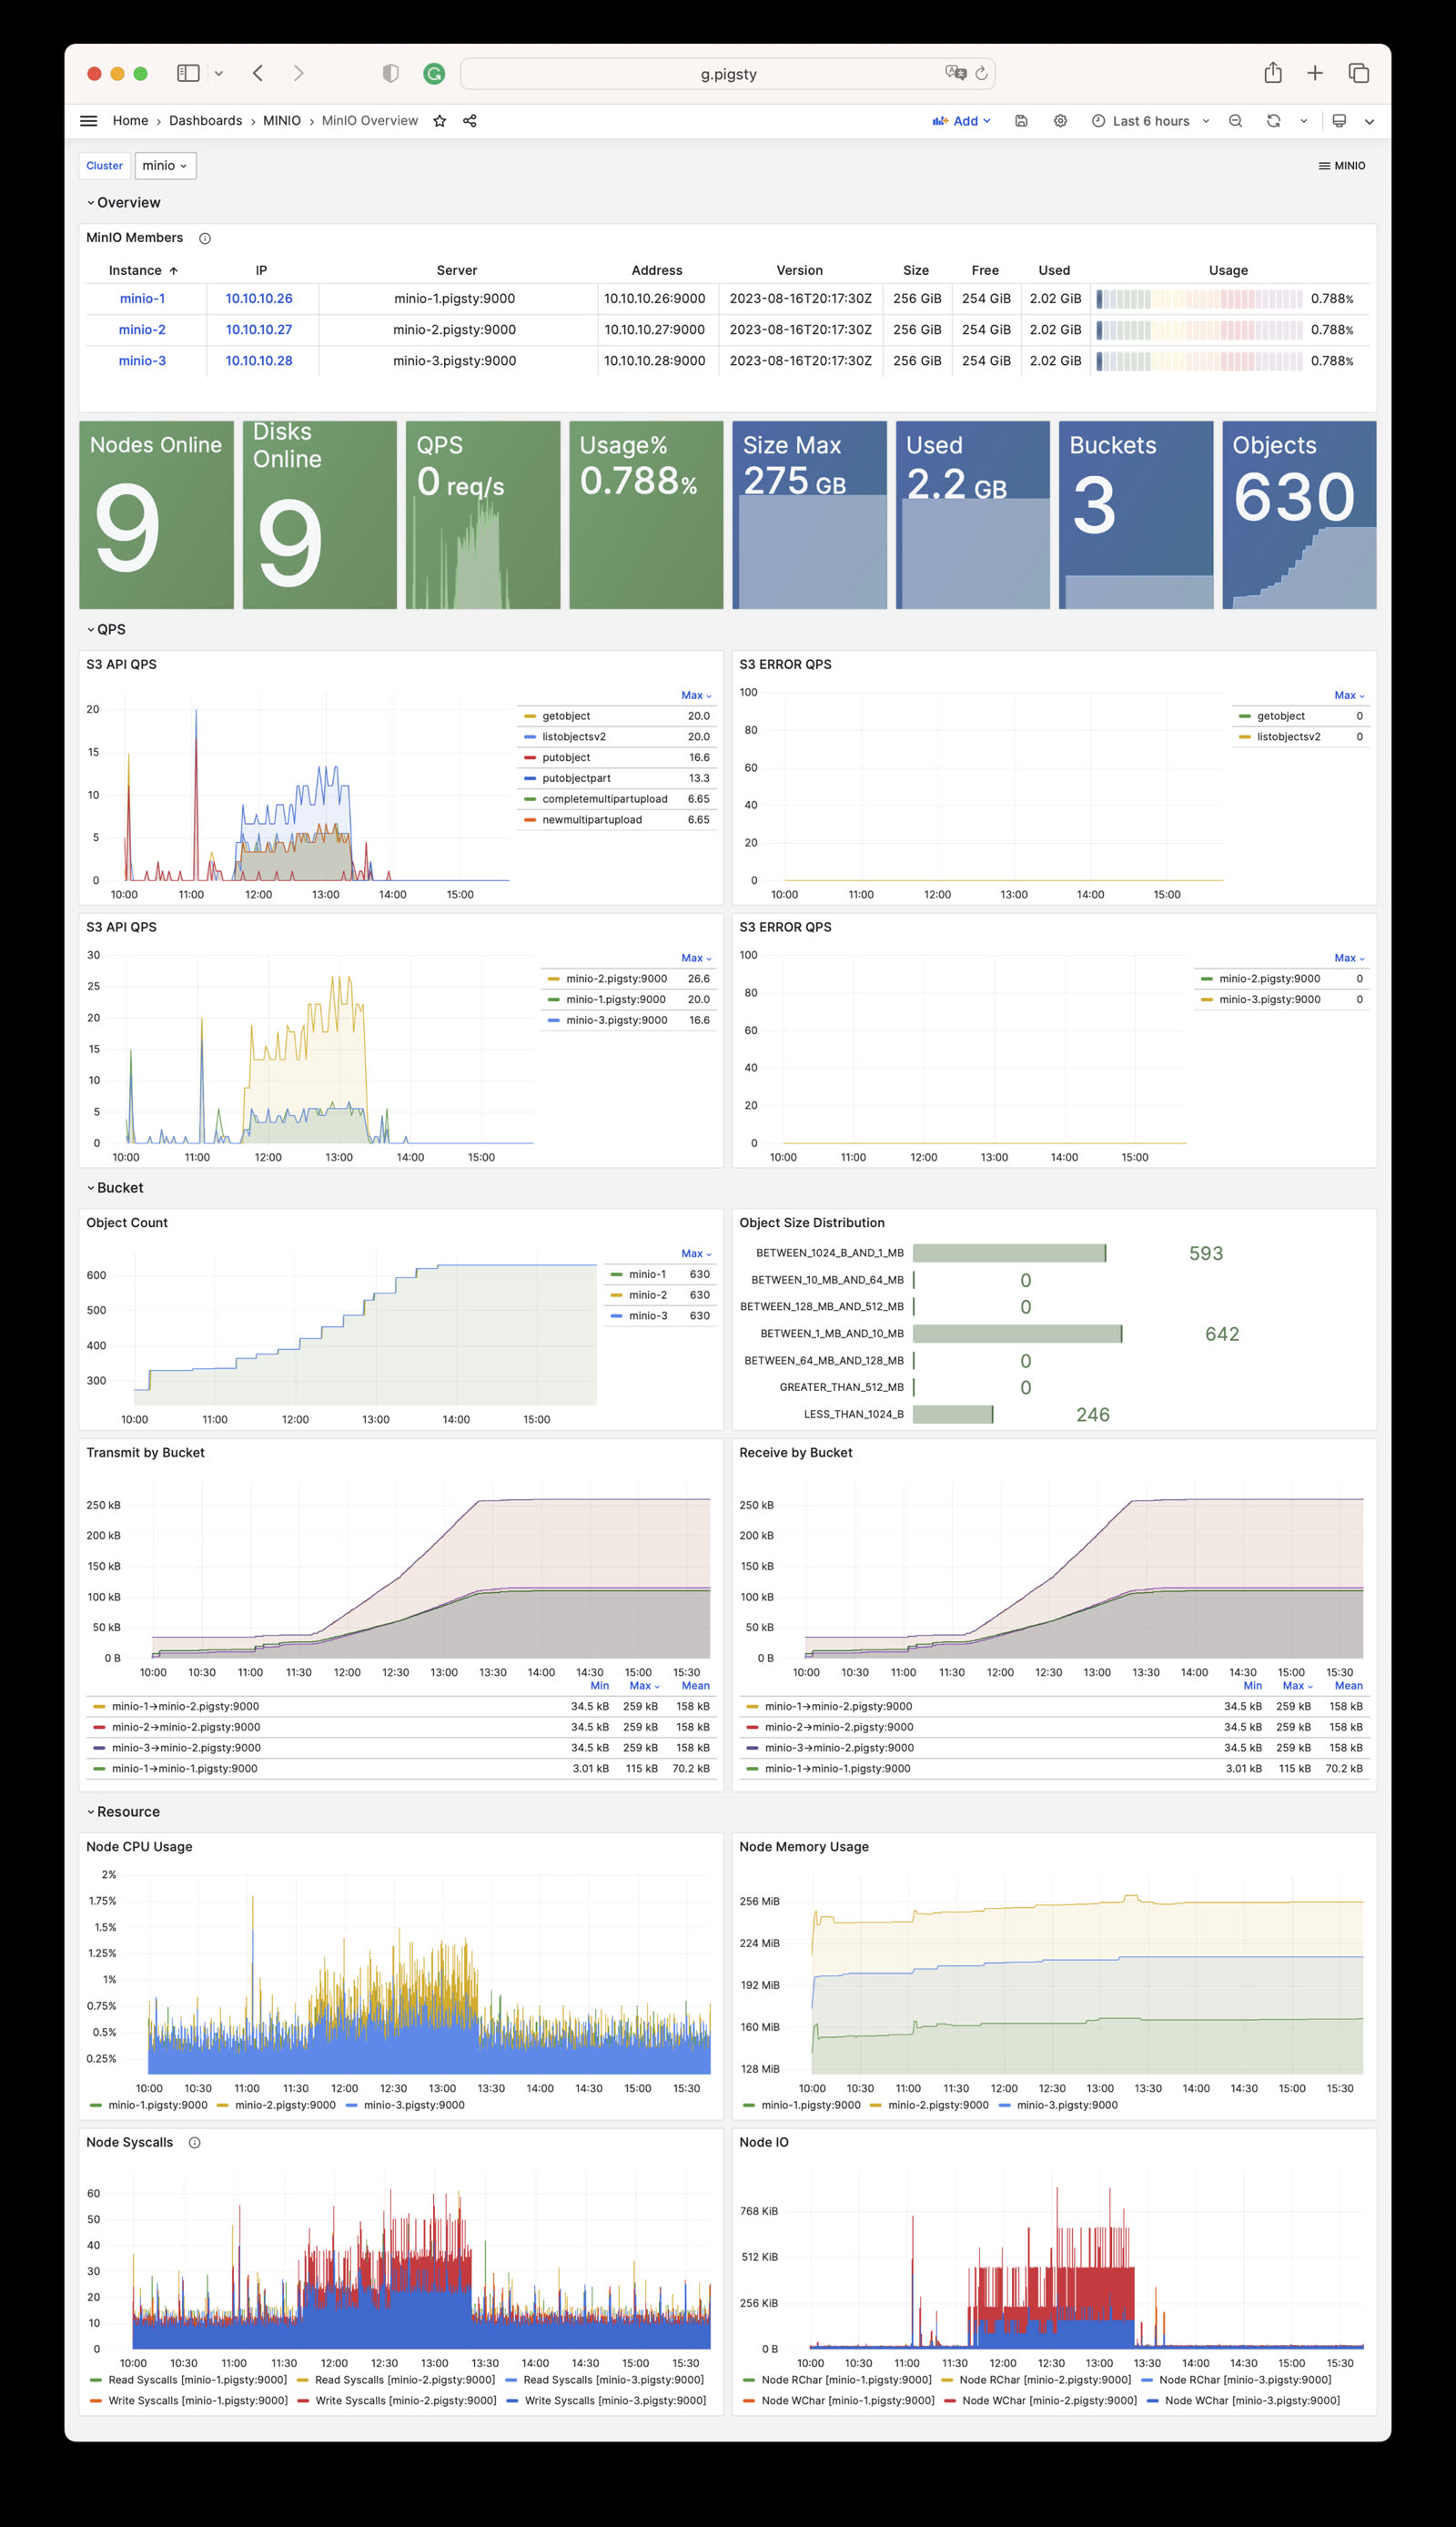

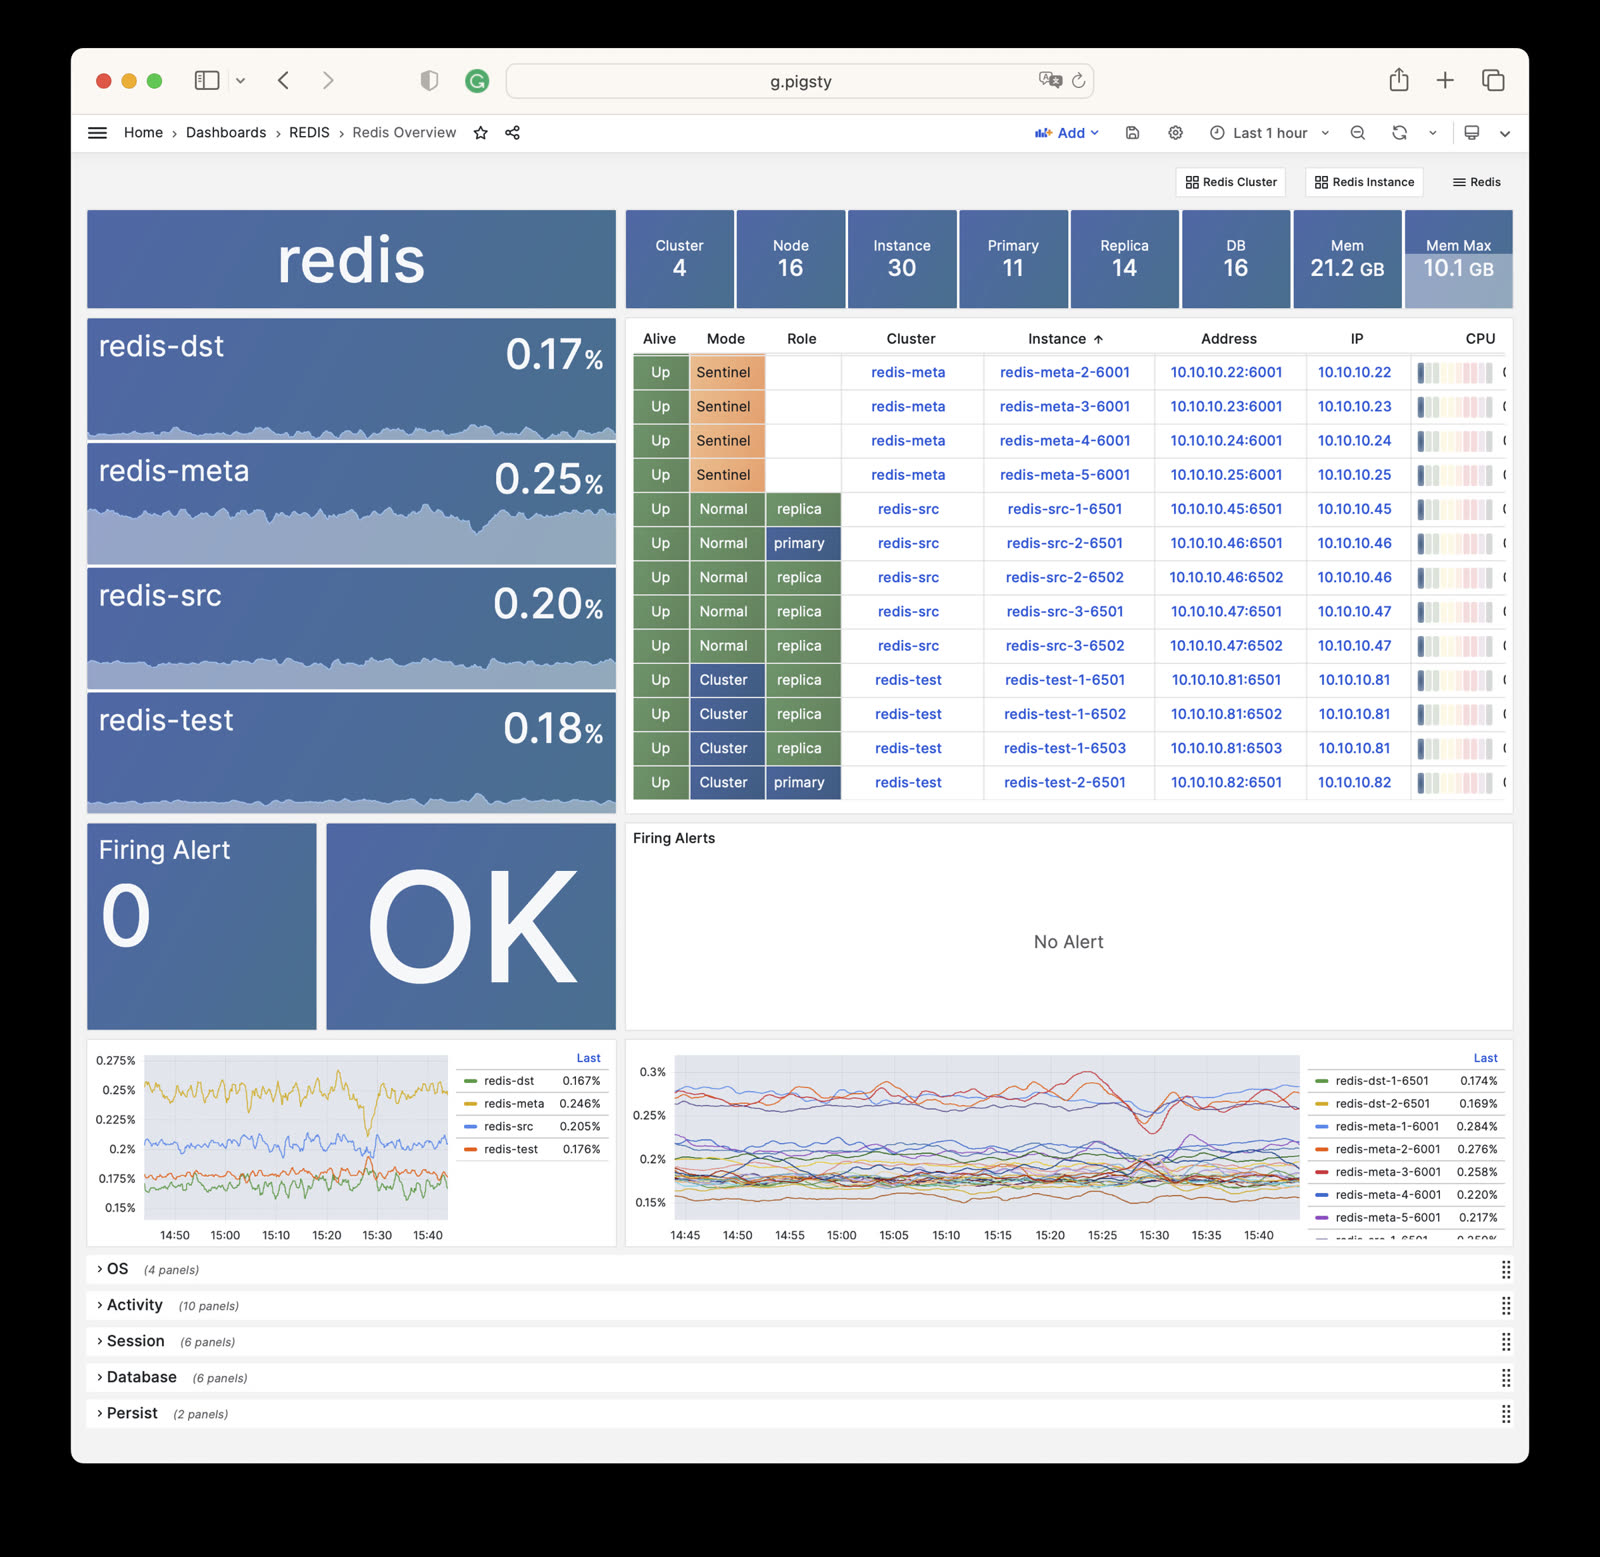
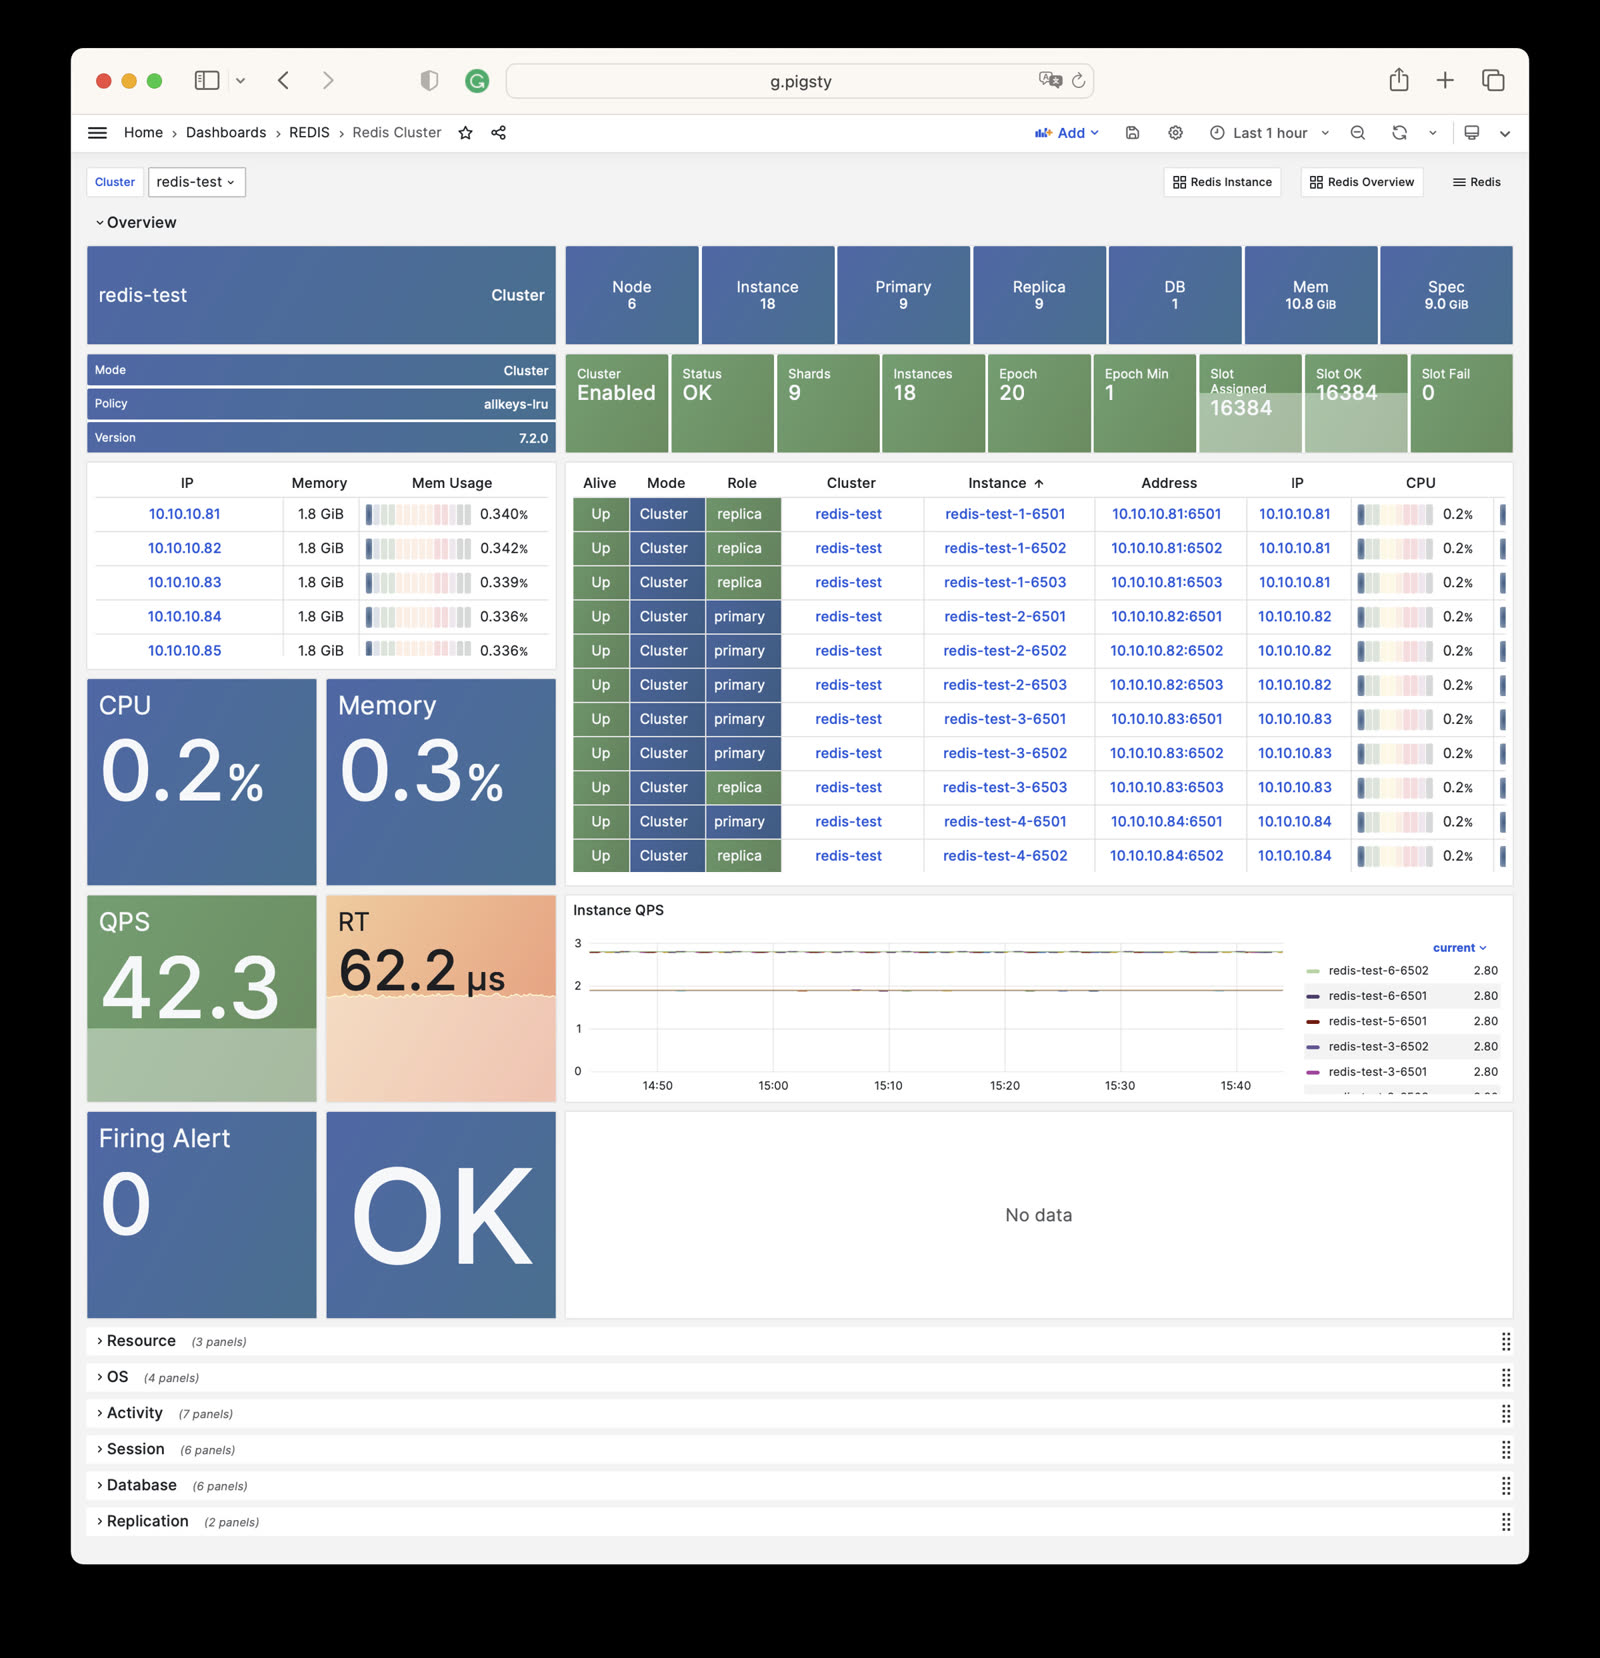

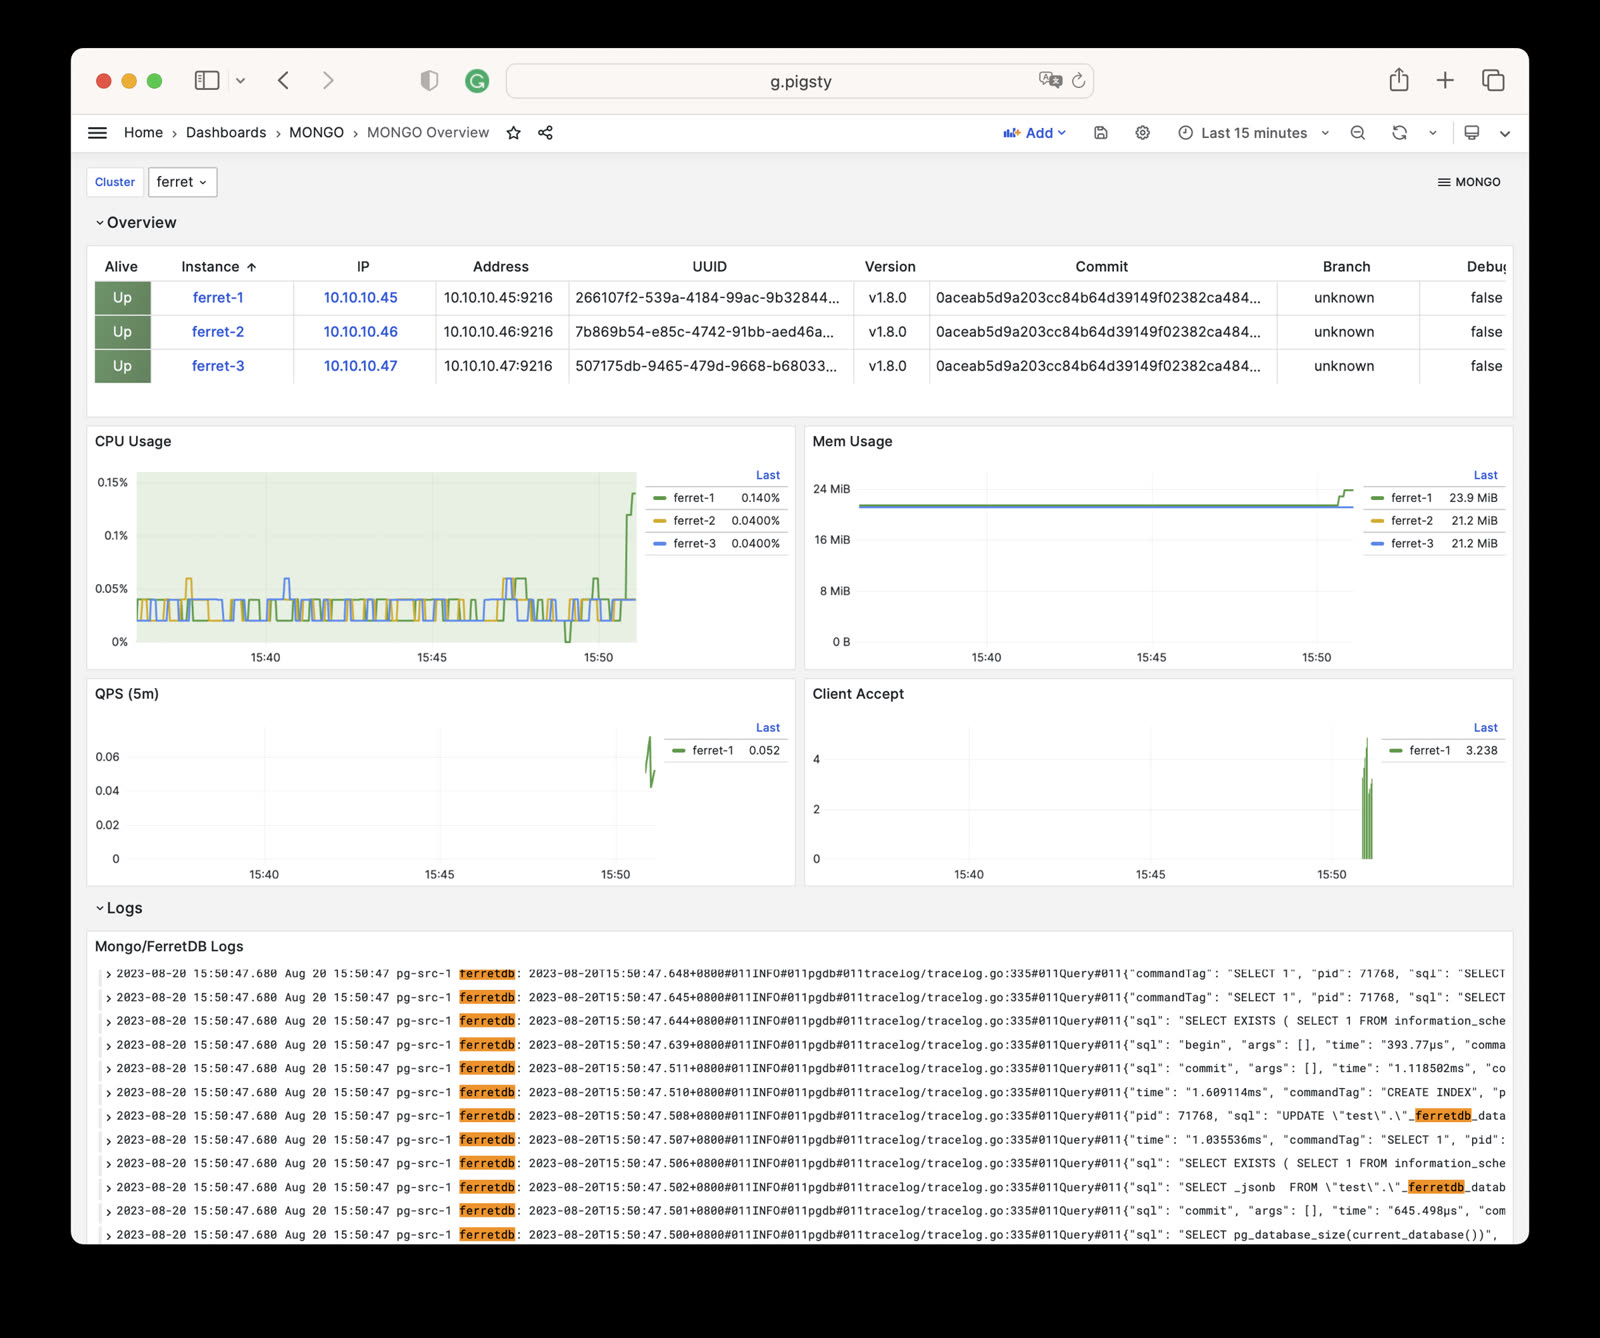