PostgreSQL is the most popular database in the world, and countless software is built on PostgreSQL, around PostgreSQL, or serves PostgreSQL itself, such as
“Application software” that uses PostgreSQL as the preferred database
“Tooling software” that serves PostgreSQL software development and management
“Database software” that derives, wraps, forks, modifies, or extends PostgreSQL
And Pigsty just have a series of Docker Compose templates for these software, application and databases:
Expose PostgreSQL & Pgbouncer Metrics for Prometheus
How to prepare Docker?
To run docker compose templates, you need to install the DOCKER module on the node,
If you don’t have the Internet access or having firewall issues, you may need to configure a DockerHub proxy, check the tutorial.
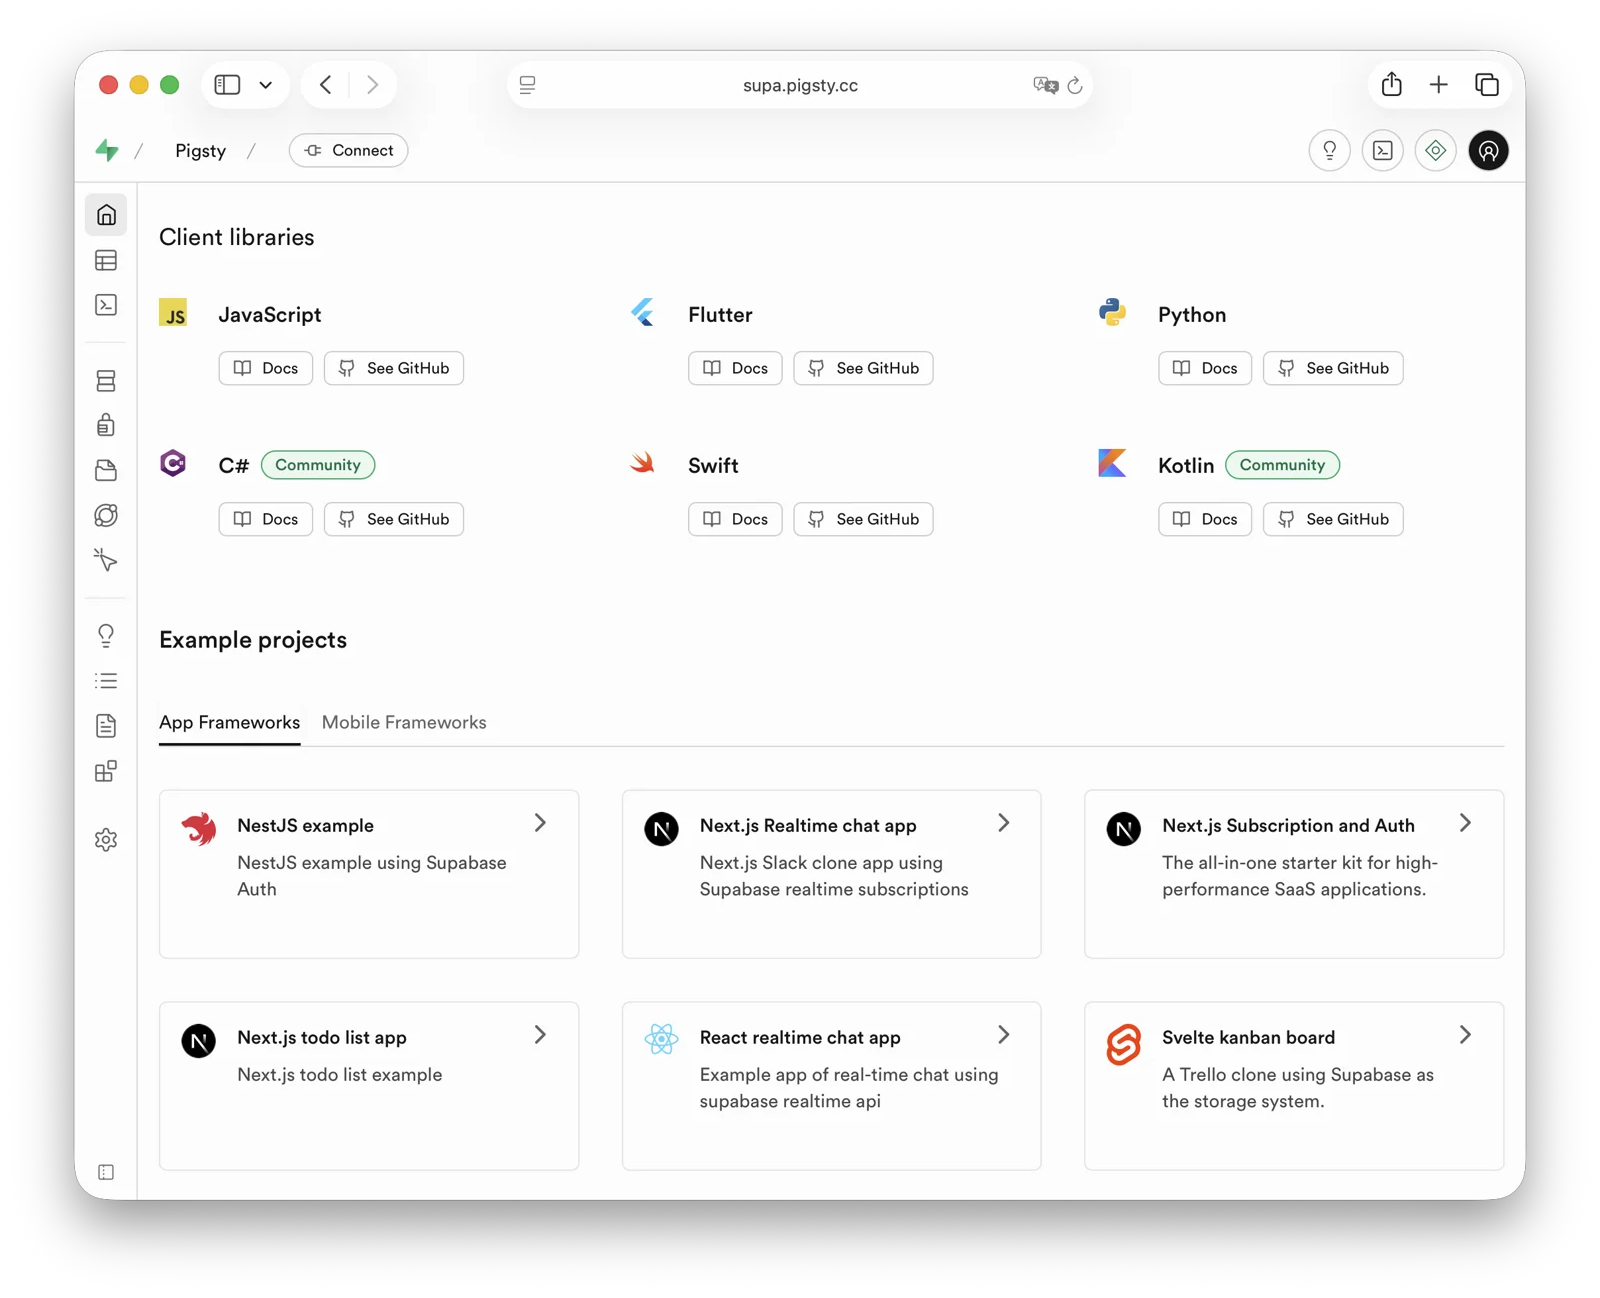
1 - Enterprise Self-Hosted Supabase
Self-host enterprise-grade Supabase with Pigsty, featuring monitoring, high availability, PITR, IaC, and 440+ PostgreSQL extensions.
Supabase is great, but having your own Supabase is even better.
Pigsty can help you deploy enterprise-grade Supabase on your own servers (physical, virtual, or cloud) with a single command — more extensions, better performance, deeper control, and more cost-effective.
Supabase is a BaaS (Backend as a Service), an open-source Firebase alternative, and the most popular database + backend solution in the AI Agent era.
Supabase wraps PostgreSQL and provides authentication, messaging, edge functions, object storage, and automatically generates REST and GraphQL APIs based on your database schema.
Supabase aims to provide developers with a one-stop backend solution, reducing the complexity of developing and maintaining backend infrastructure.
It allows developers to skip most backend development work — you only need to understand database design and frontend to ship quickly!
Developers can use vibe coding to create a frontend and database schema to rapidly build complete applications.
Currently, Supabase is the most popular open-source project in the PostgreSQL ecosystem, with over 90,000 GitHub stars.
Supabase also offers a “generous” free tier for small startups — free 500 MB storage, more than enough for storing user tables and analytics data.
Why Self-Host?
If Supabase cloud is so attractive, why self-host?
The most obvious reason is what we discussed in “Is Cloud Database an IQ Tax?”: when your data/compute scale exceeds the cloud computing sweet spot (Supabase: 4C/8G/500MB free storage), costs can explode.
And nowadays, reliable local enterprise NVMe SSDs have three to four orders of magnitude cost advantage over cloud storage, and self-hosting can better leverage this.
Another important reason is functionality — Supabase cloud features are limited. Many powerful PostgreSQL extensions aren’t available in cloud services due to multi-tenant security challenges and licensing.
Despite extensions being PostgreSQL’s core feature, only 64 extensions are available on Supabase cloud.
Self-hosted Supabase with Pigsty provides up to 440 ready-to-use PostgreSQL extensions.
Additionally, self-control and vendor lock-in avoidance are important reasons for self-hosting. Although Supabase aims to provide a vendor-lock-free open-source Google Firebase alternative, self-hosting enterprise-grade Supabase is not trivial.
Supabase includes a series of PostgreSQL extensions they develop and maintain, and plans to replace the native PostgreSQL kernel with OrioleDB (which they acquired). These kernels and extensions are not available in the official PGDG repository.
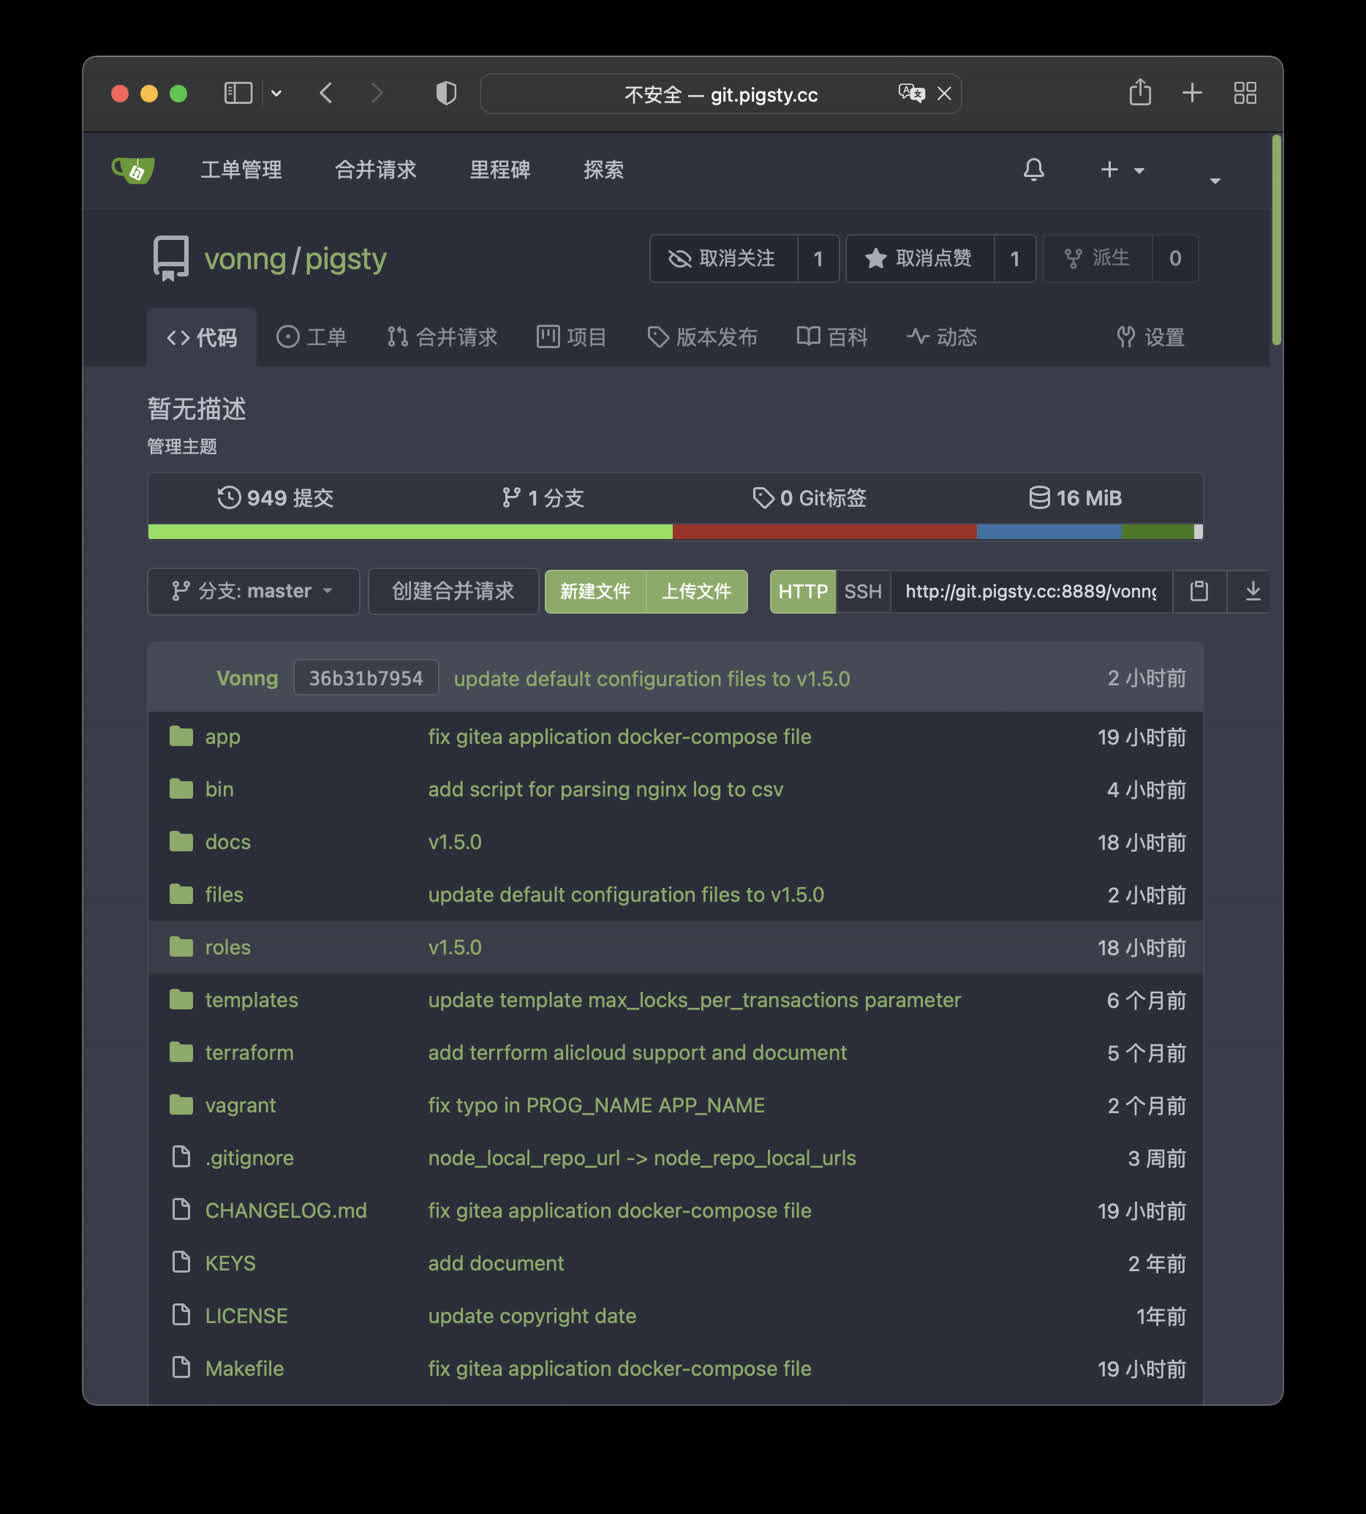
This is implicit vendor lock-in, preventing users from self-hosting in ways other than the supabase/postgres Docker image. Pigsty provides an open, transparent, and universal solution.
We package all 10 missing Supabase extensions into ready-to-use RPM/DEB packages, ensuring they work on all major Linux distributions:
Filter queries by execution plan cost (C), provided by PIGSTY
We also install most extensions by default in Supabase deployments. You can enable them as needed.
Pigsty also handles the underlying highly availablePostgreSQL cluster, highly available MinIO object storage cluster, and even Docker deployment, Nginx reverse proxy, domain configuration, and HTTPS certificate issuance. You can spin up any number of stateless Supabase container clusters using Docker Compose and store state in external Pigsty-managed database services.
With this self-hosted architecture, you gain the freedom to use different kernels (PG 15-18, OrioleDB), install 437 extensions, scale Supabase/Postgres/MinIO, freedom from database operations, and freedom from vendor lock-in — running locally forever. Compared to cloud service costs, you only need to prepare servers and run a few commands.
Single-Node Quick Start
Let’s start with single-node Supabase deployment. We’ll cover multi-node high availability later.
Before deploying Supabase, modify the auto-generated pigsty.yml configuration file (domain and passwords) according to your needs.
For local development/testing, you can skip this and customize later.
If configured correctly, after about ten minutes, you can access the Supabase Studio GUI at http://<your_ip_address>:8000 on your local network.
Default username and password are supabase and pigsty.
Notes:
In mainland China, Pigsty uses 1Panel and 1ms DockerHub mirrors by default, which may be slow.
You can configure your own proxy and registry mirror, then manually pull images with cd /opt/supabase; docker compose pull. We also offer expert consulting services including complete offline installation packages.
If you need object storage functionality, you must access Supabase via domain and HTTPS, otherwise errors will occur.
For serious production deployments, always change all default passwords!
Key Technical Decisions
Here are some key technical decisions for self-hosting Supabase:
Single-node deployment doesn’t provide PostgreSQL/MinIO high availability.
However, single-node deployment still has significant advantages over the official pure Docker Compose approach: out-of-the-box monitoring, freedom to install extensions, component scaling capabilities, and point-in-time recovery as a safety net.
If you only have one server or choose to self-host on cloud servers, Pigsty recommends using external S3 instead of local MinIO for object storage to hold PostgreSQL backups and Supabase Storage.
This deployment provides a minimum safety net RTO (hour-level recovery time) / RPO (MB-level data loss) disaster recovery in single-node conditions.
For serious production deployments, Pigsty recommends at least 3-4 nodes, ensuring both MinIO and PostgreSQL use enterprise-grade multi-node high availability deployments.
You’ll need more nodes and disks, adjusting cluster configuration in pigsty.yml and Supabase cluster configuration to use high availability endpoints.
Some Supabase features require sending emails, so SMTP service is needed. Unless purely for internal use, production deployments should use SMTP cloud services. Self-hosted mail servers’ emails are often marked as spam.
If your service is directly exposed to the public internet, we strongly recommend using real domain names and HTTPS certificates via Nginx Portal.
Next, we’ll discuss advanced topics for improving Supabase security, availability, and performance beyond single-node deployment.
Advanced: Security Hardening
Pigsty Components
For serious production deployments, we strongly recommend changing Pigsty component passwords. These defaults are public and well-known — going to production without changing passwords is like running naked:
After modifying Supabase credentials, restart Docker Compose to apply:
./app.yml -t app_config,app_launch # Using playbookcd /opt/supabase; make up # Manual execution
Advanced: Domain Configuration
If using Supabase locally or on LAN, you can directly connect to Kong’s HTTP port 8000 via IP:Port.
You can use an internal static-resolved domain, but for serious production deployments, we recommend using a real domain + HTTPS to access Supabase.
In this case, your server should have a public IP, you should own a domain, use cloud/DNS/CDN provider’s DNS resolution to point to the node’s public IP (optional fallback: local /etc/hosts static resolution).
The simple approach is to batch-replace the placeholder domain (supa.pigsty) with your actual domain, e.g., supa.pigsty.cc:
sed -ie 's/supa.pigsty/supa.pigsty.cc/g' ~/pigsty/pigsty.yml
If not configured beforehand, reload Nginx and Supabase configuration:
all:vars:certbot_sign:true# Use certbot to sign real certificatesinfra_portal:home:i.pigsty.cc # Replace with your domain!supa:domain:supa.pigsty.cc # Replace with your domain!endpoint:"10.10.10.10:8000"websocket:truecertbot:supa.pigsty.cc # Certificate name, usually same as domainchildren:supabase:vars:apps:supabase:# Supabase app definitionconf:# Override /opt/supabase/.envSITE_URL:https://supa.pigsty.cc # <------- Change to your external domain nameAPI_EXTERNAL_URL:https://supa.pigsty.cc # <------- Otherwise the storage API may not work!SUPABASE_PUBLIC_URL:https://supa.pigsty.cc # <------- Don't forget to set this in infra_portal!
For complete domain/HTTPS configuration, see Certificate Management. You can also use Pigsty’s built-in local static resolution and self-signed HTTPS certificates as fallback.
Advanced: External Object Storage
You can use S3 or S3-compatible services for PostgreSQL backups and Supabase object storage. Here we use Alibaba Cloud OSS as an example.
Pigsty provides a terraform/spec/aliyun-s3.tf template for provisioning a server and OSS bucket on Alibaba Cloud.
First, modify the S3 configuration in all.children.supa.vars.apps.[supabase].conf to point to Alibaba Cloud OSS:
# if using s3/minio as file storageS3_BUCKET:data # Replace with S3-compatible service infoS3_ENDPOINT:https://sss.pigsty:9000 # Replace with S3-compatible service infoS3_ACCESS_KEY:s3user_data # Replace with S3-compatible service infoS3_SECRET_KEY:S3User.Data # Replace with S3-compatible service infoS3_FORCE_PATH_STYLE:true# Replace with S3-compatible service infoS3_REGION:stub # Replace with S3-compatible service infoS3_PROTOCOL:https # Replace with S3-compatible service info
Reload Supabase configuration:
./app.yml -t app_config,app_launch
You can also use S3 as PostgreSQL backup repository. Add an aliyun backup repository definition in all.vars.pgbackrest_repo:
all:vars:pgbackrest_method: aliyun # pgbackrest backup method:local,minio,[user-defined repos...]pgbackrest_repo: # pgbackrest backup repo:https://pgbackrest.org/configuration.html#section-repositoryaliyun:# Define new backup repo 'aliyun'type:s3 # Alibaba Cloud OSS is S3-compatibles3_endpoint:oss-cn-beijing-internal.aliyuncs.coms3_region:oss-cn-beijings3_bucket:pigsty-osss3_key:xxxxxxxxxxxxxxs3_key_secret:xxxxxxxxs3_uri_style:hostpath:/pgbackrestbundle:y# bundle small files into a single filebundle_limit:20MiB # Limit for file bundles, 20MiB for object storagebundle_size:128MiB # Target size for file bundles, 128MiB for object storagecipher_type:aes-256-cbc # enable AES encryption for remote backup repocipher_pass:pgBackRest.MyPass # Set encryption password for pgBackRest backup reporetention_full_type:time # retention full backup by time on minio reporetention_full:14# keep full backup for the last 14 days
Then specify aliyun backup repository in all.vars.pgbackrest_method and reset pgBackrest:
./pgsql.yml -t pgbackrest
Pigsty will switch the backup repository to external object storage. For more backup configuration, see PostgreSQL Backup.
Advanced: Using SMTP
You can use SMTP for sending emails. Modify the supabase app configuration with SMTP information:
all:children:supabase:# supa groupvars:# supa group varsapps:# supa group app listsupabase:# the supabase appconf:# the supabase app conf entriesSMTP_HOST:smtpdm.aliyun.com:80SMTP_PORT:80SMTP_USER:[email protected]SMTP_PASS:your_email_user_passwordSMTP_SENDER_NAME:MySupabaseSMTP_ADMIN_EMAIL:[email protected]ENABLE_ANONYMOUS_USERS:false
Don’t forget to reload configuration with app.yml.
Advanced: True High Availability
After these configurations, you have enterprise-grade Supabase with public domain, HTTPS certificate, SMTP, PITR backup, monitoring, IaC, and 400+ extensions (basic single-node version).
For high availability configuration, see other Pigsty documentation. We offer expert consulting services for hands-on Supabase self-hosting — $400 USD to save you the hassle.
Single-node RTO/RPO relies on external object storage as a safety net. If your node fails, backups in external S3 storage let you redeploy Supabase on a new node and restore from backup.
This provides minimum safety net RTO (hour-level recovery) / RPO (MB-level data loss) disaster recovery.
For RTO < 30s with zero data loss on failover, use multi-node high availability deployment:
ETCD: DCS needs three or more nodes to tolerate one node failure.
PGSQL: PostgreSQL synchronous commit (no data loss) mode recommends at least three nodes.
INFRA: Monitoring infrastructure failure has less impact; production recommends dual replicas.
Supabase stateless containers can also be multi-node replicas for high availability.
In this case, you also need to modify PostgreSQL and MinIO endpoints to use DNS / L2 VIP / HAProxy high availability endpoints.
For these parts, follow the documentation for each Pigsty module.
Reference conf/ha/trio.yml and conf/ha/safe.yml for upgrading to three or more nodes.
2 - Odoo: Self-Hosted Open Source ERP
How to spin up an out-of-the-box enterprise application suite Odoo and use Pigsty to manage its backend PostgreSQL database.
Odoo is an open-source enterprise resource planning (ERP) software that provides a full suite of business applications, including CRM, sales, purchasing, inventory, production, accounting, and other management functions. Odoo is a typical web application that uses PostgreSQL as its underlying database.
All your business on one platform — Simple, efficient, yet affordable
Odoo listens on port 8069 by default. Access http://<ip>:8069 in your browser. The default username and password are both admin.
You can add a DNS resolution record odoo.pigsty pointing to your server in the browser host’s /etc/hosts file, allowing you to access the Odoo web interface via http://odoo.pigsty.
If you want to access Odoo via SSL/HTTPS, you need to use a real SSL certificate or trust the self-signed CA certificate automatically generated by Pigsty. (In Chrome, you can also type thisisunsafe to bypass certificate verification)
Configuration Template
conf/app/odoo.yml defines a template configuration file containing the resources required for a single Odoo instance.
all:children:# Odoo application (default username and password: admin/admin)odoo:hosts:{10.10.10.10:{}}vars:app:odoo # Specify app name to install (in apps)apps:# Define all applicationsodoo:# App name, should have corresponding ~/pigsty/app/odoo folderfile:# Optional directories to create- {path: /data/odoo ,state: directory, owner: 100, group:101}- {path: /data/odoo/webdata ,state: directory, owner: 100, group:101}- {path: /data/odoo/addons ,state: directory, owner: 100, group:101}conf:# Override /opt/<app>/.env config filePG_HOST:10.10.10.10# PostgreSQL hostPG_PORT:5432# PostgreSQL portPG_USERNAME:odoo # PostgreSQL userPG_PASSWORD:DBUser.Odoo # PostgreSQL passwordODOO_PORT:8069# Odoo app portODOO_DATA:/data/odoo/webdata # Odoo webdataODOO_ADDONS:/data/odoo/addons # Odoo pluginsODOO_DBNAME:odoo # Odoo database nameODOO_VERSION:19.0# Odoo image version# Odoo databasepg-odoo:hosts:{10.10.10.10:{pg_seq: 1, pg_role:primary } }vars:pg_cluster:pg-odoopg_users:- {name: odoo ,password: DBUser.Odoo ,pgbouncer: true ,roles: [ dbrole_admin ] ,createdb: true ,comment:admin user for odoo service }- {name: odoo_ro ,password: DBUser.Odoo ,pgbouncer: true ,roles: [ dbrole_readonly ] ,comment:read only user for odoo service }- {name: odoo_rw ,password: DBUser.Odoo ,pgbouncer: true ,roles: [ dbrole_readwrite ] ,comment:read write user for odoo service }pg_databases:- {name: odoo ,owner: odoo ,revokeconn: true ,comment:odoo main database }pg_hba_rules:- {user: all ,db: all ,addr: 172.17.0.0/16 ,auth: pwd ,title:'allow access from local docker network'}- {user: dbuser_view , db: all ,addr: infra ,auth: pwd ,title:'allow grafana dashboard access cmdb from infra nodes'}node_crontab:['00 01 * * * postgres /pg/bin/pg-backup full']# Full backup daily at 1aminfra:{hosts:{10.10.10.10:{infra_seq:1}}}etcd:{hosts:{10.10.10.10:{etcd_seq: 1 } }, vars:{etcd_cluster:etcd } }#minio: { hosts: { 10.10.10.10: { minio_seq: 1 } }, vars: { minio_cluster: minio } }vars:# Global variablesversion:v4.0.0 # Pigsty version stringadmin_ip:10.10.10.10# Admin node IP addressregion: default # Upstream mirror region:default|china|europenode_tune: oltp # Node tuning specs:oltp,olap,tiny,critpg_conf: oltp.yml # PGSQL tuning specs:{oltp,olap,tiny,crit}.ymldocker_enabled:true# Enable docker on app group#docker_registry_mirrors: ["https://docker.1panel.live","https://docker.1ms.run","https://docker.xuanyuan.me","https://registry-1.docker.io"]proxy_env:# Global proxy env for downloading packages & pulling docker imagesno_proxy:"localhost,127.0.0.1,10.0.0.0/8,192.168.0.0/16,*.pigsty,*.aliyun.com,mirrors.*,*.tsinghua.edu.cn"#http_proxy: 127.0.0.1:12345 # Add proxy env here for downloading packages or pulling images#https_proxy: 127.0.0.1:12345 # Usually format is http://user:[email protected]#all_proxy: 127.0.0.1:12345infra_portal:# Domain names and upstream servershome :{domain:i.pigsty }minio :{domain: m.pigsty ,endpoint:"${admin_ip}:9001",scheme: https ,websocket:true}odoo:# Nginx server config for odoodomain:odoo.pigsty # REPLACE WITH YOUR OWN DOMAIN!endpoint:"10.10.10.10:8069"# Odoo service endpoint: IP:PORTwebsocket:true# Add websocket supportcertbot:odoo.pigsty # Certbot cert name, apply with `make cert`repo_enabled:falsenode_repo_modules:node,infra,pgsqlpg_version:18#----------------------------------## Credentials: MUST CHANGE THESE!#----------------------------------#grafana_admin_password:pigstygrafana_view_password:DBUser.Viewerpg_admin_password:DBUser.DBApg_monitor_password:DBUser.Monitorpg_replication_password:DBUser.Replicatorpatroni_password:Patroni.APIhaproxy_admin_password:pigstyminio_secret_key:S3User.MinIOetcd_root_password:Etcd.Root
Basics
Check the configurable environment variables in the .env file:
If you want to access Odoo via SSL, you must trust files/pki/ca/ca.crt in your browser (or use the dirty hack thisisunsafe in Chrome).
3 - Dify: AI Workflow Platform
How to self-host the AI Workflow LLMOps platform — Dify, using external PostgreSQL, PGVector, and Redis for storage with Pigsty?
Dify is a Generative AI Application Innovation Engine and open-source LLM application development platform. It provides capabilities from Agent building to AI workflow orchestration, RAG retrieval, and model management, helping users easily build and operate generative AI native applications.
Pigsty provides support for self-hosted Dify, allowing you to deploy Dify with a single command while storing critical state in externally managed PostgreSQL. You can use pgvector as a vector database in the same PostgreSQL instance, further simplifying deployment.
Dify listens on port 5001 by default. Access http://<ip>:5001 in your browser and set up your initial user credentials to log in.
Once Dify starts, you can install various extensions, configure system models, and start using it!
Why Self-Host
There are many reasons to self-host Dify, but the primary motivation is data security. The Docker Compose template provided by Dify uses basic default database images, lacking enterprise features like high availability, disaster recovery, monitoring, IaC, and PITR capabilities.
Pigsty elegantly solves these issues for Dify, deploying all components with a single command based on configuration files and using mirrors to address China region access challenges. This makes Dify deployment and delivery very smooth. It handles PostgreSQL primary database, PGVector vector database, MinIO object storage, Redis, Prometheus monitoring, Grafana visualization, Nginx reverse proxy, and free HTTPS certificates all at once.
Pigsty ensures all Dify state is stored in externally managed services, including metadata in PostgreSQL and other data in the file system. Dify instances launched via Docker Compose become stateless applications that can be destroyed and rebuilt at any time, greatly simplifying operations.
Installation
Let’s start with single-node Dify deployment. We’ll cover production high-availability deployment methods later.
curl -fsSL https://repo.pigsty.io/get | bash;cd ~/pigsty
./bootstrap # Prepare Pigsty dependencies./configure -c app/dify # Use Dify application templatevi pigsty.yml # Edit configuration file, modify domains and passwords./deploy.yml # Install Pigsty and various databases
When you use the ./configure -c app/dify command, Pigsty automatically generates a configuration file based on the conf/app/dify.yml template and your current environment.
You should modify passwords, domains, and other relevant parameters in the generated pigsty.yml configuration file according to your needs, then run ./deploy.yml to execute the standard installation process.
Next, run docker.yml to install Docker and Docker Compose, then use app.yml to complete Dify deployment:
./docker.yml # Install Docker and Docker Compose./app.yml # Deploy Dify stateless components with Docker
You can access the Dify Web admin interface at http://<your_ip_address>:5001 on your local network.
The first login will prompt you to set up default username, email, and password.
You can also use the locally resolved placeholder domain dify.pigsty, or follow the configuration below to use a real domain with an HTTPS certificate.
Configuration
When you use the ./configure -c app/dify command for configuration, Pigsty automatically generates a configuration file based on the conf/app/dify.yml template and your current environment. Here’s a detailed explanation of the default configuration:
---#==============================================================## File : dify.yml# Desc : pigsty config for running 1-node dify app# Ctime : 2025-02-24# Mtime : 2025-12-12# Docs : https://doc.pgsty.com/app/odoo# License : Apache-2.0 @ https://pigsty.io/docs/about/license/# Copyright : 2018-2026 Ruohang Feng / Vonng ([email protected])#==============================================================## Last Verified Dify Version: v1.8.1 on 2025-0908# tutorial: https://doc.pgsty.com/app/dify# how to use this template:## curl -fsSL https://repo.pigsty.io/get | bash; cd ~/pigsty# ./bootstrap # prepare local repo & ansible# ./configure -c app/dify # use this dify config template# vi pigsty.yml # IMPORTANT: CHANGE CREDENTIALS!!# ./deploy.yml # install pigsty & pgsql & minio# ./docker.yml # install docker & docker-compose# ./app.yml # install dify with docker-compose## To replace domain name:# sed -ie 's/dify.pigsty/dify.pigsty.cc/g' pigsty.ymlall:children:# the dify applicationdify:hosts:{10.10.10.10:{}}vars:app:dify # specify app name to be installed (in the apps)apps:# define all applicationsdify:# app name, should have corresponding ~/pigsty/app/dify folderfile:# data directory to be created- {path: /data/dify ,state: directory ,mode:0755}conf:# override /opt/dify/.env config file# change domain, mirror, proxy, secret keyNGINX_SERVER_NAME:dify.pigsty# A secret key for signing and encryption, gen with `openssl rand -base64 42` (CHANGE PASSWORD!)SECRET_KEY:sk-somerandomkey# expose DIFY nginx service with port 5001 by defaultDIFY_PORT:5001# where to store dify files? the default is ./volume, we'll use another volume created aboveDIFY_DATA:/data/dify# proxy and mirror settings#PIP_MIRROR_URL: https://pypi.tuna.tsinghua.edu.cn/simple#SANDBOX_HTTP_PROXY: http://10.10.10.10:12345#SANDBOX_HTTPS_PROXY: http://10.10.10.10:12345# database credentialsDB_USERNAME:difyDB_PASSWORD:difyai123456DB_HOST:10.10.10.10DB_PORT:5432DB_DATABASE:difyVECTOR_STORE:pgvectorPGVECTOR_HOST:10.10.10.10PGVECTOR_PORT:5432PGVECTOR_USER:difyPGVECTOR_PASSWORD:difyai123456PGVECTOR_DATABASE:difyPGVECTOR_MIN_CONNECTION:2PGVECTOR_MAX_CONNECTION:10pg-meta:hosts:{10.10.10.10:{pg_seq: 1, pg_role:primary } }vars:pg_cluster:pg-metapg_users:- {name: dify ,password: difyai123456 ,pgbouncer: true ,roles: [ dbrole_admin ] ,superuser: true ,comment:dify superuser }pg_databases:- {name: dify ,owner: dify ,revokeconn: true ,comment:dify main database }- {name: dify_plugin ,owner: dify ,revokeconn: true ,comment:dify plugin_daemon database }pg_hba_rules:- {user: dify ,db: all ,addr: 172.17.0.0/16 ,auth: pwd ,title:'allow dify access from local docker network'}node_crontab:['00 01 * * * postgres /pg/bin/pg-backup full']# make a full backup every 1aminfra:{hosts:{10.10.10.10:{infra_seq:1}}}etcd:{hosts:{10.10.10.10:{etcd_seq: 1 } }, vars:{etcd_cluster:etcd } }#minio: { hosts: { 10.10.10.10: { minio_seq: 1 } }, vars: { minio_cluster: minio } }vars:# global variablesversion:v4.0.0 # pigsty version stringadmin_ip:10.10.10.10# admin node ip addressregion: default # upstream mirror region:default|china|europenode_tune: oltp # node tuning specs:oltp,olap,tiny,critpg_conf: oltp.yml # pgsql tuning specs:{oltp,olap,tiny,crit}.ymldocker_enabled:true# enable docker on app group#docker_registry_mirrors: ["https://docker.1panel.live","https://docker.1ms.run","https://docker.xuanyuan.me","https://registry-1.docker.io"]proxy_env:# global proxy env when downloading packages & pull docker imagesno_proxy:"localhost,127.0.0.1,10.0.0.0/8,192.168.0.0/16,*.pigsty,*.aliyun.com,mirrors.*,*.tsinghua.edu.cn"#http_proxy: 127.0.0.1:12345 # add your proxy env here for downloading packages or pull images#https_proxy: 127.0.0.1:12345 # usually the proxy is format as http://user:[email protected]#all_proxy: 127.0.0.1:12345infra_portal:# domain names and upstream servershome :{domain:i.pigsty }#minio : { domain: m.pigsty ,endpoint: "${admin_ip}:9001" ,scheme: https ,websocket: true }dify:# nginx server config for difydomain:dify.pigsty # REPLACE WITH YOUR OWN DOMAIN!endpoint:"10.10.10.10:5001"# dify service endpoint: IP:PORTwebsocket:true# add websocket supportcertbot:dify.pigsty # certbot cert name, apply with `make cert`repo_enabled:falsenode_repo_modules:node,infra,pgsqlpg_version:18#----------------------------------------------## PASSWORD : https://doc.pgsty.com/config/security#----------------------------------------------#grafana_admin_password:pigstygrafana_view_password:DBUser.Viewerpg_admin_password:DBUser.DBApg_monitor_password:DBUser.Monitorpg_replication_password:DBUser.Replicatorpatroni_password:Patroni.APIhaproxy_admin_password:pigstyminio_secret_key:S3User.MinIOetcd_root_password:Etcd.Root...
Checklist
Here’s a checklist of configuration items you need to pay attention to:
It’s best to specify an email address certbot_email for certificate expiration notifications
Configure Dify’s NGINX_SERVER_NAME parameter to specify your actual domain
all:children:# Cluster definitionsdify:# Dify groupvars:# Dify group variablesapps:# Application configurationdify:# Dify application definitionconf:# Dify application configurationNGINX_SERVER_NAME:dify.pigstyvars:# Global parameters#certbot_sign: true # Use Certbot for free HTTPS certificatecertbot_email:[email protected]# Email for certificate requests, for expiration notifications, optionalinfra_portal:# Configure Nginx serversdify:# Dify server definitiondomain:dify.pigsty # Replace with your own domain here!endpoint:"10.10.10.10:5001"# Specify Dify's IP and port here (auto-configured by default)websocket:true# Dify requires websocket enabledcertbot:dify.pigsty # Specify Certbot certificate name
Use the following commands to request Nginx certificates:
# Request certificate, can also manually run /etc/nginx/sign-cert scriptmake cert
# The above Makefile shortcut actually runs the following playbook task:./infra.yml -t nginx_certbot,nginx_reload -e certbot_sign=true
Run the app.yml playbook to redeploy Dify service for the NGINX_SERVER_NAME configuration to take effect:
./app.yml
File Backup
You can use restic to backup Dify’s file storage (default location /data/dify):
Another more reliable method is using JuiceFS to mount MinIO object storage to the /data/dify directory, allowing you to use MinIO/S3 for file state storage.
If you want to store all data in PostgreSQL, consider “storing file system data in PostgreSQL using JuiceFS”.
For example, you can create another dify_fs database and use it as JuiceFS metadata storage:
METAURL=postgres://dify:difyai123456@:5432/dify_fs
OPTIONS=( --storage postgres
--bucket :5432/dify_fs
--access-key dify
--secret-key difyai123456
${METAURL} jfs
)juicefs format "${OPTIONS[@]}"# Create PG file systemjuicefs mount ${METAURL} /data/dify -d # Mount to /data/dify directory in backgroundjuicefs bench /data/dify # Test performancejuicefs umount /data/dify # Unmount
Use NocoDB to transform PostgreSQL databases into smart spreadsheets, a no-code database application platform.
NocoDB is an open-source Airtable alternative that turns any database into a smart spreadsheet.
It provides a rich user interface that allows you to create powerful database applications without writing code. NocoDB supports PostgreSQL, MySQL, SQL Server, and more, making it ideal for building internal tools and data management systems.
Quick Start
Pigsty provides a Docker Compose configuration file for NocoDB in the software template directory:
cd ~/pigsty/app/nocodb
Review and modify the .env configuration file (adjust database connections as needed).
First-time access requires creating an administrator account
Management Commands
Pigsty provides convenient Makefile commands to manage NocoDB:
make up # Start NocoDB servicemake run # Start with Docker (connect to external PostgreSQL)make view # Display NocoDB access URLmake log # View container logsmake info # View service detailsmake stop # Stop the servicemake clean # Stop and remove containersmake pull # Pull the latest imagemake rmi # Remove NocoDB imagemake save # Save image to /tmp/nocodb.tgzmake load # Load image from /tmp/nocodb.tgz
Connect to PostgreSQL
NocoDB can connect to PostgreSQL databases managed by Pigsty.
When adding a new project in the NocoDB interface, select “External Database” and enter the PostgreSQL connection information:
Build AI-powered no-code database applications with Teable to boost team productivity.
Teable is an AI-powered no-code database platform designed for team collaboration and automation.
Teable perfectly combines the power of databases with the ease of spreadsheets, integrating AI capabilities to help teams efficiently generate, automate, and collaborate on data.
Quick Start
Teable requires a complete Pigsty environment (including PostgreSQL, Redis, MinIO).
Prepare Environment
cd ~/pigsty
./bootstrap # Prepare local repo and Ansible./configure -c app/teable # Important: modify default credentials!./deploy.yml # Install Pigsty, PostgreSQL, MinIO./redis.yml # Install Redis instance./docker.yml # Install Docker and Docker Compose./app.yml # Install Teable with Docker Compose
First-time access requires registering an administrator account
Management Commands
Manage Teable in the Pigsty software template directory:
cd ~/pigsty/app/teable
make up # Start Teable servicemake down # Stop Teable servicemake log # View container logsmake clean # Clean up containers and data
Architecture
Teable depends on the following components:
PostgreSQL: Stores application data and metadata
Redis: Caching and session management
MinIO: Object storage (files, images, etc.)
Docker: Container runtime environment
Ensure these services are properly installed before deploying Teable.
Features
AI Integration: Built-in AI assistant for auto-generating data, formulas, and workflows
Smart Tables: Powerful table functionality with multiple field types
Automated Workflows: No-code automation to boost team efficiency
Multiple Views: Grid, form, kanban, calendar, and more
Team Collaboration: Real-time collaboration, permission management, comments
API and Integrations: Auto-generated API with Webhook support
Template Library: Rich application templates for quick project starts
Configuration
Teable configuration is managed through environment variables in docker-compose.yml:
make up # pull up gitea with docker-compose in minimal modemake run # launch gitea with docker , local data dir and external PostgreSQLmake view # print gitea access pointmake log # tail -f gitea logsmake info # introspect gitea with jqmake stop # stop gitea containermake clean # remove gitea containermake pull # pull latest gitea imagemake rmi # remove gitea imagemake save # save gitea image to /tmp/gitea.tgzmake load # load gitea image from /tmp
PostgreSQL Preparation
Gitea use built-in SQLite as default metadata storage, you can let Gitea use external PostgreSQL by setting connection string environment variable
# add to nginx_upstream- {name: wiki , domain: wiki.pigsty.cc , endpoint:"127.0.0.1:9002"}
./infra.yml -t nginx_config
ansible all -b -a 'nginx -s reload'
9 - Mattermost: Open-Source IM
Build a private team collaboration platform with Mattermost, the open-source Slack alternative.
Mattermost is an open-source team collaboration and messaging platform.
Mattermost provides instant messaging, file sharing, audio/video calls, and more. It’s an open-source alternative to Slack and Microsoft Teams, particularly suitable for enterprises requiring self-hosted deployment.
Quick Start
cd ~/pigsty/app/mattermost
make up     # Start Mattermost with Docker Compose
Manage personal finances with Maybe, the open-source Mint/Personal Capital alternative.
Maybe is an open-source personal finance management application.
Maybe provides financial tracking, budget management, investment analysis, and more. It’s an open-source alternative to Mint and Personal Capital, giving you complete control over your financial data.
Quick Start
cd ~/pigsty/app/maybe
cp .env.example .env
vim .env # Must modify SECRET_KEY_BASEmake up # Start Maybe service
Use Metabase for rapid business intelligence analysis with a user-friendly interface for team self-service data exploration.
Metabase is a fast, easy-to-use open-source business intelligence tool that lets your team explore and visualize data without SQL knowledge.
Metabase provides a friendly user interface with rich chart types and supports connecting to various databases, making it an ideal choice for enterprise data analysis.
Quick Start
Pigsty provides a Docker Compose configuration file for Metabase in the software template directory:
cd ~/pigsty/app/metabase
Review and modify the .env configuration file:
vim .env # Check configuration, recommend changing default credentials
Pigsty provides convenient Makefile commands to manage Metabase:
make up # Start Metabase servicemake run # Start with Docker (connect to external PostgreSQL)make view # Display Metabase access URLmake log # View container logsmake info # View service detailsmake stop # Stop the servicemake clean # Stop and remove containersmake pull # Pull the latest imagemake rmi # Remove Metabase imagemake save # Save image to filemake load # Load image from file
Connect to PostgreSQL
Metabase can connect to PostgreSQL databases managed by Pigsty.
During Metabase initialization or when adding a database, select “PostgreSQL” and enter the connection information:
Recommended: Use a dedicated PostgreSQL database for storing Metabase metadata.
Data Persistence
Metabase metadata (users, questions, dashboards, etc.) is stored in the configured database.
If using H2 database (default), data is saved in the /data/metabase directory. Using PostgreSQL as the metadata database is strongly recommended for production environments.
Performance Optimization
Use PostgreSQL: Replace the default H2 database
Increase Memory: Add JVM memory with JAVA_OPTS=-Xmx4g
Database Indexes: Create indexes for frequently queried fields
Result Caching: Enable Metabase query result caching
Scheduled Updates: Set reasonable dashboard auto-refresh frequency
Security Recommendations
Change Default Credentials: Modify metadata database username and password
Enable HTTPS: Configure SSL certificates for production
Configure Authentication: Enable SSO or LDAP authentication
Restrict Access: Limit access through firewall
Regular Backups: Back up the Metabase metadata database
Learn how to deploy Kong, the API gateway, with Docker Compose and use external PostgreSQL as the backend database
TL;DR
cd app/kong ; docker-compose up -d
make up # pull up kong with docker-composemake ui # run swagger ui containermake log # tail -f kong logsmake info # introspect kong with jqmake stop # stop kong containermake clean # remove kong containermake rmui # remove swagger ui containermake pull # pull latest kong imagemake rmi # remove kong imagemake save # save kong image to /tmp/kong.tgzmake load # load kong image from /tmp
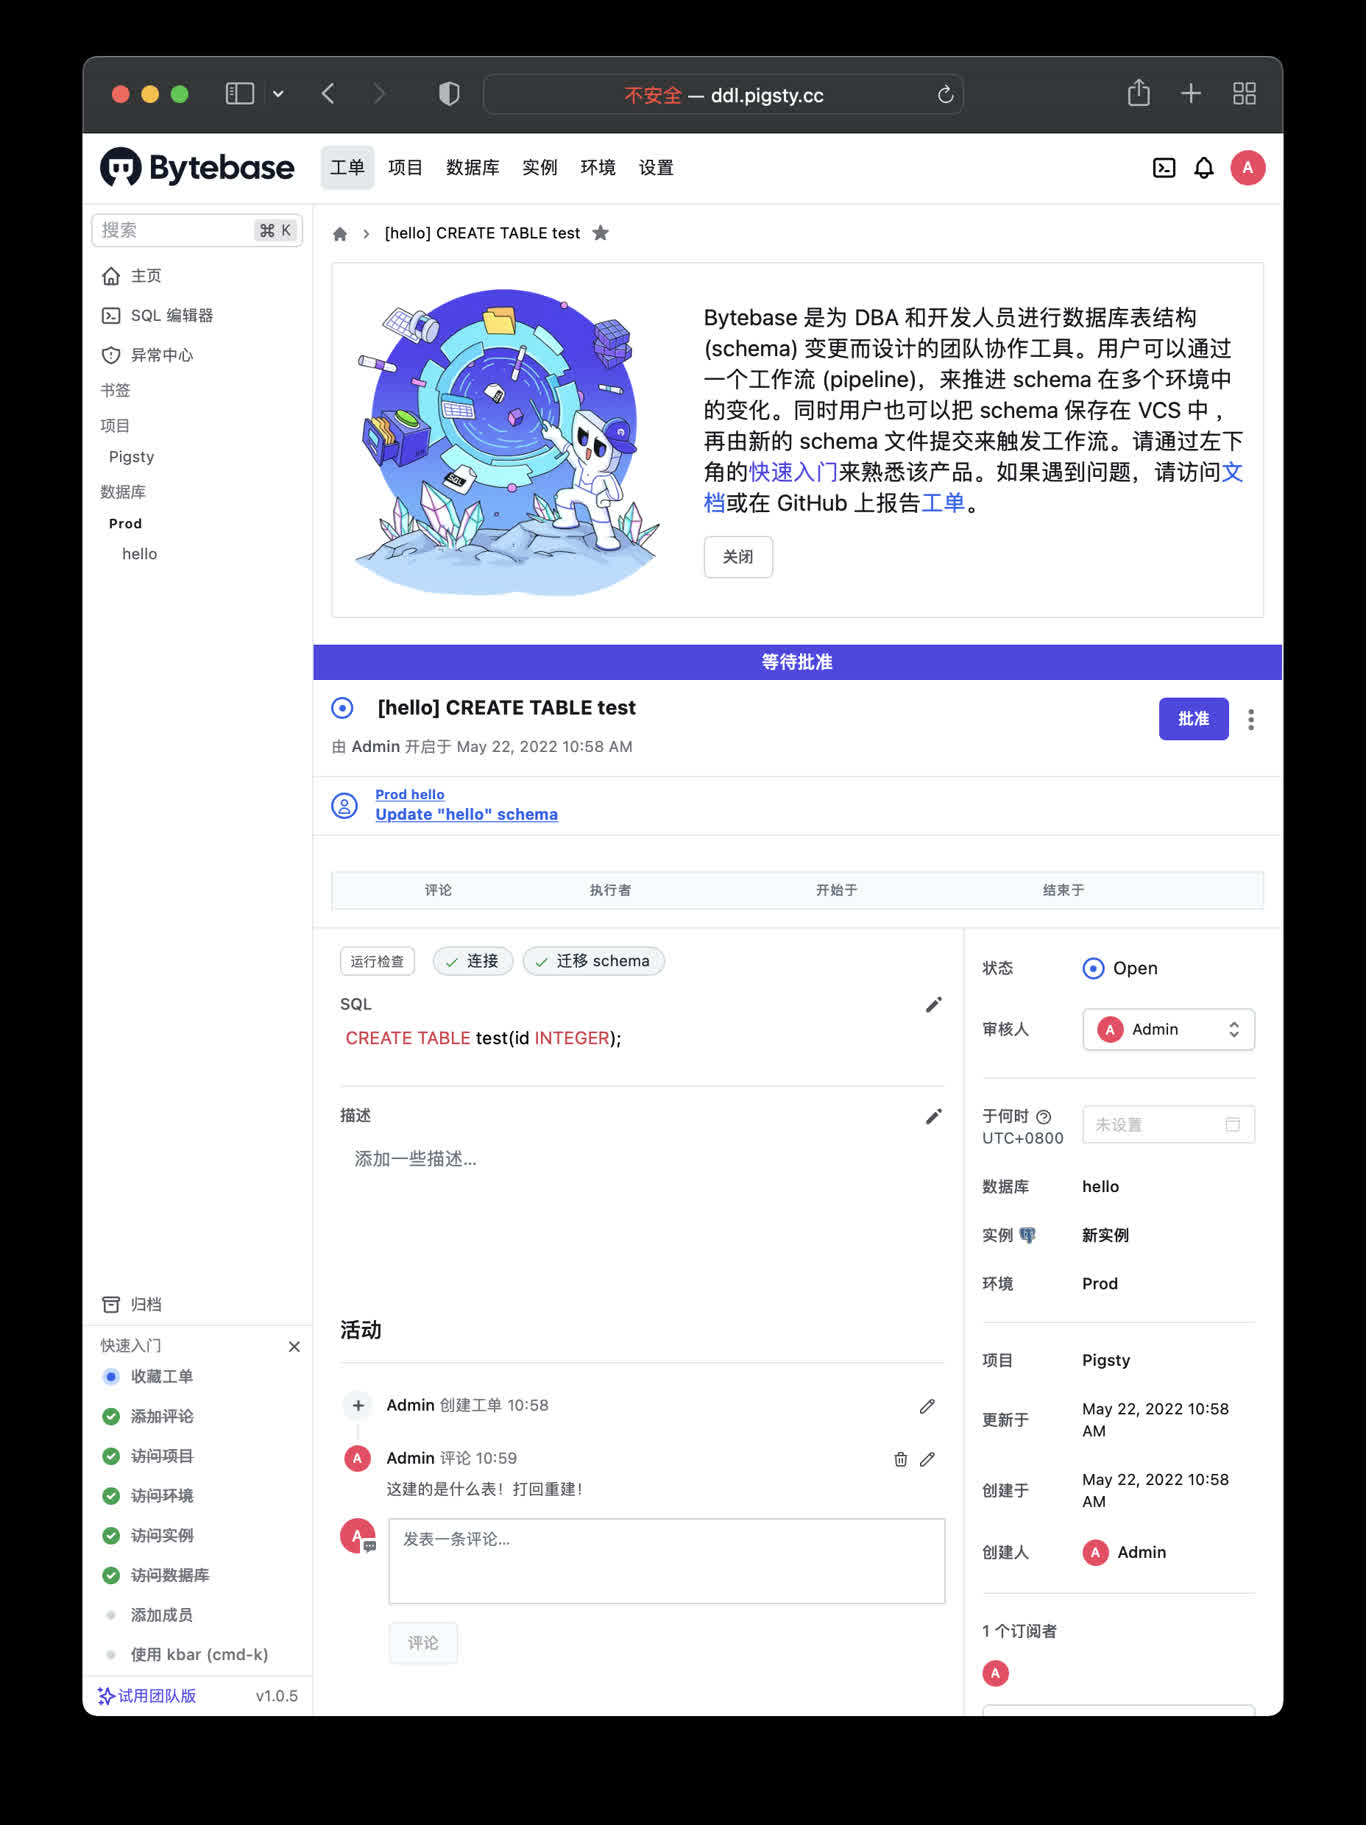
Then visit http://10.10.10.10:8887/ or http://ddl.pigsty to access bytebase console. You have to “Create Project”, “Env”, “Instance”, “Database” to perform schema migration.
make up # pull up bytebase with docker-compose in minimal modemake run # launch bytebase with docker , local data dir and external PostgreSQLmake view # print bytebase access pointmake log # tail -f bytebase logsmake info # introspect bytebase with jqmake stop # stop bytebase containermake clean # remove bytebase containermake pull # pull latest bytebase imagemake rmi # remove bytebase imagemake save # save bytebase image to /tmp/bytebase.tgzmake load # load bytebase image from /tmp
PostgreSQL Preparation
Bytebase use its internal PostgreSQL database by default, You can use external PostgreSQL for higher durability.
If you wish to perform CRUD operations and design more fine-grained permission control, please refer
to Tutorial 1 - The Golden Key to generate a signed JWT.
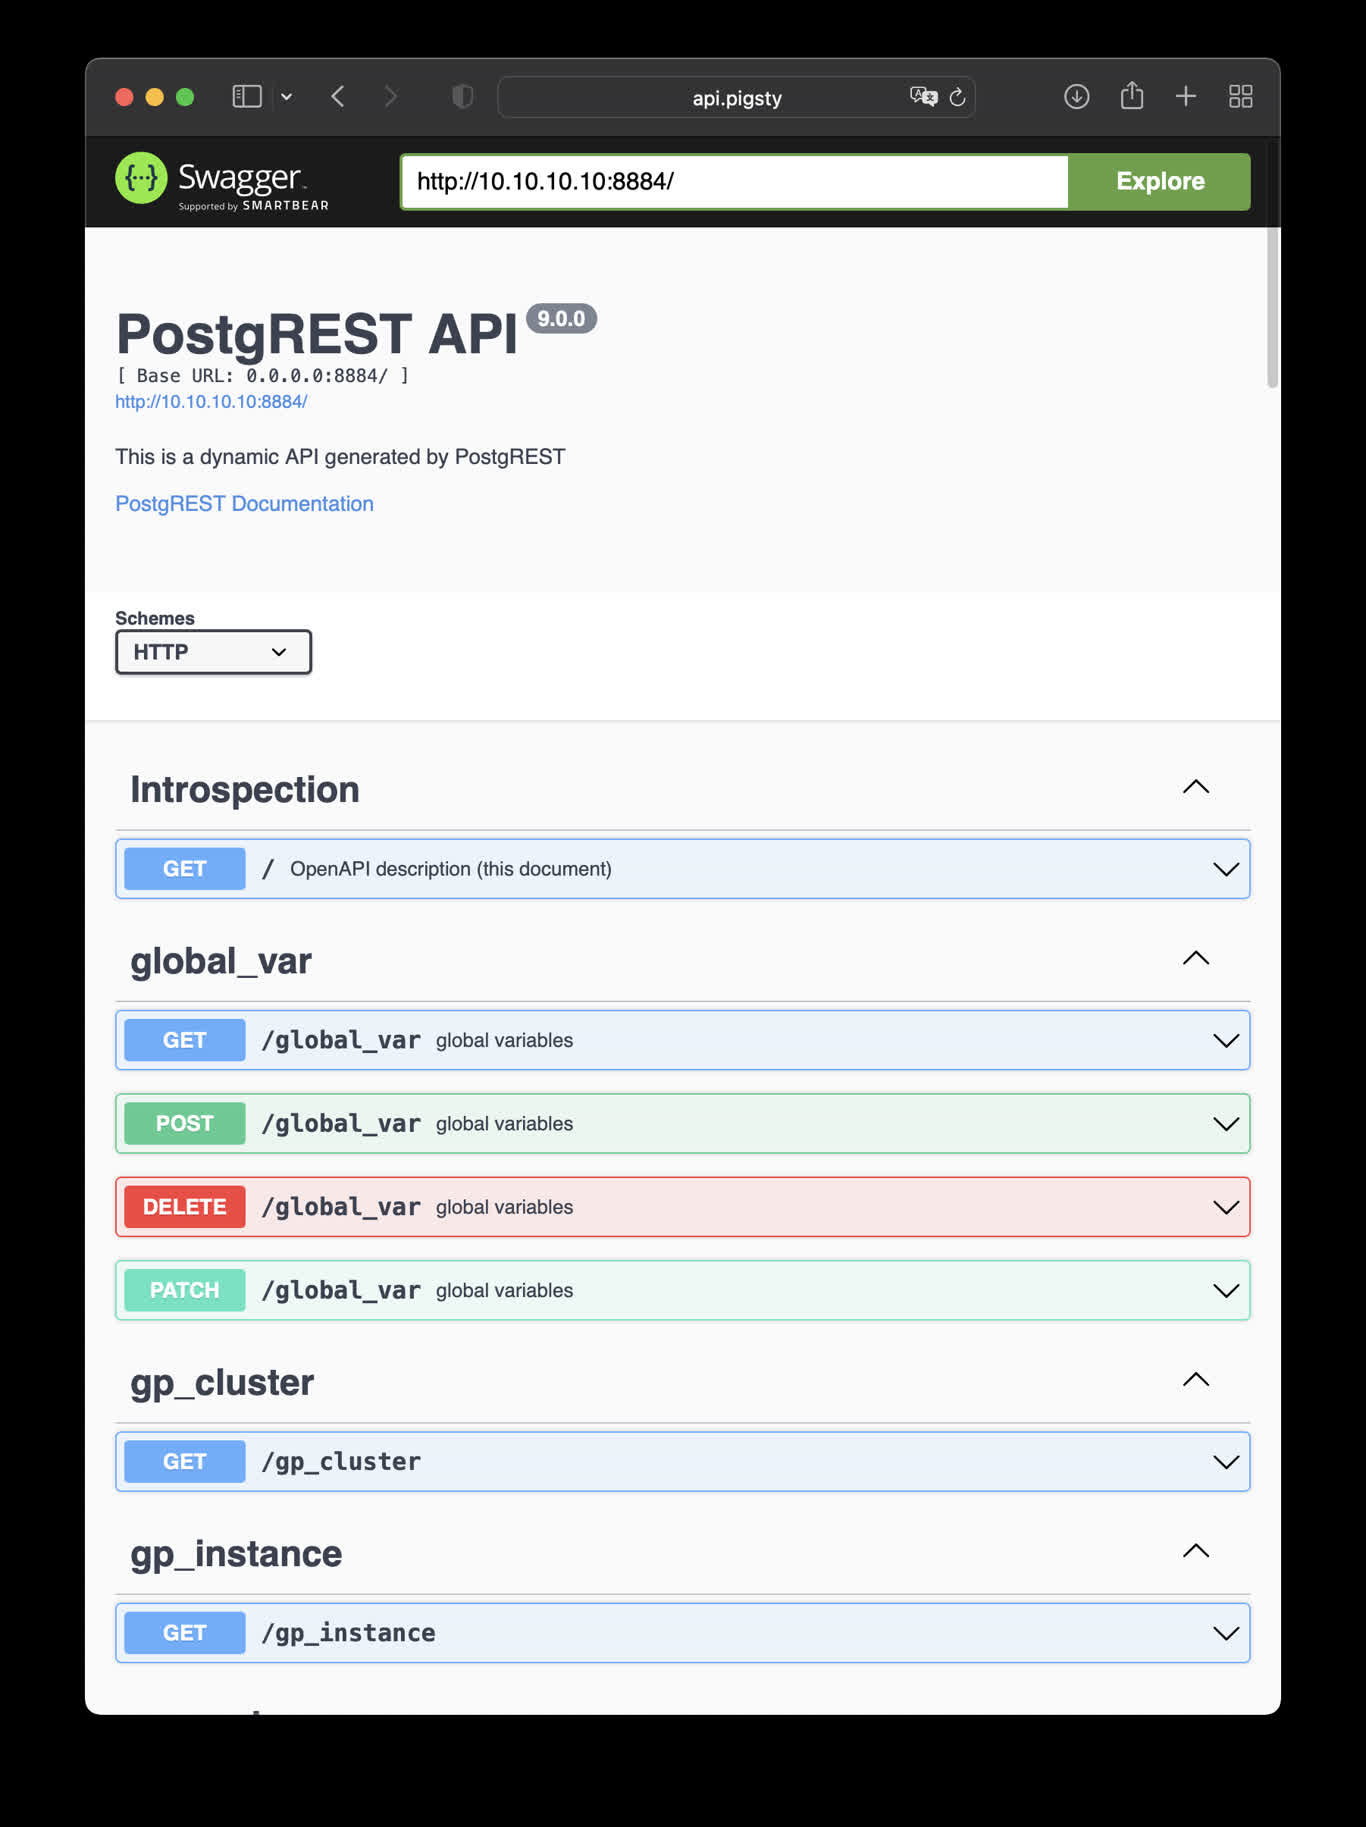
This is an example of creating pigsty cmdb API with PostgREST
cd ~/pigsty/app/postgrest ; docker-compose up -d
http://10.10.10.10:8884 is the default endpoint for PostgREST
http://10.10.10.10:8883 is the default api docs for PostgREST
make up # pull up postgrest with docker-composemake run # launch postgrest with dockermake ui # run swagger ui containermake view # print postgrest access pointmake log # tail -f postgrest logsmake info # introspect postgrest with jqmake stop # stop postgrest containermake clean # remove postgrest containermake rmui # remove swagger ui containermake pull # pull latest postgrest imagemake rmi # remove postgrest imagemake save # save postgrest image to /tmp/postgrest.tgzmake load # load postgrest image from /tmp
Swagger UI
Launch a swagger OpenAPI UI and visualize PostgREST API on 8883 with:
Use Electric to solve PostgreSQL data synchronization challenges with partial replication and real-time data transfer.
Electric is a PostgreSQL sync engine that solves complex data synchronization problems.
Electric supports partial replication, fan-out delivery, and efficient data transfer, making it ideal for building real-time and offline-first applications.
Quick Start
cd ~/pigsty/app/electric
make up     # Start Electric service
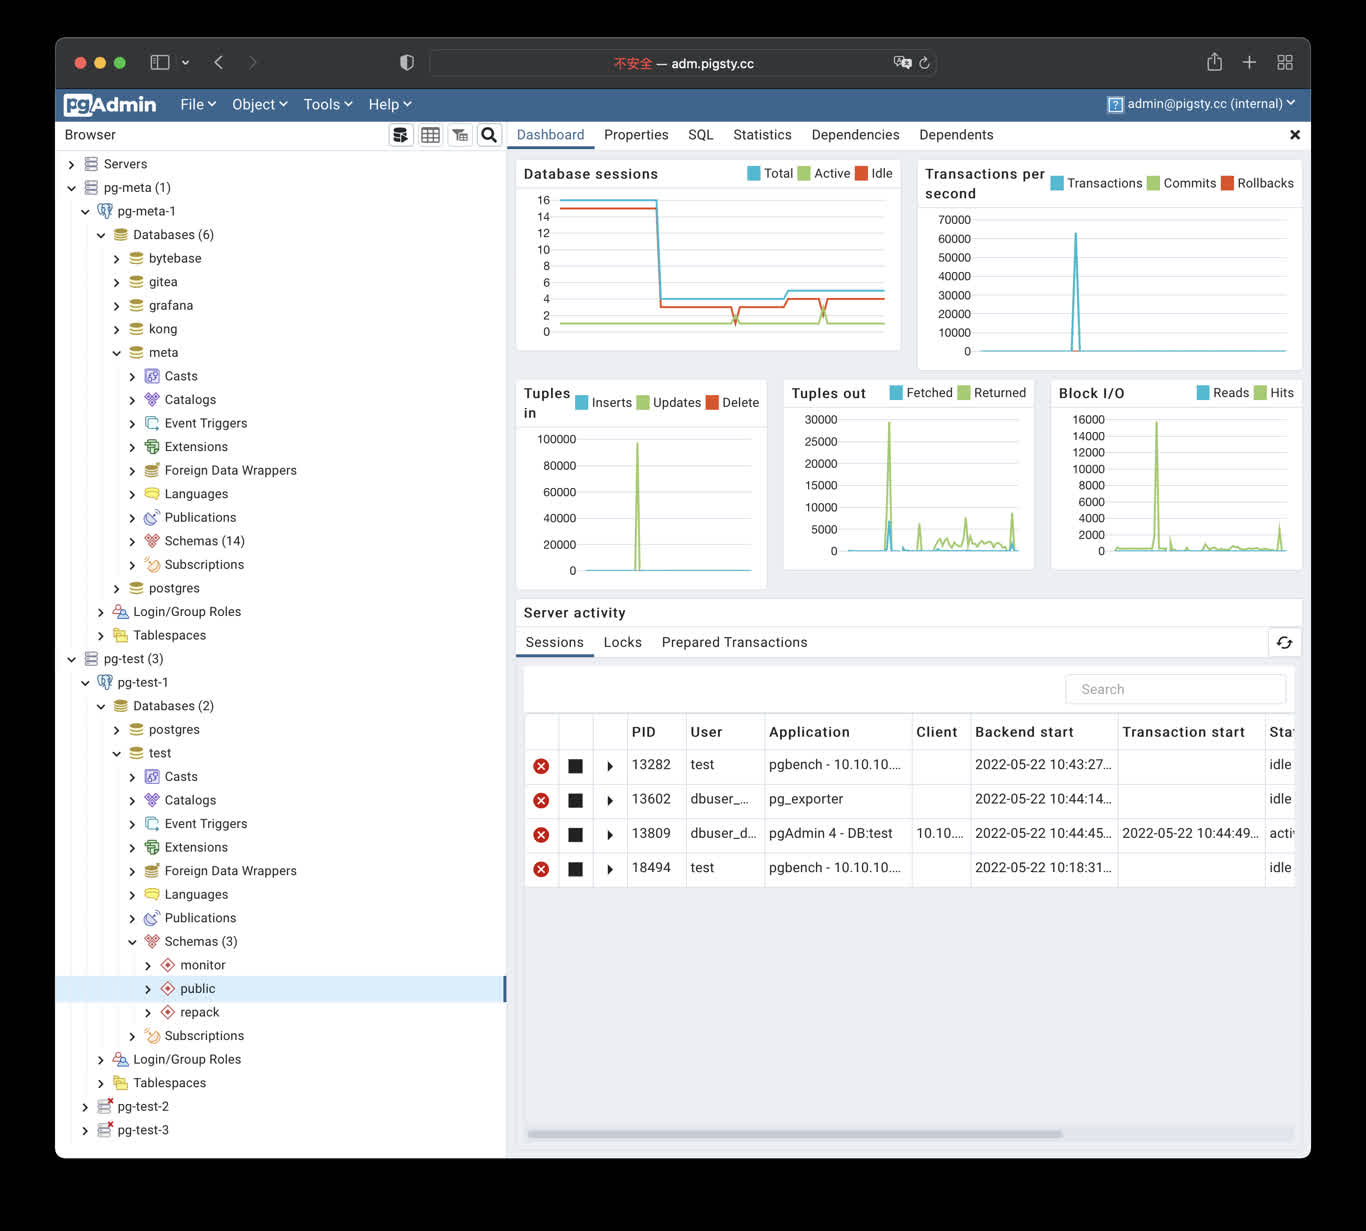
importpsycopg2conn=psycopg2.connect('postgres://dbuser_dba:[email protected]:5432/meta')cursor=conn.cursor()cursor.execute('SELECT * FROM pg_stat_activity')foriincursor.fetchall():print(i)
Alias
make up # pull up jupyter with docker composemake dir # create required /data/jupyter and set ownermake run # launch jupyter with dockermake view # print jupyter access pointmake log # tail -f jupyter logsmake info # introspect jupyter with jqmake stop # stop jupyter containermake clean # remove jupyter containermake pull # pull latest jupyter imagemake rmi # remove jupyter imagemake save # save jupyter image to /tmp/docker/jupyter.tgzmake load # load jupyter image from /tmp/docker/jupyter.tgz
21 - Data Applications
PostgreSQL-based data visualization applications
22 - PGLOG: PostgreSQL Log Analysis Application
A sample Applet included with Pigsty for analyzing PostgreSQL CSV log samples
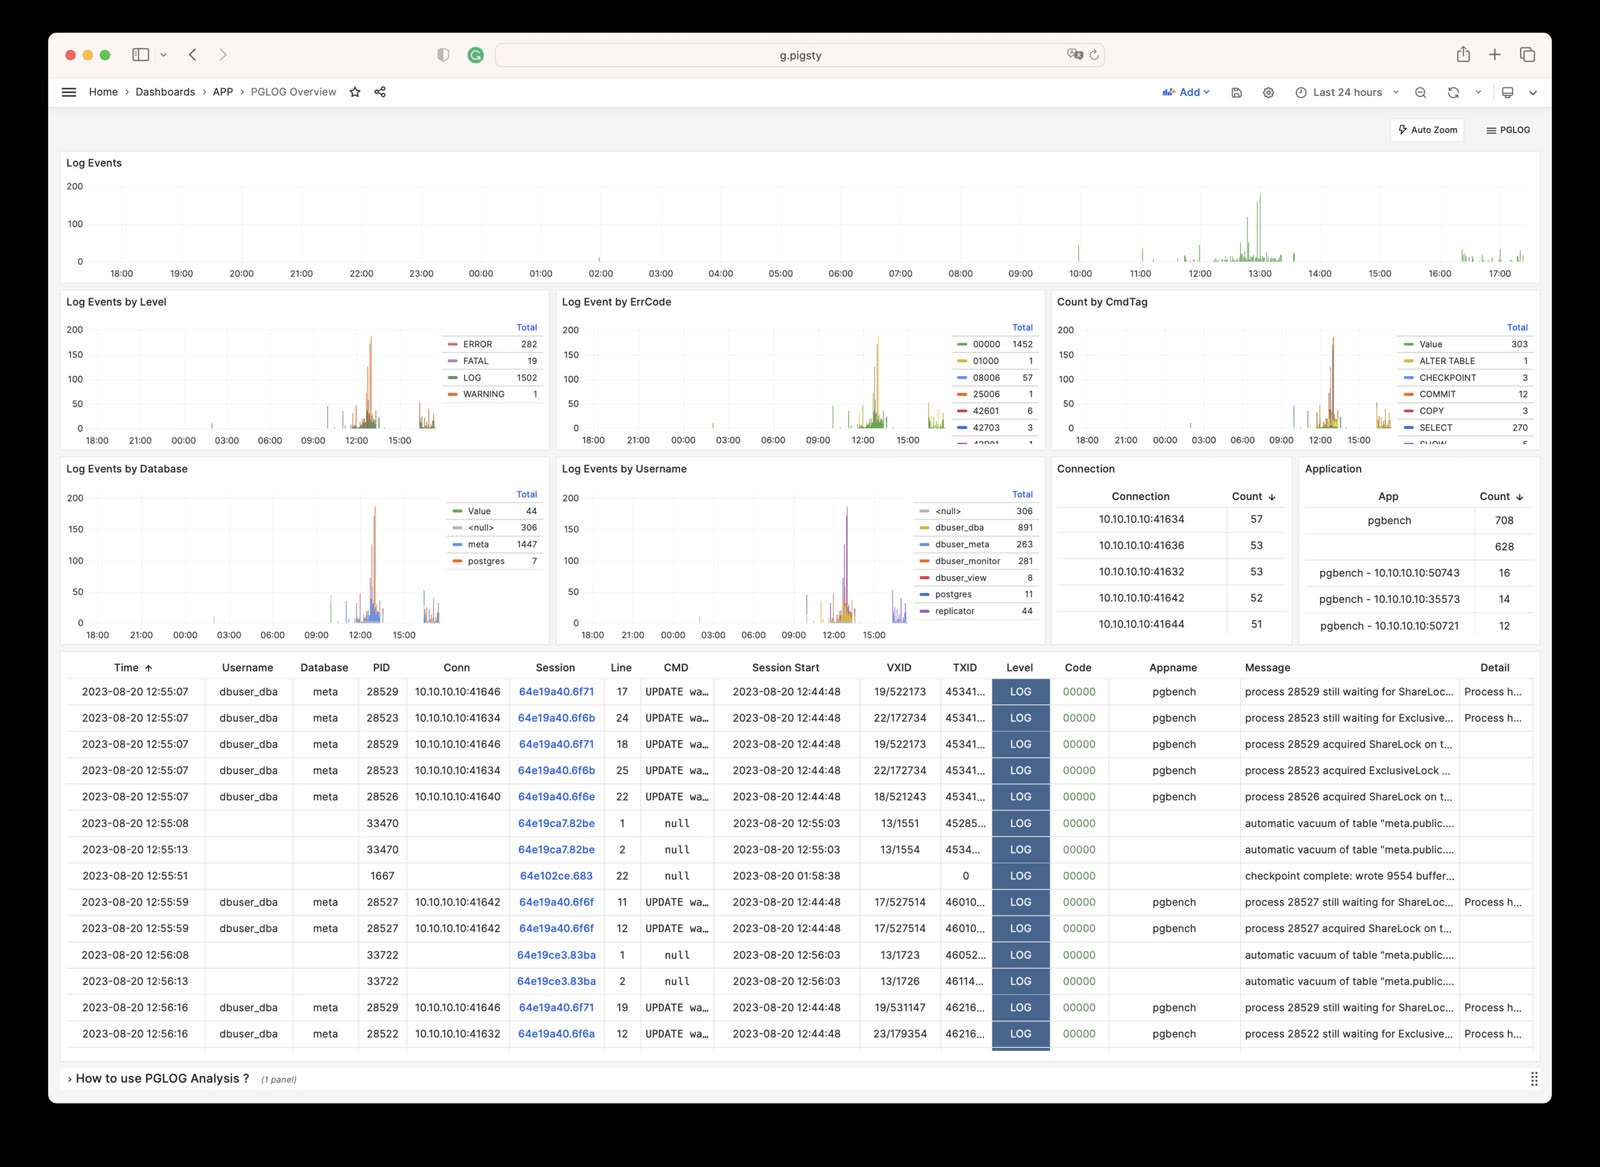
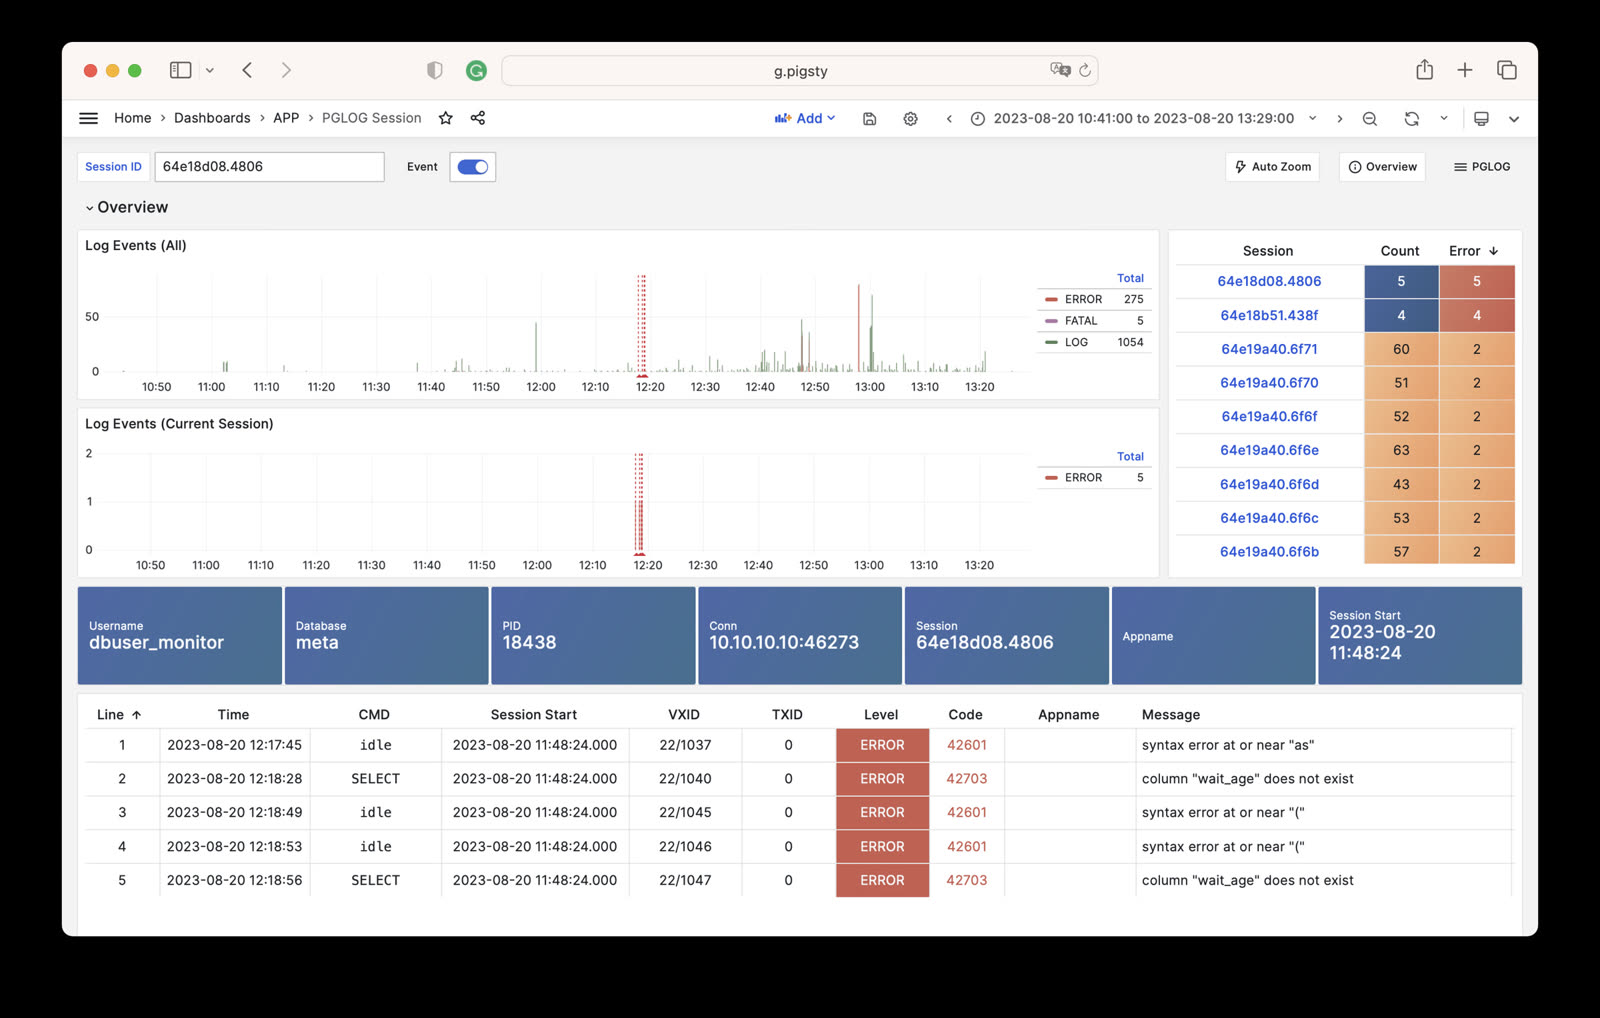
PGLOG is a sample application included with Pigsty that uses the pglog.sample table in MetaDB as its data source. You simply need to load logs into this table, then access the related dashboard.
Pigsty provides convenient commands for pulling CSV logs and loading them into the sample table. On the meta node, the following shortcut commands are available by default:
catlog [node=localhost][date=today]# Print CSV log to stdoutpglog # Load CSVLOG from stdinpglog12 # Load PG12 format CSVLOGpglog13 # Load PG13 format CSVLOGpglog14 # Load PG14 format CSVLOG (=pglog)catlog | pglog # Analyze current node's log for todaycatlog node-1 '2021-07-15'| pglog # Analyze node-1's csvlog for 2021-07-15
Next, you can access the following links to view the sample log analysis interface.
PGLOG Overview: Present the entire CSV log sample details, aggregated by multiple dimensions.
PGLOG Session: Present detailed information about a specific connection in the log sample.
The catlog command pulls CSV database logs from a specific node for a specific date and writes to stdout
By default, catlog pulls logs from the current node for today. You can specify the node and date through parameters.
Using pglog and catlog together, you can quickly pull database CSV logs for analysis.
catlog | pglog # Analyze current node's log for todaycatlog node-1 '2021-07-15'| pglog # Analyze node-1's csvlog for 2021-07-15
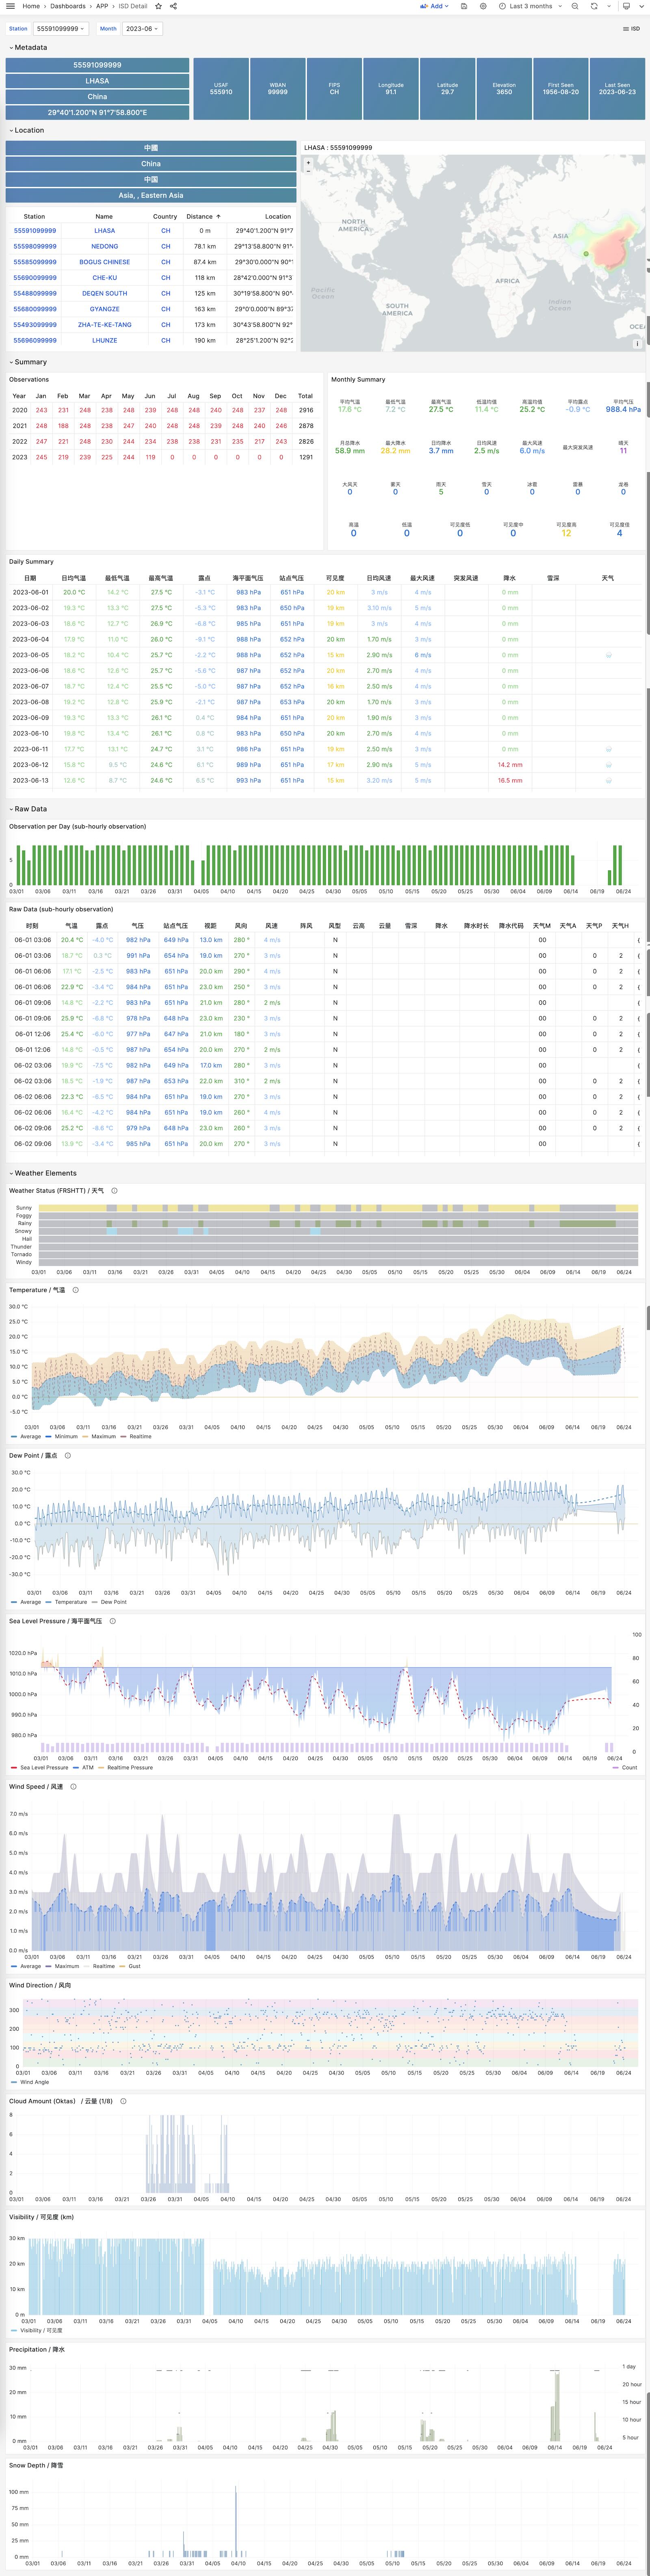
23 - NOAA ISD Global Weather Station Historical Data Query
Demonstrate how to import data into a database using the ISD dataset as an example
If you have a database and don’t know what to do with it, why not try this open-source project: Vonng/isd
You can directly reuse the monitoring system Grafana to interactively browse sub-hourly meteorological data from nearly 30,000 surface weather stations over the past 120 years.
This is a fully functional data application that can query meteorological observation records from 30,000 global surface weather stations since 1901.
The PostgreSQL instance should have the PostGIS extension enabled. Use the PGURL environment variable to pass database connection information:
# Pigsty uses dbuser_dba as the default admin account with password DBUser.DBAexportPGURL=postgres://dbuser_dba:[email protected]:5432/meta?sslmode=disable
psql "${PGURL}" -c 'SELECT 1'# Check if connection is available
Fetch and import ISD weather station metadata
This is a daily-updated weather station metadata file containing station longitude/latitude, elevation, name, country, province, and other information. Use the following command to download and import:
make reload-station # Equivalent to downloading the latest station data then loading: get-station + load-station
Fetch and import the latest isd.daily data
isd.daily is a daily-updated dataset containing daily observation data summaries from global weather stations. Use the following command to download and import.
Note that raw data downloaded directly from the NOAA website needs to be parsed before it can be loaded into the database, so you need to download or build an ISD data parser.
make get-parser # Download the parser binary from Github, or you can build directly with go using make buildmake reload-daily # Download and import the latest isd.daily data for this year into the database
Load pre-parsed CSV dataset
The ISD Daily dataset has some dirty data and duplicate data. If you don’t want to manually parse and clean it, a stable pre-parsed CSV dataset is also provided here.
This dataset contains isd.daily data up to 2023-06-24. You can download and import it directly into PostgreSQL without needing a parser.
make get-stable # Get the stable isd.daily historical dataset from Githubmake load-stable # Load the downloaded stable historical dataset into the PostgreSQL database
More Data
Two parts of the ISD dataset are updated daily: weather station metadata and the latest year’s isd.daily (e.g., the 2023 tarball).
You can use the following command to download and refresh these two parts. If the dataset hasn’t been updated, these commands won’t re-download the same data package:
make reload # Actually: reload-station + reload-daily
You can also use the following commands to download and load isd.daily data for a specific year:
bin/get-daily 2022# Get daily weather observation summary for 2022 (1900-2023)bin/load-daily "${PGURL}"2022# Load daily weather observation summary for 2022 (1900-2023)
In addition to the daily summary isd.daily, ISD also provides more detailed sub-hourly raw observation records isd.hourly. The download and load methods are similar:
bin/get-hourly 2022# Download hourly observation records for a specific year (e.g., 2022, options 1900-2023)bin/load-hourly "${PGURL}"2022# Load hourly observation records for a specific year
Data
Dataset Overview
ISD provides four datasets: sub-hourly raw observation data, daily statistical summary data, monthly statistical summary, and yearly statistical summary
Dataset
Notes
ISD Hourly
Sub-hourly observation records
ISD Daily
Daily statistical summary
ISD Monthly
Not used, can be calculated from isd.daily
ISD Yearly
Not used, can be calculated from isd.daily
Daily Summary Dataset
Compressed package size 2.8GB (as of 2023-06-24)
Table size 24GB, index size 6GB, total size approximately 30GB in PostgreSQL
If timescaledb compression is enabled, total size can be compressed to 4.5 GB
Sub-hourly Observation Data
Total compressed package size 117GB
After loading into database: table size 1TB+, index size 600GB+, total size 1.6TB
CREATETABLEIFNOTEXISTSisd.daily(stationVARCHAR(12)NOTNULL,-- station number 6USAF+5WBAN
tsDATENOTNULL,-- observation date
-- Temperature & Dew Point
temp_meanNUMERIC(3,1),-- mean temperature ℃
temp_minNUMERIC(3,1),-- min temperature ℃
temp_maxNUMERIC(3,1),-- max temperature ℃
dewp_meanNUMERIC(3,1),-- mean dew point ℃
-- Air Pressure
slp_meanNUMERIC(5,1),-- sea level pressure (hPa)
stp_meanNUMERIC(5,1),-- station pressure (hPa)
-- Visibility
vis_meanNUMERIC(6),-- visible distance (m)
-- Wind Speed
wdsp_meanNUMERIC(4,1),-- average wind speed (m/s)
wdsp_maxNUMERIC(4,1),-- max wind speed (m/s)
gustNUMERIC(4,1),-- max wind gust (m/s)
-- Precipitation / Snow Depth
prcp_meanNUMERIC(5,1),-- precipitation (mm)
prcpNUMERIC(5,1),-- rectified precipitation (mm)
sndpNuMERIC(5,1),-- snow depth (mm)
-- FRSHTT (Fog/Rain/Snow/Hail/Thunder/Tornado)
is_foggyBOOLEAN,-- (F)og
is_rainyBOOLEAN,-- (R)ain or Drizzle
is_snowyBOOLEAN,-- (S)now or pellets
is_hailBOOLEAN,-- (H)ail
is_thunderBOOLEAN,-- (T)hunder
is_tornadoBOOLEAN,-- (T)ornado or Funnel Cloud
-- Record counts used for statistical aggregation
temp_countSMALLINT,-- record count for temp
dewp_countSMALLINT,-- record count for dew point
slp_countSMALLINT,-- record count for sea level pressure
stp_countSMALLINT,-- record count for station pressure
wdsp_countSMALLINT,-- record count for wind speed
visib_countSMALLINT,-- record count for visible distance
-- Temperature flags
temp_min_fBOOLEAN,-- aggregate min temperature
temp_max_fBOOLEAN,-- aggregate max temperature
prcp_flagCHAR,-- precipitation flag: ABCDEFGHI
PRIMARYKEY(station,ts));-- PARTITION BY RANGE (ts);
Sub-hourly Raw Observation Data Table
ISD Hourly
CREATETABLEIFNOTEXISTSisd.hourly(stationVARCHAR(12)NOTNULL,-- station id
tsTIMESTAMPNOTNULL,-- timestamp
-- air
tempNUMERIC(3,1),-- [-93.2,+61.8]
dewpNUMERIC(3,1),-- [-98.2,+36.8]
slpNUMERIC(5,1),-- [8600,10900]
stpNUMERIC(5,1),-- [4500,10900]
visNUMERIC(6),-- [0,160000]
-- wind
wd_angleNUMERIC(3),-- [1,360]
wd_speedNUMERIC(4,1),-- [0,90]
wd_gustNUMERIC(4,1),-- [0,110]
wd_codeVARCHAR(1),-- code that denotes the character of the WIND-OBSERVATION.
-- cloud
cld_heightNUMERIC(5),-- [0,22000]
cld_codeVARCHAR(2),-- cloud code
-- water
sndpNUMERIC(5,1),-- mm snow
prcpNUMERIC(5,1),-- mm precipitation
prcp_hourNUMERIC(2),-- precipitation duration in hour
prcp_codeVARCHAR(1),-- precipitation type code
-- sky
mw_codeVARCHAR(2),-- manual weather observation code
aw_codeVARCHAR(2),-- auto weather observation code
pw_codeVARCHAR(1),-- weather code of past period of time
pw_hourNUMERIC(2),-- duration of pw_code period
-- misc
-- remark TEXT,
-- eqd TEXT,
dataJSONB-- extra data
)PARTITIONBYRANGE(ts);
Parser
The raw data provided by NOAA ISD is in a highly compressed proprietary format that needs to be processed through a parser before it can be converted into database table format.
For the Daily and Hourly datasets, two parsers are provided here: isdd and isdh.
Both parsers take annual data compressed packages as input, produce CSV results as output, and work in pipeline mode as shown below:
NAME
isd -- Intergrated Surface Dataset Parser
SYNOPSIS
isd daily [-i <input|stdin>][-o <output|stout>][-v] isd hourly [-i <input|stdin>][-o <output|stout>][-v][-d raw|ts-first|hour-first]DESCRIPTION
The isd program takes noaa isd daily/hourly raw tarball data as input.
and generate parsed data in csv format as output. Works in pipe mode
cat data/daily/2023.tar.gz | bin/isd daily -v | psql ${PGURL} -AXtwqc "COPY isd.daily FROM STDIN CSV;" isd daily -v -i data/daily/2023.tar.gz | psql ${PGURL} -AXtwqc "COPY isd.daily FROM STDIN CSV;" isd hourly -v -i data/hourly/2023.tar.gz | psql ${PGURL} -AXtwqc "COPY isd.hourly FROM STDIN CSV;"OPTIONS
-i <input> input file, stdin by default
-o <output> output file, stdout by default
-p <profpath> pprof file path, enableif specified
-d de-duplicate rows for hourly dataset (raw, ts-first, hour-first) -v verbose mode
-h print help
User Interface
Several dashboards made with Grafana are provided here for exploring the ISD dataset and querying weather stations and historical meteorological data.
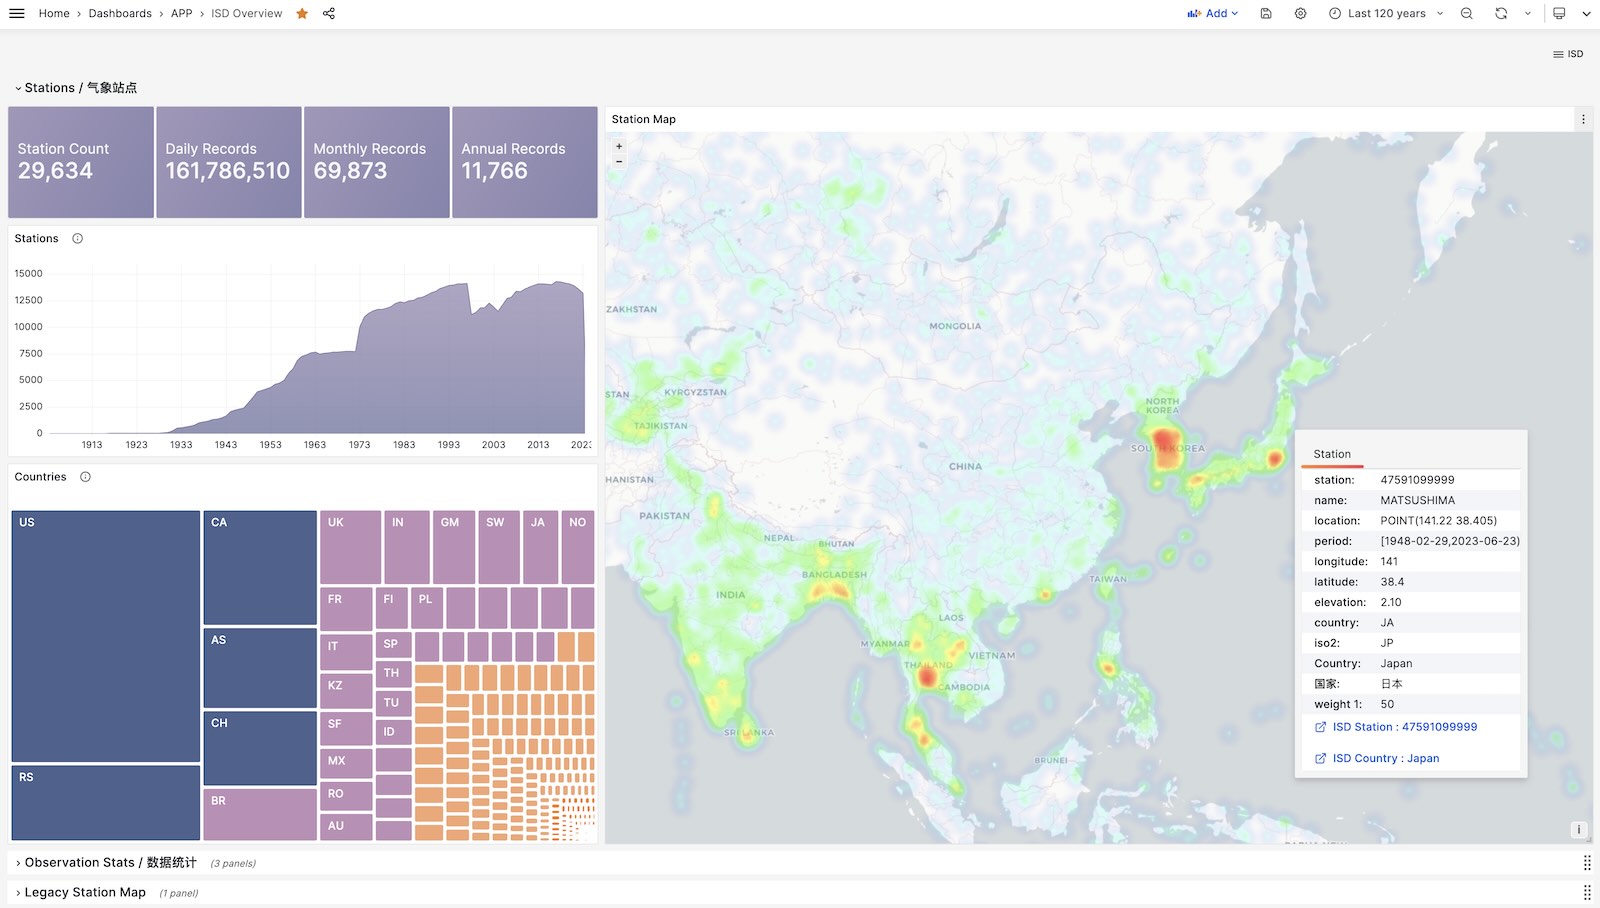
ISD Overview
Global overview with overall metrics and weather station navigation.
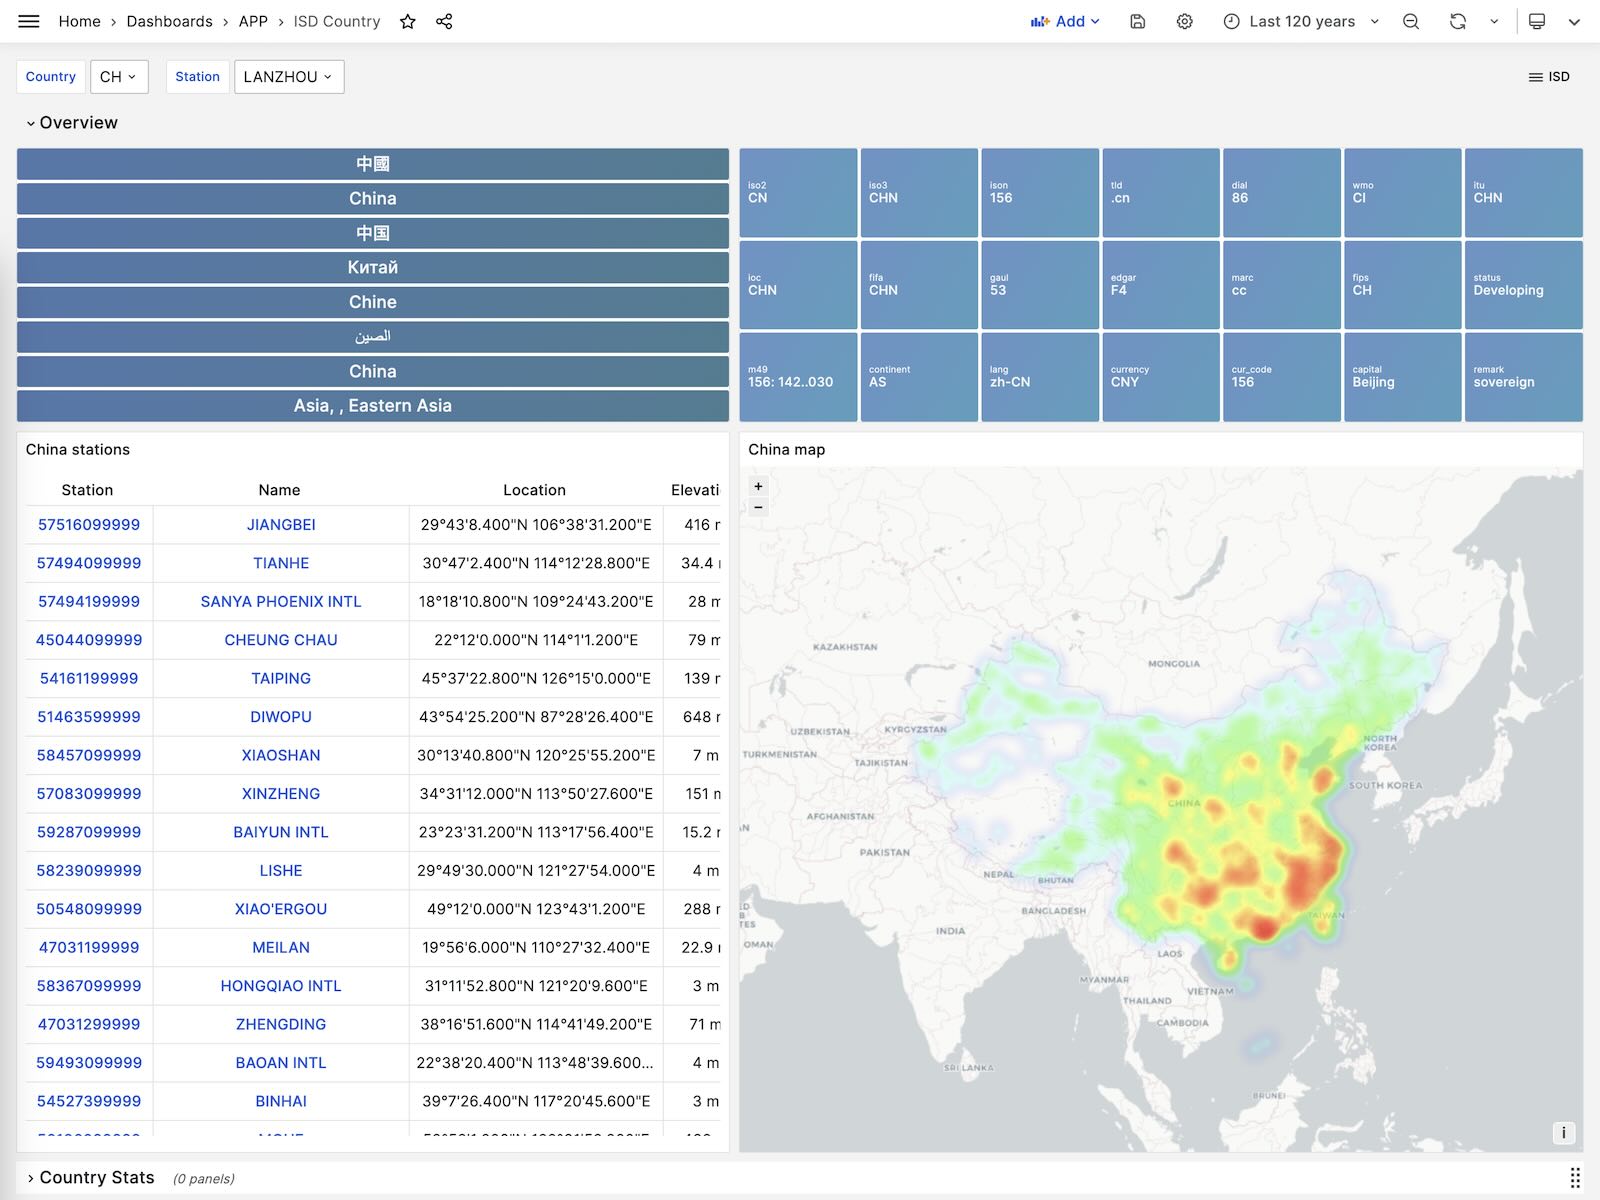
ISD Country
Display all weather stations within a single country/region.
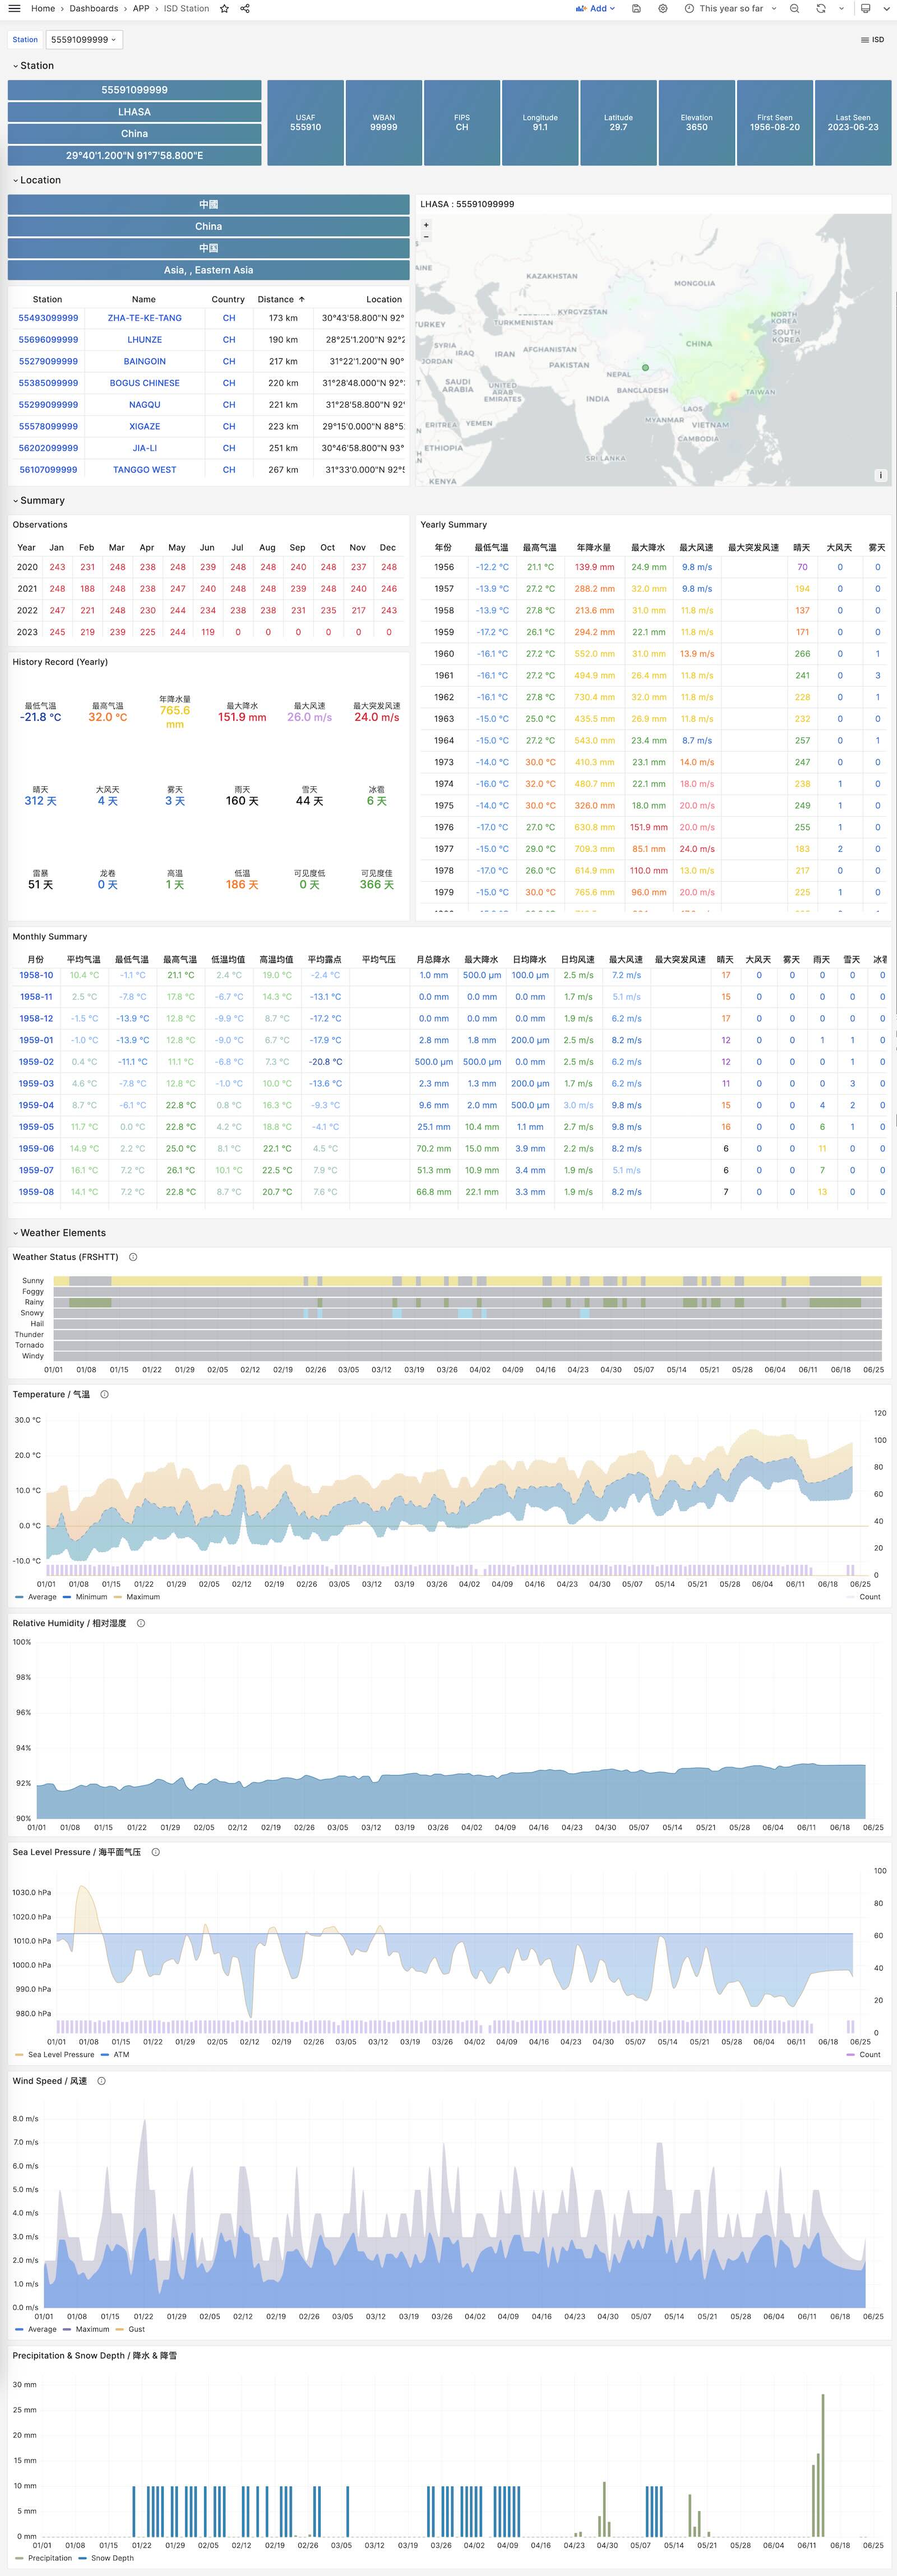
ISD Station
Display detailed information for a single weather station, including metadata and daily/monthly/yearly summary metrics.
ISD Station Dashboard
ISD Detail
Display raw sub-hourly observation metric data for a weather station, requires the isd.hourly dataset.
ISD Station Dashboard
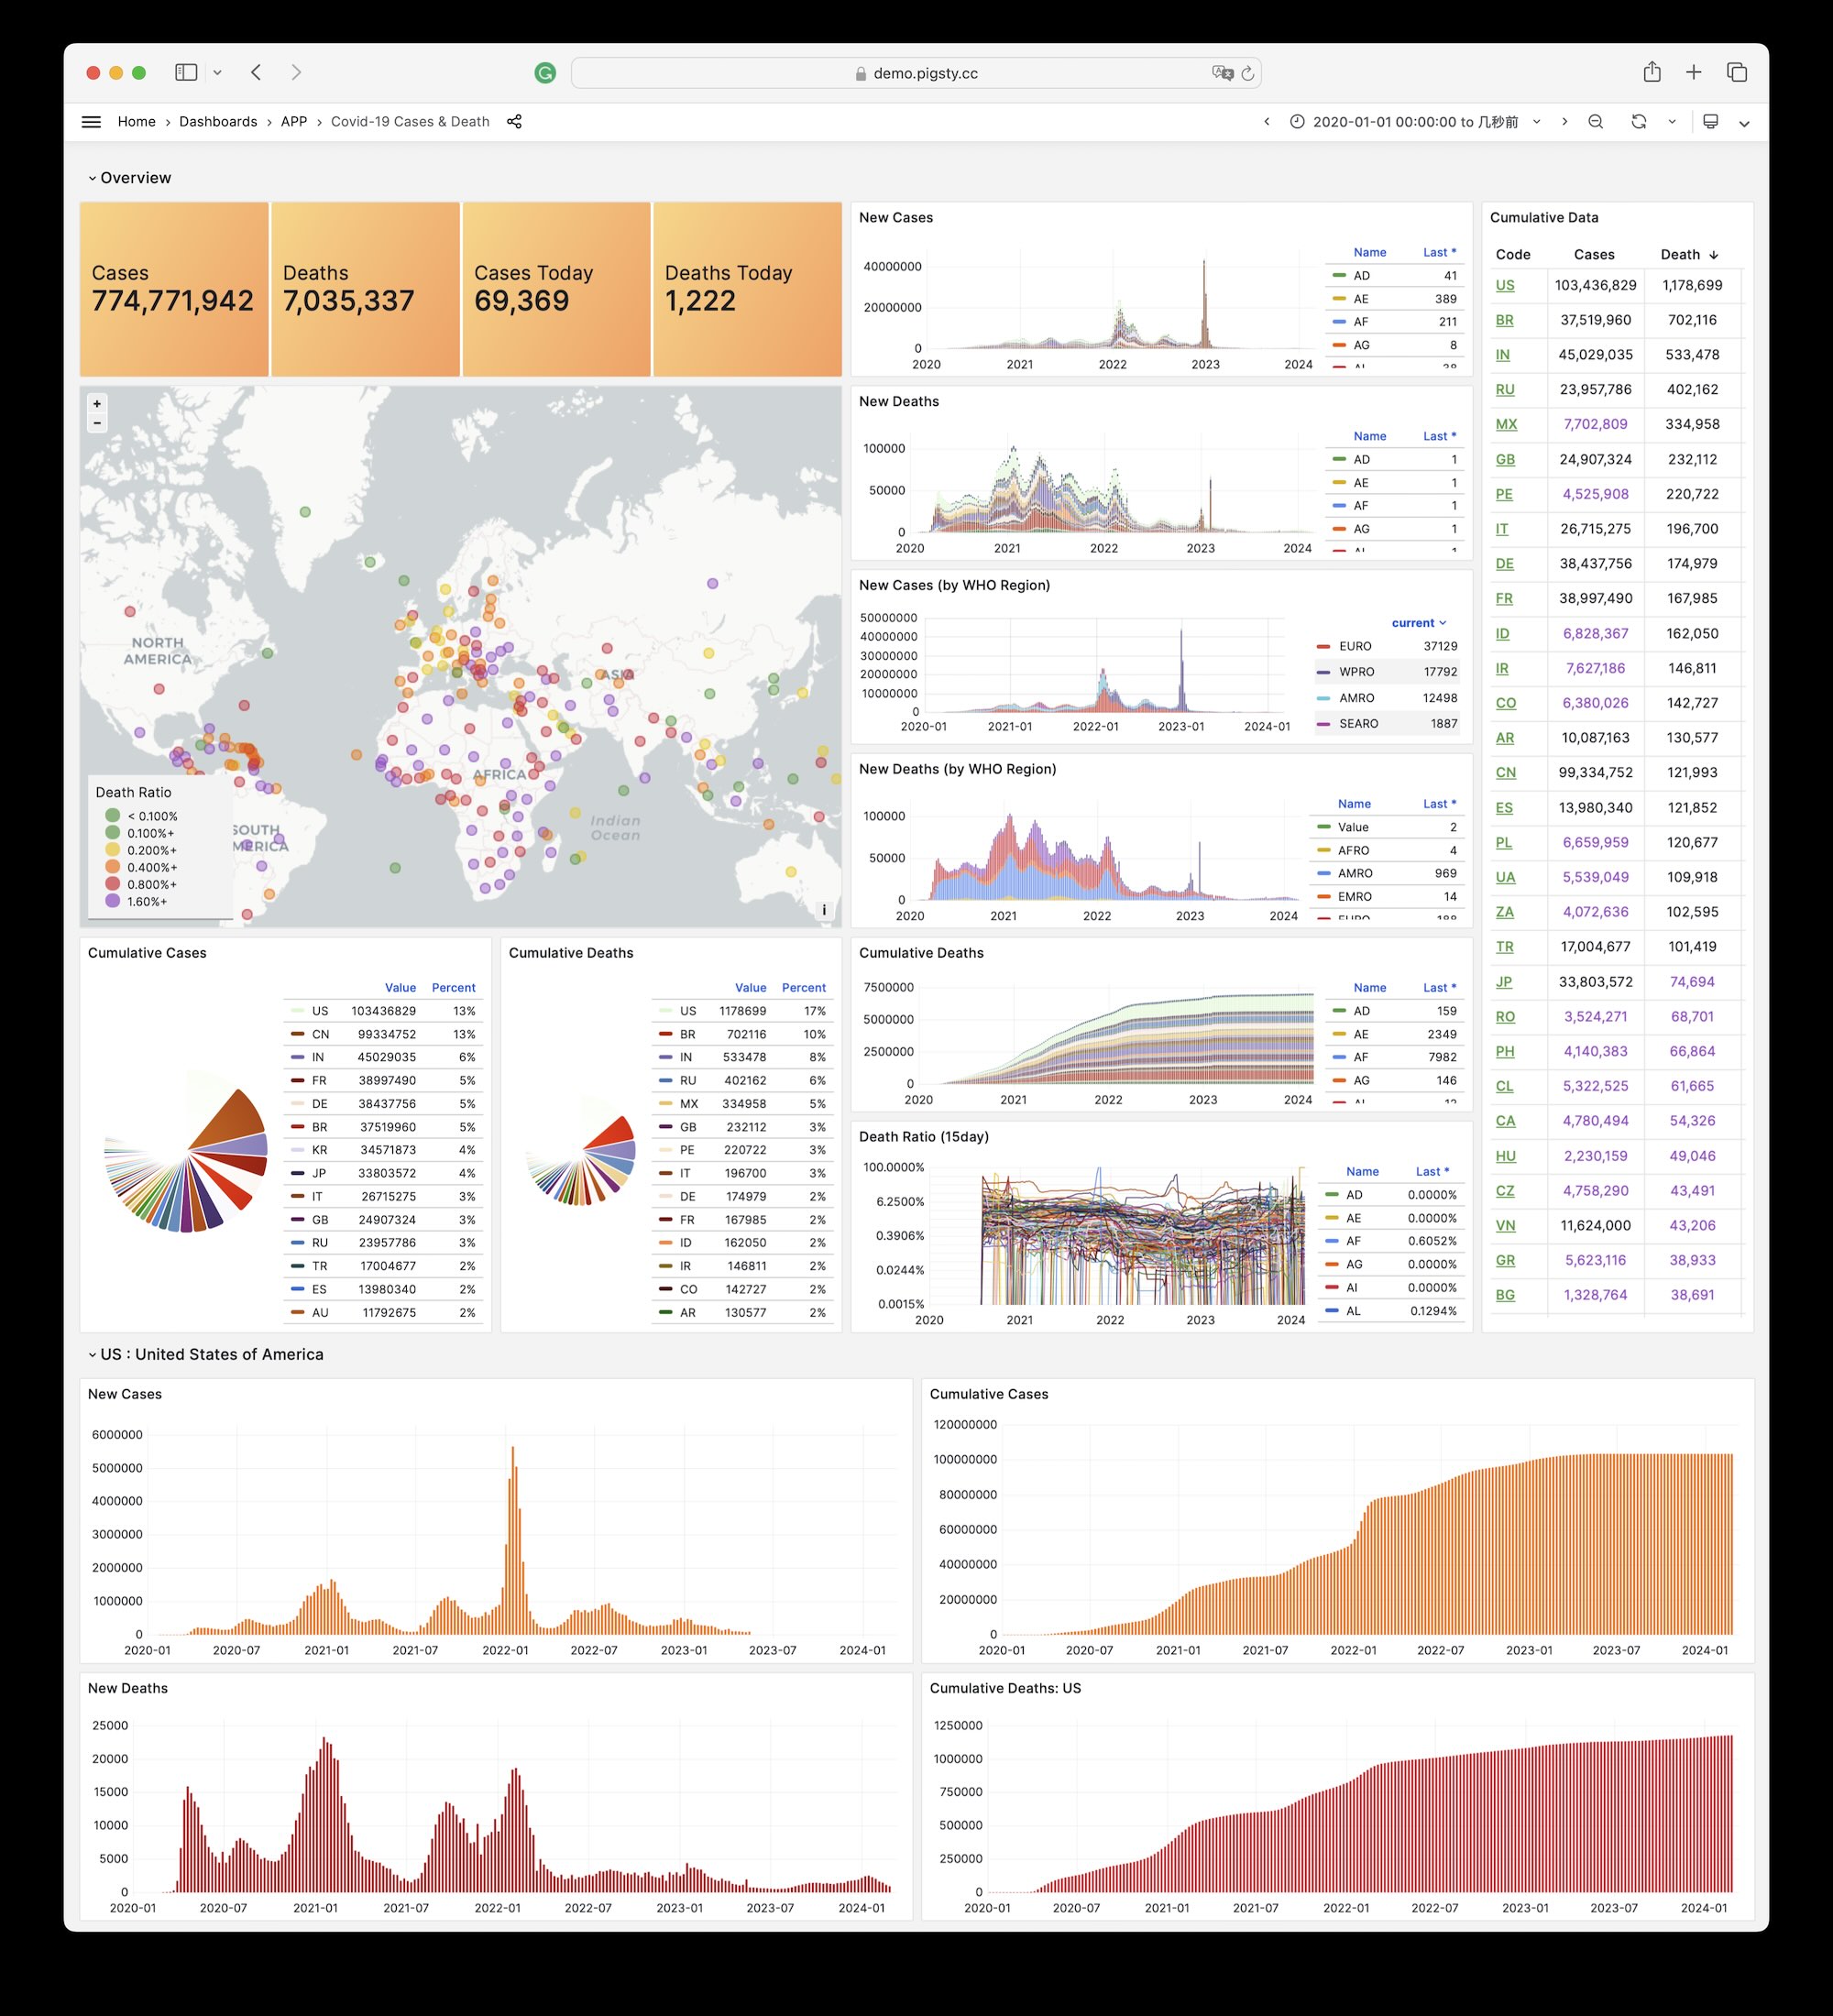
24 - WHO COVID-19 Pandemic Dashboard
A sample Applet included with Pigsty for visualizing World Health Organization official pandemic data
Covid is a sample Applet included with Pigsty for visualizing the World Health Organization’s official pandemic data dashboard.
You can browse COVID-19 infection and death cases for each country and region, as well as global pandemic trends.
Enter the application directory on the admin node and execute make to complete the installation.
make # Complete all configuration
Other sub-tasks:
make reload # download latest data and pour it againmake ui # install grafana dashboardsmake sql # install database schemasmake download # download latest datamake load # load downloaded data into databasemake reload # download latest data and pour it into database
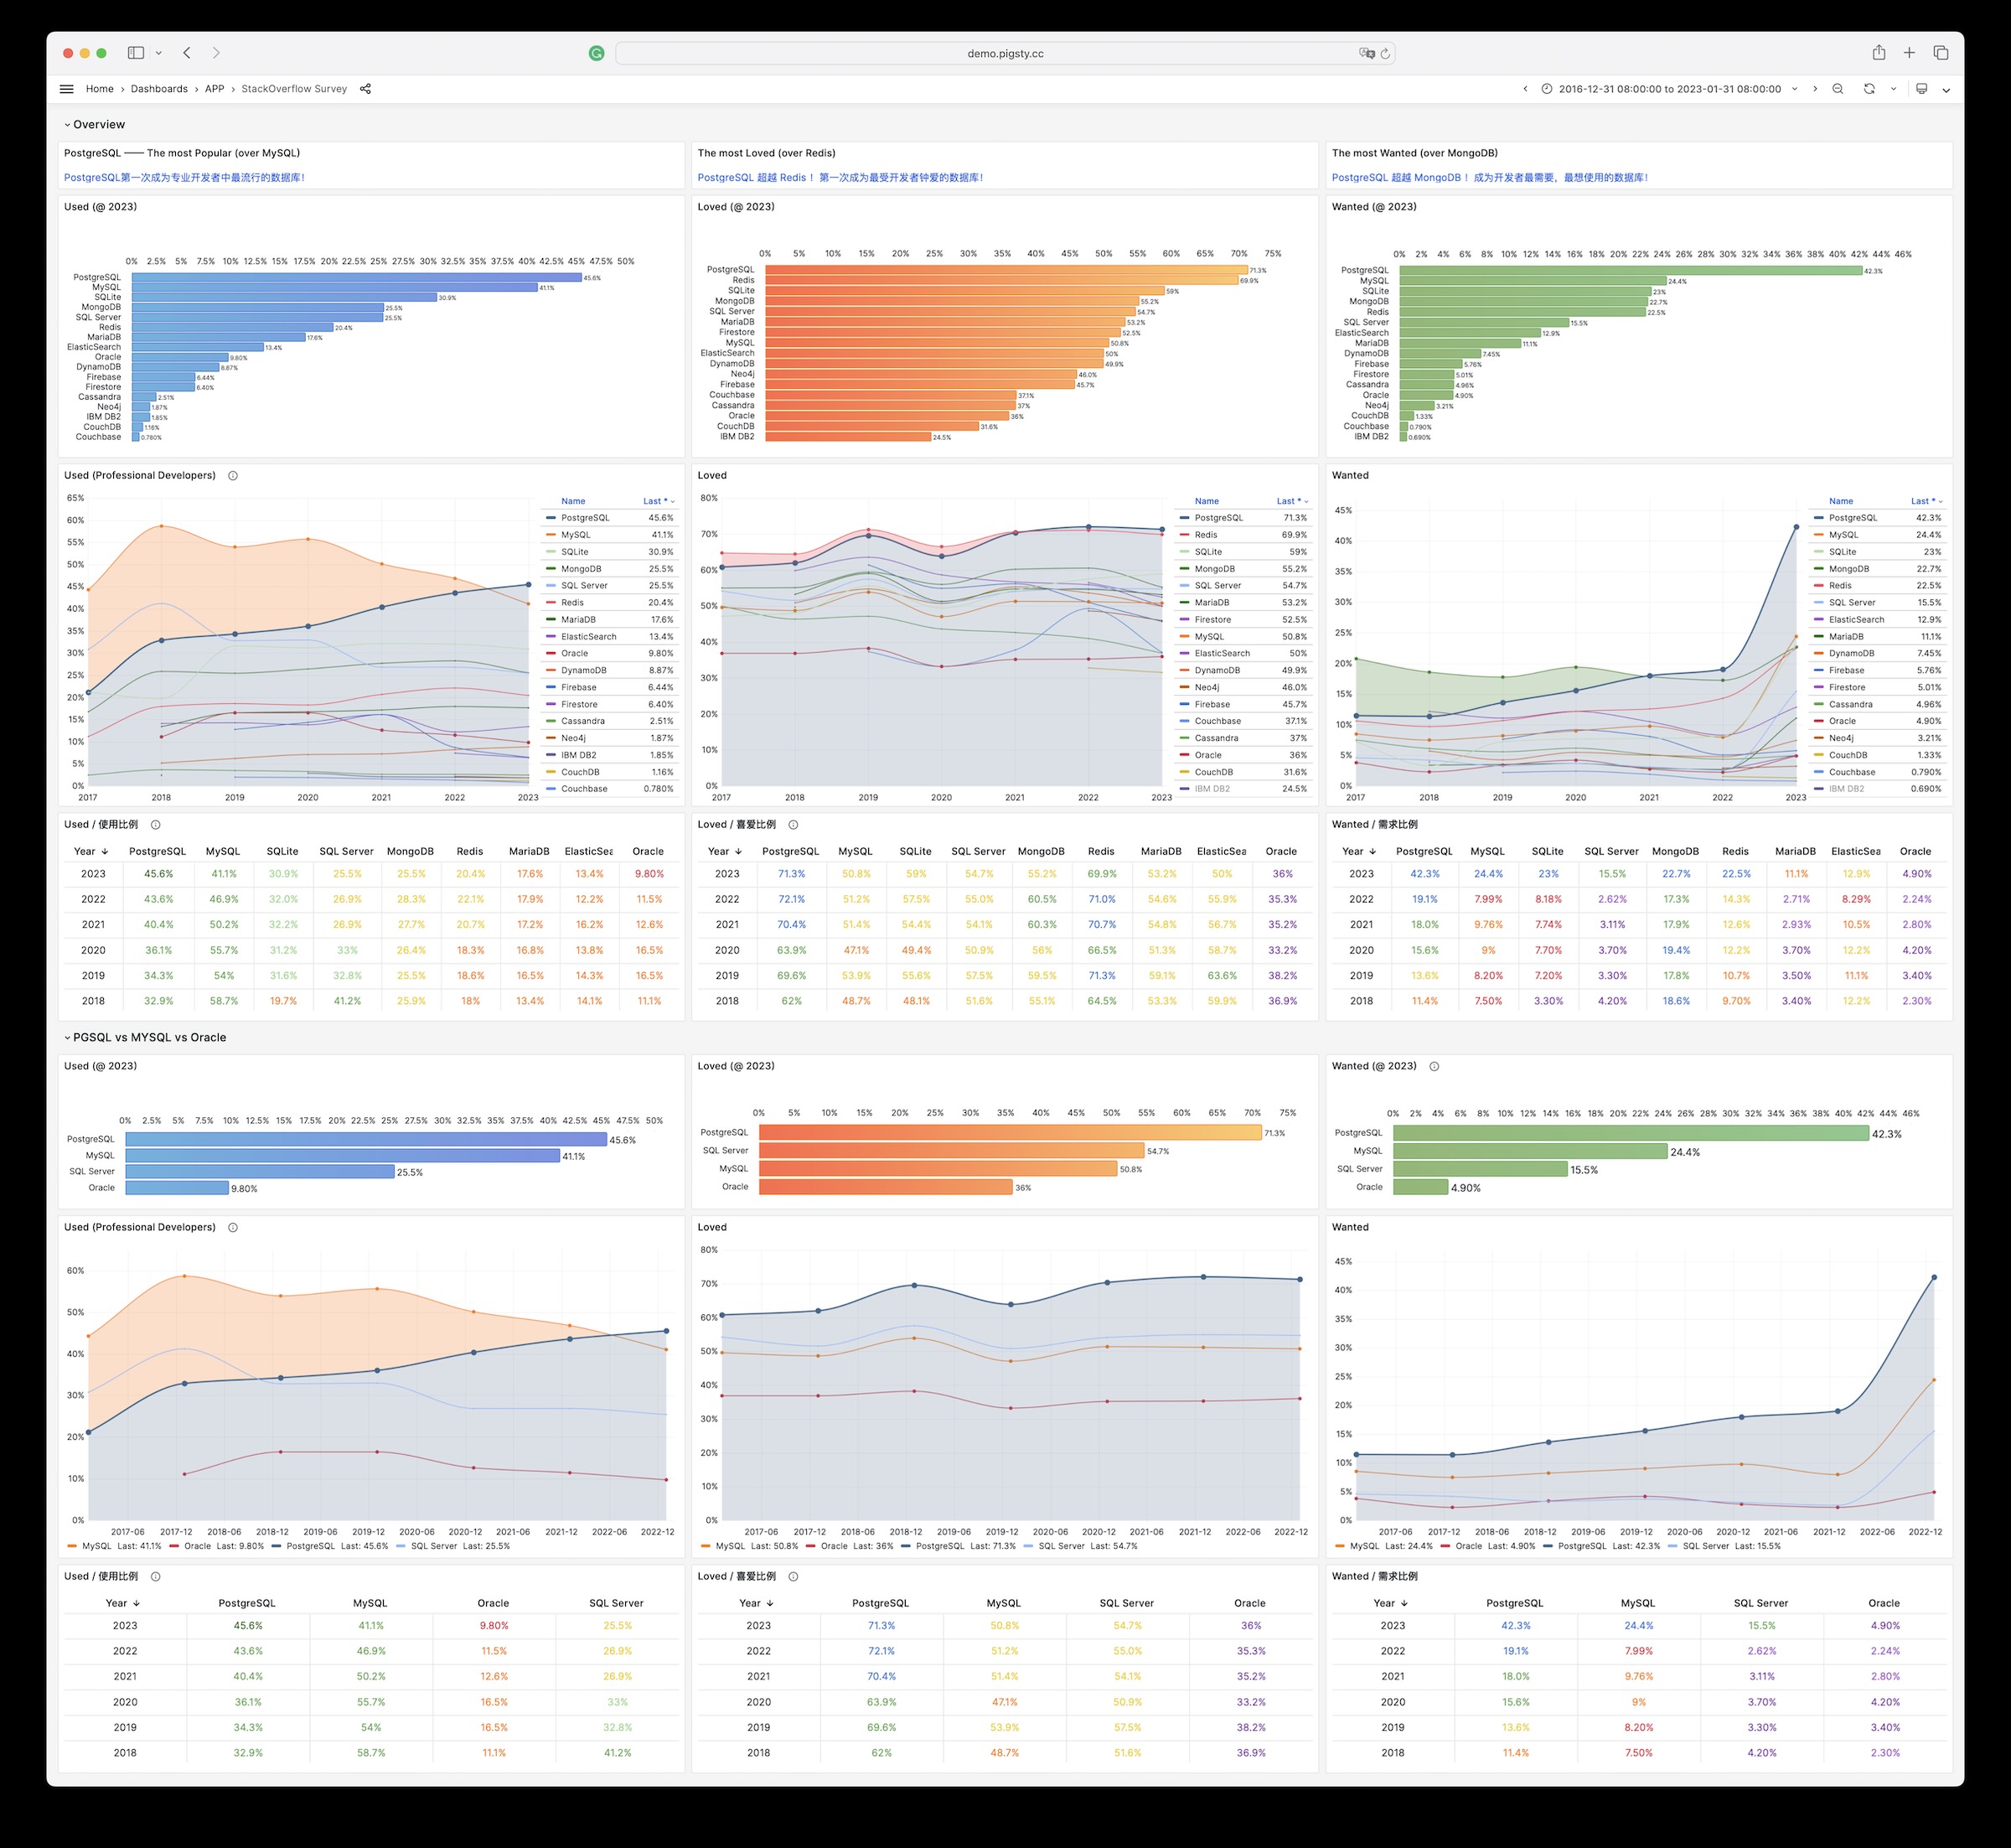
25 - StackOverflow Global Developer Survey
Analyze database-related data from StackOverflow’s global developer survey over the past seven years