This is the multi-page printable view of this section. Click here to print.

Return to the regular view of this page.

Infra as Code

Pigsty uses Infrastructure as Code (IaC) philosophy to manage all components, providing declarative management for large-scale clusters.

Pigsty follows the IaC and GitOPS philosophy: use a declarative config inventory to describe the entire environment, and materialize it through idempotent playbooks.

Users describe their desired state declaratively through parameters, and playbooks idempotently adjust target nodes to reach that state. This is similar to Kubernetes CRDs & Operators, but Pigsty implements this functionality on bare metal and virtual machines through Ansible.

Pigsty was born to solve the operational management problem of ultra-large-scale PostgreSQL clusters. The idea behind it is simple — we need the ability to replicate the entire infrastructure (100+ database clusters + PG/Redis + observability) on ready servers within ten minutes. No GUI + ClickOps can complete such a complex task in such a short time, making CLI + IaC the only choice — it provides precise, efficient control.

The config inventory pigsty.yml file describes the state of the entire deployment. Whether it’s production (prod), staging, test, or development (devbox) environments, the difference between infrastructures lies only in the config inventory, while the deployment delivery logic is exactly the same.

You can use git for version control and auditing of this deployment “seed/gene”, and Pigsty even supports storing the config inventory as database tables in PostgreSQL CMDB, further achieving Infra as Data capability. Seamlessly integrate with your existing workflows.

IaC is designed for professional users and enterprise scenarios but is also deeply optimized for individual developers and SMBs. Even if you’re not a professional DBA, you don’t need to understand these hundreds of adjustment knobs and switches. All parameters come with well-performing default values. You can get an out-of-the-box single-node database with zero configuration; Simply add two more IP addresses to get an enterprise-grade high-availability PostgreSQL cluster.


Declare Modules

Take the following default config snippet as an example. This config describes a node 10.10.10.10 with INFRA, NODE, ETCD, and PGSQL modules installed.

# monitoring, alerting, DNS, NTP and other infrastructure cluster...
infra: { hosts: { 10.10.10.10: { infra_seq: 1 } } }

# minio cluster, s3 compatible object storage
minio: { hosts: { 10.10.10.10: { minio_seq: 1 } }, vars: { minio_cluster: minio } }

# etcd cluster, used as DCS for PostgreSQL high availability
etcd: { hosts: { 10.10.10.10: { etcd_seq: 1 } }, vars: { etcd_cluster: etcd } }

# PGSQL example cluster: pg-meta
pg-meta: { hosts: { 10.10.10.10: { pg_seq: 1, pg_role: primary }, vars: { pg_cluster: pg-meta } }

To actually install these modules, execute the following playbooks:

./infra.yml -l 10.10.10.10  # Initialize infra module on node 10.10.10.10
./etcd.yml  -l 10.10.10.10  # Initialize etcd module on node 10.10.10.10
./minio.yml -l 10.10.10.10  # Initialize minio module on node 10.10.10.10
./pgsql.yml -l 10.10.10.10  # Initialize pgsql module on node 10.10.10.10

Declare Clusters

You can declare PostgreSQL database clusters by installing the PGSQL module on multiple nodes, making them a service unit:

For example, to deploy a three-node high-availability PostgreSQL cluster using streaming replication on the following three Pigsty-managed nodes, you can add the following definition to the all.children section of the config file pigsty.yml:

pg-test:
  hosts:
    10.10.10.11: { pg_seq: 1, pg_role: primary }
    10.10.10.12: { pg_seq: 2, pg_role: replica }
    10.10.10.13: { pg_seq: 3, pg_role: offline }
  vars:  { pg_cluster: pg-test }

After defining, you can use playbooks to create the cluster:

bin/pgsql-add pg-test   # Create the pg-test cluster

pigsty-iac.jpg

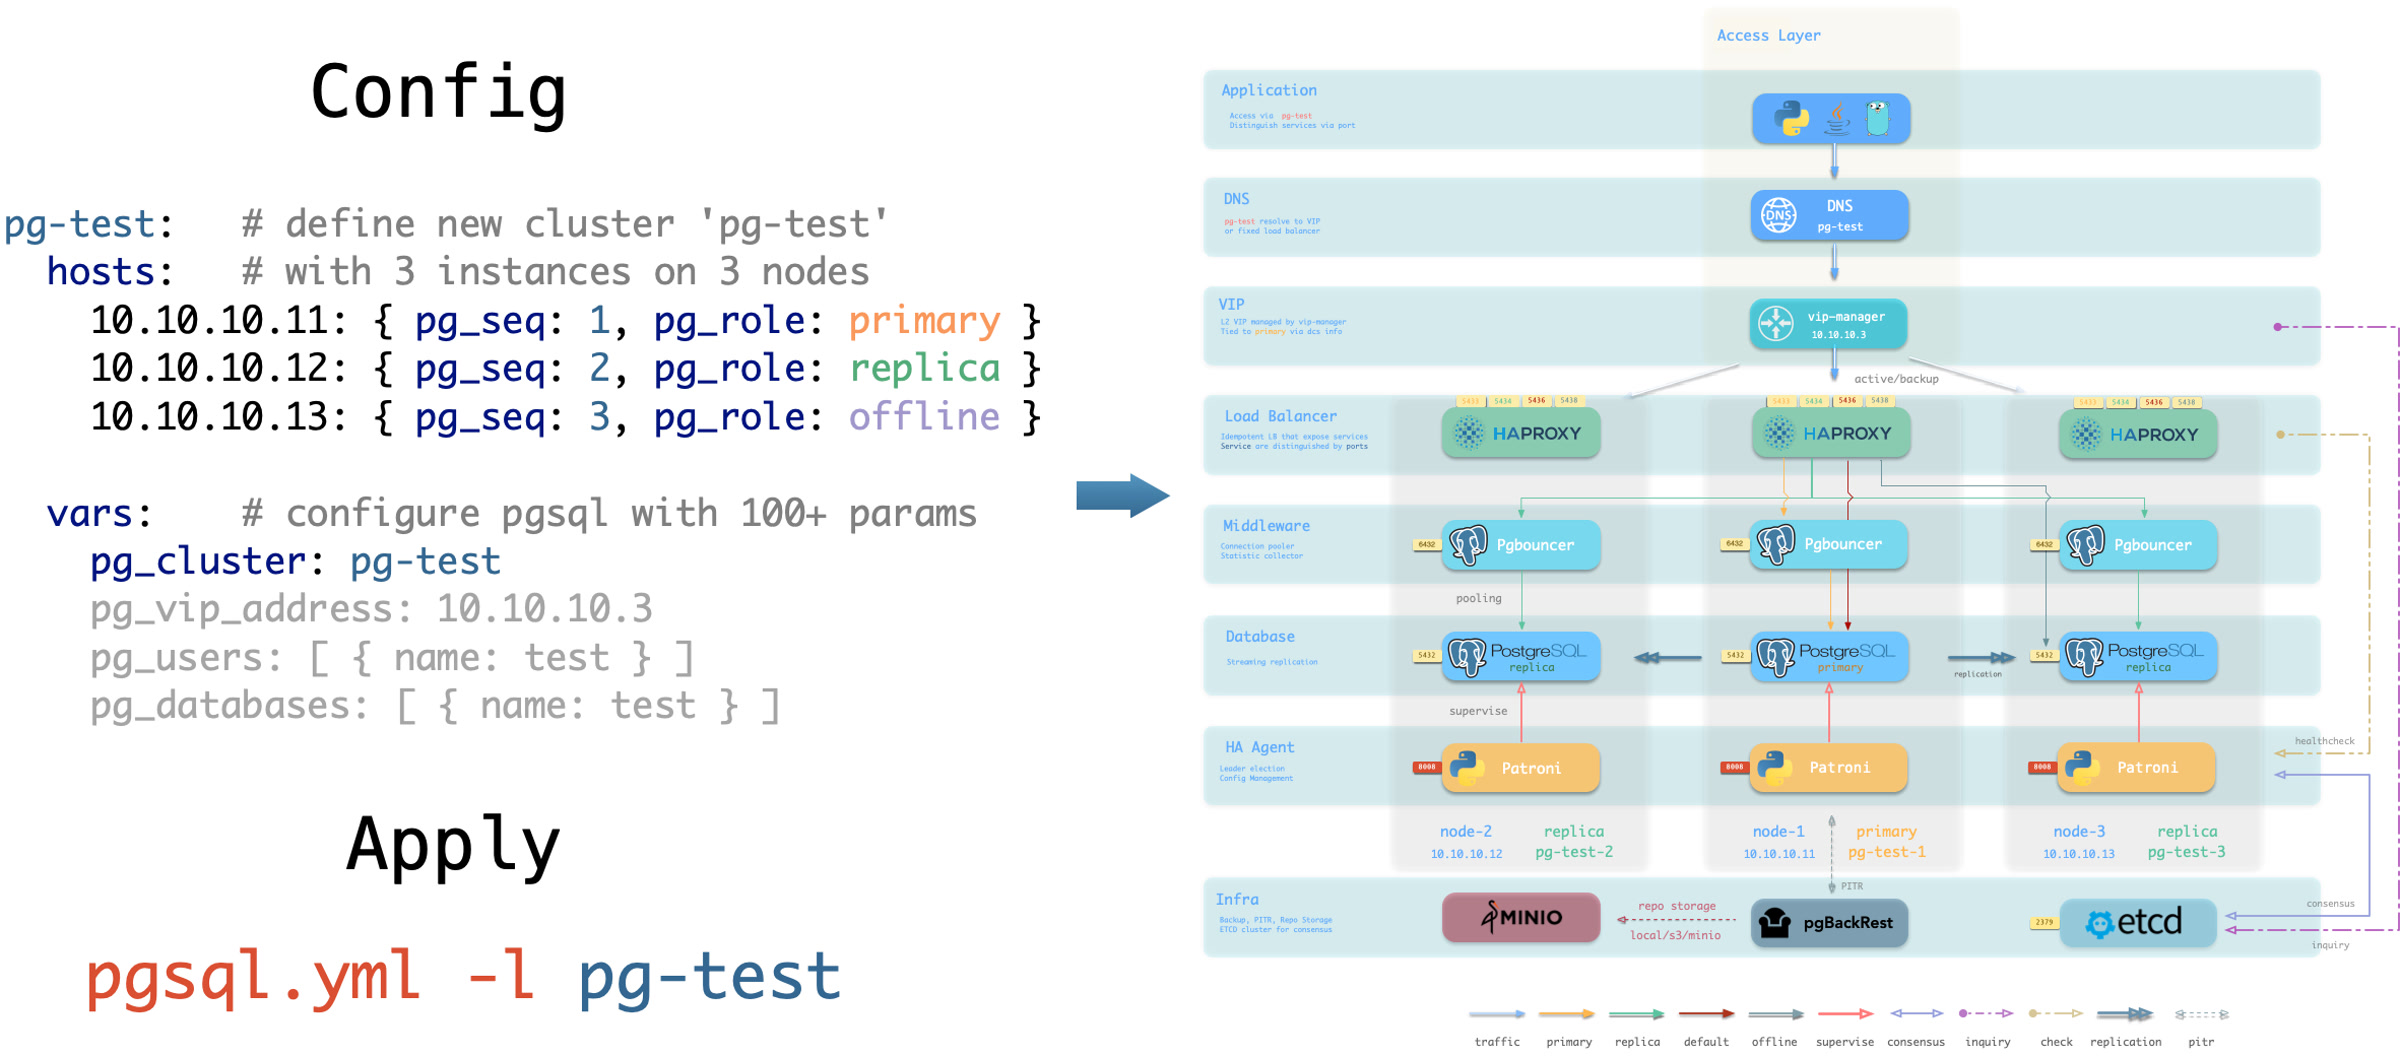
You can use different instance roles such as primary, replica, offline, delayed, sync standby; as well as different clusters: such as standby clusters, Citus clusters, and even Redis / MinIO / Etcd clusters


Customize Cluster Content

Not only can you define clusters declaratively, but you can also define databases, users, services, and HBA rules within the cluster. For example, the following config file deeply customizes the content of the default pg-meta single-node database cluster:

Including: declaring six business databases and seven business users, adding an extra standby service (synchronous standby, providing read capability with no replication delay), defining some additional pg_hba rules, an L2 VIP address pointing to the cluster primary, and a customized backup strategy.

pg-meta:
  hosts: { 10.10.10.10: { pg_seq: 1, pg_role: primary , pg_offline_query: true } }
  vars:
    pg_cluster: pg-meta
    pg_databases:                       # define business databases on this cluster, array of database definition
      - name: meta                      # REQUIRED, `name` is the only mandatory field of a database definition
        baseline: cmdb.sql              # optional, database sql baseline path, (relative path among ansible search path, e.g files/)
        pgbouncer: true                 # optional, add this database to pgbouncer database list? true by default
        schemas: [pigsty]               # optional, additional schemas to be created, array of schema names
        extensions:                     # optional, additional extensions to be installed: array of `{name[,schema]}`
          - { name: postgis , schema: public }
          - { name: timescaledb }
        comment: pigsty meta database   # optional, comment string for this database
        owner: postgres                # optional, database owner, postgres by default
        template: template1            # optional, which template to use, template1 by default
        encoding: UTF8                 # optional, database encoding, UTF8 by default. (MUST same as template database)
        locale: C                      # optional, database locale, C by default.  (MUST same as template database)
        lc_collate: C                  # optional, database collate, C by default. (MUST same as template database)
        lc_ctype: C                    # optional, database ctype, C by default.   (MUST same as template database)
        tablespace: pg_default         # optional, default tablespace, 'pg_default' by default.
        allowconn: true                # optional, allow connection, true by default. false will disable connect at all
        revokeconn: false              # optional, revoke public connection privilege. false by default. (leave connect with grant option to owner)
        register_datasource: true      # optional, register this database to grafana datasources? true by default
        connlimit: -1                  # optional, database connection limit, default -1 disable limit
        pool_auth_user: dbuser_meta    # optional, all connection to this pgbouncer database will be authenticated by this user
        pool_mode: transaction         # optional, pgbouncer pool mode at database level, default transaction
        pool_size: 64                  # optional, pgbouncer pool size at database level, default 64
        pool_size_reserve: 32          # optional, pgbouncer pool size reserve at database level, default 32
        pool_size_min: 0               # optional, pgbouncer pool size min at database level, default 0
        pool_max_db_conn: 100          # optional, max database connections at database level, default 100
      - { name: grafana  ,owner: dbuser_grafana  ,revokeconn: true ,comment: grafana primary database }
      - { name: bytebase ,owner: dbuser_bytebase ,revokeconn: true ,comment: bytebase primary database }
      - { name: kong     ,owner: dbuser_kong     ,revokeconn: true ,comment: kong the api gateway database }
      - { name: gitea    ,owner: dbuser_gitea    ,revokeconn: true ,comment: gitea meta database }
      - { name: wiki     ,owner: dbuser_wiki     ,revokeconn: true ,comment: wiki meta database }
    pg_users:                           # define business users/roles on this cluster, array of user definition
      - name: dbuser_meta               # REQUIRED, `name` is the only mandatory field of a user definition
        password: DBUser.Meta           # optional, password, can be a scram-sha-256 hash string or plain text
        login: true                     # optional, can log in, true by default  (new biz ROLE should be false)
        superuser: false                # optional, is superuser? false by default
        createdb: false                 # optional, can create database? false by default
        createrole: false               # optional, can create role? false by default
        inherit: true                   # optional, can this role use inherited privileges? true by default
        replication: false              # optional, can this role do replication? false by default
        bypassrls: false                # optional, can this role bypass row level security? false by default
        pgbouncer: true                 # optional, add this user to pgbouncer user-list? false by default (production user should be true explicitly)
        connlimit: -1                   # optional, user connection limit, default -1 disable limit
        expire_in: 3650                 # optional, now + n days when this role is expired (OVERWRITE expire_at)
        expire_at: '2030-12-31'         # optional, YYYY-MM-DD 'timestamp' when this role is expired  (OVERWRITTEN by expire_in)
        comment: pigsty admin user      # optional, comment string for this user/role
        roles: [dbrole_admin]           # optional, belonged roles. default roles are: dbrole_{admin,readonly,readwrite,offline}
        parameters: {}                  # optional, role level parameters with `ALTER ROLE SET`
        pool_mode: transaction          # optional, pgbouncer pool mode at user level, transaction by default
        pool_connlimit: -1              # optional, max database connections at user level, default -1 disable limit
      - {name: dbuser_view     ,password: DBUser.Viewer   ,pgbouncer: true ,roles: [dbrole_readonly], comment: read-only viewer for meta database}
      - {name: dbuser_grafana  ,password: DBUser.Grafana  ,pgbouncer: true ,roles: [dbrole_admin]    ,comment: admin user for grafana database   }
      - {name: dbuser_bytebase ,password: DBUser.Bytebase ,pgbouncer: true ,roles: [dbrole_admin]    ,comment: admin user for bytebase database  }
      - {name: dbuser_kong     ,password: DBUser.Kong     ,pgbouncer: true ,roles: [dbrole_admin]    ,comment: admin user for kong api gateway   }
      - {name: dbuser_gitea    ,password: DBUser.Gitea    ,pgbouncer: true ,roles: [dbrole_admin]    ,comment: admin user for gitea service      }
      - {name: dbuser_wiki     ,password: DBUser.Wiki     ,pgbouncer: true ,roles: [dbrole_admin]    ,comment: admin user for wiki.js service    }
    pg_services:                        # extra services in addition to pg_default_services, array of service definition
      # standby service will route {ip|name}:5435 to sync replica's pgbouncer (5435->6432 standby)
      - name: standby                   # required, service name, the actual svc name will be prefixed with `pg_cluster`, e.g: pg-meta-standby
        port: 5435                      # required, service exposed port (work as kubernetes service node port mode)
        ip: "*"                         # optional, service bind ip address, `*` for all ip by default
        selector: "[]"                  # required, service member selector, use JMESPath to filter inventory
        dest: default                   # optional, destination port, default|postgres|pgbouncer|<port_number>, 'default' by default
        check: /sync                    # optional, health check url path, / by default
        backup: "[? pg_role == `primary`]"  # backup server selector
        maxconn: 3000                   # optional, max allowed front-end connection
        balance: roundrobin             # optional, haproxy load balance algorithm (roundrobin by default, other: leastconn)
        options: 'inter 3s fastinter 1s downinter 5s rise 3 fall 3 on-marked-down shutdown-sessions slowstart 30s maxconn 3000 maxqueue 128 weight 100'
    pg_hba_rules:
      - {user: dbuser_view , db: all ,addr: infra ,auth: pwd ,title: 'allow grafana dashboard access cmdb from infra nodes'}
    pg_vip_enabled: true
    pg_vip_address: 10.10.10.2/24
    pg_vip_interface: eth1
    node_crontab:  # make a full backup 1 am everyday
      - '00 01 * * * postgres /pg/bin/pg-backup full'

Declare Access Control

You can also deeply customize Pigsty’s access control capabilities through declarative configuration. For example, the following config file provides deep security customization for the pg-meta cluster:

Uses the three-node core cluster template: crit.yml, to ensure data consistency is prioritized with zero data loss during failover. Enables L2 VIP and restricts database and connection pool listening addresses to local loopback IP + internal network IP + VIP three specific addresses. The template enforces Patroni’s SSL API and Pgbouncer’s SSL, and in HBA rules, enforces SSL usage for accessing the database cluster. Also enables the $libdir/passwordcheck extension in pg_libs to enforce password strength security policy.

Finally, a separate pg-meta-delay cluster is declared as pg-meta’s delayed replica from one hour ago, for emergency data deletion recovery.

pg-meta:      # 3 instance postgres cluster `pg-meta`
  hosts:
    10.10.10.10: { pg_seq: 1, pg_role: primary }
    10.10.10.11: { pg_seq: 2, pg_role: replica }
    10.10.10.12: { pg_seq: 3, pg_role: replica , pg_offline_query: true }
  vars:
    pg_cluster: pg-meta
    pg_conf: crit.yml
    pg_users:
      - { name: dbuser_meta , password: DBUser.Meta   , pgbouncer: true , roles: [ dbrole_admin ] , comment: pigsty admin user }
      - { name: dbuser_view , password: DBUser.Viewer , pgbouncer: true , roles: [ dbrole_readonly ] , comment: read-only viewer for meta database }
    pg_databases:
      - {name: meta ,baseline: cmdb.sql ,comment: pigsty meta database ,schemas: [pigsty] ,extensions: [{name: postgis, schema: public}, {name: timescaledb}]}
    pg_default_service_dest: postgres
    pg_services:
      - { name: standby ,src_ip: "*" ,port: 5435 , dest: default ,selector: "[]" , backup: "[? pg_role == `primary`]" }
    pg_vip_enabled: true
    pg_vip_address: 10.10.10.2/24
    pg_vip_interface: eth1
    pg_listen: '${ip},${vip},${lo}'
    patroni_ssl_enabled: true
    pgbouncer_sslmode: require
    pgbackrest_method: minio
    pg_libs: 'timescaledb, $libdir/passwordcheck, pg_stat_statements, auto_explain' # add passwordcheck extension to enforce strong password
    pg_default_roles:                 # default roles and users in postgres cluster
      - { name: dbrole_readonly  ,login: false ,comment: role for global read-only access     }
      - { name: dbrole_offline   ,login: false ,comment: role for restricted read-only access }
      - { name: dbrole_readwrite ,login: false ,roles: [dbrole_readonly]               ,comment: role for global read-write access }
      - { name: dbrole_admin     ,login: false ,roles: [pg_monitor, dbrole_readwrite]  ,comment: role for object creation }
      - { name: postgres     ,superuser: true  ,expire_in: 7300                        ,comment: system superuser }
      - { name: replicator ,replication: true  ,expire_in: 7300 ,roles: [pg_monitor, dbrole_readonly]   ,comment: system replicator }
      - { name: dbuser_dba   ,superuser: true  ,expire_in: 7300 ,roles: [dbrole_admin]  ,pgbouncer: true ,pool_mode: session, pool_connlimit: 16 , comment: pgsql admin user }
      - { name: dbuser_monitor ,roles: [pg_monitor] ,expire_in: 7300 ,pgbouncer: true ,parameters: {log_min_duration_statement: 1000 } ,pool_mode: session ,pool_connlimit: 8 ,comment: pgsql monitor user }
    pg_default_hba_rules:             # postgres host-based auth rules by default
      - {user: '${dbsu}'    ,db: all         ,addr: local     ,auth: ident ,title: 'dbsu access via local os user ident'  }
      - {user: '${dbsu}'    ,db: replication ,addr: local     ,auth: ident ,title: 'dbsu replication from local os ident' }
      - {user: '${repl}'    ,db: replication ,addr: localhost ,auth: ssl   ,title: 'replicator replication from localhost'}
      - {user: '${repl}'    ,db: replication ,addr: intra     ,auth: ssl   ,title: 'replicator replication from intranet' }
      - {user: '${repl}'    ,db: postgres    ,addr: intra     ,auth: ssl   ,title: 'replicator postgres db from intranet' }
      - {user: '${monitor}' ,db: all         ,addr: localhost ,auth: pwd   ,title: 'monitor from localhost with password' }
      - {user: '${monitor}' ,db: all         ,addr: infra     ,auth: ssl   ,title: 'monitor from infra host with password'}
      - {user: '${admin}'   ,db: all         ,addr: infra     ,auth: ssl   ,title: 'admin @ infra nodes with pwd & ssl'   }
      - {user: '${admin}'   ,db: all         ,addr: world     ,auth: cert  ,title: 'admin @ everywhere with ssl & cert'   }
      - {user: '+dbrole_readonly',db: all    ,addr: localhost ,auth: ssl   ,title: 'pgbouncer read/write via local socket'}
      - {user: '+dbrole_readonly',db: all    ,addr: intra     ,auth: ssl   ,title: 'read/write biz user via password'     }
      - {user: '+dbrole_offline' ,db: all    ,addr: intra     ,auth: ssl   ,title: 'allow etl offline tasks from intranet'}
    pgb_default_hba_rules:            # pgbouncer host-based authentication rules
      - {user: '${dbsu}'    ,db: pgbouncer   ,addr: local     ,auth: peer  ,title: 'dbsu local admin access with os ident'}
      - {user: 'all'        ,db: all         ,addr: localhost ,auth: pwd   ,title: 'allow all user local access with pwd' }
      - {user: '${monitor}' ,db: pgbouncer   ,addr: intra     ,auth: ssl   ,title: 'monitor access via intranet with pwd' }
      - {user: '${monitor}' ,db: all         ,addr: world     ,auth: deny  ,title: 'reject all other monitor access addr' }
      - {user: '${admin}'   ,db: all         ,addr: intra     ,auth: ssl   ,title: 'admin access via intranet with pwd'   }
      - {user: '${admin}'   ,db: all         ,addr: world     ,auth: deny  ,title: 'reject all other admin access addr'   }
      - {user: 'all'        ,db: all         ,addr: intra     ,auth: ssl   ,title: 'allow all user intra access with pwd' }

# OPTIONAL delayed cluster for pg-meta
pg-meta-delay:                    # delayed instance for pg-meta (1 hour ago)
  hosts: { 10.10.10.13: { pg_seq: 1, pg_role: primary, pg_upstream: 10.10.10.10, pg_delay: 1h } }
  vars: { pg_cluster: pg-meta-delay }

Citus Distributed Cluster

Below is a declarative configuration for a four-node Citus distributed cluster:

all:
  children:
    pg-citus0: # citus coordinator, pg_group = 0
      hosts: { 10.10.10.10: { pg_seq: 1, pg_role: primary } }
      vars: { pg_cluster: pg-citus0 , pg_group: 0 }
    pg-citus1: # citus data node 1
      hosts: { 10.10.10.11: { pg_seq: 1, pg_role: primary } }
      vars: { pg_cluster: pg-citus1 , pg_group: 1 }
    pg-citus2: # citus data node 2
      hosts: { 10.10.10.12: { pg_seq: 1, pg_role: primary } }
      vars: { pg_cluster: pg-citus2 , pg_group: 2 }
    pg-citus3: # citus data node 3, with an extra replica
      hosts:
        10.10.10.13: { pg_seq: 1, pg_role: primary }
        10.10.10.14: { pg_seq: 2, pg_role: replica }
      vars: { pg_cluster: pg-citus3 , pg_group: 3 }
  vars:                               # global parameters for all citus clusters
    pg_mode: citus                    # pgsql cluster mode: citus
    pg_shard: pg-citus                # citus shard name: pg-citus
    patroni_citus_db: meta            # citus distributed database name
    pg_dbsu_password: DBUser.Postgres # all dbsu password access for citus cluster
    pg_users: [ { name: dbuser_meta ,password: DBUser.Meta ,pgbouncer: true ,roles: [ dbrole_admin ] } ]
    pg_databases: [ { name: meta ,extensions: [ { name: citus }, { name: postgis }, { name: timescaledb } ] } ]
    pg_hba_rules:
      - { user: 'all' ,db: all  ,addr: 127.0.0.1/32 ,auth: ssl ,title: 'all user ssl access from localhost' }
      - { user: 'all' ,db: all  ,addr: intra        ,auth: ssl ,title: 'all user ssl access from intranet'  }

Redis Clusters

Below are declarative configuration examples for Redis primary-replica cluster, sentinel cluster, and Redis Cluster:

redis-ms: # redis classic primary & replica
  hosts: { 10.10.10.10: { redis_node: 1 , redis_instances: { 6379: { }, 6380: { replica_of: '10.10.10.10 6379' } } } }
  vars: { redis_cluster: redis-ms ,redis_password: 'redis.ms' ,redis_max_memory: 64MB }

redis-meta: # redis sentinel x 3
  hosts: { 10.10.10.11: { redis_node: 1 , redis_instances: { 26379: { } ,26380: { } ,26381: { } } } }
  vars:
    redis_cluster: redis-meta
    redis_password: 'redis.meta'
    redis_mode: sentinel
    redis_max_memory: 16MB
    redis_sentinel_monitor: # primary list for redis sentinel, use cls as name, primary ip:port
      - { name: redis-ms, host: 10.10.10.10, port: 6379 ,password: redis.ms, quorum: 2 }

redis-test: # redis native cluster: 3m x 3s
  hosts:
    10.10.10.12: { redis_node: 1 ,redis_instances: { 6379: { } ,6380: { } ,6381: { } } }
    10.10.10.13: { redis_node: 2 ,redis_instances: { 6379: { } ,6380: { } ,6381: { } } }
  vars: { redis_cluster: redis-test ,redis_password: 'redis.test' ,redis_mode: cluster, redis_max_memory: 32MB }

ETCD Cluster

Below is a declarative configuration example for a three-node Etcd cluster:

etcd: # dcs service for postgres/patroni ha consensus
  hosts:  # 1 node for testing, 3 or 5 for production
    10.10.10.10: { etcd_seq: 1 }  # etcd_seq required
    10.10.10.11: { etcd_seq: 2 }  # assign from 1 ~ n
    10.10.10.12: { etcd_seq: 3 }  # odd number please
  vars: # cluster level parameter override roles/etcd
    etcd_cluster: etcd  # mark etcd cluster name etcd
    etcd_safeguard: false # safeguard against purging
    etcd_clean: true # purge etcd during init process

MinIO Cluster

Below is a declarative configuration example for a three-node MinIO cluster:

minio:
  hosts:
    10.10.10.10: { minio_seq: 1 }
    10.10.10.11: { minio_seq: 2 }
    10.10.10.12: { minio_seq: 3 }
  vars:
    minio_cluster: minio
    minio_data: '/data{1...2}'          # use two disks per node
    minio_node: '${minio_cluster}-${minio_seq}.pigsty' # node name pattern
    haproxy_services:
      - name: minio                     # [required] service name, must be unique
        port: 9002                      # [required] service port, must be unique
        options:
          - option httpchk
          - option http-keep-alive
          - http-check send meth OPTIONS uri /minio/health/live
          - http-check expect status 200
        servers:
          - { name: minio-1 ,ip: 10.10.10.10 , port: 9000 , options: 'check-ssl ca-file /etc/pki/ca.crt check port 9000' }
          - { name: minio-2 ,ip: 10.10.10.11 , port: 9000 , options: 'check-ssl ca-file /etc/pki/ca.crt check port 9000' }
          - { name: minio-3 ,ip: 10.10.10.12 , port: 9000 , options: 'check-ssl ca-file /etc/pki/ca.crt check port 9000' }

1 - Inventory

Describe your infrastructure and clusters using declarative configuration files

Every Pigsty deployment corresponds to an Inventory that describes key properties of the infrastructure and database clusters.


Configuration File

Pigsty uses Ansible YAML configuration format by default, with a single YAML configuration file pigsty.yml as the inventory.

~/pigsty
  ^---- pigsty.yml   # <---- Default configuration file

You can directly edit this configuration file to customize your deployment, or use the configure wizard script provided by Pigsty to automatically generate an appropriate configuration file.


Configuration Structure

The inventory uses standard Ansible YAML configuration format, consisting of two parts: global parameters (all.vars) and multiple groups (all.children).

You can define new clusters in all.children and describe the infrastructure using global variables: all.vars, which looks like this:

all:                  # Top-level object: all
  vars: {...}         # Global parameters
  children:           # Group definitions
    infra:            # Group definition: 'infra'
      hosts: {...}        # Group members: 'infra'
      vars:  {...}        # Group parameters: 'infra'
    etcd:    {...}    # Group definition: 'etcd'
    pg-meta: {...}    # Group definition: 'pg-meta'
    pg-test: {...}    # Group definition: 'pg-test'
    redis-test: {...} # Group definition: 'redis-test'
    # ...

Cluster Definition

Each Ansible group may represent a cluster, which can be a node cluster, PostgreSQL cluster, Redis cluster, Etcd cluster, MinIO cluster, etc.

A cluster definition consists of two parts: cluster members (hosts) and cluster parameters (vars). You can define cluster members in <cls>.hosts and describe the cluster using configuration parameters in <cls>.vars. Here’s an example of a 3-node high-availability PostgreSQL cluster definition:

all:
  children:    # Ansible group list
    pg-test:   # Ansible group name
      hosts:   # Ansible group instances (cluster members)
        10.10.10.11: { pg_seq: 1, pg_role: primary } # Host 1
        10.10.10.12: { pg_seq: 2, pg_role: replica } # Host 2
        10.10.10.13: { pg_seq: 3, pg_role: offline } # Host 3
      vars:    # Ansible group variables (cluster parameters)
        pg_cluster: pg-test

Cluster-level vars (cluster parameters) override global parameters, and instance-level vars override both cluster parameters and global parameters.


Splitting Configuration

If your deployment is large or you want to better organize configuration files, you can split the inventory into multiple files for easier management and maintenance.

inventory/
├── hosts.yml              # Host and cluster definitions
├── group_vars/
│   ├── all.yml            # Global default variables (corresponds to all.vars)
│   ├── infra.yml          # infra group variables
│   ├── etcd.yml           # etcd group variables
│   └── pg-meta.yml        # pg-meta cluster variables
└── host_vars/
    ├── 10.10.10.10.yml    # Specific host variables
    └── 10.10.10.11.yml

You can place cluster member definitions in the hosts.yml file and put cluster-level configuration parameters in corresponding files under the group_vars directory.


Switching Configuration

You can temporarily specify a different inventory file when running playbooks using the -i parameter.

./pgsql.yml -i another_config.yml
./infra.yml -i nginx_config.yml

Additionally, Ansible supports multiple configuration methods. You can use local yaml|ini configuration files, or use CMDB and any dynamic configuration scripts as configuration sources.

In Pigsty, we specify pigsty.yml in the same directory as the default inventory through ansible.cfg in the Pigsty home directory. You can modify it as needed.

[defaults]
inventory = pigsty.yml

Additionally, Pigsty supports using a CMDB metabase to store the inventory, facilitating integration with existing systems.

2 - Configure

Use the configure script to automatically generate recommended configuration files based on your environment.

Pigsty provides a configure script as a configuration wizard that automatically generates an appropriate pigsty.yml configuration file based on your current environment.

This is an optional script: if you already understand how to configure Pigsty, you can directly edit the pigsty.yml configuration file and skip the wizard.


Quick Start

Enter the pigsty source home directory and run ./configure to automatically start the configuration wizard. Without any arguments, it defaults to the meta single-node configuration template:

cd ~/pigsty
./configure          # Interactive configuration wizard, auto-detect environment and generate config

This command will use the selected template as a base, detect the current node’s IP address and region, and generate a pigsty.yml configuration file suitable for the current environment.

Features

The configure script performs the following adjustments based on environment and input, generating a pigsty.yml configuration file in the current directory.

  • Detects the current node IP address; if multiple IPs exist, prompts the user to input a primary IP address as the node’s identity
  • Uses the IP address to replace the placeholder 10.10.10.10 in the configuration template and sets it as the admin_ip parameter value
  • Detects the current region, setting region to default (global default repos) or china (using Chinese mirror repos)
  • For micro instances (vCPU < 4), uses the tiny parameter template for node_tune and pg_conf to optimize resource usage
  • If -v PG major version is specified, sets pg_version and all PG alias parameters to the corresponding major version
  • If -g is specified, replaces all default passwords with randomly generated strong passwords for enhanced security (strongly recommended)
  • When PG major version ≥ 17, prioritizes the built-in C.UTF-8 locale, or the OS-supported C.UTF-8
  • Checks if the core dependency ansible for deployment is available in the current environment
  • Also checks if the deployment target node is SSH-reachable and can execute commands with sudo (-s to skip)

Usage Examples

# Basic usage
./configure                       # Interactive configuration wizard
./configure -i 10.10.10.10        # Specify primary IP address

# Specify configuration template
./configure -c meta               # Use default single-node template (default)
./configure -c rich               # Use feature-rich single-node template
./configure -c slim               # Use minimal template (PGSQL + ETCD only)
./configure -c ha/full            # Use 4-node HA sandbox template
./configure -c ha/trio            # Use 3-node HA template
./configure -c app/supa           # Use Supabase self-hosted template

# Specify PostgreSQL version
./configure -v 17                 # Use PostgreSQL 17
./configure -v 16                 # Use PostgreSQL 16
./configure -c rich -v 16         # rich template + PG 16

# Region and proxy
./configure -r china              # Use Chinese mirrors
./configure -r europe             # Use European mirrors
./configure -x                    # Import current proxy environment variables

# Skip and automation
./configure -s                    # Skip IP detection, keep placeholder
./configure -n -i 10.10.10.10     # Non-interactive mode with specified IP
./configure -c ha/full -s         # 4-node template, skip IP replacement

# Security enhancement
./configure -g                    # Generate random passwords
./configure -c meta -g -i 10.10.10.10  # Complete production configuration

# Specify output and SSH port
./configure -o prod.yml           # Output to prod.yml
./configure -p 2222               # Use SSH port 2222

Command Arguments

./configure
    [-c|--conf <template>]      # Configuration template name (meta|rich|slim|ha/full|...)
    [-i|--ip <ipaddr>]          # Specify primary IP address
    [-v|--version <pgver>]      # PostgreSQL major version (13|14|15|16|17|18)
    [-r|--region <region>]      # Upstream software repo region (default|china|europe)
    [-o|--output <file>]        # Output configuration file path (default: pigsty.yml)
    [-s|--skip]                 # Skip IP address detection and replacement
    [-x|--proxy]                # Import proxy settings from environment variables
    [-n|--non-interactive]      # Non-interactive mode (don't ask any questions)
    [-p|--port <port>]          # Specify SSH port
    [-g|--generate]             # Generate random passwords
    [-h|--help]                 # Display help information

Argument Details

ArgumentDescription
-c, --confGenerate config from conf/<template>.yml, supports subdirectories like ha/full
-i, --ipReplace placeholder 10.10.10.10 in config template with specified IP
-v, --versionSpecify PostgreSQL major version (13-18), keeps template default if not specified
-r, --regionSet software repo mirror region: default, china (Chinese mirrors), europe (European)
-o, --outputSpecify output file path, defaults to pigsty.yml
-s, --skipSkip IP address detection and replacement, keep 10.10.10.10 placeholder in template
-x, --proxyWrite current environment proxy variables (HTTP_PROXY, HTTPS_PROXY, ALL_PROXY, NO_PROXY) to config
-n, --non-interactiveNon-interactive mode, don’t ask any questions (requires -i to specify IP)
-p, --portSpecify SSH port (when using non-default port 22)
-g, --generateGenerate random values for passwords in config file, improving security (strongly recommended)

Execution Flow

The configure script executes detection and configuration in the following order:

┌─────────────────────────────────────────────────────────────┐
│                  configure Execution Flow                   │
├─────────────────────────────────────────────────────────────┤
│                                                             │
│  1. check_region          Detect network region (GFW check) │
│         ↓                                                   │
│  2. check_version         Validate PostgreSQL version       │
│         ↓                                                   │
│  3. check_kernel          Detect OS kernel (Linux/Darwin)   │
│         ↓                                                   │
│  4. check_machine         Detect CPU arch (x86_64/aarch64)  │
│         ↓                                                   │
│  5. check_package_manager Detect package manager (dnf/yum/apt) │
│         ↓                                                   │
│  6. check_vendor_version  Detect OS distro and version      │
│         ↓                                                   │
│  7. check_sudo            Detect passwordless sudo          │
│         ↓                                                   │
│  8. check_ssh             Detect passwordless SSH to self   │
│         ↓                                                   │
│  9. check_proxy           Handle proxy environment vars     │
│         ↓                                                   │
│ 10. check_ipaddr          Detect/input primary IP address   │
│         ↓                                                   │
│ 11. check_admin           Validate admin SSH + Sudo access  │
│         ↓                                                   │
│ 12. check_conf            Select configuration template     │
│         ↓                                                   │
│ 13. check_config          Generate configuration file       │
│         ↓                                                   │
│ 14. check_utils           Check if Ansible etc. installed   │
│         ↓                                                   │
│     ✓ Configuration complete, output pigsty.yml             │
│                                                             │
└─────────────────────────────────────────────────────────────┘

Automatic Behaviors

Region Detection

The script automatically detects the network environment to determine if you’re in mainland China (behind GFW):

# Check network environment by accessing Google
curl -I -s --connect-timeout 1 www.google.com
  • If Google is inaccessible, automatically sets region: china to use domestic mirrors
  • If accessible, uses region: default default mirrors
  • Can manually specify region via -r argument

IP Address Handling

The script determines the primary IP address in the following priority:

  1. Command line argument: If IP is specified via -i, use it directly
  2. Single IP detection: If the current node has only one IP, use it automatically
  3. Demo IP detection: If 10.10.10.10 is detected, select it automatically (for sandbox environments)
  4. Interactive input: When multiple IPs exist, prompt user to choose or input
[WARN] Multiple IP address candidates found:
    (1) 192.168.1.100   inet 192.168.1.100/24 scope global eth0
    (2) 10.10.10.10     inet 10.10.10.10/24 scope global eth1
[ IN ] INPUT primary_ip address (of current meta node, e.g 10.10.10.10):
=> 10.10.10.10

Low-End Hardware Optimization

When CPU core count ≤ 4 is detected, the script automatically adjusts configuration:

[WARN] replace oltp template with tiny due to cpu < 4

This ensures smooth operation on low-spec virtual machines.

Locale Settings

The script automatically enables C.UTF-8 as the default locale when:

  • PostgreSQL version ≥ 17 (built-in Locale Provider support)
  • Or the current system supports C.UTF-8 / C.utf8 locale
pg_locale: C.UTF-8
pg_lc_collate: C.UTF-8
pg_lc_ctype: C.UTF-8

China Region Special Handling

When region is set to china, the script automatically:

  • Enables docker_registry_mirrors Docker mirror acceleration
  • Enables PIP_MIRROR_URL Python mirror acceleration

Password Generation

When using the -g argument, the script generates 24-character random strings for the following passwords:

Password ParameterDescription
grafana_admin_passwordGrafana admin password
pg_admin_passwordPostgreSQL admin password
pg_monitor_passwordPostgreSQL monitor user password
pg_replication_passwordPostgreSQL replication user password
patroni_passwordPatroni API password
haproxy_admin_passwordHAProxy admin password
minio_secret_keyMinIO Secret Key
etcd_root_passwordETCD Root password

It also replaces the following placeholder passwords:

  • DBUser.Meta → random password
  • DBUser.Viewer → random password
  • S3User.Backup → random password
  • S3User.Meta → random password
  • S3User.Data → random password
$ ./configure -g
[INFO] generating random passwords...
    grafana_admin_password   : xK9mL2nP4qR7sT1vW3yZ5bD8
    pg_admin_password        : aB3cD5eF7gH9iJ1kL2mN4oP6
    ...
[INFO] random passwords generated, check and save them

Configuration Templates

The script reads configuration templates from the conf/ directory, supporting the following templates:

Core Templates

TemplateDescription
metaDefault template: Single-node installation with INFRA + NODE + ETCD + PGSQL
richFeature-rich version: Includes almost all extensions, MinIO, local repo
slimMinimal version: PostgreSQL + ETCD only, no monitoring infrastructure
fatComplete version: rich base with more extensions installed
pgsqlPure PostgreSQL template
infraPure infrastructure template

HA Templates (ha/)

TemplateDescription
ha/dual2-node HA cluster
ha/trio3-node HA cluster
ha/full4-node complete sandbox environment
ha/safeSecurity-hardened HA configuration
ha/simu42-node large-scale simulation environment

Application Templates (app/)

TemplateDescription
supabaseSupabase self-hosted configuration
app/difyDify AI platform configuration
app/odooOdoo ERP configuration
app/teableTeable table database configuration
app/registryDocker Registry configuration

Special Kernel Templates

TemplateDescription
ivoryIvorySQL: Oracle-compatible PostgreSQL
mssqlBabelfish: SQL Server-compatible PostgreSQL
polarPolarDB: Alibaba Cloud open-source distributed PostgreSQL
citusCitus: Distributed PostgreSQL
orioleOrioleDB: Next-generation storage engine

Demo Templates (demo/)

TemplateDescription
demo/demoDemo environment configuration
demo/redisRedis cluster demo
demo/minioMinIO cluster demo

Output Example

$ ./configure
configure pigsty v4.0.0 begin
[ OK ] region = china
[ OK ] kernel  = Linux
[ OK ] machine = x86_64
[ OK ] package = rpm,dnf
[ OK ] vendor  = rocky (Rocky Linux)
[ OK ] version = 9 (9.5)
[ OK ] sudo = vagrant ok
[ OK ] ssh = [email protected] ok
[WARN] Multiple IP address candidates found:
    (1) 192.168.121.193	    inet 192.168.121.193/24 brd 192.168.121.255 scope global dynamic noprefixroute eth0
    (2) 10.10.10.10	    inet 10.10.10.10/24 brd 10.10.10.255 scope global noprefixroute eth1
[ OK ] primary_ip = 10.10.10.10 (from demo)
[ OK ] admin = [email protected] ok
[ OK ] mode = meta (el9)
[ OK ] locale  = C.UTF-8
[ OK ] ansible = ready
[ OK ] pigsty configured
[WARN] don't forget to check it and change passwords!
proceed with ./deploy.yml

Environment Variables

The script supports the following environment variables:

Environment VariableDescriptionDefault
PIGSTY_HOMEPigsty installation directory~/pigsty
METADB_URLMetabase connection URLservice=meta
HTTP_PROXYHTTP proxy-
HTTPS_PROXYHTTPS proxy-
ALL_PROXYUniversal proxy-
NO_PROXYProxy whitelistBuilt-in default

Notes

  1. Passwordless access: Before running configure, ensure the current user has passwordless sudo privileges and passwordless SSH to localhost. This can be automatically configured via the bootstrap script.

  2. IP address selection: Choose an internal IP as the primary IP address, not a public IP or 127.0.0.1.

  3. Password security: In production environments, always modify default passwords in the configuration file, or use the -g argument to generate random passwords.

  4. Configuration review: After the script completes, it’s recommended to review the generated pigsty.yml file to confirm the configuration meets expectations.

  5. Multiple executions: You can run configure multiple times to regenerate configuration; each run will overwrite the existing pigsty.yml.

  6. macOS limitations: When running on macOS, the script skips some Linux-specific checks and uses placeholder IP 10.10.10.10. macOS can only serve as an admin node.


FAQ

How to use a custom configuration template?

Place your configuration file in the conf/ directory, then specify it with the -c argument:

cp my-config.yml ~/pigsty/conf/myconf.yml
./configure -c myconf

How to generate different configurations for multiple clusters?

Use the -o argument to specify different output files:

./configure -c ha/full -o cluster-a.yml
./configure -c ha/trio -o cluster-b.yml

Then specify the configuration file when running playbooks:

./deploy.yml -i cluster-a.yml

How to handle multiple IPs in non-interactive mode?

You must explicitly specify the IP address using the -i argument:

./configure -n -i 10.10.10.10

How to keep the placeholder IP in the template?

Use the -s argument to skip IP replacement:

./configure -c ha/full -s   # Keep 10.10.10.10 placeholder

  • Inventory: Understand the Ansible inventory structure
  • Parameters: Understand Pigsty parameter hierarchy and priority
  • Templates: View all available configuration templates
  • Installation: Understand the complete installation process
  • Metabase: Use PostgreSQL as a dynamic configuration source

3 - Parameters

Fine-tune Pigsty customization using configuration parameters

In the inventory, you can use various parameters to fine-tune Pigsty customization. These parameters cover everything from infrastructure settings to database configuration.


Parameter List

Pigsty provides approximately 380+ configuration parameters distributed across 8 default modules for fine-grained control of various system aspects. See Reference - Parameter List for the complete list.

ModuleGroupsParamsDescription
PGSQL9123Core configuration for PostgreSQL database clusters
INFRA1082Infrastructure: repos, Nginx, DNS, monitoring, Grafana, etc.
NODE1183Host node tuning: identity, DNS, packages, tuning, security, admin, time, VIP, etc.
ETCD213Distributed configuration store and service discovery
REDIS121Redis cache and data structure server
MINIO221S3-compatible object storage service
FERRET19MongoDB-compatible database FerretDB
DOCKER18Docker container engine

Parameter Form

Parameters are key-value pairs that describe entities. The Key is a string, and the Value can be one of five types: boolean, string, number, array, or object.

all:                            # <------- Top-level object: all
  vars:
    admin_ip: 10.10.10.10       # <------- Global configuration parameter
  children:
    pg-meta:                    # <------- pg-meta group
      vars:
        pg_cluster: pg-meta     # <------- Cluster-level parameter
      hosts:
        10.10.10.10:            # <------- Host node IP
          pg_seq: 1
          pg_role: primary      # <------- Instance-level parameter

Parameter Priority

Parameters can be set at different levels with the following priority:

LevelLocationDescriptionPriority
CLI-e command line argumentPassed via command lineHighest (5)
Host/Instance<group>.hosts.<host>Parameters specific to a single hostHigher (4)
Group/Cluster<group>.varsParameters shared by hosts in group/clusterMedium (3)
Globalall.varsParameters shared by all hostsLower (2)
Default<roles>/default/main.ymlRole implementation defaultsLowest (1)

Here are some examples of parameter priority:

  • Use command line parameter -e grafana_clean=true when running playbooks to wipe Grafana data
  • Use instance-level parameter pg_role on host variables to override pg instance role
  • Use cluster-level parameter pg_cluster on group variables to override pg cluster name
  • Use global parameter node_ntp_servers on global variables to specify global NTP servers
  • If pg_version is not set, Pigsty will use the default value from the pgsql role implementation (default is 18)

Except for identity parameters, every parameter has an appropriate default value, so explicit setting is not required.


Identity Parameters

Identity parameters are special parameters that serve as entity ID identifiers, therefore they have no default values and must be explicitly set.

ModuleIdentity Parameters
PGSQLpg_cluster, pg_seq, pg_role, …
NODEnodename, node_cluster
ETCDetcd_cluster, etcd_seq
MINIOminio_cluster, minio_seq
REDISredis_cluster, redis_node, redis_instances
INFRAinfra_seq

Exceptions are etcd_cluster and minio_cluster which have default values. This assumes each deployment has only one etcd cluster for DCS and one optional MinIO cluster for centralized backup storage, so they are assigned default cluster names etcd and minio. However, you can still deploy multiple etcd or MinIO clusters using different names.

4 - Conf Templates

Use pre-made configuration templates to quickly generate configuration files adapted to your environment

In Pigsty, deployment blueprint details are defined by the inventory, which is the pigsty.yml configuration file. You can customize it through declarative configuration.

However, writing configuration files directly can be daunting for new users. To address this, we provide some ready-to-use configuration templates covering common usage scenarios.

Each template is a predefined pigsty.yml configuration file containing reasonable defaults suitable for specific scenarios.

You can choose a template as your customization starting point, then modify it as needed to meet your specific requirements.


Using Templates

Pigsty provides the configure script as an optional configuration wizard that generates an inventory with good defaults based on your environment and input.

Use ./configure -c <conf> to specify a configuration template, where <conf> is the path relative to the conf directory (the .yml suffix can be omitted).

./configure                     # Default to meta.yml configuration template
./configure -c meta             # Explicitly specify meta.yml single-node template
./configure -c rich             # Use feature-rich template with all extensions and MinIO
./configure -c slim             # Use minimal single-node template

# Use different database kernels
./configure -c pgsql            # Native PostgreSQL kernel, basic features (13~18)
./configure -c citus            # Citus distributed HA PostgreSQL (14~17)
./configure -c mssql            # Babelfish kernel, SQL Server protocol compatible (15)
./configure -c polar            # PolarDB PG kernel, Aurora/RAC style (15)
./configure -c ivory            # IvorySQL kernel, Oracle syntax compatible (18)
./configure -c mysql            # OpenHalo kernel, MySQL compatible (14)
./configure -c pgtde            # Percona PostgreSQL Server transparent encryption (18)
./configure -c oriole           # OrioleDB kernel, OLTP enhanced (17)
./configure -c supabase         # Supabase self-hosted configuration (15~18)

# Use multi-node HA templates
./configure -c ha/dual          # Use 2-node HA template
./configure -c ha/trio          # Use 3-node HA template
./configure -c ha/full          # Use 4-node HA template

If no template is specified, Pigsty defaults to the meta.yml single-node configuration template.


Template List

Main Templates

The following are single-node configuration templates for installing Pigsty on a single server:

TemplateDescription
meta.ymlDefault template, single-node PostgreSQL online installation
rich.ymlFeature-rich template with local repo, MinIO, and more examples
slim.ymlMinimal template, PostgreSQL only without monitoring and infrastructure

Database Kernel Templates

Templates for various database management systems and kernels:

TemplateDescription
pgsql.ymlNative PostgreSQL kernel, basic features (13~18)
citus.ymlCitus distributed HA PostgreSQL (14~17)
mssql.ymlBabelfish kernel, SQL Server protocol compatible (15)
polar.ymlPolarDB PG kernel, Aurora/RAC style (15)
ivory.ymlIvorySQL kernel, Oracle syntax compatible (17)
mysql.ymlOpenHalo kernel, MySQL compatible (14)
pgtde.ymlPercona PostgreSQL Server transparent encryption (17)
oriole.ymlOrioleDB kernel, OLTP enhanced (17, Debian pkg pending)
supabase.ymlSupabase self-hosted configuration (15~17)

You can add more nodes later or use HA templates to plan your cluster from the start.


HA Templates

You can configure Pigsty to run on multiple nodes, forming a high-availability (HA) cluster:

TemplateDescription
dual.yml2-node semi-HA deployment
trio.yml3-node standard HA deployment
full.yml4-node standard deployment
safe.yml4-node security-enhanced deployment with delayed replica
simu.yml20-node production environment simulation

Application Templates

You can use the following templates to run Docker applications/software:

TemplateDescription
supa.ymlStart single-node Supabase
odoo.ymlStart Odoo ERP system
dify.ymlStart Dify AI workflow system
electric.ymlStart Electric sync engine

Demo Templates

Besides main templates, Pigsty provides a set of demo templates for different scenarios:

TemplateDescription
el.ymlFull-parameter config file for EL 8/9 systems
debian.ymlFull-parameter config file for Debian/Ubuntu systems
remote.ymlExample config for monitoring remote PostgreSQL clusters or RDS
redis.ymlRedis cluster example configuration
minio.yml3-node MinIO cluster example configuration
demo.ymlConfiguration file for Pigsty public demo site

Build Templates

The following configuration templates are for development and testing purposes:

TemplateDescription
build.ymlOpen source build config for EL 9/10, Debian 12/13, Ubuntu 22.04/24.04

5 - Use CMDB as Config Inventory

Use PostgreSQL as a CMDB metabase to store Ansible inventory.

Pigsty allows you to use a PostgreSQL metabase as a dynamic configuration source, replacing static YAML configuration files for more powerful configuration management capabilities.


Overview

CMDB (Configuration Management Database) is a method of storing configuration information in a database for management.

In Pigsty, the default configuration source is a static YAML file pigsty.yml, which serves as Ansible’s inventory.

This approach is simple and direct, but when infrastructure scales and requires complex, fine-grained management and external integration, a single static file becomes insufficient.

FeatureStatic YAML FileCMDB Metabase
QueryingManual search/grepSQL queries with any conditions, aggregation analysis
VersioningDepends on Git or manual backupDatabase transactions, audit logs, time-travel snapshots
Access ControlFile system permissions, coarse-grainedPostgreSQL fine-grained access control
Concurrent EditingRequires file locking or merge conflictsDatabase transactions naturally support concurrency
External IntegrationRequires YAML parsingStandard SQL interface, easy integration with any language
ScalabilityDifficult to maintain when file becomes too largeScales to physical limits
Dynamic GenerationStatic file, changes require manual applicationImmediate effect, real-time configuration changes

Pigsty provides the CMDB database schema in the sample database pg-meta.meta schema baseline definition.


How It Works

The core idea of CMDB is to replace the static configuration file with a dynamic script. Ansible supports using executable scripts as inventory, as long as the script outputs inventory data in JSON format. When you enable CMDB, Pigsty creates a dynamic inventory script named inventory.sh:

#!/bin/bash
psql ${METADB_URL} -AXtwc 'SELECT text FROM pigsty.inventory;'

This script’s function is simple: every time Ansible needs to read the inventory, it queries configuration data from the PostgreSQL database’s pigsty.inventory view and returns it in JSON format.

The overall architecture is as follows:

flowchart LR
    conf["bin/inventory_conf"]
    tocmdb["bin/inventory_cmdb"]
    load["bin/inventory_load"]
    ansible["🚀 Ansible"]

    subgraph static["📄 Static Config Mode"]
        yml[("pigsty.yml")]
    end

    subgraph dynamic["🗄️ CMDB Dynamic Mode"]
        sh["inventory.sh"]
        cmdb[("PostgreSQL CMDB")]
    end

    conf -->|"switch"| yml
    yml -->|"load config"| load
    load -->|"write"| cmdb
    tocmdb -->|"switch"| sh
    sh --> cmdb

    yml --> ansible
    cmdb --> ansible

Data Model

The CMDB database schema is defined in files/cmdb.sql, with all objects in the pigsty schema.

Core Tables

TableDescriptionPrimary Key
pigsty.groupCluster/group definitions, corresponds to Ansible groupscls
pigsty.hostHost definitions, belongs to a group(cls, ip)
pigsty.global_varGlobal variables, corresponds to all.varskey
pigsty.group_varGroup variables, corresponds to all.children.<cls>.vars(cls, key)
pigsty.host_varHost variables, host-level variables(cls, ip, key)
pigsty.default_varDefault variable definitions, stores parameter metadatakey
pigsty.jobJob records table, records executed tasksid

Table Structure Details

Cluster Table pigsty.group

CREATE TABLE pigsty.group (
    cls     TEXT PRIMARY KEY,        -- Cluster name, primary key
    ctime   TIMESTAMPTZ DEFAULT now(), -- Creation time
    mtime   TIMESTAMPTZ DEFAULT now()  -- Modification time
);

Host Table pigsty.host

CREATE TABLE pigsty.host (
    cls    TEXT NOT NULL REFERENCES pigsty.group(cls),  -- Parent cluster
    ip     INET NOT NULL,                               -- Host IP address
    ctime  TIMESTAMPTZ DEFAULT now(),
    mtime  TIMESTAMPTZ DEFAULT now(),
    PRIMARY KEY (cls, ip)
);

Global Variables Table pigsty.global_var

CREATE TABLE pigsty.global_var (
    key   TEXT PRIMARY KEY,           -- Variable name
    value JSONB NULL,                 -- Variable value (JSON format)
    mtime TIMESTAMPTZ DEFAULT now()   -- Modification time
);

Group Variables Table pigsty.group_var

CREATE TABLE pigsty.group_var (
    cls   TEXT NOT NULL REFERENCES pigsty.group(cls),
    key   TEXT NOT NULL,
    value JSONB NULL,
    mtime TIMESTAMPTZ DEFAULT now(),
    PRIMARY KEY (cls, key)
);

Host Variables Table pigsty.host_var

CREATE TABLE pigsty.host_var (
    cls   TEXT NOT NULL,
    ip    INET NOT NULL,
    key   TEXT NOT NULL,
    value JSONB NULL,
    mtime TIMESTAMPTZ DEFAULT now(),
    PRIMARY KEY (cls, ip, key),
    FOREIGN KEY (cls, ip) REFERENCES pigsty.host(cls, ip)
);

Core Views

CMDB provides a series of views for querying and displaying configuration data:

ViewDescription
pigsty.inventoryCore view: Generates Ansible dynamic inventory JSON
pigsty.raw_configRaw configuration in JSON format
pigsty.global_configGlobal config view, merges defaults and global vars
pigsty.group_configGroup config view, includes host list and group vars
pigsty.host_configHost config view, merges group and host-level vars
pigsty.pg_clusterPostgreSQL cluster view
pigsty.pg_instancePostgreSQL instance view
pigsty.pg_databasePostgreSQL database definition view
pigsty.pg_usersPostgreSQL user definition view
pigsty.pg_servicePostgreSQL service definition view
pigsty.pg_hbaPostgreSQL HBA rules view
pigsty.pg_remoteRemote PostgreSQL instance view

pigsty.inventory is the core view that converts database configuration data to the JSON format required by Ansible:

SELECT text FROM pigsty.inventory;

Utility Scripts

Pigsty provides three convenience scripts for managing CMDB:

ScriptFunction
bin/inventory_loadLoad YAML configuration file into PostgreSQL database
bin/inventory_cmdbSwitch configuration source to CMDB (dynamic inventory script)
bin/inventory_confSwitch configuration source to static config file pigsty.yml

inventory_load

Parse and import YAML configuration file into CMDB:

bin/inventory_load                     # Load default pigsty.yml to default CMDB
bin/inventory_load -p /path/to/conf.yml  # Specify configuration file path
bin/inventory_load -d "postgres://..."   # Specify database connection URL
bin/inventory_load -n myconfig           # Specify configuration name

The script performs the following operations:

  1. Clears existing data in the pigsty schema
  2. Parses the YAML configuration file
  3. Writes global variables to the global_var table
  4. Writes cluster definitions to the group table
  5. Writes cluster variables to the group_var table
  6. Writes host definitions to the host table
  7. Writes host variables to the host_var table

Environment Variables

  • PIGSTY_HOME: Pigsty installation directory, defaults to ~/pigsty
  • METADB_URL: Database connection URL, defaults to service=meta

inventory_cmdb

Switch Ansible to use CMDB as the configuration source:

bin/inventory_cmdb

The script performs the following operations:

  1. Creates dynamic inventory script ${PIGSTY_HOME}/inventory.sh
  2. Modifies ansible.cfg to set inventory to inventory.sh

The generated inventory.sh contents:

#!/bin/bash
psql ${METADB_URL} -AXtwc 'SELECT text FROM pigsty.inventory;'

inventory_conf

Switch back to using static YAML configuration file:

bin/inventory_conf

The script modifies ansible.cfg to set inventory back to pigsty.yml.


Usage Workflow

First-time CMDB Setup

  1. Initialize CMDB schema (usually done automatically during Pigsty installation):
psql -f ~/pigsty/files/cmdb.sql
  1. Load configuration to database:
bin/inventory_load
  1. Switch to CMDB mode:
bin/inventory_cmdb
  1. Verify configuration:
ansible all --list-hosts          # List all hosts
ansible-inventory --list          # View complete inventory

Query Configuration

After enabling CMDB, you can flexibly query configuration using SQL:

-- View all clusters
SELECT cls FROM pigsty.group;

-- View all hosts in a cluster
SELECT ip FROM pigsty.host WHERE cls = 'pg-meta';

-- View global variables
SELECT key, value FROM pigsty.global_var;

-- View cluster variables
SELECT key, value FROM pigsty.group_var WHERE cls = 'pg-meta';

-- View all PostgreSQL clusters
SELECT cls, name, pg_databases, pg_users FROM pigsty.pg_cluster;

-- View all PostgreSQL instances
SELECT cls, ins, ip, seq, role FROM pigsty.pg_instance;

-- View all database definitions
SELECT cls, datname, owner, encoding FROM pigsty.pg_database;

-- View all user definitions
SELECT cls, name, login, superuser FROM pigsty.pg_users;

Modify Configuration

You can modify configuration directly via SQL:

-- Add new cluster
INSERT INTO pigsty.group (cls) VALUES ('pg-new');

-- Add cluster variable
INSERT INTO pigsty.group_var (cls, key, value)
VALUES ('pg-new', 'pg_cluster', '"pg-new"');

-- Add host
INSERT INTO pigsty.host (cls, ip) VALUES ('pg-new', '10.10.10.20');

-- Add host variables
INSERT INTO pigsty.host_var (cls, ip, key, value)
VALUES ('pg-new', '10.10.10.20', 'pg_seq', '1'),
       ('pg-new', '10.10.10.20', 'pg_role', '"primary"');

-- Modify global variable
UPDATE pigsty.global_var SET value = '"new-value"' WHERE key = 'some_param';

-- Delete cluster (cascades to hosts and variables)
DELETE FROM pigsty.group WHERE cls = 'pg-old';

Changes take effect immediately without reloading or restarting any service.

Switch Back to Static Configuration

To switch back to static configuration file mode:

bin/inventory_conf

Advanced Usage

Export Configuration

Export CMDB configuration to YAML format:

psql service=meta -AXtwc "SELECT jsonb_pretty(jsonb_build_object('all', jsonb_build_object('children', children, 'vars', vars))) FROM pigsty.raw_config;"

Or use the ansible-inventory command:

ansible-inventory --list --yaml > exported_config.yml

Configuration Auditing

Track configuration changes using the mtime field:

-- View recently modified global variables
SELECT key, value, mtime FROM pigsty.global_var
ORDER BY mtime DESC LIMIT 10;

-- View changes after a specific time
SELECT * FROM pigsty.group_var
WHERE mtime > '2024-01-01'::timestamptz;

Integration with External Systems

CMDB uses standard PostgreSQL, making it easy to integrate with other systems:

  • Web Management Interface: Expose configuration data through REST API (e.g., PostgREST)
  • CI/CD Pipelines: Read/write database directly in deployment scripts
  • Monitoring & Alerting: Generate monitoring rules based on configuration data
  • ITSM Systems: Sync with enterprise CMDB systems

Considerations

  1. Data Consistency: After modifying configuration, you need to re-run the corresponding Ansible playbooks to apply changes to the actual environment

  2. Backup: Configuration data in CMDB is critical, ensure regular backups

  3. Permissions: Configure appropriate database access permissions for CMDB to avoid accidental modifications

  4. Transactions: When making batch configuration changes, perform them within a transaction for rollback on errors

  5. Connection Pooling: The inventory.sh script creates a new connection on each execution; if Ansible runs frequently, consider using connection pooling


Summary

CMDB is Pigsty’s advanced configuration management solution, suitable for scenarios requiring large-scale cluster management, complex queries, external integration, or fine-grained access control. By storing configuration data in PostgreSQL, you can fully leverage the database’s powerful capabilities to manage infrastructure configuration.

FeatureDescription
StoragePostgreSQL pigsty schema
Dynamic Inventoryinventory.sh script
Config Loadbin/inventory_load
Switch to CMDBbin/inventory_cmdb
Switch to YAMLbin/inventory_conf
Core Viewpigsty.inventory