If you intend to learn about Pigsty, you can start with the Quick Start single-node deployment. A Linux virtual machine with 1C/2G is sufficient to run Pigsty.
You can use a Linux MiniPC, free/discounted virtual machines provided by cloud providers, Windows WSL, or create a virtual machine on your own laptop for Pigsty deployment.
Pigsty provides out-of-the-box Vagrant templates and Terraform templates to help you provision Linux VMs with one click locally or in the cloud.
The single-node version of Pigsty includes all core features: 440+PG extensions, self-contained Grafana/Victoria monitoring, IaC provisioning capabilities,
and local PITR point-in-time recovery. If you have external object storage (for PostgreSQL PITR backup), then for scenarios like demos, personal websites, and small services,
even a single-node environment can provide a certain degree of data persistence guarantee.
However, single-node cannot achieve High Availability—automatic failover requires at least 3 nodes.
If you want to install Pigsty in an environment without internet connection, please refer to the Offline Install mode.
If you only need the PostgreSQL database itself, please refer to the Slim Install mode.
If you are ready to start serious multi-node production deployment, please refer to the Deployment Guide.
This command runs the install script, downloads and extracts Pigsty source to your home directory and installs dependencies. Then complete Configure and Deploy:
cd ~/pigsty # Enter Pigsty directory./configure -g # Generate config file (optional, skip if you know how to configure)./deploy.yml # Execute deployment playbook based on generated config
After installation, access the Web UI via IP/domain + port 80/443 through Nginx,
and access the default PostgreSQL service via port 5432.
The complete process takes 3–10 minutes depending on server specs/network. Offline installation speeds this up significantly; for monitoring-free setups, use Slim Install for even faster deployment.
Video Example: Online Single-Node Installation (Debian 13, x86_64)
Prepare
Installing Pigsty involves some preparation work. Here’s a checklist.
For single-node installations, many constraints can be relaxed—typically you only need to know your IP address. If you don’t have a static IP, use 127.0.0.1.
Typically, you only need to focus on your local IP address—as an exception, for single-node deployment, use 127.0.0.1 if no static IP available.
Install
Use the following commands to auto-install Pigsty source to ~/pigsty (recommended). Deployment dependencies (Ansible) are installed automatically.
curl -fsSL https://repo.pigsty.io/get | bash # Install latest stable versioncurl -fsSL https://repo.pigsty.io/get | bash -s v4.0.0 # Install specific version
curl -fsSL https://repo.pigsty.cc/get | bash # Install latest stable versioncurl -fsSL https://repo.pigsty.cc/get | bash -s v4.0.0 # Install specific version
If you prefer not to run a remote script, you can manually download or clone the source. When using git, always checkout a specific version before use.
git clone https://github.com/pgsty/pigsty;cd pigsty;git checkout v4.0.0-b4;# Always checkout a specific version when using git
For manual download/clone installations, run the bootstrap script to install Ansible and other dependencies. You can also install them yourself.
./bootstrap # Install ansible for subsequent deployment
Configure
In Pigsty, deployment blueprints are defined by the inventory, the pigsty.yml configuration file. You can customize through declarative configuration.
Pigsty provides the configure script as an optional configuration wizard,
which generates an inventory with good defaults based on your environment and input:
./configure -g # Use config wizard to generate config with random passwords
The generated config file is at ~/pigsty/pigsty.yml by default. Review and customize as needed before installation.
Many configuration templates are available for reference. You can skip the wizard and directly edit pigsty.yml:
./configure # Default template, install PG 18 with essential extensions./configure -v 17# Use PG 17 instead of default PG 18./configure -c rich # Create local repo, download all extensions, install major ones./configure -c slim # Minimal install template, use with ./slim.yml playbook./configure -c app/supa # Use app/supa self-hosted Supabase template./configure -c ivory # Use IvorySQL kernel instead of native PG./configure -i 10.11.12.13 # Explicitly specify primary IP address./configure -r china # Use China mirrors instead of default repos./configure -c ha/full -s # Use 4-node sandbox template, skip IP replacement/detection
Example configure output
$ ./configure
configure pigsty v4.0.0 begin
[ OK ]region= default
[ OK ]kernel= Linux
[ OK ]machine= x86_64
[ OK ]package= rpm,dnf
[ OK ]vendor= rocky (Rocky Linux)[ OK ]version=9(9.6)[ OK ]sudo= vagrant ok
[ OK ]ssh=[email protected] ok
[WARN] Multiple IP address candidates found:
(1) 192.168.121.24 inet 192.168.121.24/24 brd 192.168.121.255 scope global dynamic noprefixroute eth0
(2) 10.10.10.12 inet 10.10.10.12/24 brd 10.10.10.255 scope global noprefixroute eth1
[ IN ] INPUT primary_ip address (of current meta node, e.g 10.10.10.10):
=> 10.10.10.12 # <------- INPUT YOUR PRIMARY IPV4 ADDRESS HERE![ OK ]primary_ip= 10.10.10.12 (from input)[ OK ]admin=[email protected] ok
[ OK ]mode= meta (el9)[ OK ]locale= C.UTF-8
[ OK ] configure pigsty doneproceed with ./deploy.yml
Common configure arguments:
Argument
Description
-i|--ip
Primary internal IP of current host, replaces placeholder 10.10.10.10
If your machine has multiple IPs bound, use -i|--ip <ipaddr> to explicitly specify the primary IP, or provide it in the interactive prompt.
The script replaces the placeholder 10.10.10.10 with your node’s primary IPv4 address. Choose a static IP; do not use public IPs.
Change default passwords!
We strongly recommend modifying default passwords and credentials in the config file before installation. See Security Recommendations for details.
When you see pgsql init done, PLAY RECAP and similar output at the end, installation is complete!
Upstream repo changes may cause online installation failures!
Upstream repos used by Pigsty (like Linux/PGDG repos) can sometimes enter a broken state due to improper updates, causing deployment failures (this has happened multiple times)!
You can wait for upstream fixes or use pre-made offline packages to solve this.
Avoid re-running the deployment playbook!
Warning: Running deploy.yml again on an existing deployment may restart services and overwrite configurations!
Interface
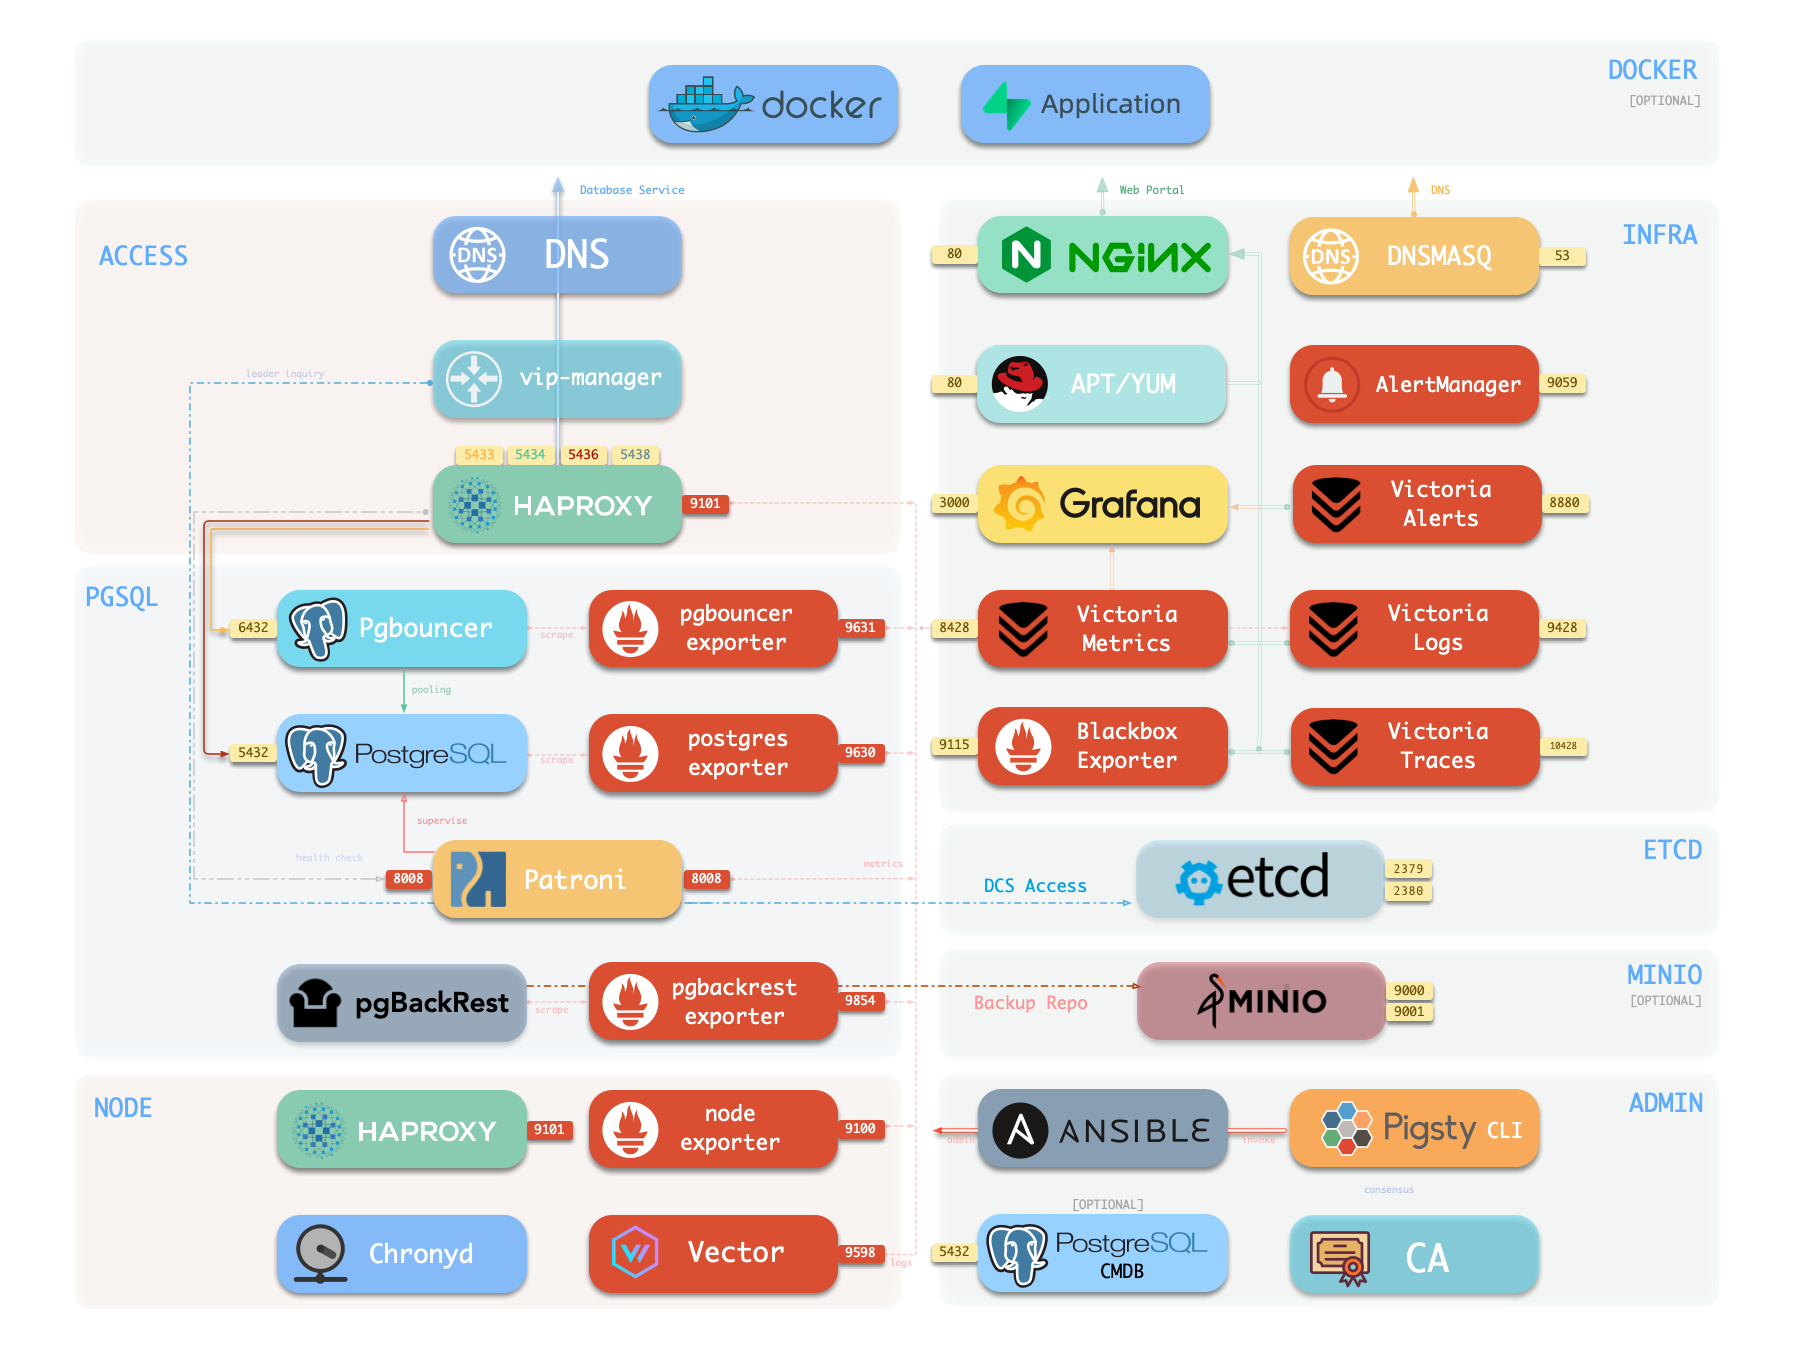
After single-node installation, you typically have four modules installed on the current node:
PGSQL, INFRA, NODE, and ETCD.
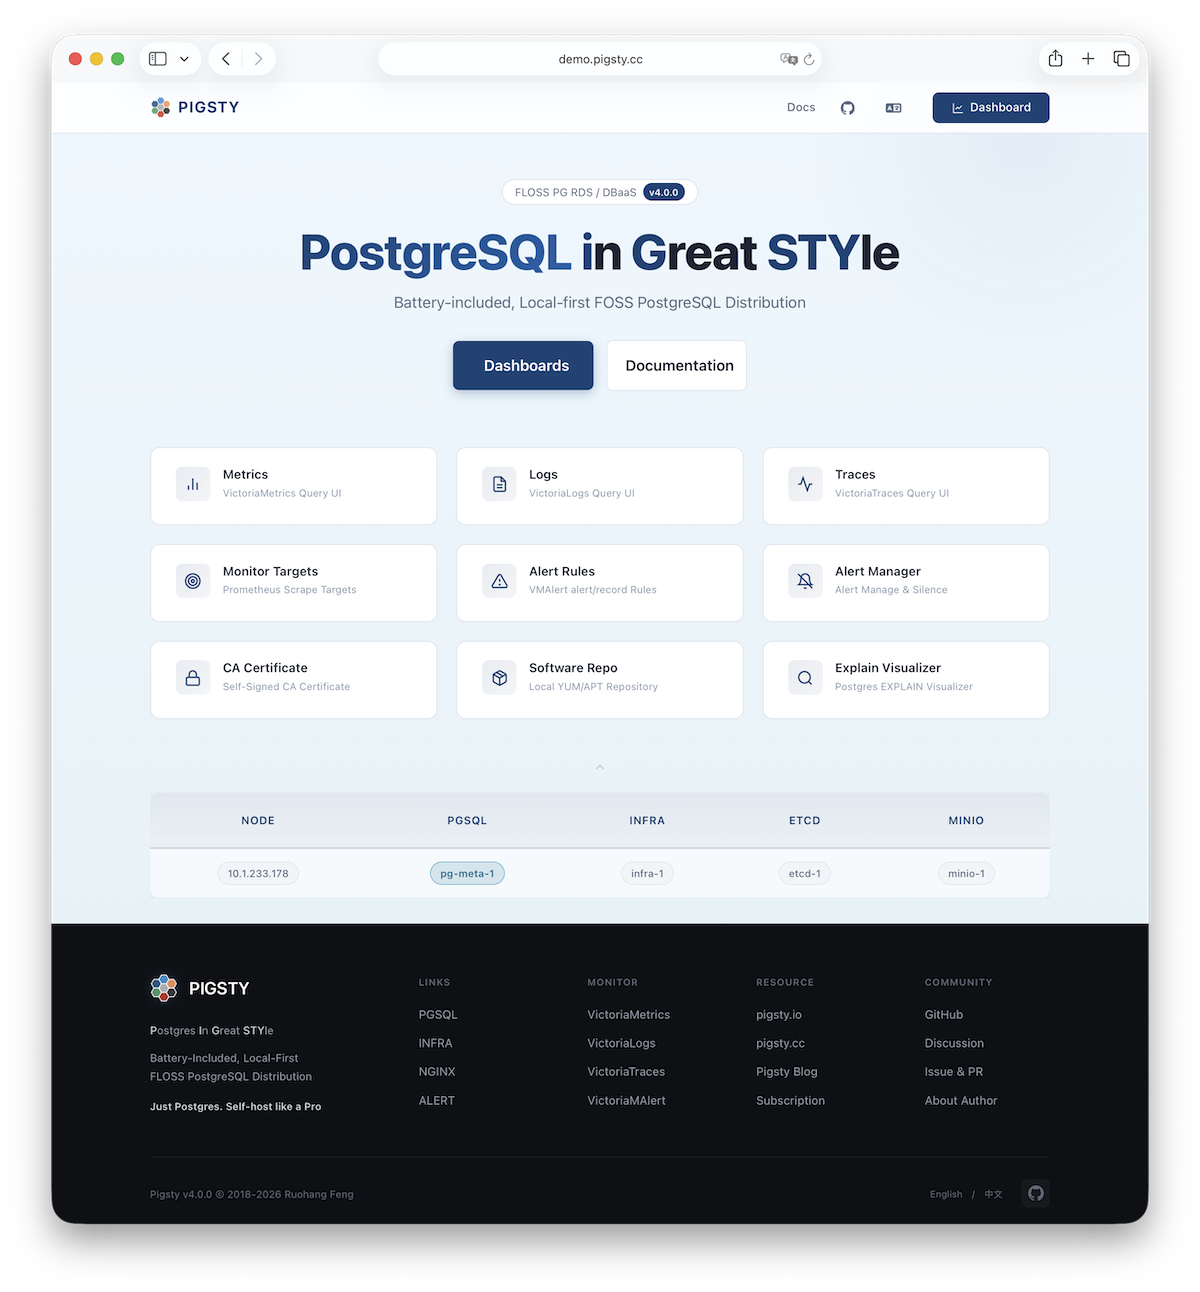
Explore Pigsty’s Web graphical management interface, Grafana dashboards, and how to access them via domain names and HTTPS.
After single-node installation, you’ll have the INFRA module installed on the current node, which includes an out-of-the-box Nginx web server.
The default server configuration provides a WebUI graphical interface for displaying monitoring dashboards and unified proxy access to other component web interfaces.
Access
You can access this graphical interface by entering the deployment node’s IP address in your browser. By default, Nginx serves on standard ports 80/443.
If your service is exposed to Internet or office network, we recommend accessing via domain names and enabling HTTPS encryption—only minimal configuration is needed.
Endpoints
By default, Nginx exposes the following endpoints via different paths on the default server at ports 80/443:
If you have your own domain name, you can point it to Pigsty server’s IP address to access various services via domain.
If you want to enable HTTPS, you should modify the home server configuration in the infra_portal parameter:
all:vars:infra_portal:home :{domain:i.pigsty }# Replace i.pigsty with your domain
all:vars:infra_portal:# domain specifies the domain name # certbot parameter specifies certificate namehome :{domain: demo.pigsty.io ,certbot:mycert }
You can run make cert command after deployment to apply for a free Let’s Encrypt certificate for the domain.
If you don’t define the certbot field, Pigsty will use the local CA to issue a self-signed HTTPS certificate by default.
In this case, you must first trust Pigsty’s self-signed CA to access normally in your browser.
You can also mount local directories and other upstream services to Nginx. For more management details, refer to INFRA Management - Nginx.
3 - Getting Started with PostgreSQL
Get started with PostgreSQL—connect using CLI and graphical clients
PostgreSQL (abbreviated as PG) is the world’s most advanced and popular open-source relational database. Use it to store and retrieve multi-modal data.
This guide is for developers with basic Linux CLI experience but not very familiar with PostgreSQL, helping you quickly get started with PG in Pigsty.
We assume you’re a personal user deploying in the default single-node mode. For prod multi-node HA cluster access, refer to Prod Service Access.
Basics
In the default single-node installation template, you’ll create a PostgreSQL database cluster named pg-meta on the current node, with only one primary instance.
PostgreSQL listens on port 5432, and the cluster has a preset database meta available for use.
After installation, exit the current admin user ssh session and re-login to refresh environment variables.
Then simply type p and press Enter to access the database cluster via the psql CLI tool:
vagrant@pg-meta-1:~$ p
psql (18.1 (Ubuntu 18.1-1.pgdg24.04+2))Type "help"for help.
postgres=#
You can also switch to the postgres OS user and execute psql directly to connect to the default postgres admin database.
Connecting to Database
To access a PostgreSQL database, use a CLI tool or graphical client and fill in the PostgreSQL connection string:
postgres://username:password@host:port/dbname
Some drivers and tools may require you to fill in these parameters separately. The following five are typically required:
Parameter
Description
Example Value
Notes
host
Database server address
10.10.10.10
Replace with your node IP or domain; can omit for localhost
port
Port number
5432
PG default port, can be omitted
username
Username
dbuser_dba
Pigsty default database admin
password
Password
DBUser.DBA
Pigsty default admin password (change this!)
dbname
Database name
meta
Default template database name
For personal use, you can directly use the Pigsty default database superuser dbuser_dba for connection and management. The dbuser_dba has full database privileges.
By default, if you specified the configure -g parameter when configuring Pigsty, the password will be randomly generated and saved in ~/pigsty/pigsty.yml:
cat ~/pigsty/pigsty.yml | grep pg_admin_password
Default Accounts
Pigsty’s default single-node template presets the following database users, ready to use out of the box:
Username
Password
Role
Purpose
dbuser_dba
DBUser.DBA
Superuser
Database admin (change this!)
dbuser_meta
DBUser.Meta
Business admin
App R/W (change this!)
dbuser_view
DBUser.Viewer
Read-only user
Data viewing (change this!)
For example, you can connect to the meta database in the pg-meta cluster using three different connection strings with three different users:
Note: These default passwords are automatically replaced with random strong passwords when using configure -g. Remember to replace the IP address and password with actual values.
Using CLI Tools
psql is the official PostgreSQL CLI client tool, powerful and the first choice for DBAs and developers.
On a server with Pigsty deployed, you can directly use psql to connect to the local database:
# Simplest way: use postgres system user for local connection (no password needed)sudo -u postgres psql
# Use connection string (recommended, most universal)psql 'postgres://dbuser_dba:[email protected]:5432/meta'# Use parameter formpsql -h 10.10.10.10 -p 5432 -U dbuser_dba -d meta
# Use env vars to avoid password appearing in command lineexportPGPASSWORD='DBUser.DBA'psql -h 10.10.10.10 -p 5432 -U dbuser_dba -d meta
After successful connection, you’ll see a prompt like this:
psql (18.1)Type "help"for help.
meta=#
Common psql Commands
After entering psql, you can execute SQL statements or use meta-commands starting with \:
Command
Description
Command
Description
Ctrl+C
Interrupt query
Ctrl+D
Exit psql
\?
Show all meta commands
\h
Show SQL command help
\l
List all databases
\c dbname
Switch to database
\d table
View table structure
\d+ table
View table details
\du
List all users/roles
\dx
List installed extensions
\dn
List all schemas
\dt
List all tables
Executing SQL
In psql, directly enter SQL statements ending with semicolon ;:
-- Check PostgreSQL version
SELECTversion();-- Check current time
SELECTnow();-- Create a test table
CREATETABLEtest(idSERIALPRIMARYKEY,nameTEXT,created_atTIMESTAMPTZDEFAULTnow());-- Insert data
INSERTINTOtest(name)VALUES('hello'),('world');-- Query data
SELECT*FROMtest;-- Drop test table
DROPTABLEtest;
Using Graphical Clients
If you prefer graphical interfaces, here are some popular PostgreSQL clients:
Grafana
Pigsty’s INFRA module includes Grafana with a pre-configured PostgreSQL data source (Meta).
You can directly query the database using SQL from the Grafana Explore panel through the browser graphical interface, no additional client tools needed.
Grafana’s default username is admin, and the password can be found in the grafana_admin_password field in the inventory (default pigsty).
DataGrip
DataGrip is a professional database IDE from JetBrains, with powerful features.
IntelliJ IDEA’s built-in Database Console can also connect to PostgreSQL in a similar way.
DBeaver
DBeaver is a free open-source universal database tool supporting almost all major databases. It’s a cross-platform desktop client.
pgAdmin
pgAdmin is the official PostgreSQL-specific GUI tool from PGDG, available through browser or as a desktop client.
Pigsty provides a configuration template for one-click pgAdmin service deployment using Docker in Software Template: pgAdmin.
Viewing Monitoring Dashboards
Pigsty provides many PostgreSQL monitoring dashboards, covering everything from cluster overview to single-table analysis.
We recommend starting with PGSQL Overview. Many elements in the dashboards are clickable, allowing you to drill down layer by layer to view details of each cluster, instance, database, and even internal database objects like tables, indexes, and functions.
Trying Extensions
One of PostgreSQL’s most powerful features is its extension ecosystem. Extensions can add new data types, functions, index methods, and more to the database.
Pigsty provides an unparalleled 440+ extensions in the PG ecosystem, covering 16 major categories including time-series, geographic, vector, and full-text search—install with one click.
Start with three powerful and commonly used extensions that are automatically installed in Pigsty’s default template. You can also install more extensions as needed.
postgis: Geographic information system for processing maps and location data
pgvector: Vector database supporting AI embedding vector similarity search
timescaledb: Time-series database for efficient storage and querying of time-series data
\dx-- psql meta command, list installed extensions
TABLEpg_available_extensions;-- Query installed, available extensions
CREATEEXTENSIONpostgis;-- Enable postgis extension
Next Steps
Congratulations on completing the PostgreSQL basics! Next, you can start configuring and customizing your database.
4 - Customize Pigsty with Configuration
Express your infra and clusters with declarative config files
Besides using the configuration wizard to auto-generate configs, you can write Pigsty config files from scratch.
This tutorial guides you through building a complex inventory step by step.
If you define everything in the inventory upfront, a single deploy.yml playbook run completes all deployment—but it hides the details.
This doc breaks down all modules and playbooks, showing how to incrementally build from a simple config to a complete deployment.
Minimal Configuration
The simplest valid config only defines the admin_ip variable—the IP address of the node where Pigsty is installed (admin node):
all:{vars:{admin_ip:10.10.10.10}}
# Set region: china to use mirrorsall:{vars:{admin_ip: 10.10.10.10, region:china } }
This config deploys nothing, but running ./deploy.yml generates a self-signed CA in files/pki/ca for issuing certificates.
For convenience, you can also set region to specify which region’s software mirrors to use (default, china, europe).
Add Nodes
Pigsty’s NODE module manages cluster nodes. Any IP address in the inventory will be managed by Pigsty with the NODE module installed.
all:# Remember to replace 10.10.10.10 with your actual IPchildren:{nodes:{hosts:{10.10.10.10:{}}}}vars:admin_ip:10.10.10.10# Current node IPregion:default # Default reposnode_repo_modules:node,pgsql,infra # Add node, pgsql, infra repos
all:# Remember to replace 10.10.10.10 with your actual IPchildren:{nodes:{hosts:{10.10.10.10:{}}}}vars:admin_ip:10.10.10.10# Current node IPregion:china # Use mirrorsnode_repo_modules:node,pgsql,infra # Add node, pgsql, infra repos
These parameters enable the node to use correct repositories and install required packages.
The NODE module offers many customization options: node names, DNS, repos, packages, NTP, kernel params, tuning templates, monitoring, log collection, etc.
Even without changes, the defaults are sufficient.
Run deploy.yml or more precisely node.yml to bring the defined node under Pigsty management.
A full-featured RDS cloud database service needs infrastructure support: monitoring (metrics/log collection, alerting, visualization), NTP, DNS, and other foundational services.
Define a special group infra to deploy the INFRA module:
all:# Simply changed group name from nodes -> infra and added infra_seqchildren:{infra:{hosts:{10.10.10.10:{infra_seq:1}}}}vars:admin_ip:10.10.10.10region:defaultnode_repo_modules:node,pgsql,infra
all:# Simply changed group name from nodes -> infra and added infra_seqchildren:{infra:{hosts:{10.10.10.10:{infra_seq:1}}}}vars:admin_ip:10.10.10.10region:chinanode_repo_modules:node,pgsql,infra
./infra.yml # Install INFRA module on infra group (includes NODE module)
NODE module is implicitly defined as long as an IP exists. NODE is idempotent—re-running has no side effects.
After completion, you’ll have complete observability infrastructure and node monitoring, but PostgreSQL database service is not yet deployed.
If your goal is just to set up this monitoring system (Grafana + Victoria), you’re done! The infra template is designed for this.
Everything in Pigsty is modular: you can deploy only monitoring infra without databases;
or vice versa—run HA PostgreSQL clusters without infra—Slim Install.
In Pigsty, you can customize PostgreSQL cluster internals like databases and users through the inventory:
all:children:# Other groups and variables hidden for brevitypg-meta:hosts:{10.10.10.10:{pg_seq: 1, pg_role:primary } }vars:pg_cluster:pg-metapg_users:# Define database users- {name: dbuser_meta ,password: DBUser.Meta ,pgbouncer: true ,roles: [dbrole_admin] ,comment:admin user }pg_databases:# Define business databases- {name: meta ,baseline: cmdb.sql ,comment: pigsty meta database ,schemas: [pigsty] ,extensions:[vector] }
pg_users: Defines a new user dbuser_meta with password DBUser.Meta
pg_databases: Defines a new database meta with Pigsty CMDB schema (optional) and vector extension
Pigsty offers rich customization parameters covering all aspects of databases and users.
If you define these parameters upfront, they’re automatically created during ./pgsql.yml execution.
For existing clusters, you can incrementally create or modify users and databases:
bin/pgsql-user pg-meta dbuser_meta # Ensure user dbuser_meta exists in pg-metabin/pgsql-db pg-meta meta # Ensure database meta exists in pg-meta
Use pre-made application templates to launch common software tools with one click, such as the GUI tool for PG management: Pgadmin:
./app.yml -l infra -e app=pgadmin
You can even self-host enterprise-gradeSupabase with Pigsty, using external HA PostgreSQL clusters as the foundation and running stateless components in containers.
5 - Run Playbooks with Ansible
Use Ansible playbooks to deploy and manage Pigsty clusters
Pigsty uses Ansible to manage clusters, a very popular large-scale/batch/automation ops tool in the SRE community.
Ansible can use declarative approach for server configuration management. All module deployments are implemented through a series of idempotent Ansible playbooks.
For example, in single-node deployment, you’ll use the deploy.yml playbook. Pigsty has more built-in playbooks, you can choose to use as needed.
Understanding Ansible basics helps with better use of Pigsty, but this is not required, especially for single-node deployment.
Deploy Playbook
Pigsty provides a “one-stop” deploy playbook deploy.yml, installing all modules on the current env in one go (if defined in config):
Playbook
Command
Group
infra
[nodes]
etcd
minio
[pgsql]
infra.yml
./infra.yml
-l infra
✓
✓
node.yml
./node.yml
✓
✓
✓
✓
etcd.yml
./etcd.yml
-l etcd
✓
minio.yml
./minio.yml
-l minio
✓
pgsql.yml
./pgsql.yml
✓
This is the simplest deployment method. You can also follow instructions in Customization Guide to incrementally complete deployment of all modules and nodes step by step.
Install Ansible
When using the Pigsty installation script, or the bootstrap phase of offline installation, Pigsty will automatically install ansible and its dependencies for you.
If you want to manually install Ansible, refer to the following instructions. The minimum supported Ansible version is 2.9.
sudo apt install -y ansible python3-jmespath
sudo dnf install -y ansible python-jmespath # EL 10sudo dnf install -y ansible python3.12-jmespath # EL 9/8
brew install ansible
pip3 install jmespath
Change default passwords!
Please note that EL10 EPEL repo doesn’t yet provide a complete Ansible package. Pigsty PGSQL EL10 repo supplements this.
Ansible is also available on macOS. You can use Homebrew to install Ansible on Mac,
and use it as an admin node to manage remote cloud servers. This is convenient for single-node Pigsty deployment on cloud VPS, but not recommended in prod envs.
Execute Playbook
Ansible playbooks are executable YAML files containing a series of task definitions to execute.
Running playbooks requires the ansible-playbook executable in your environment variable PATH.
Running ./node.yml playbook is essentially executing the ansible-playbook node.yml command.
You can use some parameters to fine-tune playbook execution. The following 4 parameters are essential for effective Ansible use:
./node.yml # Run node playbook on all hosts./pgsql.yml -l pg-test # Run pgsql playbook on pg-test cluster./infra.yml -t repo_build # Run infra.yml subtask repo_build./pgsql-rm.yml -e pg_rm_pkg=false# Remove pgsql, but keep packages (don't uninstall software)./infra.yml -i conf/mynginx.yml # Use another location's config file
Limit Hosts
Playbook execution targets can be limited with -l|--limit <selector>.
This is convenient when running playbooks on specific hosts/nodes or groups/clusters.
Here are some host limit examples:
./pgsql.yml # Run on all hosts (dangerous!)./pgsql.yml -l pg-test # Run on pg-test cluster./pgsql.yml -l 10.10.10.10 # Run on single host 10.10.10.10./pgsql.yml -l pg-* # Run on hosts/groups matching glob `pg-*`./pgsql.yml -l '10.10.10.11,&pg-test'# Run on 10.10.10.11 in pg-test group./pgsql-rm.yml -l 'pg-test,!10.10.10.11'# Run on pg-test, except 10.10.10.11
To run multiple tasks, specify multiple tags separated by commas -t tag1,tag2:
./node.yml -t node_repo,node_pkg # Add repos, then install packages./pgsql.yml -t pg_hba,pg_reload # Configure, then reload pg hba rules
Extra Vars
You can override config parameters at runtime using CLI arguments, which have highest priority.
Extra command-line parameters are passed via -e|--extra-vars KEY=VALUE, usable multiple times:
# Create admin using another admin user./node.yml -e ansible_user=admin -k -K -t node_admin
# Initialize a specific Redis instance: 10.10.10.11:6379./redis.yml -l 10.10.10.10 -e redis_port=6379 -t redis
# Remove PostgreSQL but keep packages and data./pgsql-rm.yml -e pg_rm_pkg=false -e pg_rm_data=false
For complex parameters, use JSON strings to pass multiple complex parameters at once:
# Add repo and install packages./node.yml -t node_install -e '{"node_repo_modules":"infra","node_packages":["duckdb"]}'
Specify Inventory
The default config file is pigsty.yml in the Pigsty home directory.
You can use -i <path> to specify a different inventory file path.
./pgsql.yml -i conf/rich.yml # Initialize single node with all extensions per rich config./pgsql.yml -i conf/ha/full.yml # Initialize 4-node cluster per full config./pgsql.yml -i conf/app/supa.yml # Initialize 1-node Supabase deployment per supa.yml
Changing the default inventory file
To permanently change the default config file, modify the inventory parameter in ansible.cfg.
Convenience Scripts
Pigsty provides a series of convenience scripts to simplify common operations. These scripts are in the bin/ directory:
These scripts are simple wrappers around Ansible playbooks, making common operations more convenient.
Playbook List
Below are the built-in playbooks in Pigsty. You can also easily add your own playbooks, or customize and modify playbook implementation logic as needed.
Install Pigsty in air-gapped env using offline packages
Pigsty installs from Internet upstream by default, but some envs are isolated from the Internet.
To address this, Pigsty supports offline installation using offline packages.
Think of them as Linux-native Docker images.
Overview
Offline packages bundle all required RPM/DEB packages and dependencies; they are snapshots of the local APT/YUM repo after a normal installation.
In serious prod deployments, we strongly recommend using offline packages.
They ensure all future nodes have consistent software versions with the existing env,
and avoid online installation failures caused by upstream changes (quite common!),
guaranteeing you can run it independently forever.
Advantages of offline packages
Easy delivery in Internet-isolated envs.
Pre-download all packages in one pass to speed up installation.
No need to worry about upstream dependency breakage causing install failures.
If you have multiple nodes, all packages only need to be downloaded once, saving bandwidth.
Use local repo to ensure all nodes have consistent software versions for unified version management.
Disadvantages of offline packages
Offline packages are made for specific OS minor versions, typically cannot be used across versions.
It’s a snapshot at the time of creation, may not include the latest updates and OS security patches.
Offline packages are typically about 1GB, while online installation downloads on-demand, saving space.
Offline Packages
We typically release offline packages for the following Linux distros, using the latest OS minor version.
If you use an OS from the list above (exact minor version match), we recommend using offline packages.
Pigsty provides ready-to-use pre-made offline packages for these systems, freely downloadable from GitHub.
Offline packages are made for specific Linux OS minor versions
When OS minor versions don’t match, it may work or may fail—we don’t recommend taking the risk.
Please note that Pigsty’s EL9/EL10 packages are built on 9.6/10.0 and currently cannot be used for 9.7/10.1 minor versions (due to OpenSSL version changes).
You need to perform an online installation on a matching OS version and create your own offline package, or contact us for custom offline packages.
Using Offline Packages
Offline installation steps:
Download Pigsty offline package, place it at /tmp/pkg.tgz
Download Pigsty source package, extract and enter directory (assume extracted to home: cd ~/pigsty)
./bootstrap, it will extract the package and configure using local repo (and install ansible from it offline)
./configure -g -c rich, you can directly use the rich template configured for offline installation, or configure yourself
Run ./deploy.yml as usual—it will install everything from the local repo
If you want to use the already extracted and configured offline package in your own config, modify and ensure these settings:
repo_enabled: Set to true, will build local software repo (explicitly disabled in most templates)
node_repo_modules: Set to local, then all nodes in the env will install from the local software repo
In most templates, this is explicitly set to: node,infra,pgsql, i.e., install directly from these upstream repos.
Setting it to local will use the local software repo to install all packages, fastest, no interference from other repos.
If you want to use both local and upstream repos, you can add other repo module names too, e.g., local,node,infra,pgsql
The first parameter, if enabled, Pigsty will create a local software repo. The second parameter, if contains local, then all nodes in the env will use this local software repo.
If it only contains local, then it becomes the sole repo for all nodes. If you still want to install other packages from other upstream repos, you can add other repo module names too, e.g., local,node,infra,pgsql.
Hybrid Installation Mode
If your env has Internet access, there’s a hybrid approach combining advantages of offline and online installation.
You can use the offline package as a base, and supplement missing packages online.
For example, if you’re using RockyLinux 9.5 but the official offline package is for RockyLinux 9.6.
You can use the el9 offline package (though made for 9.6), then execute make repo-build before formal installation to re-download missing packages for 9.5.
Pigsty will download the required increments from upstream repos.
Making Offline Packages
If your OS isn’t in the default list, you can make your own offline package with the built-in cache.yml playbook:
Find a node running the exact same OS version with Internet access
cd ~/pigsty; ./cache.yml: make and fetch the offline package to ~/pigsty/dist/${version}/
Copy the offline package to the env without Internet access (ftp, scp, usb, etc.), extract and use via bootstrap
We offer paid services providing tested, pre-made offline packages for specific Linux major.minor versions (¥200).
Bootstrap
Pigsty relies on ansible to execute playbooks; this script is responsible for ensuring ansible is correctly installed in various ways.
./bootstrap # Ensure ansible is correctly installed (if offline package exists, use offline installation and extract first)
Usually, you need to run this script in two cases:
You didn’t install Pigsty via the installation script, but by downloading or git clone of the source package, so ansible isn’t installed.
You’re preparing to install Pigsty via offline packages and need to use this script to install ansible from the offline package.
The bootstrap script will automatically detect if the offline package exists (-p to specify, default is /tmp/pkg.tgz).
If it exists, it will extract and use it, then install ansible from it.
If the offline package doesn’t exist, it will try to install ansible from the Internet. If that still fails, you’re on your own!
Where are my yum/apt repo files?
The bootloader will by default move away existing repo configurations to ensure only required repos are enabled.
You can find them in /etc/yum.repos.d/backup (EL) or /etc/apt/backup (Debian / Ubuntu).
If you want to keep existing repo configurations during bootstrap, use the -k|--keep parameter.
./bootstrap -k # or --keep
7 - Slim Installation
Install only HA PostgreSQL clusters with minimal dependencies
If you only want HA PostgreSQL database cluster itself without monitoring, infra, etc., consider Slim Installation.
Slim installation has no INFRA module, no monitoring, no local repo—just ETCD and PGSQL and partial NODE functionality.
Slim installation is suitable for:
Only needing PostgreSQL database itself, no observability infra required.
Extremely resource-constrained envs unwilling to bear infra overhead (~0.2 vCPU / 500MB on single node).
Already having external monitoring system, wanting to use your own unified monitoring framework.
Not wanting to introduce the AGPLv3-licensed Grafana visualization dashboard component.
Limitations of slim installation:
No INFRA module, cannot use WebUI and local software repo features.
Offline Install is limited to single-node mode; multi-node slim install can only be done online.
Overview
To use slim installation, you need to:
Use the slim.yml slim install config template (configure -c slim)
Run the slim.yml playbook instead of the default deploy.yml
Three security hardening tips for single-node quick-start deployment
For Demo/Dev single-node deployments, Pigsty’s default config is secure enough as long as you change default passwords.
If your deployment is exposed to Internet or office network, consider adding firewall rules to restrict port access and source IPs for enhanced security.
Additionally, we recommend protecting Pigsty’s critical files (config files and CA private key) from unauthorized access and backing them up regularly.
For enterprise prod envs with strict security requirements, refer to the Deployment - Security Hardening documentation for advanced configuration.
Passwords
Pigsty is an open-source project with well-known default passwords. If your deployment is exposed to Internet or office network, you must change all default passwords!
To avoid manually modifying passwords, Pigsty’s configuration wizard provides automatic random strong password generation using the -g argument with configure.
$ ./configure -g
configure pigsty v4.0.0 begin
[ OK ]region= china
[WARN]kernel= Darwin, can be used as admin node only
[ OK ]machine= arm64
[ OK ]package= brew (macOS)[WARN]primary_ip= default placeholder 10.10.10.10 (macOS)[ OK ]mode= meta (unknown distro)[ OK ]locale= C.UTF-8
[ OK ] generating random passwords...
grafana_admin_password : CdG0bDcfm3HFT9H2cvFuv9w7
pg_admin_password : 86WqSGdokjol7WAU9fUxY8IG
pg_monitor_password : 0X7PtgMmLxuCd2FveaaqBuX9
pg_replication_password : 4iAjjXgEY32hbRGVUMeFH460
patroni_password : DsD38QLTSq36xejzEbKwEqBK
haproxy_admin_password : uhdWhepXrQBrFeAhK9sCSUDo
minio_secret_key : z6zrYUN1SbdApQTmfRZlyWMT
etcd_root_password : Bmny8op1li1wKlzcaAmvPiWc
DBUser.Meta : U5v3CmeXICcMdhMNzP9JN3KY
DBUser.Viewer : 9cGQF1QMNCtV3KlDn44AEzpw
S3User.Backup : 2gjgSCFYNmDs5tOAiviCqM2X
S3User.Meta : XfqkAKY6lBtuDMJ2GZezA15T
S3User.Data : OygorcpCbV7DpDmqKe3G6UOj
[ OK ] random passwords generated, check and save them
[ OK ]ansible= ready
[ OK ] pigsty configured
[WARN] don't forget to check it and change passwords!
proceed with ./deploy.yml
Firewall
For deployments exposed to Internet or office networks, we strongly recommend configuring firewall rules to limit access IP ranges and ports.
You can use your cloud provider’s security group features, or Linux distribution firewall services (like firewalld, ufw, iptables, etc.) to implement this.
Direction
Protocol
Port
Service
Description
Inbound
TCP
22
SSH
Allow SSH login access
Inbound
TCP
80
Nginx
Allow Nginx HTTP access
Inbound
TCP
443
Nginx
Allow Nginx HTTPS access
Inbound
TCP
5432
PostgreSQL
Remote database access, enable as needed
Pigsty supports configuring firewall rules to allow 22/80/443/5432 from external networks, but this is not enabled by default.
Files
In Pigsty, you need to protect the following files:
pigsty.yml: Pigsty main config file, contains access information and passwords for all nodes
files/pki/ca/ca.key: Pigsty self-signed CA private key, used to issue all SSL certificates in the deployment (auto-generated during deployment)
We recommend strictly controlling access permissions for these two files, regularly backing them up, and storing them in a secure location.